Projects Setup Best Practices
Note
This section provides structural guidelines for setting up your environment. It assumes a foundational understanding of JFrog concepts such as Projects, Stages, and Repositories. For more information about configuring these entities, see Basic Projects Terminology.
For fresh installations (greenfield), use this guide to implement and manage JFrog Projects in a scalable, secure, and maintainable way. By categorizing your setup into four logical phases, you can ensure your JFrog Platform scales efficiently across teams without creating unnecessary management overhead.
This guide includes the following phases:
- Phase 1: Defining the "Project Entity"
- Phase 2: Identity and Access Strategy
- Phase 3: Repository and Technology Scoping
- Phase 4: Collaboration and Sharing
Phase 1: Defining the Project Entity
Note
This phase is performed by the Platform Admin.
When creating a new project entity, keep the following guidelines in mind:
-
Determine Your Project Scope: A project's scope depends heavily on your business DNA: however, JFrog highly recommends the "Team = Project" model as a general best practice. Treating a project as a single team's workspace allows developers to use a single virtual repository URL for all package management, minimizing overhead and streamlining their daily work.
-
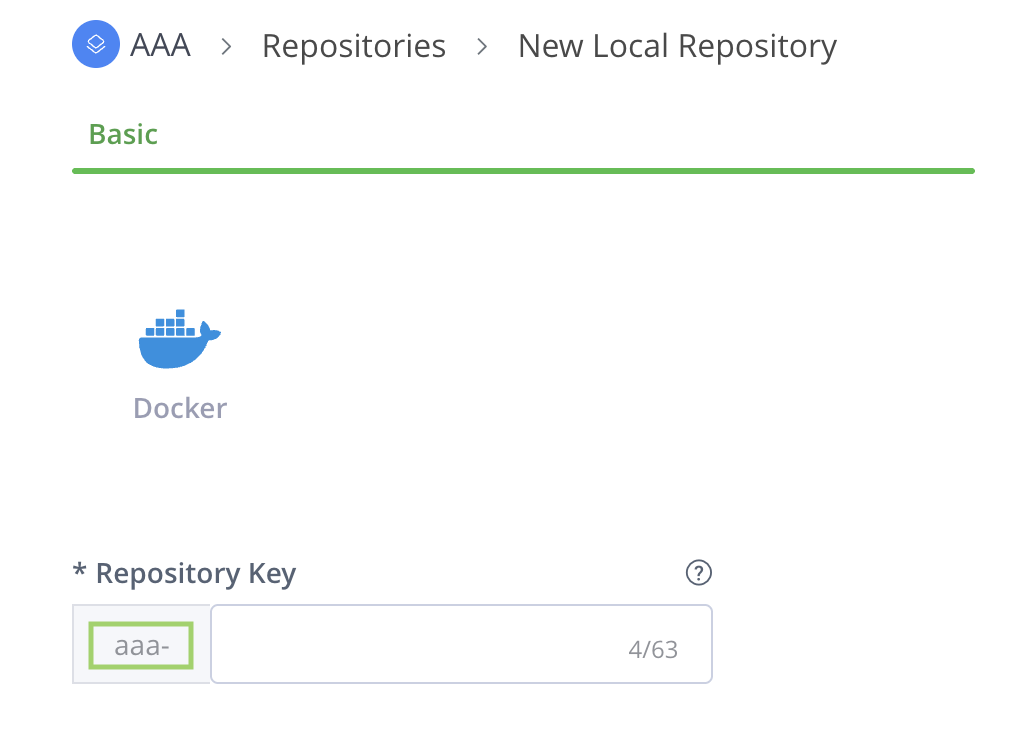
Unique Project Keys (The Prefix): The Project Key is an immutable, unique identifier that acts as a mandatory prefix for all repositories created within the project. Choosing a meaningful Project Key is highly recommended, as this prefix appears on all associated repositories and makes it significantly easier to search, filter, and identify your project resources across the platform later on.
As shown in the example below, when you create a new repository from within a project, the Project Key is automatically applied as a prefix to the repository name.
- Define Quotas: JFrog recommends setting a storage quota when initializing a project to prevent a single team from exhausting global resources. These act as notification triggers rather than hard blocks; the storage quota triggers a notification once exceeded, but does not block actions.
Phase 2: Identity and Access Strategy
- Project-Based RBAC: Move away from global permission targets. In a JFrog project, permissions are not assigned directly to every individual repository. Instead, they are managed through project roles mapped to stages. This ensures that, as an artifact moves from one stage to another, its access levels change automatically based on the software's maturity. This significantly eases onboarding new members with pre-assigned roles and access to necessary resources (for example, repositories and builds).
- Authenticate CI Pipelines With OIDC: CI pipelines authenticate to the JFrog Platform using OpenID Connect (OIDC), a keyless approach that replaces static credentials with short-lived tokens, reducing the risk of credential theft. Identity mappings enable fine-grained access control by linking OIDC claims (such as repository or workflow) to specific project roles, enforcing least privilege. This also removes the need for developers to create, rotate, or manage tokens manually.
Phase 3: Repository and Technology Scoping
Note
The Project Admin primarily manages this phase once the Platform Admin has established the project.
Establish a repository structure inside each project to manage its resources. The flow starts by creating your repositories while keeping strict naming conventions in mind. Once created, you then map these repositories to your technologies (package types) and SDLC stages.
-
Scope Repositories by Project: Design your architecture using dedicated, project-scoped repositories rather than a single global repository. This targeted approach ensures optimal platform performance, prevents artifact-naming collisions across teams, and empowers each team to manage its own data retention policies.
-
Repository Naming Convention: JFrog recommends a four-part naming structure, preferably in the following order:
<team>-<tech>-<maturity>-<locator>, where:- Team: The Project Key representing the specific team that owns the resource.
- Tech: The technology stack or package type (e.g., Maven, npm, Docker).
- Maturity: The specific SDLC stage the repository represents (e.g., dev, qa, prod).
- Locator: The type of repository being utilized (e.g., local, remote, virtual).
For more information, see Best Practices for Structuring and Naming Artifactory Repositories.
-
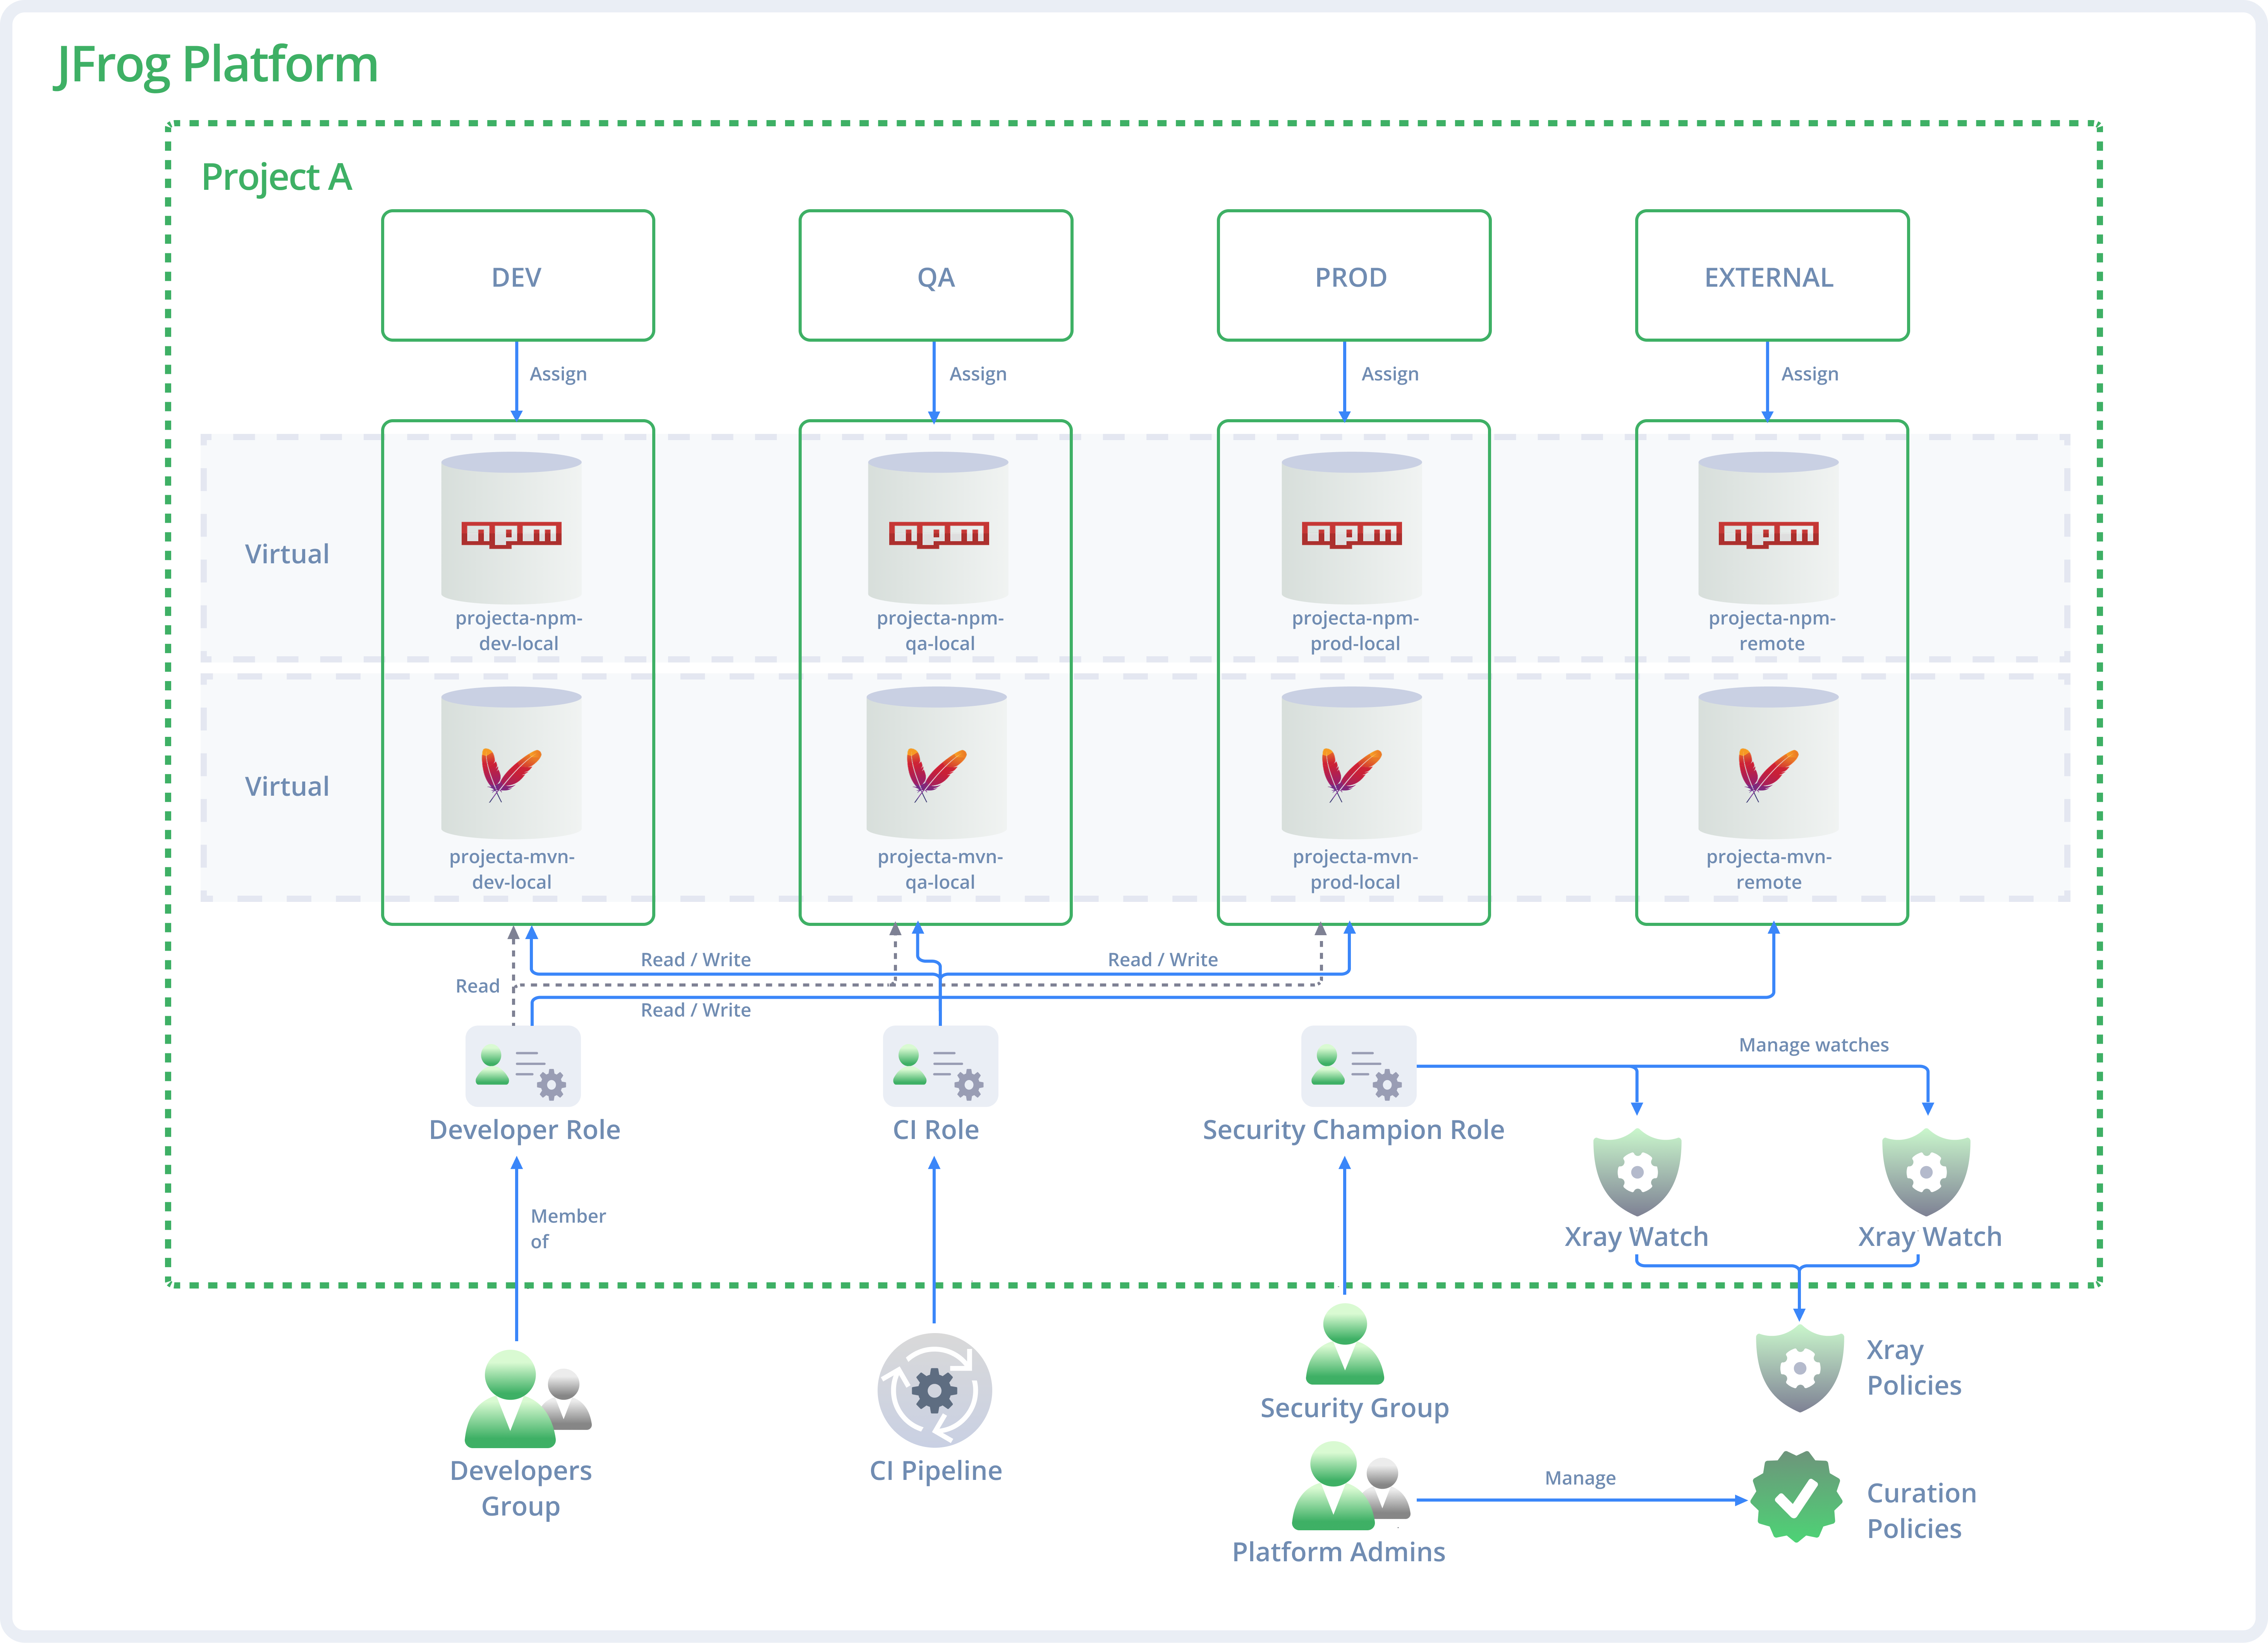
Map JFrog repositories to the SDLC stage (DEV/QA/PROD): Align repository structures with your branches (e.g., dev, release, main). Each stage (DEV, QA, PROD) should have one local repository per technology to maintain a single "source of truth".
The following example illustrates our recommended repository mapping. Because the DEV stage supports both npm and Maven, a dedicated local repository is used to separate each technology per stage.
-
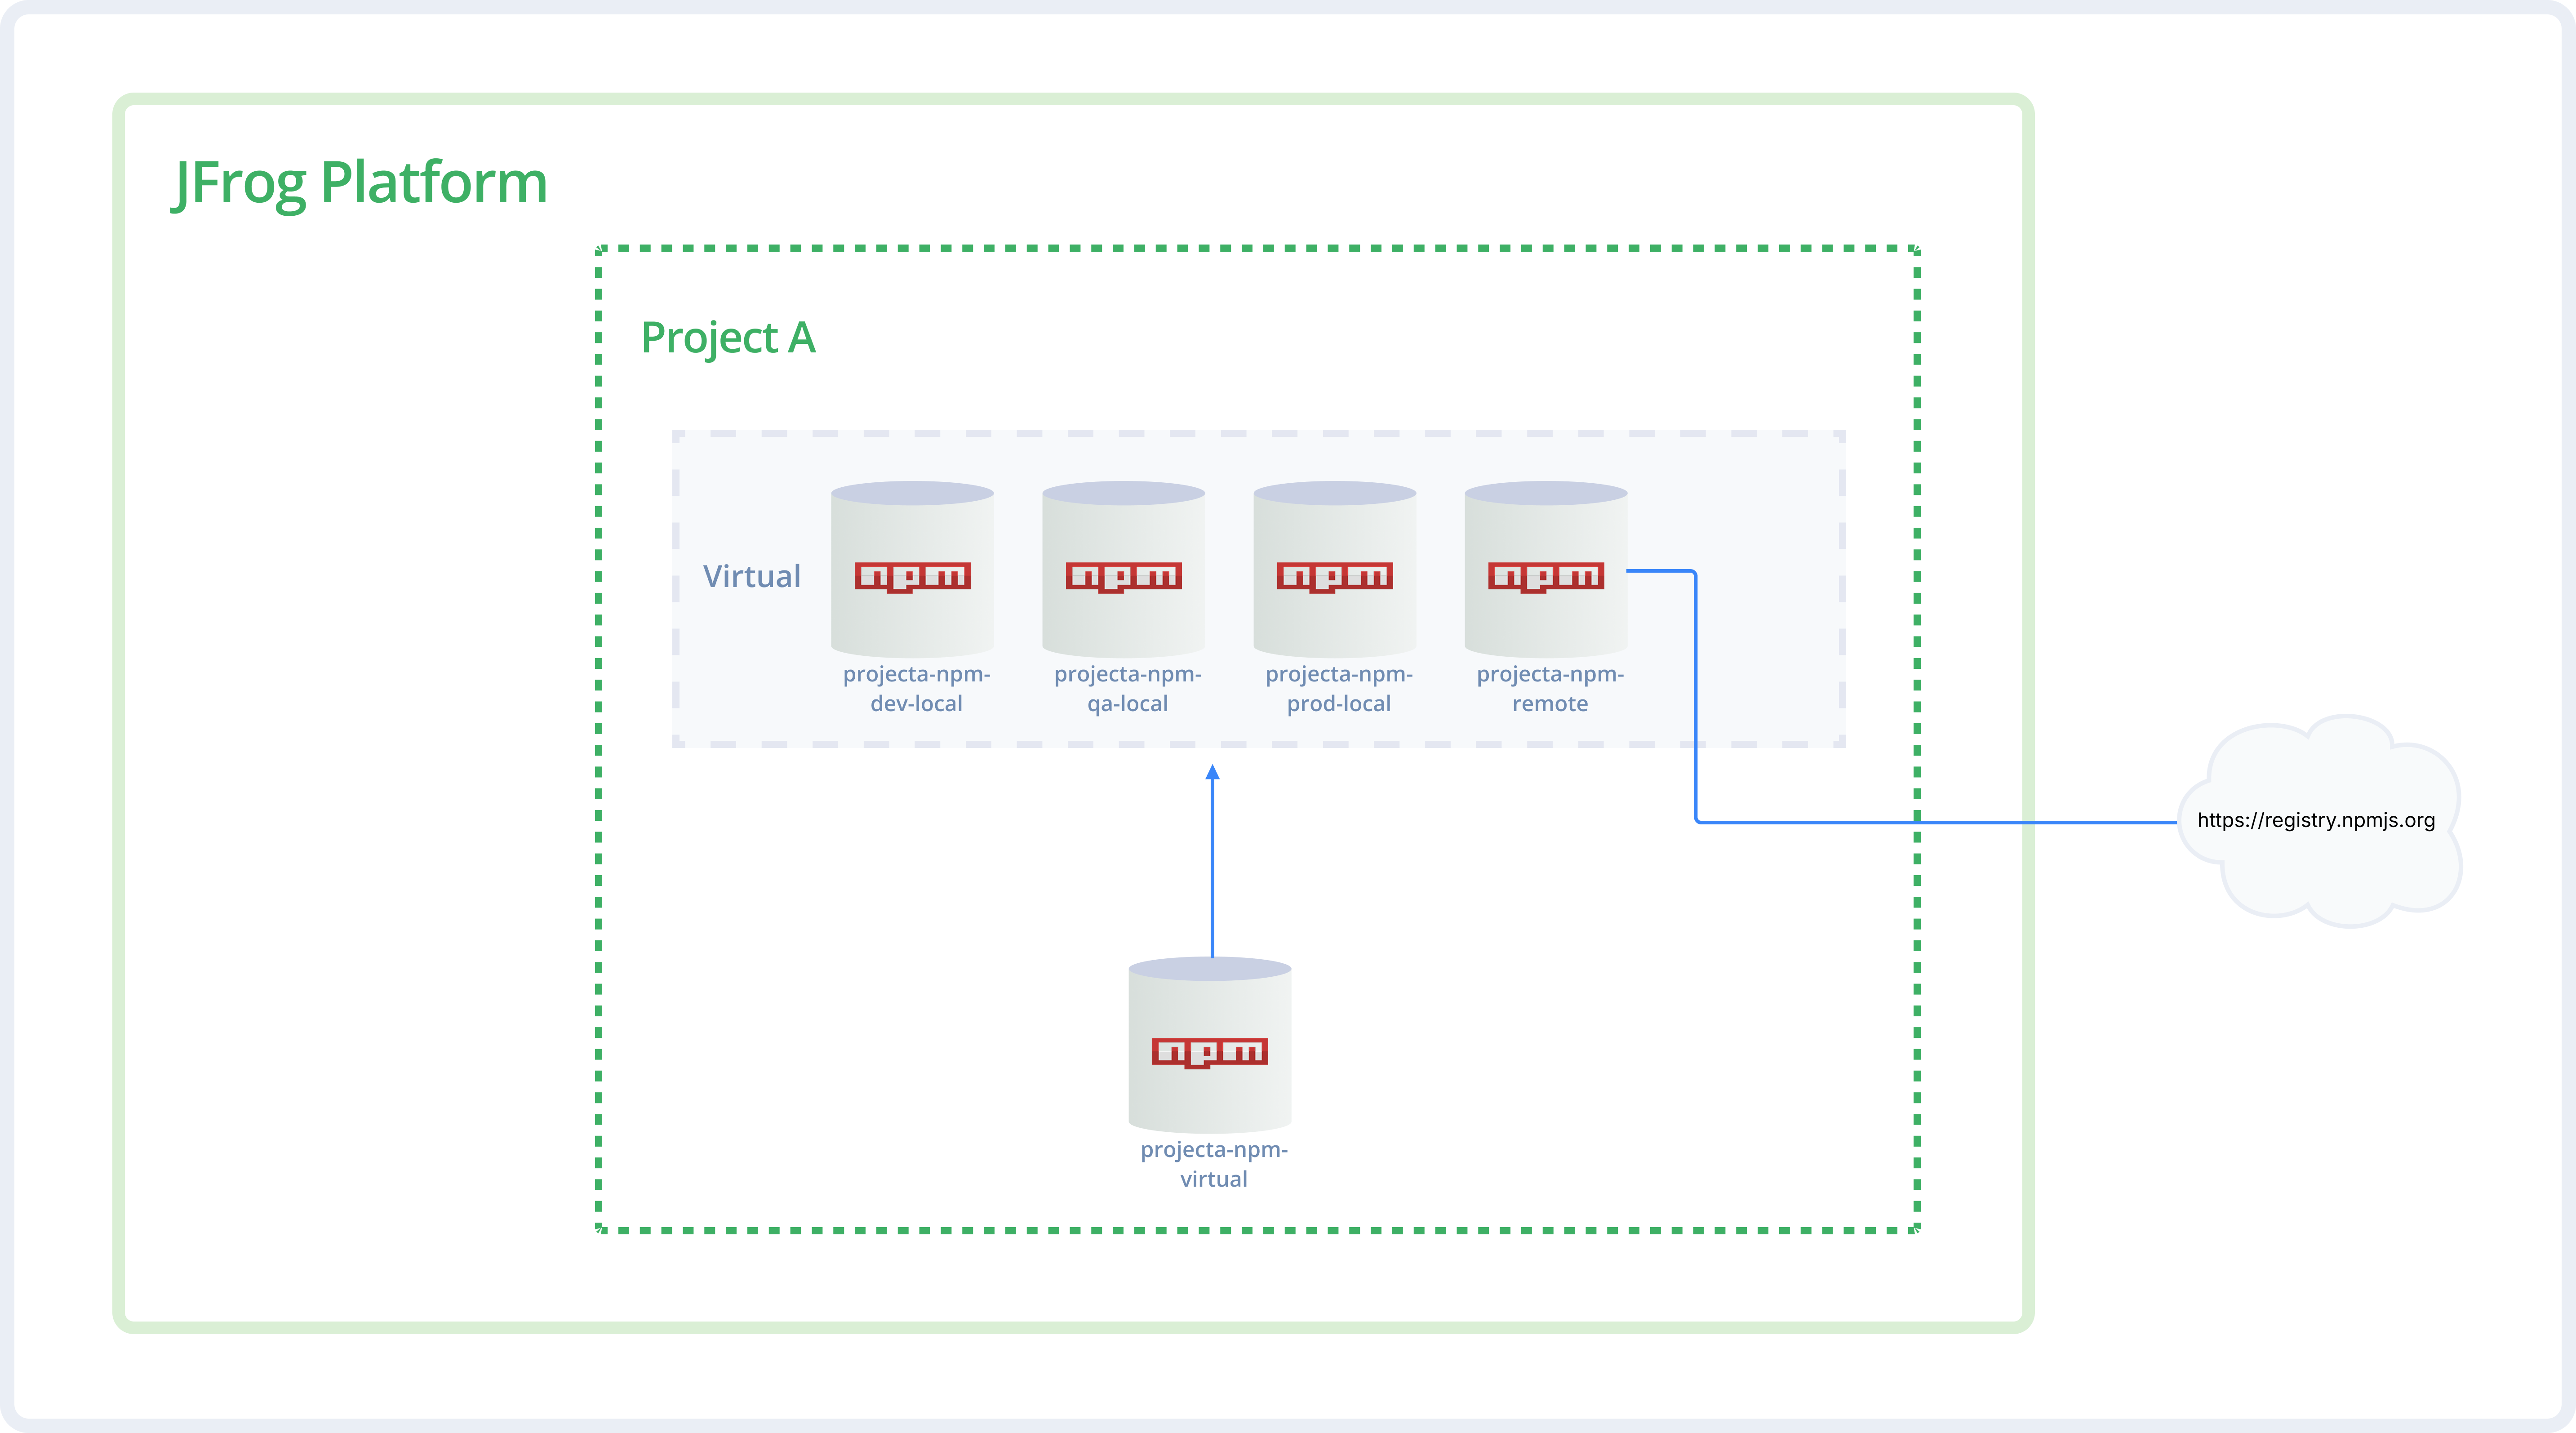
The Virtual Wrapper (the 'Aggregator'): Every project should have a virtual repository that acts as an aggregator. Whether the source is one of the project's own local repositories, a shared repository from another project, or a smart remote proxy, they are all bundled into one single virtual URL for developers to use.
Tip
Order matters! Place the "Prod" local repository first in the resolution order for faster retrieval of stable assets.
The following diagram illustrates the virtual wrapper concept using npm. Notice how a single virtual repository aggregates both local and remote npm repositories, providing developers with a single URL for all package resolution.
-
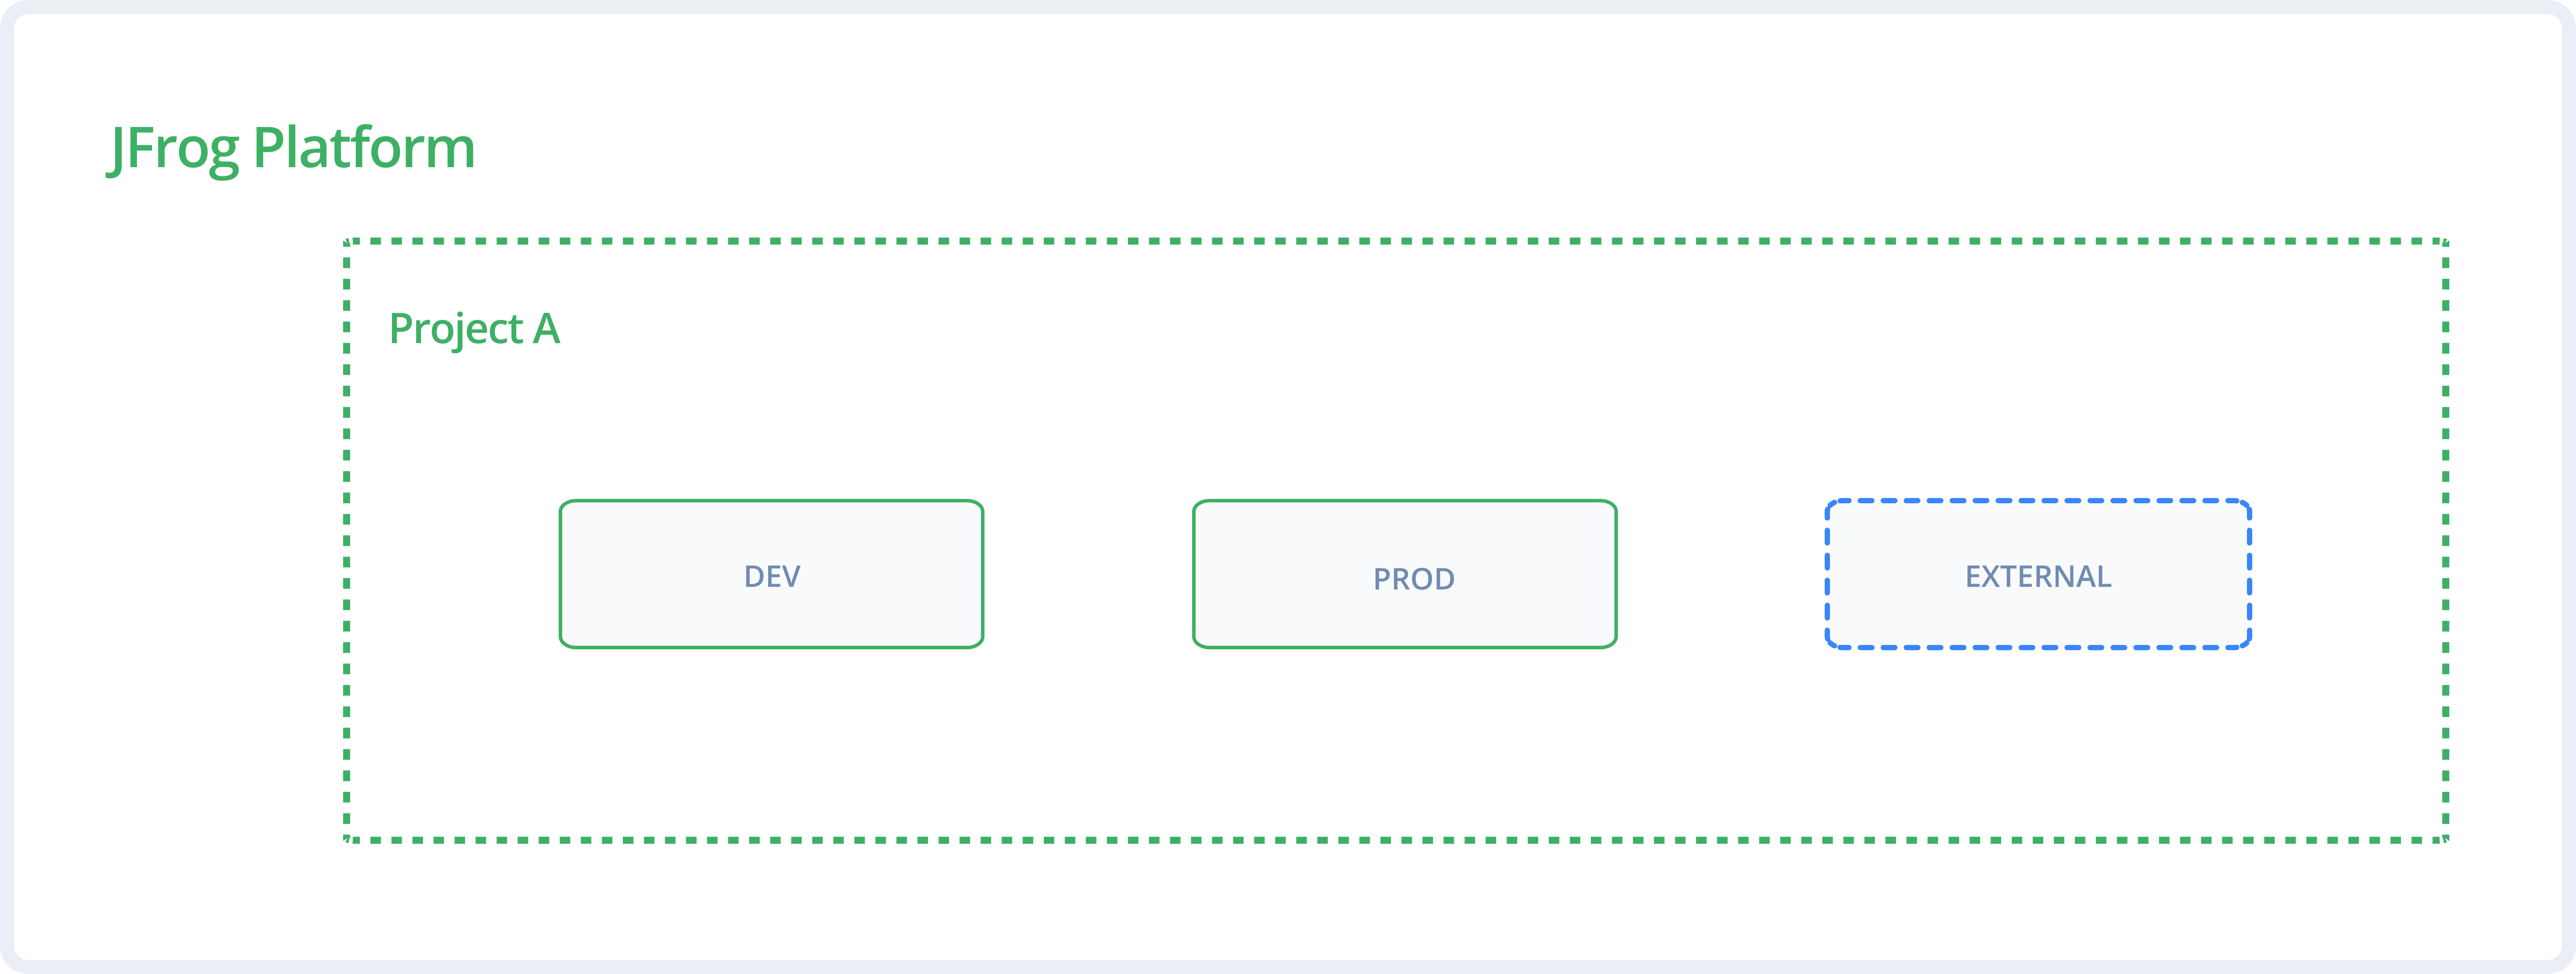
The "External Stage" Pattern (Least Privilege): Create a dedicated stage (for example, External) for remote or third-party repositories. Assign developers Read and Write access to this external stage to allow downloading and caching new packages, but maintain Read-Only access on internal DEV and PROD stages. This pattern enforces least privilege and prevents manual, unverified uploads to internal environments while allowing development to flow.
The following diagram shows the out-of-the-box predefined global DEV and PROD stages, and the best-practice External stage.
Phase 4: Collaboration and Sharing
Any project might develop resources that are valuable to other teams, such as shared libraries or "golden images" (production-ready assets like base OS images or core templates). Effective collaboration requires sharing these internal dependencies in a secure and optimized way. Sharing can be done in the following ways:
- Direct Sharing (The "Push" Method): For seamless internal sharing, the producer project marks its Production local repository as Shared within the platform settings. Once shared, this repository becomes visible to other projects. The consumer project simply includes this shared repository in its own virtual Repository.
In this method, the producer project manages the lifecycle. If the producer deletes the resource, it disappears for the consumer. - Smart Remote Proxy (The "Pull" Method): For more autonomy or strict segregation, the producer project marks its Production Local Repository as Shared within the platform settings. Then, the consumer project creates a Smart Remote Repository that points to the producer project’s URL, instead of pointing to the public internet. The consumer provides credentials to access the producer’s assets.
In this method, the consumer stores the resource in a local cache: if the producer deletes the original file, the consumer might still have the version saved (depending on cleanup policies), providing a layer of protection against accidental upstream deletions. - Secure Consumption (The Read-Only Rule): Regardless of the sharing method used, consumers of shared artifacts must always be assigned read-only permissions. This maintains clear resource ownership and prevents accidental modifications of the producing project's assets.
UI and REST API Documentation Quick Reference
Use the following table to find the specific documentation for each part of the setup process.
Task | UI Documentation | REST API Documentation | |
|---|---|---|---|
1.1 | Create a Project | ||
1.2 | Manage Storage Quotas | ||
2.1 | Manage Project Roles | ||
2.2 | Configure OIDC | ||
2.3 | Configure Identity Mappings | ||
3.1 | Create a Local Repository | ||
3.2 | Manage Stages | ||
3.3 | Create a Virtual Repository | ||
4.1 | Share a Repository | ||
4.2 | Include a Shared Repository | ||
4.3 | Create a Smart Remote Proxy |