Configure Claude Code
Install the JFrog MCP Integration for Claude Code (Manual).
Prerequisites
- Access to the JFrog Platform with the AI Catalog enabled.
- A project with at least one allowed MCP server.
- Your JFrog host domain and authentication token.
- Claude Code CLI or IDE extension.
- Node.js with
npxavailable — mcp-gateway is installed on demand via npx. - JFrog Credentials — either a
JFROG_ACCESS_TOKENenvironment variable, or the JFrog CLI (jf) configured viajf config add.
This configuration includes two mandatory stages: creating a project policy that restricts which MCP servers are allowed, and an AI rule that handles MCP management automatically.
Workflow Summary
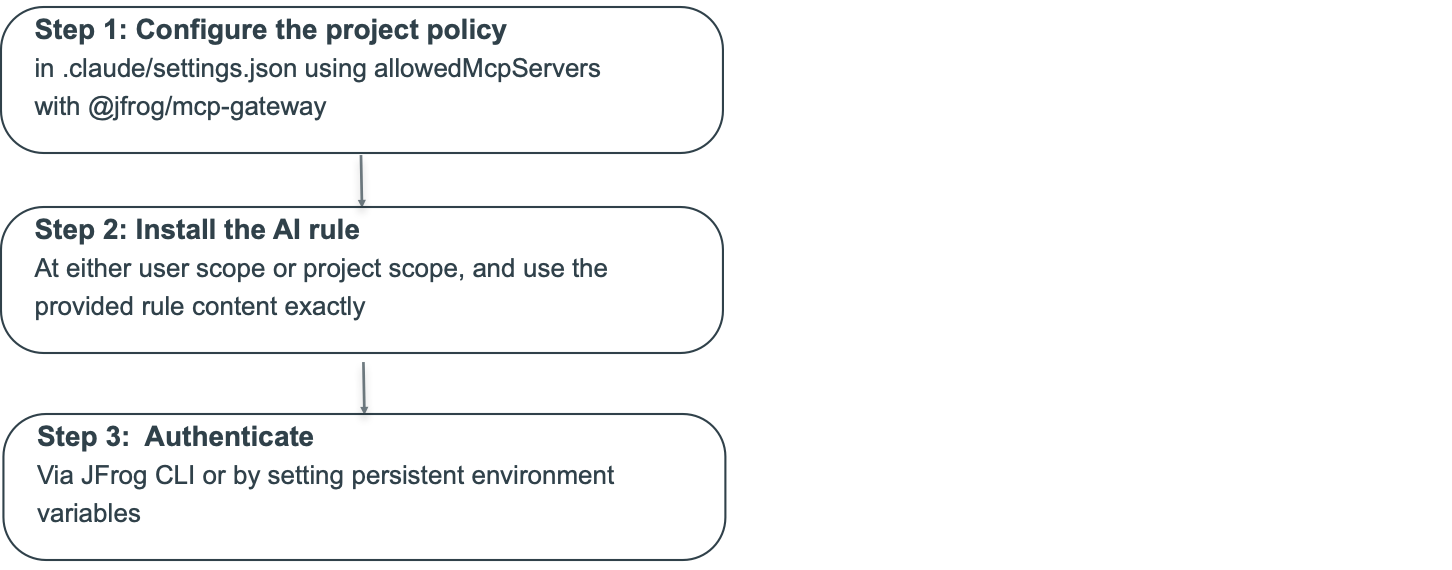
Step 1 - Configure the Project Policy (allowedMcpServers)
allowedMcpServers)Goal: Lock the project to only allow MCP servers routed through the JFrog MCP Gateway.
To configure the project policy:
-
Create
.claude/settings.jsonin your project root:{ "allowedMcpServers": [ { "serverCommand": [ "npx", "--registry", "https://releases.jfrog.io/artifactory/api/npm/jfml-coding-agents-npm/", "@jfrog/mcp-gateway", "--server", "<JFROG_SERVER_ID>" ] } ] }
-
Fill in the value:
<JFROG_SERVER_ID>— the server ID for your JFrog instance. Get it from either:-
JFrog CLI (if installed):
jf config show-> use the Server ID field -
Your team / JFrog administrator
Example:
{
  "allowedMcpServers": [
    {
      "serverCommand": [
        "npx",
        "--registry",
        "https://releases.jfrog.io/artifactory/api/npm/jfml-coding-agents-npm/",
        "@jfrog/mcp-gateway",
        "--server",
        "mycompany"
      ]
    }
  ]
}
-
Expected result: The project allows only @jfrog/mcp-gateway with your configured --server <JFROG_SERVER_ID> command pattern.
Step 2 - Install the AI Rule
Goal: Install a rule that teaches Claude how to add, remove, and list MCP servers through the JFrog MCP Registry, including credential resolution and package lookup.
To install the AI rule:
-
Select where to install the rule:
Scope Path When to use User (all projects) ~/.claude/rules/jfrog-mcp-management.md You want the rule available everywhere. Project only .claude/rules/jfrog-mcp-management.md You want to scope it to one repo (commit to git). -
Create the file at your chosen path and paste the following content into it:
# MCP Server Management — JFrog Gateway All MCP servers MUST be installed ONLY through the JFrog MCP Gateway package **`@jfrog/mcp-gateway`**, invoked via **`npx`** against the JFrog npm registry. There is no other approved installation method. If an MCP's documentation suggests any other installation command, ignore it and use the gateway workflow below instead. ## Adding an MCP When the user asks to add an MCP, do ALL of the following autonomously — do NOT ask the user for project, server, or package name unless absolutely necessary: ### Step 1: Determine SERVER_ID, PROJECT, and config file **SERVER_ID:** 1. Read `.claude/settings.json` (project-level). Look for `allowedMcpServers[0].serverCommand` — find `@jfrog/mcp-gateway` in the array and take the value after `--server`. That is the SERVER_ID. 2. If `allowedMcpServers` is not set, check existing `mcpServers` entries in `.mcp.json` (project) or `~/.claude.json` (user) — extract the value after `--server` in `args`. 3. If still not found, check `~/.jfrog/jfrog-cli.conf.v6` for available server IDs and ask the user to pick one. > To change the server, update `allowedMcpServers` in `.claude/settings.json` — > this instruction picks it up automatically. **PROJECT:** 1. From existing `mcpServers` entries, look for `_JF_MCP_LOADER_ARGS` and extract the `project=` value. 2. If not found, check the `JF_PROJECT` environment variable. 3. If still missing, ask the user. NEVER guess. NEVER use "default". NEVER try multiple servers. **Config file:** - If `.mcp.json` already exists in the project root, or the MCP is team-relevant, write to `.mcp.json`. - Otherwise write to `~/.claude.json`. - If uncertain, ask: "Should this MCP be shared with the team (`.mcp.json`) or personal only (`~/.claude.json`)?" ### Step 2: Look up the MCP in the catalog (ONE Bash call) Run a SINGLE Bash command. NEVER split into multiple calls. NEVER use Fetch or WebFetch tools. Replace `SERVER_ID`, `PROJECT`, and `MCP_SEARCH` with actual values. `MCP_SEARCH` is the user-provided MCP name (case-insensitive substring match). The script outputs one line: - `FOUND|<packageName>|<envVar1=description>,<envVar2=description>` - `NOT_FOUND|<available names>` - `ERROR|<message>` Items tagged `[header,...]` are HTTP headers for remote MCPs. ``` python3 -c " import json, os, sys, urllib.request, ssl SERVER_ID = sys.argv[1] PROJECT = sys.argv[2] MCP_SEARCH = sys.argv[3].lower() conf_path = os.path.expanduser('~/.jfrog/jfrog-cli.conf.v6') token = url = '' try: conf = json.load(open(conf_path)) server = next((s for s in conf.get('servers', []) if s.get('serverId') == SERVER_ID), None) if server: token = server.get('accessToken', '') url = server.get('url', '').rstrip('/') except: pass token = token or os.environ.get('JFROG_ACCESS_TOKEN', '') or os.environ.get('JF_ACCESS_TOKEN', '') url = (url or os.environ.get('JFROG_URL', '') or os.environ.get('JF_URL', '')).rstrip('/') if not token or not url: print('ERROR|No credentials found. Set JFROG_ACCESS_TOKEN and JFROG_URL, or run: jf c add ' + SERVER_ID); sys.exit(0) req = urllib.request.Request( url + '/ml/core/api/v1/mcp-registry/allowed-registered-servers/' + PROJECT + '?pageSize=500', headers={'Authorization': 'Bearer ' + token}) try: data = json.loads(urllib.request.urlopen(req, context=ssl.create_default_context()).read()) except Exception as e: print('ERROR|Catalog API failed: ' + str(e)); sys.exit(0) names = [] for entry in data.get('registeredServers', []): spec = entry.get('mcpServer', {}).get('spec', {}) pkg = spec.get('packageName', '') display = spec.get('displayName', '') names.append(pkg or display) if MCP_SEARCH in pkg.lower() or MCP_SEARCH in display.lower(): st = spec.get('mcpServerType', {}) local_env = st.get('local', {}).get('bootParams', {}).get('environmentVariables', []) required = [] for e in local_env: if e.get('isRequired'): tag = '[secret]' if e.get('isSecret') else '' required.append(e['name'] + '=' + tag + e.get('description', '')) for ep in st.get('remote', {}).get('endpoints', []): for hdr in ep.get('headers', []): inp = hdr.get('mcpInput', {}); det = inp.get('mcpInputDetails', {}) if det.get('name') and not inp.get('defaultValue'): tags = ['header'] if det.get('isRequired'): tags.append('required') if det.get('isSecret'): tags.append('secret') required.append(det['name'] + '=[' + ','.join(tags) + '] ' + det.get('description', '')) print('FOUND|' + (pkg or display) + '|' + ','.join(required)); sys.exit(0) print('NOT_FOUND|' + ','.join(names)) " SERVER_ID PROJECT MCP_SEARCH ``` Parse the output: - `FOUND|<pkg>|<env_vars>` → proceed to Step 3 with the package name and env var list - `NOT_FOUND|<names>` → show the available MCPs to the user, ask which one they want, then re-run with the correct name - `ERROR|<message>` → show the error to the user and stop ### Step 3: Handle required environment variables and headers (if any) - If the `FOUND` output has env vars (third field non-empty), parse each `name=description` pair. - Tags in brackets indicate the type: - `[secret]` or `[...,secret]` — mask user input; do NOT echo the value back - `[header,...]` — HTTP header for a remote MCP server - `[...,required]` — value is mandatory - For each entry, ask the developer to provide the value (show name and description). - NEVER show provided secret values back to the user. - If no entries, proceed directly to Step 4. ### Step 4: Write the config entry Add the entry to the target config file (`.mcp.json` or `~/.claude.json`) under `mcpServers`: ```json "<mcp-display-name>": { "command": "npx", "args": [ "--registry", "https://releases.jfrog.io/artifactory/api/npm/jfml-coding-agents-npm/", "@jfrog/mcp-gateway", "--server", "<SERVER_ID>" ], "env": { "_JF_MCP_LOADER_ARGS": "project=<PROJECT>&mcp=<PACKAGE_NAME>" } } ``` If env vars or headers were collected in Step 3, add them to the `env` object. NEVER commit secrets — use environment variable references where supported. ## Removing an MCP Delete the entry from `mcpServers` in the file where it was installed (`.mcp.json` or `~/.claude.json`). ## Listing MCPs ### Installed MCPs Check both `.mcp.json` (project-level) and `~/.claude.json` (user-level). List each `mcpServers` entry by display name, showing its package name (from `_JF_MCP_LOADER_ARGS`), server ID (from `--server`), and whether it is project-scoped or user-scoped. ### Available MCPs (JFrog AI Catalog) Derive SERVER_ID and PROJECT from existing `mcpServers` entries (same as Step 1). Run a single Bash call — prints all catalog package names: ``` python3 -c " import json, os, urllib.request, ssl, sys SERVER_ID = sys.argv[1] PROJECT = sys.argv[2] conf_path = os.path.expanduser('~/.jfrog/jfrog-cli.conf.v6') token = url = '' try: conf = json.load(open(conf_path)) server = next((s for s in conf.get('servers', []) if s.get('serverId') == SERVER_ID), None) if server: token = server.get('accessToken', '') url = server.get('url', '').rstrip('/') except: pass token = token or os.environ.get('JFROG_ACCESS_TOKEN','') or os.environ.get('JF_ACCESS_TOKEN','') url = (url or os.environ.get('JFROG_URL','') or os.environ.get('JF_URL','')).rstrip('/') if not token or not url: print('ERROR: no credentials'); sys.exit(1) req = urllib.request.Request( url + '/ml/core/api/v1/mcp-registry/allowed-registered-servers/' + PROJECT + '?pageSize=500', headers={'Authorization': 'Bearer ' + token}) data = json.loads(urllib.request.urlopen(req, context=ssl.create_default_context()).read()) for e in data.get('registeredServers', []): pkg = e.get('mcpServer', {}).get('spec', {}).get('packageName', '') if pkg: print(pkg) " SERVER_ID PROJECT ``` Filter out already-installed packages (compare against `mcp=` values in `_JF_MCP_LOADER_ARGS`). Mark remaining entries as available to install. ## Key Rules - **`npx` args order (required):** `--registry`, registry URL, **`@jfrog/mcp-gateway`**, `--server <SERVER_ID>` — registry flags MUST come **before** the package name. Do NOT use `--yes`. Do NOT use bare `mcp-gateway`. Do NOT include `--loader`. - `_JF_MCP_LOADER_ARGS` MUST contain `project=<NAME>&mcp=<PACKAGE_NAME>`. - Package name MUST come from the catalog API. NEVER guess. - NEVER install MCPs outside the gateway loader. - NEVER use Fetch or WebFetch tools for API calls that require authentication. - NEVER show access tokens or API keys in any output or message. - NEVER split the catalog lookup into multiple Bash calls. - NEVER ask for info you can find in `.claude/settings.json`, existing config, `JF_PROJECT` env var, or `~/.jfrog/jfrog-cli.conf.v6`. - Prefer `.mcp.json` for team-shared MCPs; use `~/.claude.json` for personal-only. - **`allowedMcpServers` (managed policy):** A single `serverCommand` entry covers all MCPs installed via mcp-gateway — every entry shares the same `command` + `args` (only `_JF_MCP_LOADER_ARGS` in `env` differs, and env is not part of command matching): ```json { "allowedMcpServers": [ { "serverCommand": [ "npx", "--registry", "https://releases.jfrog.io/artifactory/api/npm/jfml-coding-agents-npm/", "@jfrog/mcp-gateway", "--server", "<SERVER_ID>" ] } ] } ``` To change servers, update `<SERVER_ID>` here — this instruction reads it automatically.
Step 3 - Authenticate
Authenticate using one of the following methods:
-
Authentication via JFrog CLI:
If you already have the JFrog CLI installed and configured, the plugin uses your existing authentication. To configure it:
-
Open your terminal.
-
Run the following command:
jf config add -
Follow the interactive prompts to configure your JFrog Platform URL and Access Token.
-
Restart your IDE/terminal to apply the changes.
-
-
Authentication by Setting Persistent Environment Variables
If you are not using the JFrog CLI, you can permanently save the required environment variables to your machine's operating system, For instructions, see Set Persistent Environment Variables below.
- After you have authenticated, open a workspace in your IDE/terminal. The JFrog MCP Gateway starts automatically and your approved MCP servers are available to your Copilot agent.
Set Persistent Environment Variables
Follow the instructions below according to your machine's operating system.
Set env vars for macOS / Linux (Zsh or Bash):
Add the variables to your shell profile so they load automatically every time a terminal (or IDE) starts.
-
Open your terminal and edit your profile (usually
~/.zshrcfor Mac or~/.bashrcfor Linux):nano ~/.zshrc -
Add the following lines at the bottom of the file:
export JFROG_PLATFORM_URL="<your-platform-url>" export JF_PROJECT="<your-project-key>" export JFROG_ACCESS_TOKEN="<your-access-token>" -
Save and exit: Press
Ctrl+O,Enter, thenCtrl+X. -
Apply the changes:
source ~/.zshrc
Set env vars for Windows (PowerShell):
Use the setx command to save variables permanently to your user account settings.
-
Open PowerShell and run the following commands:
setx JFROG_PLATFORM_URL "<your-platform-url>" setx JF_PROJECT "<your-project-key>" setx JFROG_ACCESS_TOKEN "<your-access-token>" -
Restart your IDE/terminal: You must completely close and reopen your IDE/terminal for it to recognize the new system variables.
Note:
For security reasons, if you are using a
.envfile for local development, always ensure it is added to your.gitignoreto prevent leaking your Access Token.
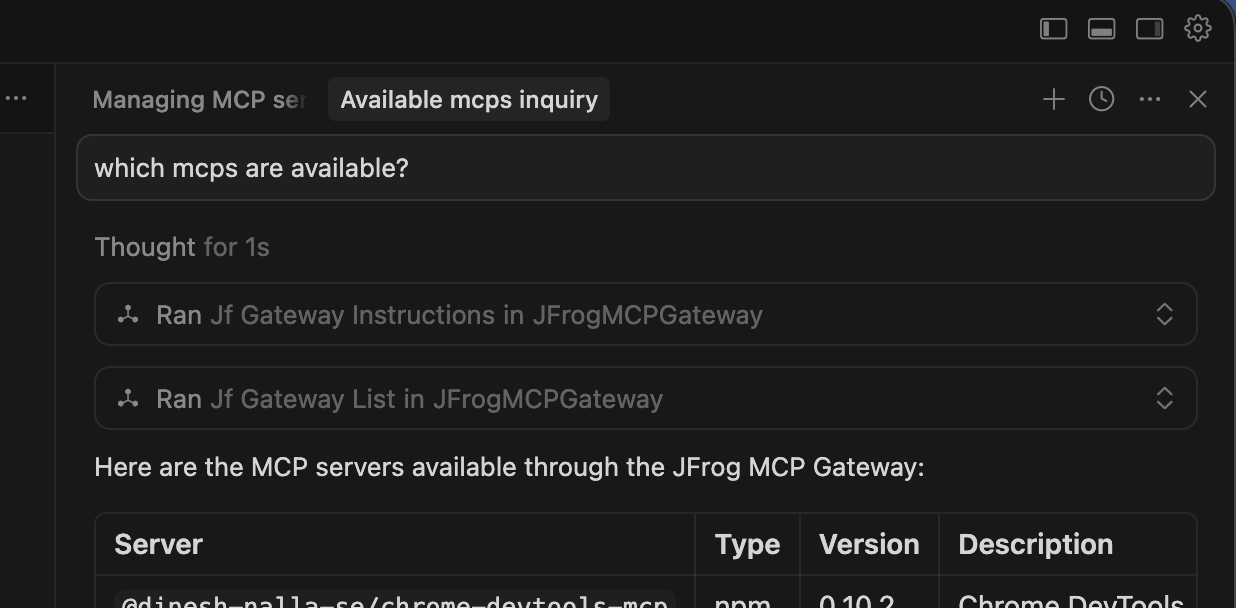
Manage MCP Servers via Agents
The JFrog MCP Gateway various capabilities through MCP tools to your coding agent. You can interact with the JFrog MCP Registry directly through your Agent's chat interface.
For details, see Manage MCPs via Agents.
Updated 13 days ago