Use the MCP Registry with Agent Guard
Connect your coding agent to the JFrog Agent Guard using the JFrog coding assistant plugin.
The JFrog Agent Guard is a local proxy that wraps each approved MCP server individually and enforces your organization's tool policies on every agent call. Install the JFrog plugin for your coding assistant to connect your coding agent to the Guard.
Once connected, your agent can only see and use MCP servers that your project admin has approved. For the full MCP Registry lifecycle, see
Get Started with the JFrog MCP Registry.
Setup Summary
Complete these steps in order to connect your coding agent to Agent Guard.
For more information, see AI Catalog for Developers at JFrog Academy.
Enable the MCP Registry
In order to use your coding assistant with allowed MCP servers, you first need to enable the MCP Registry in JFrog AI Catalog.
To enable the MCP registry:
-
In the Administration module, select AI/ML Settings > AI Catalog.
-
Toggle Enable MCP registry to Active.
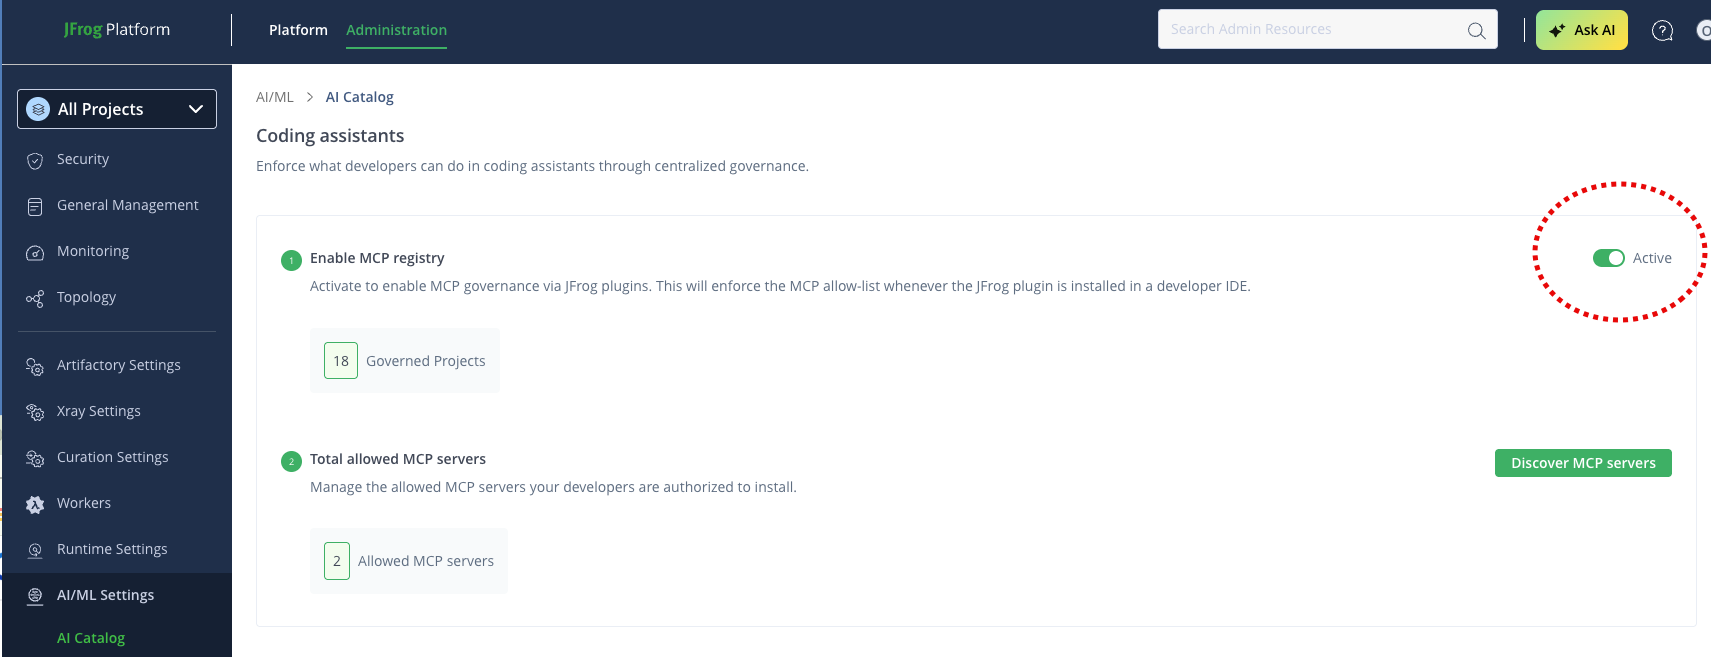
Notes:
- If the Enable MCP Registry setting is not set to Active, when you select Install MCP in the Registry, all the IDE options are unavailable.
- On the Discovery page, if the MCP Registry has not been activated, the Activate MCP Registry button can be selected to take you to the AI Catalog Settings page.
s approved. For the full MCP Registry lifecycle, see
Get Started with the JFrog MCP Registry.Setup SummaryComplete these steps in
Install the JFrog Plugin in Your Coding Assistant
The JFrog plugin installs and configures Agent Guard for your coding assistant. Complete the prerequisites before you install the plugin for your IDE.
Prerequisites
- JFrog Platform Access: An active account with the AI Catalog enabled.
- Project Configuration: To use custom or third-party MCP servers, ensure they are allowed for your project in the AI Catalog. If none are allowed, only the default JFrog MCP will be available.
- Your JFrog host domain and authentication token.
- Enable the Agent Guard via the JFrog Platform
- Your JFrog plugin has been installed for your chosen IDE. See JFrog Plugins.
To install the JFrog plugin in your coding assistant:
Select your coding assistant instructions from the following table.
| Coding Assistant | Installation Instructions |
|---|---|
| Cursor | Cursor |
| VS Code | VS Code |
| Claude Code | Claude Code |
| OpenCode | OpenCode (JFrog Platform MCP and Agent Skills; does not use Agent Guard) |
Authenticate Coding Assistant to Work with Agent Guard
The JFrog Agent Guard automatically resolves your credentials from several sources. Choose one of the following authentication methods. This authenticates Agent Guard to your JFrog Platform. To sign in to a remote MCP server that itself requires OAuth or SSO, see Authenticate Remote MCP Tools in Agent Guard. For the authoritative resolution order, including the --server flag and the force variables, see Configuration Precedence.
To authenticate your coding assistant to work with Agent Guard:
Authenticate by Setting Persistent Environment Variables:
Use this if you are not using the JFrog CLI. Both variables must be set together. You can permanently save the required environment variables to your machine's operating system.
Environment Variables:
| Variable | Description |
|---|---|
JFROG_URL | Your JFrog platform URL, for example https://<mycompany>.jfrog.io |
JFROG_ACCESS_TOKEN | Your JFrog access token |
Optional —JF_PROJECT (applies to all authentication options) JF_PROJECT is your JFrog project key. It is optional regardless of which authentication option you choose. If it isn't set, the agent will ask you for the project key when needed.
Follow the OS-specific instructions in this section.
Set env vars for macOS / Linux (Zsh or Bash):
Option 1: Using echo commands
echo 'export JFROG_URL="https://<your-host>"' >> ~/.zshrc
echo 'export JFROG_ACCESS_TOKEN="<your-token>"' >> ~/.zshrc
source ~/.zshrc
Option 2: Using nano editor
-
Open your terminal and edit your profile (usually
~/.zshrcfor Mac or~/.bashrcfor Linux):nano ~/.zshrc -
Append these lines at the bottom of the file:
export JFROG_URL="<your-platform-url>"
export JFROG_ACCESS_TOKEN="<your-access-token>"
Optional: You can also set
export JF_PROJECT="<your-project-key>"to default to a specific project. -
Save, exit and apply changes:
PressCtrl+O,Enter, thenCtrl+X. Then run:source ~/.zshrc
After setting environment variables, restart your IDE so it picks up the new environment.
Set env vars for Windows (PowerShell):
- Open PowerShell and run the following commands:
   [Environment]::SetEnvironmentVariable("JFROG_URL", "<your-platform-url>", "User")
   [Environment]::SetEnvironmentVariable("JFROG_ACCESS_TOKEN", "<your-access-token>", "User")
Optional: [Environment]::SetEnvironmentVariable("JF_PROJECT", "<your-project-key>", "User")
Important: The "User" scope writes the variables permanently to your Windows user profile (registry key HKCU\Environment), so they persist across reboots and are inherited by every new process.
Alternatives:
Command Prompt: Use setx. For more information, see learn.microsoft.com/setx. setx truncates values over 1024 characters. If your access token exceeds that limit, use the PowerShell command above instead.
GUI: Start → "Edit the system environment variables" → Environment Variables…
-
Completely close and reopen your IDE/terminal for the changes to take effect. The current PowerShell window won't see the new values until it's restarted.
Security Note:
For security reasons, if you are using a
.envfile for local development, always ensure it is added to your.gitignoreto prevent your Access Token from leaking.
Authenticate with JFrog CLI:
If you have already run jf config add for exactly one server, and the JFROG_URL environment variable is not set, the Agent Guard defaults to that server automatically. No flags or variables are required.
To configure the JFrog CLI:
-
Open your terminal.
-
Run the following command:
jf config add -
Follow the interactive prompts to configure your JFrog Platform URL and Access Token.
-
Restart your IDE/terminal to apply the changes.
After jf config add, you're done.
📘 Note:
If you have more than one CLI server configured, provide the --server <SERVER_ID> flag to select which server Agent Guard uses. The --server flag takes precedence over the environment variables and the jf CLI config. For the full resolution order, see Configuration Precedence.
After you have authenticated and set the variables, restart your IDE and terminal so they pick up the new environment. The JFrog Agent Guard starts automatically and your approved MCP servers are available to your coding agent.
Configuration Precedence
The JFrog Agent Guard resolves your credentials from several sources. When more than one source is available, the higher-priority source wins.
The following table lists the credential sources from highest to lowest priority.
| Priority | Source | Behavior |
|---|---|---|
| 1 | --server <server> CLI flag | Explicit server ID. Overrides the environment variables when provided. |
| 2 | JFROG_URL + JFROG_ACCESS_TOKEN | Both must be set together. See Legacy Environment Variable Aliases. |
| 3 | jf CLI config | Used automatically when exactly one server is configured, or when a default server is set with jf config use-profile. |
Legacy Environment Variable Aliases
The canonical variable names are recommended. The legacy aliases still work for backward compatibility.
The following table lists the canonical variables and their legacy aliases.
| Canonical Variable | Legacy Aliases |
|---|---|
JFROG_URL | JF_URL, JFROG_PLATFORM_URL |
JFROG_ACCESS_TOKEN | JF_ACCESS_TOKEN |
How Conflicts Are Resolved
If both an environment variable and a --server flag are set, --server wins. If no environment variables and no --server flag are set, Agent Guard falls back to the jf CLI config automatically. This works for both the single-server case and a default server set with jf config use-profile.
Network Access - Agent Guard Registry
By default, the JFrog Agent Guard is downloaded from: https://releases.jfrog.io/artifactory/api/npm/coding-agents-npm/
If your workstation can't reach that URL, you do not need to change anything in this section.
To route Agent Guard through your Artifactory when releases.jfrog.io is blocked:
-
In JFrog Artifactory , create a remote npm repository that points to https://releases.jfrog.io/artifactory/api/npm/jfml-coding-agents-npm .
-
Set
JFROG_AGENT_GUARD_REPOto your remote repository URL (use the OS-specific instructions from Authenticate ):JFROG_AGENT_GUARD_REPO=https://<JFROG_URL>/artifactory/api/npm/<REPO_NAME> -
Restart your IDE and terminal so the environment variable is picked up.
For more information about managing MCP Servers via Agents, see Example Workflows (Manage MCPs via Agents).
Frequently Asked Questions
This section provides answers to frequently asked questions about connecting your coding agent to Agent Guard.
FAQs
Q: Why must I enable the MCP Registry before I install the JFrog plugin?
A: JFrog's Plugins rely on this setting during installation. (The registry must be active before coding agent install options appear in the MCP Registry.) For more information, see Enable the MCP Registry.
Q: Which authentication method should I use for Agent Guard?
A: Use persistent environment variables if you do not use the JFrog CLI. If you already configured exactly one server with jf config add, Agent Guard can use that configuration automatically. See Authenticate Coding Assistant to Work with Agent Guard.
Q: Do I need to set JFROG_URL and JFROG_ACCESS_TOKEN together?
JFROG_URL and JFROG_ACCESS_TOKEN together?A: Yes. Both variables are required when you authenticate with environment variables. You can optionally set JF_PROJECT to default to a specific project key.
Q: Can I still use JFROG_PLATFORM_URL or JF_URL to set my platform URL?
JFROG_PLATFORM_URL or JF_URL to set my platform URL?A: Yes. Those are legacy aliases and still work, but JFROG_URL is the recommended name. See Legacy Environment Variable Aliases.
Q: What if my network blocks access to releases.jfrog.io?
A: Create a remote npm repository in JFrog Artifactory that proxies the Agent Guard registry, then set JFROG_AGENT_GUARD_REPO to your repository URL. See Network Access - Agent Guard Registry.
Q: What happens if I have multiple JFrog CLI servers configured?
A: When you have more than one CLI server configured, provide the --server <SERVER_ID> flag to select which server Agent Guard uses. The --server flag takes precedence over the environment variables and the jf CLI config. For the full resolution order, see Configuration Precedence.
Related Topics
- Get Started with the JFrog MCP Registry
- Install an MCP Server
- JFrog Plugins
- Install JFrog Plugin for OpenCode
- Configure Tool Policies
- Troubleshoot MCP Registry
Updated about 2 months ago