Custom MCP Servers
Upload, govern, and distribute your proprietary MCP servers using the JFrog MCP Registry.
Custom MCP servers are privately developed packages (Python or npm) stored securely in JFrog Artifactory. They act as the bridge between AI agents and your company's internal systems, such as databases, internal APIs, and private platforms.
By registering these custom MCP servers in the JFrog MCP Registry, you:
- Enable Secure Discovery - AI and coding agents can find your internal tools.
- Enforce Governance - Every action is vetted against enterprise security policies.
- Ensure Auditability - Track which tools are used, when, and by whom.
- Control Access - Only authorized users can register and use specific servers.
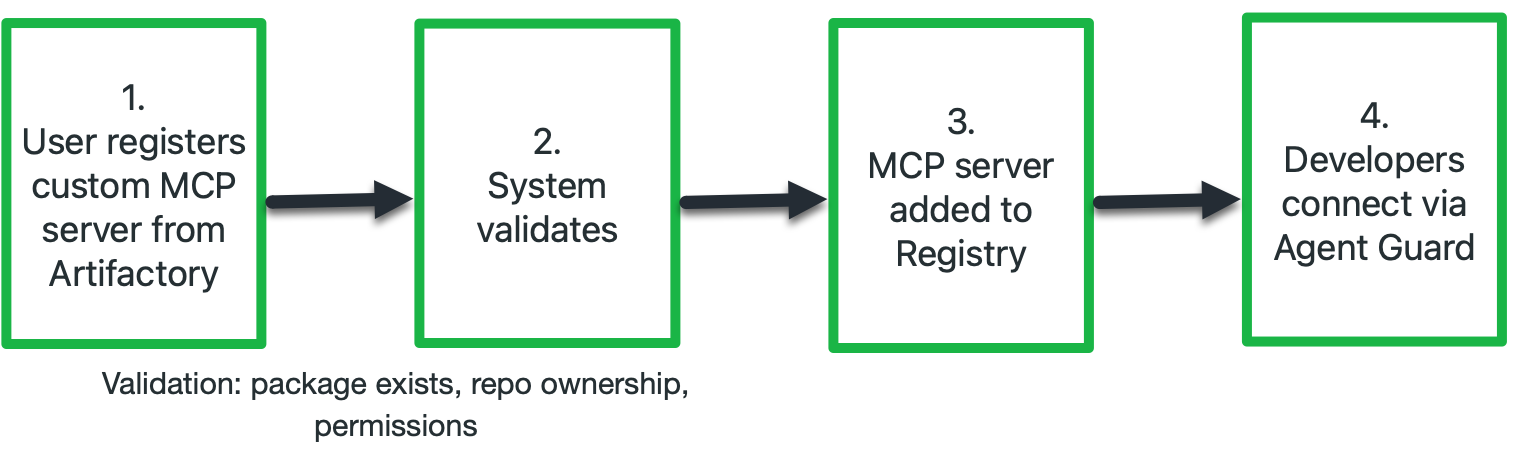
Registration Flow
To ensure a trusted supply chain, the package and its optional README.md must first exist in a local Artifactory repository before it can be registered and governed by the MCP Registry.
Prerequisites
- Upload the binary: Publish your MCP package to a local npm or local PyPI repository using the standard package managers. All uploaded artifacts must be fully self-contained and include all runtime dependencies.
- Check project scoping: Ensure the local repository is assigned to the JFrog Project where you intend to register the server.
- ALLOW permission for the target project within the AI Catalog.
- READ access to the repository containing the custom MCP server package.
- Custom MCP registration currently supports npm and PyPI.
- Public MCPs are available through Discovery (public catalog) and can be allowed for your project from there.
Register a Custom MCP Server
Registering an MCP server links the physical Artifactory binary to the MCP Registry, approving it for organizational use. This can be done via the UI or REST API.
Register through the UI
-
In the Platform module, navigate to AI/ML > Registry.
-
Select the project for which you want to register the MCP server.
-
Click (+), and select Upload Custom MCP to open the registration pane.
-
Select the local repository that contains the server binary, and enter the path to the artifact.
-
Define the server Name: Enter a unique identifier for the server.
The registry automatically formats the display name as
<type>:<repository>:<name>. -
(Optional) Configure runtime settings:
- Runtime Arguments: Enter the required strings for execution and provide a description for each argument. These are optional command-line execution flags.
- Environment Variables: Define required keys with descriptions. Set the
isSecretandisRequiredtoggles as needed. These are optional configuration keys.
-
Enter the path to the README file (see Prerequisites above).
-
Click Complete Registration. The MCP server details are displayed in the Registry page, where you can define the Tool Policy.
-
Define the Tool Policy - how to govern the tools within this server - by selecting one of the following options:
- Allow all tools: Automatically approves all current tools and any tools added to this server in future updates.
- Select tools manually: Opens the Allow List and Deny List configuration. This enables you to define granular policies using static text and Regex patterns. See Configure Tool Policies.
Register through the REST API
To automate custom MCP registration in your CI/CD pipeline, send a POST request to https://<JFROG_DOMAIN>/ml/core/api/v1/mcp-registry/custom-server (the registration endpoint).
Example 1: With runtime arguments and environment variables
curl --location 'https://{JFROG_DOMAIN}/ml/core/api/v1/mcp-registry/custom-server' \
--header 'Content-Type: application/json' \
--header 'Authorization: Bearer {TOKEN}' \
--data '{
    "projectKey": "ai-research",
    "repoArtifactInfo": {
      "repoKey": "ai-pypi-local",
      "repoPath": "org/project/mcp-server/1.0.0/mcp_server-1.0.0.tar.gz",
      "readmePath": "org/project/mcp-server/1.0.0/README.md"
    },
    "mcpServerInfo": {
      "description": "Internal Database Connector for AI Agents",
      "version": "1.0.0",
      "environmentVariables": [
        {
          "name": "DB_CONNECTION_STRING",
          "description": "Connection string for the production DB",
          "format": "string",
          "isRequired": true,
          "isSecret": true
        }
      ],
      "runtimeArguments": [
        {
          "name": "--port",
          "description": "Runtime port for the MCP server",
          "format": "integer",
          "type": "int",
          "defaultValue": "8080"
        }
      ]
    }
}'
Example 2: Without runtime arguments and environment variables
curl --location 'https://{JFROG_DOMAIN}/ml/core/api/v1/mcp-registry/custom-server' \
--header 'Content-Type: application/json' \
--header 'Authorization: Bearer {TOKEN}' \
--data '{
    "projectKey": "ai-research",
    "repoArtifactInfo": {
      "repoKey": "ai-npm-local",
      "repoPath": "org/project/simple-mcp/1.0.0/simple-mcp-1.0.0.tgz",
      "readmePath": "org/project/simple-mcp/1.0.0/README.md"
    },
    "mcpServerInfo": {
      "description": "A basic utility MCP server with default settings",
      "version": "1.0.0",
      "environmentVariables": [],
      "runtimeArguments": []
    }
}'
JSON Payload Parameters
| Parameter | Description | Required? |
|---|---|---|
{TOKEN} | Your authentication token. | Yes |
projectKey | The target JFrog project key for this MCP server | Yes |
repoArtifactInfo.repoKey | The local Artifactory repository name housing the package. | Yes |
repoArtifactInfo.repoPath | The exact path to the server binary within the repository. | Yes |
mcpServerInfo.description | A readable summary of the MCP server's capabilities. | Yes |
mcpServerInfo.version | The version of the custom MCP server. | Yes |
repoArtifactInfo.readmePath | The path to a Markdown README file within the repository. | No |
mcpServerInfo.environmentVariables | Array of required config keys (for example, API keys, URLs). | No |
mcpServerInfo.runtimeArguments | Array of command-line execution flags (for example, --verbose). | No |
Unregister Custom MCP Servers
Unregistering an MCP server immediately removes its metadata and governance policies from the AI Catalog, disconnecting it from developer IDEs.
The physical binary remains untouched in JFrog Artifactory.
Unregister Through the UI
-
In the Platform module, navigate to AI/ML > Registry.
-
Select the project to which the MCP server you want to remove is registered.
-
Locate the MCP server and click Unregister.
-
Confirm the action in the confirmation message.
Once unregistered, the MCP server is immediately removed from the MCP Registry and developers can no longer connect to it.
Unregister Through the REST API
Registration and unregistration use different API base paths; use the endpoints shown in this section and in Register through the REST API.
Send a DELETE request to the unregister endpoint, passing the server name and project key:
curl -X DELETE "https://<JFROG_URL>/api/v1/ml/registry/mcp/unregister?name=<MCP_NAME>" \
     -H "Authorization: Bearer <TOKEN>" \
     -H "JFrog-Project-Key: <PROJECT_KEY>"
Where:
<JFROG_URL>– Your JFrog Platform URL.<MCP_NAME>– The name of the MCP server to unregister.<TOKEN>– Your authentication token.<PROJECT_KEY>– The project key for the MCP server.