Deployment Strategies
General and specific explanations of variations and deployment strategies.
Overview of Deployment Strategies
ML models deployed as a real-time service support an advanced traffic management tool called variations. The tool enables you to perform a canary release of a new model or to shadow deploy a model.
A variation is an additional identifier through which you can manage the amount of traffic routed to a specific deployed build. You can deploy multiple builds per model by assigning builds to different variations.
Shadow deployment lets you test a model using production data without returning the predictions produced by the model to the caller. The JFrog ML platform still logs all requests and model responses, so you can review them and evaluate the model performance.
Deploying a Real-Time Model with Variations
When you deploy your first model, the default variation name will be "default".
The first build automatically receives 100% of the traffic.
How to Deploy an Additional Variation
Prerequisite: To deploy an additional variation first you must create an audience.
Then you can attach it to the model in the deployment process.
To deploy an additional variation:
- Click the deploy button next to the build you want to deploy.
- In the deployment popup, enter a new variation name and click create new variation in the select.
Choose a name that adheres to the following rules:
- Contains no more than 36 characters.
- Contains only lowercase alphanumeric characters, dashes or periods.
- Starts with an alphanumeric character.
- Ends with an alphanumeric character.
- In the tab Traffic Control attach the new or the existing variations to the audience.
- Ensure that the total traffic percentages add up to 100% in each audience.
- Select a fallback variation. (can be either the new one or the existing one).
- Click Deploy.
How to Replace an Existing Variation
▶ To replace an existing variation:
- In the deployment popup, choose the variation you want to replace.
- Modify the deployed model. You can replace any variation, including the default variation. The next tab of Traffic Control also allows you to modify the percentage of traffic.
Deployment via the CLI
To deploy a model with variations via the CLI, use this command:
frogml models deploy realtime --from-file <config-file-path>The configuration file should look like this:
model_id: <model-id>
build_id: <build-id-to-deploy>
realtime:
  variation_name: <The variation name being deployed>
  audiences:
    - id: <The audience id>
      name: <The audience name>
      routes:
        - variation_name: <First variation>
          weight: 20
          shadow: false
        - variation_name: <The variation name being deployed>
          weight: 80
          shadow: false
fallback_variation: <One of the variations>- If you use
--variation-namein the CLI command, you don't have to pass thevariation_namein the configuration file. - When you deploy your first build, you don't have to pass any variation-related data. You can also pass just the variation name parameter. Traffic is automatically adjusted to 100%.
- If you are using the configuration file, you must pass all the existing variations, regardless of whether you modify them or not.
Inference on a Specific Variation
You can run an inference against a specific variation by using one of the clients:
Python Runtime SDK
import pandas as pd
from frogml_inference import RealTimeClient

model_id = "test_model"
feature_vector = [
   {
     "feature_a": "feature_value",
     "feature_b": 1,
     "feature_c": 0.5
   }]

client = RealTimeClient(model_id=model_id, variation="variation_name")
response: pd.DataFrame = client.predict(feature_vector)
Java Inference SDK
RealtimeClient client = RealtimeClient.builder()
          .environment("env_name")
          .apiKey(API_KEY)
          .build();

PredictionResponse response = client.predict(PredictionRequest.builder()
          .modelId("test_model")
          .variation("variation_name")
          .featureVector(FeatureVector.builder()
                .feature("feature_a", "feature_value")
                .feature("feature_b", 1)
                .feature("feature_c", 0.5)
                .build())
          .build());

Optional<PredictionResult> singlePrediction = response.getSinglePrediction();
double score = singlePrediction.get().getValueAsDouble("score");
REST API
curl --location --request POST 'https://<tenantId>.ml.jfrog.io/v1/test_model/<variation_name>/predict' \
     --header 'Content-Type: application/json' \
     --header 'Authorization: Bearer <Auth Token>' \
     --data '{"columns":["feature_a","feature_b","feature_c"],"index":[0],"data":[["feautre_value",1,0.5]]}'
Targeting A Specific Audience
PythonClient
You can run an inference against a specific audience by using the python sdk:
client.predict(feature_vector, metadata: {<key>:<value>})You need to pass a key-value dictionary, its value will lead the traffic to the wanted audiences by its conditions.
REST API
curl --location --request POST 'https://<tenantId>.ml.jfrog.io/v1/test_model/<variation_name>/predict' \
     --header 'Content-Type: application/json' \
     --header 'Authorization: Bearer <Auth Token>' \
     --header "<key>: <value>" \
     --data '{"columns":["feature_a","feature_b","feature_c"],"index":[0],"data":[["feature_value",1,0.5]]}'
Traffic Splitting with Audiences and Variations
JFrog ML provides multiple ways to split traffic and run A/B tests using Audiences and Variations. Using JFrog ML, you can segment traffic, compare different variations, and make data-driven decisions to enhance the performance of your models.
Segmenting Traffic with Audiences
Audiences are a powerful tool for categorizing traffic on predefined client-side metadata conditions. Configured at the JFrog ML Account level, they apply to all real-time models within the Account.
By default, requests that do not meet any specific Audience criteria are routed to the fallback Audience.
Important
Audience details must be included in the metadata or header fields at each inference request.
Creating an Audience
Audiences are created using YAML files and managed via the FrogML CLI.
Below is an example of an Audience that categorizes users from New York aged between 10 and 30
The first condition matches the location field to be new-york. This match has to be exact, it's not a regex.
The second condition is binary, where the age key is in the range specified with first_operand and second_operand.
api_version: v1
spec:
  audiences:
    - name: New-York
      description: Users from New York aged 10-30
      conditions:
        unary:
          - key: location
            operator: UNARY_OPERATOR_TYPE_EXACT_MATCH
            operand: new-york
        binary:
          - key: age
            operator: BINARY_OPERATOR_TYPE_RANGE_MATCH
            first_operand: 10
            second_operand: 30
Each audience definition must include:
- Name: A display name of the audience used on the JFrog ML platform UI.
- Description: A general description of the audience.
- Conditions: A list of conditions with an AND operand between them.
Defining Conditions
The following condition types are available when creating an audience:
Unary Operators
UNARY_OPERATOR_TYPE_EXACT_MATCH: Matches an exact value.UNARY_OPERATOR_TYPE_SAFE_REGEX_MATCH: Matches using a regular expression.UNARY_OPERATOR_TYPE_PRESENT_MATCH: Checks for the presence of a key.UNARY_OPERATOR_TYPE_PREFIX_MATCH: Matches values that start with a specified prefix.UNARY_OPERATOR_TYPE_SUFFIX_MATCH: Matches values that end with a specified suffix.UNARY_OPERATOR_TYPE_CONTAINS_MATCH: Matches values containing a specified substring.
Binary Operator
BINARY_OPERATOR_TYPE_RANGE_MATCH: Checks if a value falls within a specified range.
Registering and Managing Audiences
Register an Audience from a Config File
Apply an audience configuration using a CLI command:
frogml audiences create -f <path_of_audience_config.yaml>List All Existing Audiences
Returns a list of audience ids and names.
frogml audiences listRetrieve the Details of a Specific Audience
To get the audience-id ,use the frogml audiences list command first, to retrieve all audiences with their IDs.
frogml audiences get --audience-id <audience_id>Tip
Tip
For a full list of available options and parameters, use the command
frogml audiences --help.
Directing Traffic to Audiences
In the following examples, we demonstrate how to route requests to specific Audiences.
Using the Python Client
from frog_inference import RealTimeClient

model_id = <your_model_id>
feature_vector = <...>
metadata = {"location": "new-york", "age": 25}

client = RealTimeClient(model_id=model_id)

client.predict(feature_vector, metadata=metadata)
Using REST Calls
curl --location --request POST 'https://<tenantId>.ml.jfrog.io/v1/1_hour_model/predict' \
--header 'Content-Type: application/json' \
--header 'location: new-york' \
--header 'age: 25' \
--header 'Authorization: Bearer <Auth Token>' \
--data '{
  "columns": ["feature_1", "feature_2"],
  "index": [0],
  "data": [[0.0, 0.0]]
}'Warning
Audience information is not stored in the JFrog ML Analytics Lake. This means that audience information of requests cannot be tracked.
Splitting Traffic with Variations
Variations are used for traffic splitting, operating above the Audience level. They have the following key characteristics:
- Each Variation is linked to a specific model Build.
- Variations always draw traffic from an Audience, so creating an Audience is required before using Variations.
- They can allocate traffic by percentage from various audiences or between different Builds, enabling effective A/B testing. Variations can be designated as Shadow Variations, which replicate a percentage of live traffic to other Builds for testing purposes.
- Each Variation can direct traffic to only one deployed Build at a time.
- The Variation assigned to a request is recorded in Analytics under the column
variation_name.
Assigning Traffic to Variations
When deploying a model with multiple variations, audiences are assigned to specific variations, including the fallback audience and a fallback variation.
When distributing traffic from an audience to multiple variations, the total percentage allocated must equal 100% of that audience's traffic.
The only exception is the Shadow Variation, which can receive less than 100% of live traffic.
The currently deployed Variations appear under Traffic Control section in the model overview:
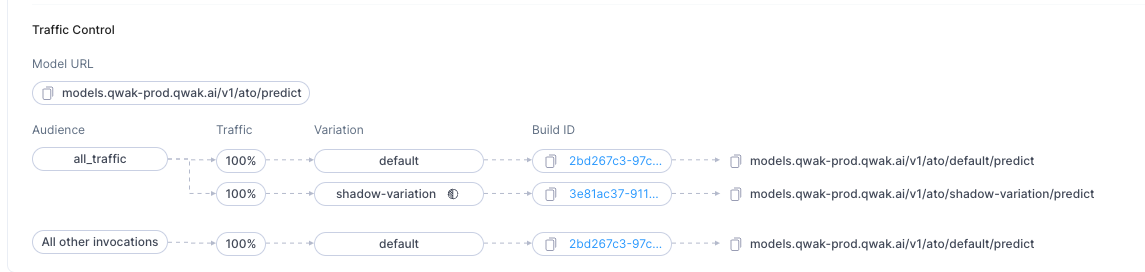
Fallback Variation: Receives traffic that doesn't match any audience.
Connecting Audiences to Variations: Audiences can be linked to one or more variations, with traffic between variations distributed randomly based on defined percentages.
▶ To modify traffic configuration:
- Edit the deployment of the desired build.
- Adjust the percentage of traffic for each variation.
Enabling Variations with the default Audience
default AudienceIn certain scenarios, you may not require the traditional traffic categorization provided by audience conditions. For such cases, JFrog ML offers support for a default audience, which lacks conditions but enables the utilization of variations for all requests.
Below is an example of configuring the default audience to enable variations:
api_version: v1
spec:
  audiences:
    - name: default
      description: All traffic
To register this audience configuration, please refer to the Audiences section above.
Example Deployment Request with Traffic Splitting
The following is an example of a deployment request that incorporates traffic splitting. In this example, the variation named 'test-variation' is being deployed, with traffic split evenly—50% to the default variation and 50% to the test-variation.
Note
The 'default' variation must always be deployed before any other variations. Additionally, the combined percentage of all variations must total 100%.
realtime:
  variation_name: test-variation
  audiences:
    - id: 208a9c7f-7271-416b-ac67-4939c1c45601
      name: "default" # audience name
      routes:
        - variation_name: default
          weight: 50
          shadow: false
        - variation_name: test-variation
          weight: 50
          shadow: false
  fallback_variation: default
Undeploying a Multi-variation Realtime Model
Once you have more than one build deployed, when you undeploy an existing build, you must specify how to split the traffic after the undeployment.
Undeploying Models Using the UI
▶ To undeploy a variation:
- In the build view, click the options icon next to a deployed build and select Undeploy.
- Redistribute the traffic between the remaining variations and then click Undeploy.
Undeploying Models Using the CLI
▶ To undeploy a model with variation from the CLI, run the following command:
frogml models undeploy \
    --model-id <model-id> \
    --variation-name <variation-name> \
    --from-file <config-file-path>
With a configuration file as follows:
realtime:
  variation_name: <The variation name being undeployed>
   audiences:
    - id: <remaining audience id>
      name: "<audience name>
      routes:
        - variation_name: <other existing variation>
          weight: 80
          shadow: false
        - variation_name: <other existing variation 2>
          weight: 20
          shadow: false
  fallback_variation: <other existing variation>
If you use --variation-name in the CLI command, you don't have to pass the variation_name in the configuration file.
When undeploying from 2 variations to one, you don't have to pass any variation-related data -all the traffic will pass to the remaining variation.
Note
By default the undeploy command is executed asynchronously, which means that the command does not wait for the undeployment to complete.
To execute the command in sync, use the
--syncflag.
Shadow Deployment
What is Shadow Deployment?
When using Shadow deployment, the traffic is not divided between the deployments but instead multiplied. The shadow deployment itself does not respond to the request but processes it and logs the output.
This kind of deployment is best for cases where you want to check how a model behaves without affecting the actual production traffic.
Technical Considerations
Like a regular variation, you can configure the percentage of traffic that the deployment handles. For example, entering 20 in the percentage of the variation copies and routes every 5th request to the shadow deployment.
Note
Traffic for shadow deployments is routed from the general traffic and not from a specific variation.
Shadow Deployment in the UI
Every audience can have at most one shadow variation!

▶ To add a shadow deployment:
- Select Traffic Control button and check the ghost icon next to the wanted variation in the tab.
- Specify the percentage of traffic handled by the shadow deployment model.
Shadow Variation using the CLI
Making the variation a shadow variation is simple. In the deployment config just add the shadow flag:
realtime:
  variation_name: <shadow variation name>
  audiences:
    - id: <audience_id>
      name: <audience_name>
      routes:
        - variation_name: <variation>
          weight: 100
          shadow: false
        - variation_name: <shadow variation name>
          weight: 20
          shadow: true
fallback_variation: <variation>frogml models deploy realtime --model-id <model-identifier> --build-id <build-id> --variation-name <shadow variation name> --from-file <config-file-path>Note
The percentage of all the variations must add up to 100, regardless of shadow deployments.
Updated 3 months ago