Self-Managed Cloud Installation
Set up JFrog ML on your own infrastructure with full control and security
About
This guide walks you through installing the self-hosted version of JFrog ML. It outlines the required infrastructure and resources for a successful deployment.
Requirements:
- JFrog ML requires an existing JFrog Platform Deployment (JPD). It is installed as an additional component alongside JPD.
- Minimum Artifactory version: 7.117.5
Overview
JFrog ML is an end-to-end platform for managing the machine learning lifecycle — from experimentation to production. It provides built-in security, governance, and streamlined collaboration across teams.
Architecture
The diagram below illustrates the core architecture of JFrog ML in a self-hosted setup:
- JPD - The JFrog Platform Deployment.
- JFrog ML Control Plane - Manages ML operations and is hosted on the JFrog Cloud.
- JFrog Bridge - Facilitates a secure tunnel enabling communication between the Control Plane and the self-hosted environment.
- JFrog ML Cluster - JFrog ML services handling AI/ML workloads.
- Environment - A logical unit within the cluster, isolated for specific ML tasks and configurations.
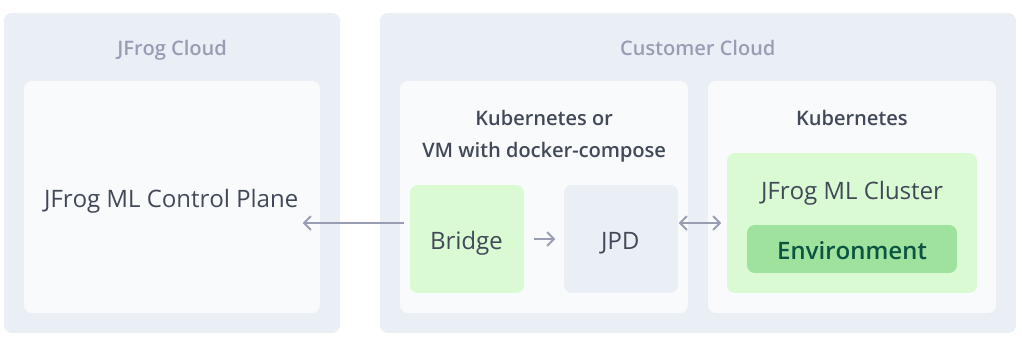
JFrog ML Self-Managed High Level Architecture
Prerequisites
JFrog ML currently supports cloud-based installations on Amazon EKS and Google GKE, integrated with an existing JFrog Platform Deployment (JPD).
Support for Azure AKS and on-premise (data center) environments is planned.
To install JFrog ML self-hosted, ensure the following requirements are met:
- Kubernetes Cluster Access
- A provisioned Kubernetes cluster is required, preferably a clean cluster.
- Supported Cloud Providers
- Amazon Web Services (AWS).
- Google Cloud Platform (GCP).
- Kubernetes Cluster Requirements
- Supported Amazon EKS or Google GKE versions: 1.24 - 1.32.
- Must have outbound internet access.
- Must have network connectivity to your existing JFrog Platform Deployment (JPD).
- Networking & Security
- Outbound connectivity is required between the JFrog ML data plane (your cluster) and the JFrog ML control plane (cloud).
- JFrog ML is built with security in mind and works seamlessly with third-party security and monitoring tools.
- JFrog Bridge
- The JFrog Bridge must be installed and running to enable secure communication between your JPD and JFrog ML.
- Deployment options:
- Same Kubernetes cluster as JPD.
- Same VM as JPD using
docker-compose.
AWS Prerequisites
Before installing JFrog ML on AWS, ensure the following resources and configurations are in place:
- AWS Account ID - The account where JFrog ML will be deployed.
- S3 Bucket - Used to store ML metadata, artifacts, and logs.
- Region - The region where the deployment will take place.
- Glue Catalog ARN - For integration with AWS Glue Data Catalog.
- IAM Role - With permissions to access S3, Glue, Athena, and related services.
- OIDC ID - For secure identity federation between JFrog ML and your AWS environment.
- Athena Workgroup - Used for query execution and monitoring.
- External ID (Optional) - Adds an extra layer of security when assuming the IAM role.
AWS Resources to Create
During installation, you’ll need to create the following:
- IAM Role Policy - Defines the required permissions for JFrog ML to interact with AWS services.
- IAM Trust Policy - Establishes trust between your AWS environment and JFrog ML via OIDC.
GCP Prerequisites
Before installing JFrog ML on GCP, ensure the following services and resources are configured:
- Enable BigLake and BigQuery.
- Data Catalog
- Create a Data Catalog named:
JFrogML_Catalog.
- Create a Data Catalog named:
- Service account
- Create a service account named:
jfrogml-sa. - Assign the following roles to the service account:
roles/biglake.admin
roles/bigquery.admin
roles/iam.serviceAccountUser
roles/storage.admin
roles/storage.objectAdmin
roles/iam.workloadIdentityUser
- Create a service account named:
- GCS Bucket – Used to store metadata, artifacts, and logs.
- Region - The region where the JFrog ML installation will be deployed.
Installing JFrog ML
The JFrog ML installation consists of several steps, including running Helm charts and provisioning cloud resources in your cloud of choice. To begin, please use the installation wizard available in the JFrog Platform UI, which guides you step-by-step through the process.
1. Log In to Your JFrog Self-Hosted Platform
- Log in to your self-hosted JFrog Platform Deployment (JPD).
- Navigate to the AI/ML tab in the UI.
- Follow the installation wizard to begin setting up JFrog ML. The steps in this document mirror the wizard for reference.
2. Install JFrog Bridge
The JFrog Bridge facilitates secure communication between your JFrog Platform Deployment (JPD) and the JFrog ML Control Plane.
Please refer to the JFrog Bridge Installation documentation for detailed instructions.
Important:
The Bridge must be installed and running before continuing, as it is required to register your JFrog ML account and enable communication with the ML control plane.
3. Create JFrog ML Account
After the Bridge is successfully installed, you’ll need to create a JFrog ML account. This account uniquely identifies your JFrog ML installation.
You’ll be asked to provide the following information:
- Platform URL - The JPD base URL, accessible from your Kubernetes cluster.
- Default Project - The JFrog Project in which ML artifacts will be stored.
Connect Kubernetes Cluster
Once the JFrog ML account is created, you can proceed to install JFrog ML services on your Kubernetes cluster.
To connect your cluster:
- Navigate to Administration > AI/ML Settings > Infrastructure in the JFrog Platform.
- Click Connect Cluster to begin the setup process.
The wizard will then generate the necessary configuration and Helm commands based on your selections.
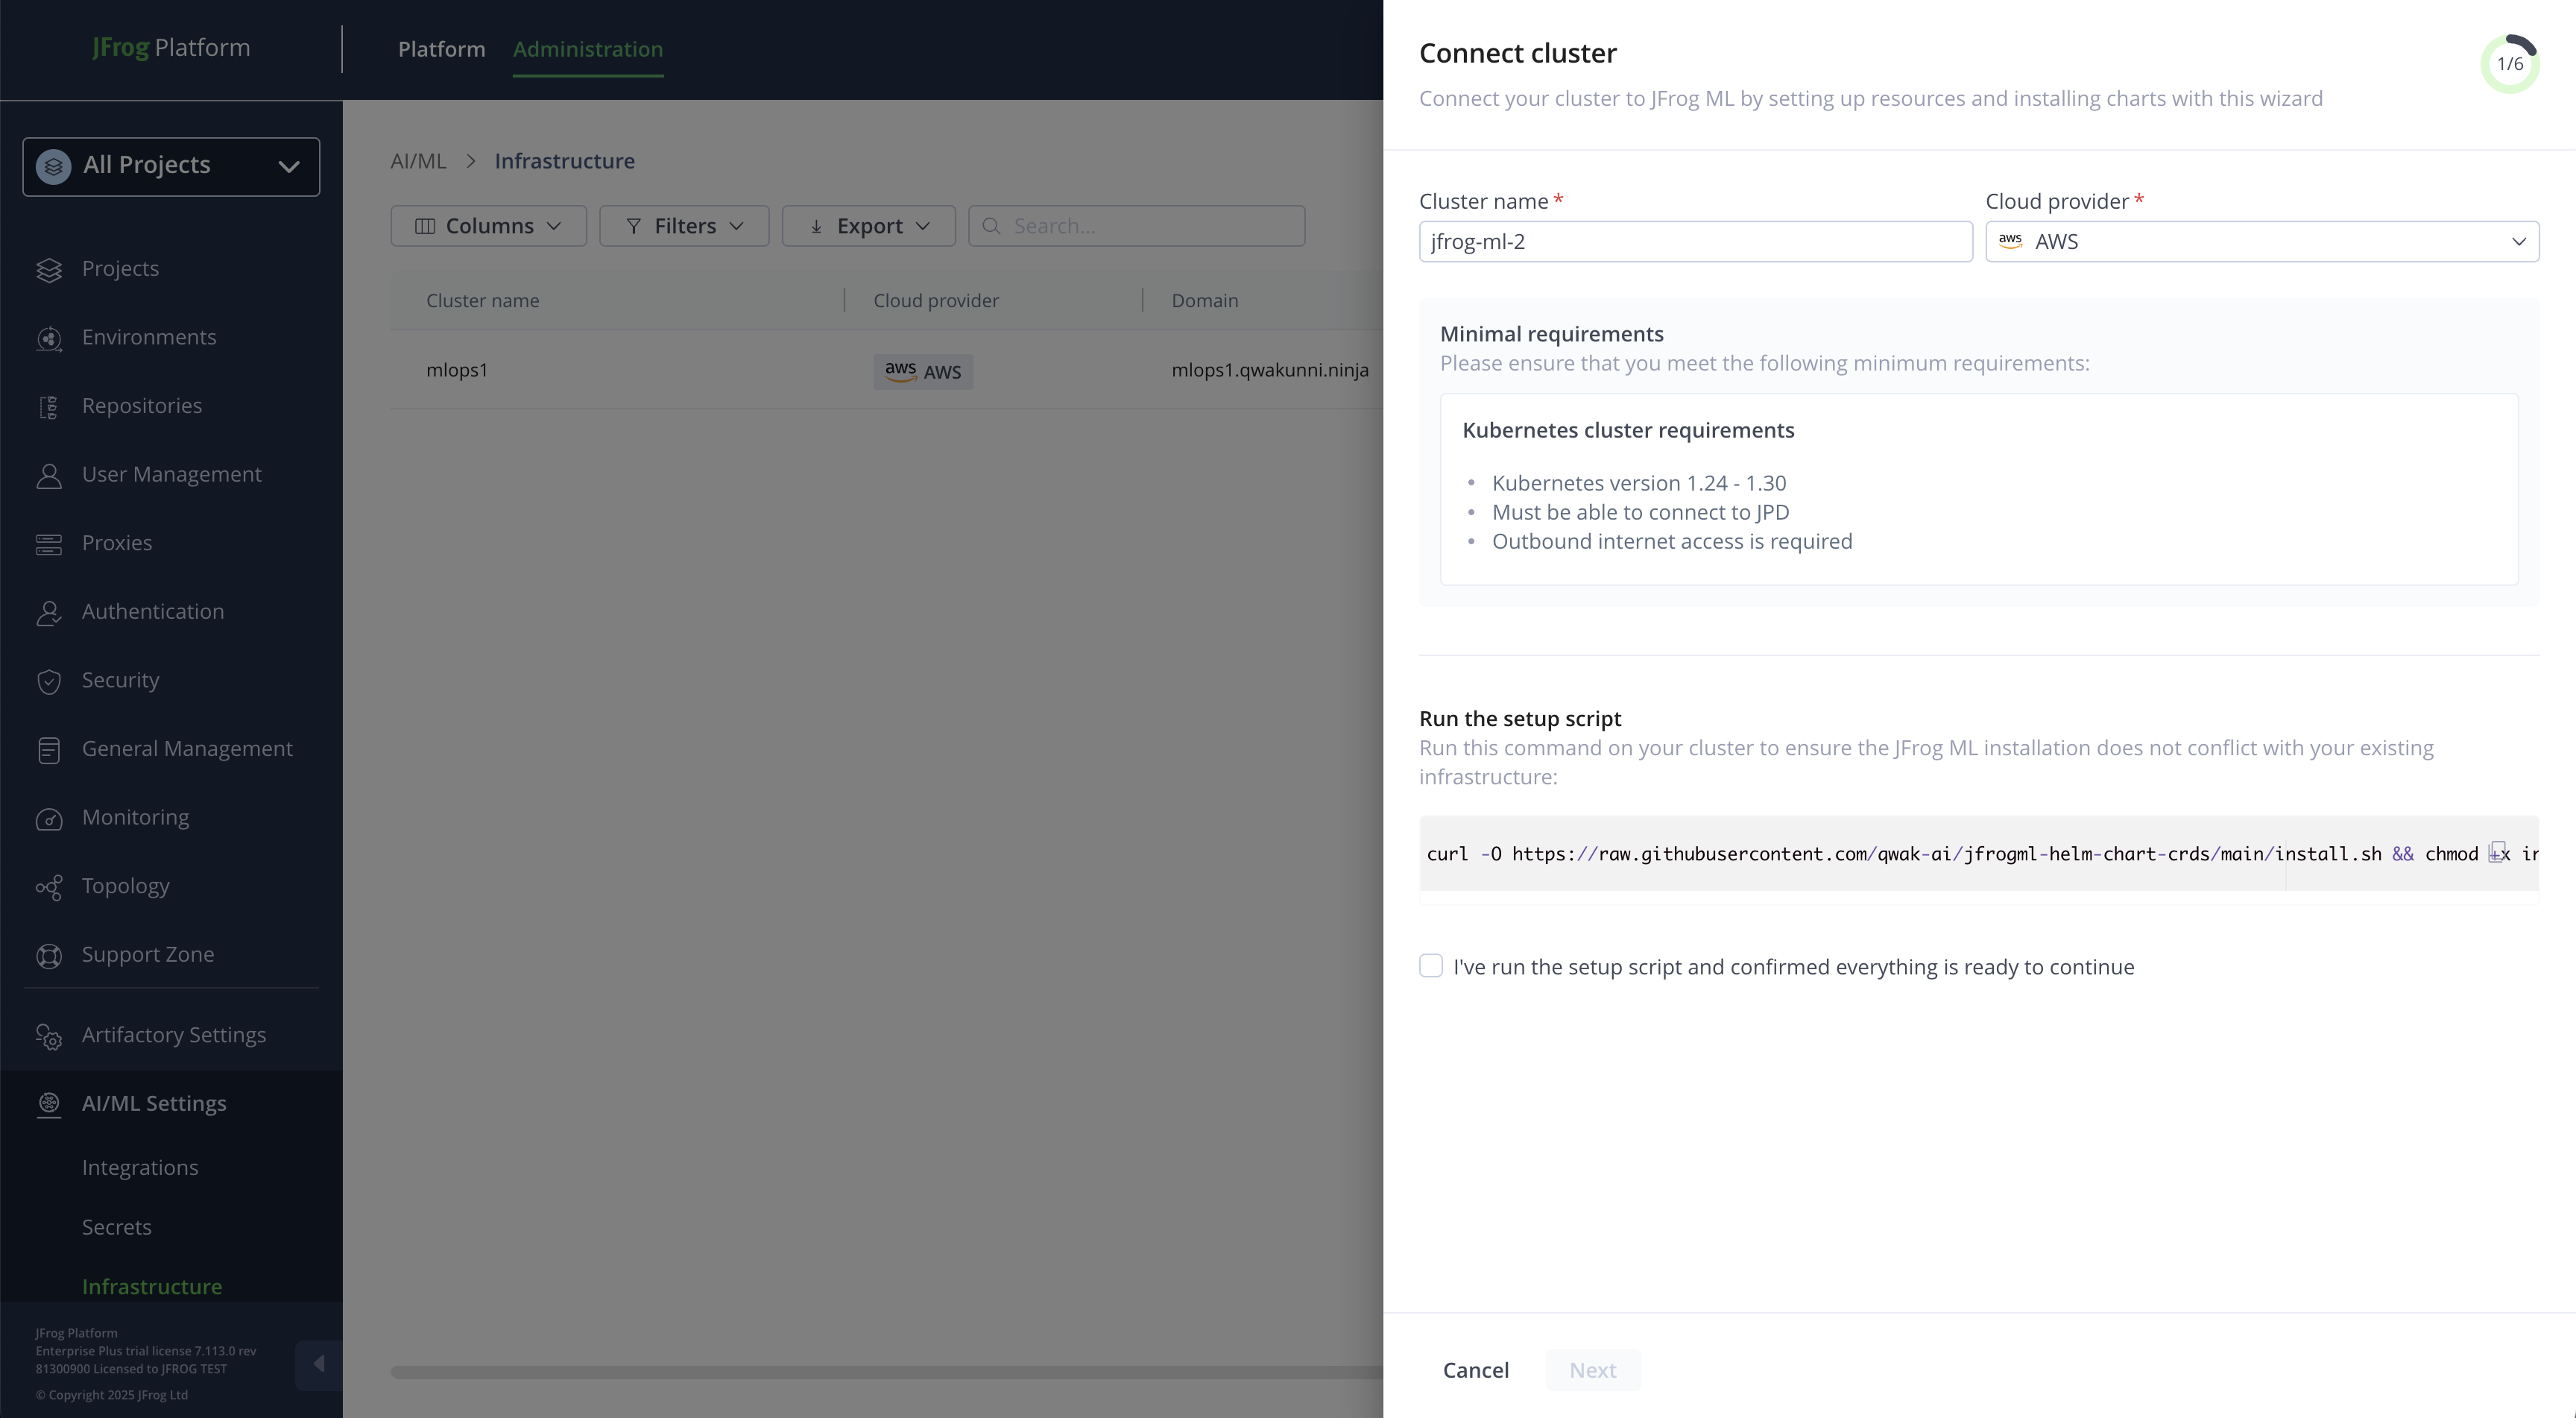
JFrog ML Cluster Installation Wizard
Before proceeding:
- Select your cloud provider (for example, AWS or GCP), as installation may require cloud-native components specific to your environment.
- Choose a unique name for your cluster. This helps identify and manage the installation later.
Run Setup Script
Before installing JFrog ML, you must run a setup script on your Kubernetes cluster. This step ensures that the installation will not conflict with your existing infrastructure.
The setup script performs the following tasks:
- Verifies compatibility and checks for potential conflicts.
- Installs required Custom Resource Definitions (CRDs) if they are not already present on your cluster.
The following CRDs may be installed as part of this step:
- Prometheus - To support observability and metrics collection.
- ServiceMonitors - For monitoring JFrog ML components via Prometheus.
- Istio - For service mesh functionality (if enabled).
- Kafka - For handling ML event streams and logging.
- VictoriaMetrics - As a time-series metrics storage solution.
- Elasticsearch - For logs and metadata indexing.
Run this command on the Kubernetes cluster where JFrog ML will be installed:
curl -O [https://raw.githubusercontent.com/qwak-ai/jfrogml-helm-chart-crds/main/install.sh](https://raw.githubusercontent.com/qwak-ai/jfrogml-helm-chart-crds/main/install.sh) && chmod +x install.sh && bash install.sh --cloud-provider \<aws/gcp>JFrog ML on AWS
Make sure the following are ready before you install JFrog ML on AWS:
- AWS Account ID - representing the AWS installation account.
- S3 Bucket - Used for storing metadata and logs.
- Region - The AWS region where the installation will take place.
- Glue Catalog ARN - For data catalog integration.
- IAM Role - With the necessary permissions to access the above services.
- OIDC ID - For secure identity federation.
- Athena Workgroup - For query execution and monitoring.
- External ID (Optional) - Used for enhanced security when assuming the IAM role.
Create a role with the following policy:
{
    "Version": "2012-10-17",
    "Statement": [
      {
        "Action": "s3:*",
        "Resource": [
            "arn:aws:s3:::",
            "arn:aws:s3:::/*"
        ],
        "Effect": "Allow"
      },
      {
        "Action": [
            "athena:ListQueryExecutions",
            "athena:BatchGetQueryExecution",
            "athena:GetQueryResults",
            "athena:GetQueryExecution",
            "athena:StartQueryExecution",
            "athena:ListDataCatalogs",
            "athena:GetWorkGroup",
            "athena:ListEngineVersions"
        ],
        "Resource": "*",
        "Effect": "Allow"
      },
      {
        "Action": [
            "glue:GetDatabase",
            "glue:CreateDatabase"
        ],
        "Resource": [
            "arn:aws:glue:::catalog",
            "arn:aws:glue:::database"
        ],
        "Effect": "Allow"
      },
      {
        "Action": [
          "glue:GetDatabase",
          "glue:CreateDatabase",
          "glue:GetTable",
          "glue:GetTables",
          "glue:CreateTable",
          "glue:GetUserDefinedFunctions",
          "glue:GetPartitions",
          "glue:DeleteDatabase",
          "glue:GetDatabases",
          "glue:GetCatalogImportStatus",
          "glue:BatchDeleteTable",
          "glue:GetTableVersions",
          "glue:GetPartitionIndexes",
          "glue:BatchCreatePartition",
          "glue:DeleteTable",
          "glue:UpdateTable",
          "glue:GetPartition"
        ],
        "Resource": [
          "",
          "arn:aws:glue:::database/jfrogml_*",
          "arn:aws:glue:::table/jfrogml_*",
          "arn:aws:glue:::userDefinedFunction/jfrogml_*"
        ],
        "Effect": "Allow"
      }
    ]
  }
Create a trust policy attached to the role:
{
  "Version": "2012-10-17",
  "Statement": [
    {
      "Effect": "Allow",
      "Principal": {
        "Federated": "arn:aws:iam:::oidc-provider/oidc.eks..amazonaws.com/id/"
      },
      "Action": "sts:AssumeRoleWithWebIdentity",
      "Condition": {
        "StringEquals": {
          "oidc.eks..amazonaws.com/id/:aud": "sts.amazonaws.com"
        }
      }
    }
  ]
}
JFrog ML on GCP
Ensure the following prerequisites are met before installing JFrog ML on GCP:
- Enable BigLake and BigQuery.
- Create a Data Catalog named: JFrogML_Catalog.
- Create a service account named: jfrogml-sa and download the service key file locally.
- Grant the service account the following permissions:
roles/biglake.admin
roles/bigquery.admin
roles/iam.serviceAccountUser
roles/storage.admin
roles/storage.objectAdmin
roles/iam.workloadIdentityUser- Generate the following secret on your cluster using the service key you downloaded:
kubectl create secret generic -n jfrogml jfrogml-gcp-service-account --from-file=<PATH_OF_SA_KEY>- Set GCP access permissions:
- GCS Bucket - Used for storing metadata and logs.
- Region - The GCP region for the installation.
- Big Lake Connection Name - Identifier for the Big Lake connection.
- Big Lake Location - The geographic location for Big Lake storage.
- Catalog Name - The name of the Data Catalog (for example, JFrogML_Catalog).
- Service Account Email - Email address of the service account (for example, jfrogml-sa).
Ingress Configuration
JFrog ML uses Istio-based ingress to enable secure external access to the platform.
Option 1: Let JFrog ML Install Istio for You
If you choose to have Istio installed automatically:
- No additional configuration is needed.
- The installation wizard will deploy Istio as part of the setup.
Option 2: Use Your Existing Istio Installation
If you already have Istio deployed in your cluster, you must update your Istio mesh configuration to support JFrog ML authentication.
Add the following to your Istio mesh configuration:
extensionProviders:
  - name: ext-authz-grpc
    envoyExtAuthzGrpc:
      service: "auth.jfrogml.svc.cluster.local"
      port: "6578"
Cluster DNS Configuration
- Regardless of how Istio is installed, you must configure a DNS record that points to the Istio ingress gateway.
- Create a DNS record that resolves to the external IP or hostname of the Istio ingress gateway.
Certificate Configuration
- Generate a TLS certificate for your chosen domain.
- Store the certificate as a Kubernetes TLS secret in the namespace where your istio is installed. If you choose to install it as part of the JFrog ML installation it will be in the
jfrogmlnamespace. - Istio will use this certificate to terminate TLS traffic for your domain.
Install Infrastructure
Run this command on your Kubernetes cluster to install the relevant JFrog ML infrastructure:
Installing on GCP
helm repo add jfrog-charts https://charts.jfrog.io/artifactory/api/helm/enterprise-helm --username --password

helm repo update

helm upgrade --install jfrogml jfrog-charts/jfrogml --namespace jfrogml \
--set jfrogUrl="" \
--set cloud="<gcp/aws>" \
--set cloudPermissions="" \
--set clusterDNS="" \
--set clusterName="" \
--set clusterCertificateName="" \
--set object-storage.bucket="" \
--set metrics-server.enabled=false \
--set region="" \
--set gcp.data_catalog_configuration.big_lake.big_lake_location="" \
--set gcp.data_catalog_configuration.big_lake.big_lake_connection_name="" \
--set gcp.data_catalog_configuration.big_lake.catalog_name="" \
--set istio.enabled=true \
--set joinkey=<JPD_JOIN_KEY>
Installing on AWS
helm repo add jfrog-charts https://charts.jfrog.io/artifactory/api/helm/enterprise-helm --username --password

helm repo update

helm upgrade --install jfrogml jfrog-charts/jfrogml --namespace jfrogml \
--set jfrogUrl="" \
--set cloud="<gcp/aws>" \
--set cloudPermissions="" \
--set clusterDNS="" \
--set clusterName="" \
--set clusterCertificateName="" \
--set object-storage.bucket="" \
--set region="" \
--set istio.enabled=true \
--set joinkey=<JPD_JOIN_KEY>
Verify Installation
Run the following Helm command in the Kubernetes cluster where JFrog ML is installed, and upload the output to verify that the installation was successful.
kubectl logs -n jfrogml -l job-name=jfrogml-validationInstall JFrog ML Services
The following parameters are required:
- JFROG_ML_CLUSTER_ID - Received in the UI after creating a new cluster.
- JF_SHARED_NODE_ID - The shared IP between the JPD and JFrog ML.
- JFROG_SELF_HOSTED_JPD_ID - A unique identifier.
helm upgrade --install jfrogml-captain jfrog-charts-edgeeuc1-local/jfrogml-captain \
--namespace jfrogml \
--set JFROG_ML_CLUSTER_ID=<cluster-id> \
--set JF_SHARED_NODE_ID=<shared-node-id> \
--set JFROG_SELF_HOSTED_JPD_ID=<jpd-id>
Creating Your First Environment
An environment is an isolated runtime within a cluster, designed for deploying and managing AI/ML workloads securely and efficiently.
Environment DNS Configuration
- Regardless of how Istio is installed, you must configure a DNS record that points to the Istio ingress gateway.
- Create a DNS record that resolves to the external IP or hostname of the Istio ingress gateway.
Environment Certificate Configuration
- Generate a TLS certificate for your chosen domain.
- Store the certificate as a Kubernetes TLS secret in the namespace where your istio is installed (if you choose to install it as part of the JfrogML installation it will be in the
jfrogmlnamespace). - Istio will use this certificate to terminate TLS traffic for your domain.
Start Using JFrog ML
After completing the cluster installation and setting up your first environment, you're ready to build and deploy models with JFrog ML.
First, review the JFrog ML Quickstart Guide to build and deploy your first model.
Installed Components
The following components are installed as part of the JFrog ML self-hosted setup:
JPD-Related
| Component | Description |
|---|---|
| Bridge-client | Establishes a secure tunnel between the JPD and the JFrog ML control plane |
JFrog ML Data Plane
Open-source Tools
| Component | Description |
|---|---|
| Victoria metrics, Prometheus, and Grafana | Collect and visualize model metrics in the JFrog ML UI |
| Fluentbit, Logstash, kibana, and Elasticsearch | Collect model logs in the JFrog ML UI |
| Kafka | Streams logs and analytics events |
| Keda and metric-server | Enable model autoscaling based on custom metrics |
| Redis (Use multi-shard clusters) | Data storage for Feature Store's online serving |
| Istio | Provides ingress to the JFrog ML data plane |
| Reflector | Syncs Secrets and ConfigMaps across namespaces |
| Spark and Sparkhistory | Process Feature Sets and analytics data |
| Dcgm-exporter \ node-exporter \ nvidia-device-plugin | Collect node, GPU, and pod-level metrics for monitoring |
JFrog ML Services
| Component | Description |
|---|---|
| edge-captain-service | Manages deployment of models and Feature Store resources on Kubernetes) |
| edge-state-publisher | Reports model and Feature Store state to the JFrog ML control plane |
| auth | Handles authentication and authorization for data plane requests |
| jfrogml-secret-service | Generates Kubernetes Secrets for model and Feature Store data access |
| log-reader-webapp | Provides log viewing UI powered by Elasticsearch |
| fs-serving-webapp | Interfaces with Redis for online Feature Store serving |
| fs-offline-serving | Interfaces with object storage for offline Feature Store serving |
| analytics | Connects to cloud analytics service to provide insights and dashboards |
| data-distribution-management | Manages data versioning and distribution within the system |
| model-data-metric & model-meteic-exporter | Enable alerting and tracking based on model data metrics |
| Monitoring-data-manager | Manages and curates observability data across the data plane |
| hosting-gateway | Provides routing and multi-tenant isolation for hosted model endpoints |
Updated 19 days ago