Install the MCP Gateway
One-command setup for the JFrog CLI, MCP Gateway plugin, and IDE configuration.
The JFrog MCP Gateway acts as the bridge between your enterprise policies and your local workstation. It is installed via a single script that pulls the JFrog CLI and MCP Gateway plugin from Artifactory and configures your IDE to use it. All MCP binaries are resolved from Artifactory so your workstation stays in the governed supply chain.
Prerequisites
Ensure you have the runtime for your desired MCPs installed (Docker, Node.js/npx, or Python/uv). The script will verify this for you.
The script will only warn you if none of the above runtimes are available.
Install
To install the MCP Gateway, you need to start by running the installation command, and then configuring your coding agent.
Run the Installation Command
If you need to generate a token, follow the instructions under Using the UI below.
Installation command:
export HOST_DOMAIN=<yourhost.jfrog.io> AUTH=user:token PROJECT_KEY=<project> CLIENT_ID=<ide>; bash <(curl -fL https://releases.jfrog.io/artifactory/jfrog-cli-plugins/mcp-gateway/latest/scripts/mcp-gateway.sh)The script:
- Installs or updates the JFrog CLI (
jf). - Installs the
mcp-gatewayplugin. - Authenticates and sets the active project context.
- Configures the chosen IDE to route MCP requests through the Gateway.
Parameters:
| Variable | Description |
|---|---|
AUTH | Authentication: TOKEN (API key) or USER:TOKEN (JFrog username:identity token or key token). |
PROJECT_KEY | The JFrog Project key for which MCPs are allowed. |
IDE | Target IDE so the script can auto-configure it: cursor, vscode, or claude. |
If auto-configuration fails, add the Gateway manually. See Configure Coding Agents for your IDE (Cursor, VS Code, or Claude Code) and MCP Gateway CLI for manual commands.
Using the UI
If you need to first generate a token, follow these steps to generate a pre-filled command,
- From the MCP Registry page in the JFrog Platform, click Install MCP (or Configure MCP):
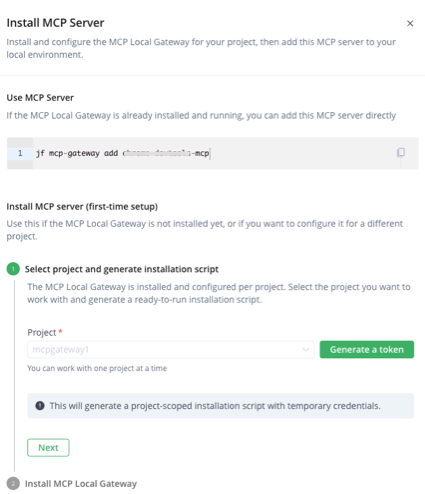
-
Follow the instructions below, according to whether this is the first time setup of an MCP server, or the MCP local Gateway is already installed and running:
For first-time setup:
- Click Generate a token. The Set Up A Generic Client pane opens on the Configure tab.
- Enter your JFrog account password, and click Generate Token & Create Instructions.
- Copy the token generated. This takes you back to the Install MCP Server pane.
- Select your IDE, copy and run the prepared script shown in your terminal. For when MCP local gateway is already installed and running:
- Copy the command to add the MCP server directly.
- Run the command in your terminal.
jf mcp-gateway add <mcp name>
-
After running the Install command, configure your coding agent(s).
Updated 2 days ago