PyPI Repositories
The JFrog Artifactory integration with the Python Package Index (PyPI) allows you to manage PyPI packages in Artifactory. PyPI is a repository of software for the Python programming language. For more information, see the Python Packaging User Guide and Common Questions on the PyPI website.
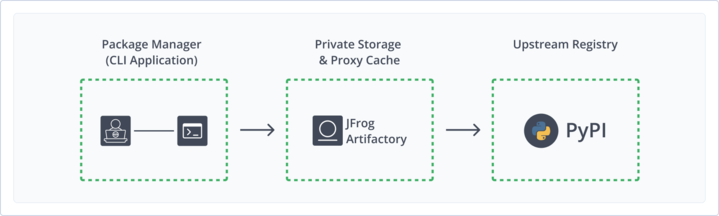
Artifactory fully supports PyPI repositories, including:
- Provisioning PyPI packages from Artifactory to the Poetry, Twine,
pip, anduvcommand line tools from all repository types. - Calculating metadata for PyPI packages hosted in Artifactory's local repositories.
- Accessing remote PyPI repositories (such as
https://pypi.org/) through Remote Repositories, which provide proxy and caching functionality. - Accessing multiple PyPI repositories from a single URL by aggregating them under a Virtual Repository.
- Compatibility with the setuptools (and its predecessor distutils) libraries for uploading PyPI packages.
Get Started with PyPI
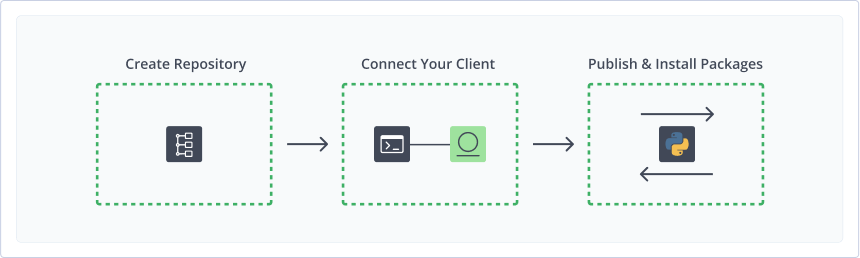
To get started working with PyPI, complete the following main steps:
- Create a PyPI Repository
- Connect Your PyPI Client to Artifactory
-
Publish and install PyPI packages using a supported PyPI client:
Note
As Artifactory supports legacy PyPI, both underscores (_) and dots (.) are allowed in package names. However, they will not be aggregated into one package.
For example,
jfrog.pypiandjfrog_pypiwill be treated as two separate packages with the same behavior as in the PyPI registry.
Create a PyPI Repository
This topic describes how to create a PyPI Repository. This is required before publishing and installing PyPI packages. There are three primary types of repositories:
- Local repositories: Where you store and share 1st and 2nd party packages with your organization
- Remote repositories: Enable you to download from any remote location, including external package registries or other Artifactory instances
- Virtual repositories: Enable aggregating remote and local repositories, enabling your organization to scale by providing a single URL that allows access to multiple repositories and types
For more information on JFrog repositories, see Repository Management.
Prerequisite: You need Admin or Project Admin permissions to create a PyPI repository. If you don't have Admin permissions, the option will not be available.
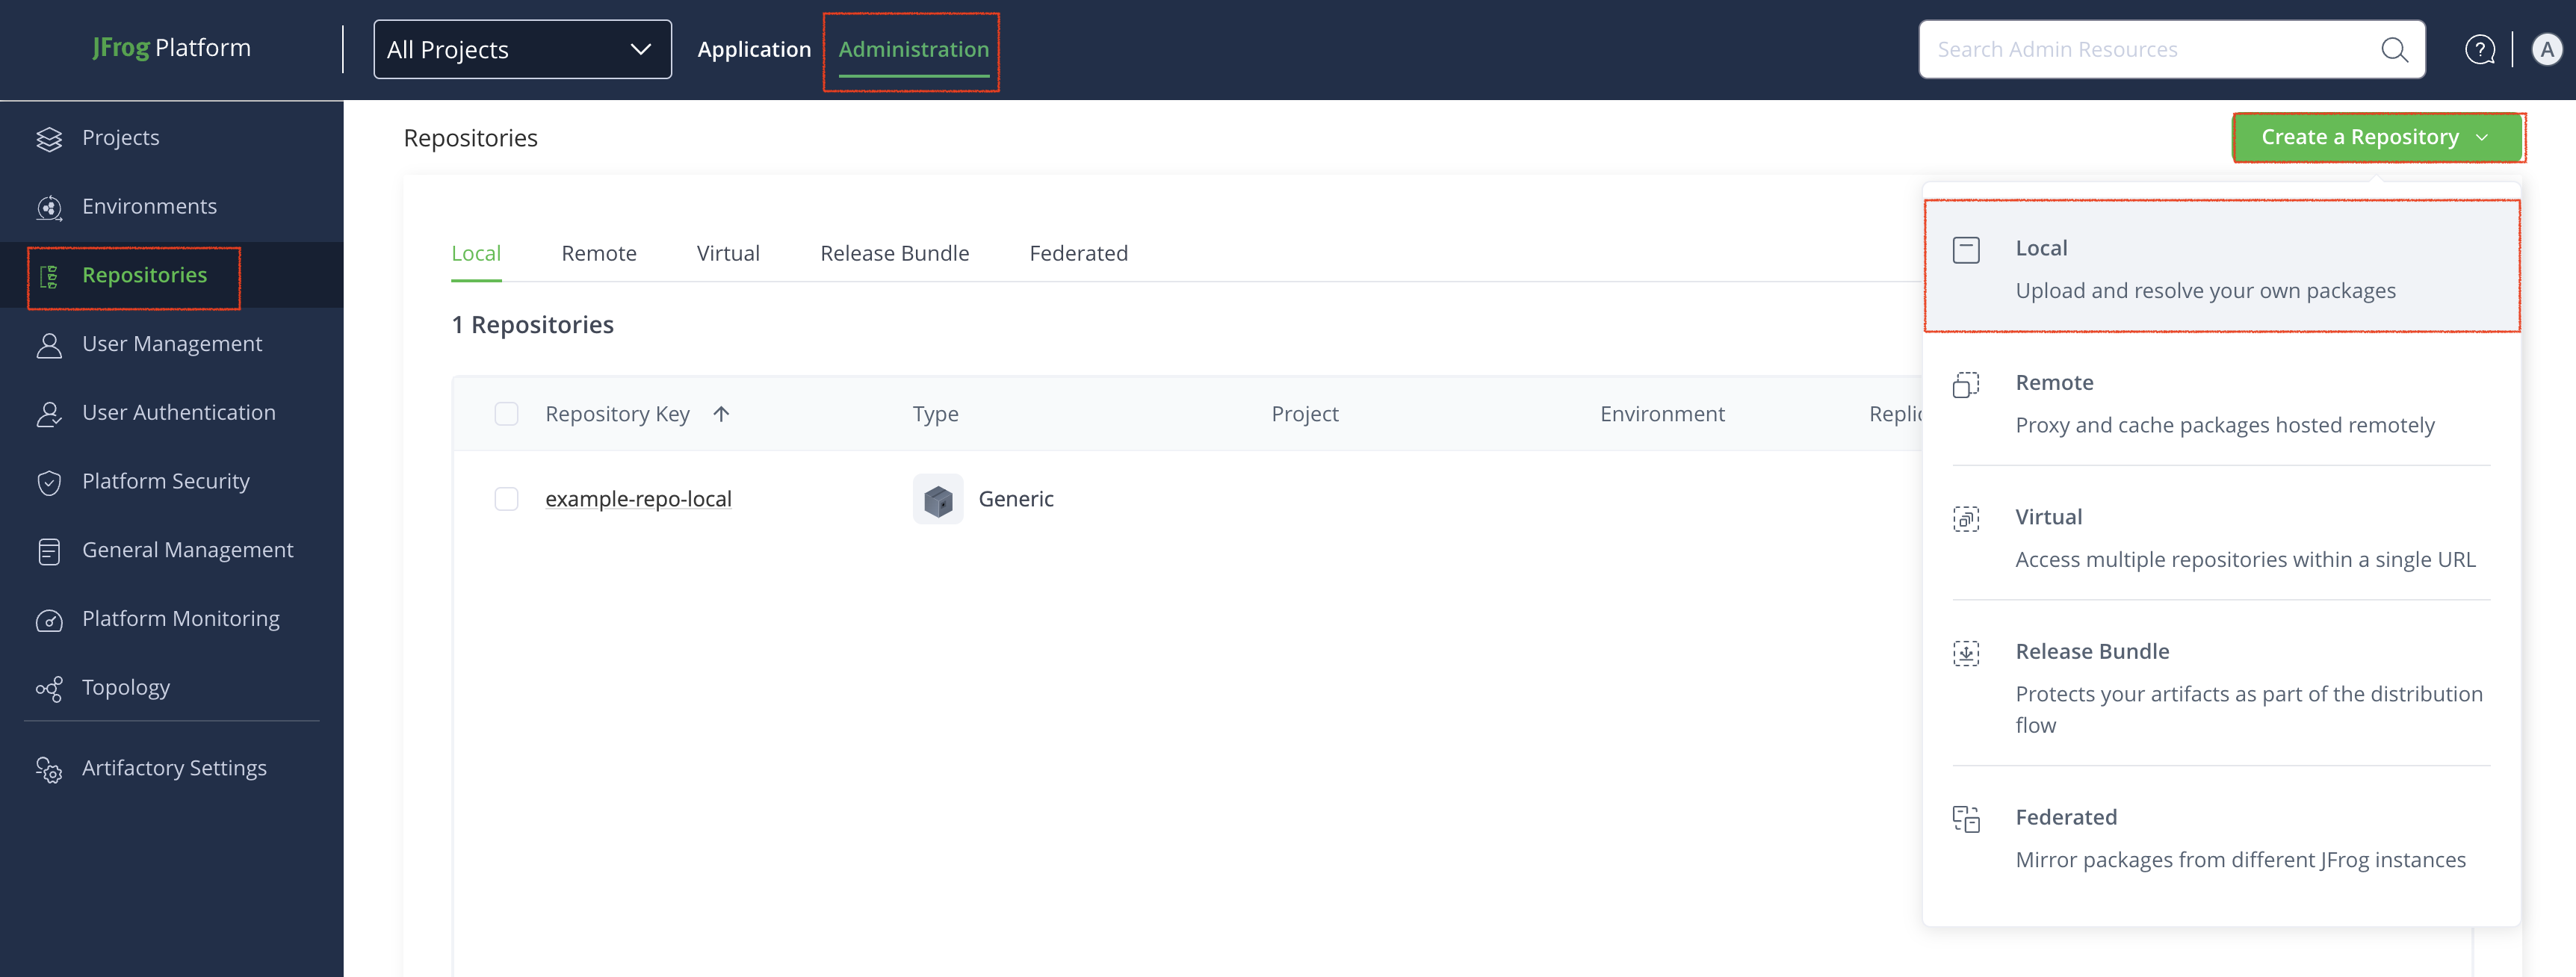
To create a PyPI repository:
-
In the Administration tab, click Repositories.
-
Click Create a Repository and then select the repository type you want to create (local, remote, or virtual).
-
In the Select Package Type window, click PyPI.
-
Configure the repository, as described below:
- Local repository: Enter a meaningful name for the repository (for example, pypi-local-repository-1) and configure other basic and advanced settings, as required. For more information, see Basic Settings for Local Repositories and Advanced Settings for Local Repositories.
- Remote repository: In addition to providing a name, verify the URL of the remote registry, and configure other basic and advanced settings, as required. For more information, see Basic Settings for Remote Repositories and Advanced Settings for Remote Repositories.
- Virtual repository: In addition to providing a name, select one or more local or remote repositories to include in the virtual repository. For more information, see Basic Settings for Virtual Repositories.
-
Click Create Repository.
Connect Your PyPI Client to Artifactory
This topic provides details on configuring PyPI to work with Artifactory.
Prerequisite: Before connecting your PyPI client to Artifactory, you must have an existing PyPI repository in Artifactory. For more information, see Create a PyPI Repository.
Supported PyPI clients:
- For installing and publishing packages: Poetry (from version 1.2.0 and later), uv (from version 0.8.15 and later)
- For installing packages only: Pip (from version 20.2 and later)
- For publishing packages only: Twine (from version 3.3.0 and later)
Poetry Client
The following topics describe how to connect Poetry as well as install and publish packages:
- Connect the Poetry PyPI Client to Artifactory
- Install Python Packages with Poetry
- Publish Python Packages with Poetry
Connect the Poetry PyPI Client to Artifactory
The Poetry client can be used to both install and publish Python packages.
To connect the Poetry PyPI Client to Artifactory:
-
In the command line, configure the upload endpoint for your publishable repository with the following commands:
poetry config repositories.artifactory-<REPOSITORY_NAME>
https://<YOUR_JFROG_DOMAIN>/artifactory/api/pypi/<REPOSITORY_KEY>

poetry config http-basic.artifactory-<REPOSITORY_NAME> <USER> <PASSWORD/TOKEN>
For example:
poetry config repositories.artifactory-pypi-local https://my-awesome.jfrog.io/artifactory/api/pypi/pypi-local poetry config http-basic.artifactory-pypi-local johnfrog RANDOM_TOKEN_YWRtaW46QVBBVWJjTExkZTU4WT -
Add the repository source with the
source addcommand as follows:poetry config http-basic.<REPOSITORY_NAME> <USER><PASSWORD/TOKEN> poetry source add <REPOSITORY_NAME> https://<YOUR_JFROG_DOMAIN>/artifactory/api/pypi/<REPOSITORY_NAME>/simpleFor example:
poetry config http-basic.pypi-local johnfrog RANDOM_TOKEN_YWRtaW46QVBBVWJjTExkZTU4WT

poetry source add pypi-local https://my-awesome.jfrog.io/artifactory/api/pypi/pypi-local/simple
Note
The
source addcommand inserts the URL into the project'spyproject.toml.
Next steps:
Install Python Packages with Poetry
To install Python packages with Poetry:
Run the following command:
poetry add --source <REPOSITORY_NAME> <PACKAGE_NAME>For example:
poetry add --source pypi-local my_pypi_packagePublish Python Packages with Poetry
To publish Python packages with Poetry:
Run the following command:
poetry publish --repository artifactory-<REPOSITORY_NAME> --dist-dir distFor example:
poetry publish --repository artifactory-pypi-local --dist-dir distTwine Client
The following topics describe how to connect the Twine client and publish packages:
Connect the Twine PyPI Client to Artifactory
The Twine client can be used to publish Python packages on PyPI.
To connect the Twine PyPI client with Artifactory:
To deploy packages using Twine, add an Artifactory repository to the .pypirc file (usually located in your home directory) as follows:
[distutils]
index-servers = <REPOSITORY_NAME>
[<REPO_NAME>]
repository: https://<YOUR_JFROG_DOMAIN>/artifactory/api/pypi/<REPOSITORY_NAME>
username: <USER>
password: <PASSWORD/TOKEN>
For example:
[distutils]
index-servers = pypi-local
[pypi-local]
repository: https://my-awesome.jfrog.io/artifactory/api/pypi/pypi-local
username: johnfrog
password: RANDOM_TOKEN_YWRtaW46QVBBVWJjTExkZTU4WT
Next step:
Publish Python Packages with Twine
To publish (upload) Python packages with Twine:
To upload a Python package to Artifactory, use the following command:
twine upload --repository <REPOSITORY_NAME> <PATH_TO_FILE>For example:
twine upload --repository pypi-local ~/workspace/my_file.tar.gzPip Client
The following topics describe how to connect the Pip client and install packages:
Connect the Pip PyPI Client to Artifactory
The pip client can be used to install Python packages on your local system.
Running on Windows
To use Artifactory PyPI repositories on Windows, you must set the required environment variables for Python and pip.
On Windows, the per-user configuration file is named
pip.iniand is located at%APPDATA%\pip\pip.ini. A legacy per-user configuration file at%HOME%\pip\pip.iniis also respected.The
pip.inifile replaces thepip.conffile used on other operating systems.
To connect the pip PyPI client with Artifactory:
Add the following to ~/.pip/pip.conf:
[global]
index-url = https://<USER>:<PASSWORD/TOKEN>@<YOUR_JFROG_DOMAIN>/artifactory/api/pypi/<REPO_NAME>/simple
For example:
[global]
index-url = https://johnfrog:[email protected]/artifactory/api/pypi/pypi-local/simpleNote
If credentials are required, they should be embedded in the URL.
Next step:
Install Python Packages with Pip
To install Python packages with the pip client:
Run the following command:
pip3 install <PACKAGE_NAME>For example:
pip3 install my_pypi_packageuv Client
The following topics describe how to connect the uv client to Artifactory and use it to manage Python packages:
- Connect the uv Client to Artifactory
- Install Python Packages with uv
- Publish Python Packages with uv
Connect the uv Client to Artifactory
The uv client can be used to publish Python packages on PyPI. For more information, see uv.
To connect uv to Artifactory, complete the following steps:
Authenticate the uv Client to Artifactory
uv Client to ArtifactoryAuthenticate the uv client to Artifactory to be able to read and install Python packages from your repositories. There are two ways to authenticate the uv client to Artifactory:
Connect uv to Artifactory using uv auth login
uv to Artifactory using uv auth loginUse uv auth login to securely store your Artifactory credentials and connect the uv client to Artifactory.
To connect the uv client to Artifactory using uv auth login:
-
Run the following command:
uv auth login https://[JFrogPlatformURL]/artifactory/api/pypi/<REPO> --username <USERNAME> --password <AUTH>Where:
[JFrogPlatformURL]: The URL of your Artifactory service endpoint<REPO>: The name of the target repository<USERNAME>: Your Artifactory username<AUTH>: Your Artifactory identity token
For example:
uv auth login https://company.jfrog.io/artifactory/api/pypi/pypi-local --username jeffry --RANDOM_TOKEN_YWRtaW46QVBBVWJjTExkZTU4WT
Note
You can also use JFrog Set me up to copy the snippet populated with your token and environment. For more information, see Use Artifactory Set Me Up for Configuring Package Manager Clients.
Connect uv to Artifactory using .netrc
uv to Artifactory using .netrcYou can manually configure uv to connect to Artifactory by storing your credentials in the .netrc file.
To manually connect the uv client to Artifactory:
-
Open your
.netrcfile in a text editor. The file location varies by operating system:- Linux/Unix:
~/.netrc - Windows:
%USERPROFILE%\_netrc
- Linux/Unix:
-
Add the following snippet to the file:
machine [JFrogPlatformURL]
login <USERNAME>
password <AUTH>
Where:
[JFrogPlatformURL]: The hostname of your JFrog service endpoint<USERNAME>: Your Artifactory username<AUTH>: Your Artifactory identity token
For example:
machine company.jfrog.io login jeffry password RANDOM_TOKEN_YWRtaW46QVBBVWJjTExkZTU4WT -
Save the changes to the file.
Note
You can also use JFrog Set me up to copy the snippet populated with your token and environment. For more information, see Use Artifactory Set Me Up for Configuring Package Manager Clients.
Add uv Environment Variables for Publishing
uv Environment Variables for PublishingWhile authenticating the uv client allows you to install packages, you need to add environment variables to be able to publish packages to Artifactory.
To add environment variables for publishing:
-
Run the following command:
export UV_PUBLISH_USERNAME=<USERNAME>
export UV_PUBLISH_PASSWORD=<AUTH>
Where:
<USERNAME>: Your Artifactory username<AUTH>: The Artifactory identity token you want to use for publish permissions
For example:
export UV_PUBLISH_USERNAME=jeffry
export UV_PUBLISH_PASSWORD=PUBLISH_TOKEN_YWRtaW46QVBBVWJjTExkZTU4WT
Note
You can also use JFrog Set me up to copy the snippet populated with your token and environment. For more information, see Use Artifactory Set Me Up for Configuring Package Manager Clients.
Add Artifactory as the Default Registry for uv
uvTo publish to Artifactory using the uv client, configure Artifactory as the default registry in the uv.toml file.
To add Artifactory as your default registry:
-
Open the
uv.tomlfile in a text editor. The location of the file varies by operating system:- Linux/Unix:
~/.config/uv/uv.toml - Windows:
%APPDATA%\uv\uv.toml
If the file doesn't exist, create it in the appropriate location.
- Linux/Unix:
-
Add the following snippet to the
uv.tomlfile:[[index]] name="<REPO>" publish-url = "https://[JFrogPlatformURL]/artifactory/api/pypi/<REPO>" url = "https://[JFrogPlatformURL]/artifactory/api/pypi/<REPO>/simple" default = trueWhere:
<REPO>: The name of the target repository[JFrogPlatformURL]: The hostname for your JFrog service endpoint
For example:
[[index]] name="pypi_local" publish-url = "https://company.jfrog.io/artifactory/api/pypi/pypi_local" url = "https://company.jfrog.io/artifactory/api/pypi/pypi_local/simple" default = true -
Save the changes to the file.
Note
You can also use JFrog Set me up to copy the snippet populated with your token and environment. For more information, see Use Artifactory Set Me Up for Configuring Package Manager Clients.
Next step:
Install Python Packages with uv
You can use the uv client to install Python packages from Artifactory.
To resolve packages from Artifactory with uv:
-
Run one of the following commands:
-
Using the
uv-native project API:uv add <PACKAGE>Where
<PACKAGE>is the name of the package you want to resolve. For example:uv add pandas -
Using the
pipcompatibility API:uv pip install <PACKAGE>Where
<PACKAGE>is the name of the package you want to install. For example:uv pip install flask
-
Publish Python Packages with uv
You can use uv to natively publish Python packages to Artifactory.
To publish to Artifactory with uv:
-
Run the following command:
uv publish <FILE_PATH> --index <REPO>Where:
<FILE_PATH>: The file path to the project you want to publish<REPO>: The name of the target repository in Artifactory
For example:
uv publish dist/* --index pypi_local
Additional PyPI Information
The following additional actions are available with PyPI repositories:
- Use PyPI Package Naming Tools
- Search for PyPI Packages
- View Metadata of PyPI Packages
- Work with PyPI Remote Repositories with the Custom Registry Suffix
- Resolve from Artifactory Using Pip
- Additional PyPI Publishing Tools
- Publish PyPI Packages Manually Using the Web UI or the REST API
- Enable JSON Indexing in PyPI Repositories
Use PyPI Package Naming Tools
Artifactory provides the following tools for naming PyPI packages correctly:
- Use PyPI Enforce Layout
- Use PyPI File Path Name Normalization
- Use Both PyPI File Path Naming Normalization and Enforce Layout
Used either together or separately, these tools help you keep a consistent naming method for PyPI artifacts to reduce potential package name duplications.
Use PyPI Enforce Layout
The PyPI Enforce Layout feature ensures that uploaded packages adhere to a standardized physical directory structure, filenames, and internal metadata, to promote a consistent and compliant repository.
JFrog recommends using this feature in conjunction with File Path Name Normalization. For more information, see Use File Path Name Normalization and Using Both File Path Name Normalization and Enforce Layout.
PyPI Enforce Layout is available in Artifactory starting from version 7.70.2.
Backward Compatibility
Enforce Layout applies to all PyPI repositories in your Artifactory instance. Previously uploaded packages that already exist in your instance will not be updated but if you attempt to upload a newer version or overwrite an existing one you will be prevented from doing so since the file path name sections must match the metadata values.
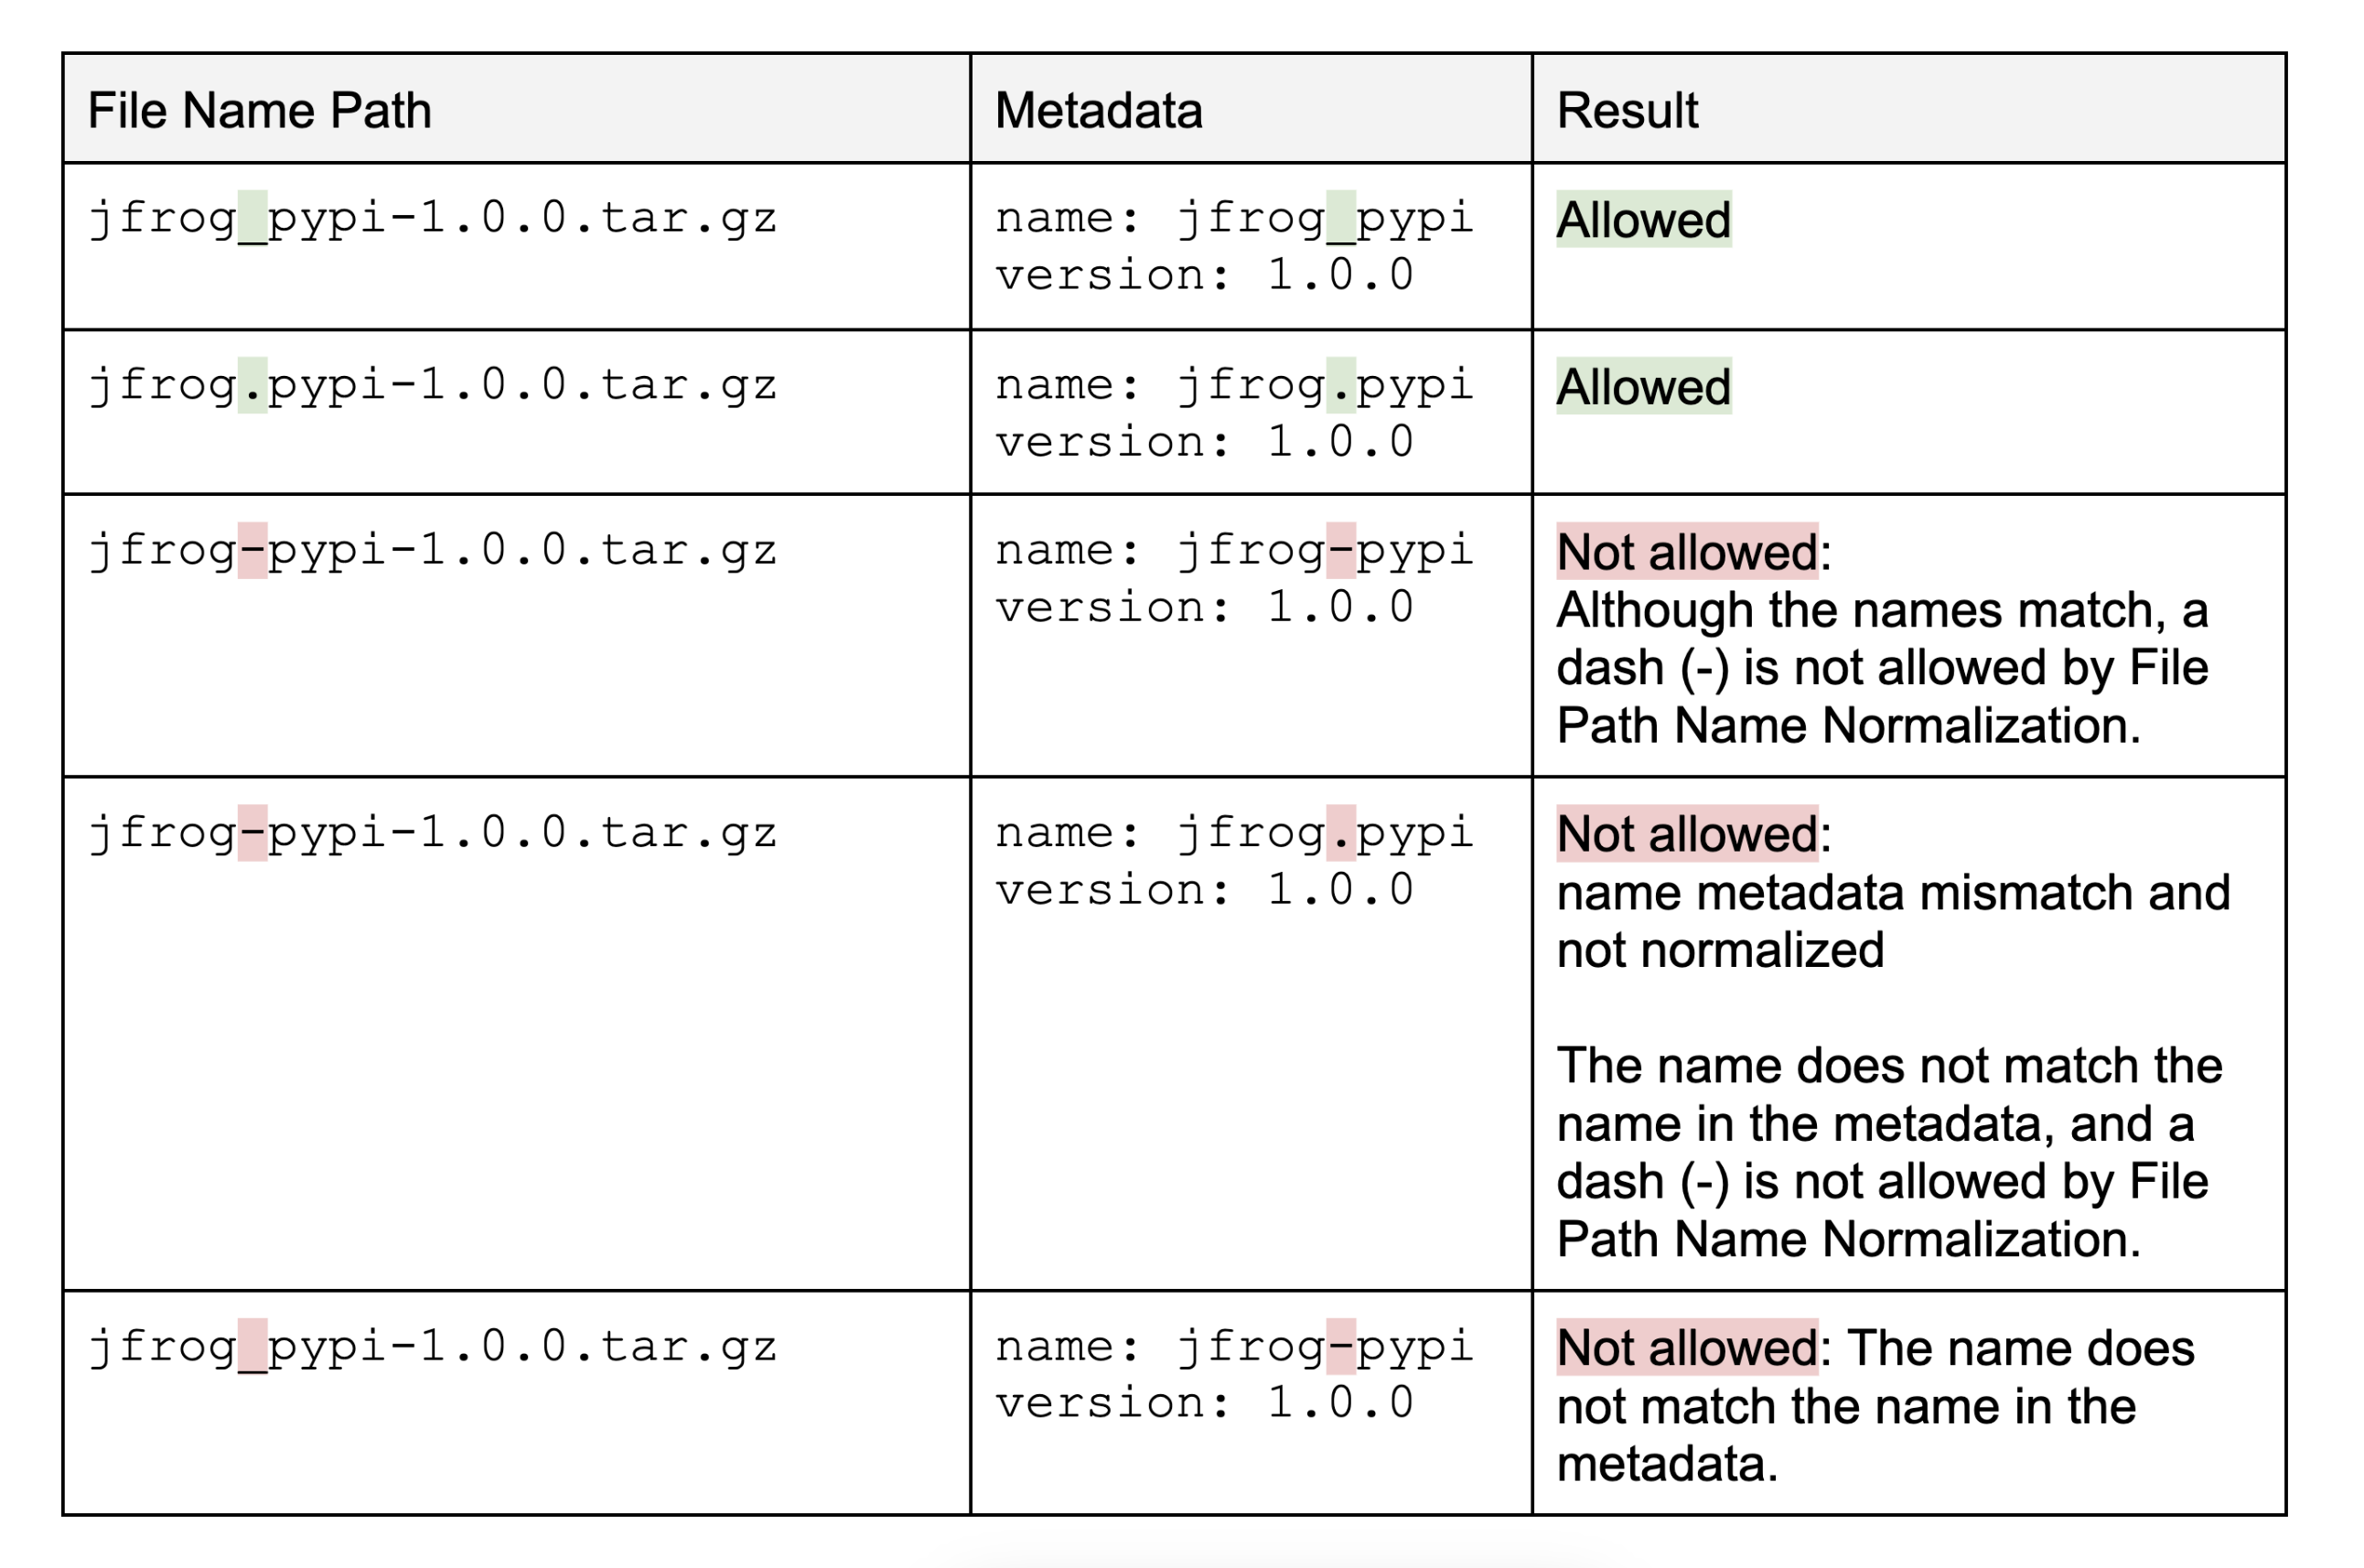
This feature enables you to restrict uploads to artifacts where the file name and version in the path match the package name and version stored in the artifact’s metadata.
The following examples explain how this feature applies without File Path Name Normalization:
To enable PyPI Enforce Layout, in the artifactory.system.properties settings file set the system property:
artifactory.pypi.enforce.layout = trueArtifactory will return an error when trying to perform actions on an artifact with a name that does not match the package metadata, with a description of the issue:
| Error | Description |
|---|---|
| 403 | Action prevented due to Enforce Layout policy - package file name/version <ARTIFACT_NAME> does not match the ” + package internal name/version <ARTIFACT_NAME> in the metadata file |
| 403 | Action prevented due to Enforce Layout policy - could not find metadata file to compare |
Use PyPI File Path Name Normalization
The PyPI File Path Name Normalization feature brings Artifactory closer in alignment with the PyPI.org registry by enforcing a consistent naming method for PyPI artifacts, which reduces potential package name duplications due to the use of non-normalized characters.
JFrog recommends using this feature in conjunction with PyPI Enforce Layout. For more information, see Use PyPI Enforce Layout and Using Both PyPI File Path Name Normalization and Enforce Layout.
PyPI Enforce Layout is available in Artifactory starting from version 7.70.2.
Backward Compatibility
File Path Name Normalization applies to all PyPI repositories in your Artifactory instance, previously uploaded packages that already exist in your instance will not be updated, but if you attempt to upload a newer version or overwrite an existing one you will be prevented from doing so since the file path name does not conform to the normalization rules.
When this feature is enabled, Artifactory blocks the deployment of files with path name/distribution values that do not conform to standard PyPI naming conventions, as specified in the Python documentation pages (see Distribution File Name and File Format).
{NAME}-{VERSION}-{OPTIONAL-PARAMETERS}.tar.gz
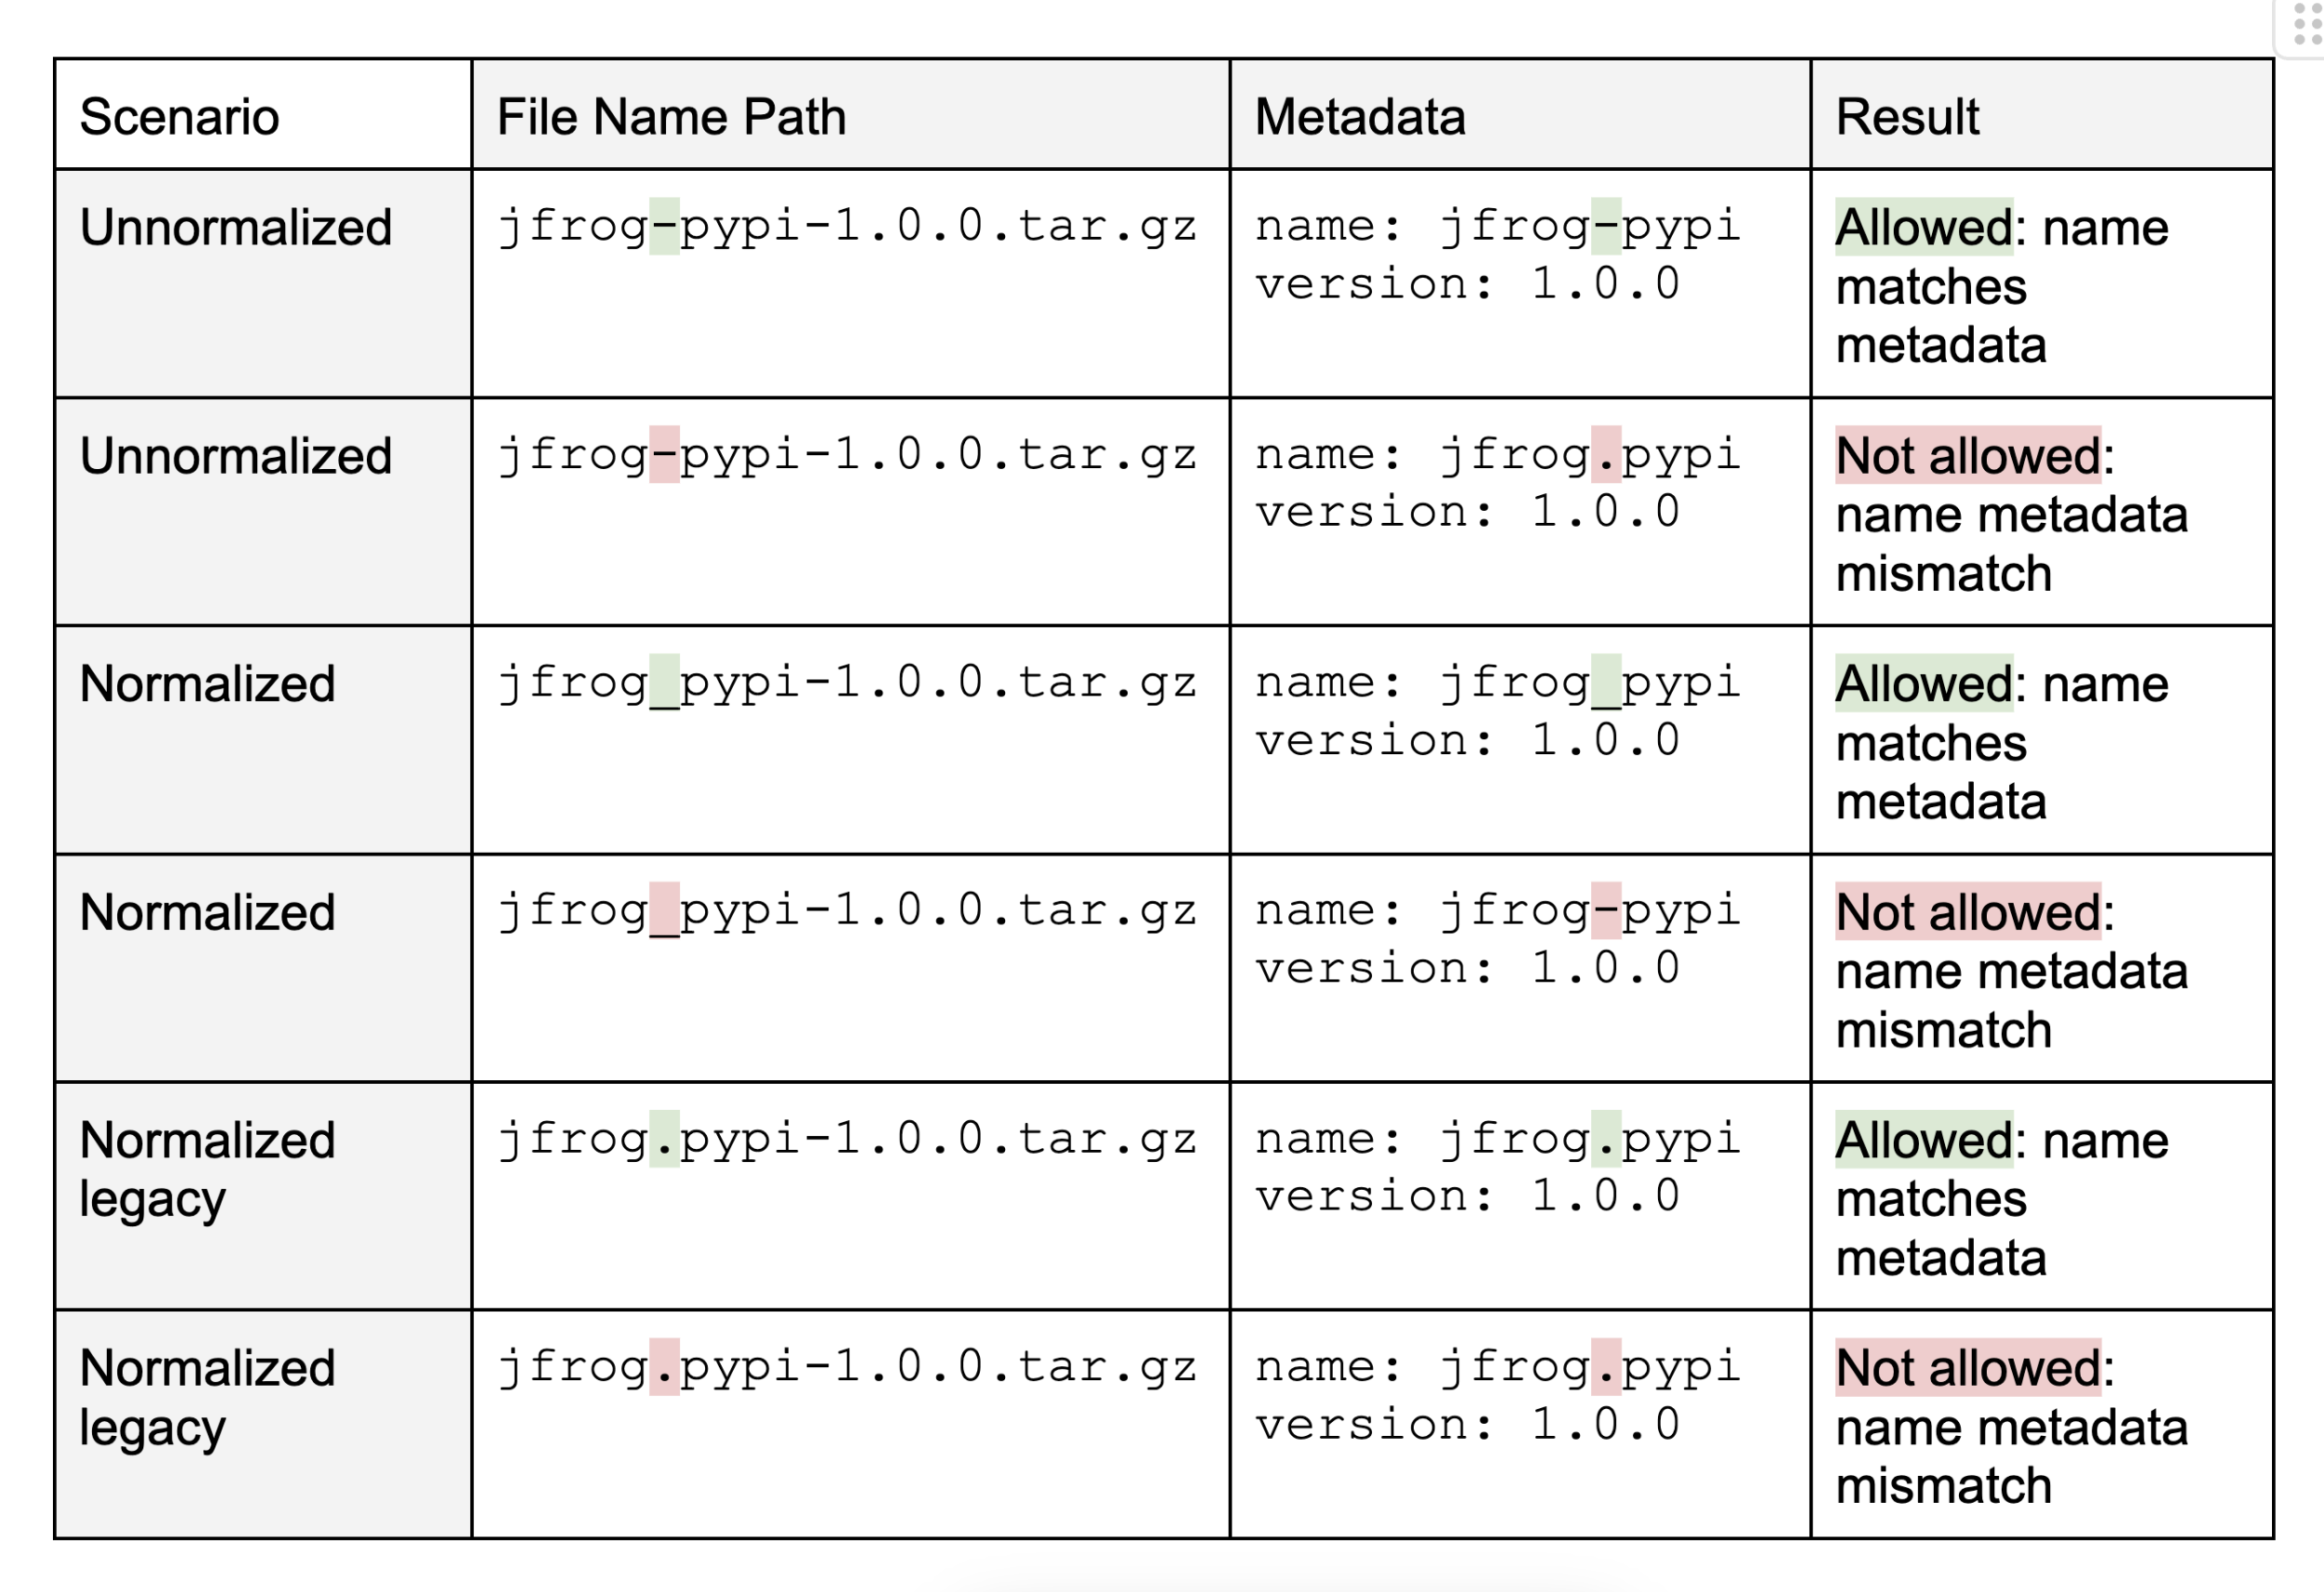
{DISTRIBUTION}-{VERSION}-{OPTIONAL-PARAMETERS}.whlThe most common example of how this feature provides value is the prevention of the dash (-), which is considered a Reserved Character between the different segments of the naming path (name/distribution, version, optional parameters, etc.), from being used within the name/distribution segment.
The table below describes which names would be allowed when File Path Name Normalization is enabled:

To enable PyPI File Path Name Normalization, in the artifactory.system.properties settings file set the following system property:
artifactory.pypi.enforce.naming.normalization = true Artifactory will return an error when trying to perform actions on an artifact whose name does not match the naming conventions, with a description of the issue:
| Error | Description |
|---|---|
| 403 | Action prevented due to artifact file name normalization requirements - artifact name <ARTIFACT_NAME> does not conform to normalized requirements |
Use Both PyPI File Path Naming Normalization and Enforce Layout
PyPI Path Name Normalization and PyPI Enforce Layout work both independently and together to create a safety net for correct package naming.
The Enforce Layout setting ensures that the file path and metadata have matching properties, while the File Path Name Normalization setting verifies that the names conform to standard PyPI naming conventions. Using both features will ensure that you do not have duplicate or redundant packages.
Important
Please note that although PyPI allows the use of the dash in the internal metadata names, our enforce layout feature is strict, and your metadata names must always match the file path name.
For example, this will be the behavior when both File Path Name Normalization and Enforce Layout are enabled:
Search for PyPI Packages
Use Pip Search
Artifactory supports search using the pip search command in local and virtual repositories. For example:
$ pip search frog-fu --index http://localhost:8081/artifactory/api/pypi/pypi-virtual/
frog-fu                   - 0.2a
  INSTALLED: 0.2a (latest)

$ pip search irbench --index http://localhost:8081/artifactory/api/pypi/pypi-virtual/
irbench                   - Image Retrieval Benchmark.
In this example, frog-fu and irbench are two locally installed packages in different local repositories, and both repositories are aggregated by the pypi-virtual repository.
Note
Since pip search has been deprecated, Artifactory no longer supports pip search in remote repositories, including Smart Remote repositories. As such, if a virtual repository includes remote repositories, those remote repositories will not be scanned for search results.
Specifying the index
When using the search command, the index should be specified explicitly (without the
/simpleat the end), as pip will ignore theindex-urlvariable in itspip.conffile.
Use Artifactory Search
PyPI packages can also be searched for using Artifactory's Property Search. All PyPI packages have the properties pypi.name, pypi.version and pypi.summary set by the uploading client, or later during indexing for supported file types.
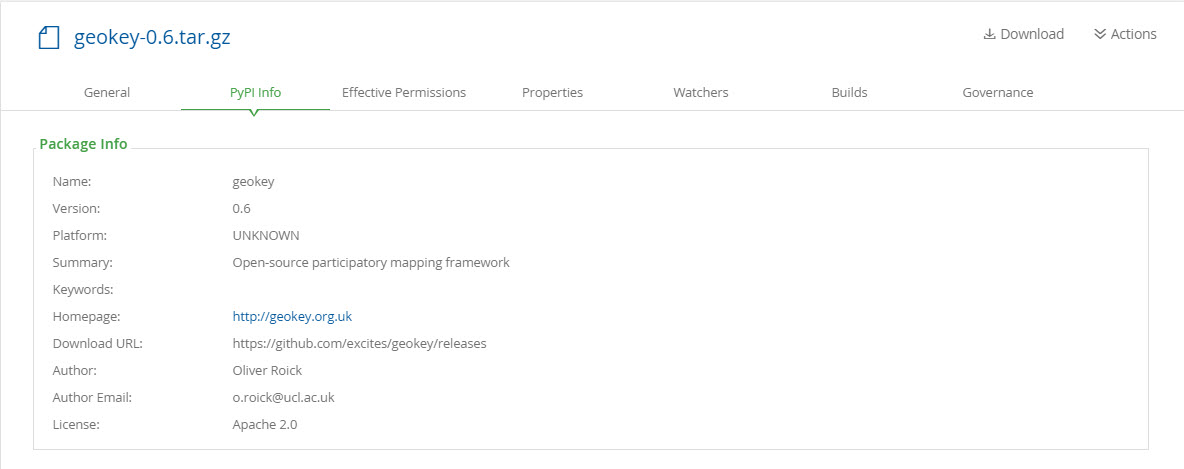
View Metadata of PyPI Packages
Artifactory lets you view selected metadata for a PyPI package directly from the UI.
In the Artifacts module Tree Browser, drill down to select the file you want to inspect. The metadata is displayed in the PyPI Info tab.
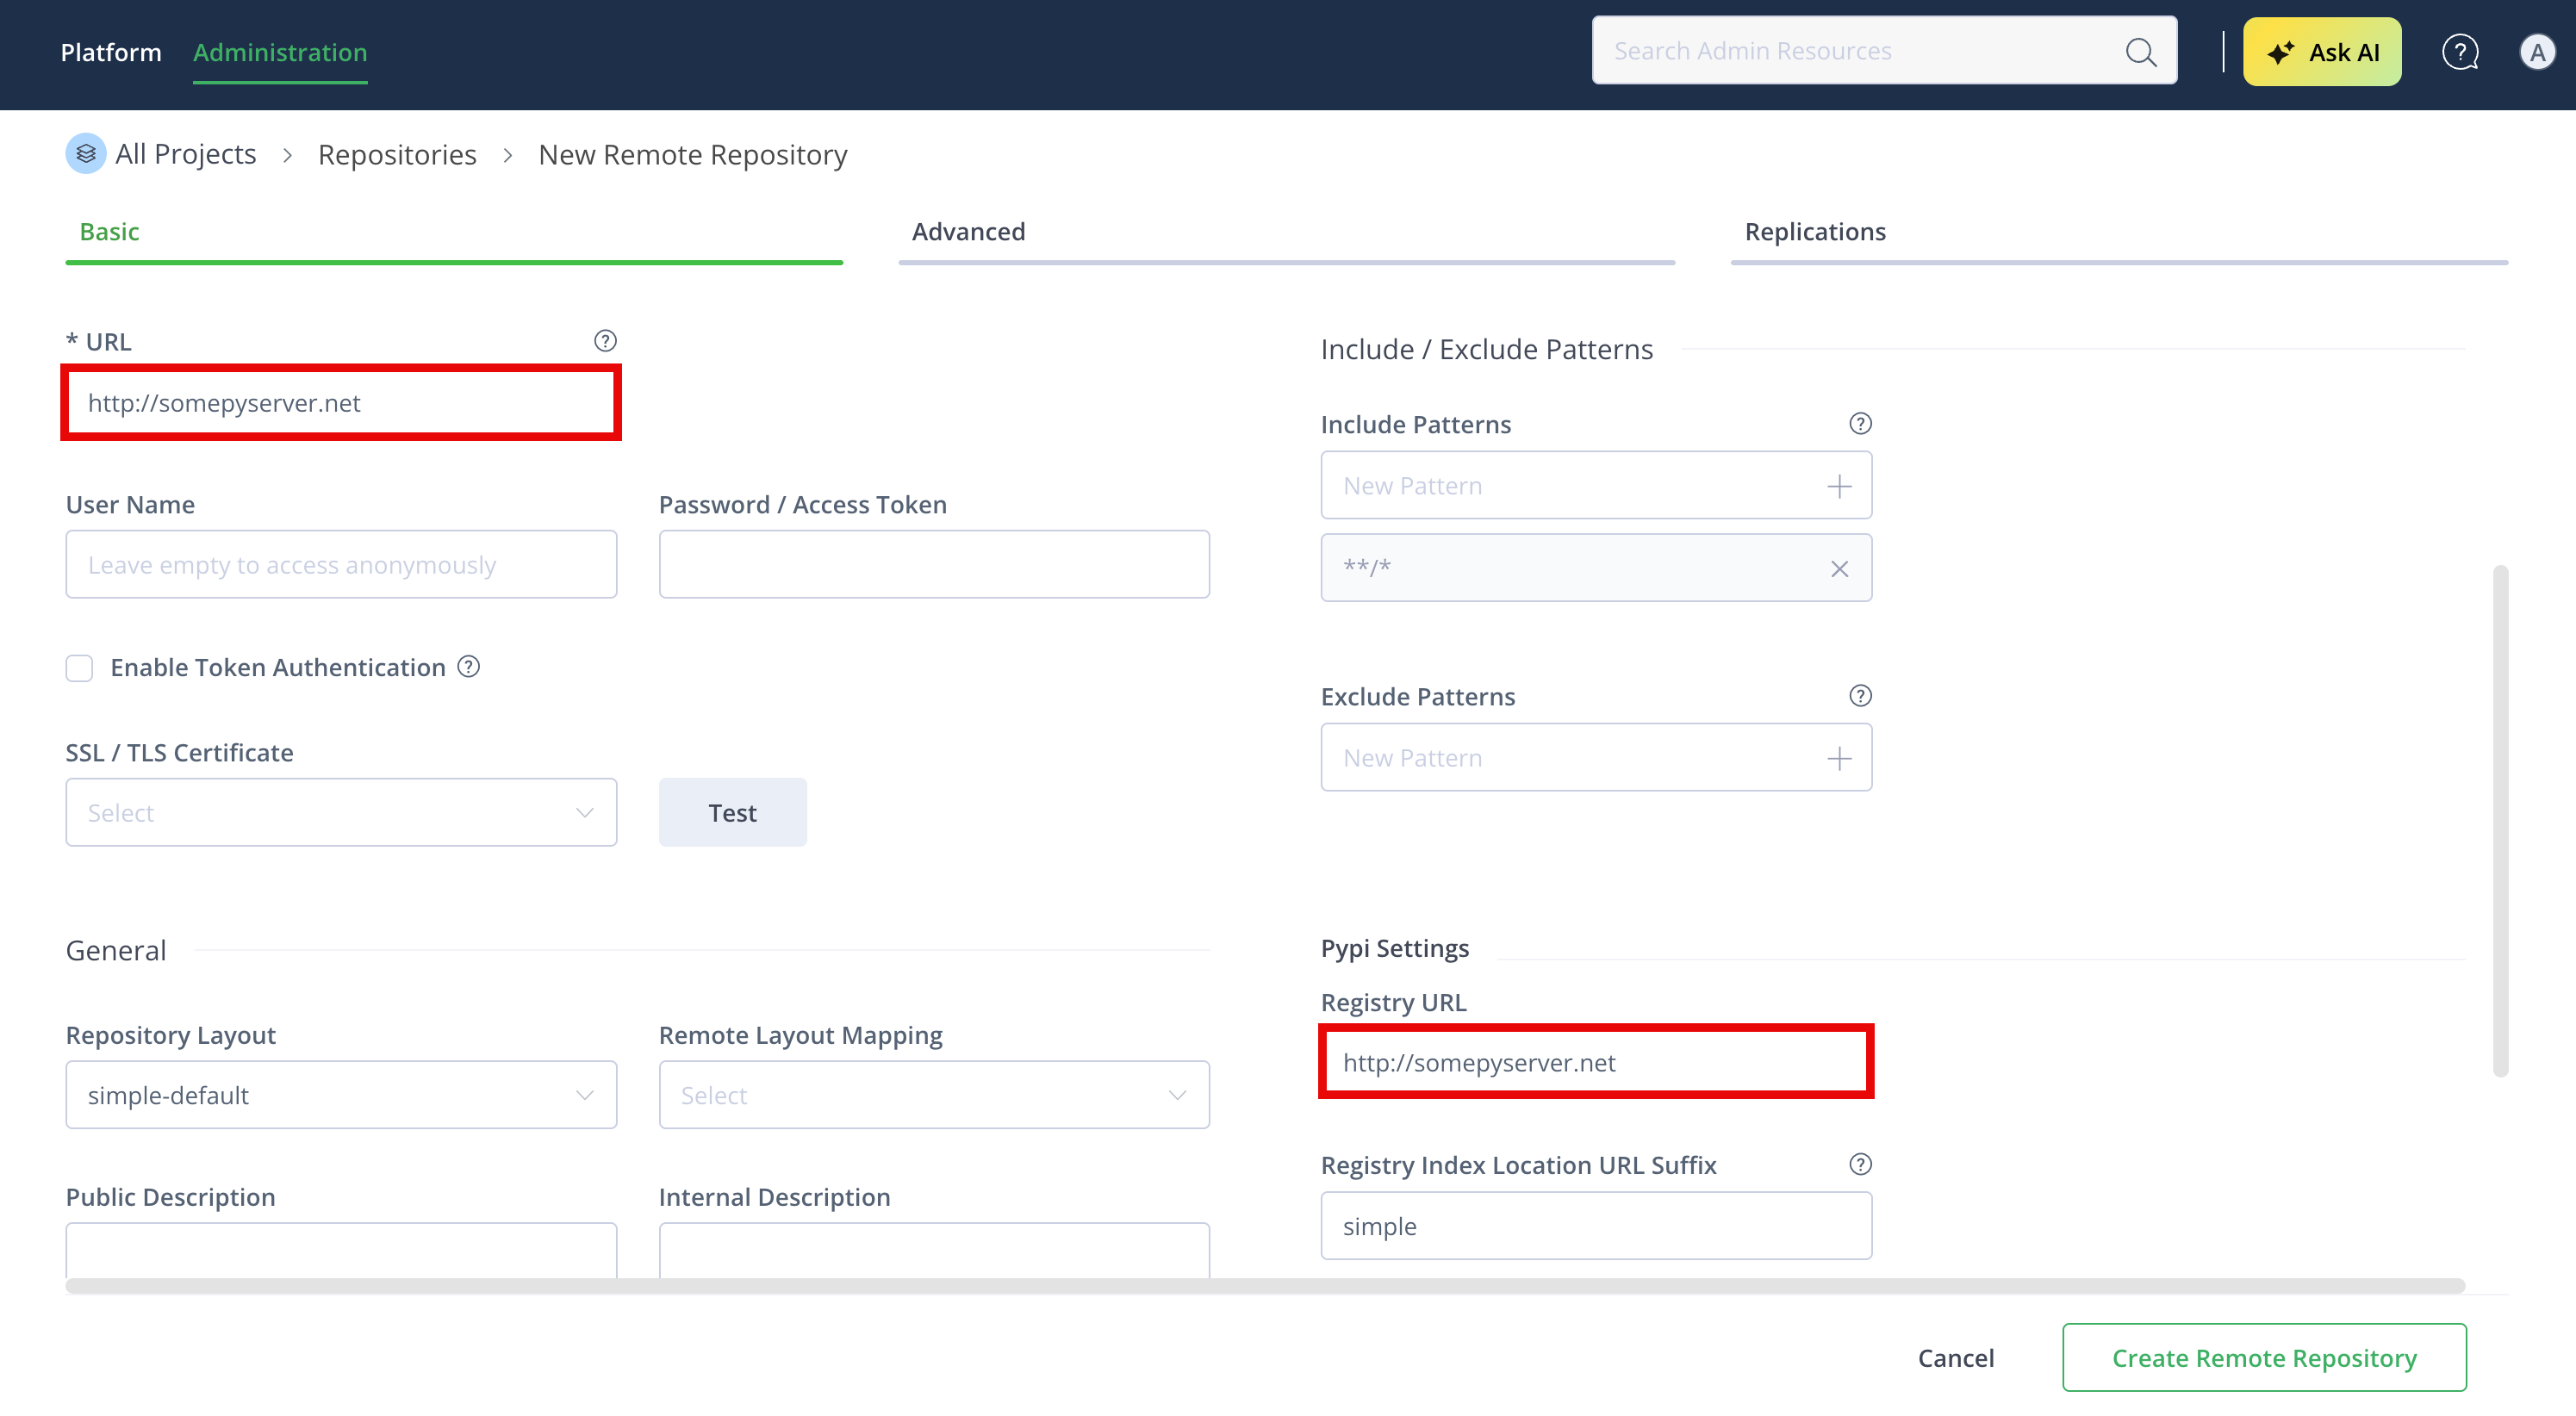
Work with PyPI Remote Repositories with the Custom Registry Suffix
You can set a custom suffix instead of the default suffix, for example to work with a non-default index layout.
To set a custom registry suffix:
When creating the repository, enter the same root URL for both the URL and Registry URL fields. For example: http://somepyserver.net.
To search, include the required scope in the index URL (as in the somepyserver example, it could be myorg/mypypi).
$ pip search frog-fu --index http://localhost:8081/artifactory/api/pypi/somepyserver/myorg/mypypi/To install, include the desired scope in the index URL (as in the somepyserver example, it could be myorg/mypypi).
$ pip install frog-bar -i http://localhost:8081/artifactory/api/pypi/somepyserver/myorg/mypypi/simpleResolve from Artifactory Using Pip
To install the pip command line tool refer to pip documentation. We recommend using virtualenv to separate your environment when installing PIP.
Using a Valid SSL Certificate with pip and Artifactory
pip uses packages from the local cache, (i.e. from the machine on which the pip client is running on), only if the download URL of the package is a trusted host with a valid SSL certificate. This means that if your Artifactory instance is not running with a valid SSL certificate, requests for packages will always first reach Artifactory even if the packages exist on the local cache.
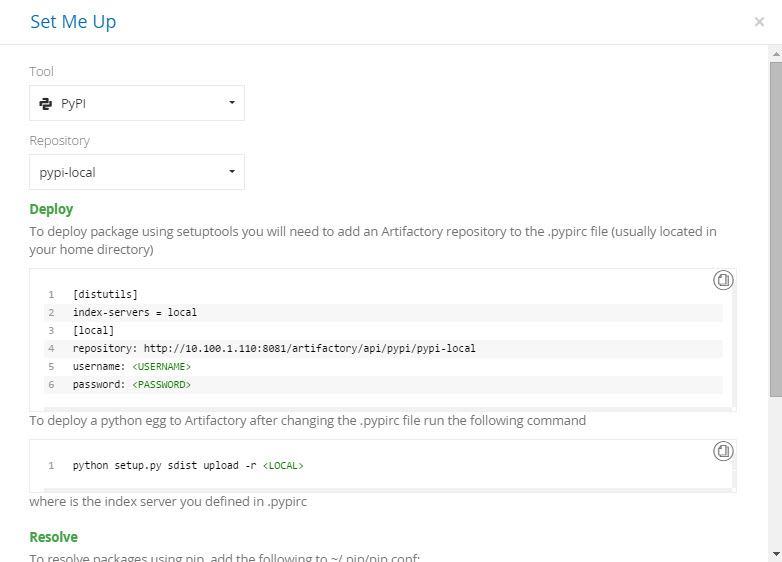
To display code snippets you can use to configure pip and setup.py to use your PyPI repository, select the repository and then click Set Me Up.
Specify the PyPI Repository on the Command Line
Index URL
When accessing a PyPI repository through Artifactory, the repository URL should be prefixed with
api/pypiin the path. This applies to allpipcommands anddistutilsURLs includingpip install.When using
pipto resolve PyPI packages it must point to<Artifactory URL>/api/pypi/<repository key>/simple.For example, if you are using Artifactory standalone or as a local service, you would access your PyPI repositories using the following URL:
http://localhost:8081/artifactory/api/pypi/<repository key>/simpleOr, if you are using Artifactory Cloud, the URL would be:
https://<server name>.jfrog.io/artifactory/api/pypi/<repository key>/simple
Once pip is installed, it can be used to specify the URL of the repository from which to resolve:
Installing with full repository URL
$ pip install frog-bar -i http://localhost:8081/artifactory/api/pypi/pypi-local/simpleNote
The default configuration snippet for Nginx and Apache using reverse proxy contains the
X-JFrog-Override-Base-Urlby default. If reverse proxy is not used in your environment, you need to add the header manually to the request, for example:-H "X-JFrog-Override-Base-Url: http://$ART_HOST"Instead of adding the header manually, you can also run the request on port 8081, or add a slash (/) at the end of the request:
http://$ART_HOST/artifactory/api/pypi/pypi-virtual/simple/
Use PyPI Credentials
Due to its design, pip does not support reading credentials from a file. Credentials can be supplied as part of the URL, for example http://<username>:<password>@localhost:8081/artifactory/api/pypi/pypi-local/simple. The password can be omitted (with the preceding colon), and in this case, the user will be prompted to enter credentials interactively.
Use a Pip Configuration File
Aliases for different repositories can be specified through a pip configuration file, ~/.pip/pip.conf . The file contains configuration parameters per repository, for example:
~/.pip/pip.conf
[global]
index-url = http://user:password@localhost:8081/artifactory/api/pypi/pypi-virtual/simple
For more information, please refer to PIP User Guide.
Use a Pip Requirements File
A requirements file contains a list of packages to install. Usually, these are dependencies for the current package. It can be created manually or using the pip freeze command. The index URL can be specified in the first line of the file, For example:
requirements.txt
--index-url http://localhost:8081/artifactory/api/pypi/pypi-local/simple
PyYAML==3.11
argparse==1.2.1
frog-bar==0.2
frog-fu==0.2a
nltk==2.0.4
wsgiref==0.1.2
Additional PyPI Publishing Tools
Limitation
Users should not deploy packages in Artifactory to repositories in the paths
pypi-repo/packages/**orpypi-repo/simple/**, as these are saved namespaces used by Artifactory for internal logic. If you attempt to deploy to these paths, Artifactory returns a 400 error.
In addition to the PyPI clients supported by Artifactory, there are several alternative methods for publishing PyPI packages to Artifactory:
- Use disutils or setuptools
- Use .netrc
- Upload Authenticated PyPI Packages to JFrog Artifactory
- Upload PyPI Egg and Wheel Packages
Use PyPI distutils or setuptools
setuptools vs. distutils and python versions
Artifactory is agnostic to whether you use
setuptoolsordistutils, and also to the version or implementation of Python your project uses.The following instruction were written for Python 2.7 and
setuptoolsin mind. Using different version of Python, or different tools suchzest, distutilsand others may require minor modification to the instructions below.
Uploading to Artifactory using a setup.py script is supported in a similar way to uploading to PyPI. First, you need to add Artifactory as an index server for your user.
For instructions on using setuptools to package Python projects and create a setup.py script, please refer to the setuptools documentation and this tutorial project.
Create the $HOME/.pypirc File
To upload to Artifactory, an entry for each repository needs to be made in $HOME/.pypirc as follows:
[distutils]
index-servers =
    local
    pypi

[pypi]
repository: https://pypi.org/pypi
username: mrBagthrope
password: notToBeSeen

[local]
repository: http://localhost:8081/artifactory/api/pypi/pypi-local
username: admin
password: password
Notice that the URL does not end with /simple.
The HOME environment variable
setuptoolsrequires that the.pypircfile be found under$HOME/.pypirc,using theHOMEenvironment variable.On unix-like systems this is usually set by your system to
/home/yourusername/but in certain environments such as build servers you will have to set it manually.On Windows it must be set manually.
Use .netrc to Upload PyPI Packages
Uploading PyPI packages to Artifactory using a .netrc file credentials is supported. For more information on the .netrc file , see The .netrc file and Purpose of the '.netrc' file.
Note
- For information on how to use a Keyring provider via PyPI repositories, see How to use Keyring Provider via Pypi Repositories.
- The Twine client is not compatible with
.netrccredentials.
To use the .netrc file:
-
To create a
.netrcfile in your root directory and set it with the minimum required permissions (Chmod 600), if you do not have one already, run the following command:touch ~/.netrc -
Run the following command to populate the
.netrcfile with your Artifactory URL and credentials according to the.netrcfile format:
Note
Make sure to replace the placeholders in bold with your own Artifactory URL, username, and password or identity token.
echo "machine <ARTIFACTORY_URL> login <USERNAME> password <PASSWORD/TOKEN>" > ~/.netrcUpload Authenticated PyPI Packages to JFrog Artifactory
To upload authenticated PyPI packages to JFrog Artifactory:
-
Create the
.pypircfile using the following code, and add your access token from JFrog Artifactory for the usernamepypiadmin..[distutils] index-servers = private-repository [private-repository] repository = https://soleng.jfrog.io/artifactory/api/pypi/demo-pypi-local username = pypiadmin password = eyJ2ZXIiOiIyIiwidHlwIjoiSldUIiwiYWxnIjoiUlMyNTYiLCJraWQiOiJsYkpadzNJUU13WXBBSWNRa01RRjN0dlA2Yml5M3dWcXdrQ0txUkxLaXhRIn0.eyJleHQiOiJ7XCJyZXZvY2FibGVcIjpcInRydWVcIn0iLCJzdWIiOiJqZmFjQDAxZTlycTMza3ljMHQxMWtwangybmcwemo1XC91c2Vyc1wvcHlwaWFkbWluIiwic2NwIjoiYXBwbGllZC1wZXJtaXNzaW9uc1wvYWRtaW4iLCJhdWQiOiIqQCoiLCJpc3MiOiJqZmZlQDAwMCIsImV4cCI6MTY4OTY5ODA5MywiaWF0IjoxNjU4MTYyMDkzLCJqdGkiOiJiZWY1YWY5Ni0zNTkyLTRiOTQtYWYyNS1kZmIxY2U1ZGU4YzIifQ.NI5OXpw0NHs7Asd3f_sY3tMyzM-2_07c3WyWEpbJrDPxO8eKoLRp10vGEF8Jo3HyRQ0H7Ybzf2-Cn8wf9yFMo4UGlgxGfm7_yc24xWVLCINjg0B2A5YRSvAetwdT2wgVPvEMUqCPSCU4_SGgGg606lIDxxImRfgZWwFn-wHfU8b8dCV7EV4dXGvH7iVb33W2JguE9KIQFP7lKkQlaErO6pGFNuPfOx1JbJllHh0oRpAPzvykda2i6Q2q3ZCObJZ9Rp8NqZYQfEm42YtIaOvAlE5fGepZgDjzHaaLcztJDHoR-BWjMiDfP0LRThHASo7F52t8p3vsZHW5NEov_trFrQ -
Copy the
.pypircfile to your Users folder.- For macOS users, create the file under
%USERPROFILE% - For Windows users, create the file under
c:\users\<name>
- For macOS users, create the file under
-
Validate that the
setup.pyfile contains all of the following fields. It should be automatically created, but if it is not, add the file to your root folder with the following content.#!/usr/bin/env python from setuptools import setup setup( name='demo-python-example', version='1.0', description='Project example for building Python project with JFrog products', author='JFrog', author_email='[email protected]', packages=['helloworld'], install_requires=['PyYAML>3.11', 'nltk'], ) -
Create a PyPI package.
py setup.py sdist bdist_wheelThe following displays an example output.
C:\Users\johnk\helloworld>py setup.py sdist bdist_wheel running sdist running egg_info writing demo_python_example.egg-info\PKG-INFO writing dependency_links to demo_python_example.egg-info\dependency_links.txt writing requirements to demo_python_example.egg-info\requires.txt writing top-level names to demo_python_example.egg-info\top_level.txt reading manifest file 'demo_python_example.egg-info\SOURCES.txt' writing manifest file 'demo_python_example.egg-info\SOURCES.txt' warning: sdist: standard file not found: should have one of README, README.rst, README.txt, README.md running check creating demo-python-example-1.0 creating demo-python-example-1.0\demo_python_example.egg-info creating demo-python-example-1.0\helloworld copying files to demo-python-example-1.0... copying setup.py -> demo-python-example-1.0 copying demo_python_example.egg-info\PKG-INFO -> demo-python-example-1.0\demo_python_example.egg-info copying demo_python_example.egg-info\SOURCES.txt -> demo-python-example-1.0\demo_python_example.egg-info copying demo_python_example.egg-info\dependency_links.txt -> demo-python-example-1.0\demo_python_example.egg-info copying demo_python_example.egg-info\requires.txt -> demo-python-example-1.0\demo_python_example.egg-info copying demo_python_example.egg-info\top_level.txt -> demo-python-example-1.0\demo_python_example.egg-info copying helloworld\app.py -> demo-python-example-1.0\helloworld Writing demo-python-example-1.0\setup.cfg Creating tar archive removing 'demo-python-example-1.0' (and everything under it) running bdist_wheel running build running build_py C:\Users\johnk\installs\lib\site-packages\setuptools\command\install.py:34: SetuptoolsDeprecationWarning: setup.py install is deprecated. Use build and pip and other standards-based tools. warnings.warn( installing to build\bdist.win-amd64\wheel running install running install_lib creating build\bdist.win-amd64\wheel creating build\bdist.win-amd64\wheel\helloworld copying build\lib\helloworld\app.py -> build\bdist.win-amd64\wheel\.\helloworld running install_egg_info Copying demo_python_example.egg-info to build\bdist.win-amd64\wheel\.\demo_python_example-1.0-py3.10.egg-info running install_scripts creating build\bdist.win-amd64\wheel\demo_python_example-1.0.dist-info\WHEEL creating 'dist\demo_python_example-1.0-py3-none-any.whl' and adding 'build\bdist.win-amd64\wheel' to it adding 'helloworld/app.py' adding 'demo_python_example-1.0.dist-info/METADATA' adding 'demo_python_example-1.0.dist-info/WHEEL' adding 'demo_python_example-1.0.dist-info/top_level.txt' adding 'demo_python_example-1.0.dist-info/RECORD' removing build\bdist.win-amd64\wheel C:\Users\johnk\helloworld> -
Upload the package to JFrog Artifactory.
py setup.py sdist upload -r private-repositoryThe following displays an example output.
C:\Users\johnk\helloworld>py setup.py sdist bdist_wheel running sdist running egg_info writing demo_python_example.egg-info\PKG-INFO writing dependency_links to demo_python_example.egg-info\dependency_links.txt writing requirements to demo_python_example.egg-info\requires.txt writing top-level names to demo_python_example.egg-info\top_level.txt reading manifest file 'demo_python_example.egg-info\SOURCES.txt' writing manifest file 'demo_python_example.egg-info\SOURCES.txt' warning: sdist: standard file not found: should have one of README, README.rst, README.txt, README.md running check creating demo-python-example-1.0 creating demo-python-example-1.0\demo_python_example.egg-info creating demo-python-example-1.0\helloworld copying files to demo-python-example-1.0... copying setup.py -> demo-python-example-1.0 copying demo_python_example.egg-info\PKG-INFO -> demo-python-example-1.0\demo_python_example.egg-info copying demo_python_example.egg-info\SOURCES.txt -> demo-python-example-1.0\demo_python_example.egg-info copying demo_python_example.egg-info\dependency_links.txt -> demo-python-example-1.0\demo_python_example.egg-info copying demo_python_example.egg-info\requires.txt -> demo-python-example-1.0\demo_python_example.egg-info copying demo_python_example.egg-info\top_level.txt -> demo-python-example-1.0\demo_python_example.egg-info copying helloworld\app.py -> demo-python-example-1.0\helloworld Writing demo-python-example-1.0\setup.cfg Creating tar archive removing 'demo-python-example-1.0' (and everything under it) running bdist_wheel running build running build_py C:\Users\johnk\installs\lib\site-packages\setuptools\command\install.py:34: SetuptoolsDeprecationWarning: setup.py install is deprecated. Use build and pip and other standards-based tools. warnings.warn( installing to build\bdist.win-amd64\wheel running install running install_lib creating build\bdist.win-amd64\wheel creating build\bdist.win-amd64\wheel\helloworld copying build\lib\helloworld\app.py -> build\bdist.win-amd64\wheel\.\helloworld running install_egg_info Copying demo_python_example.egg-info to build\bdist.win-amd64\wheel\.\demo_python_example-1.0-py3.10.egg-info running install_scripts creating build\bdist.win-amd64\wheel\demo_python_example-1.0.dist-info\WHEEL creating 'dist\demo_python_example-1.0-py3-none-any.whl' and adding 'build\bdist.win-amd64\wheel' to it adding 'helloworld/app.py' adding 'demo_python_example-1.0.dist-info/METADATA' adding 'demo_python_example-1.0.dist-info/WHEEL' adding 'demo_python_example-1.0.dist-info/top_level.txt' adding 'demo_python_example-1.0.dist-info/RECORD' removing build\bdist.win-amd64\wheel C:\Users\johnk\helloworld> -
Your package was uploaded successfully to the JFrog Platform. Check it out by navigating to Artifactory > Artifacts in the Platform module.
Upload PyPI Egg and Wheel Packages
After creating a .pypirc file and a setup.py script at the root of your project, you can upload your egg (tar.gz) packages as follows:
~/python_project $ python setup.py sdist upload -r localIf you are using wheel (whl) you can upload your packaged as follows:
~/python_project $ python setup.py bdist_wheel upload -r localOr if you wish to use both egg (tar.gz) and wheel (whl), you can upload them as follows:
~/python_project $ python setup.py sdist bdist_wheel upload -r localWhere local is the name of the section in your .pypirc file that points to your Artifactory PyPI repository.
Default upload
By default, both
setuptoolsanddistutilswill upload tohttps://pypi.org/pypiif no repository is specified.
The 'register' command should be omitted
When uploading directly to
pypi.org, the documentation states that your package must first be registered by callingpython setup.py register.When uploading to Artifactory this is neither required nor supported and should be omitted.
Publish PyPI Packages Manually Using the Web UI or the REST API
PyPI packages can also be uploaded manually using the Web UI or the Artifactory REST API. For Artifactory to handle those packages correctly as PyPI packages, they must be uploaded with pypi.name and pypi.version properties.
Automatic extraction of properties
While indexing the newly uploaded packages Artifactory will automatically try to extract required properties from the package metadata saved in the file. Note that not all supported files can be extracted.
Currently, only
zip,tar,tgz,tar.gz,tar.bz2,eggandwhlfiles can be extracted for metadata.In addition, indexing starts after a 60 second quiet period, counting from the last upload to the current repository.
Enable JSON Indexing in PyPI Repositories
PyPI repositories in Artifactory support JSON indexing through the PyPI Simple JSON API. When JSON indexing is enabled, PyPI repositories in Artifactory return JSON-formatted indexes. JSON formatting is supported for local, remote, and virtual repositories, with local repositories continuing to index both in JSON and HTML.
Prerequisites: You must have Admin or Project Admin permissions to configure Artifactory settings.
To enable JSON indexing:
- On the Administration module, navigate to Artifactory Settings > Packages Settings.
- Under PyPI, select the Enable simple json format checkbox.
- Click Save.
Limitations
The following items are limitations of the PyPI Simple JSON API in PyPI in Artifactory:
- Fallback logic: If JSON is requested but not available, the system falls back to HTML. If HTML is requested but not available, the system returns nothing.
- Virtual repositories: Virtual repositories only serve JSON if all included sub-repositories can provide it. If any sub-repository is restricted to HTML, the virtual repository responds with HTML to maintain consistency.
- Offline availability risks: If JSON indexing is disabled after caching indexes from a remote source, you may lose access to those indexes if that source is offline. Because Artifactory cannot fetch the required HTML equivalents from an offline repository, the packages remain unavailable until the connection is restored.