npm Repositories
The JFrog Artifactory integration with npm allows you to manage npm collections in Artifactory. npm is the world's largest software registry and the default package manager for the JavaScript runtime environment Node.js. Developers use npm to discover, share, and manage reusable code packages, known as packages or modules. You can use npm with Artifactory to simplify the development workflow by centrally handling the installation and management of project dependencies. For more information, see npm documentation.
Artifactory fully supports npm repositories, including the following capabilities:
- Managing packages in Artifactory repositories using the
npm,pnpm, or Yarn command line tools. - Calculating metadata for packages stored in Artifactory local repositories.
- Storing your internal and private npm packages securely in Local Repositories.
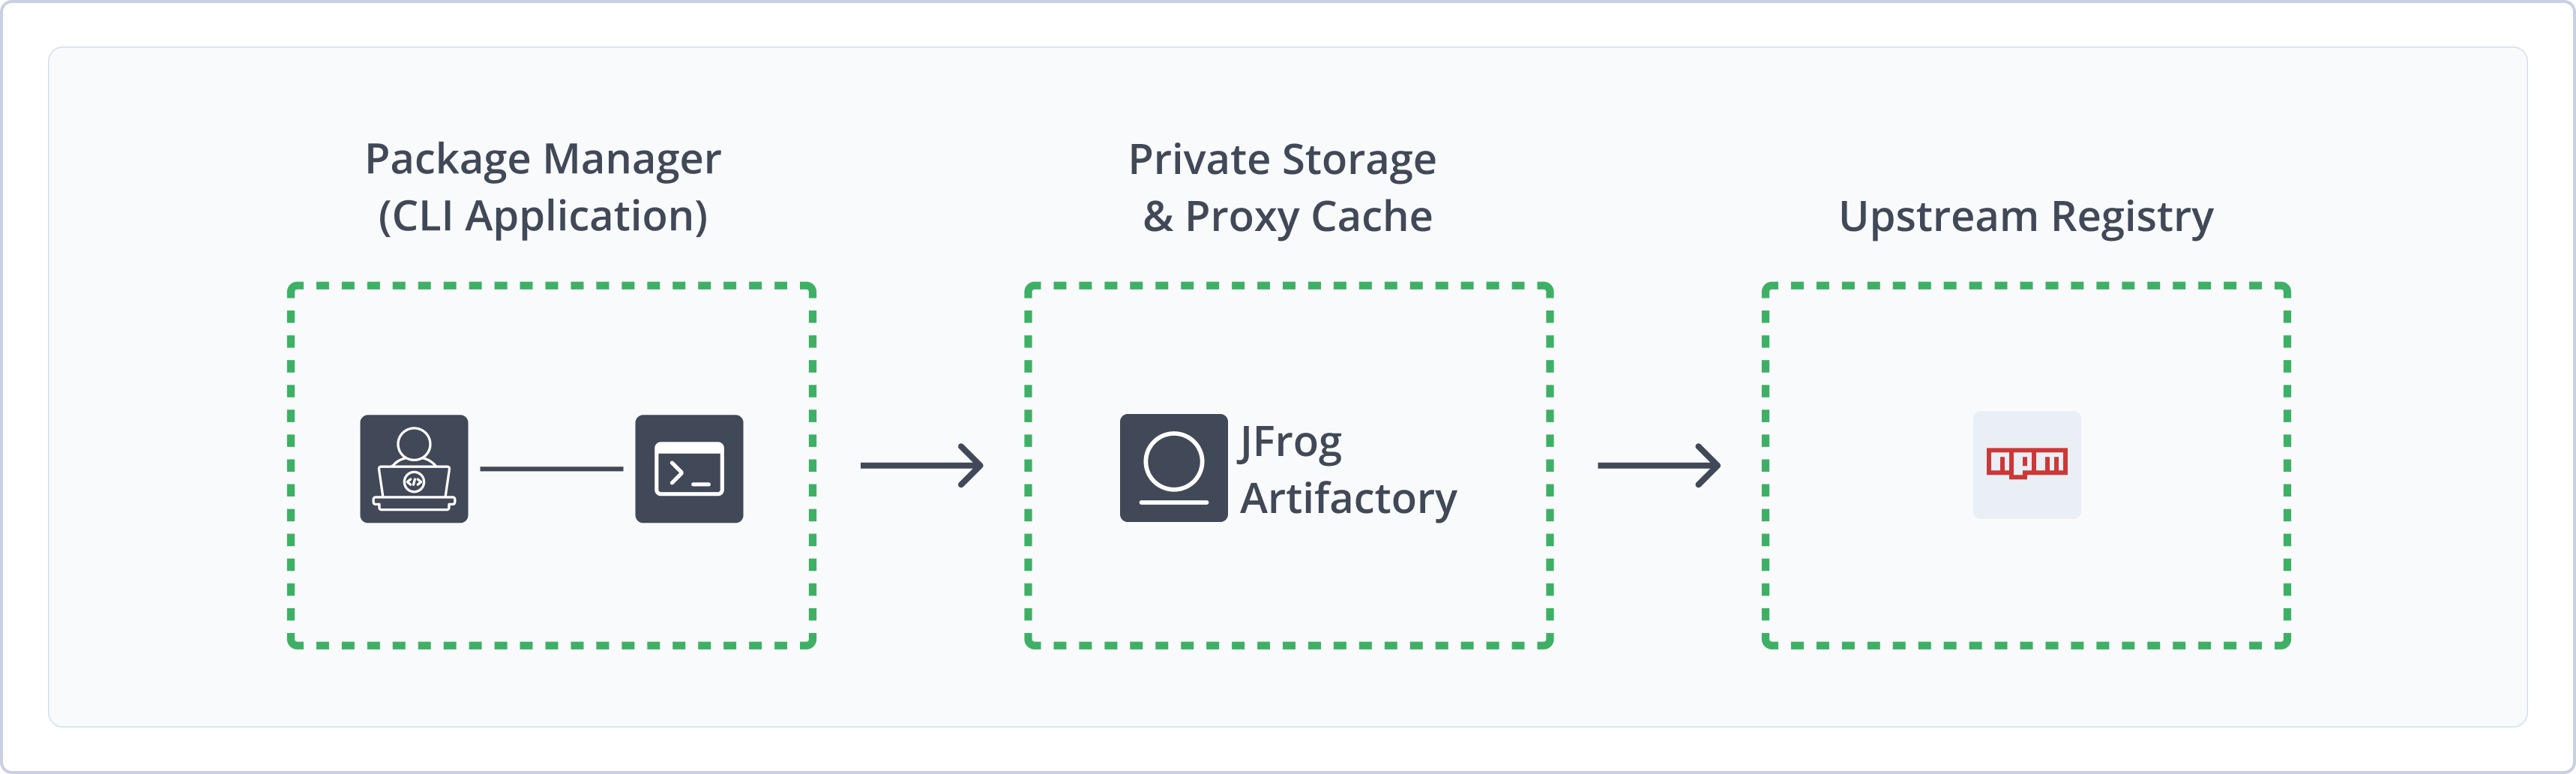
- Accessing remote npm registries (such as https://registry.npmjs.org) through Remote Repositories, which provide proxy and caching functionality.
- Aggregating multiple local and remote registries under a single URL using Virtual Repositories.
- Validating remote npm repository data.
- SHA512 support for npm packages.
Note
- To learn more about how Artifactory secures npm packages, see What is npm.
- Read about the Shai-Hulud npm supply chain attack, how it compromised npm packages and how JFrog Artifactory protects your software from such vulnerabilities.
Warning
Due to recent supply-chain attacks, npm package managers introduced a breaking change that includes an immaturity policy enabled on the client side. The immaturity policy means that published artifacts may not be available until 24 hours after publishing.
For more information, including how to change this configuration on the client side, see the knowledge base article Recently published NPM packages may be blocked for 24 hours - New client enforcements.
Get Started with npm
To get started working with npm, complete the following main steps:
- Connect Your npm Client to Artifactory
-
Publish and install npm packages using the client of your choice:
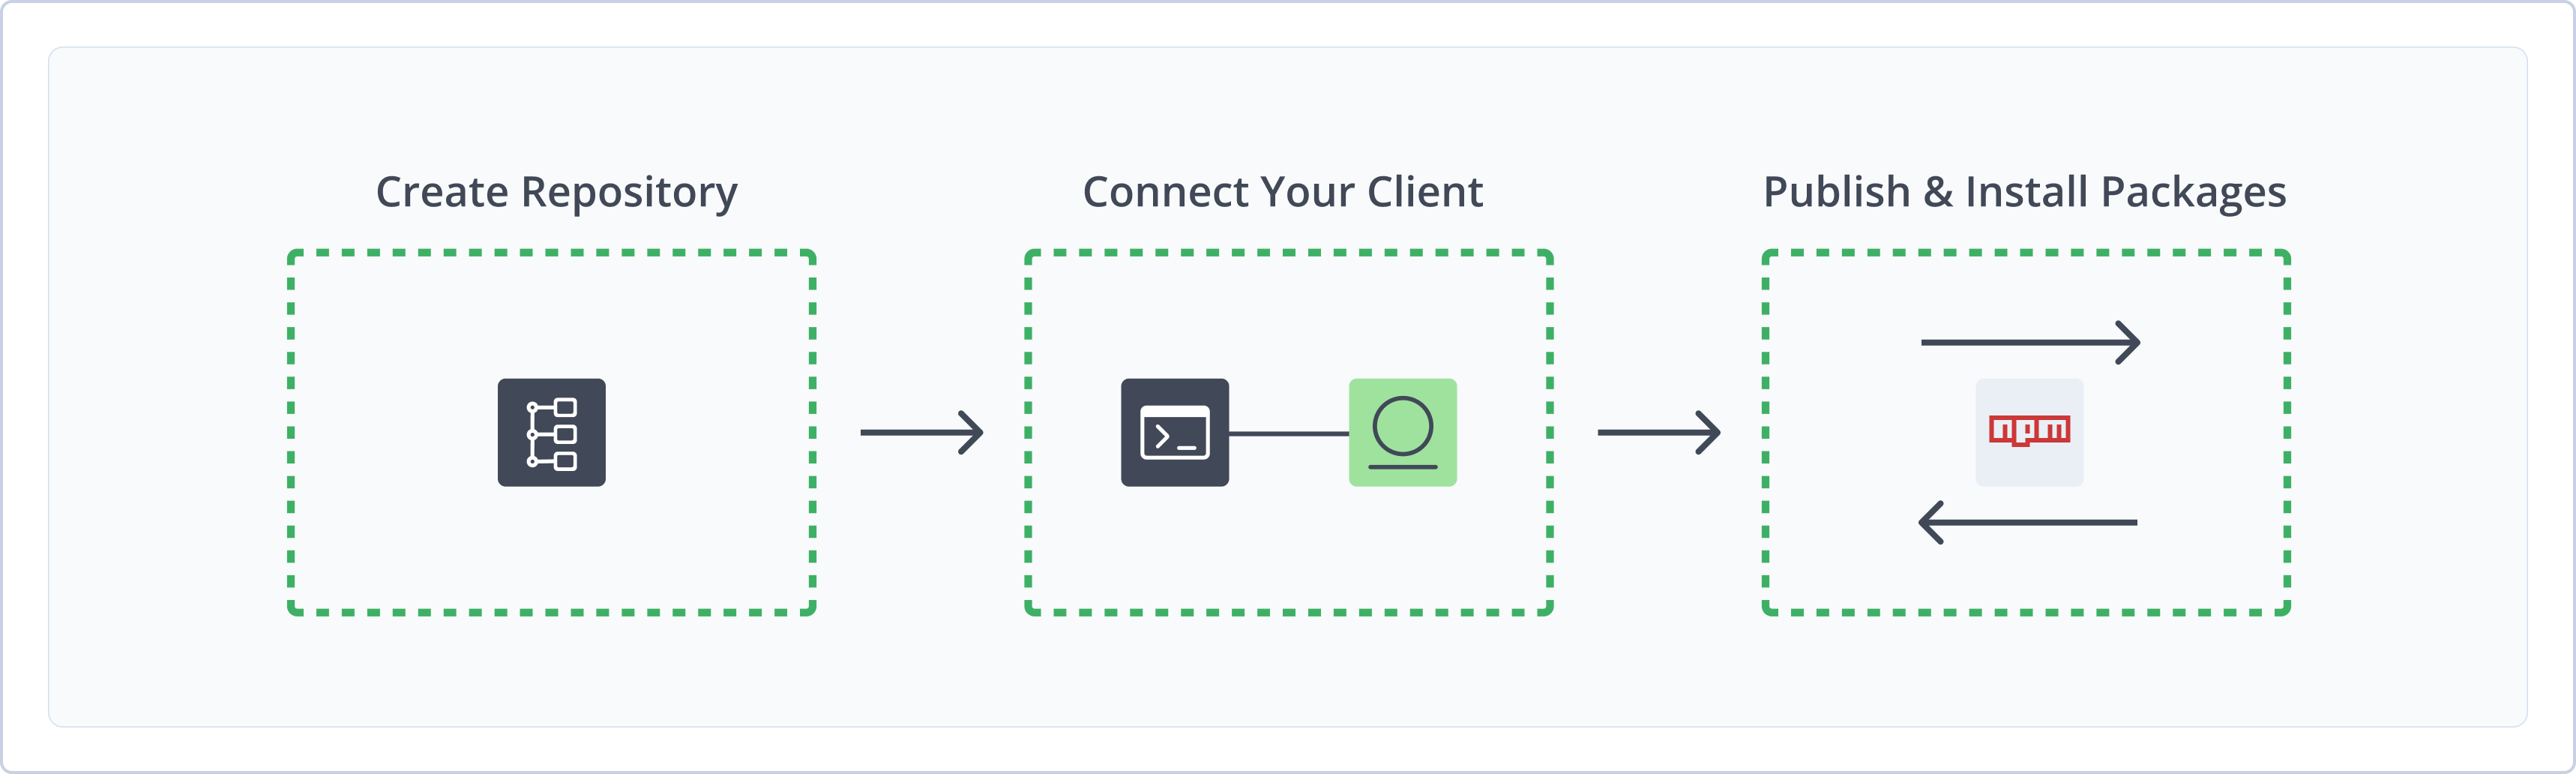
Create an npm Repository
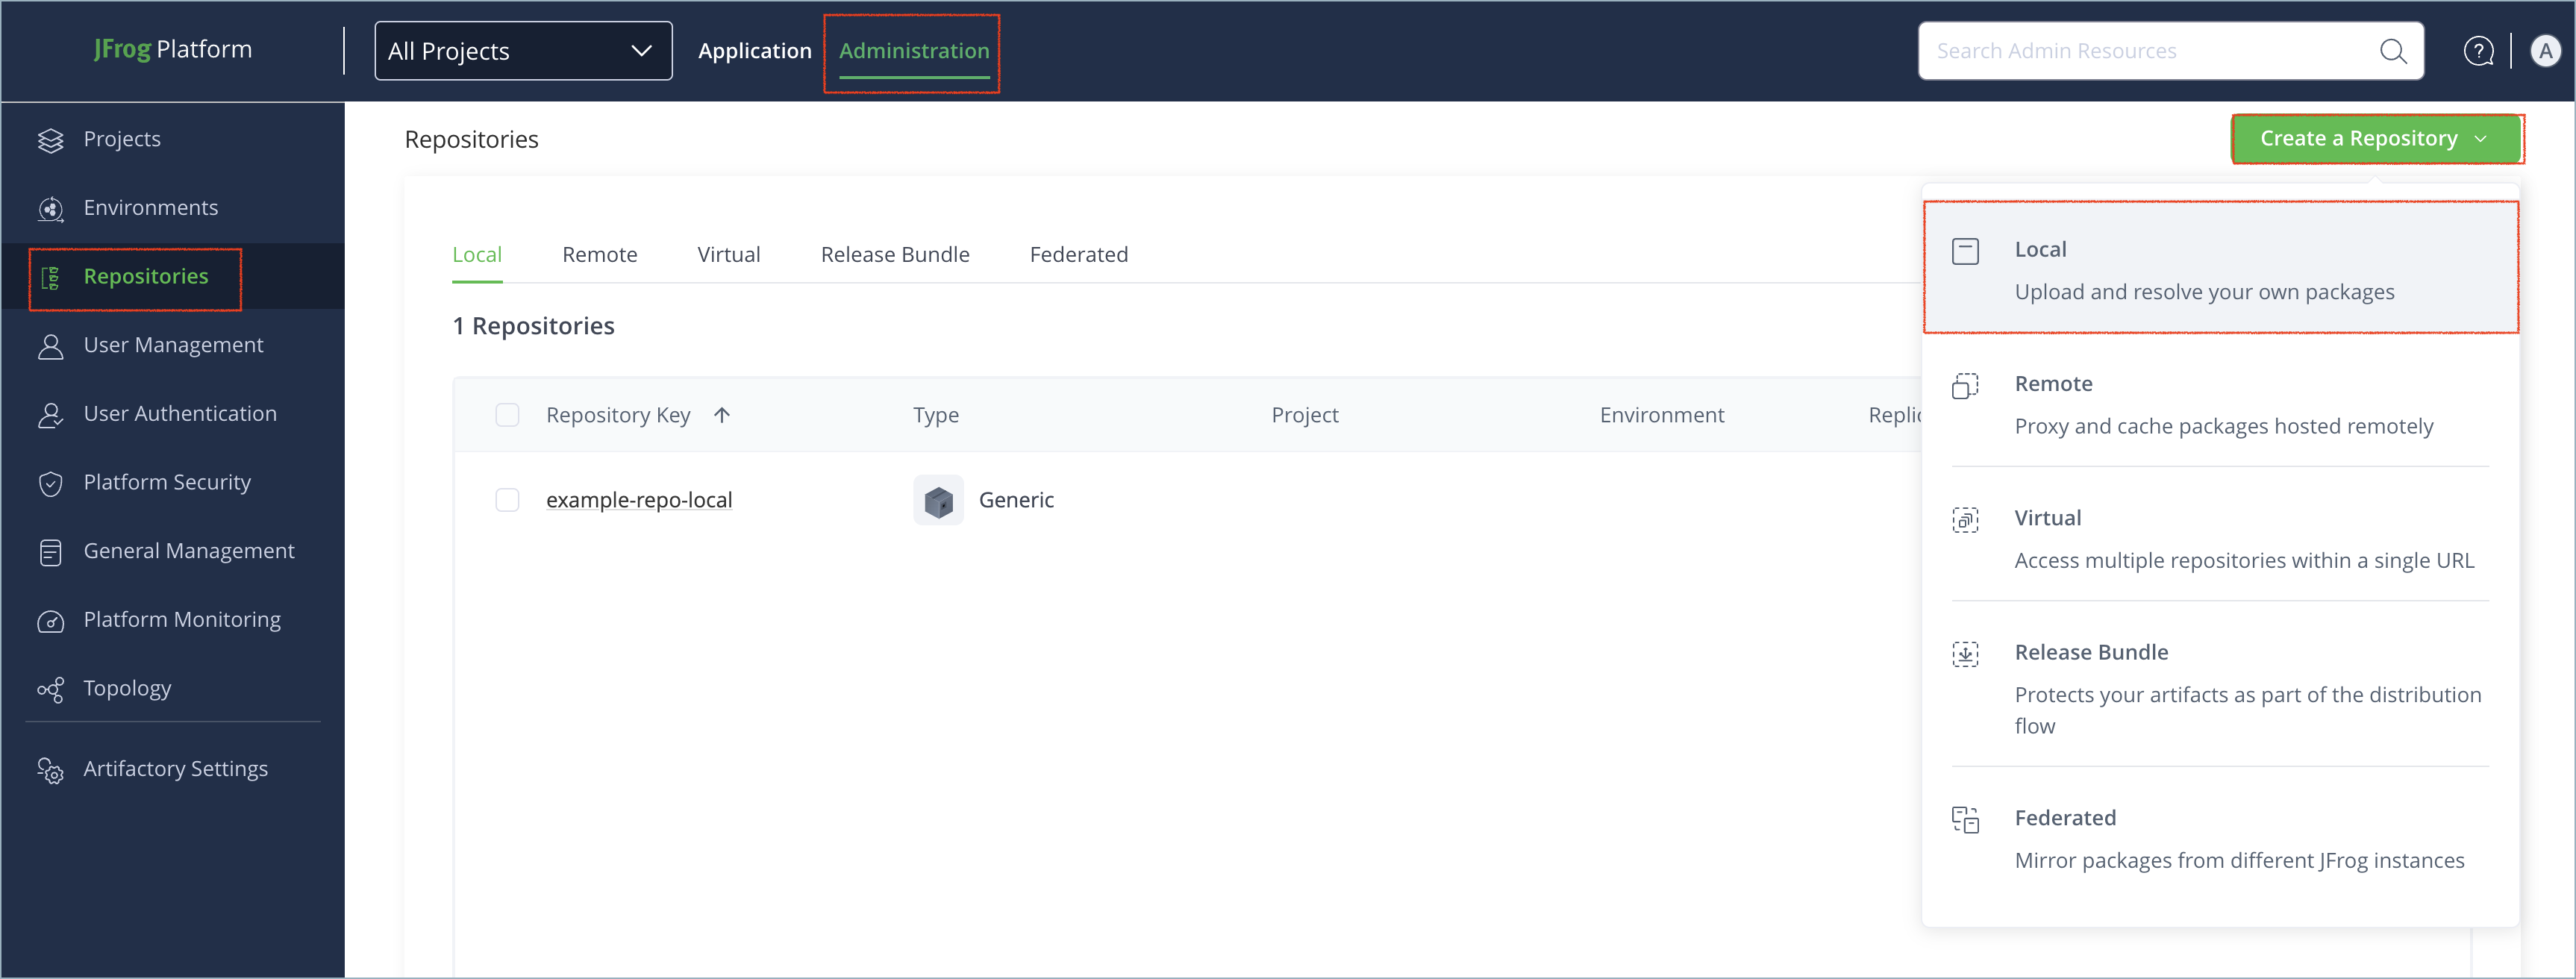
This topic describes how to create an npm repository. This is required before publishing and installing npm packages. There are three primary types of repositories:
- Local repositories: Store and share first- and second-party packages with your organization
- Remote repositories: Download packages from any remote location, including external package registries or other Artifactory instances
- Virtual repositories: Aggregate remote and local repositories, enabling your organization to scale by providing a single URL that provides access to multiple repositories and types
For more information on JFrog repositories, see Repository Management.
Prerequisite: You need Admin or Project Admin permissions in Artifactory to create a repository. If you don't have Admin permissions, the option will not be available.
To create an npm repository:
-
In the Administration tab, click Repositories > Create a Repository.
-
Select the type of repository you want to create.
-
Select the npm package type.
-
Configure the required fields for the repository:
- For local repositories, in the Repository Key field, type a meaningful name for the repository. For example,
npm-local. For more information on local repositories and their settings, see Local Repositories. - For remote repositories, verify the Repository URL and update as needed. For more information on remote repositories and their settings, see Remote Repositories.
- For virtual repositories, select one or more local or remote repository types to include in the virtual repository. For more information on virtual repositories and their settings, see Virtual Repositories.
- For local repositories, in the Repository Key field, type a meaningful name for the repository. For example,
-
Click Create Repository. The repository is created and the Repositories window is displayed.
Connect Your npm Client to Artifactory
This topic provides details on configuring npm to work with Artifactory. To get up and running quickly to use npm, see Get Started with npm.
Pre-requisite: Before connecting your npm client to Artifactory, you must have an existing npm repository in Artifactory. For more information, see Create an npm Repository.
Supported Clients
- npm CLI version 1.4.3 and above
- pnpm CLI
- Yarn client
npm CLI
The following topics describe how to configure and use the npm CLI with Artifactory:
- Connect the npm CLI to Artifactory
- Install npm Packages with npm CLI
- Publish npm Packages with the npm CLI
Connect the npm CLI to Artifactory
You can use the npm CLI as a client to install and publish npm packages. Connect the npm CLI to Artifactory in one of these ways, based on your repository and environment:
JFrog recommends using a virtual repository as the default registry setting. Virtual repositories provide flexibility to access external sources and local repositories, and reconfigure them as needed. For more information on setting up a virtual npm repository, see Create an npm Repository.
npm login for Unscoped Registries
Set an npm repository in Artifactory as your default npm registry. You can also log in to a specific registry without overriding the default.
To set up and log in to a default npm registry:
-
Run this command:
npm config set registry https://[JFrogPlatformURL]/artifactory/api/npm/<REPO_NAME>/Where:
[JFrogPlatformURL]:The URL of your JFrog platform<REPO_NAME>: The name of the target npm repository in Artifactory
For example:
npm config set registry https://company.jfrog.io/artifactory/api/npm/npm-virtual/ -
Run this command:
npm login --auth-type=web
Note
You can also use JFrog Set me up to copy the snippet populated with your token and environment. For more information, see Use Artifactory Set Me Up for Configuring Package Manager Clients.
To log in to a specific registry:
Run this command:
npm login --registry=[JFrogPlatformURL]/artifactory/api/npm/<REPO_NAME>/ --auth-type=webWhere:
[JFrogPlatformURL]: The URL of your JFrog platform<REPO_NAME>: The name of the target repository
For example:
npm login --registry=https://company.jfrog.io/artifactory/api/npm/npm-virtual/ --auth-type=webNote
You can also use JFrog Set me up to copy the snippet populated with your token and environment. For more information, see Use Artifactory Set Me Up for Configuring Package Manager Clients.
npm login for Scoped Registries
If you work with scoped packages, you can log in to a scoped Artifactory repository.
To log in a scoped npm registry:
Run this command:
npm login --registry=https://[JFrogPlatformURL]/artifactory/api/npm/<REPO_NAME>/ --auth-type=web --scope=@<SCOPE>Where:
[JFrogPlatformURL]: The URL of your JFrog platform<REPO_NAME>: The name of the target scoped npm repository in Artifactory<SCOPE>: The scope or namespace
For example:
npm login --registry=https://company.jfrog.io/artifactory/api/npm/npm-internal-virtual/ --auth-type=web --scope=@internalNote
You can also use JFrog Set me up to copy the snippet populated with your token and environment. For more information, see Use Artifactory Set Me Up for Configuring Package Manager Clients.
Edit .npmrc file
If you cannot log in manually or if you are using automated scripts, edit the .npmrc file with authentication snippets. This is called basic authentication. The location of the .npmrc file is %userprofile%\.npmrc on Windows, the USER root folder on Mac, and ~/.npmrc on Linux. You can use basic authentication for unscoped or scoped packages.
To use basic authentication for unscoped packages:
Add the following snippet to the .npmrc file:
registry=https://[JFrogPlatformURL]/artifactory/api/npm/<REPO_NAME>/
//[JFrogPlatformURL]/artifactory/api/npm/<REPO_NAME>/:_authToken=<TOKEN>
Where:
[JFrogPlatformURL]: The URL of your JFrog platform<REPO_NAME>: The name of the target registry<TOKEN>: Your JFrog identity token
For example:
registry=https://company.jfrog.io/artifactory/api/npm/npm-virtual/
//company.jfrog.io/artifactory/api/npm/npm-virtual/:_authToken=aK9xL2gH4jF6bN8pS0cV3zW1qR7tY5uIeP3oA2sD4fG6hJ8kL0mZ7xV9bN1cdXNlcm5hbWU6U2FtcGxlRW5jcnlwdGVkUGFzc3dvcmQxMjM0NQ==Note
You can also use JFrog Set me up to copy the snippet populated with your token and environment. For more information, see Use Artifactory Set Me Up for Configuring Package Manager Clients.
To use basic authentication for scoped packages:
Add the following snippet to the .npmrc file:
@<SCOPE>:registry=https://[JFrogPlatformURL]/artifactory/api/npm/<REPO_NAME>/
//[JFrogPlatformURL]/artifactory/api/npm/<REPO_NAME>/:_authToken=<TOKEN>
Where:
<SCOPE>: The scope of the registry[JFrogPlatformURL]: The URL of your JFrog platform<REPO_NAME>: The name of the target registry<TOKEN>: Your JFrog identity token
For example:
@internal:registry=https://company.jfrog.io/artifactory/api/npm/npm-internal-virtual/
//company.jfrog.io/artifactory/api/npm/npm-internal-virtual/:_authToken=aK9xL2gH4jF6bN8pS0cV3zW1qR7tY5uIeP3oA2sD4fG6hJ8kL0mZ7xV9bN1cdXNlcm5hbWU6U2FtcGxlRW5jcnlwdGVkUGFzc3dvcmQxMjM0NQ==Note
You can also use JFrog Set me up to copy the snippet populated with your token and environment. For more information, see Use Artifactory Set Me Up for Configuring Package Manager Clients.
Next steps:
Install npm Packages with npm CLI
Artifactory supports installing an npm package using the npm CLI. You can use npm install to install packages from default or scoped registries set in the .npmrc file. You can also install from any npm registry by adding the --registry flag to your npm install command. This flag overrides the settings in your .npmrc file.
To install an npm package:
Run the following command:
npm install <PACKAGE_NAME>Where:
<PACKAGE_NAME>: The name of the package you want to install, including the@<SCOPE>/prefix for scoped packages
For example:
npm install colorsTo install packages from a specific registry:
Run the following command:
npm install <PACKAGE_NAME> --registry [JFrogPlatformURL]/artifactory/api/npm/<REPO_NAME>/Where:
<PACKAGE_NAME>: The name of the package you want to install, including the@<SCOPE>/prefix for scoped packages[JFrogPlatformURL]: The URL of your JPD<REPO_NAME>: The name of the target repository
For example:
npm install colors --registry https://company.jfrog.io/artifactory/api/npm/npm-localNote
You can also use JFrog Set me up to copy the snippet populated with your token and environment. For more information, see Use Artifactory Set Me Up for Configuring Package Manager Clients.
Publish npm Packages with the npm CLI
Configure the npm CLI to publish packages to Artifactory by adding the target repository to the package.json file. You can also specify the repository name in the npm publish command to override the configured target repository.
Note
If you run
npm publishwithout configuring thepackage.jsonfile, the package publishes to the default repository in the.npmrcfile. Configuring thepackage.jsonis an optional override to publish a specific package to a different repository.
To set up the npm CLI to publish packages to Artifactory:
-
Add the following snippet to your package.json file:
"publishConfig":{"registry":"[JFrogPlatformURL]/artifactory/api/npm/<REPO_NAME>/"}Where:
[JFrogPlatformURL]: The URL of your JPD<REPO_NAME>: The name of the target repository
For example:
"publishConfig":{"registry":"https://company.jfrog.io/artifactory/api/npm/npm-local/"} -
Run the following command:
npm publish
Note
You can also use JFrog Set me up to copy the snippet populated with your token and environment. For more information, see Use Artifactory Set Me Up for Configuring Package Manager Clients.
To publish to a specific repository:
Run the following command:
npm publish --registry [JFrogPlatformURL]/artifactory/api/npm/<REPO_NAME>/Where:
[JFrogPlatformURL]: The URL of your JPD<REPO_NAME>: The name of the target repository
For example:
npm publish --registry https://company.jfrog.io/artifactory/api/npm/npm-local/Note
You can also use JFrog Set me up to copy the snippet populated with your token and environment. For more information, see Use Artifactory Set Me Up for Configuring Package Manager Clients.
pnpm
The following topics describe how to configure and use the pnpm CLI with Artifactory:
Connect pnpm to Artifactory
You can use the pnpm CLI as a client to install and publish npm packages. Connect pnpm to Artifactory in one of these ways, based on your repository and environment:
JFrog recommends using a virtual repository as the default registry setting. Virtual repositories provide flexibility to access external sources and local repositories, and reconfigure them as needed. For more information on setting up a virtual npm repository, see Create an npm Repository.
Log In to Unscoped Registries using pnpm login
pnpm loginSet an npm repository in Artifactory as your default registry for pnpm. You can also log in to a specific registry without overriding the default.
To set up and log in to a default npm registry using the pnpm CLI:
-
Run this command:
pnpm config set registry https://[JFrogPlatformURL]/artifactory/api/npm/<REPO_NAME>/Where:
[JFrogPlatformURL]:The URL of your JFrog service endpoint<REPO_NAME>: The name of the target npm repository in Artifactory
For example:
pnpm config set registry https://company.jfrog.io/artifactory/api/npm/npm-virtual/ -
Run this command:
pnpm login --auth-type=webIf you are logging in for the first time, repeat this step after accessing the UI for the first time.
Note
You can also use JFrog Set me up to copy the snippet populated with your token and environment. For more information, see Use Artifactory Set Me Up for Configuring Package Manager Clients.
To log in to a specific registry:
Run this command:
pnpm login --registry=[JFrogPlatformURL]/artifactory/api/npm/<REPO_NAME>/ --auth-type=webWhere:
[JFrogPlatformURL]: The URL of your JFrog service endpoint<REPO_NAME>: The name of the target repository
For example:
pnpm login --registry=https://company.jfrog.io/artifactory/api/npm/npm-virtual/Note
You can also use JFrog Set me up to copy the snippet populated with your token and environment. For more information, see Use Artifactory Set Me Up for Configuring Package Manager Clients.
Log In to Scoped Registries using pnpm login
pnpm loginIf you work with scoped packages, you can use the --scope flag to specify the scope.
To log in a scoped npm registry using pnpm:
Run this command:
pnpm login --registry=https://company.jfrog.io/artifactory/api/npm/npm-local/ --scope=@<SCOPE>Where:
[JFrogPlatformURL]: The URL of your JPD<REPO_NAME>: The name of the target scoped npm repository in Artifactory<SCOPE>: The scope or namespace
For example:
pnpm login --registry=https://company.jfrog.io/artifactory/api/npm/npm-local/ --scope=@INTERNALIf you are logging in for the first time, run the command again after accessing the UI for the first time.
Note
You can also use JFrog Set me up to copy the snippet populated with your token and environment. For more information, see Use Artifactory Set Me Up for Configuring Package Manager Clients.
Edit .npmrc file for pnpm
If you cannot log in manually or if you are using automated scripts, edit the .npmrc file with authentication snippets. This is called basic authentication. You can use basic authentication for unscoped or scoped acces.
To edit the .npmrc file for basic authentication:
-
Open the
.npmrcfile in a text editor. The file location varies by operating system:- Linux:
~/.npmrc - Mac:
USERroot folder - Windows:
%USERPROFILE%/.npmrc
- Linux:
-
Add one of the following code snippets to the
.npmrcfile based on whether you are configuring unscoped or scoped access:-
Unscoped:
registry=https://[JFrogPlatformURL]/artifactory/api/npm/<REPO_NAME>/:_authToken=<TOKEN>Where:
[JFrogPlatformURL]: The URL of your JPD<REPO_NAME>: The name of the target registry<TOKEN>: Your JFrog identity token
For example:
registry=https://company.jfrog.io/artifactory/api/npm/npm-local/:_authToken=Random_Token -
Scoped:
@<SCOPE>:registry=https://[JFrogPlatformURL]/artifactory/api/npm/<REPO_NAME>/:_authToken=<TOKEN>Where:
<SCOPE>: The scope of the registry[JFrogPlatformURL]: The URL of your JPD<REPO_NAME>: The name of the target registry<TOKEN>: Your JFrog identity token
For example:
@INTERNAL:registry=https://company.jfrog.io/artifactory/api/npm/npm-local/:_authToken=Random_Token
-
-
Save the changes to the file.
Note
You can also use JFrog Set me up to copy the snippet populated with your token and environment. For more information, see Use Artifactory Set Me Up for Configuring Package Manager Clients.
Next Steps:
Install npm Packages with pnpm
Artifactory supports installing an npm package using pnpm. You can use pnpm add to install packages from registries set in the .npmrc file.
To install an npm package with pnpm:
Run the following command:
pnpm add <PACKAGE>Where:
<PACKAGE>: The name of the package you want to install
For example:
pnpm add colorsTo install a specific version of a package:
Run the following command:
pnpm add <PACKAGE>@<VERSION>Where:
<PACKAGE>: The name of the package you want to install<VERSION>: The package version you want to install
For example:
pnpm add colors@latestNote
You can also use JFrog Set me up to copy the snippet populated with your token and environment. For more information, see Use Artifactory Set Me Up for Configuring Package Manager Clients.
Publish npm Packages with pnpm
Configure pnpm to publish packages to Artifactory by adding the target repository to the package.json file. You can also specify the repository name in the pnpm publish command to override the configured target repository.
Note
If you run
pnpm publishwithout configuring thepackage.jsonfile, the package publishes to the default repository in the.npmrcfile. Configuring thepackage.jsonis an optional override to publish a specific package to a different repository.
To set up pnpm to publish packages to Artifactory:
-
Add the following snippet to your
package.jsonfile:"publishConfig":{"registry":"[JFrogPlatformURL]/artifactory/api/npm/<REPO_NAME>/"}Where:
[JFrogPlatformURL]: The URL of your JFrog service endpoint<REPO_NAME>: The name of the target repository
For example:
"publishConfig":{"registry":"https://company.jfrog.io/artifactory/api/npm/npm-local/"} -
Run the following command:
pnpm publish
Note
You can also use JFrog Set me up to copy the snippet populated with your token and environment. For more information, see Use Artifactory Set Me Up for Configuring Package Manager Clients.
To publish to a specific repository:
Run the following command:
pnpm publish --registry [JFrogPlatformURL]/artifactory/api/npm/<REPO_NAME>/Where:
[JFrogPlatformURL]: The URL of your JFrog service endpoint<REPO_NAME>: The name of the target repository
For example:
pnpm publish --registry https://company.jfrog.io/artifactory/api/npm/npm-local/Note
You can also use JFrog Set me up to copy the snippet populated with your token and environment. For more information, see Use Artifactory Set Me Up for Configuring Package Manager Clients.
Yarn
The following topics describe how to configure and use the Yarn client with Artifactory:
Connect Yarn to Artifactory
You can use Yarn Modern (V2+) or Yarn Classic (V1) to natively manage npm packages in Artifactory.
Configure Yarn Modern
You can use yarn commands to programmatically configure your Yarn client with required permissions to access your Artifactory repositories.
To connect Yarn Modern to Artifactory:
- Run this command to set Artifactory as your default npm registry:
Where:
yarn config set --home npmRegistryServer "https://<JFrogPlatformURL>/api/npm/<REPO_NAME>/"<JFrogPlatformURL>: The URL of your JFrog Platform<REPO_NAME>: The name of the target repository
For example:
yarn config set --home npmRegistryServer "https://company.jfrog.io/api/npm/npm-virtual/" - Run this command to configure Yarn to always authenticate with Artifactory:
Where:
yarn config set --home 'npmRegistries["https://<JFrogPlatformURL>/artifactory/api/npm/<REPO_NAME>/"].npmAlwaysAuth' true<JFrogPlatformURL>: The URL of your JFrog Platform<REPO_NAME>: The name of the target repository
For example:
yarn config set --home 'npmRegistries["https://company.jfrog.io/artifactory/api/npm/npm-virtual/"].npmAlwaysAuth' true - Run this command to set your authentication token for Artifactory:
Where:
yarn config set --home 'npmRegistries["https://<JFrogPlatformURL>/artifactory/api/npm/<REPO_NAME>/"].npmAuthToken' <TOKEN><JFrogPlatformURL>: The URL of your JFrog Platform<REPO_NAME>: The name of the target repository<TOKEN>: Your Artifactory identity token For example:
yarn config set --home 'npmRegistries["https://company.jfrog.io/artifactory/api/npm/npm-virtual/"].npmAuthToken' Random_TokenPoYzI5MGRYSnZiM2w2SWpvaWRIaGlabWxmWTI5dEluMC5zVzE2ODU - Optionally, enable non-secure HTTP interaction by running this command:
Where
yarn config set unsafeHttpWhitelist --home --json '["<HOSTNAME>"]'<HOSTNAME>is the hostname of your JFrog Platform, without the protocol. For example:yarn config set unsafeHttpWhitelist --home --json '["company.jfrog.io"]'
Configure Yarn Classic
To configure Yarn Classic for use with Artifactory:
-
Run the following command to set an Artifactory repository as the default npm registry:
npm config set registry [JFrogPlatformURL]/artifactory/api/npm/<REPO_NAME>/Where:
[JFrogPlatformURL]: The URL of your JPD<REPO_NAME>: The name of the target repository
For example:
npm config set registry https://company.jfrog.io/artifactory/api/npm/npm-virtual/ -
Run the following command to authenticate to Artifactory, and enter your credentials when prompted:
npm login --auth-type=web
echo "always-auth=true" >> ~/.npmrc
Next steps:
Install npm Packages with Yarn
Artifactory supports installing an npm package using the Yarn client. The install workflow is the same for Yarn Classic and Yarn Modern.
To install an npm package with Yarn:
Run the following command:
yarn add <PACKAGE_NAME>Where:
<PACKAGE_NAME>: The name of the package you want to install, including the @<SCOPE>/ prefix for scoped packages
For example:
yarn add lodashTip
You can also specify a certain version of the package by adding
@<VERSION>after the package name, where<VERSION>is the version of the package you want to install. For example,yarn add [email protected]installs version 4.17.21 of the lodash package.
Publish npm Packages with Yarn
You can publish npm packages to Artifactory using either Yarn V2+ (Modern) or Yarn V1 (Classic).
Publish npm Packages with Yarn Modern
You can publish npm packages to Artifactory using Yarn Modern by running the publish command from a package folder.
To publish a package to Artifactory with Yarn Modern:
- Run the following command from the package folder:
yarn npm publish
Publish npm Packages with Yarn Classic
Configure Yarn Classic to publish packages to Artifactory by adding the target repository to the package.json file. You can also specify the target repository in the yarn publish command to override the configured target repository.
To publish a package to Artifactory with Yarn Classic:
-
Add the following snippet to the
package.jsonfile:"publishConfig": { "registry": "[JFrogPlatformURL]/artifactory/api/npm/<REPO_NAME>/" }Where:
[JFrogPlatformURL]: The URL of your JPD<REPO_NAME>: The name of the target repository
For example:
"publishConfig": { "registry": "https://company.jfrog.io/artifactory/api/npm/npm-local/" } -
Run the following command:
yarn publish
Tip
You can also publish to a specific repository using the
--registryflag to specify the full repository URL after the publish command. For example,yarn publish --registry https://company.jfrog.io/artifactory/api/npm/npm-local/.
Additional npm Information
The following pages provide additional information about using npm with Artifactory:
- Publish npm Packages via the UI
- Automatically Rewrite External npm Dependencies
- Install npm Packages using Distribution Tags
- npm Scope Packages
- Search for npm Packages
- Specify the Latest Version of npm Package
- Use npm Audit
- Use npm Enforce Path Layout
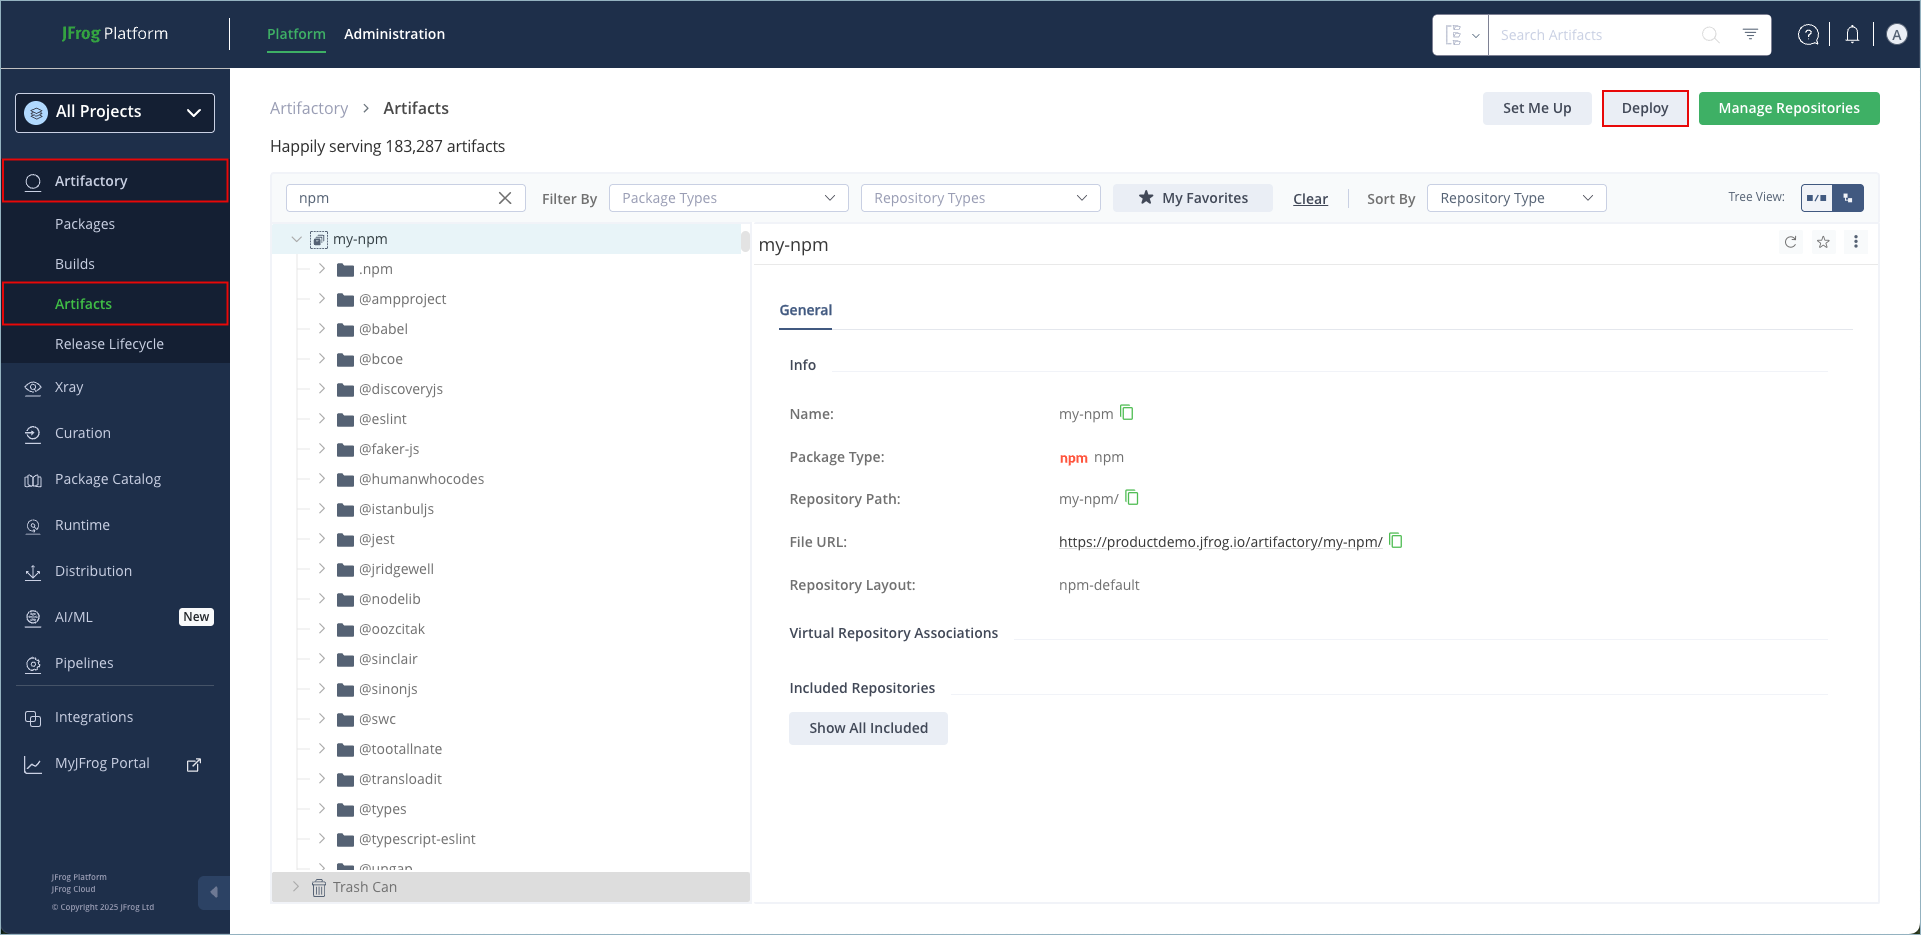
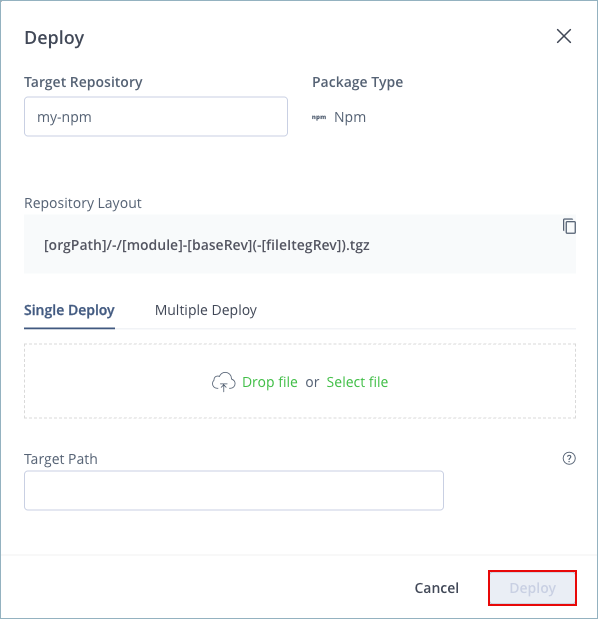
Publish npm Packages via the UI
To publish an npm package via Artifactory UI:
-
In the Platform tab, click Artifactory | Artifacts, then click Deploy. Deploy options are displayed.
-
Verify the deploy options, then click Deploy.
The package is deployed.
Automatically Rewrite External npm Dependencies
Packages requested by the npm client frequently use external dependencies as defined in the packages' package.json file. These dependencies may, in turn, need additional dependencies. Therefore, when downloading an npm package, you may not have full visibility into the full set of dependencies that your original package needs (whether directly or transitively). As a result, you are at risk of downloading malicious dependencies from unknown external resources.
To manage this risk, and maintain the best practice of consuming external packages through Artifactory, you may specify a "safe" Allow List from which dependencies may be downloaded, cached in Artifactory and configure to rewrite the dependencies so that the npm client accesses dependencies through a virtual repository as follows:
-
Select the Enable Dependency Rewrite checkboxin the npm virtual repository advanced configuration.
-
Specify an Allow List pattern of external resources from which dependencies may be downloaded.
-
Specify the remote repository in which those dependencies should be cached.
It is preferable to configure a dedicated remote repository for that purpose so it is easier to maintain.
Artifactory supports all possible shorthand resolvers including the following:
git+ssh://user@hostname:project.git#commit-ish
git+ssh://user@hostname/project.git#commit-ish
git+https://[email protected]/<user>/<filename>.git
Install npm Packages using Distribution Tags
You can add distributions tags to your npm install command to install specific versions of a package based on the tags. By default, the npm install command returns the first package with the tag that appears in the priority resolution order you configured. For more information on repository configurations, see Repositories Configurations in Artifactory YAML.
To install a package with distribution tags:
Run the following command:
npm install <PACKAGE_NAME>@<DIST_TAG>Where:
<PACKAGE_NAME>: The name of the package you want to install, including the@<SCOPE>/prefix for scoped packages<DIST_TAG>: The target distribution tag
For example:
npm install colors@betaConfigure Distribution Tag Behavior in Artifactory YAML
Starting from Artifactory version 7.75.3, you can modify distribution tag behavior using system properties in your Repositories Configurations in Artifactory YAML file.
-
To install the latest SemVer version of the package with the dist-tag in your priority resolution repositories, set the following system property:
artifactory.npm.merge.latest.dist.tag.base.strategy.enabled=true -
To install the most recently created version of the package with the dist-tag in your priority resolution repositories, set the following system properties:
artifactory.npm.merge.latest.dist.tag.base.strategy.enabled=true
artifactory.npm.tag.tagLatestByPublish=true
npm Scope Packages
Artifactory fully supports npm scope packages. The support is transparent to the user and does not require any different usage of the npm client.
Npm 'slash' character encoding
By default, the npm client encodes slash characters (
/) to their ASCII representation (%2f) before communicating with the npm registry. ApacheTomcat is the HTTP Web Server used by Artifactory, which does not allow encoded slashes by default. This might result in HTTP 400 status codes being returned to the client.Starting from Artifactory 7.98.9, Artifactory is configured by default to enable encoded slashes, which supports npm scope packages. For more information, see Artifactory Known Issues.
If Artifactory is running behind a reverse proxy, make sure to disable URL decoding on the proxy itself to work with npm scope packages. For Apache, add the following setting inside the
<VirtualHost *:xxx>block:AllowEncodedSlashes On
Search for npm Packages
Artifactory supports a variety of ways to search artifacts. For details, please refer to Understanding how to Search for Artifacts and Packages.
Artifactory also supports npm search [search term]. However, these packages may not be available immediately after being published for the following reasons:
- Local Repositories: When publishing a package to a local repository, Artifactory calculates the search index asynchronously.
- Virtual repositories: Since a virtual repository may contain local repositories, a newly published package may not be available immediately for the same reason.
In the case of remote repositories, a new package will only be found once Artifactory checks for it according to the Retrieval Cache Period setting.
Tip
Artifactory annotates each deployed or cached npm package with two properties:
npm.nameandnpm.version.You can use the Property Search to search for npm packages according to their name or version.
Specify the Latest Version of npm Package
By default, the latest version of a package in an npm registry in Artifactory is the one with the highest SemVer version number. You can override this so that the most recently uploaded package is returned by Artifactory as the latest version. To do so, in Artifactory's system.properties file, add or set:
artifactory.npm.tag.tagLatestByPublish = trueUse npm Audit
Artifactory supports npm audit, allowing you to get vulnerabilities on your npm projects’ dependencies tree.
Note
As of Xray version 3.102.x, Xray no longer provides enrichment with
npm audit. To check Xray vulnerabilities from the command line, use jf audit instead.
Audit reports contain information about security vulnerabilities of dependencies and can help fix a vulnerability by providing npm commands and recommendations for further troubleshooting.
This functionality is enabled by default on npm virtual repositories that aggregate at least one remote repository that supports npm audit. For example, a remote repository that points to https://registry.npmjs.org or Artifactory Smart Remote repository. From Artifactory version 7.124.0 and later, npm audit is also enabled by default on npm remote repositories that support npm audit directly.
JFrog Xray users with Artifactory Pro X / Enterprise / Enterprise+ license, will get an enhanced audit report that includes security vulnerabilities from Xray's database. When Xray is configured to work with Artifactory, an audit report can be generated from scratch even without connecting to any remote repository.
Users with read permissions on supported remote and virtual repositories can use the following npm commands:
| Command | Description |
|---|---|
npm audit | Returns a vulnerability report based on the dependency tree sent by the npm client that is generated by https://npmjs.com/ and optionally enhanced by Jfrog Xray. |
npm audit fix | Fetches the same report as npm audit and attempts to automatically act upon the recommendations in the report. |
npm audit signatures | Returns the signatures and attestations of uploaded packages so you can ensure the integrity of the downloaded packages. |
In order to change the source of the npm audit reports, set the artifactory.npm.default.audit.provider system property (default https://registry.npmjs.org) to your desired audit provider url.
For more information about npm audit, see the npm documentation.
Use npm audit signatures
npm audit signaturesStarting from version 7.83.1, Artifactory supports npm audit signatures, a mechanism that applies and verifies artifact signatures using the ECDSA Key Pairs.
When ECDSA auto signing is enabled on a local repository, it creates a signature for each package which allows you to verify its origins using the npm client. You can ensure the integrity of your packages using the following CLI command:
npm audit signaturesWhen executing this command, Artifactory will respond with a count of the total number of packages in your repository that are signed. For supported packages in remote and virtual repositories, the response includes both ECDSA signatures and provenance data:
"dist":{
...
  "attestations": {
	"url": "https://registry.npmjs.org/-/npm/v1/attestations/<package_name>@1.0.0",
    "provenance": {
        "predicateType": "https://slsa.dev/provenance/v1"
    }
  },
  "signatures": [
			{
    		"keyid": "SHA256:{{SHA256_PUBLIC_KEY}}",
    		"sig": "a312b7c3cb4a1b693e8ebac5ee1ca9cc01g2661c14381917dcb111517f72370809..."
      }
	]
},
Identify Whether an npm Local Repository Uses ECDSA Signing
To identify whether your local repository has signing enabled, look for the signature in one of the packages in the repository.
You can view the signature for a package under the dist object in the package metadata JSON file, for example:
"dist":{
...
  "signatures": [{
    "keyid": "SHA256:{{SHA256_PUBLIC_KEY}}",
    "sig": "a312b7c3cb4a1b693e8ebac5ee1ca9cc01g2661c14381917dcb111517f72370809..."
  }],
Enable ECDSA Signing in Local Repositories
To enable npm audit signatures on a repository:
-
Generate a ECDSA key pair using the following command:
gpg --expert --full-generate-key -
Export the public and private keys using the following commands:
gpg --output private.pgp --armor --export-secret-key <KEY_ID>

gpg --output public.pgp --armor --export <KEY_ID>
Note
Replace the placeholder with the key ID that you can find in the output of the key generation command.
- In the JFrog Platform WebUI, go to Administration > Platform Security > Keys Management
- Click + Add Keys, and select ECDSA Keys from the drop-down menu
- Enter a name and alias for the key you created, and upload the public and private keys. When you are done, click Add ECDSA Key
- Go to the repository page on the JFrog Platform WebUI, and scroll down to the ECDSA Key Pair section: under Primary Key Name, select the name of the key you just created from the drop down menu.
- Click Save - the repository will automatically reindex and sign all the packages with the keys you provided.
npm Client Implications for npm audit signatures
npm audit signaturesWorking With Remote Repositories
When running npm audit signatures from a remote repository, the signature process is up to the upstream registry. The official npm registry already signs using ECDSA, therefore Artifactory provides the signature directly from the remote repository.
If you are pointing to a different remote repository and want to use the npm audit signatures command, you must verify that the upstream registry is signing the packages. Otherwise, the command will always show you exceptions.
Working With Virtual Repositories
When running npm audit signatures from a virtual repository, make sure to enable ECDSA signing on all of your local repositories nested under the virtual repository, so that all of the packages will be signed.
In addition, verify that all your remote repositories are pointing to registries that are signing the packages.
Avoid mixing signed and unsigned repositories in Virtual repositories
If you mix repositories with signed and unsigned packages, the
npm audit signaturescommand will always display an error that you have packages that do not have signatures. This is expected, of course, but will stop the npm client from continuing its usual actions, e.g. proceeding to download packages.
Known Issues With npm audit signatures
npm audit signatures- Running
npm audit signatureson a virtual repository that includes at least one local or remote repository that does not have signatures enabled causes the npm client to return an error, since not all your packages are signed. - If you have applied an include pattern to the repository with a list of accepted patterns, add the following include pattern to your list to be able to use
npm audit signatures:.npm/keys.json
Use npm Enforce Path Layout
You can activate a system property to enforce npm path layout. When activated, this system property will prevent, on all your npm repositories, uploading packages with file names that do not match the internal metadata of the package. This ensures that package uploads align with the package name in the artifact path across all your local npm repositories.
Activate this system property as follows:
artifactory.npm.enforce.path=trueNote
Enforcing npm path layout is not backward compatible and is applied only to npm packages that are uploaded after the system property was activated. npm packages that were uploaded to Artifactory prior to activating this system property will continue to be stored in Artifactory even if the file name does not match the internal metadata of the package.
npm Limitations in Artifactory
The following are the limitations of npm in Artifactory:
- Authentication with transient users: If an Admin creates an access token with a transient user,
npm loginwill fail as the user is not registered in Artifactory. - Legacy
_authproperty: Using the_authproperty for basic authentication is not supported by npm version 9 and newer. For npm version 9 and newer, authenticate usingnpm loginor an_authToken. - Client-side immaturity policy: In response to recent supply chain attacks, npm package managers introduced an immaturity policy that blocks new packages for 24 hours. For more information, including how to resolve this on the client side, see Recently published NPM packages may be blocked for 24 hours - New client enforcements.