

Custom Webhooks
To create a custom webhook:
-
Select All Projects, or from the Projects list, select the specific project for which to create a webhook.
-
Select the Platform module, then select Integrations > Webhooks.
-
Click New Webhook.
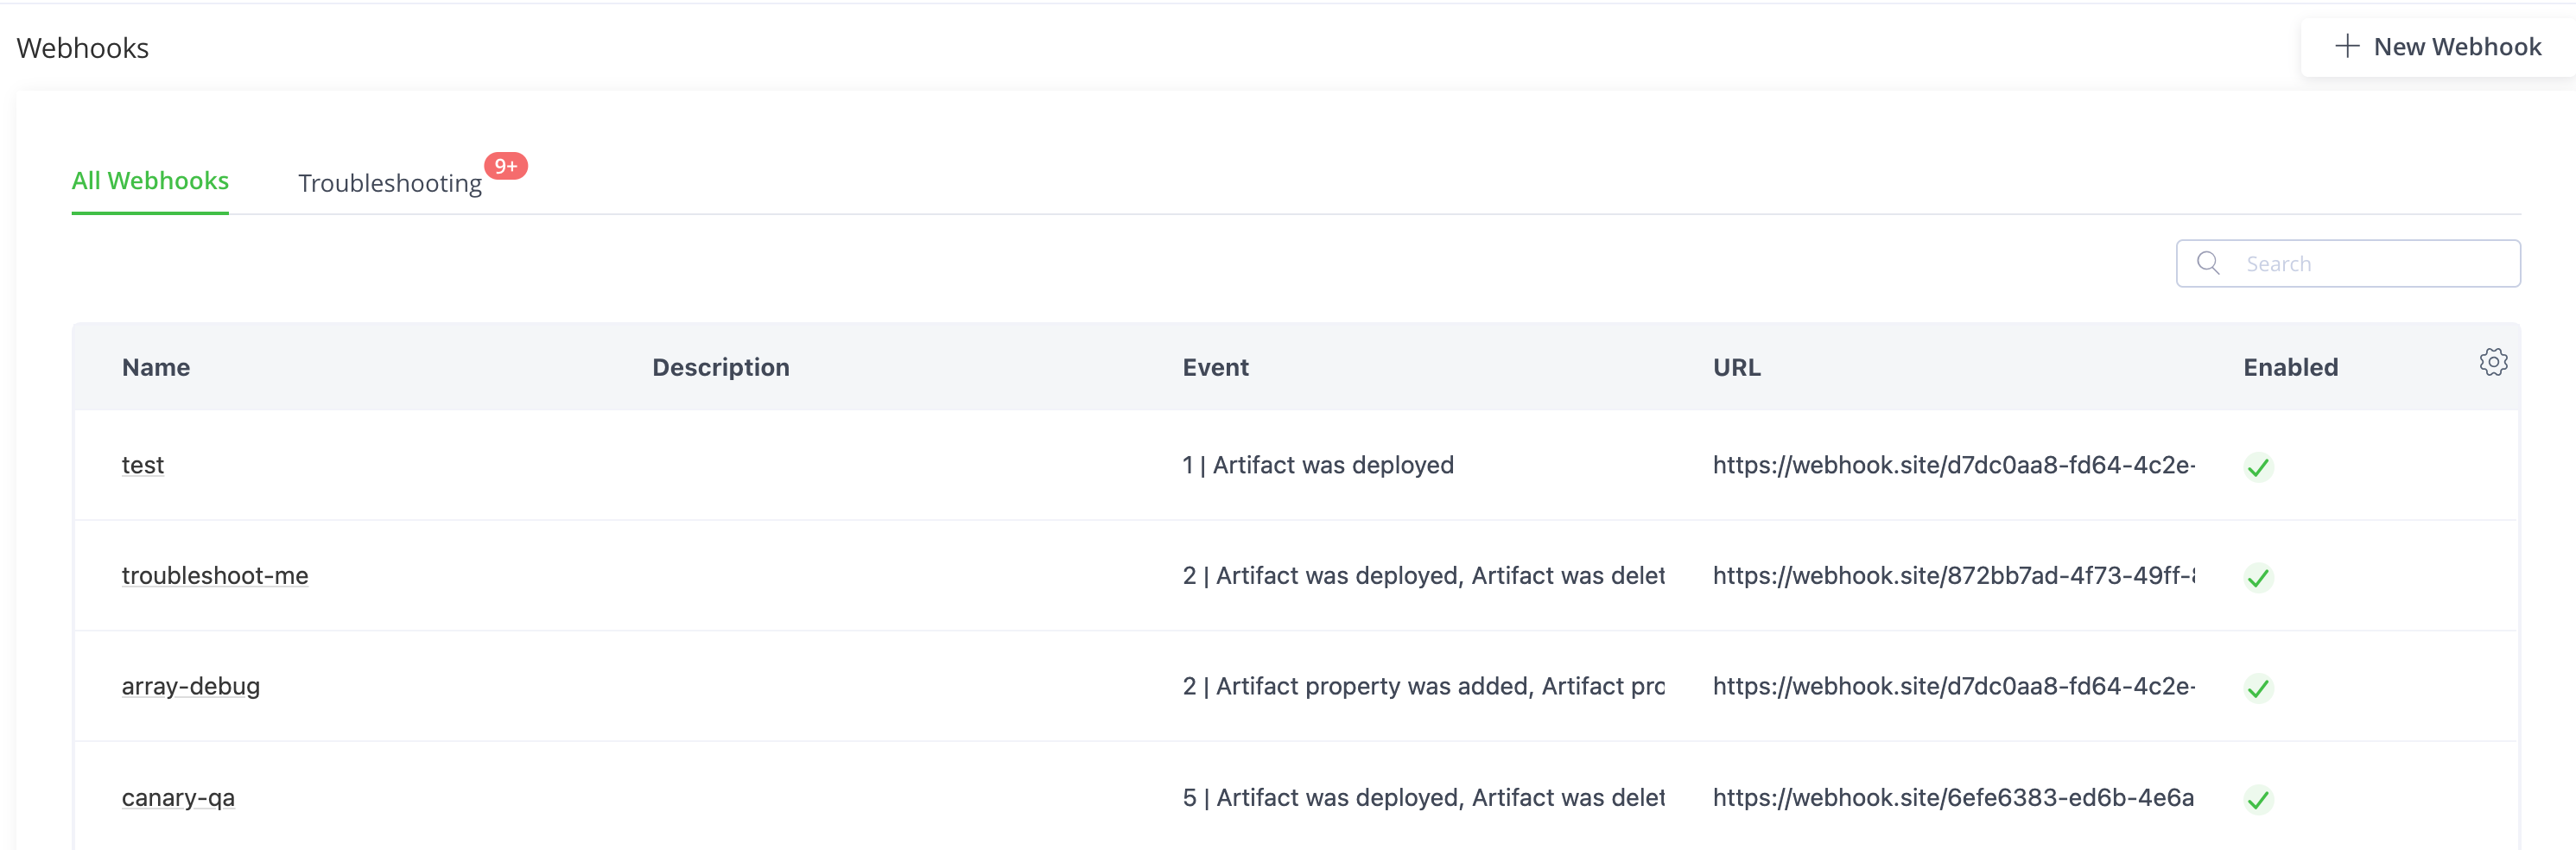
-
Click the Custom toggle.
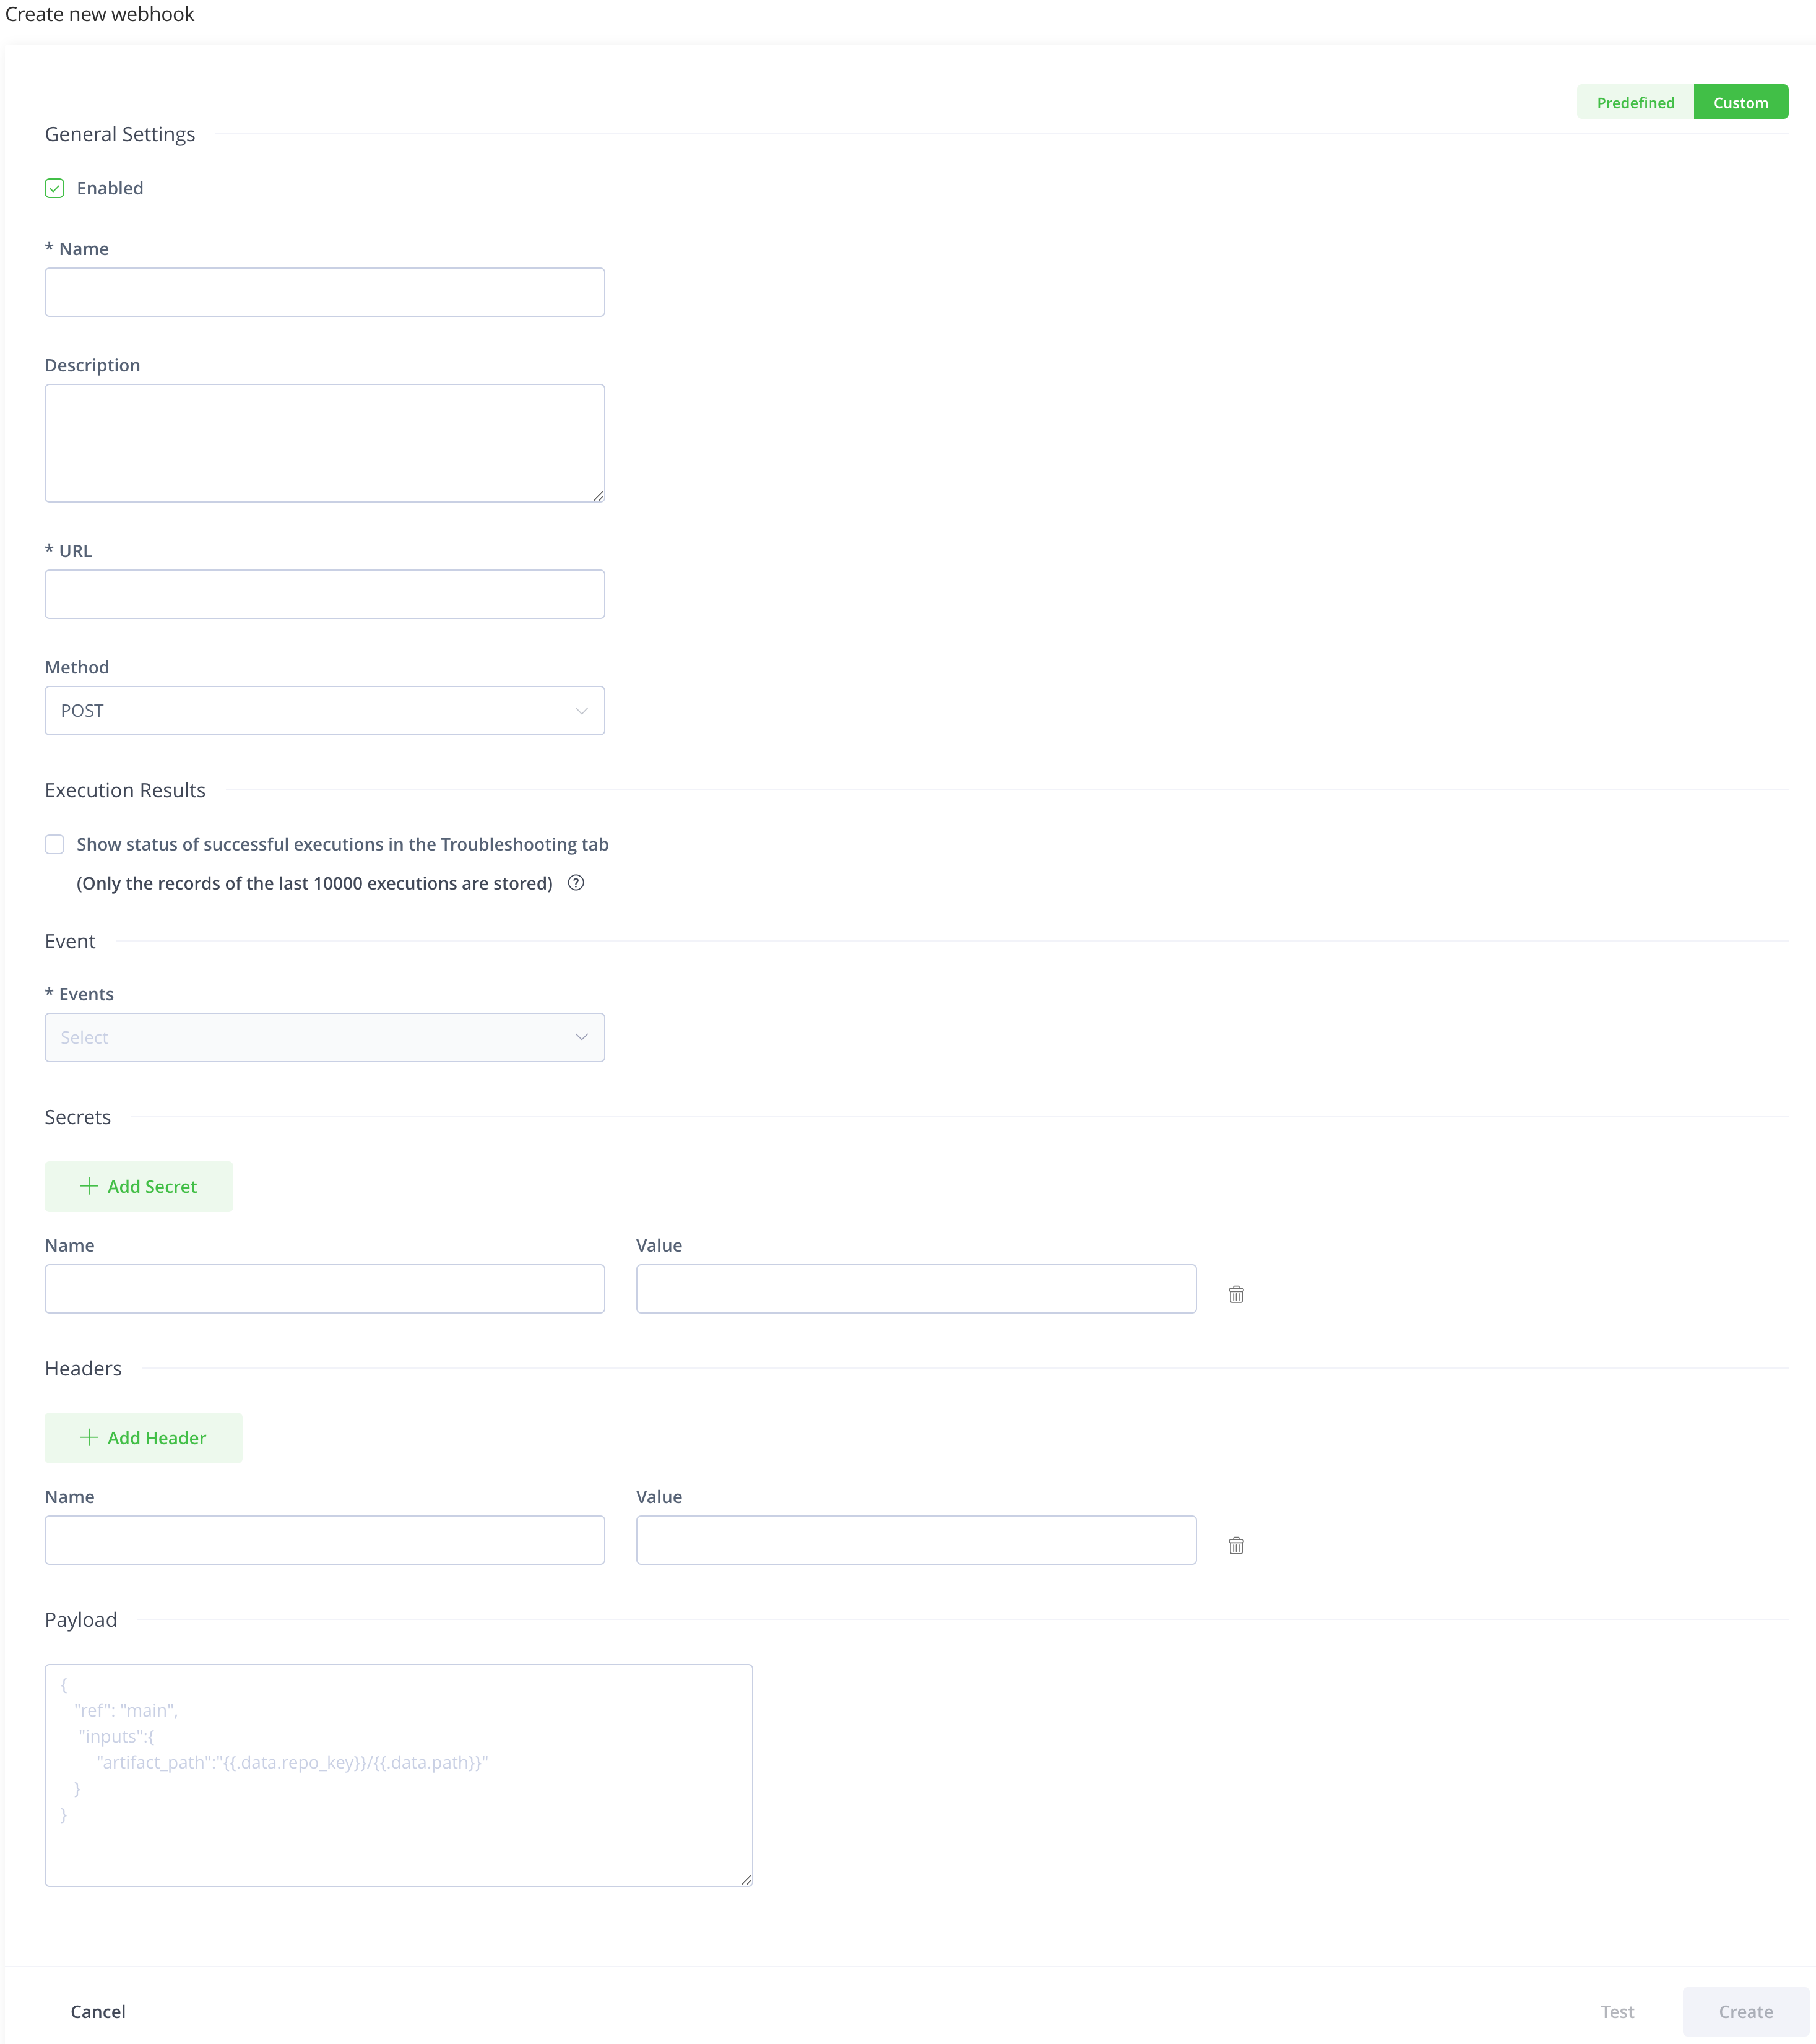
-
Enter the name and description of the webhook.
-
Enter the URL that the webhook invokes.
For example:
https://api.github.com/repos/myrepo/actions/workflows/artifact_deployed.yml/dispatches -
Select the HTTP method that the webhook should use.
You can choose from
POST,PUT,GET,PATCH, andDELETE. The default selection isPOST. -
Select a proxy server from the list of configured proxy servers in the Use Proxy dropdown list if you want to send the webhook through a proxy.
Applicable only for a self-hosted JFrog Platform installation
-
Select whether to show the results of the successful execution of the webhooks in the Troubleshooting tab.
Note
SaaS: Applicable only if Webhooks troubleshooting is available in your SaaS instance.
Self-managed: Applicable only if you configured Webhooks Troubleshooting.
-
Select the event or events that should trigger the webhook from the dropdown list. Hover over the resource type to see the available events, and select the checkbox for events you want to include.
Note
For a webhook associated with a specific project, event types are limited to those for Artifacts, Docker, Artifact Properties, and Builds.
-
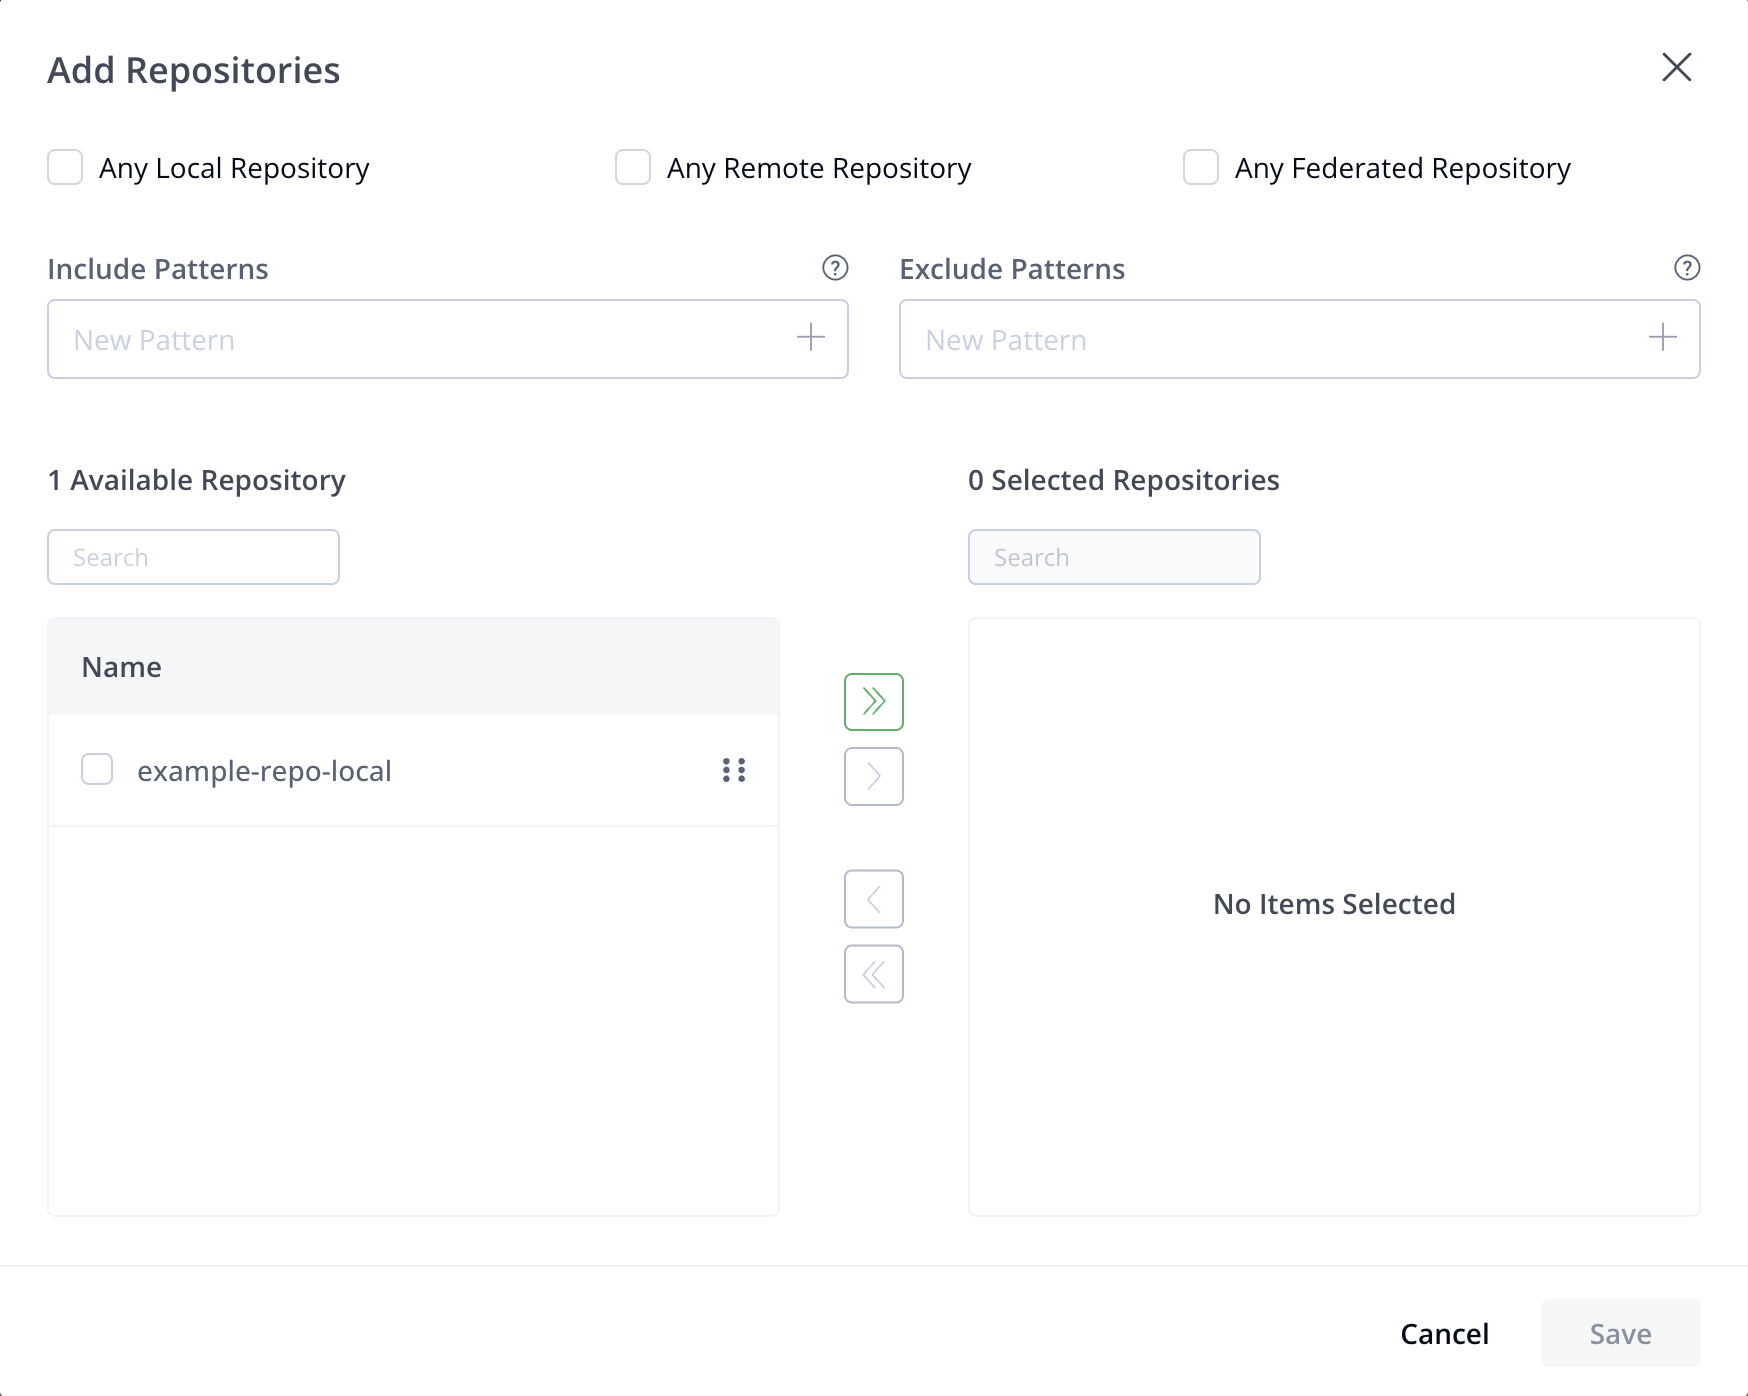
Select resources that the webhook will work on in the dialog box, and click Save. For example:
-
For artifacts, you can apply the
deployed,deleted,moved, andcopiedevent types to artifacts in any repository or in a list of repositories, by selecting manually or by using an include or exclude pattern.
Note
If you select any local or remote repository, the webhook applies to all existing repositories and any repositories you create in the future.
-
For builds, you can apply the
uploaded,promoted, anddeletedevent types to every new build that is uploaded to JFrog Artifactory or to a list of builds, by selecting manually or by using an include or exclude pattern.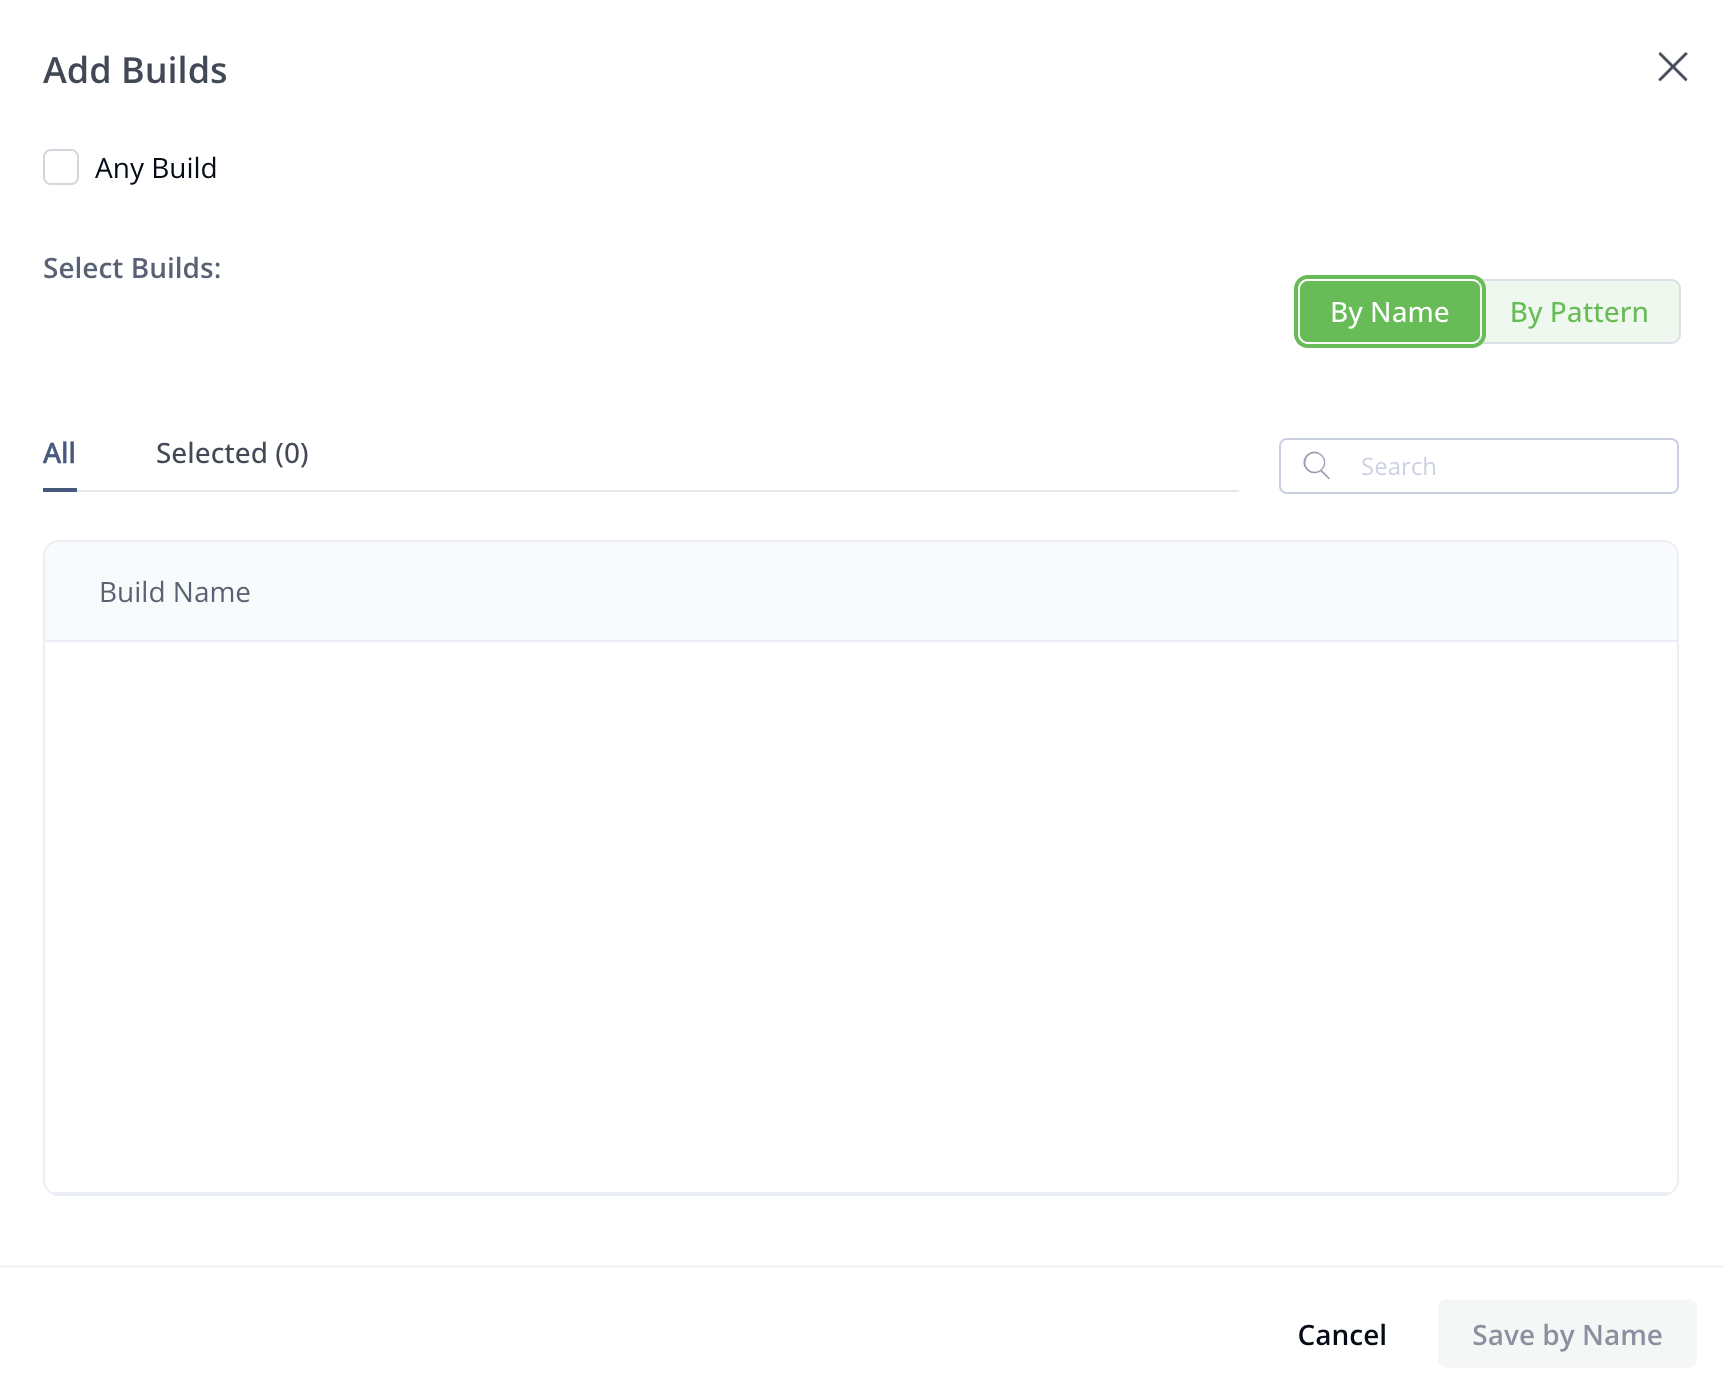
-
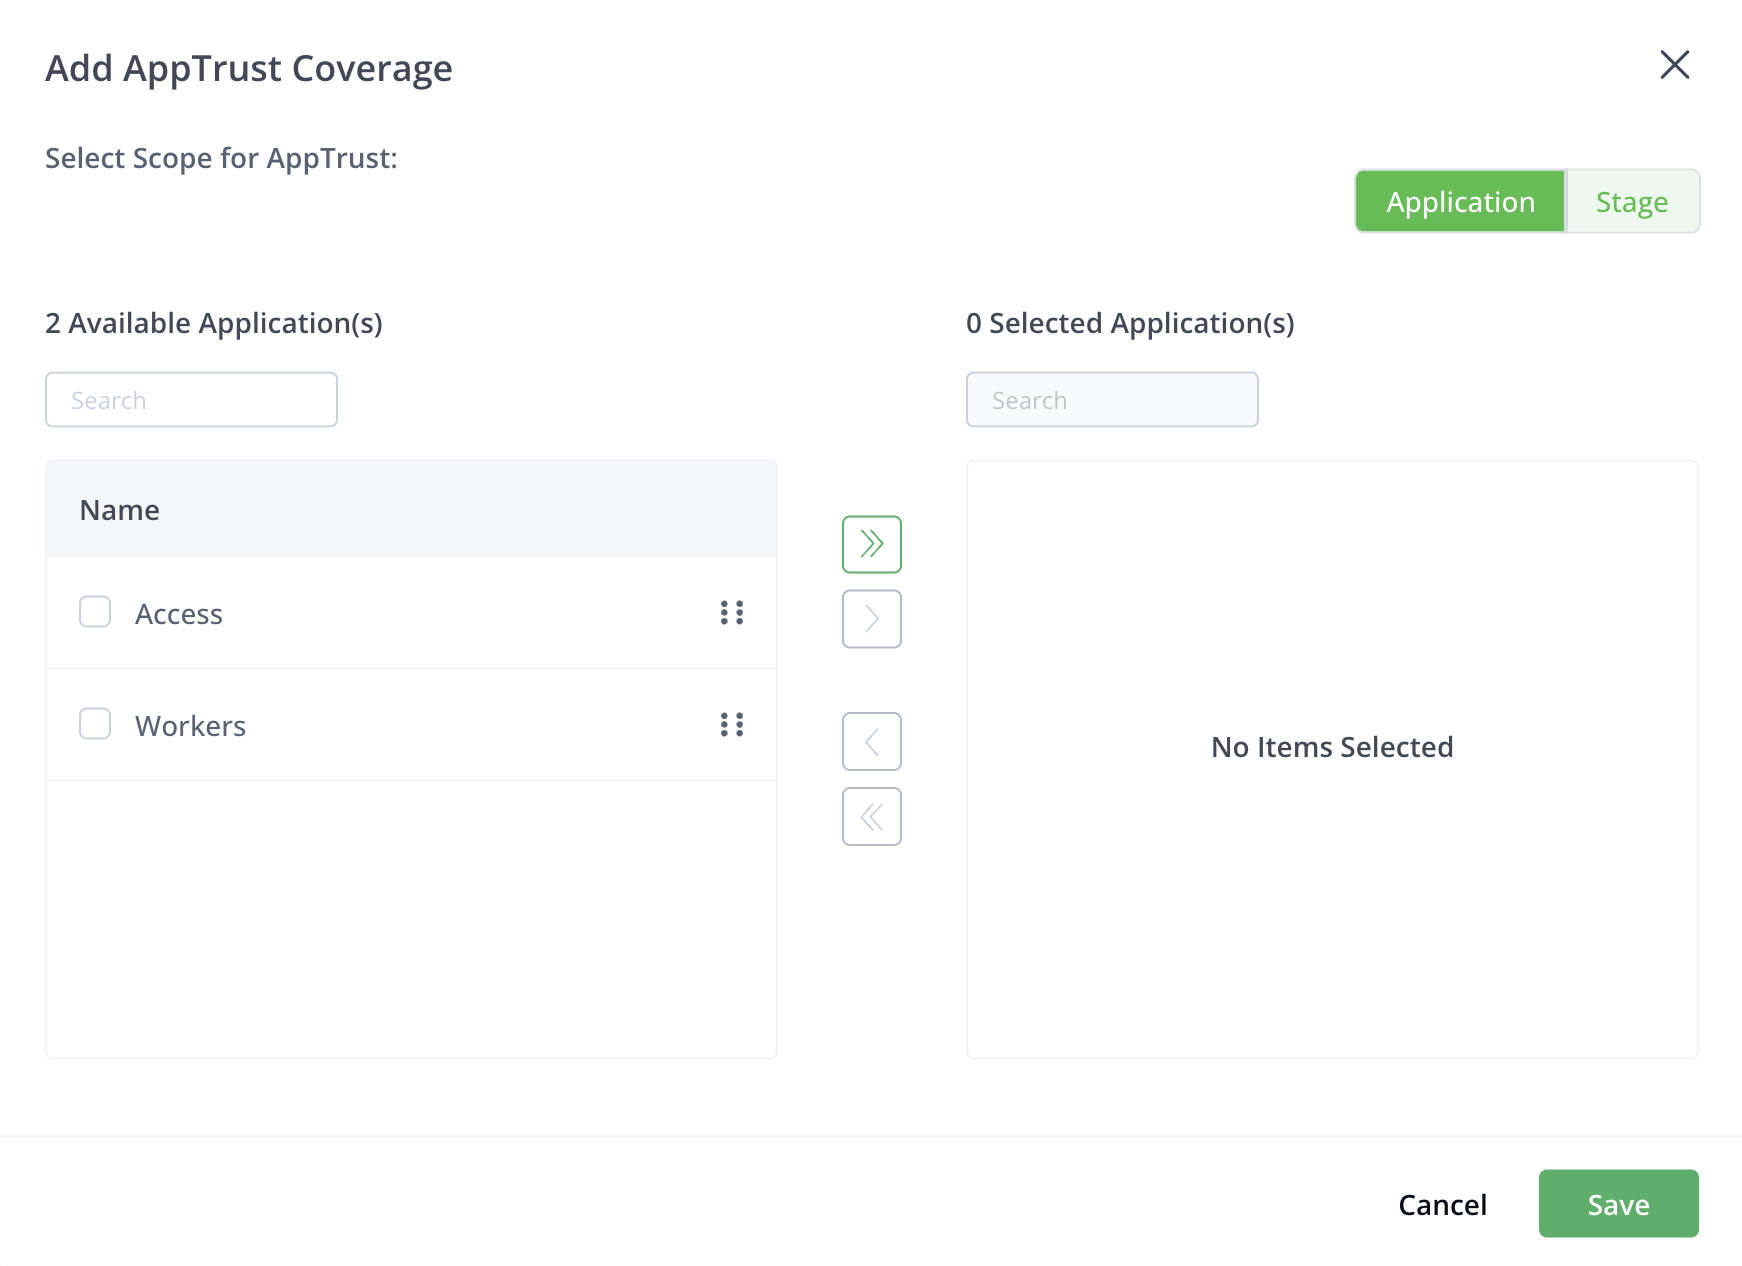
For JFrog AppTrust, you can apply entry gate, exit gate, release, version, and application events to specific applications or stages.
-
-
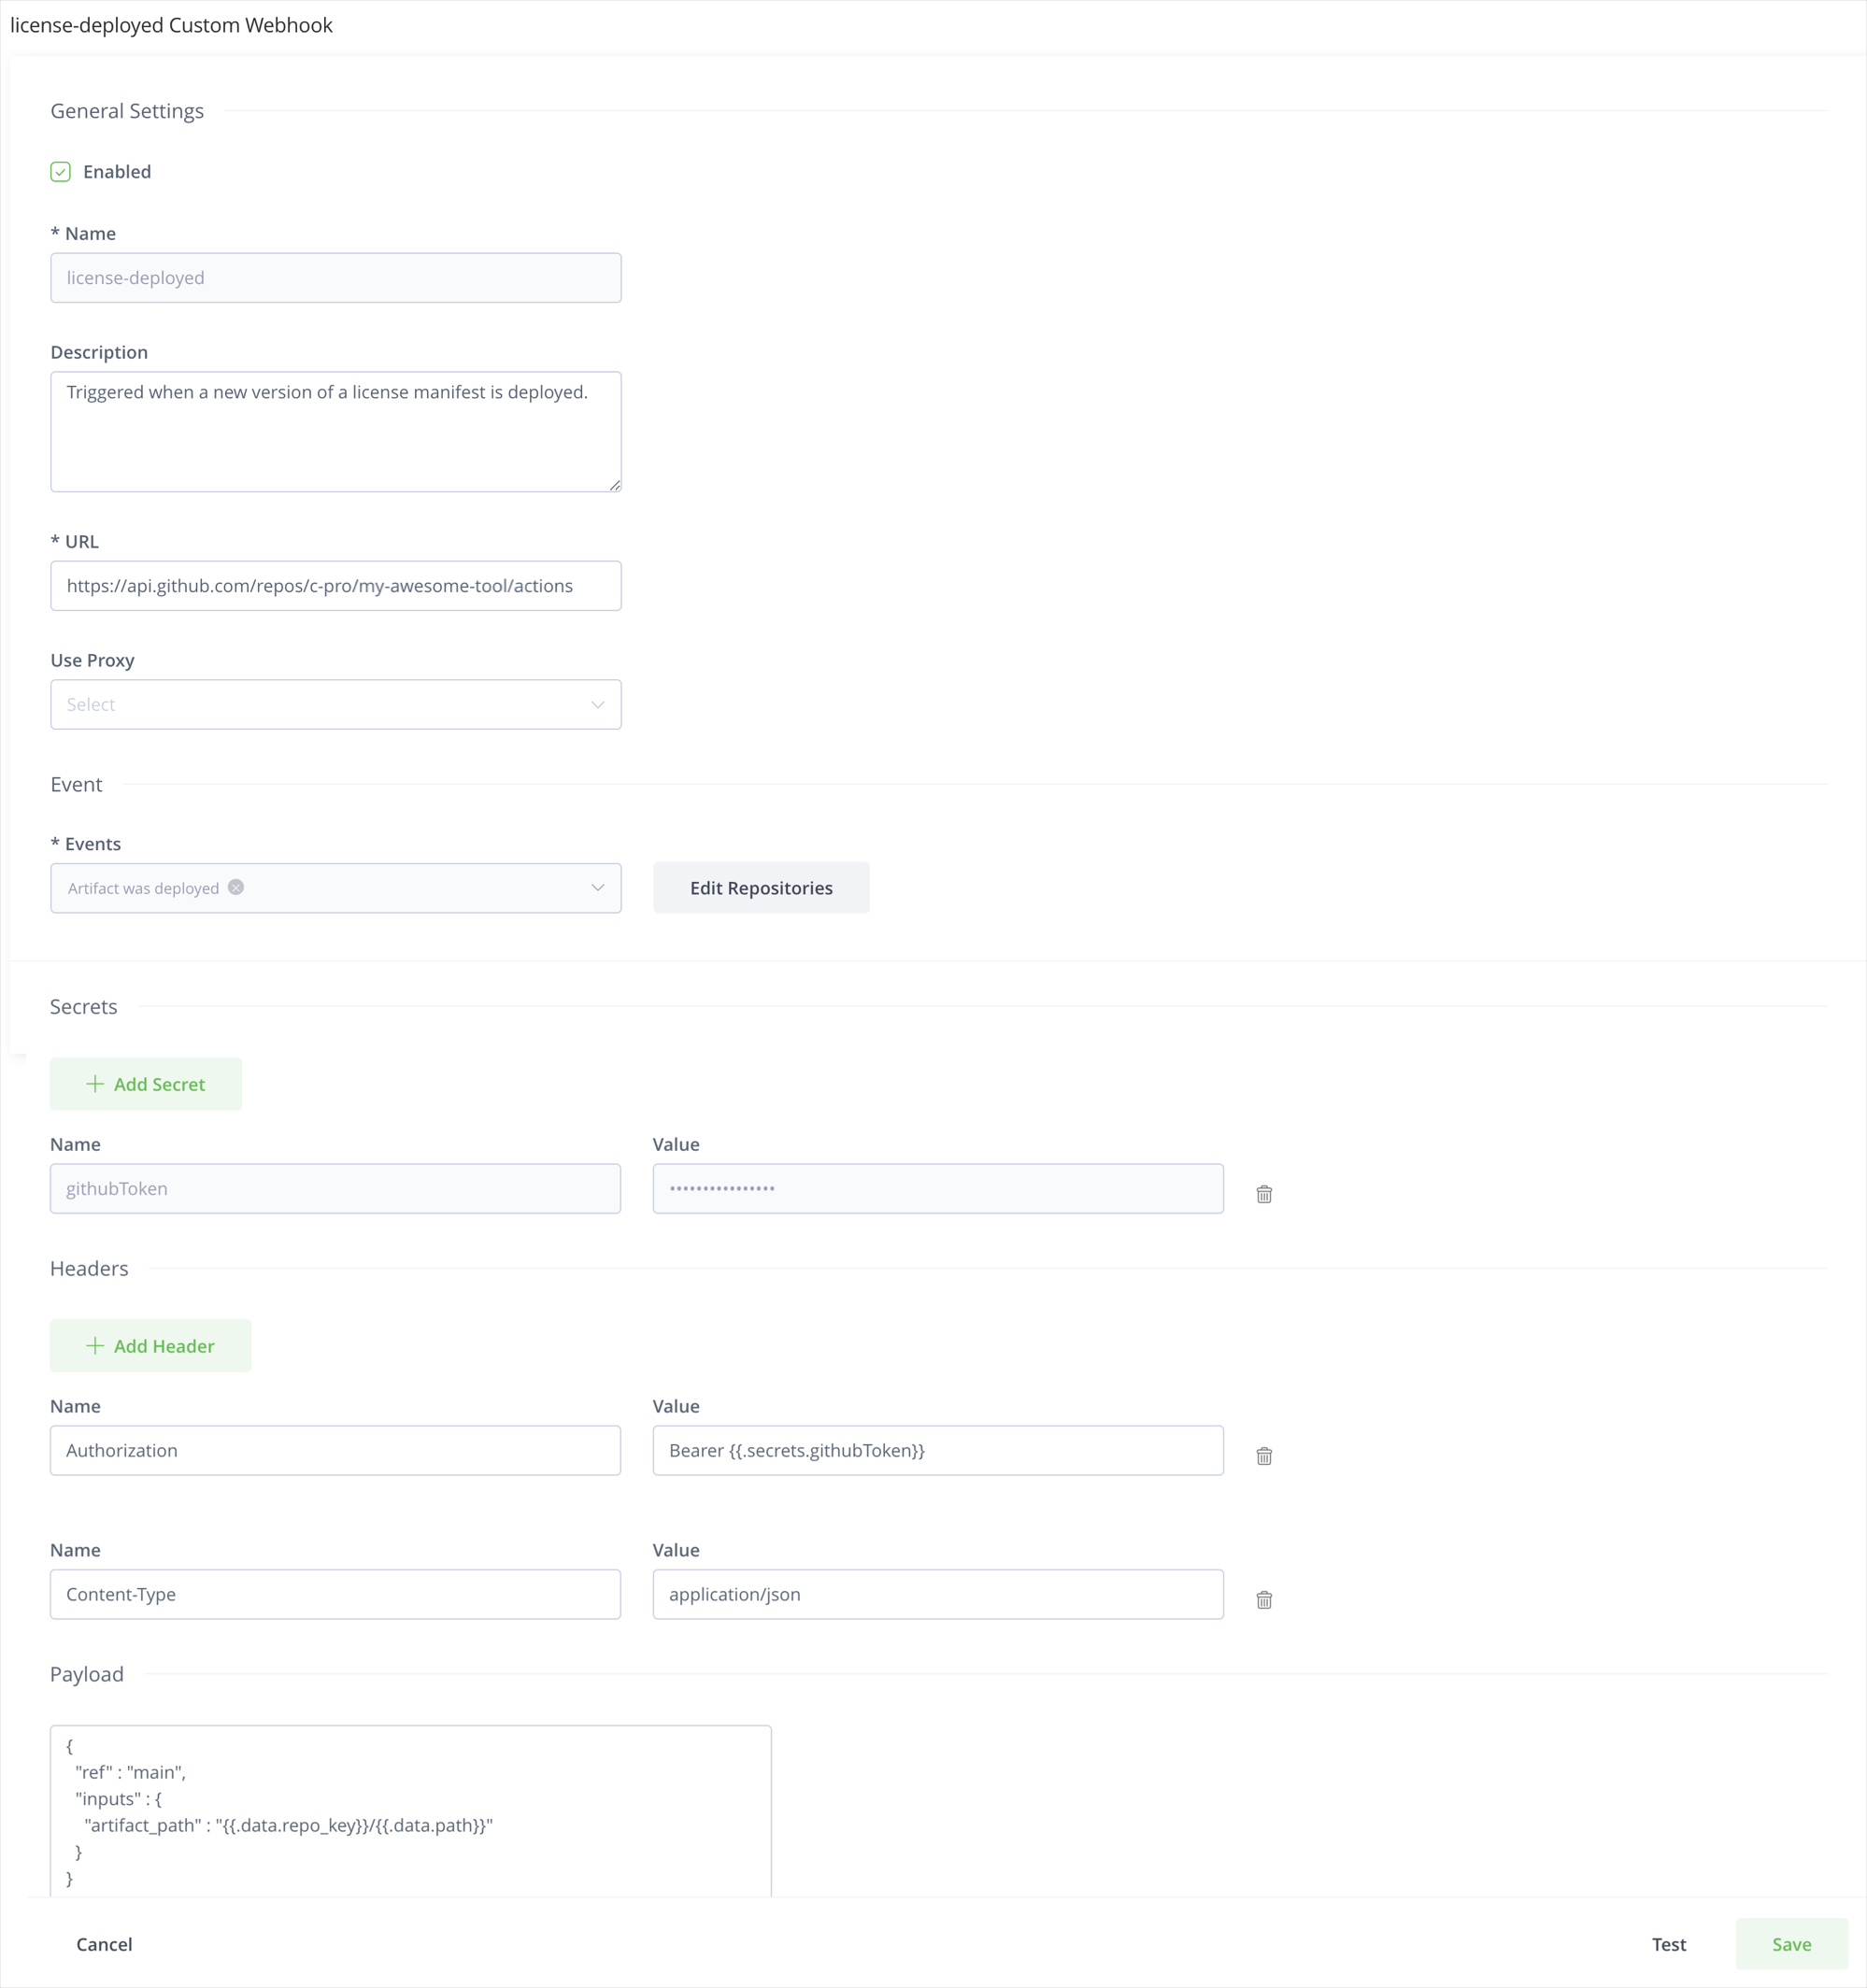
(Optional) Add secrets to the webhook. These define a set of sensitive values, such as tokens and passwords, that can be injected into the headers or payload. The values of the secrets are encrypted.
Invoke the value in the header or payload using the
{{.secrets.token}}format, wheretokenis the name provided for the secret value.Click Add Secret to add more than one secret.
Note
You can update the value of a secret when a password changes or a token expires using the Update Webhook Subscription by Key REST API.
PUT /event/api/v1/subscriptions/<sub-key>/secrets/<secret-name>Authorization: Bearer
<admin token>Content-Type: text/plain
<secret-value>
-
Add HTTP headers you want to use to invoke the webhook.
Click Add Header to add more than one header.
-
Enter the custom payload that you want to send to the target service.
In the payload, you can invoke values using dotted syntax. For more information, see Custom Webhooks Payload Templates.
The following is an example.
{
    "ref": "main",
    "inputs": {
        "artifact_path": "{{.data.repo_key}}/{{.data.path}}"
    }
}
For more information, see Event Types.
-
Click Test to test the configuration.
This sends a fake HTTP request to the target URL and verifies that the webhook is working.
-
Click Create to save the webhook configuration.
Note
By default, you can't use private networks as webhook targets for security reasons. To allow private targets, set
Security.Blacklist.Enabledtofalsein thesystem.yamlfile. For more information, see Artifactory System YAML.
Custom Webhooks Payload Templates
JFrog Custom Webhooks use a similar payload-templating approach to Golang text templates, but are limited to the following actions. In payloads, you can:
- Display dynamic scalar values by rendering a textual representation for the variables: For example,
{{ .variable_name }}. - Use
jsonoryamlfunctions on an object to convert them into JSON or YAML format, to prepare the object for transmission or storage. For example,{{ json .variable_name }}or{{ yaml .variable_name }}.
The following table describes the supported root objects.
| Root Object | Description | Example |
|---|---|---|
data | An object containing the payload specific to the event, as defined in Event Types. |
In a |
secrets | An object containing all the secrets you have defined for this webhook. |
This renders the secret name |
userContext | An object identifying the user who triggered the event. Contains id, which is the username or token subject, isToken, which is a boolean indicating access token authentication, and realm, which is the authentication realm. For more information, see User Context in Event Payloads. |
This renders the name of the user who triggered the event. |
Example
To create a custom webhook to automate Kubernetes deployments as part of Automate Your Deployments on Kubernetes Using GitHub Workflows and JFrog Artifactory Custom Webhooks, you can use this payload template:
{
    "event_type" : "hot-deploy",
    "client_payload" :  {
        "tag" : "{{ .data.tag }}"
    }
}
Custom Webhooks Examples
The following are some examples of custom webhooks for various services.
GitHub Example
    {
        "key": "subscriptionOnGithub",
        "description": "some custom webhook subscription",
        "enabled": true,
        "event_filter": {
            "criteria": {
                "anyLocal": true
            },
            "domain": "artifact",
            "event_types": [
                "deployed"
            ]
        },
        "handlers": [
            {
                "handler_type": "custom-webhook",
                "url": "https://api.github.com/repos/{owner}/{repo}/dispatches",
                "payload": "{\"event_type\": \"someEventType\"}",
                "secrets": [
                    {
                        "name": "token",
                        "value": "XXX"
                    }
                ],
                "http_headers": [
                    {
                        "name": "Authorization",
                        "value": "Bearer {{ .secrets.token }}"
                    }
                ]
            }
        ]
    }
GitLab Example
{
    "key": "subscriptionOnGitlab",
    "description": "some custom webhook subscription",
    "enabled": true,
    "event_filter": {
        "domain": "artifact",
        "event_types": [
            "deployed"
        ],
        "criteria": {
            "anyLocal": true,
            "anyRemote": false,
            "includePatterns": [],
            "excludePatterns": [],
            "repoKeys": []
        }
    },
    "handlers": [
        {
            "handler_type": "custom-webhook",
            "url": "http://<gitlaburl>/api/v4/projects/2/ref/main/trigger/pipeline",
            "secrets": [
                {
                    "name": "privatetoken",
                    "value": "XXXXX"
                },
                {
                    "name": "accesstoken",
                    "value": "XXXXXX"
                },
                {
                    "name": "token",
                    "value": "XXXXXXX"
                }
            ],
            "http_headers": [
                {
                    "name": "PRIVATE-TOKEN",
                    "value": "{{ .secrets.privatetoken  }}"
                },
                {
                    "name": "Content-Type",
                    "value": "application/x-www-form-urlencoded"
                }
            ],
            "payload": "token={{ .secrets.token }}&variables[TEST_VAR_CHECKSUM]={{ .data.sha256 }}&variables[ACCESS_TOKEN]={{ .secrets.accesstoken }}"
        }
    ]
}
Jenkins Example
{
    "key": "subscriptionOnJenkins",
    "description": "some custom webhook subscription",
    "enabled": true,
    "event_filter": {
        "criteria": {
            "anyLocal": true
        },
        "domain": "artifact",
        "event_types": [
            "deployed"
        ]
    },
    "handlers": [
        {
            "handler_type": "custom-webhook",
            "url": "http://<jenkinsurl>/job/test/buildWithParameters",
            "secrets": [
                {
                    "name": "token",
                    "value": "mytoken"
                },
                {
                    "name": "restapitoken",
                    "value": "XXXXX"
                }
            ],
            "http_headers": [
                {
                    "name": "Content-Type",
                    "value": "application/x-www-form-urlencoded"
                },
                {
                    "name": "Authorization",
                    "value": "Basic {{ .secrets.restapitoken }}"
                }
            ],
            "payload": "token={{ .secrets.token }}&sha256={{ .data.sha256 }}"
        }
    ]
}
Slack Integration Example
{
  "key": "customwebhook",
  "description": "notify slack channel at artifact deploy",
  "enabled": true,
  "event_filter": {
    "domain": "artifact",
    "event_types": [
      "deployed"
    ],
    "criteria": {
      "anyLocal": true,
      "anyRemote": false,
      "excludePatterns": [],
      "includePatterns": [],
      "repoKeys": []
    }
  },
  "handlers": [
    {
      "handler_type": "custom-webhook",
      "url": "https://hooks.slack.com/services/XXXX",
            "payload": "{\"text\": \"Hello from custom webhook triggered by event type {{ .type }}\"}",
      "http_headers": [
        {
          "name": "Content-type",
          "value": "application/json"
        }
      ]
    }
  ]
}
Jira Integration Example
This example reports uploaded builds to Jira Software Cloud using the Builds REST API. Build results then appear on linked issues in the Development panel.
{
  "key": "report-build-to-jira",
  "event_filter": {
    "domain": "build",
    "event_types": ["uploaded"]
  },
  "handlers": [
    {
      "handler_type": "custom-webhook",
      "url": "https://your-domain.atlassian.net/rest/builds/0.1/bulk",
      "method": "POST",
      "http_headers": [
        { "name": "Content-Type", "value": "application/json" },
        { "name": "Accept", "value": "application/json" },
        { "name": "Authorization", "value": "Bearer {{ .secrets.jira_build_info_token }}" }
      ],
      "secrets": [
        { "name": "jira_build_info_token", "value": "<oauth-access-token-from-your-jiraBuildInfoProvider-app>" }
      ],
      "payload": "{ \"builds\": [ { \"schemaVersion\": \"1.0\", \"pipelineId\": \"{{ .data.build_name }}\", \"buildNumber\": {{ .data.build_number }}, \"updateSequenceNumber\": {{ .data.build_number }}, \"displayName\": \"{{ .data.build_name }} #{{ .data.build_number }}\", \"url\": \"{{ .jpd_origin }}\", \"state\": \"successful\", \"lastUpdated\": \"{{ .data.build_started }}\", \"issueKeys\": [\"PROJ-123\"] } ] }"
    }
  ]
}Note
The
Authorizationbearer token must come from a Jira app that registers thejiraBuildInfoProviderConnect or Forge module. A personal API token doesn't authorize this endpoint.issueKeysis a placeholder. Custom webhook templates can't derive an issue key from the build event.
Microsoft Teams Integration Example
This example posts an Adaptive Card to a Microsoft Teams channel when an artifact is deployed. In the channel, select ··· > Workflows, then use the Post to a channel when a webhook request is received template.
{
  "key": "notify-teams-on-artifact-deploy",
  "event_filter": {
    "domain": "artifact",
    "event_types": ["deployed"]
  },
  "handlers": [
    {
      "handler_type": "custom-webhook",
      "url": "<paste the HTTP POST URL generated by your workflow's \"When a Teams webhook request is received\" trigger>",
      "method": "POST",
      "http_headers": [
        { "name": "Content-Type", "value": "application/json" }
      ],
      "payload": "{ \"type\": \"message\", \"attachments\": [ { \"contentType\": \"application/vnd.microsoft.card.adaptive\", \"content\": { \"type\": \"AdaptiveCard\", \"version\": \"1.4\", \"body\": [ { \"type\": \"TextBlock\", \"weight\": \"bolder\", \"text\": \"Artifact {{ .type }} in {{ .data.repo_key }}\", \"wrap\": true }, { \"type\": \"FactSet\", \"facts\": [ { \"title\": \"Path\", \"value\": \"{{ .data.path }}\" }, { \"title\": \"Size\", \"value\": \"{{ .data.size }}\" }, { \"title\": \"SHA256\", \"value\": \"{{ .data.sha256 }}\" }, { \"title\": \"JPD\", \"value\": \"{{ .jpd_origin }}\" } ] } ] } } ] }"
    }
  ]
}Note
Use a Workflows webhook, not the retired Office 365 Connectors incoming webhook. Copy the HTTP POST URL from the workflow creation dialog box. The URL is shown only once and acts as the secret, so this example doesn't use extra secrets or
Authorizationheaders. For more information, see Retirement of Office 365 Connectors within Microsoft Teams.
Updated about 2 months ago