PagerDuty Integrations
This section describes integrations with PagerDuty.
Artifactory Integration with PagerDuty
PagerDuty is a SaaS-based platform that helps to prevent and resolve business-impacting incidents.
Usually, when making software updates to your binaries and applications, your development teams don’t always have direct access to the metadata surrounding events (example: during the compilation of that code). Getting this information is especially important when you have different teams in charge of different parts of your software delivery pipeline. Our integration with PagerDuty allows this monitoring to take place so your on-call teams can monitor events in real-time.
For a list of supported notifications with PagerDuty integration with Artifactory, see Types of Supported Notifications with Artifactory Integration with PagerDuty.
How it Works
- Users will install the JFrog Artifactory integration application from within the PagerDuty Service Directory and receive a URL to setup the PagerDuty webhook events within JFrog Artifactory.
- JFrog Artifactory will utilize the PagerDuty webhook trigger to send notifications to PagerDuty. Users will be able to configure their webhook events for repositories, builds, artifact properties, and release bundles within JFrog Artifactory and associate these events with the PagerDuty webhook trigger.
- Once the webhook is configured within JFrog Artifactory, a change event alert will be available within the PagerDuty service whenever an event occurs.
- Artifactory performs a re-check of all selected repositories, builds, artifact properties, and release bundles and any events generated will be sent as a change event to the service in PagerDuty. Events from Artifactory will trigger a new change event on the corresponding PagerDuty service, or group them as alerts into an existing change event.
Configuration Overview
For instructions on how to set up this configuration, see Artifactory Integration with PagerDuty Configuration Overview.
Support
If you need help with this integration, contact [email protected].
Artifactory Integration with PagerDuty Configuration Overview
This topic reviews how to integrate Artifactory with PagerDuty.
Requirements
- PagerDuty integration requires an Admin base role for account authorization. If you do not have this role, please reach out to an Admin or Account Owner within your organization to configure the integration.
- JFrog Artifactory requires an Admin based role with administrative privileges to configure the integration. If you do not have this role, please reach out to an Admin or Account Owner within your organization to configure the integration.
Configuration Overview
To work with the integration:
| Task | Description | For more information, see... | |
|---|---|---|---|
| 1 | Set up PagerDuty | Register an account with PagerDuty and hover over the people tab to get started. | Setup PagerDuty for Integration with Artifactory |
| 2 | Integrate with a an existing service or create a new one. | Create a new PagerDuty service in Artifactory if you don't already have one set up. | Add the JFrog Integration as New Service for Artifactory Integration with PagerDuty |
| 3 | Set up webhooks | Set up webhooks and define events to include for notifications. | Setup Webhooks in JFrog Artifactory for Integration with PagerDuty |
Setup PagerDuty for Integration with Artifactory
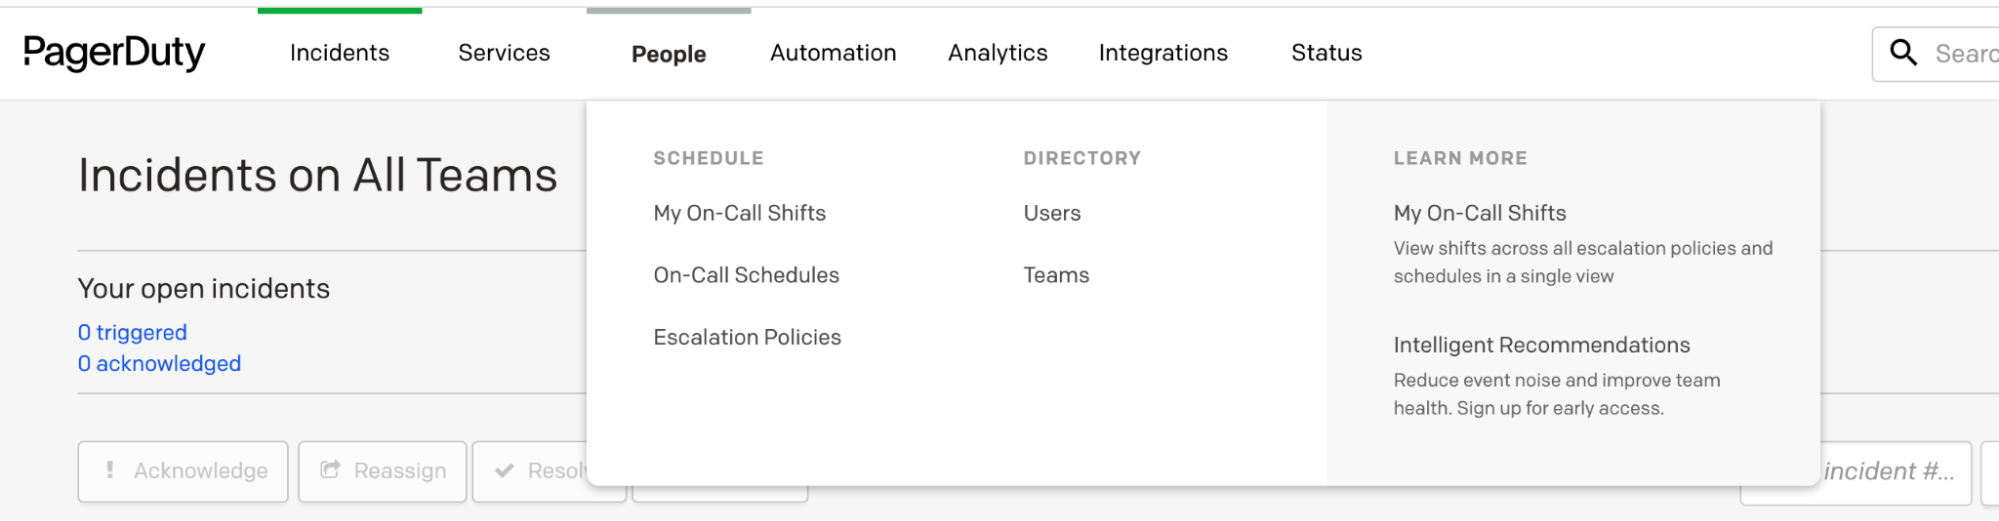
First, if you don’t already have one, you’ll need to register an account with PagerDuty. Then, once logged into PagerDuty, you’ll hover over the People tab to get started. You can refer to the PagerDuty Quick Start Guide for more information regarding each of these pre-steps to setup and associate your recent changes with a service within PagerDuty.
Add the JFrog Integration as New Service for Artifactory Integration with PagerDuty
Add JFrog Artifactory integration to an existing PagerDuty service or create a new service by following the steps below:
-
First, you’ll need to create a new service. Navigate to Services > Service Directory and click +New Service.
-
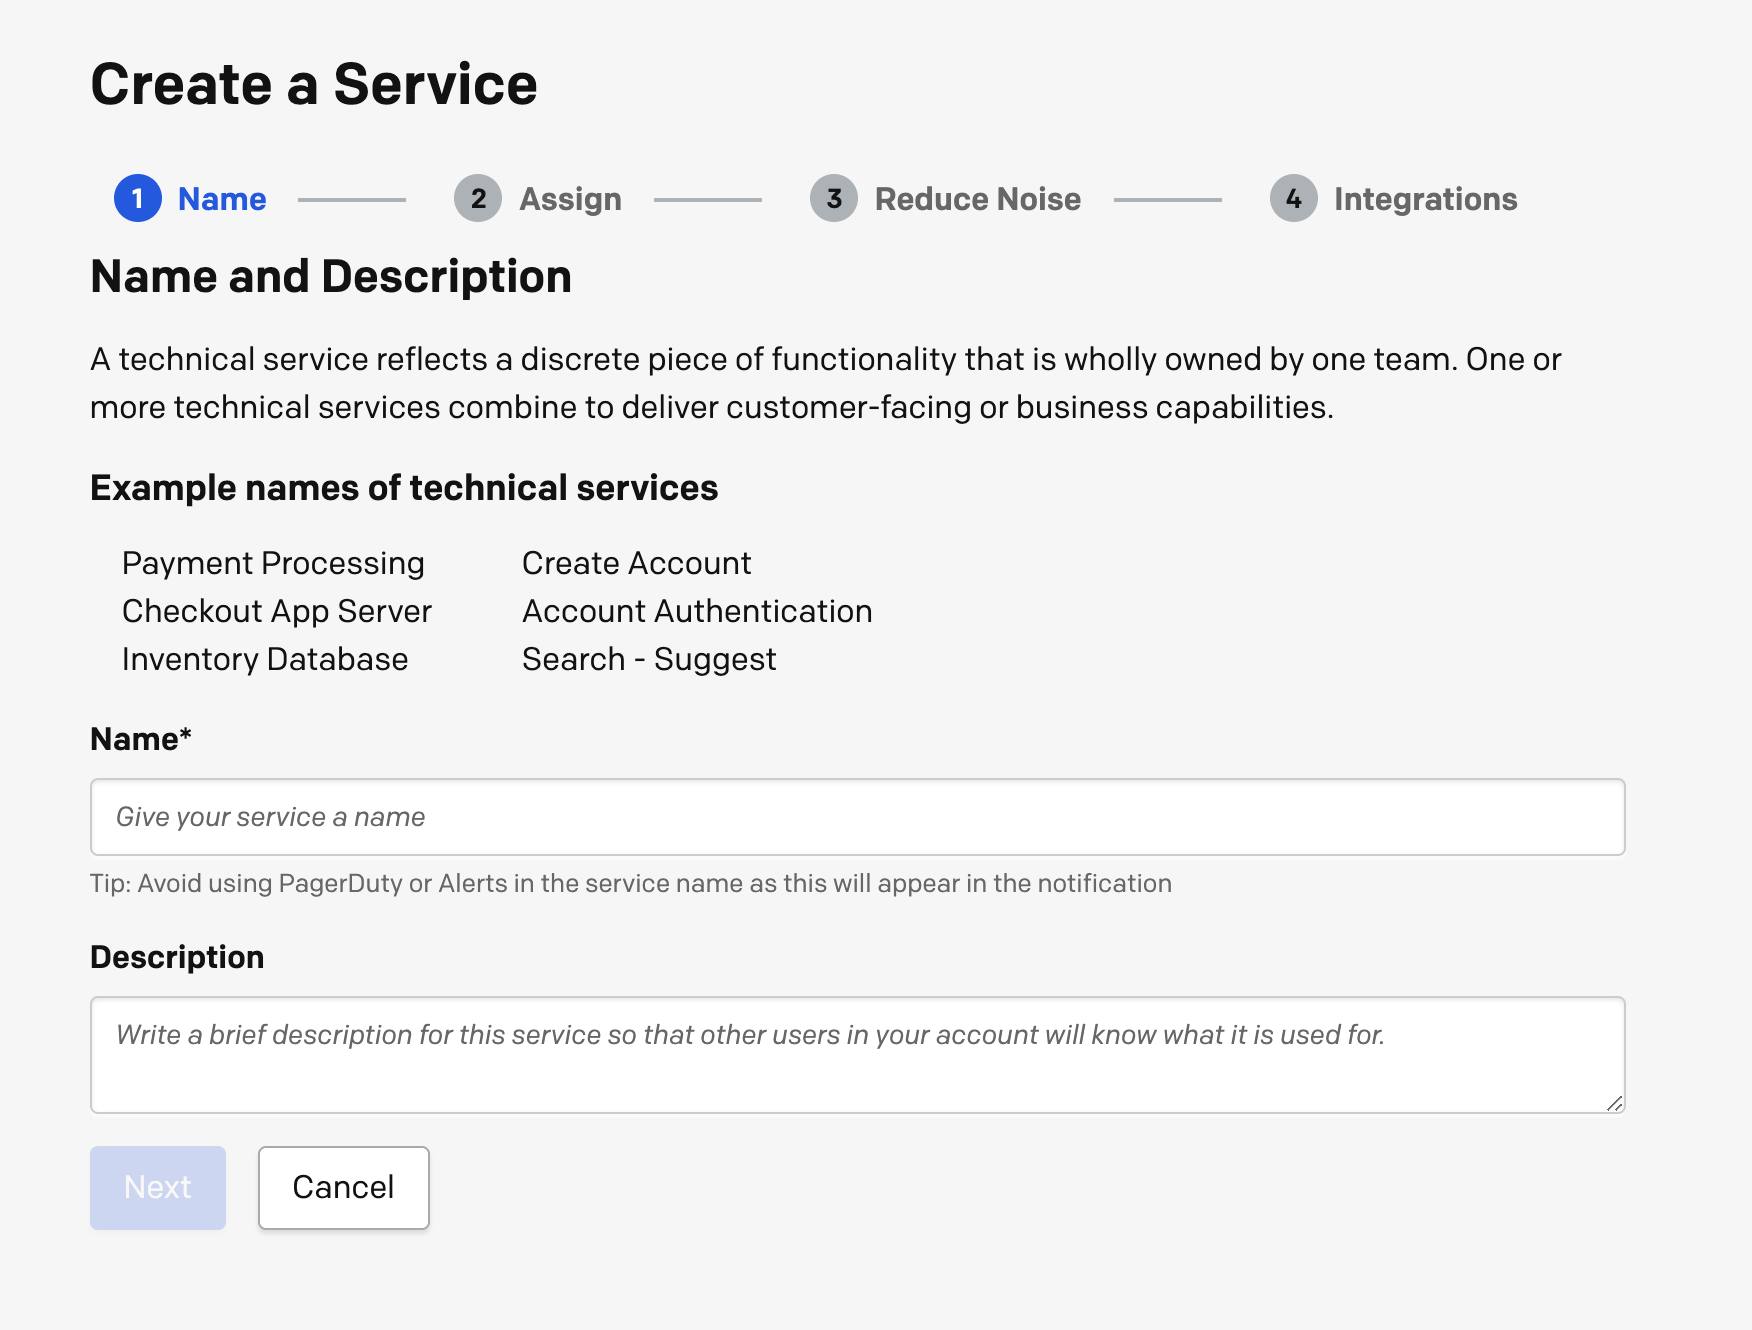
On the next screen, give your new service a name.
-
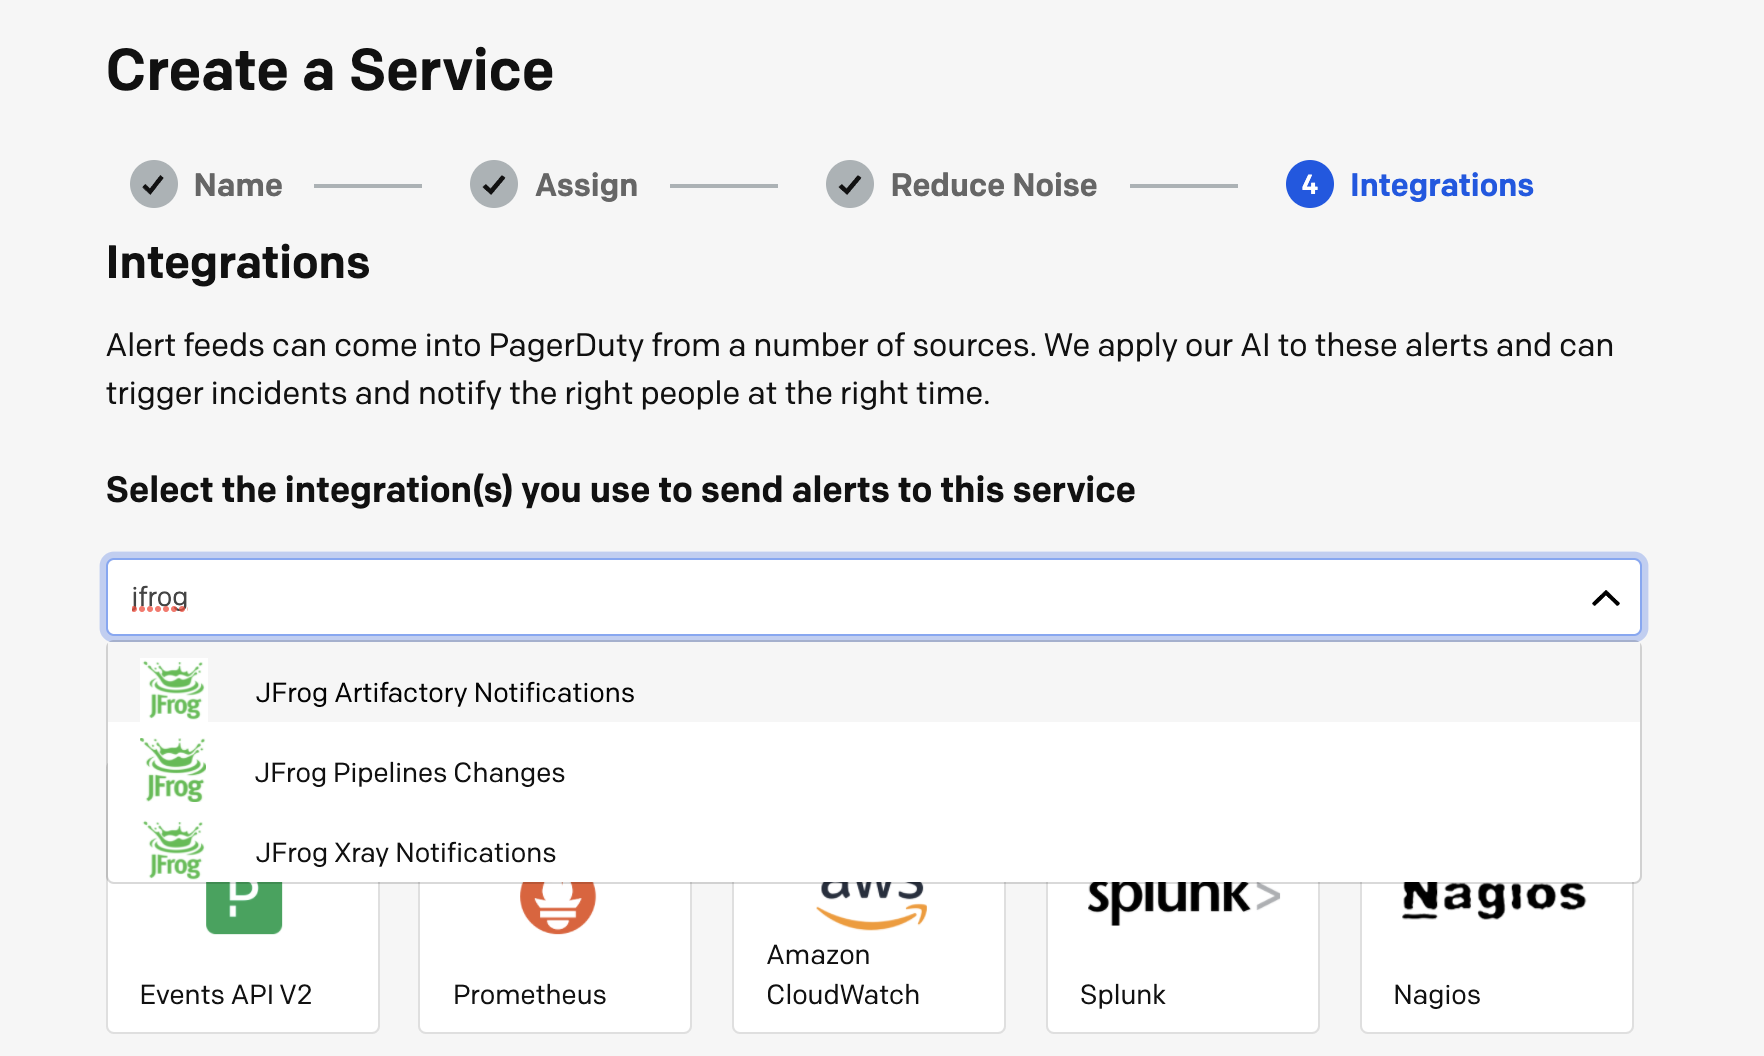
After you get to step 4, search for “jfrog” and select JFrog Artifactory Notifications. You’ll then click on the Create Service button.
-
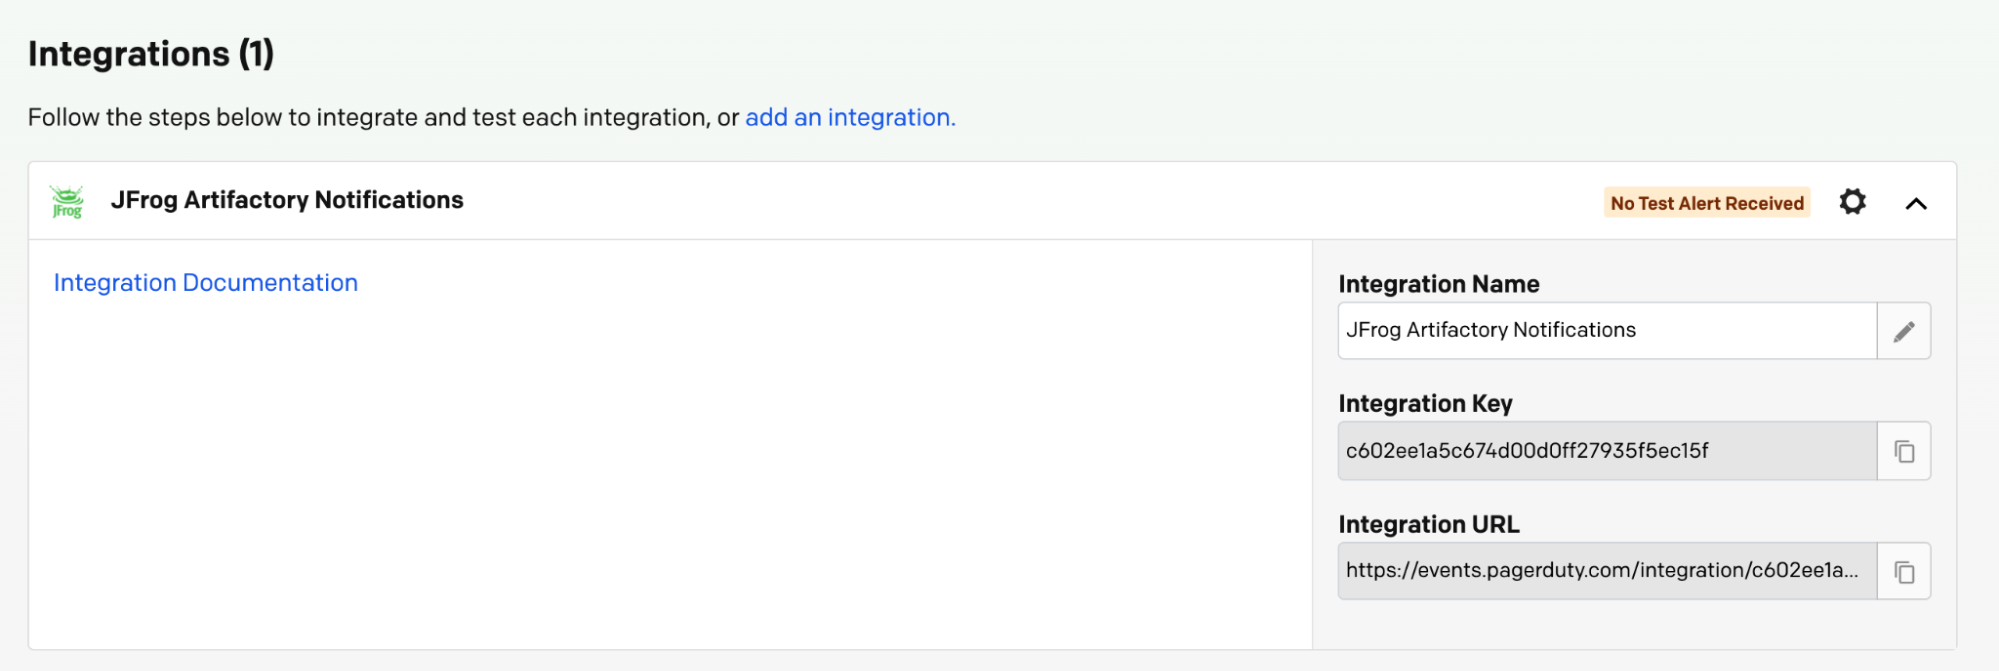
You’ll now see the following information. Copy the Integration URL as you’ll be using it to create your webhooks in the JFrog Platform:
-
Once, you have created a service inside PagerDuty, you’ll need to login to your JFrog instance to create webhooks. These webhooks will send event data to PagerDuty an serve as the basis for your alerts.
Setup Webhooks in JFrog Artifactory for Integration with PagerDuty
-
First, please login to your JFrog Platform instance.
-
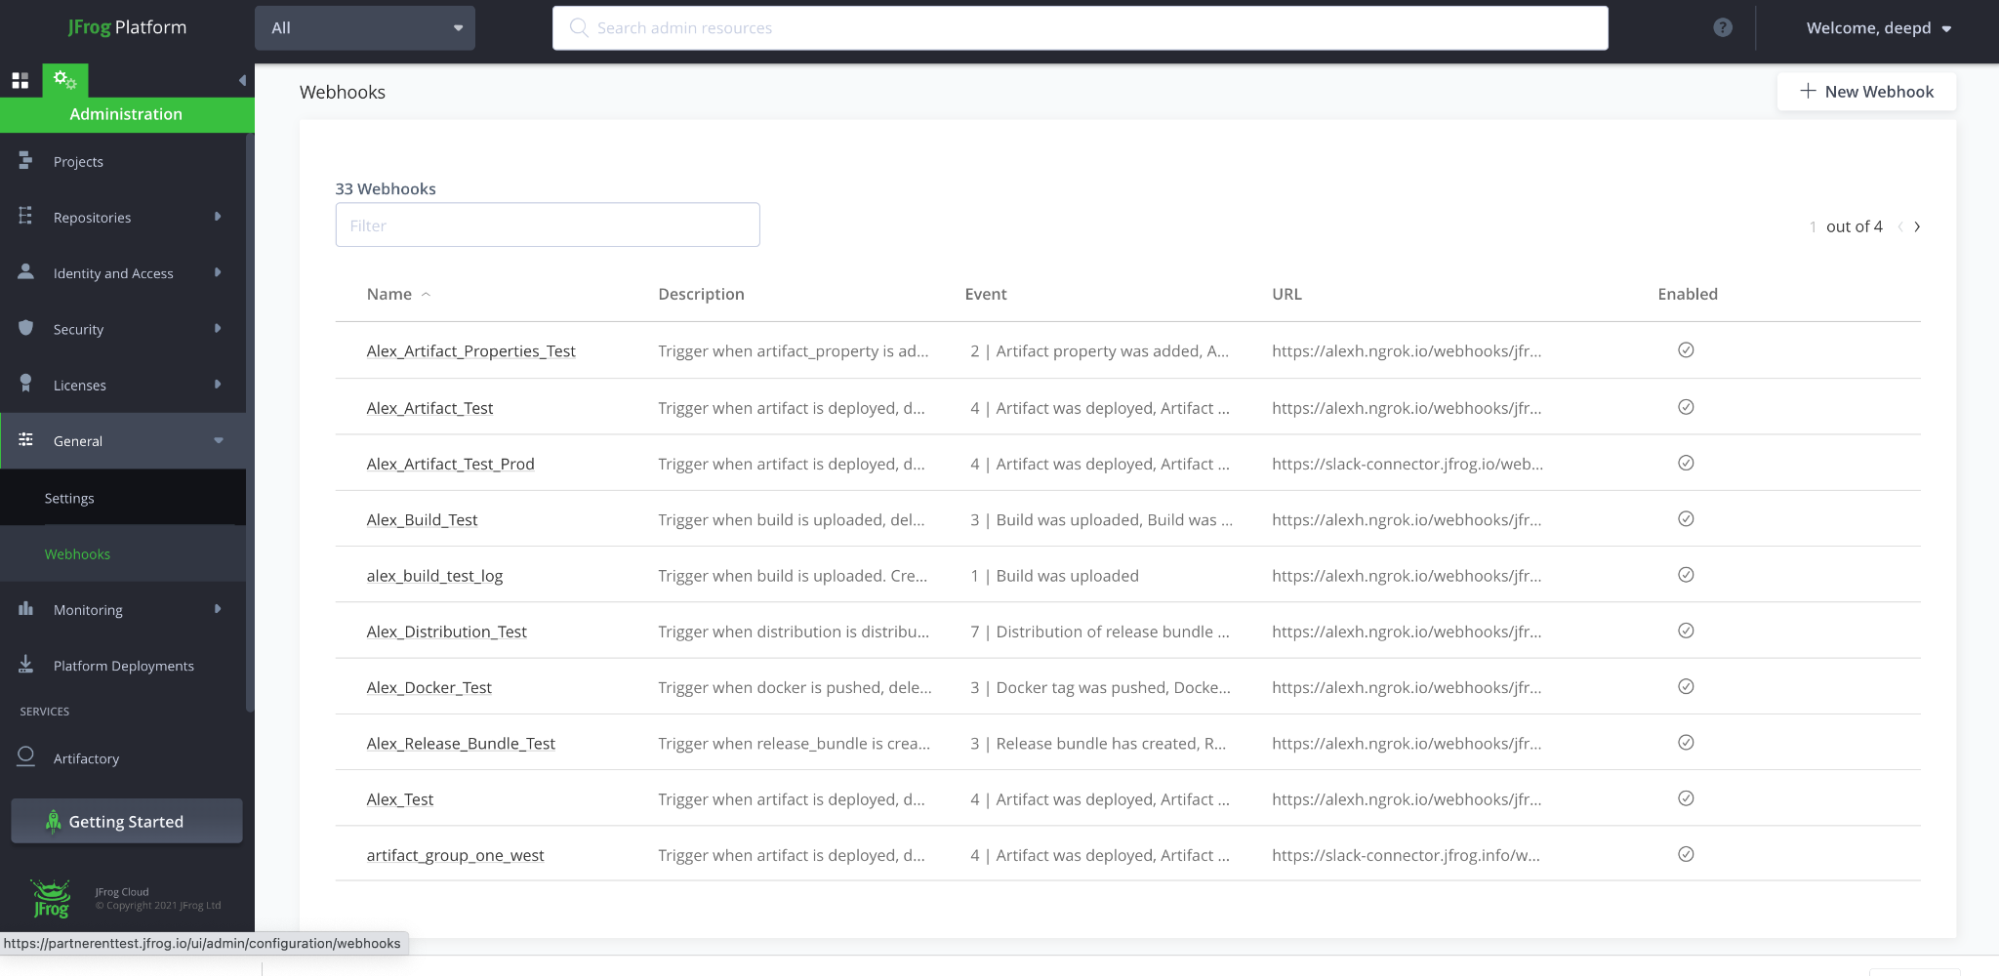
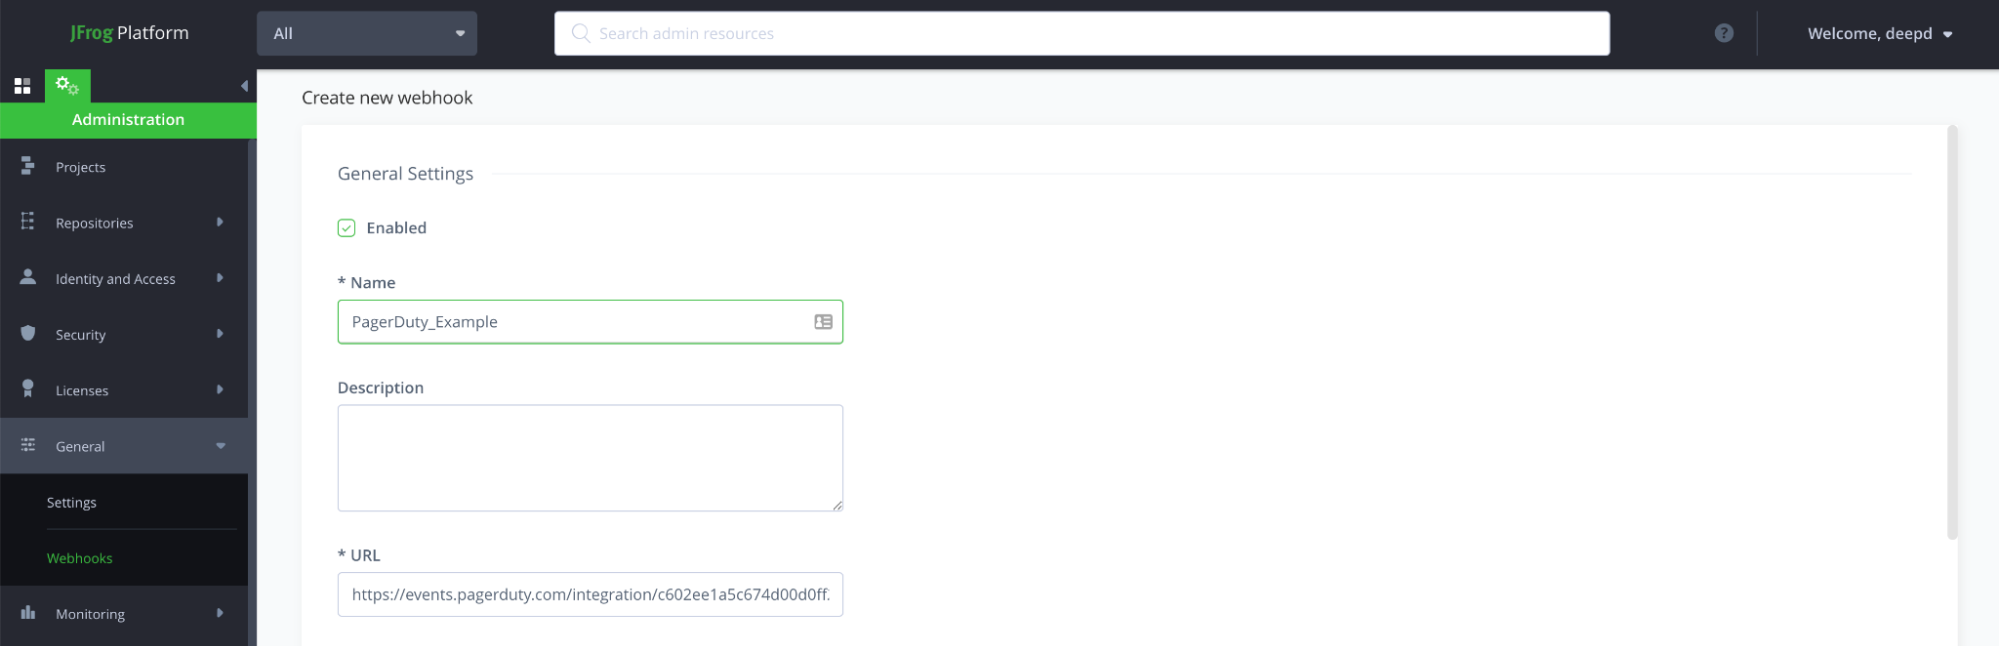
Under the administration panel, click on General > Webhooks. Next, select + New Webhook from the top-right corner.
-
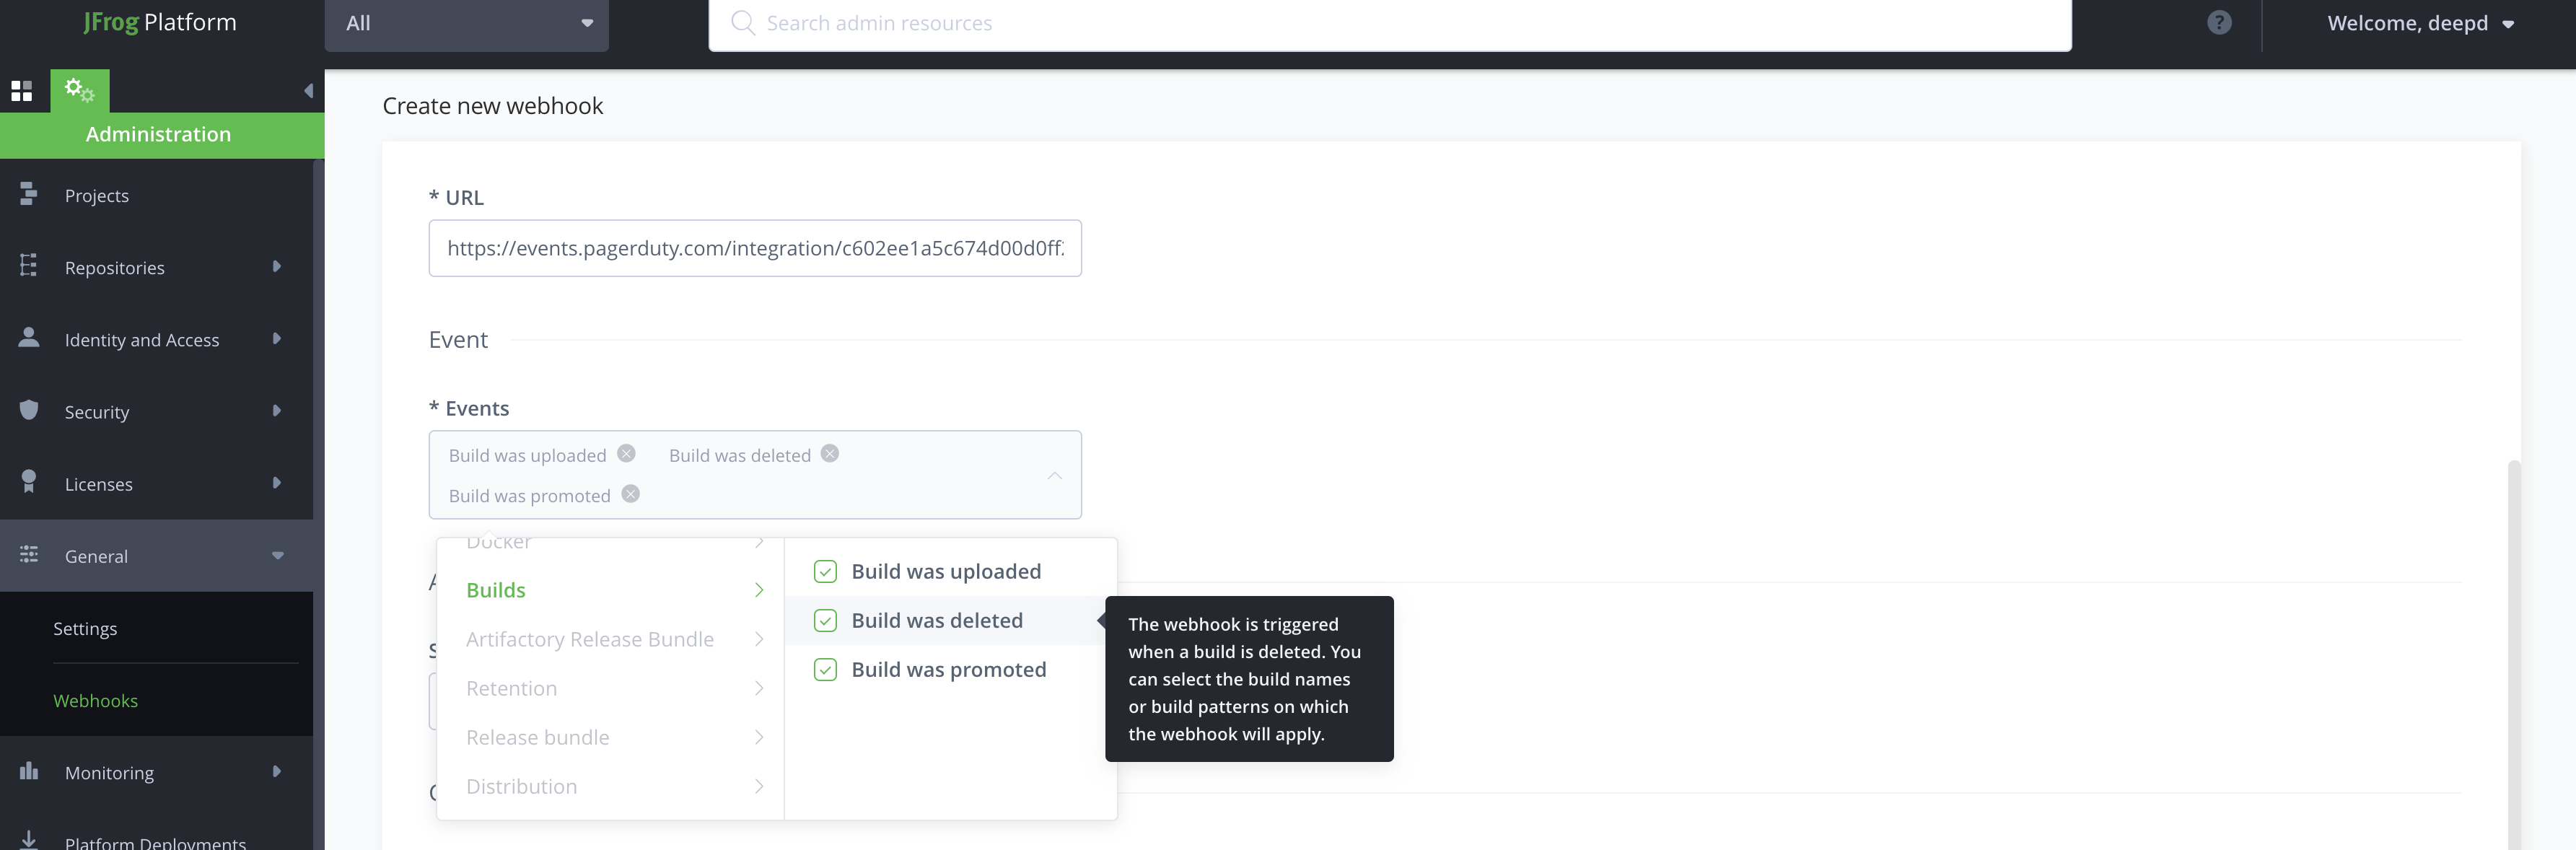
Next, provide a name to your new webhook. After providing the name, please copy the Integration URL from PagerDuty and paste it where it says URL here.
-
Then, select the types of events to include. In this example, we’re creating a Build webhook notification.
-
Now, select the repositories to include in this webhook notification.
-
Hit Save.
-
At the bottom of the main screen, you can Test the notification, by selecting the Test button.
This will send your webhook event to your PagerDuty integration.
-
After you have tested your webhook, hit Create and you’re done.
-
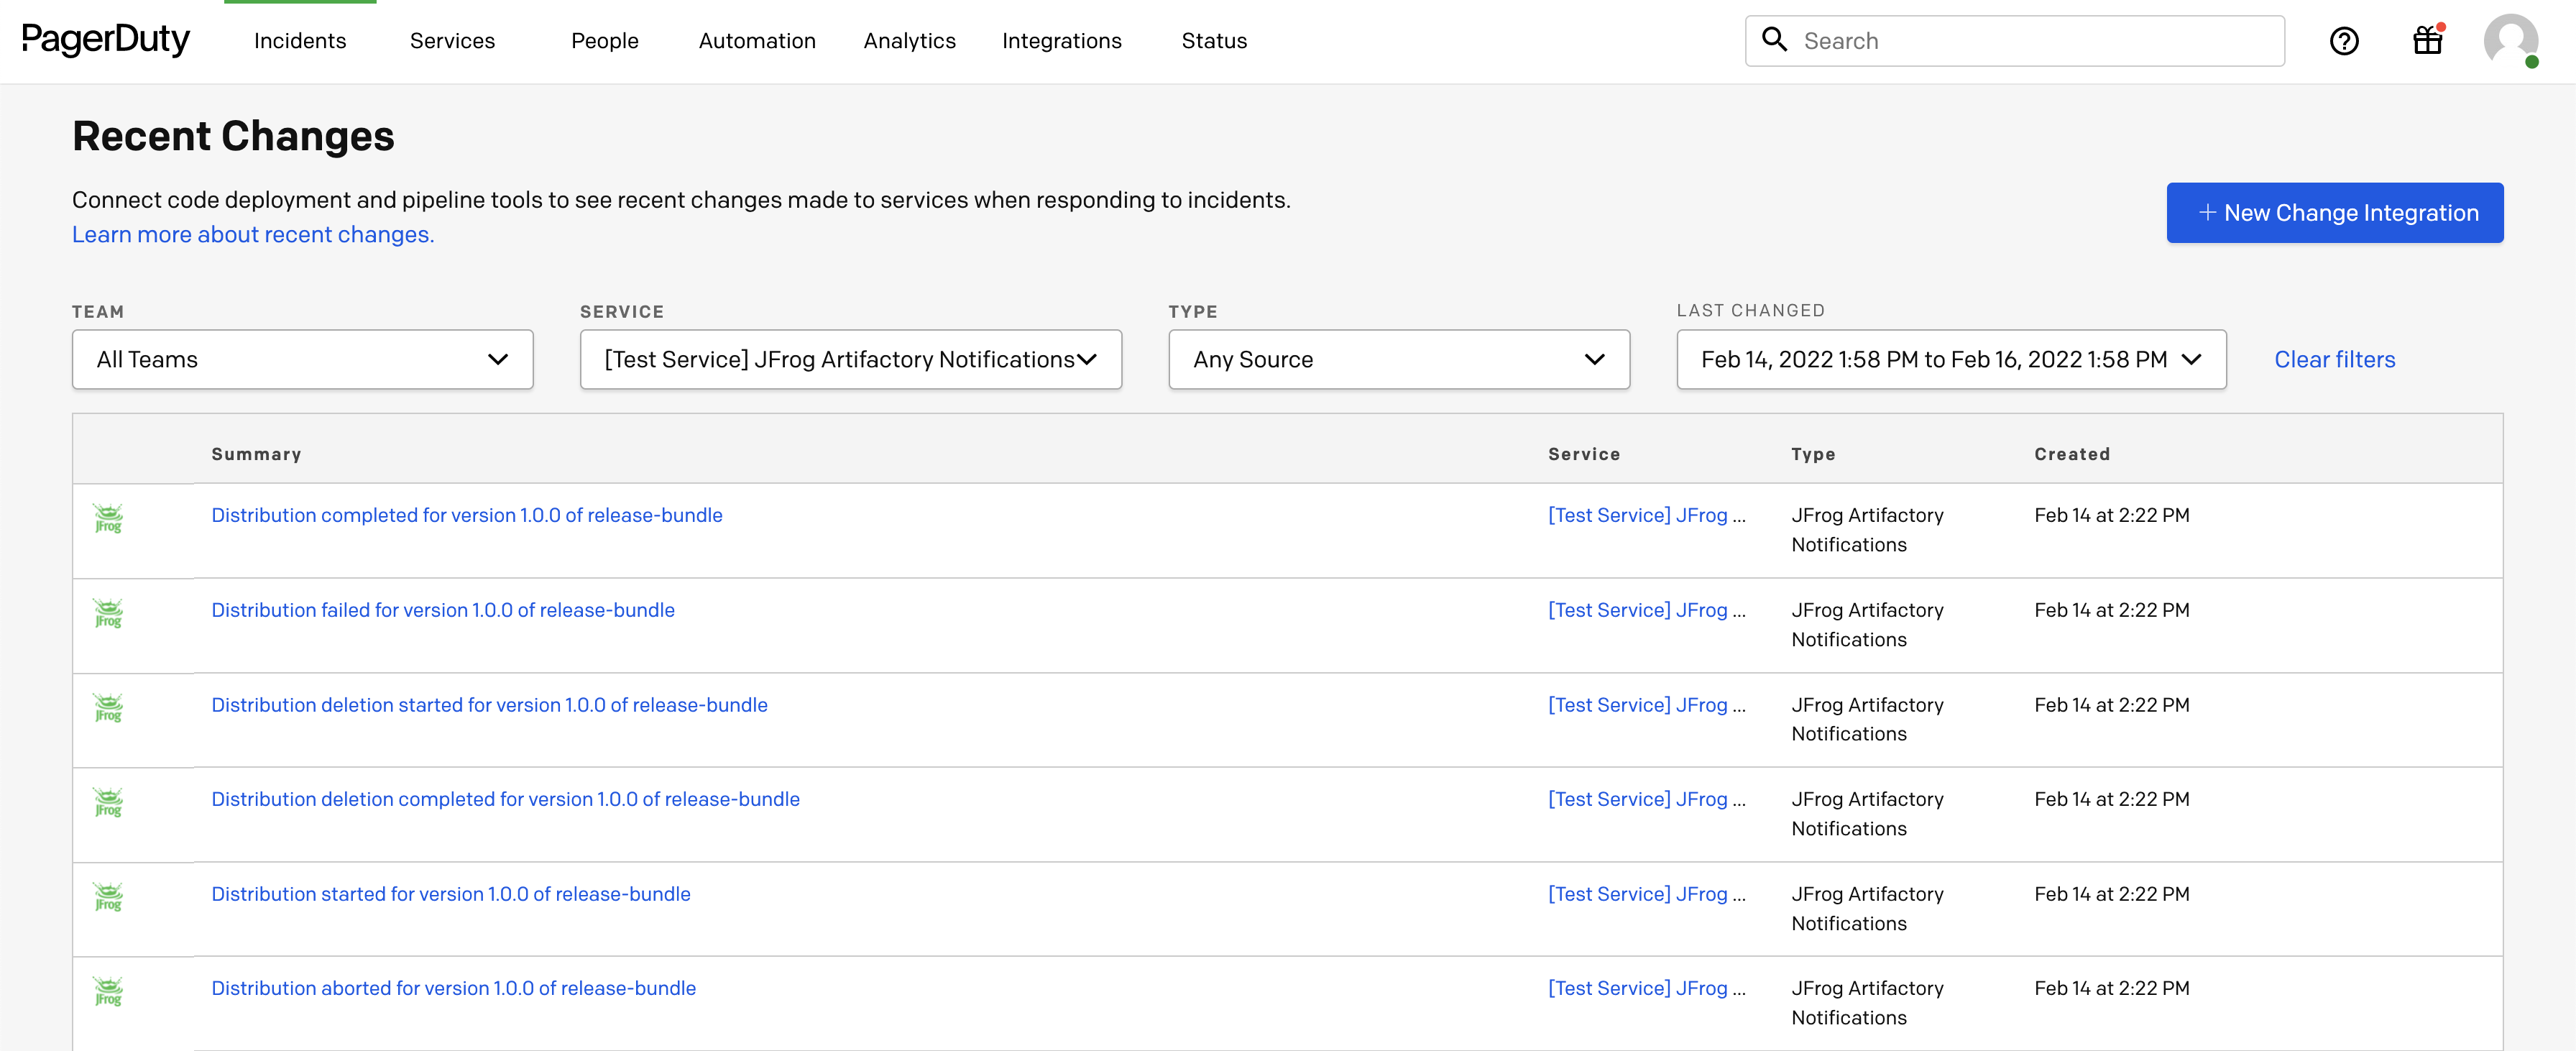
Once you have tested and finish creating your webhooks, you can see them as recent changes in PagerDuty:
Types of Supported Notifications with Artifactory Integration with PagerDuty
All notifications are based on webhook events in the JFrog Platform. The currently supported notifications include:
| Type | Events |
|---|---|
| Artifact | deployed, deleted, moved, copied |
| Artifact Properties | added, deleted |
| Docker Tag | pushed, deleted, promoted |
| Builds | uploaded, deleted, promoted |
| Release Bundles (Enterprise+) | created, signed, deleted |
| Distribution (Enterprise+) | stared, completed, aborted, failed, deletion started, deletion failed, deletion completed |
Uninstall Artifactory Integration with PagerDuty
- Find the integration to delete by navigating to Services and selecting Service Directory.
- Select the service with your integration and navigate to Integrations tab.
- Navigate to the integration by clicking on the integration name (JFrog Artifactory Notifications).
- Click on the Delete Integration button on the top right corner.
Xray Integration with PagerDuty
PagerDuty integration with JFrog enables you to manage security and compliance proactively across the software development and release lifecycle. This integration allows you to receive early notifications within PagerDuty on vulnerabilities and compliance violations impacting artifacts, builds and components before production release.
Important
This integration was updated on July 12 2023 with the following improvements.
- Summarized Notifications - Instead of getting hundreds of notifications from JFrog Xray, you get a much shorter list of notifications summarized by severity.
- Link to the Scan Results page in JFrog Xray Included in your PagerDuty event - This is where you can check details of each vulnerability, CVE etc.
Benefits
- Proactively manage security and compliance across the software development and release lifecycle. Receive early notifications within PagerDuty on vulnerabilities and compliance violations impacting artifacts, builds and components before releasing to production.
- Customize notifications - Configure granular policies within JFrog Xray based on type of violation, severity, and receive notifications on repositories, builds or release bundles of interest.
- Summarized notifications for easy consumption - Receive a summary of Xray watch issues by severity as well as the link to the watch scan results as a PagerDuty event.
How it Works
- Users will install the JFrog Xray integration application from within the PagerDuty Service Directory and receive a URL to setup the PagerDuty webhook within JFrog Xray
- JFrog Xray will utilize the PagerDuty webhook trigger to send notifications to PagerDuty. Users will be able to configure their rules and set up watch policies for repositories, builds and release bundles within JFrog Xray and associate these rules with the PagerDuty webhook trigger.
- Once the webhook is configured within JFrog Xray, an incident will be sent to the PagerDuty service whenever security or license violation occurs.
- Xray performs a recheck of all watched resources and any found violations will send an event to a service in PagerDuty. Events from Xray will trigger a new incident on the corresponding PagerDuty service, or group as alerts into an existing incident.
Support
If you need help with this integration, contact [email protected].
Xray Integration with Pager Duty Service Configuration Overview
This topic reviews how to integrate Xray with PagerDuty Service.
To configure the integration, you must first have a PagerDuty account setup. Next, follow the instructions below or watch the video to understand how to finish the integration.
Requirements
- PagerDuty integration requires an admin base role for account authorization. If you do not have this role, please reach out to an Admin or Account Owner within your organization to configure the integration.
- JFrog Xray requires an Admin based role with administrative privileges to configure the integration. If you do not have this role, please reach out to an Admin or Account Owner within your organization to configure the integration.
For information available with PagerDuty integration for Xray, see Available Information in PagerDuty with Xray Integration
Configuration Overview
Add JFrog Xray integration to an existing PagerDuty service or create a new service by doing the following:
| Task | Description | For more information, see... | |
|---|---|---|---|
| 1 | Integrate Xray with PagerDuty service | Add the integration to an existing or new service. | Integrating Xray with a Pager |
| 2 | Configure Xray for the PagerDuty integration | Configure webhooks, an Events API endpoint, policyname and more. | Configure JFrog Xray for integration with PagerDuty |
Integrate Xray with a PagerDuty Service
-
From the Configuration menu, select Services.
-
There are two ways to add an integration to a service:
- If you are adding your integration to an existing service: Click the name of the service you want to add the integration to. Then, select the Integrations tab and click the New Integration button.
- If you are creating a new service for your integration: Please read our documentation in section Configuring Services and Integrations and follow the steps outlined in the Create a New Service section, selecting JFrog Xray + PagerDuty Notifications as the Integration Type in step 4. Continue with the In JFrog Xray Setup section (below) once you have finished these steps.
-
Enter an Integration Name in the format
JFrogand select JFrog Xray + PagerDuty Notifications from the Integration Type menu. -
Click the Add Integration button to save your new integration. You will be redirected to the Integrations tab for your service.
-
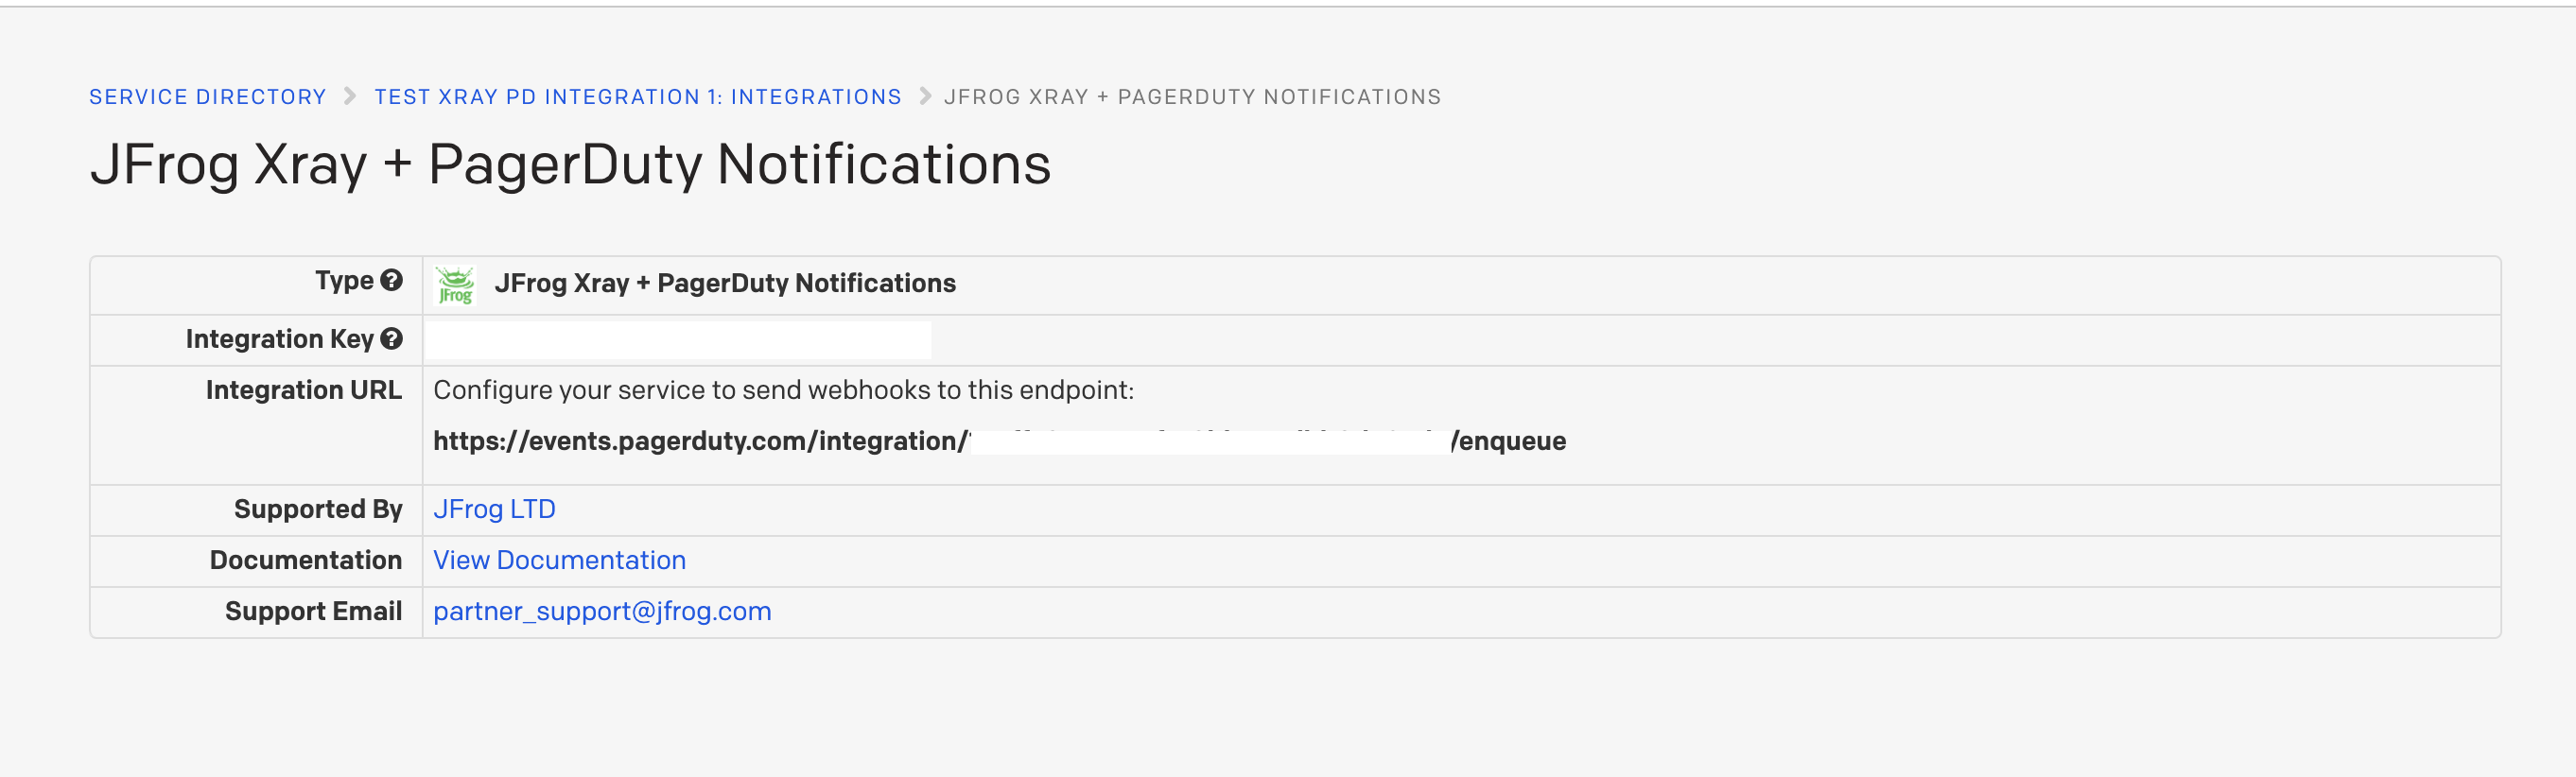
An Integration Key will be generated on this screen. Click on the integration name next to the integration key and copy the integration URL in a safe place as it will be used when you configure the integration with JFrog Xray + PagerDuty Notifications in the next section.
Configure JFrog Xray for integration with PagerDuty
-
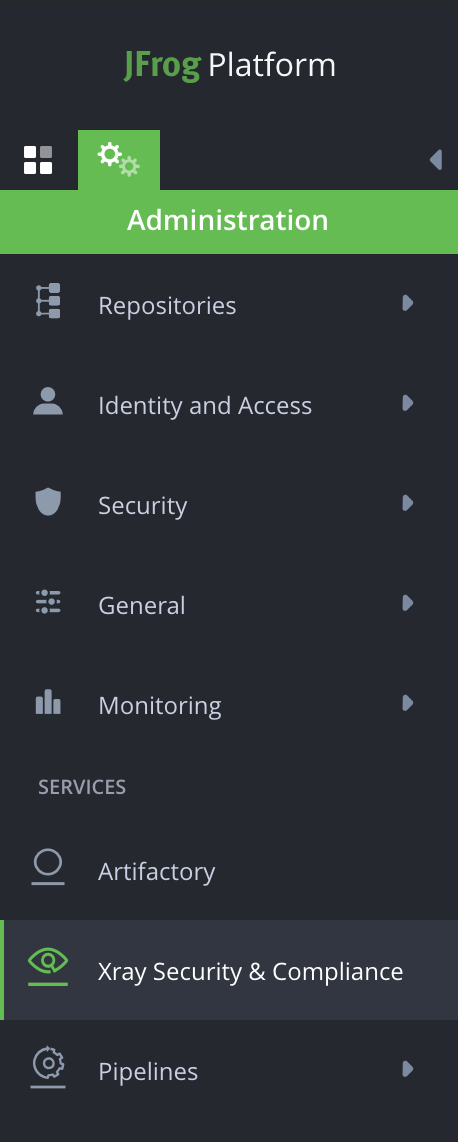
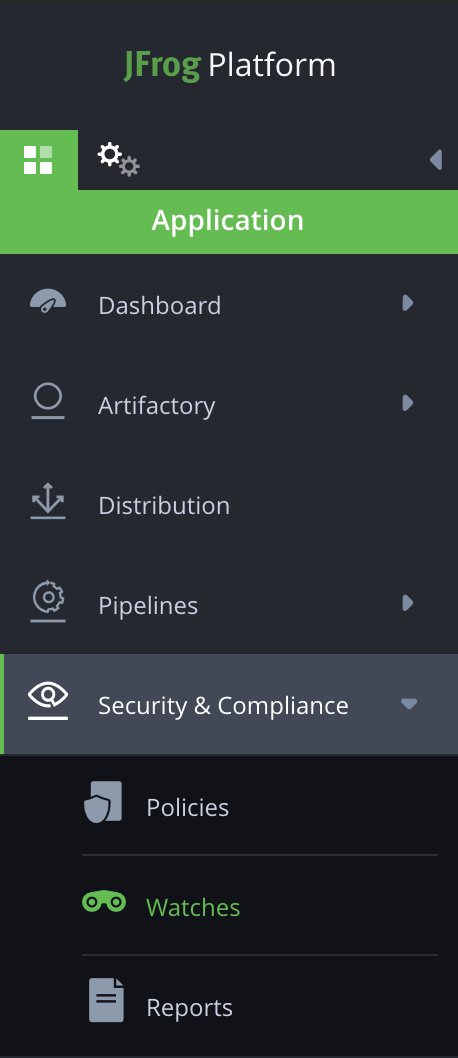
Navigate to Xray Security & Compliance in JFrog Platform’s Administration section and click on it
-
Click on Webhooks in the General tile
-
Create a new webhook for pagerduty

-
Enter Webhook Name
-
Enter URL (URL is the Events API endpoint from pagerduty) e.g.,
https://events.pagerduty.com/integration/integration_id/enqueue -
Click Save
-
Navigate to Security and Compliance in JFrog Platform’s Application section and select Policies

-
Next, specify the policy name and select security from the dropdown list below policy name
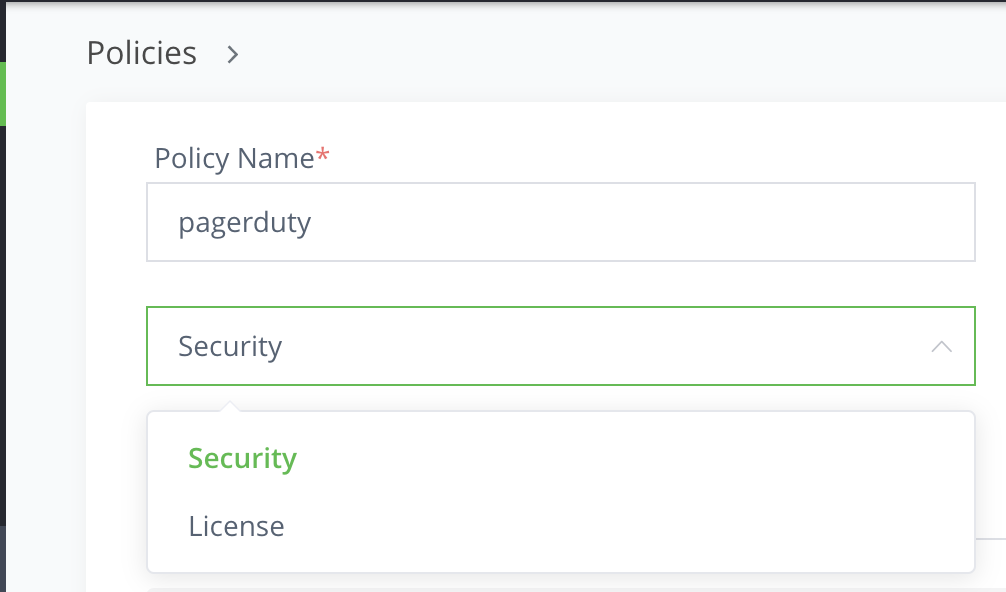
-
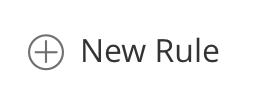
Next, create a new rule for the policy by clicking on the New Rule to the right
-
Enter a rule name
-
In the criteria section, select the minimal severity or the cvss score. Violations in Xray are filtered based on this criteria and sent to pagerduty
-
In the Automatic Actions section, select Trigger Webhook checkbox and select the webhook that you created above for pagerduty
-
Click on Save
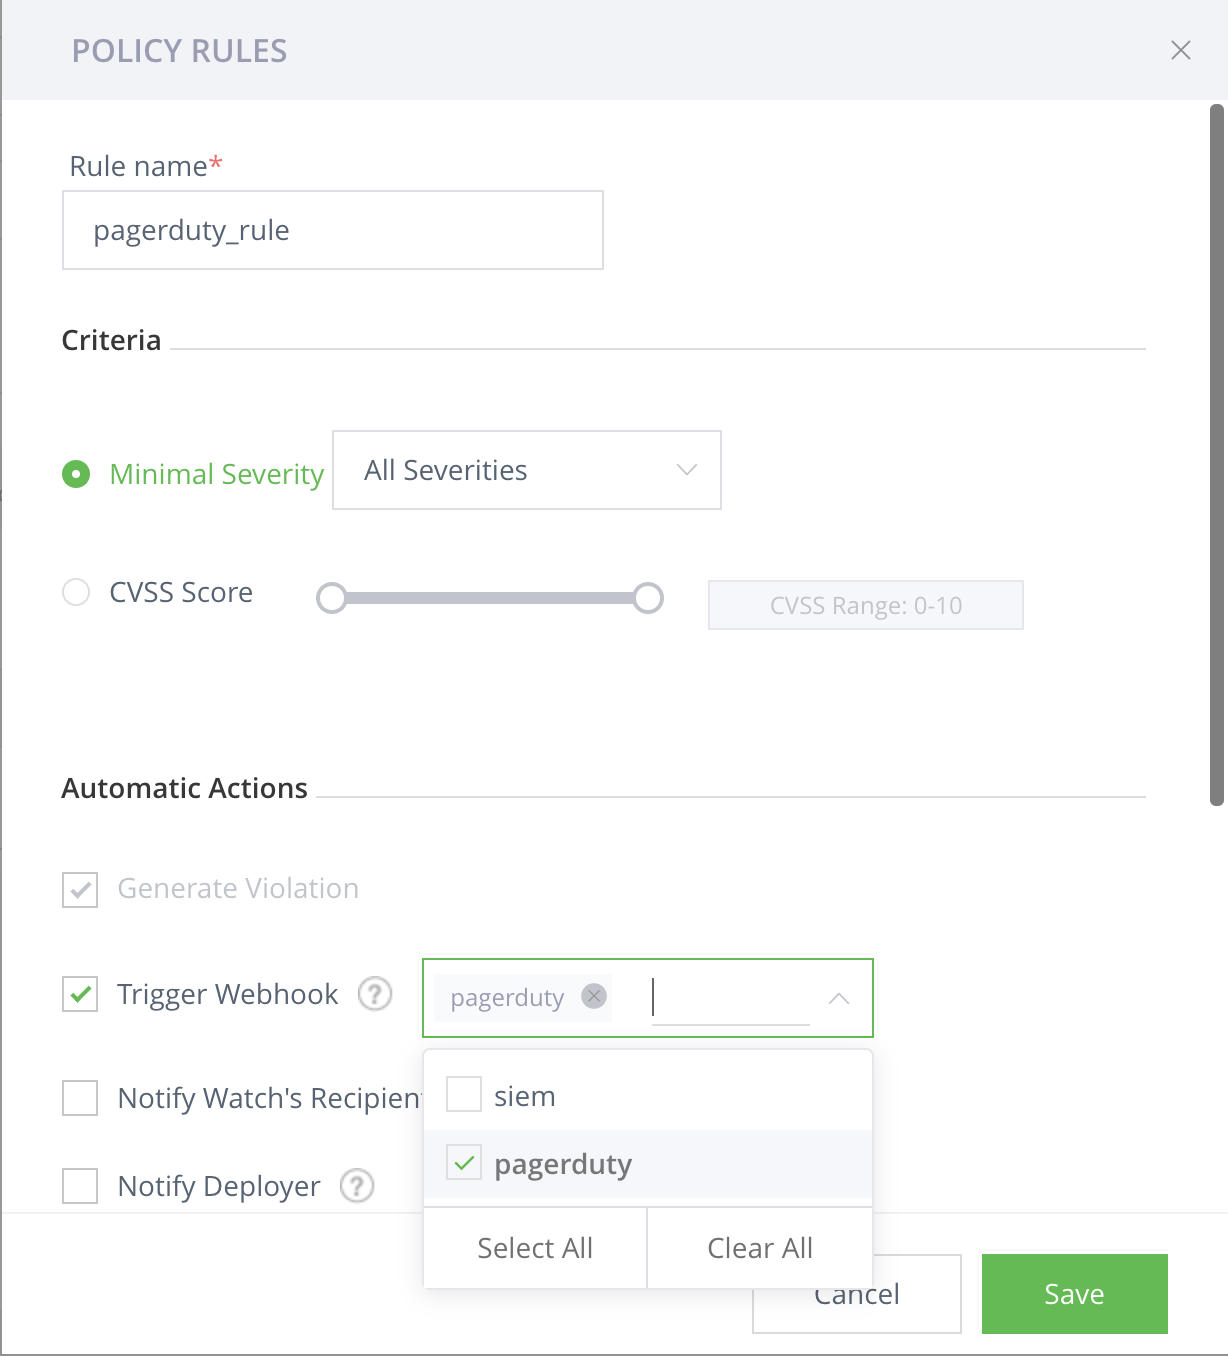
-
A policy rule is created with the rule name sepecified in Step10
-
Click create to create a policy with name specified in Step8
-
Navigate to watches in the Security and Compliance section on the left
-
Create a new watch or edit an existing watch
-
In order to create a new watch, click on the New Watch present at the top right corner of the screen
-
Enter the name and description of the watch
-
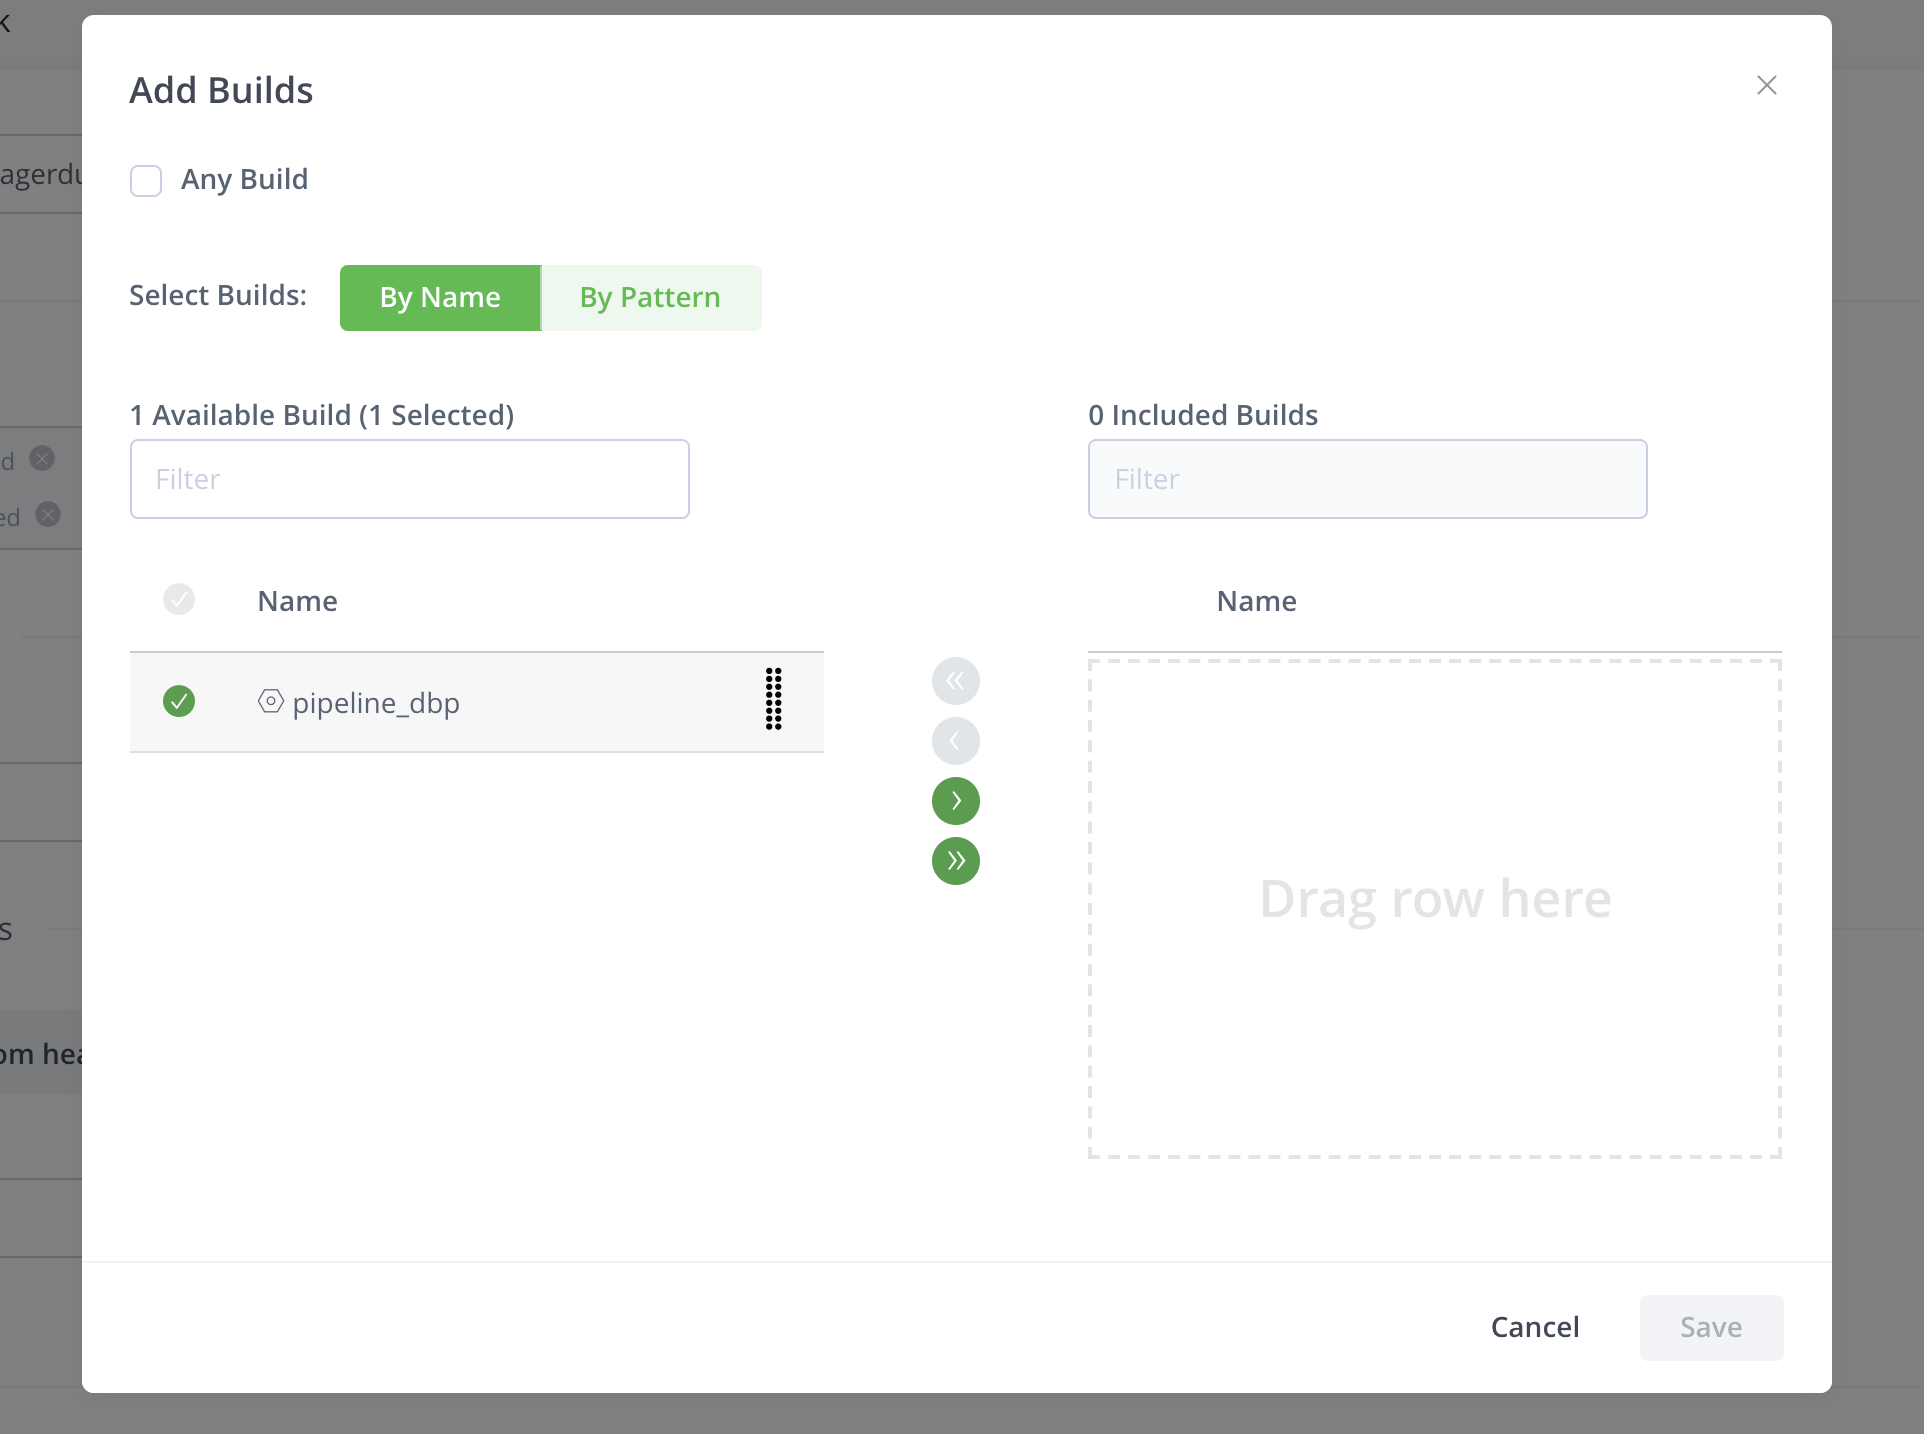
In Manage Resources section, click on Add repositories or Add Builds or Add Bundles and then include the resource that you want to watch from the available resources and click Save
-
In the Assigned policies section, Click on Manage policies towards the right and include the policy created in Step15 and click Save
-
Click Save to save the watch
-
You’ll see the watch in the list of watches
-
To manually trigger a watch, click on the play button and this will start sending any violations related to the watch to pagerduty

Available Information in PagerDuty with Xray Integration
Once you have setup using the walkthrough below, the following metadata will become available in PagerDuty:
| CUSTOM DETAILS | |
|---|---|
| created | 2019-11-21T04:47:09.837Z |
| cve | CVE-2019-19126 |
| description | On the x86-64 architecture, the GNU C Library (aka glibc) before 2.31 fails to ignore the LD_PREFER_MAP_32BIT_EXEC environment variable during program execution after a security transition, allowing local attackers to restrict the possible mapping addresses for loaded libraries and thus bypass ASLR for a setuid program. |
| impacted_artifacts | [ { "depth": 0, "display\_name": "connector:0.8.0", "infected\_files": [ { "depth": 0, "display\_name": "debian:buster:libc6:2.28-10", "name": "libc6:2.28-10", "parent\_sha": "9411f38bb959244da6cb01b9baeb079f9e5193832ad5c7b4ad3aa45301f50e1c", "path": "", "pkg\_type": "Debian", "sha256": "30fe03584a947466c61145df3cd7ea3c0503aa319b8bc913f373701fdff44e85" } ], "name": "manifest.json", "parent\_sha": "6537920ab5240121a74713c46c3f5a3f0a13db43fe16684be6db91dd21706501", "path": "default/integrations/connector/0.8.0/", "pkg\_type": "Docker", "sha1": "", "sha256": "6537920ab5240121a74713c46c3f5a3f0a13db43fe16684be6db91dd21706501" } ] |
| provider | JFrog |
| severity | Low |
| summary | On the x86-64 architecture, the GNU C Library (aka glibc) before 2.31 fails to ignore the LD_PREFER_MAP_32BIT_EXEC environment variable during program execution after a security transition, allowing local attackers to restrict the possible mapping addresses for loaded libraries and thus bypass ASLR for a setuid program. |
| type | security |
| policy | PD_Test-2-policy |
| watch | PD_Test-2-Watch |
Uninstall the PagerDuty Integration with Xray
- Find the integration to delete by navigating to Services and selecting Service Directory
- Select the service with your integration and navigate to Integrations tab
- Navigate to the integration by clicking on the integration name (JFrog Xray + PagerDuty Notifications)
- Click on the Delete Integration button on the top right corner
Pipelines Integration with PagerDuty
PagerDuty integration with JFrog enables you monitor your software release pipeline in real-time, receive up-to-date notifications within PagerDuty about the progress of your builds throughout the various stages in your continuous integration and continuous deployment pipeline. This allows you to respond quickly to build failures and to receive actionable, granular information about a particular pipeline step.
Benefits
- Monitor your software release pipeline in real-time. Receive up-to-date notifications within PagerDuty about the progress of your builds throughout the various stages in your continuous integration and continuous deployment pipeline.
- Respond quickly to build failures. Receive actionable, granular information about a particular pipeline step, including its status, name, type, and other details to respond quickly to builds that are failing or taking too long to complete
How it Works
- JFrog Pipeline will send notifications by calling PagerDuty’s Events API.
- PagerDuty users will be able to register the JFrog Pipeline integration application within their developer platform and set up the event integration. Once the setup is complete, JFrog Pipelines will use the Events API to push notifications containing build status information.
Support
If you need help with this integration, contact [email protected].
Pipelines Integration with PagerDuty Configuration Overview
This topic reviews how to integrate PagerDuty with Pipelines.
Requirements
- PagerDuty integration requires an admin base role for account authorization. If you do not have this role, please reach out to an Admin or Account Owner within your organization to configure the integration.
- JFrog Platform with Pipelines installed with a PagerDuty Pipelines Integration configured.
Configuration Overview
To work with the integration, do the following:
| Task | Description | For more information, see... | |
|---|---|---|---|
| 1 | Integrate with a PagerDuty service | Add pipelines integration to a PagerDuty service. | Integrate Pipelines with a PagerDuty Service |
| 2 | Create Pipelines integration | Add a Pipelines integration service for PagerDuty. | Create a Pipelines Integration for PagerDuty |
| 3 | Create a Pipelines Build YAML | Create a Pipelines build YAM for integration. | Create a Pipelines Build YAML for Integration with PagerDuty |
| 4 | Run a Pipelines Build | Run the pipelines build. | Run a Pipelines Build with PagerDuty Integration |
Integrate Pipelines with a PagerDuty Service
Add JFrog Pipelines integration to an existing PagerDuty service or create a new service with the following the steps.
-
From the Configuration menu, select Services.
-
There are two ways to add an integration to a service:
- If you are adding your integration to an existing service: Click the name of the service you want to add the integration to. Then, select the Integrations tab and click the New Integration button.
- If you are creating a new service for your integration: Please read our documentation in section Configuring Services and Integrations and follow the steps outlined in the Create a New Service section, selecting JFrog Pipelines Changes as the Integration Type in step 4. Continue with the In JFrog Pipelines Setup section (below) once you have finished these steps.
-
Enter an Integration Name in the format
JFrogand select JFrog Pipelines + PagerDuty Notifications from the Integration Type menu. -
Click the Add Integration button to save your new integration. You will be redirected to the Integrations tab for your service.
-
An Integration Key will be on this screen. This is the key that is called
service integration/routing keywhen configuring the UI in pipelines. This confusion is inherited from the inconsistencies in the PagerDuty api docs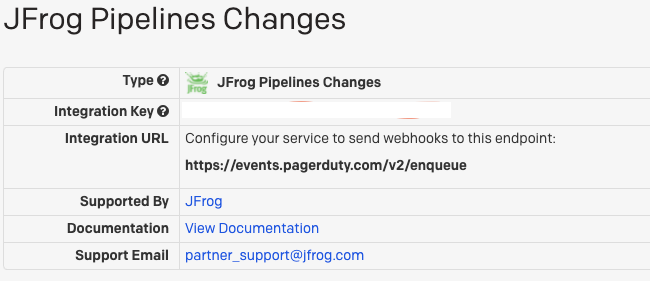

Create a Pipelines Integration for PagerDuty
Add JFrog Pipelines integration to an existing PagerDuty service or create a new service with the following steps.
-
Open your JFrog Platform with Pipelines and click on the
Adminstration gearsin the left menu. Click on thePipelinesmenu item and then click on the sub-tabIntegrations. -
Click the
+ Add an Integrationlink on the top right. -
Select
PagerDuty Eventsfor the integration type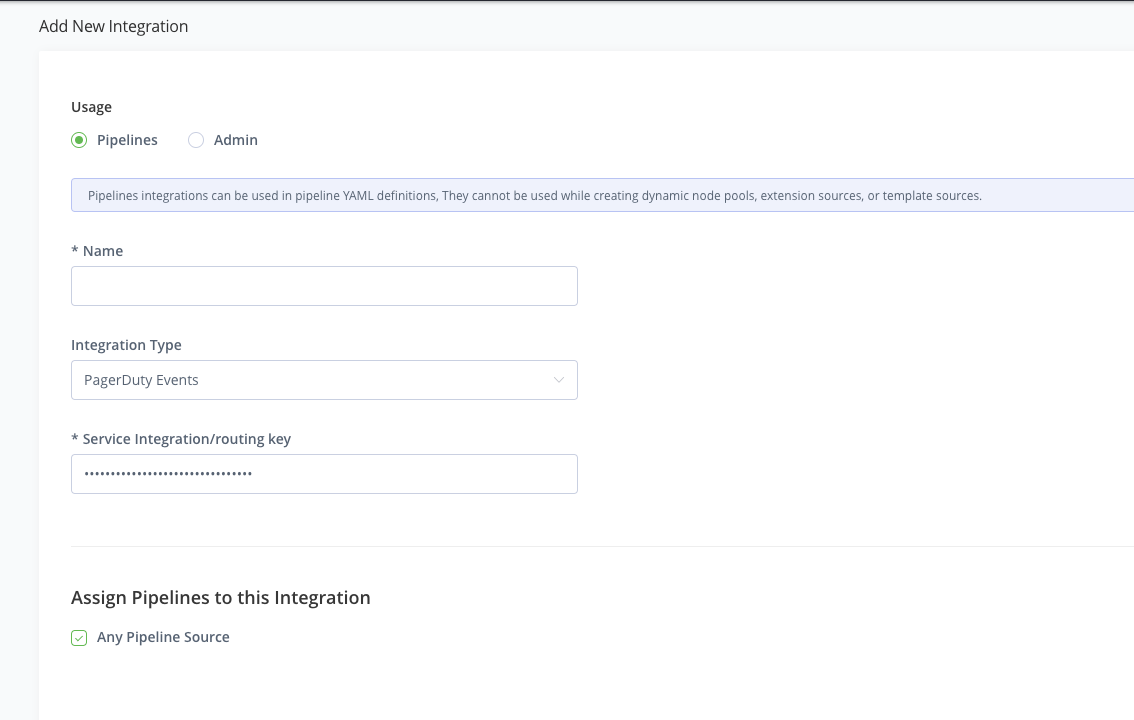
-
Enter a name for this integration which will be used in the pipeline yaml. ex:
MyPagerDutyIntegration -
Enter the Pagerduty
Integration Keycreated in prior steps. -
Click Create.
Create a Pipelines Build YAML for Integration with PagerDuty
- Create a new git repository or use an existing repository to save a new file
pipeline.yaml - Create a new Pipelines integration for your SCM provider. Visit the official documentation.
- Create a new pipeline YAML definition that uses the new PagerDuty Events integration above to send build notifications to PagerDuty.
- Replace
<MyPagerDutyIntegration>with the name of the Pipelines integration for Pagerduty
resources:
  - name: pagerDutyGitRepo
    type: GitRepo
    configuration:
      gitProvider: MyGithubIntegration
      path: jfrog/jfrog-pipelines-example
pipelines:
  - name: pipeline_pagerduty_example
    steps:
      - name: pagerduty_example_step
        type: Bash
        configuration:
         integrations:
           - name: <MyPagerDutyIntegration>
          inputResources:
            - name: pagerDutyGitRepo
        execution:
          onExecute:
           - send_notification <MyPagerDutyIntegration> --text "<Your message>"
Commit the pipeline yaml to your SCM provider and then follow the official steps on adding a pipeline.
Run a Pipelines Build with PagerDuty Integration
-
Click the JFrog Pipeline tab
My Pipelines. -
Select the Pipeline you have synced .
-
Click the Pipeline tile and click the
Trigger this stepbutton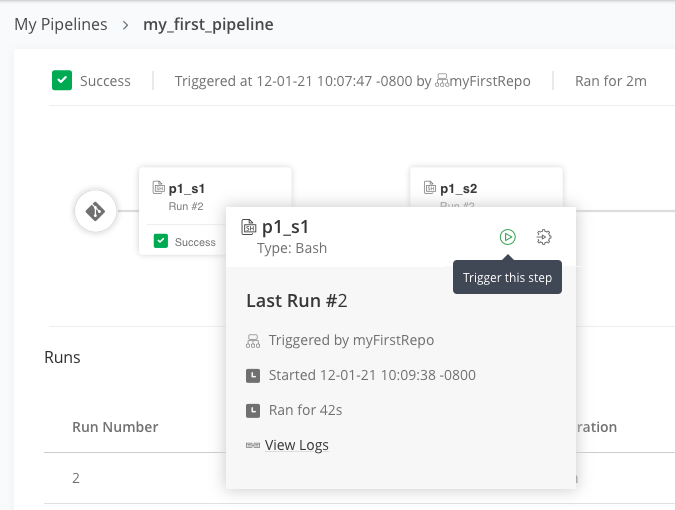
.
Or follow the official steps on all the ways of how to trigger a JFrog pipelines.
Uninstall Pipelines Integration with PagerDuty
-
Find the integration to delete by navigating to Services and selecting Service Directory.
-
Select the service with your integration and navigate to Integrations tab.
-
Navigate to the integration by clicking on the integration name (JFrog Pipelines + PagerDuty Notifications).
-
Click the Delete Integration button on the top right corner.
-
Remove any PagerDuty Pipelines in the
Pipelines Sourcestab of JFrog Pipelines by clicking theDeletebutton shown below.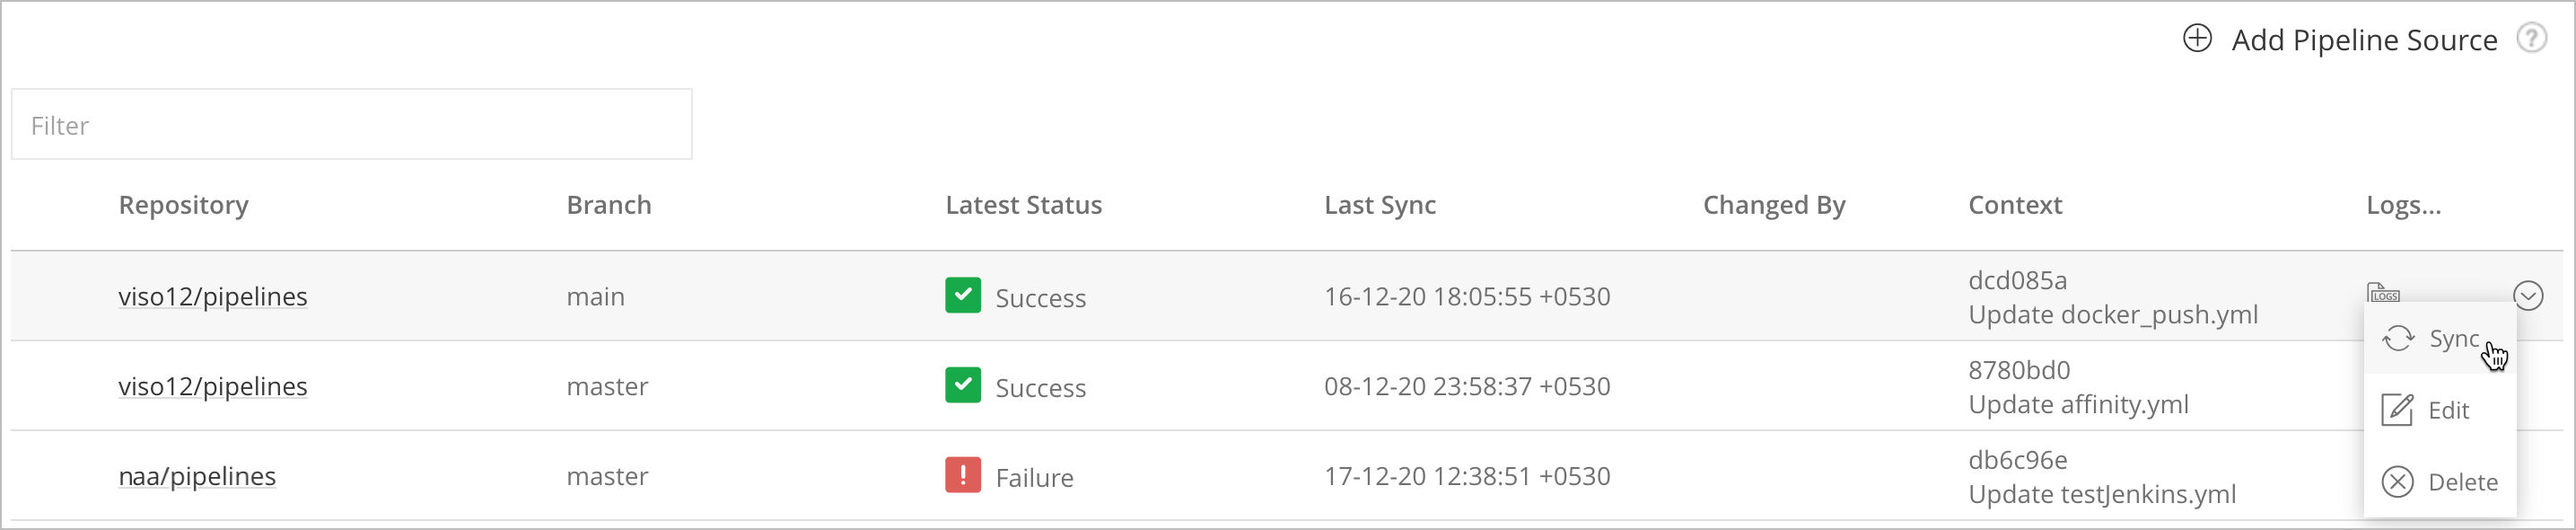
.
Updated about 2 months ago