Hashicorp Integrations
This section describes integrations with Hashicorp Vault and Hashicorp Terraform.
Hashicorp Vault Artifactory Secrets Plugin
The HashiCorp Vault plugin talks to JFrog Artifactory server (5.0.0 or later) and will dynamically provision access tokens with specified scopes.
This plugin is now being actively maintained by JFrog Inc. Refer to CONTRIBUTING.md for contributions and create Github issues to request support.
Build
This is a HashiCorp Vault plugin, which talks to the JFrog Artifactory server and provisions access tokens with specified scopes dynamically. This backend can be mounted multiple times to provide access to multiple Artifactory servers. Using this plugin, you can limit the accidental exposure window of Artifactory tokens; useful for continuous integration servers.
Access Token Creation and Revoking
This backend creates access tokens in Artifactory using the admin credentials provided. Note that if you provide non-admin credentials, then the "username" must match the username of the credential owner.
Issues
RTFACT-22477, proposing CIDR restrictions on the created access tokens.
Contributors
See the contribution guide.
Licenses
Copyright (c) 2023 JFrog.Apache 2.0 licensed, see LICENSE file.
Install the Hashicorp Vault Artifactory Secrets Plugin
This topic reviews subjects related to the installation of the Hashicorp Vault Artifactory Secrets Plugin.
Using Pre-built Releases
You can find pre-built releases of the plugin here. Once you have downloaded the latest archive corresponding to your target OS, uncompress it to retrieve the artifactory binary file.
From Sources
If you prefer to build the plugin from sources, clone the GitHub repository locally and run the command make build from the root of the sources directory. Upon successful compilation, the resulting artifactory binary is stored in the vault/plugins directory.
Hashicorp Vault Artifactory Secrets Plugin Configuration
Copy the plugin binary into a location of your choice; this directory must be specified as the plugin_directory in the Vault configuration file:
plugin_directory= "path/to/plugin/directory"Start a Vault server with this configuration file:
vault server -config=path/to/vault/config.hclOnce the server is started, register the plugin in the Vault server's plugin catalog.
vault write sys/plugins/catalog/secret/artifactory \
    sha_256="$(sha256sum path/to/plugin/directory/artifactory | cut -d "" -f 1)" \
command="artifactory"Note
You may need to also add arguments to the registration like
-args="-ca-cert ca.pem or something insecure like:-args="-tls-skip-verify"depending on your environment. (see./path/to/plugins/artifactory -helpfor all the options)
Warning
This inline checksum calculation above is provided for illustration purpose and does not validate your binary. It should not be used for production environment. Instead you should use the checksum provided as part of the release. For more information, see Verify Binary Checksums.
You can now enable the Artifactory secrets plugin:
vault secrets enable artifactoryVerify Binary Checksums
Checksums for each binary are provided in the artifactory-secrets-plugin_<version>_checksums.txt file. It is signed with the public key vault-plugin-secrets-artifactory-public-key.asc which creates the signature file artifactory-secrets-plugin_<version>_checksums.txt.sig.
If the public key is not in your GPG keychain, import the key.
gpg --import artifactory-secrets-plugin-public-key.ascVerify the checksums file signature.
gpg --verify artifactory-secrets-plugin_<version>_checksums.txt.sigYou should see something like the following example.
gpg: assuming signed data in 'artifactory-secrets-plugin_0.2.17_checksums.txt'
gpg: Signature made Mon May  8 14:22:12 2023 PDT
gpg:                using RSA key ED4FF1CD6C2318B470A33A1659FE1520A4A355CD
gpg: Good signature from "Alex Hung <[email protected]>" [ultimate]
With the checksums file verified, you can now safely use the SHA256 checkum inside as part of the Vault plugin registration (vs calling sha256sum).
Configure Artifactory for Hashicorp Vault
-
Log into the JFrog Platform UI as "admin".
-
Create the Access Token that Vault will use to interact with Artifactory. Or use the . See
get-access-key.shin Terraform Artifactory Provider.Click JFrog Platform UI | User Management | Access Tokens | Generate Token.
Use the following parameters.
- Token Type: Scoped Token
- Description: (optional) vault-plugin-secrets-artifactory (Note: This will be lost on admin token rotation, because it is not part of the token.)
- Username: vault-admin (for example)
- Service: Artifactory (or you can leave it on "All")
- Expiration time: Never (do not set the expiration time less than 7h, since by default, it will not be revocable once the expiration is less than 6h)
-
Save the generated token as the environment variable
TOKEN.
Alternatively:
-
Use the Create Token REST API, and save the access_token from the JSON response as the environment variable
TOKEN. -
Use getArtifactoryAdminToken.sh.
export JFROG_URL=https://artifactory.example.org
export ARTIFACTORY_USERNAME=admin
export ARTIFACTORY_PASSWORD=password
TOKEN=$(scripts/getArtifactoryAdminToken.sh)
Vault Configuration
vault write artifactory/config/admin \
    url=https://artifactory.example.org \
    access_token=$TOKEN
Optionally, rotate the admin token, so that only vault knows it.
vault write -f artifactory/config/rotateNote
Some versions of Artifactory (notably 7.39.10) fail to rotate correctly. We recommend being on 7.42.1 or higher.
Also, if you want to change the username for the admin token (tired of it just being "admin"?) or set a "Description" on the token, those parameters are optionally available on the artifactory/config/rotate endpoint.
vault write artifactory/config/rotate username="new-username" description="A token used by vault-secrets-engine on our vault server"`Bypass TLS connection verification with Artifactory
To bypass TLS connection verification with Artifactory, set bypass_artifactory_tls_verification to true.
vault write artifactory/config/admin \
    url=https://artifactory.example.org \
    access_token=$TOKEN \
    bypass_artifactory_tls_verification=true
Optionally, check the results.
vault read artifactory/config/adminSample Output
Key                                 Value
---                                 -----
access_token_sha256                 74834a86b2082750201e2a1e520f21f7bfc7d4026e5bd2b075ca2d0699b7c4e3
bypass_artifactory_tls_verification false
scope                               applied-permissions/admin
token_id                            db0002b0-af08-486c-bbad-b255a3cc7b31
url                                 http://localhost:8082
use_expiring_tokens                 false
username                            vault-admin
version                             7.55.6
Test the Hashicorp Vault Artifactory Secrets Plugin Locally
If you're compiling this yourself and want to do a local sanity test, you can do something like:
In first terminal, build the plugin and start the local dev server:
makeIn another terminal, setup the vault with values:
export VAULT_ADDR=http://127.0.0.1:8200
export VAULT_TOKEN=root
make setup
Once that's completed, in the same terminal:
make artifactory &# Runs netcat returning a static JSON response
vault read artifactory/token/test
Use the Hashicorp Vault Artifactory Secrets Plugin
This topic reviews how to use the use the Hashicorp Vault Artifactory Secrets Plugin.
You will need the "admin" user's password (not an admin, but admin specifically).
- Log into the JFrog Platform UI as "admin".
- Under "Welcome, admin" (top right) go to "Edit Profile".
- Create the Access Token that Vault will use to interact with Artifactory. In Artifactory 7.x this can be done in the UI Administration -> User Management -> Access Tokens -> Generate Token. (Scoped Token, User name:
admin, Service:Artifactory, Expiration time:Never). Or use the Create Token REST API. Seeget-access-key.shin Terraform Artifactory Provider.
Note that username must be admin otherwise you will not be able to specify different usernames for roles. Save the access_token from the JSON response as the environment variable TOKEN.
vault write artifactory/config/admin \
    url=https://artifactory.example.org/artifactory \
access_token=$TOKEN- Optionally, rotate the admin token, so that only vault knows it.
vault write -f artifactory/config/rotate- Create a Role (scope for Artifactory < 7.21.1)
vault write artifactory/roles/jenkins \
    username="example-service-jenkins" \
    scope="api:* member-of-groups:ci-server" \
default_ttl=1h max_ttl=3h- Create a role (scope for Artifactory
>=7.21.1)
vault write artifactory/roles/jenkins \
    username="example-service-jenkins" \
    scope="applied-permissions/groups:automation " \
    default_ttl=1h max_ttl=3h
Also supports grant_type=[Optional, default: "client_credentials"], and audience=[Optional, default: @] see Create Token REST API.
Note : There are some changes in the scopes supported in Artifactory request >7.21. Refer to the JFrog documentation for the same according to the Artifactory version.
vault list artifactory/roles

Keys
----
jenkins
vault read artifactory/token/jenkins
Key Value
--- -----
lease_id artifactory/token/jenkins/25jYH8DjUU548323zPWiSakh
lease_duration 1h
lease_renewable true
access_token adsdgbtybbeeyh...
role jenkins
scope api:* member-of-groups:ci-serverDevelop with the Hashicorp Vault Artifactory Secrets Plugin
- Install Vault binary
brew tap hashicorp/tap
brew install hashicorp/tap/vault- Start Vault dev server
make start- In a separate shell, build plugin binary
make build- Export Vault url and enable plugin
export VAULT_ADDR='http://127.0.0.1:8200'
make enable- Export auth token and write it to the vault
export TOKEN=<Your Artifactory auth token>
vault write artifactory/config/admin \
    url=http://127.0.0.1:8200/artifactory \
    access_token=$TOKEN
Hashicorp Terraform Provider for JFrog Artifactory
The Hashicorp Terraform Provider for JFrog Artifactory enables customers to configure and manage the resources, settings and properties associated with their artifactory instances by leveraging a system of Artifactory APIs. With this provider, customers can use a collection of Terraform resources to:
- Create and manage local, remote, virtual, and federated repositories
- Create users and groups and set permission targets
- Configure security and SSO settings
- Create and manage Artifactory API keys and access tokens
- Create and configure replication between Artifactory repositories; and
- Set webhooks for Artifactory events associated with artifacts, builds, and release bundles.
Prerequisites
The Hashicorp Terraform Provider for JFrog Artifactory requires the following:
- Terraform version 0.13 and subsequent versions
- Admin user privileges for your Artifactory account.
- A valid Artifactory Pro or Enterprise license
How it Works
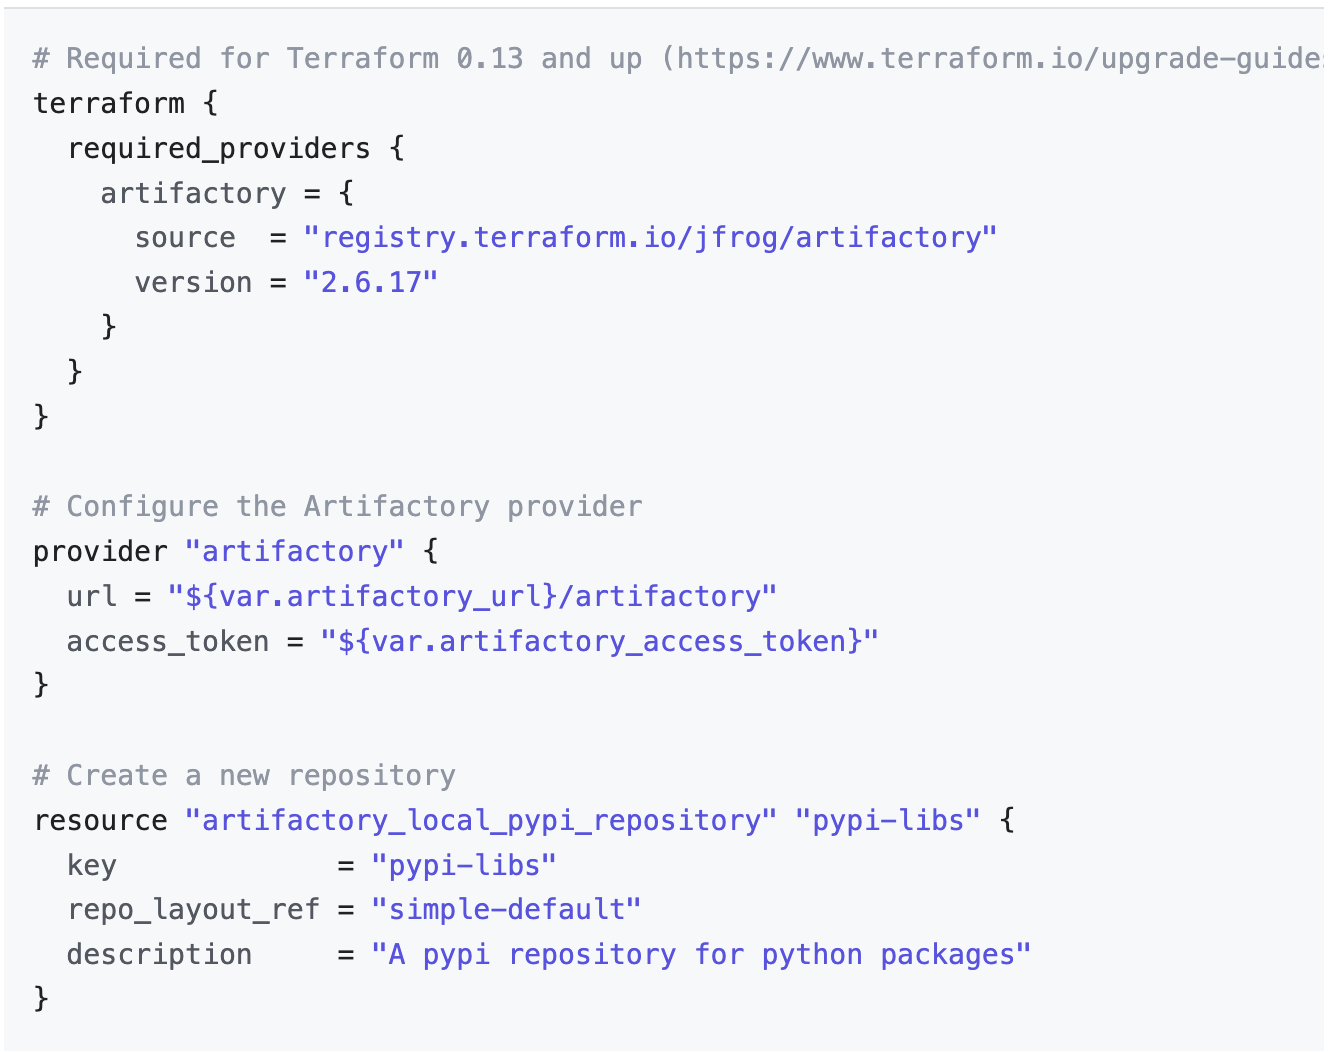
The Terraform Provider for JFrog Artifactory requires access to the Artifactory APIs that are only available for Pro and Enterprise license tiers. A list of Terraform resources are used for the creation and management of the entities described in the previous section. An example of how to configure JFrog Artifactory with the Terraform provider is shown below for reference. For more information on how to use the provider, please visit the JFrog Artifactory Terraform Provider Github page.
Example Usage
Hashicorp Terraform Provider for Artifactory Projects
The Hashicorp Terraform Provider for JFrog Projects enables customers to create and manage projects within their Artifactory instances. With this provider, customers can use a collection of Terraform resources to:
- Create projects
- Assign and manage project administrator privileges
- Set storage limits for your project
- Assign members and groups and set permissions
- Create custom roles
- Assign local, remote, virtual and federated repositories to your project.
Prerequisites
The Hashicorp Terraform Provider for JFrog Projects requires the following:
- Terraform version 0.13 and subsequent versions
- Platform Admin user privileges for your Artifactory account
- A valid Artifactory Pro or Enterprise license.
How it Works
The Terraform Provider for JFrog Project requires access to the Artifactory APIs that are only available for Pro and Enterprise license tiers. Additionally, an account with Platform Administrator privileges is required to this provider to create and manage the projects. A list of terraform resources are used for the creation and management of projects and its set of entities described in the previous section. For more information on how to use the provider, please visit the Terraform Provider for Artifactory Projects GitHub page.
Hashicorp Terraform Provider for JFrog Xray
The Hashicorp Terraform Provider for JFrog Xray enables customers to create and manage JFrog Xray policies and watches for the resources within their Artifactory instances. With this provider, customers can use a collection of terraform resources to:
- Create and edit license and security policies
- Define actions for the policies that are created
- Create and edit Xray watches and assign it to the resources within their Artifactory instance
- Configure ignore rules for your policies and watches
- Modify database sync time for Xray
Prerequisites
The Hashicorp Terraform Provider for JFrog Xray requires the following:
- Terraform version 0.13 and subsequent versions
- Platform Admin user privileges for your Artifactory account
- A valid Artifactory Pro or Enterprise license
- An installed instance of JFrog Xray
How it Works
The Terraform Provider for JFrog Xray requires access to Artifactory and Xray APIs that are only available for Pro and Enterprise license tiers. Additionally, an account with Platform Administrator privileges is required for the authentication required by these set of APIs. A list of Terraform resources are used for the creation and management of Xray policies and watches. For more information on how to use the provider, visit the Terraform Provider for JFrog Xray GitHub page.
Updated about 2 months ago