GitHub Actions and Artifactory CI Integration Example
This section provides a comprehensive walkthrough of setting up Continuous Integration (CI) workflows using GitHub Actions and JFrog Artifactory. It covers the process for both Docker and Maven projects, automating the build, test, and artifact publication process.
- Continuous Integration: A development practice where code changes are automatically built, tested, and integrated into a shared repository.
- GitHub Actions: A CI/CD platform that automates software development workflows directly within GitHub repositories.
- JFrog Artifactory: A universal artifact repository manager that stores and manages binaries and artifacts generated during the software development process.
- JFrog CLI: A command-line tool that simplifies interactions with JFrog products, enabling automation of artifact management.
Prerequisites
Before you begin, ensure you have the following:
-
Docker
- A GitHub repository containing the required project files, including a Dockerfile
- Access to JFrog Artifactory and Docker Repositories created
-
Maven
- A GitHub repository containing the required project files, including a
pom.xmlfile - Access to JFrog Artifactory and Maven Repositories created
- A GitHub repository containing the required project files, including a
Related Information
JFrog Artifactory uses different types of repositories to manage artifacts
- Local repositories store artifacts generated within your organization
- Remote repositories act as proxies for external repositories, caching downloaded artifacts
- Virtual repositories aggregate local and remote repositories, providing a single point of access for artifacts
Configure GitHub Actions and JFrog Platform
To enable seamless CI workflows, you need to connect GitHub Actions with your JFrog Platform.
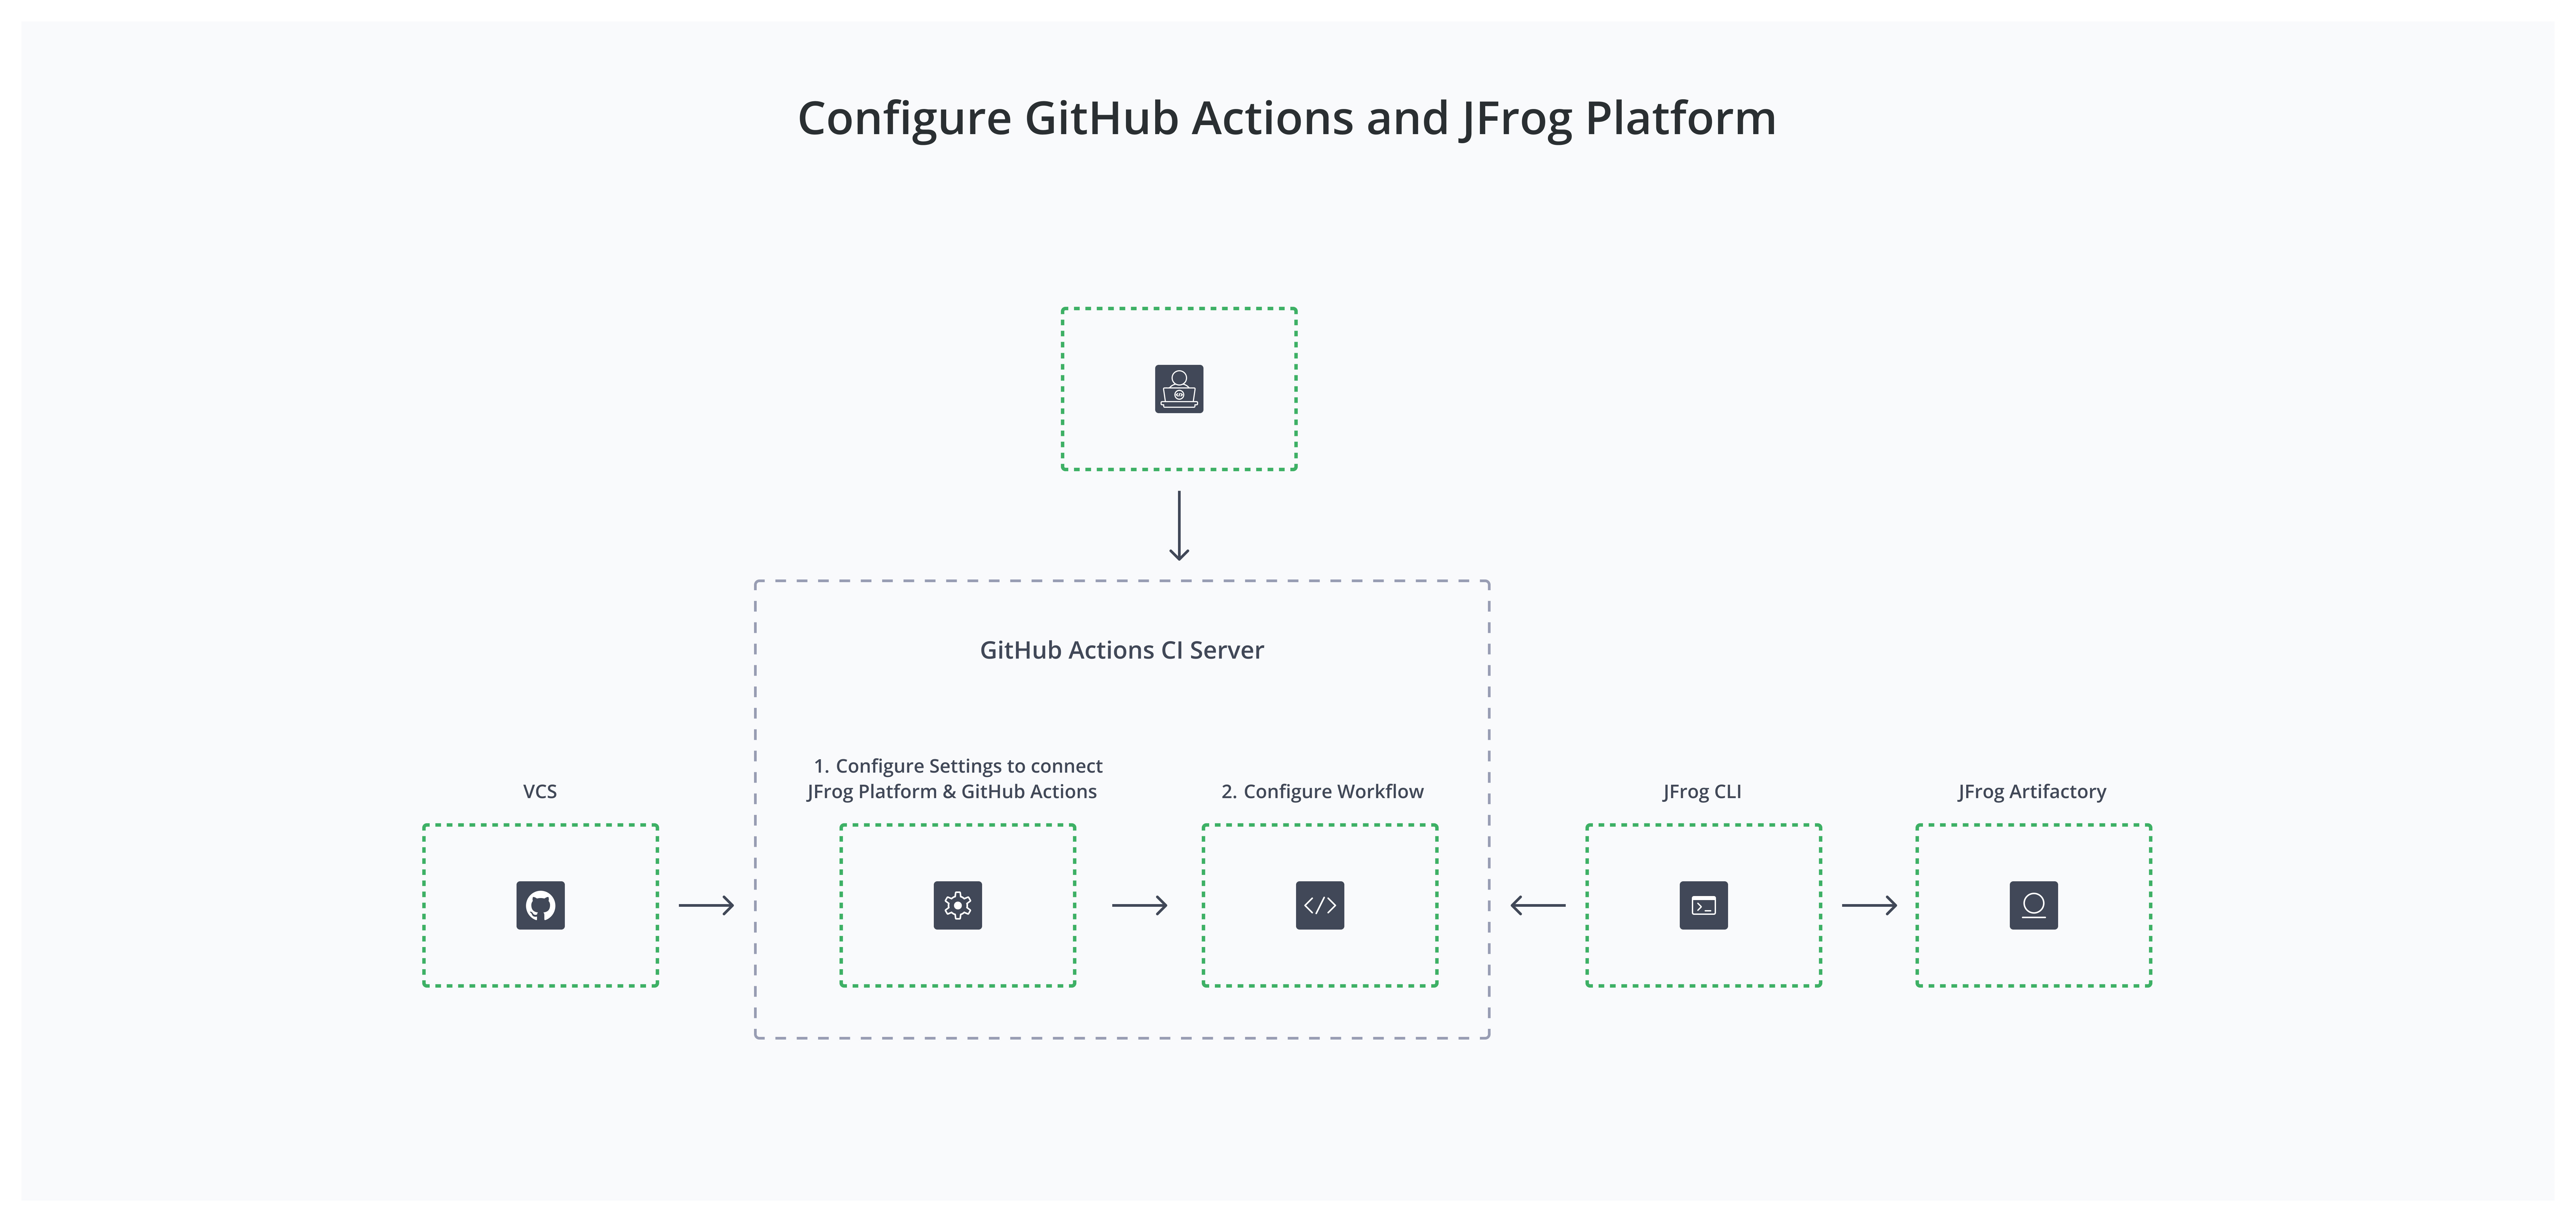
Connect GitHub Actions with JFrog Platform
-
Authentication Methods
To connect GitHub actions with the JFrog platform, you need to authenticate with one of the following methods.
- OIDC: For details, refer to the JFrog documentation
- Basic Authentication: Using a username and password
- Platform Access Token: Using a generated access token
-
GitHub Actions Secrets and Variables
You'll need to configure secrets and variables in your GitHub Actions workflow to securely store and access sensitive information.
- Secrets: Store sensitive information like JFrog access tokens or passwords
- Variables: Store non-sensitive information like the JFrog Artifactory URL.
Note
To enable the integration, you must configure at least the JF_URL and JF_ACCESS_TOKEN environment variables.
Example: Using Secrets and Variables in a Workflow
          # JFrog platform url (for example: https://acme.jfrog.io)
          JF_URL: ${{ vars.JF_URL }}

          # JFrog Platform access token
          JF_ACCESS_TOKEN: ${{ secrets.JF_ACCESS_TOKEN }}

          # Basic authentication credentials
          ## JF_USER: ${{ secrets.JF_USER }}
          ## JF_PASSWORD: ${{ secrets.JF_PASSWORD }}
Configure CI Workflow
This section details the configuration of CI workflows for Docker and Maven projects.
Configure Docker Workflow
This workflow automates building, tagging, and pushing Docker images to JFrog Artifactory whenever code is pushed to the main branch.
Docker Workflow Example
name: Build and Tag Docker Image

on:
  push:
    branches:
      - main

jobs:
  build-and-tag:
    runs-on: ubuntu-latest

    env:
      JFROG_CLI_BUILD_NAME: jfrog-docker-build-example
      JFROG_CLI_BUILD_NUMBER: ${{ github.run_number }}

    steps:
      - name: Checkout code
        uses: actions/checkout@v2

      - name: Setup JFrog CLI
        uses: jfrog/setup-jfrog-cli@v4
        env:
          JF_URL: ${{ vars.JF_URL }}
          JF_ACCESS_TOKEN: ${{ secrets.JF_ACCESS_TOKEN }}

      - name: Build and Push Docker Image
        env:
          IMAGE_NAME: <Platform_URL>/<Repository_Name>/<Image_Name>:${{ github.run_number }}
        run: |
          jf docker build -t $IMAGE_NAME .
          jf docker push $IMAGE_NAME --build-name=$JFROG_CLI_BUILD_NAME --build-number=$JFROG_CLI_BUILD_NUMBER

      - name: Publish Build Info With JFrog CLI
        run: |
          # Collect environment variables for the build
          jf rt bce $JFROG_CLI_BUILD_NAME $JFROG_CLI_BUILD_NUMBER
          # Collect VCS details from git and add them to the build
          jf rt bag $JFROG_CLI_BUILD_NAME $JFROG_CLI_BUILD_NUMBER
          # Publish build info
          jf rt bp $JFROG_CLI_BUILD_NAME $JFROG_CLI_BUILD_NUMBER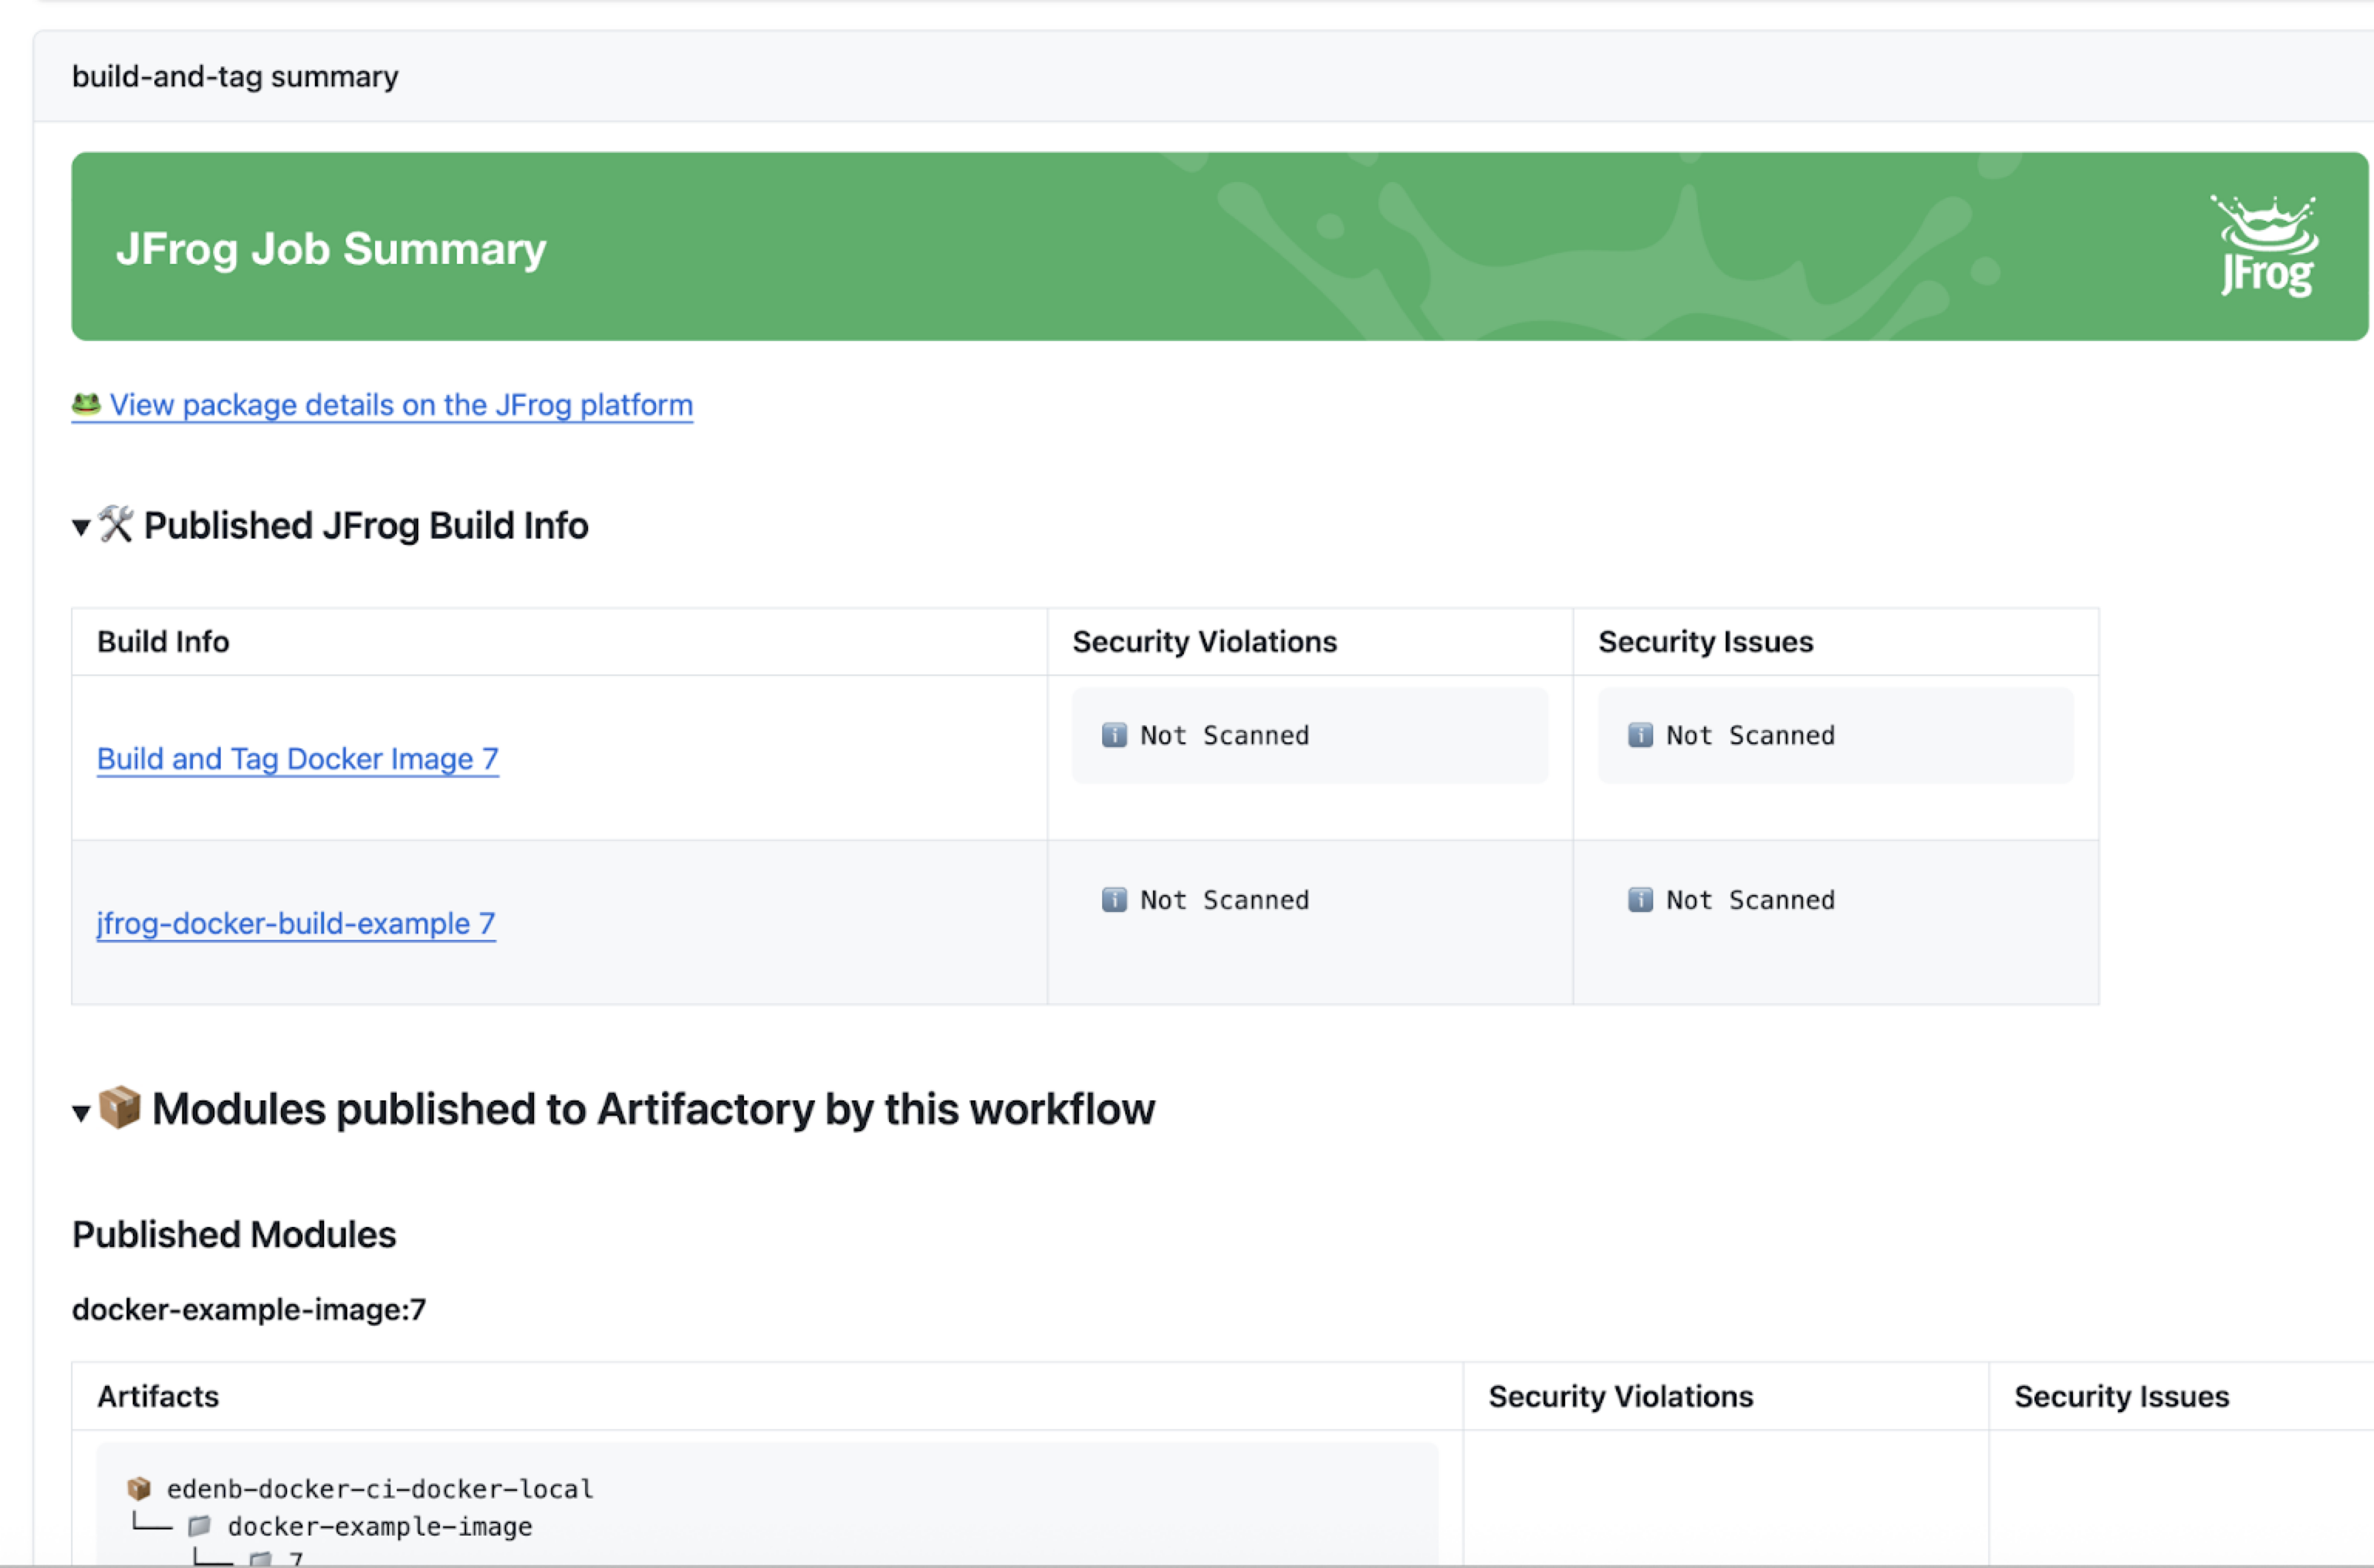
Docker Workflow Breakdown
-
Checkout code: The
actions/checkout@v2action retrieves the repository code, providing access to the Dockerfile. -
Set up JFrog CLI: The
jfrog/setup-jfrog-cli@v4action installs and configures the JFrog CLI.- JF_URL: JFrog Artifactory URL
- JF_ACCESS_TOKEN: The JFrog access token (from GitHub Secrets)
-
Build, Tag and Push Docker Image:
-
The jf docker build command builds the Docker image, using a dynamic tag with the GitHub Actions run_number (a unique number assigned to each workflow run).
-
The jf docker push command pushes the image to JFrog Artifactory.
Reference: jf docker
-
-
Publish Build Info: This step collects information about the build and publishes it to JFrog:
-
Sets the
JFROG_CLI_BUILD_NAMEandJFROG_CLI_BUILD_NUMBERenvironment variables, whereJFROG_CLI_BUILD_NUMBERis also set to the current GitHub Actionsrun_number. -
Executes the following commands:
- jf rt bce: Collects the environment variables
- jf rt bag: Collects version control system details (like commit info, branch name) from Git.
- jf rt bp: Publishes the collected build information to JFrog, linking the built Docker image with its metadata.
-
| Step | Regular docker commands | Jf docker commands | Example |
|---|---|---|---|
| Encapsulate Docker client commands | docker build …. docker push …. | jf docker build …. jf docker push …. |
|
JFrog CLI simplifies interactions with Artifactory and other JFrog services by centralizing configuration and commands.
Using JFrog CLI transforms straightforward docker commands into a robust, traceable, and artifact-focused process. While standard docker commands can handle basic builds, integrating JFrog CLI allows teams to leverage advanced features for artifact management and build tracking.
By adopting JFrog CLI, you can work more collaboratively, manage resources more effectively, and streamline their workflows.
CI Docker Workflow
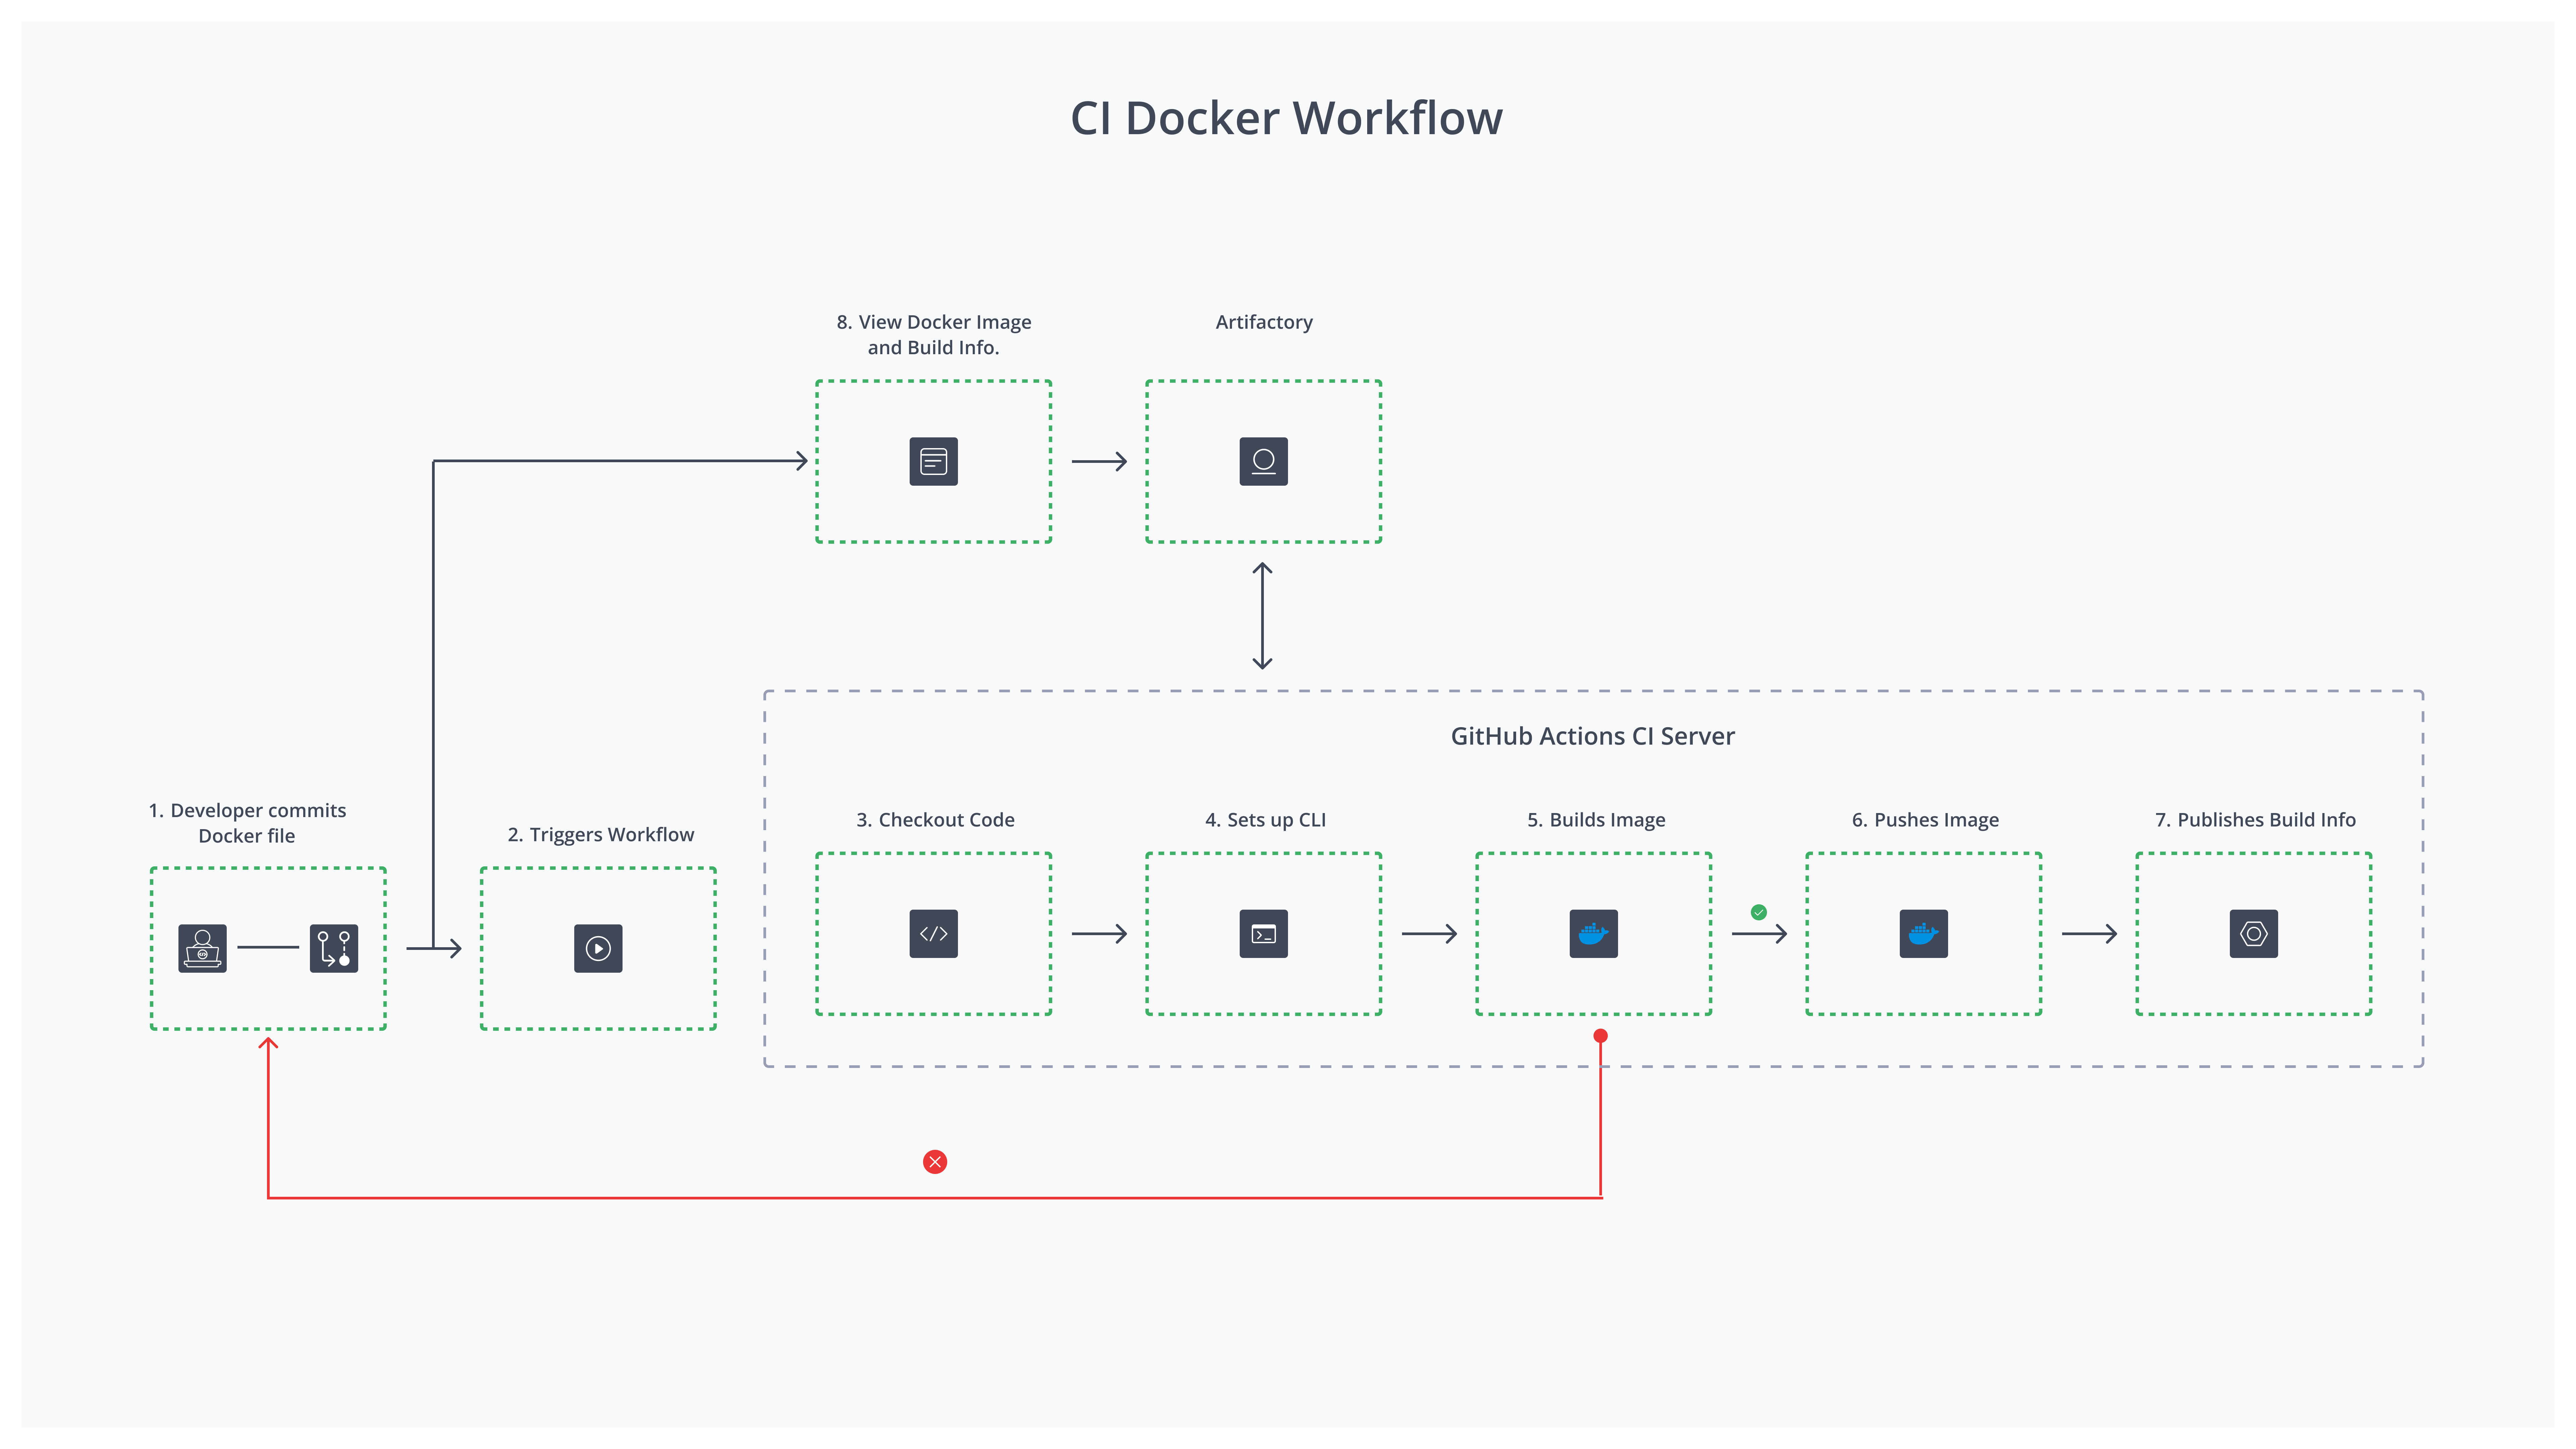
- Developer Commits Dockerfile: The workflow begins when a developer makes a commit to the version control system (VCS), including changes to the Dockerfile and other relevant application code.
- Triggers Workflow: The commit triggers the CI pipeline, notifying the CI server, GitHub Actions, to begin the process.
- Checkout Code: The CI server checks out the latest code from the repository to ensure that the build incorporates the most recent changes.
- Sets Up CLI: The CI environment sets up the necessary Command-Line Interface (CLI) tools required for building the Docker image.
- Builds Image: The CI server builds the Docker image using the Dockerfile and application code.
- Pushes Image: Once the image is built successfully, the CI server pushes it to the specified Docker image repository.
- Publishes Build Info: The CI server publishes the build information to JFrog Artifactory. This includes metadata about the build, which can be referred to in future development cycles for tracking and auditing purposes.
- View Docker Image and BuildInfo: View the Docker image and related build information in JFrog Artifactory, which provides insights into artifacts, builds, and packages created during the CI process.
Configure Maven Workflow
This workflow automates building, testing, and deploying Maven artifacts to JFrog Artifactory on every push to the main branch.
Maven Workflow Example
name: Build and Deploy Maven Artifacts to Artifactory

on:
  push:
    branches:
      - main  # Change to your preferred branch

jobs:
  build-and-publish:
    runs-on: ubuntu-latest

    steps:
    # Step 1: Checkout code
    - name: Checkout code
      uses: actions/checkout@v2

    # Step 2: Set up JDK for Maven
    - name: Set up JDK (for Maven)
      uses: actions/setup-java@v2
      with:
        java-version: '11'  # Specify your Java version
        distribution: 'adopt'

    # Step 3: Set up JFrog CLI
    - name: Set up JFrog CLI
      uses: jfrog/setup-jfrog-cli@v4
      with:
        version: 2.75.0  # Specify the JFrog CLI version
      env:
        JF_URL: ${{ vars.JF_URL }}
        JF_ACCESS_TOKEN: ${{ secrets.JF_ACCESS_TOKEN }}

    # Step 4: Configure Maven with JFrog CLI
    - name: Configure Maven with JFrog CLI
      run: |
        jf mvnc --repo-deploy-releases=<release_repo_in_artifactory> \
                --repo-deploy-snapshots=<snapshot_repo_in_artifactory>

    # Step 5: Build and deploy Maven artifacts to Artifactory
    - name: Build and deploy Maven artifacts
      env:
        JFROG_CLI_BUILD_NAME: <Build_Name>
        JFROG_CLI_BUILD_NUMBER: ${{ github.run_number }}
      run: |
        jf mvn clean install \
          --build-name=$JFROG_CLI_BUILD_NAME \
          --build-number=$JFROG_CLI_BUILD_NUMBER

    # Step 6: Run unit tests
    - name: Run unit tests
      run: mvn test


   # Step 7: Publish Build Info with JFrog CLI
    - name: Publish Build Info With JFrog CLI
      env:
        JFROG_CLI_BUILD_NAME: <Build_Name>
        JFROG_CLI_BUILD_NUMBER: ${{ github.run_number }}
      run: |
        # Collect environment variables for the build
        jf rt bce $JFROG_CLI_BUILD_NAME $JFROG_CLI_BUILD_NUMBER
        # Collect VCS details from git and add them to the build
        jf rt bag $JFROG_CLI_BUILD_NAME $JFROG_CLI_BUILD_NUMBER
        # Publish build info
jf rt bp $JFROG_CLI_BUILD_NAME $JFROG_CLI_BUILD_NUMBERReference:
| Step | Regular maven command | Jf maven command | Example |
|---|---|---|---|
| Encapsulate maven client commands | mvn clean install | jf mvn clean install | jf mvn clean install \ --build-name=$JFROG_CLI_BUILD_NAME \ --build-number=$JFROG_CLI_BUILD_NUMBER |
JFrog CLI simplifies interactions with Artifactory and other JFrog services by centralizing configuration and commands.
Using JFrog CLI transforms a straightforward Maven command into a robust, traceable, and artifact-focused process. While standard Maven commands can handle basic builds, integrating JFrog CLI allows teams to leverage advanced features for artifact management and build tracking.
By adopting JFrog CLI, you can work more collaboratively, manage resources more effectively, and streamline their workflows.
Maven Workflow Breakdown
-
Checkout Code: The
actions/checkout@v2action retrieves the repository code, providing access to the pom.xml file. -
Set up:
-
JDK: The actions/setup-java@v2 action installs the specified Java Development Kit (JDK).
-
JFrog CLI: The jfrog/setup-jfrog-cli@v4 he JFrog CLI.
- JF_URL: The JFrog Artifactory URL (from GitHub Variables).
- JF_ACCESS_TOKEN: The JFrog access token (from GitHub Secrets)
Reference: Managing Artifacts with JFrog CLI
-
-
Configure Maven Repositories to deploy: The
jf mvnccommand configures the deployment repositories for releases and snapshots. -
Build and Publish the Maven Project: The
jf mvn clean installcommand builds the Maven project and deploys the artifacts to Artifactory. -
Publish Build Info: This step collects information about the build and publishes it to JFrog:
-
Sets the
JFROG_CLI_BUILD_NAMEandJFROG_CLI_BUILD_NUMBERenvironment variables, whereJFROG_CLI_BUILD_NUMBERis also set to the current GitHub Actionsrun_number. -
Executes the following commands:
jf rt bce: Collects the environment variablesjf rt bag: Collects version control system details (like commit info, branch name) from Git.jf rt bp: Publishes the collected build information to JFrog, linking the built maven artifact with its metadata.
-
CI Maven Workflow
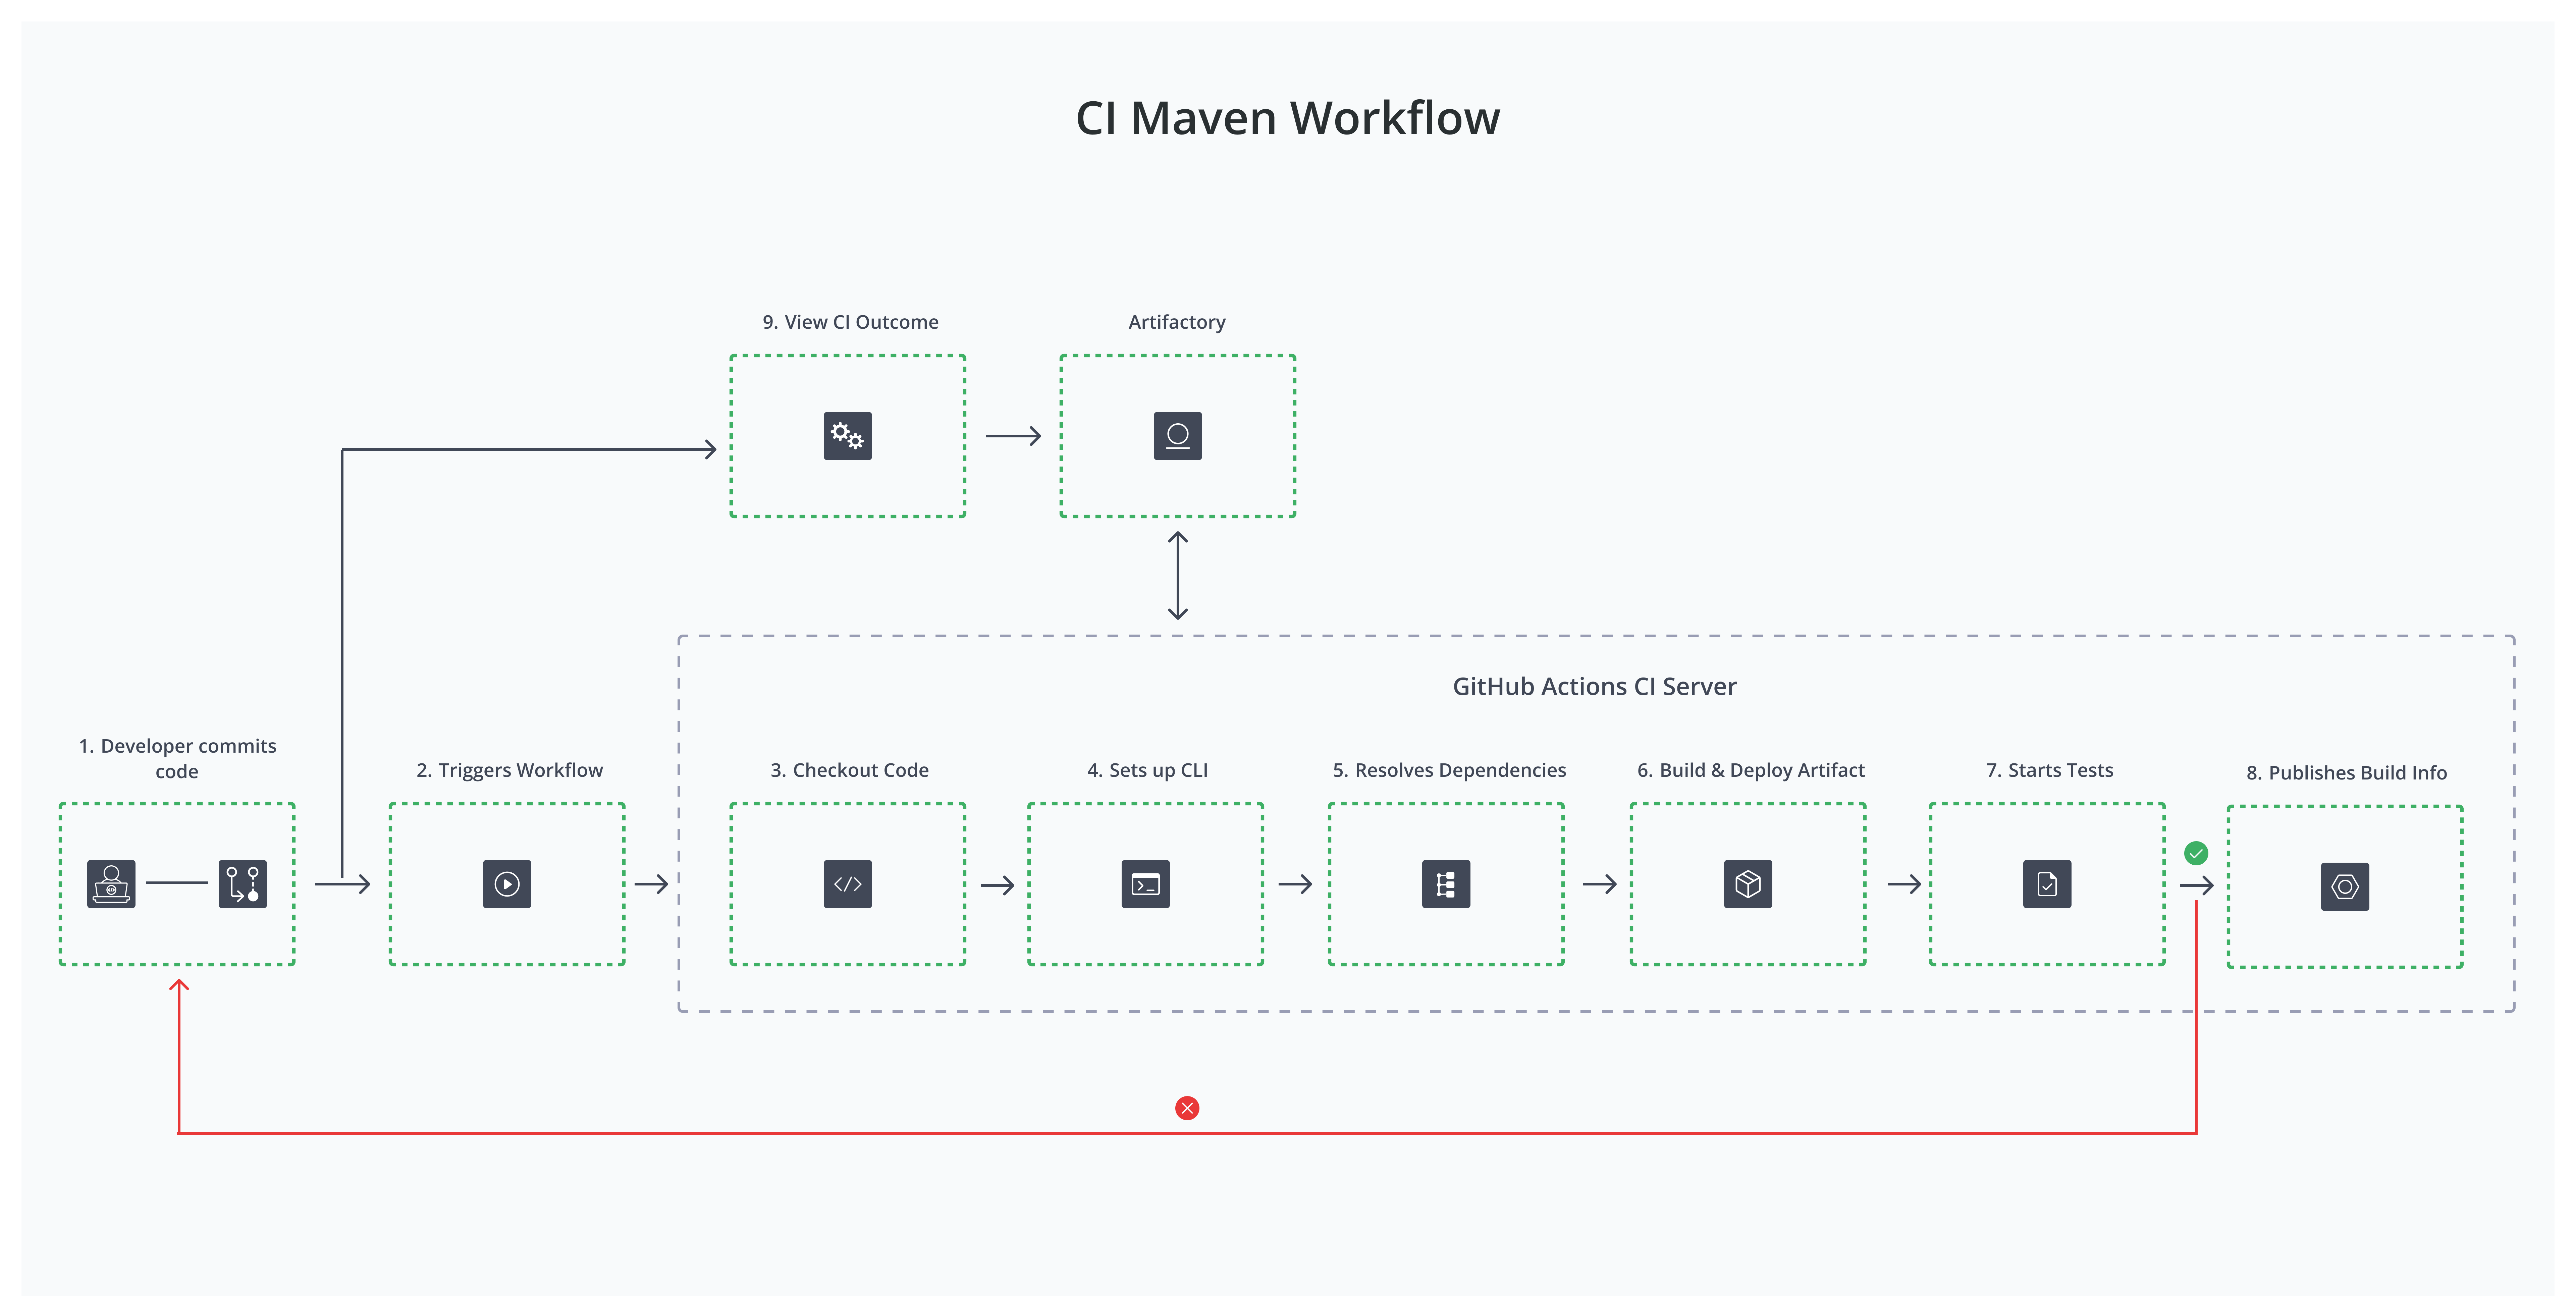
- Developer Commits Code: The workflow initiates when a developer commits code changes to the version control system (VCS), including updates to the Maven project files.
- Triggers Workflow: The code commit triggers the Continuous Integration (CI) pipeline, notifying GitHub Actions to begin the build process.
- Checkout Code: The CI server begins the build process, preparing for dependency resolution and artifact construction.
- Sets Up CLI: The CI environment configures the necessary Command-Line Interface (CLI) tools required to manage Maven projects and build artifacts.
- Resolves Dependencies: The CI server resolves the necessary dependencies specified in the Maven project descriptor (pom.xml), ensuring that all required libraries and artifacts are available for the build.
- Builds and Deploys Artifact: The server then builds the artifact by compiling the code and packaging it according to the specifications in the Maven configuration, and then deploys it to Artifactory.
- Starts Testing: Once the artifact is built, automated tests are executed to verify the code's functionality and integrity.
- Publishes Build Info: After successful testing, the CI server publishes build information to JFrog Artifactory. This includes metadata that can be useful for tracking and validation in future development cycles.
- View CI Outcome: View the overall CI outcome, including the status of the build, results, and access to the published artifacts in JFrog Artifactory.
References:
Updated 19 days ago