Jenkins Artifactory Plugin - Release Management
The Artifactory plugin includes release management capabilities for Maven and Gradle jobs that use Subversion, Git or Perforce for VCS.
The plugin lets you manually stage a release build, allowing you to:
- Change values for the release and next development version
- Choose a target staging repository for deployment of the release, and
- Create a VCS tag for the release.
Staged release builds can, later on, be promoted or rolled-back, changing their release status in Artifactory and, optionally, moving the build artifacts to a different target repository.
Inside Artifactory the history of all build status change activities (staged, promoted, rolled-back, etc.) is recorded and displayed for full traceability.
Plugin Issue tracker
Plugin Source Code
Maven Release Management for Jenkins Artifactory Plugin
Release management with Maven is done entirely by the plugin and executes the Maven build only once.
These are the basic steps that the plugin performs:
- Change the POM versions to the release version (before the build starts)
- Trigger the Maven build (with optionally different goals)
- Commit/push changes to the tag (Subversion) or the release branch (Git)
- Change the POM versions to the next development version
- Commit/push changes to the trunk
In case of a failure, the plugin will do its best to rollback the changes (local and committed).
Configure Maven Jobs
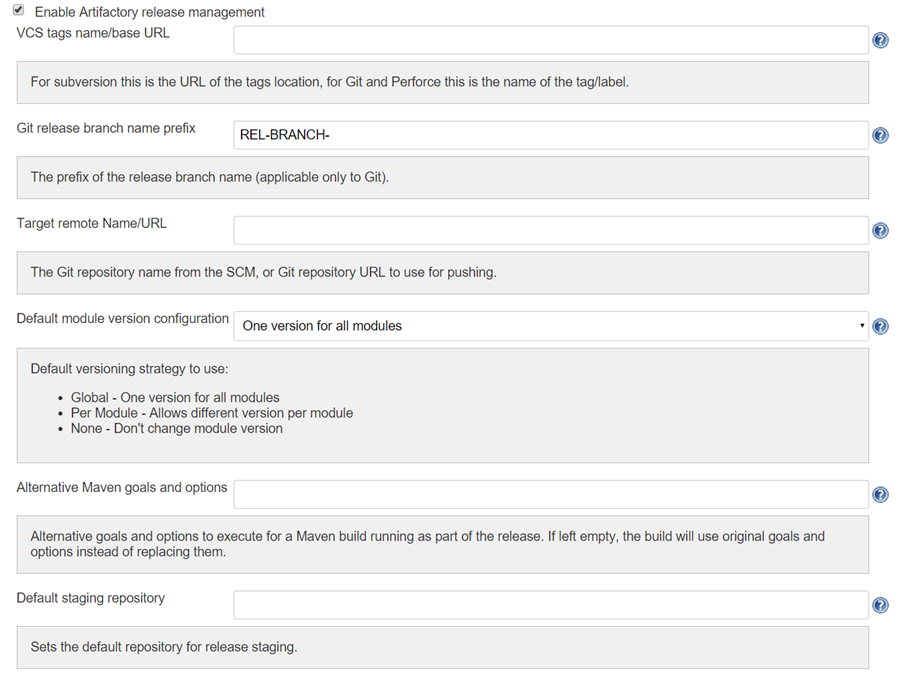
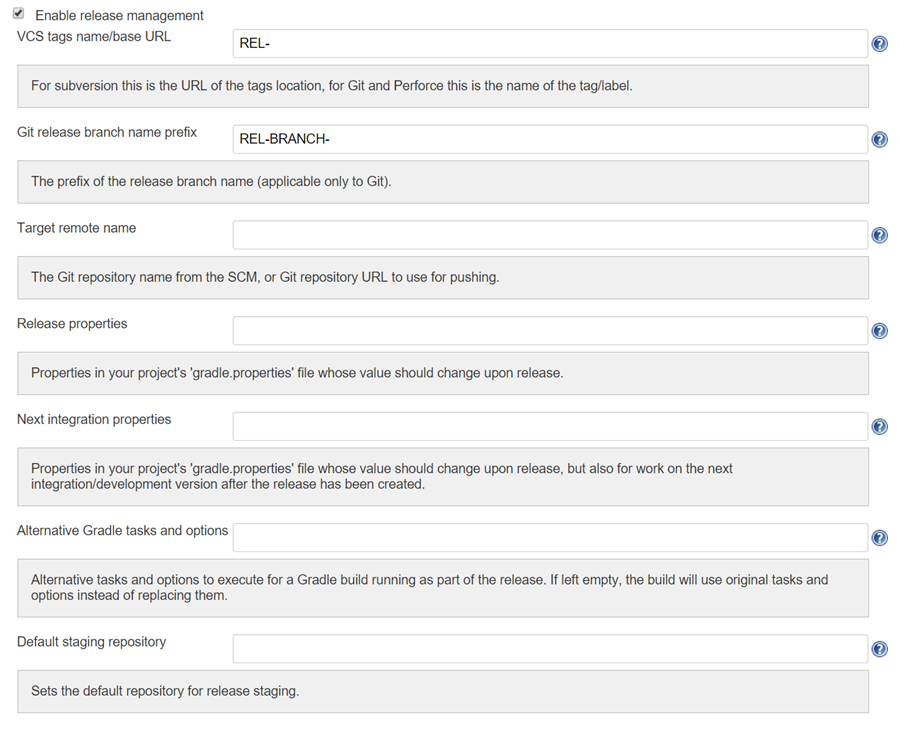
To enable release management in Maven jobs, edit the job configuration and check the "Enable Artifactory release management" checkbox.
Stage a Maven Release Build
Once the release management is enabled, Artifactory release staging link will appear in the left panel ( to authorized users)
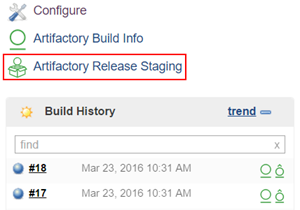
Clicking on the release staging link will open a new page with configuration options for the release build:
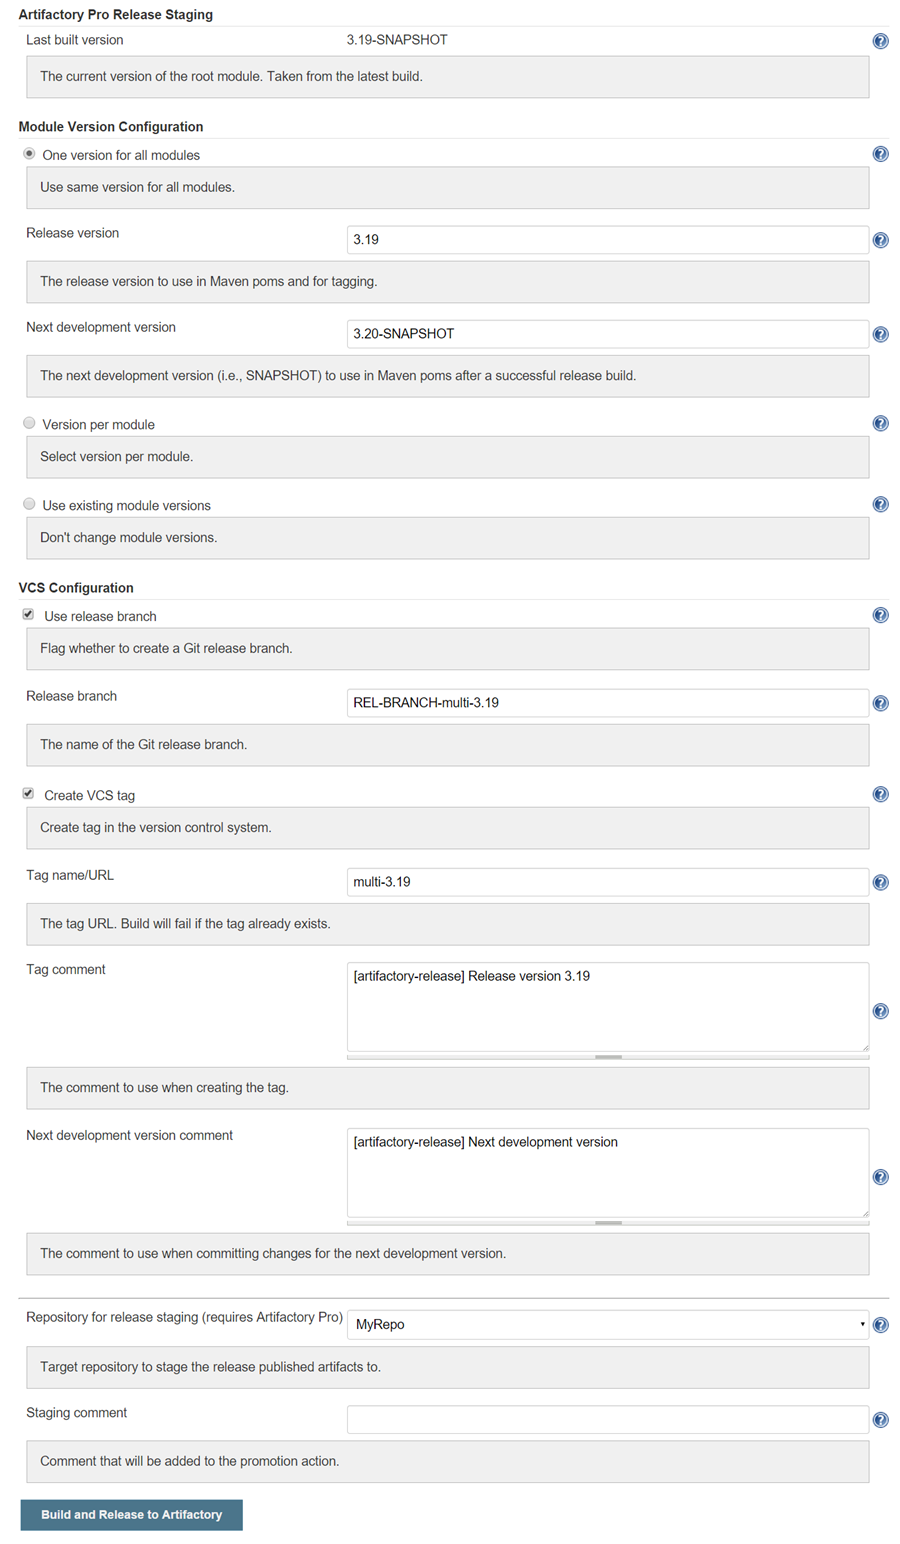
The release staging page displays the last build version (the version is of the root pom and it is taken from the last non-release build).
Most of the fields in the form are filled with the default values.
Version configuration controls how the plugin changes the version in the pom files (global version for all modules, version per module or no version changes).
If create VCS tag is checked (default), the plugin will commit/push the poms with the release version to the VCS system with the commit comment. When using Git, there's also an option to create a release branch.
If the target Artifactory server is the Pro edition, the last section lets you change the target repository (the default is the release repository configured in Artifactory publisher) and to add a staging comment which will be included in the build info deployed to Artifactory.
Click on the "Build and Release to Artifactory" button to trigger the release build.
Promote a Maven Release Build
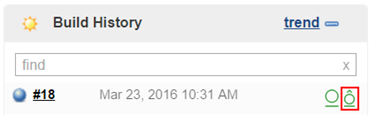
After a release build finish successfully it is possible to promote the build. This is not a required step, but very useful if you want to mark the build as released in Artifactory and to move/copy the built artifacts to another repository so the artifacts will be available for the consumers.
To activate the action either click on the icon next to the build number or on the "Artifactory Release Promotion" link on the left panel of a built release job.
Note that Artifactory Pro is required for promotion.
Clicking on the link will open the promotion page:
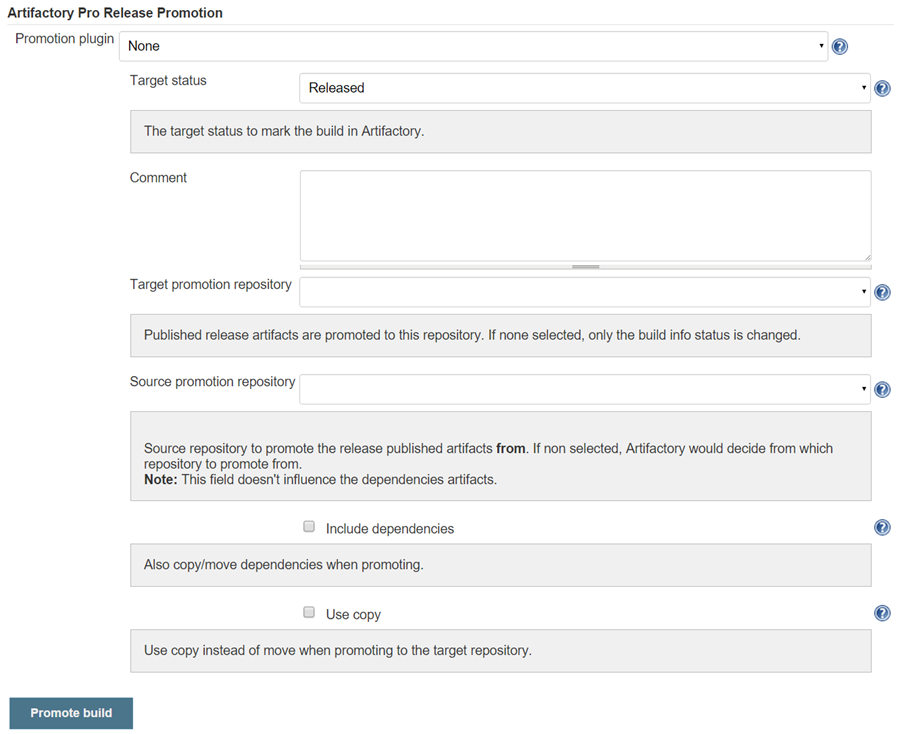
Select the target status (Released or Rolled-Back) of the build and optional comment to display in the build in Artifactory. To move or copy the build artifacts select the target repository.
Promote a Non-Staged Maven Build
Artifactory also allows you to promote a build that has not been through release staging.
To do so, check the Allow promotion of non-staged builds box in the build job configuration dialog.
Gradle Release Management for Jenkins Artifactory Plugin
The release management in Gradle relies on version (and other) properties managed by gradle.properties file. You add all the relevant properties to the release management configuration, and the plugin will read and modify those properties in the gradle.properties file.
These are the basic steps that the plugin performs:
- Change the gradle.properties with release values (before the build starts)
- Trigger the Gradle build step (with optionally different tasks and options)
- Commit/push changes to the tag (Subversion) or the release branch (Git)
- Change the gradle.properties with next integration values
Promote a Gradle Release Build
Promotion is same as in Maven.
Configure Gradle Jobs as part of Release Management
The release management is also available for Gradle build steps in a free style project. To enable Gradle release management, edit the free style job configuration and check "Gradle-Artifactory Integration" and then "Enabled Release Management" checkbox inside the Gradle-Artifactory integration.
Stage a Gradle Release Build as part of Release Management
Once the release management is enabled, Artifactory release staging link will appear in the left panel (to authorized users).
Clicking on the release staging link will open a new page with configuration options for the release build:
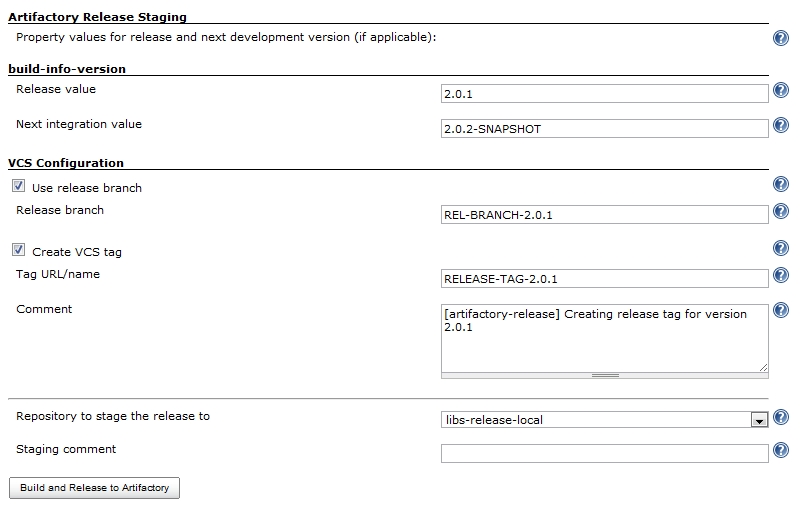
The release staging page displays the release and next development properties configured for the job. The values are read from the gradle.properties file and calculation of the release and next integration version is attempted and displayed in the text fields.
If create VCS tag is checked (default), the plugin will commit/push the poms with the release version to the VCS system with the commit comment. When using Git, if 'Use release branch' is checked, the next release version changes will be done on the branch instead of the currently checkout branch.
The last section lets you change the target repository (the default is the release repository configured in Artifactory publisher) and optional staging comment which will be included in the build info deployed to Artifactory.
Click on the "Build and Release to Artifactory" button to trigger the release build.
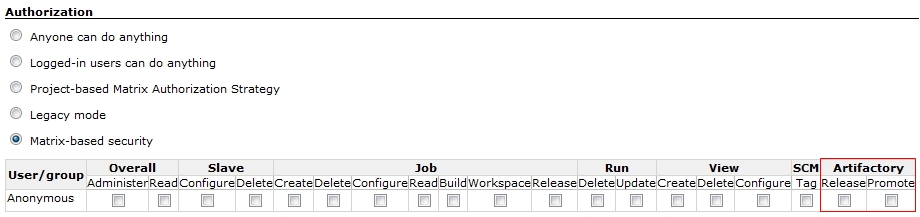
Configure Authorization for Jenkins Artifactory Plugin
If you're using matrix based security, you'll have to grant permissions for the release and promote actions.
The plugin adds two permission types:
- Release - Allows the user to trigger release builds
- Promote - Allows the user to promote a build
Variables Exposed by Release Staging
The Release Staging process exposes the following variables, which can be later used inside the build job. The variables are exposed when the release build ends.
RT_RELEASE_STAGING_VERSION - Contains the release version configured for the release.
RT_RELEASE_STAGING_NEXT_VERSION - Contains the next development version configured for the release.
RT_RELEASE_STAGING_SCM_TAG - Contains the SCM tag name configured for the release.
RT_RELEASE_STAGING_SCM_BRANCH - Contains the SCM branch name configured for the release.
Release Management - Work with Subversion
The release management supports Subversion SCM when using one checkout directory.
During the release the plugin will perform the following:
- Commit the release version directly to the tag (if create tag is checked). The release version is not committed to the to the working branch.
- Commit the next development version to the working branch
Release Management - Work with Git
To work with Git, the Git plugin (version 1.1.10 or later) has to be configured to build one branch AND to checkout to the same local branch. The remote URL should allow Read+Write access.
The plugin uses the git client installed on the machine and uses its credentials to push back to the remote Git repository.
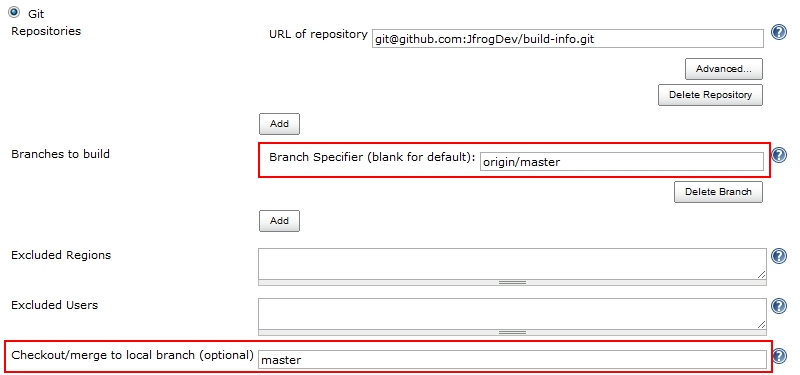
During the release the plugin will perform the following:
- If create branch is checked, create and switch to the release branch
- Commit the release version to the current branch
- Create a release tag
- Push the changes
- Switch to the checkout branch and commit the next development version
- Push the next development version to the working branch
Note that changes will only be committed if changes were made to the files (pom files or gradle.properties)
Release Management - Work with Perforce
The release management supports Perforce SCM when using one checkout directory.
During the release the plugin will perform the following:
- Commit the release version to the working branch and create a label pointing to the changed files (if create VCS tag is checked).
- Commit the next development version to the working branch
Jenkins Artifactory Release Staging API
The Jenkins Artifactory Plugin exposes a Release Management API that provides access to all the features that are available through the Jenkins UI.
The format of the API is as follows:
Mandatory parameters
<Jenkins Server URL>/job/<Project Name>/artifactory/staging?<Parameters List>where:
| Parameter | Description |
|---|---|
| Jenkins Server URL | The URL of the Jenkins server running the build |
| Project Name | The name of the Jenkins project being built |
Maven Project Parameters
The table below details the parameters that should be provided to the API. These parameters mirror those used with the Jenkins UI.
The parameters list should have the following format: <param name1>=<param value1>&<param name2>=<param value2>...
Mandatory parameters
If you do not specify any of the below parameters, the Release Management API will use the values provided by the configured Artifactory Staging User Plugin.
| Name | Expected Values |
|---|---|
| versioning | NONE: Use existing module versions GLOBAL: One version for all modules PER_MODULE : Version per module |
| tagUrl | The name/URL of the VCS tag to create |
| tagComment | The VCS tag comment |
| stagingComment | A comment that will be added to the promotion action |
| repositoryKey | Target repository to which the published release artifacts should be uploaded |
| releaseVersion | Relevant only if versioning is set to GLOBAL The new release version |
| releaseBranch | The name of the release branch to create |
release.<Artifact GroupID>:<Artifact ID> | Relevant only if versioning is set to PER_MODULE Specifies the new release version for the module using the pattern |
| nextVersion | Relevant only if versioning is set to GLOBAL The next development version |
| nextDevelCommitComment | The comment to use when committing changes for the next development version |
next.<Artifact GroupID>:<Artifact ID> | Relevant only if versioning is set to PER_MODULE specifies the next development version for the module using the pattern |
| createVcsTag | true: Create a VCS tag false: Do not create a VCS tag |
| createReleaseBranch | true: Create a release branch false: Do not create a release branch |
API Execution Example Using Curl
curl -X POST \
--user $USER:$API_TOKEN \
http://localhost:8080/job/$JOB_NAME/artifactory/staging \
-H "Content-Type: application/x-www-form-urlencoded" \
-d releaseVersion=8.0.1 \
-d nextVersion=8.1-SNAPSHOT \
-d createReleaseBranch=false \
-d createVcsTag=true \
-d tagUrl=8.0 \
-d tagComment="[artifactory-release|artifactory-release] Release version 8.0" \
-d nextDevelCommitComment=comment...Note
In the above cUrl example, please replace $USER, $API_TOKEN and $JOB_NAME with the relevant values.
Also, this will only work with a generated API Token. Using password will prompt the following error message: No valid crumb was included in the request
Gradle Project Parameters
| Name | Expected Values |
|---|---|
| versioning | Not used in Gradle projects |
| releaseVersion | Not used in Gradle projects |
| nextVersion | Not used in Gradle projects |
release.<Property version name in gradle.properties> | Specifies the new release version for the module using the pattern: release.<Property version name in gradle.properties> |
next.<Property version name in gradle.properties> | Specifies the next development version for the module using the pattern: next.<Property version name in gradle.properties> |
Watch the Screencast - Jenkins Artifactory Release Integration
To see the Jenkins Artifactory Release Integration in action you can watch the following:
Configure Jenkins Artifactory Plug-in
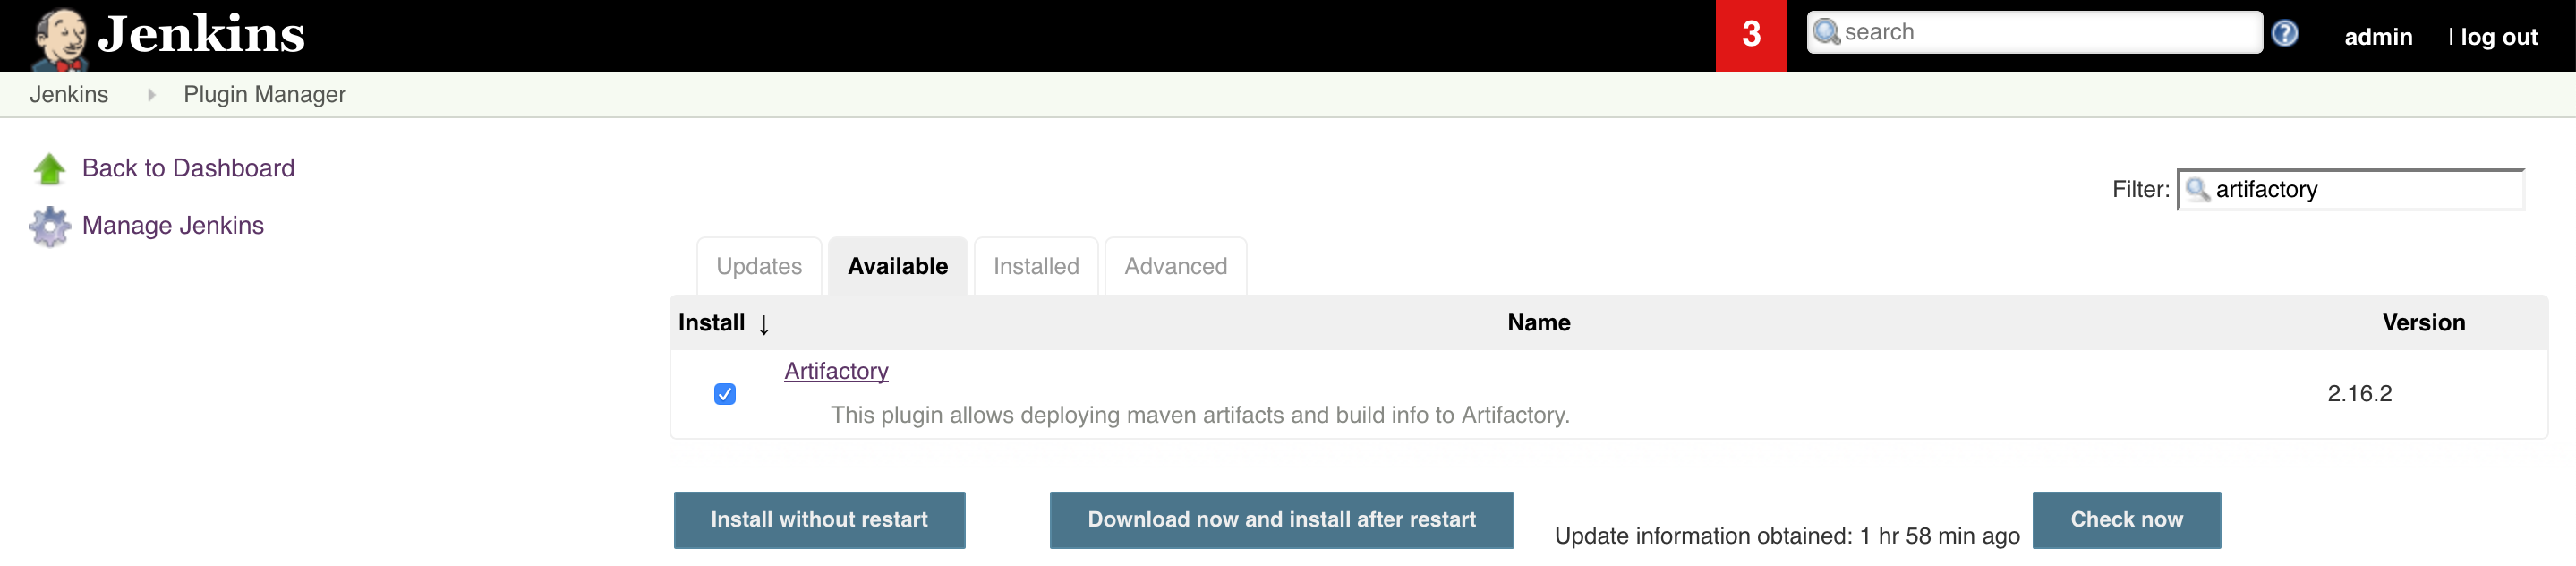
To install the Jenkins Artifactory Plugin, go to Manage Jenkins > Manage Plugins, click on the Available tab and search for Artifactory. Select the Artifactory plugin and click Download Now and Install After Restart.
JFrog Plugin for Jenkins Configuration
To configure your JFrog Platform instance settings, go to the Jenkins System Configuration Page (Manage Jenkins > Configure System).
Click on the Add JFrog Platform Instance button to create a new JFrog instance configuration. If you'd like to set separate base URLs for Artifactory or Distribution, click on the Advanced button, and set the URLs.
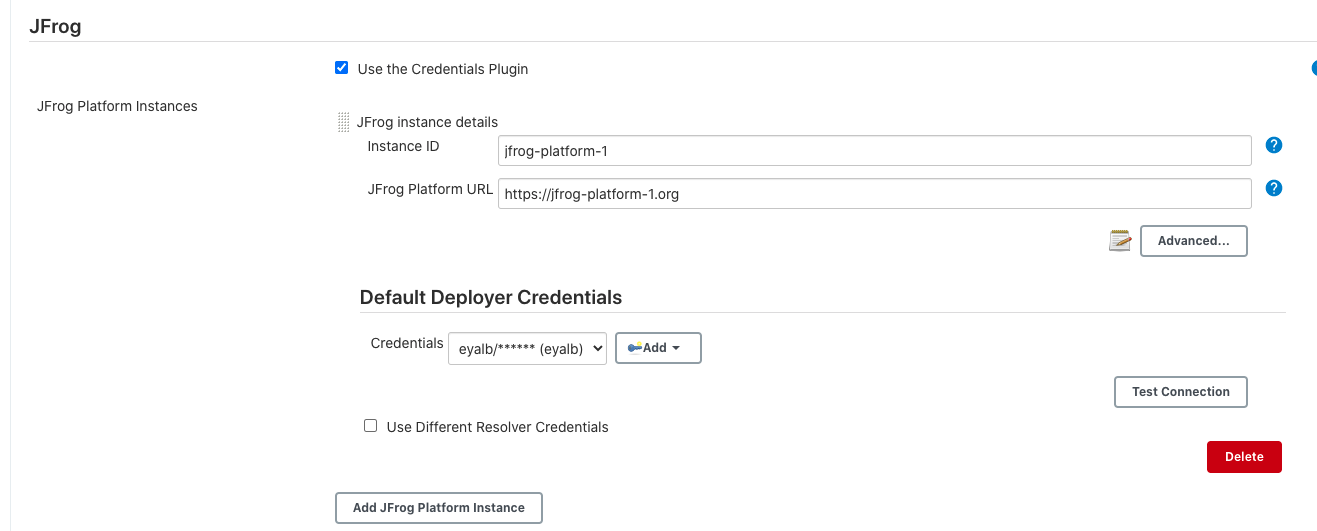
| Field | Description |
|---|---|
| Use the Credentials Plugin | Enable this checkbox to use the Jenkins Credentials Plugin to configure your Artifactory Servers credentials in your Jenkins job configuration pages. Using the Jenkins Credentials Plugin, you have the option of setting an Access Token or Username and Password / API Key to authenticate with Artifactory. Read more about this here. |
| Server ID | Configure the JFrog Platform instance ID. This ID can be used by your pipeline jobs to reference the configured instance. |
| JFrog Platform URL | The JFrog Platform URL. |
| Advanced fields | |
| JFrog Artifactory URL | The JFrog Artifactory URL. Its value is usually <JFrog Platform URL>/artifactory, but you can use this field to set a different URL for it. |
| JFrog Distribution URL | The Distribution URL. Its value is usually <JFrog Platform URL>/distribution, but you can use this field to set a different URL for it. |
| Connection Timeout | The network timeout in seconds, used for establishing a connection and for unanswered requests. |
| Number of retries | The network connection retries number. |
| Number of threads for Generic uploads | The number of concurrent threads used for Generic uploads. |
| Bypass HTTP proxy | Enable to bypass the global Jenkins proxy configuration when connecting to this server. The "Test Connection button" will work with the new setting once the page is saved. |
| Username/Password | (Optional) Username and password that will be used for this Artifactory instance. You can also override these credentials from within the Jenkins Job. Note: the credentials are only required if Artifactory is configured not to allow anonymous access. |
| Use Different Resolver Credentials | (Optional) Enable this checkbox to set different credentials for the resolver. |
Warning
The user specified above must have Deploy permission in Artifactory. Log into Artifactory with Administrator privilege, go Security | Permissions in the Admin tab. Grant Deploy permission to the Deployer user (or perhaps better, a group to which the user belongs).
Authenticate with Artifactory and Distribution using Access Tokens or Basic Auth for Jenkins
Using the Jenkins Credentials Window, you have the option of setting an Access Tokens or Username and Password / API Key to authenticate with Artifactory.
For Access Token authentication, choose Secret text in the credentials Kind field.
For Username and Password / API Key authentication, choose Username and password in the credentials Kind field.

Configure HTTP and HTTPS proxy for Jenkins
Define HTTP or HTTPS proxy according to the following Jenkins Documentation.
Note
To bypass the HTTP proxy, enable the "Bypass HTTP proxy" checkbox described above.
Work with Jenkins and Maven Builds
The Jenkins Artifactory Plugin supports Maven build projects, allowing your build jobs deploy artifacts and resolve dependencies to and from Artifactory, and then have them linked to the build job that created them.
As described below, using the Jenkins Maven Plugin, you can create either a specific Maven build project, or a freestyle project with Artifactory Maven integration.
JDK compatibility
From version 3.0.0, the plugin no longer supports building with JDK 7.
Maven Compatibility
The minimum Maven version supported is 3.3.9
Integration Benefits
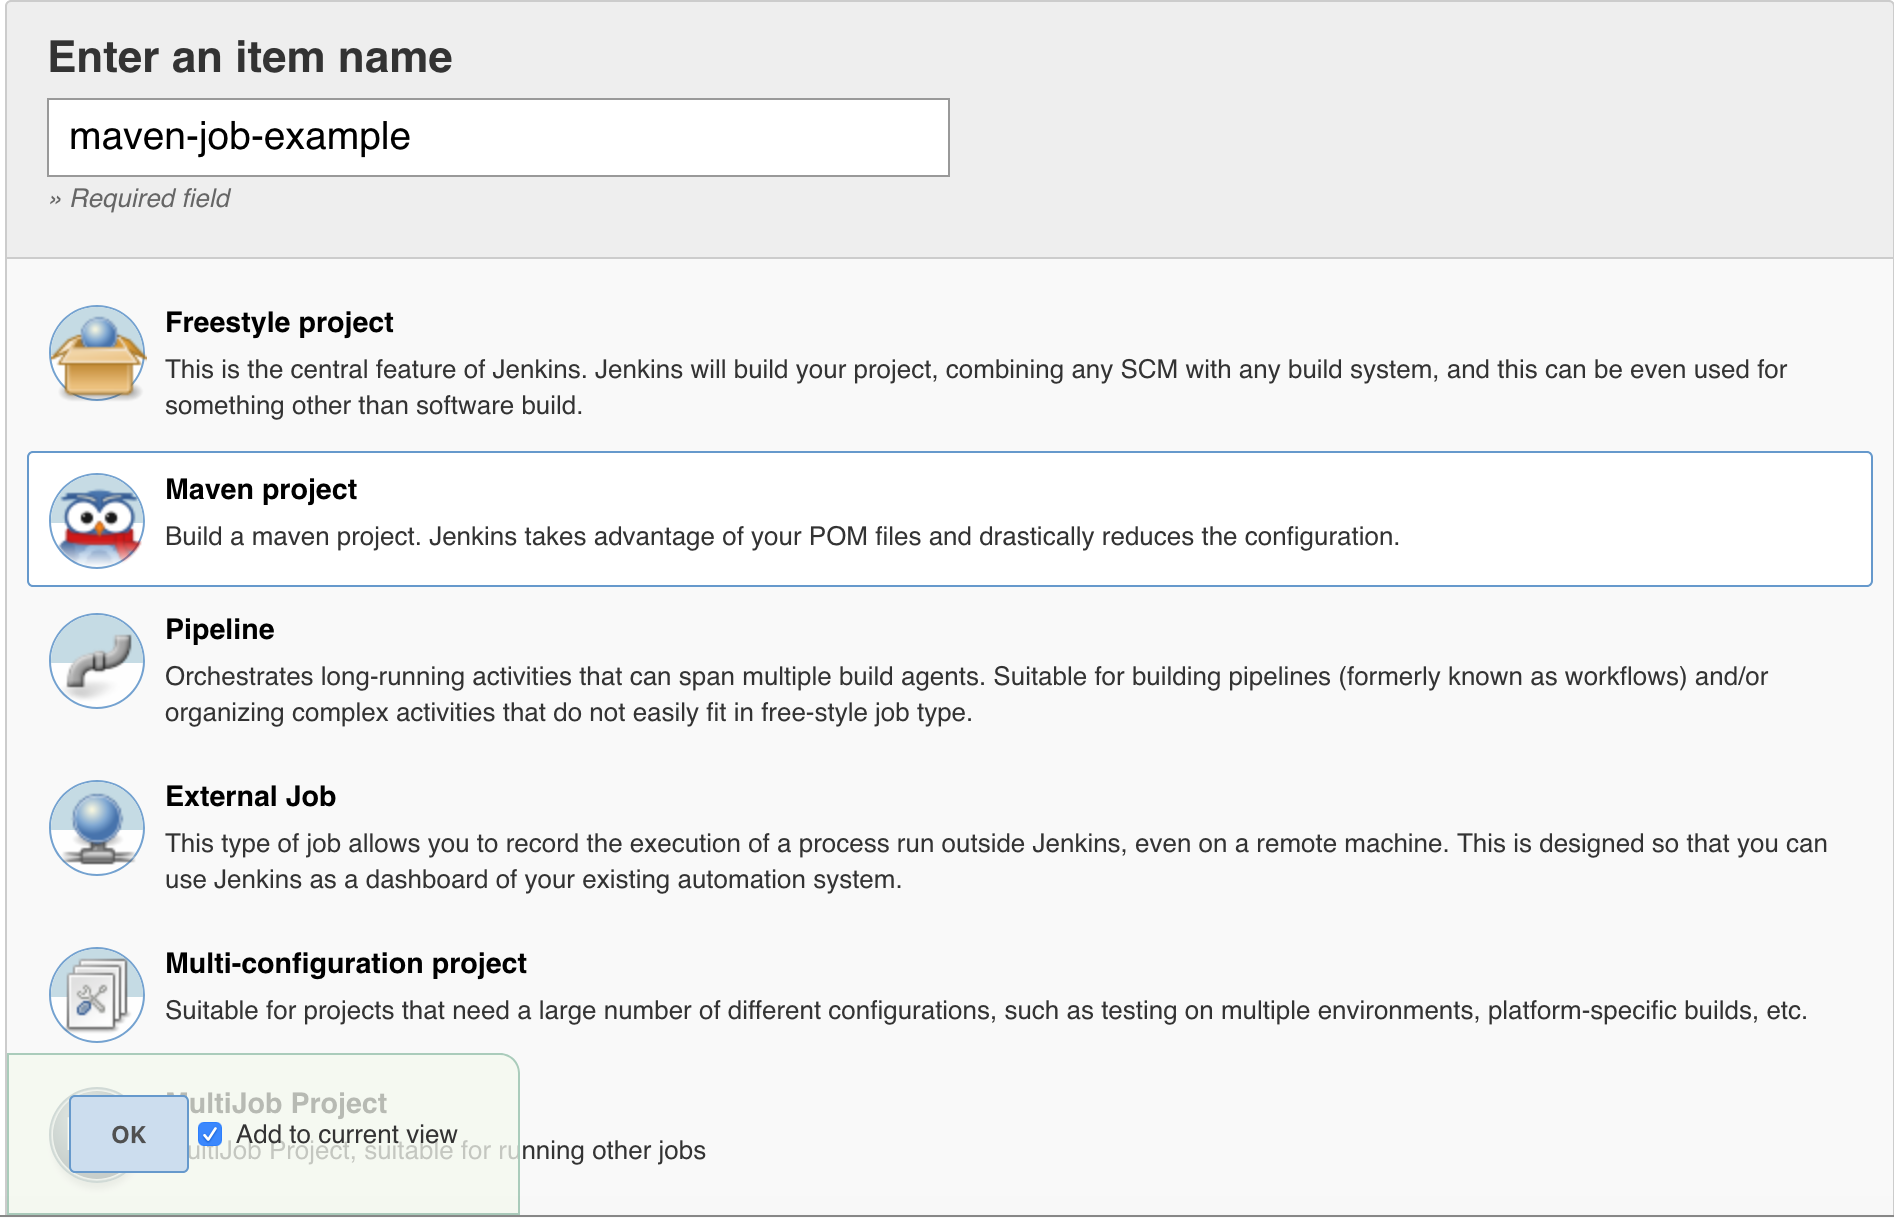
Configure Maven Projects
Once you have at least one Artifactory server configure, you can configure your Maven builds using the following 3 steps:
- Resolve Artifacts from Artifactory
- Deploy Artifacts to Artifactory
- Allow release management (in the Build Environment section, check "Enable Artifactory release management". Additional info here)
Resolve Artifacts from Artifactory
To resolve artifacts from Artifactory, in the Build Environment section, check "Resolve artifacts from Artifactory"
Resolve artifacts from Artifactory, can be distinguish between repositories that resolves Snapshot artifacts and repositories that resolves Release artifacts.
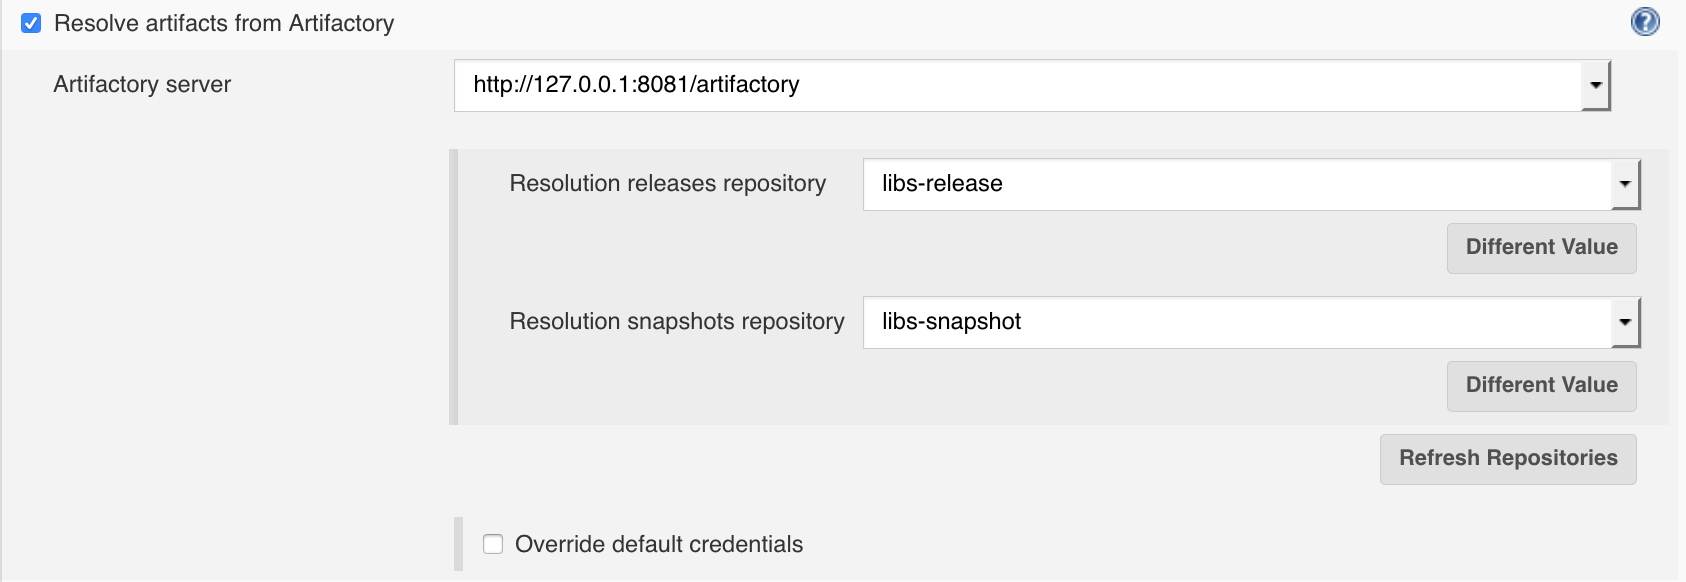
| Field | Description |
|---|---|
| Artifactory server | Artifactory server as defined in the Artifactory plugin configuration. The selected server will be used for artifacts resolution and build info deployment. |
| Resolution releases repository | Repository used to download released artifacts from. |
| Resolution snapshots repository | Repository used to download snapshot artifacts from. |
| Override default credentials | Override default credentials. |
Deploy Artifacts to Artifactory
To deploy artifacts to Artifactory, in the Post build Actions section, add a "Deploy artifacts to Artifactory" post build action.
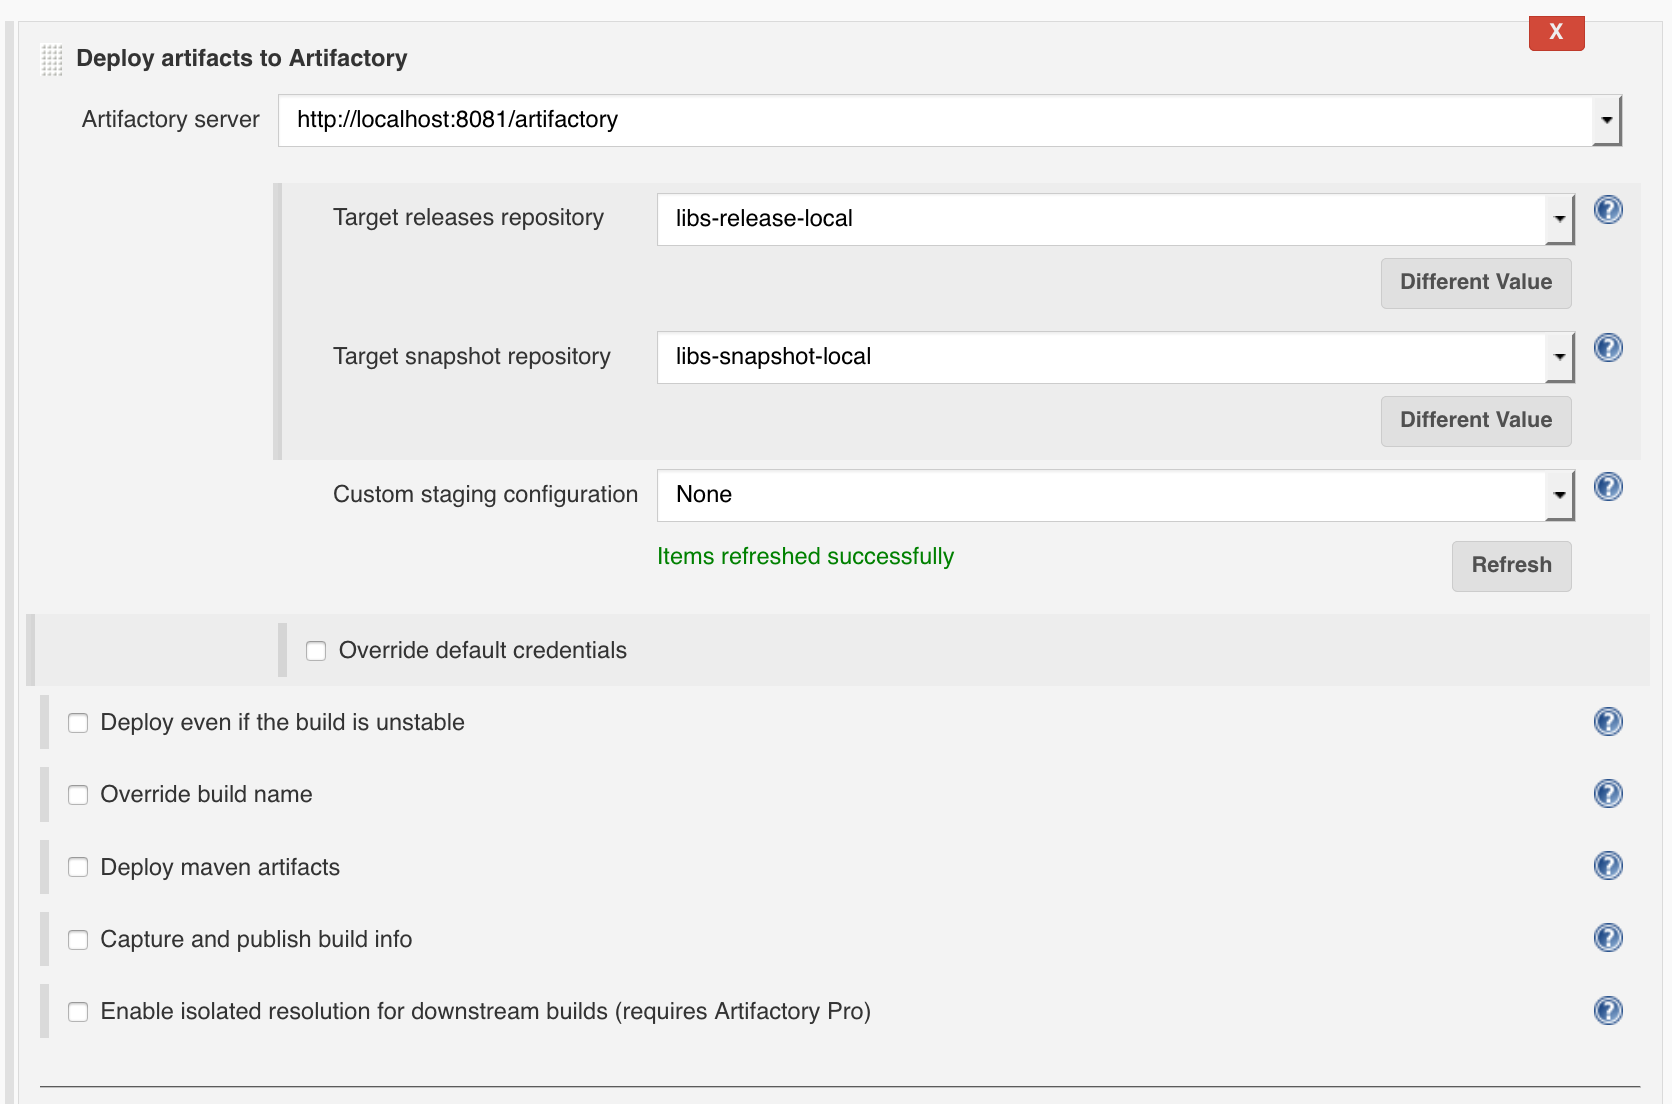
| Field | Description |
|---|---|
| Artifactory Server | Artifactory server as defined in the Artifactory plugin configuration. The selected server will be used for artifacts resolution and build info deployment. |
| Target releases repository | Repository to deploy release artifacts to. Using the text mode will enable you to also use placeholders for environment variable which will be replaced with your environment value at build time. |
| Target snapshot repository | Repository to deploy snapshots artifacts to. Using the text mode will enable you to also use placeholders for environment variable which will be replaced with your environment value at build time |
| Custom staging configuration | Select a named staging configuration defined by an Artifactory User Plugin or select "None" to use the default staging settings. |
| Override default credentials | Override default credentials. |
| Deploy even if the build is unstable | Perform deployment even if the build is unstable. |
| Override build name | Override Artifactory default build name. |
| Deploy maven artifacts | Publish produced build artifacts to Artifactory. |
| Capture and publish build info | Publish build information to Artifactory. |
| Enable isolated resolution for downstream builds (requires Artifactory Pro) | When checked, a build parameter named ARTIFACTORY_BUILD_ROOT with a value of $ For example: ARTIFACTORY_BUILD_ROOT=Infrastructure-1025. The value of the parameter is also attached to published artifacts as the property: build.root as a matrix parameter on the deployment URL. Downstream builds will add build.root=$ For example: build.root=Infrastructure-1025 to achieve isolated resolution from Artifactory and only resolve artifacts produced by the root build that triggered it, avoiding any artifacts produced by other runs that are out of the build chain. |
Build Maven Configuration
The build Goals and options should be set to clean install
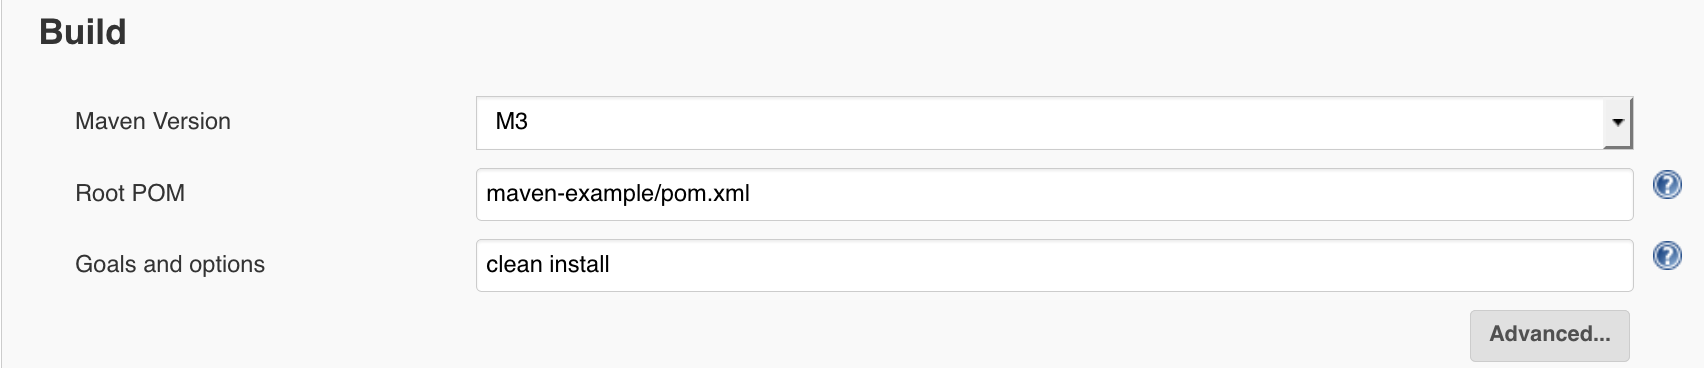
| Field | Description |
|---|---|
| Maven Version | The Maven version. |
| Root POM | If your workspace has the top-level pom.xml in somewhere other than the 1st module's root directory, specify the path (relative to the module root) here, such as parent/pom.xml. If left empty, defaults to pom.xml |
| Goals and options | Specifies the goals to execute, such as "clean install" or "deploy". This field can also accept any other command line options to Maven, such as "-e" or "-Djava.net.preferIPv4Stack=true". |
Configure Freestyle Maven 3 Projects
The Jenkins Artifactory plugin supports running Maven 3 builds from freestyle projects by using a Maven 3 build step + a build environment section for the Artifactory Maven 3 integration (artifact and build information deployment). However, users are encouraged to configure the Artifactory integration using Jenkins Maven Project.
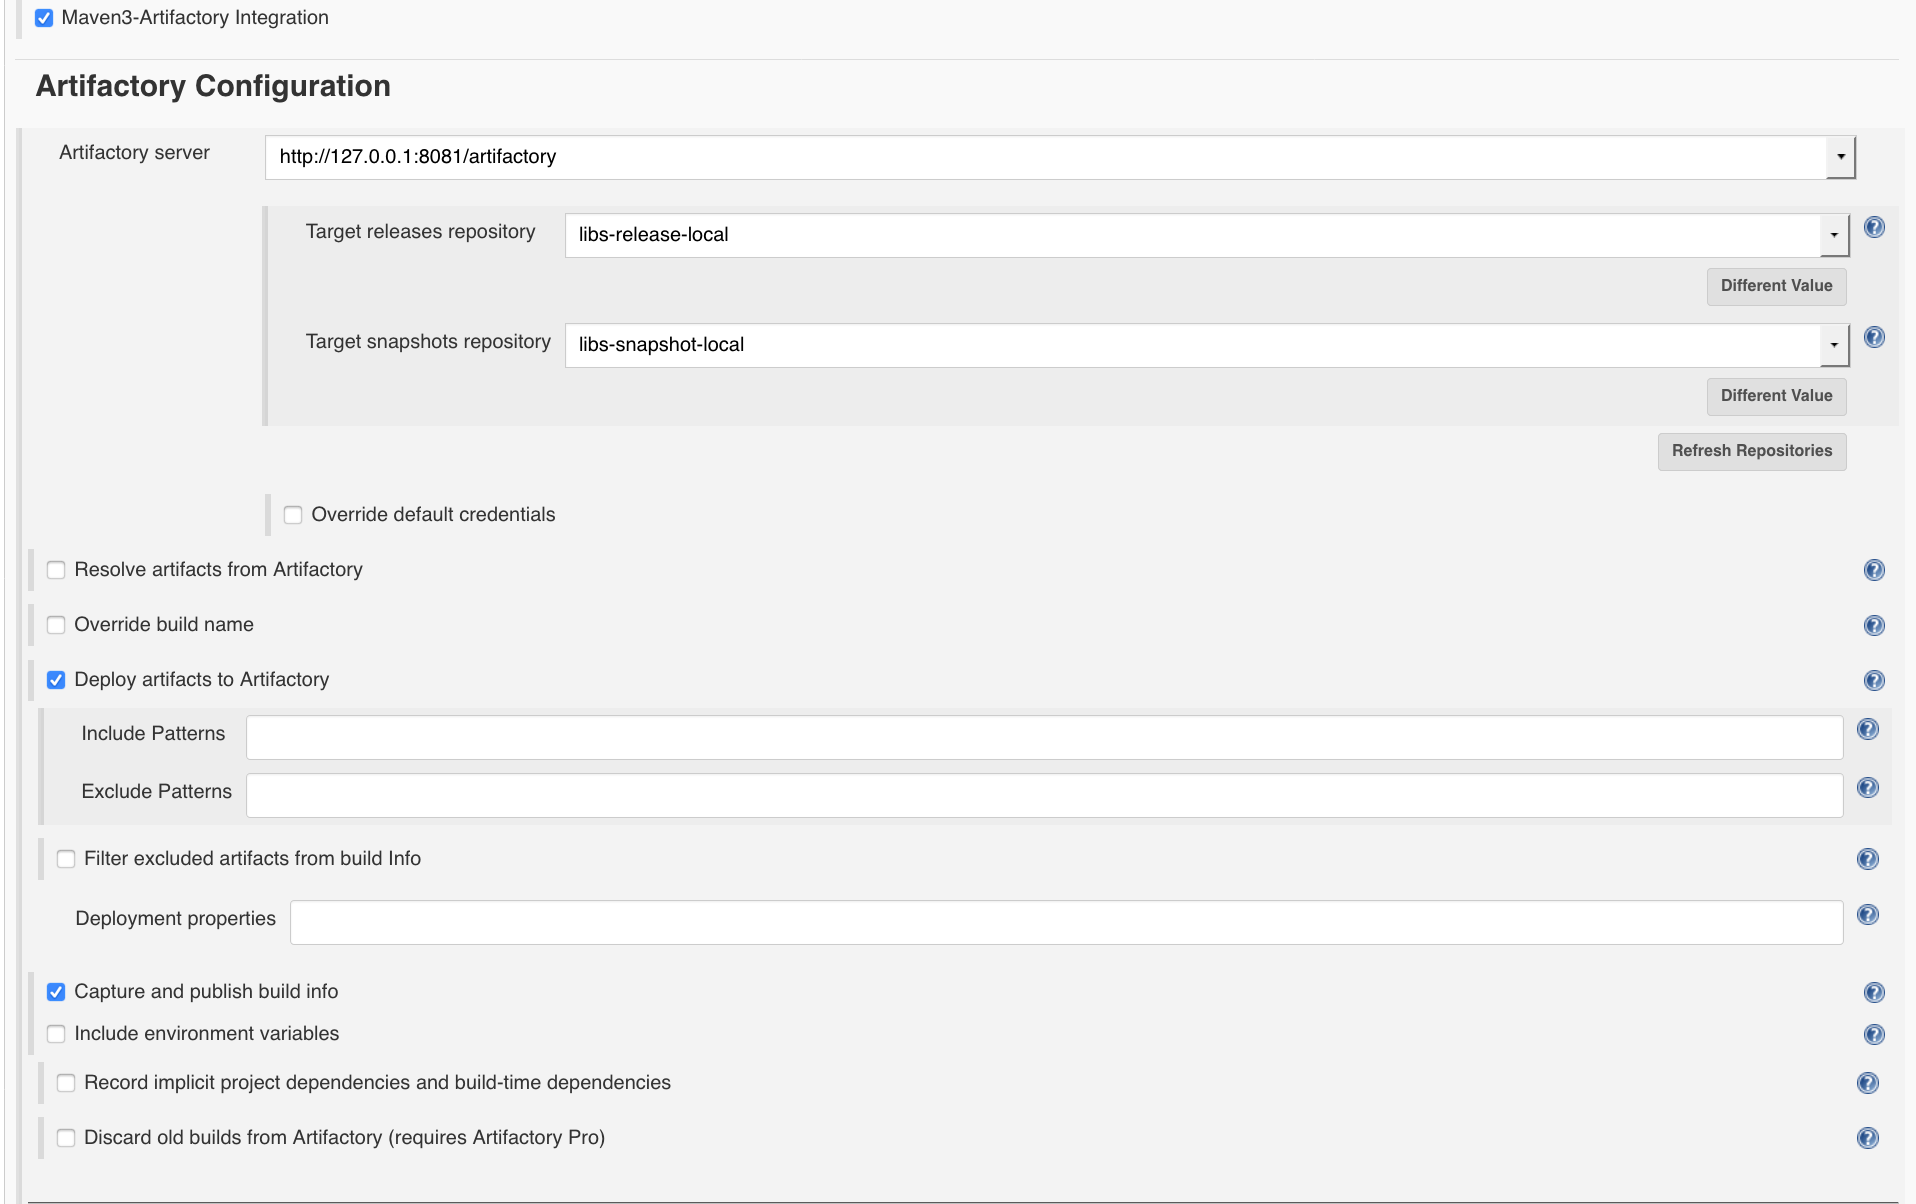
| Field | Description |
|---|---|
| Artifactory Server | Artifactory server as defined in the Artifactory plugin configuration. The selected server will be used for artifacts and build info deployment. |
| Target releases repository | Repository to deploy release artifacts to. Using the text mode will enable you to also use placeholders for environment variable which will be replaced with your environment value at build time. |
| Target snapshot repository | Repository to deploy snapshots artifacts to. Using the text mode will enable you to also use placeholders for environment variable which will be replaced with your environment value at build time. |
| Override default credentials | Override default credentials. |
| Resolve artifacts from Artifactory | Check if you wish all dependency resolution to go through Artifactory. Using the text mode will enable you to also use placeholders for environment variable which will be replaced with your environment value at build time. Notice: this will override any external repository definition in Maven settings or POM files. |
| Override build name | Override Artifactory default build name. |
| Deploy artifacts to Artifactory | Check if you wish to publish produced build artifacts to Artifactory. |
| Filter excluded artifacts from build info | Add the excluded files to the excludedArtifacts list and remove them from the artifacts list in the build info. |
| Capture and publish build info | Publish build information to Artifactory. |
| Include environment variables | Check if you wish to include all environment variables accessible by the builds process. Jenkins-specific EnvVars are always included. Note: including all environment variables as part of the captured build information may result in very large build objects and may slow down deployment. |
| Record implicit project dependencies and build-time dependencies | Check if you wish build information published to Artifactory to include implicit project dependencies (for example, poms and parent poms of the project dependencies) as well as build-time dependencies (for example, maven plugins used during the build). |
| Discard old builds from Artifactory (requires Artifactory Pro) | Automatically remove old builds stored in Artifactory according to Jenkins’s configured policy for discarding old builds. |
Updated 9 days ago