Platform Ansible Installation [Quick Start]
Deploy JFrog Platform on Linux VMs using the jfrog.platform Ansible collection. Supports evaluation and production topologies.
Choose Your Install Path
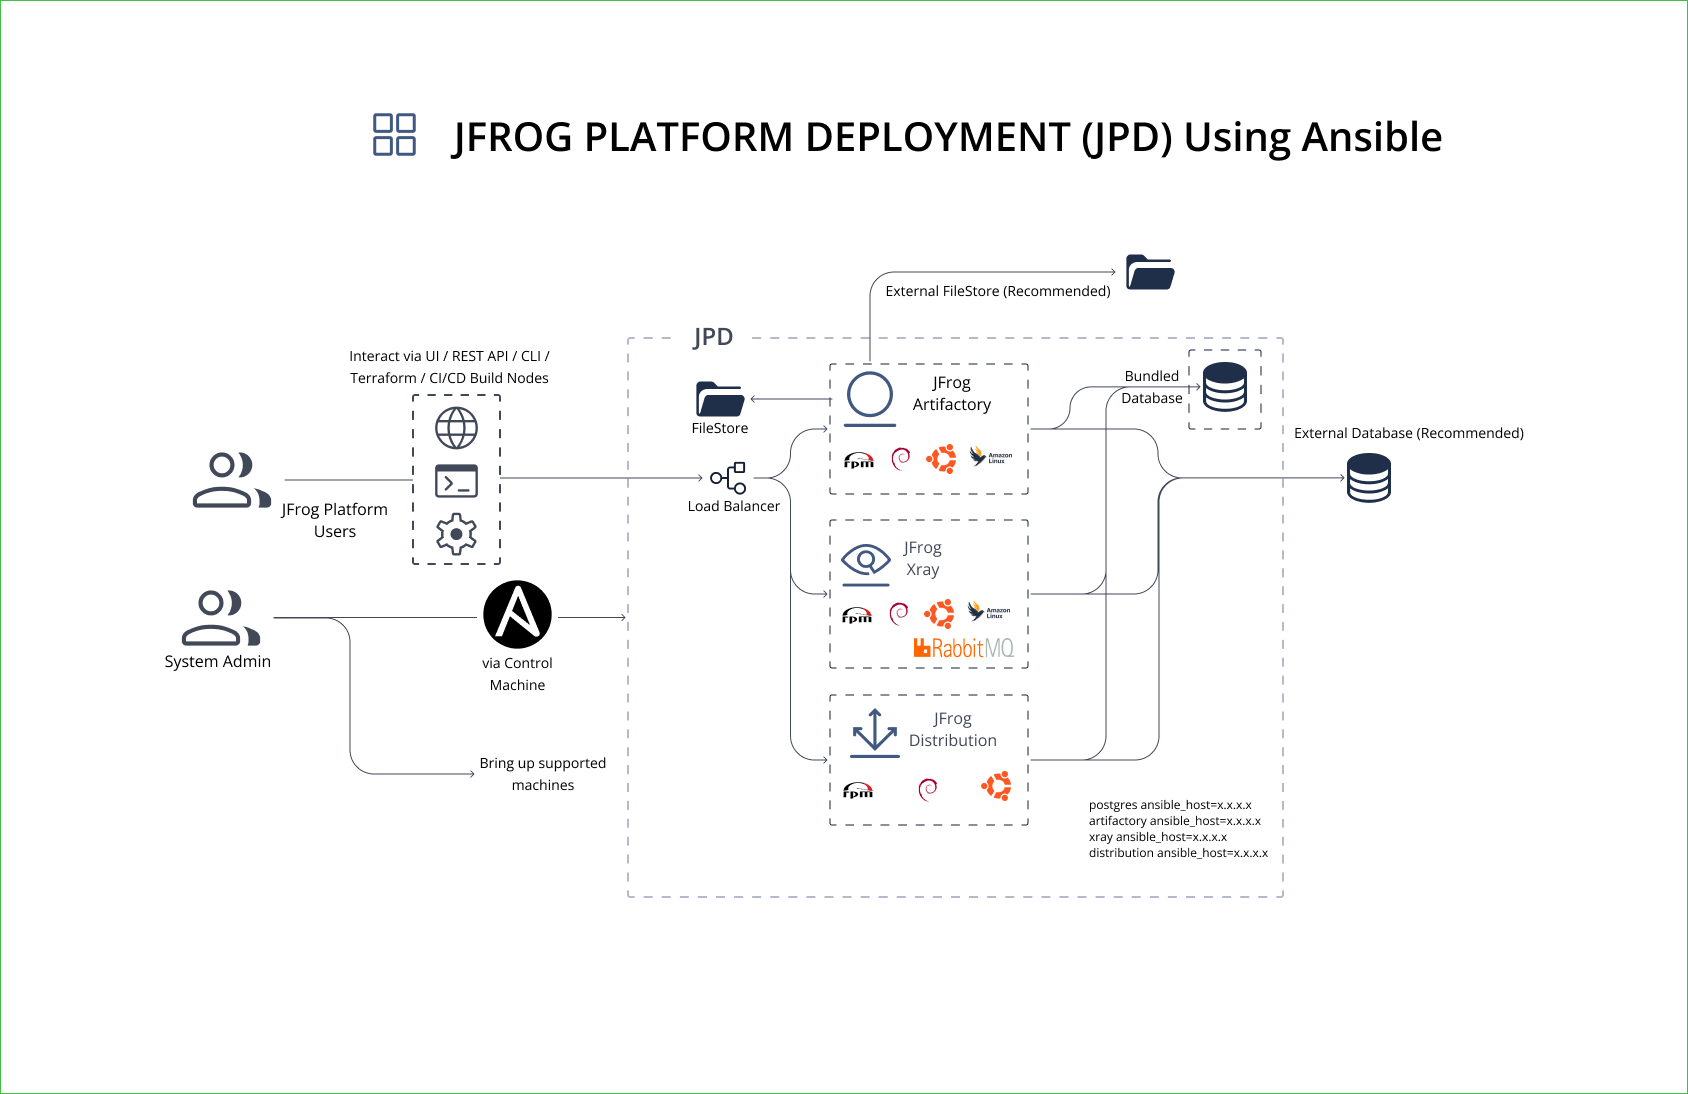
Install the JFrog Platform — Artifactory, Xray, and Distribution — on Linux bare-metal or VM hosts using the jfrog.platform Ansible collection. The collection handles installation, configuration, and upgrades across all products from a single playbook. For Kubernetes deployments, use the Helm quick start instead.
Path | When to Use | What It Needs |
|---|---|---|
Production | Real workloads, team use | External PostgreSQL, unique security keys, cloud filestore |
Evaluation | Fast exploration, | Nothing. Collection defaults work out of the box |
For license requirements by product combination, see the License Matrix.
The Ansible collection deploys to Linux target hosts only (Ubuntu 20.04/22.04/24.04, RHEL 8.x/9.x, Debian 11.x/12.x). Windows is not supported as a target host. The control host running Ansible can be any Linux or macOS machine.
Before installing, verify you have:
- Ansible 2.13.9+
- SSH access from the control host to all target hosts
- Root or sudo privileges on targets
- A valid JFrog license
Root or sudo required
Run the installation as root or provide sudo access to a non-root user on every target host.
What You Need
| Component | Requirement |
|---|---|
| Ansible | V 2.13.9+ |
| Collection dependencies | From jfrog.platform collection 10.11.x+ (FQCN usage), install: community.postgresql, community.general, ansible.posix |
| Host access | SSH access from control host to targets |
| Privileges | Root or sudo on target hosts |
| License | JFrog license (or JFrog Platform Free Trial) |
For supported operating systems, see System Requirements.
Platform Deployment via Ansible
Collection Defaults Vs Production
| Area | Collection Default | Production |
|---|---|---|
| Artifactory | Enabled | Enabled |
| Xray (+ bundled RabbitMQ) | Enabled | Enabled |
| Distribution (+ bundled Redis; Redis removed in Distribution 2.37.0) | Enabled (disable with distribution_enabled: false) | Enable only if licensed |
| NGINX | Enabled | Enabled |
| Database | Bundled PostgreSQL (postgres_enabled: true) with trust auth, no replication | External PostgreSQL — see External Database With Ansible |
| Security keys | Insecure placeholders for master_key/join_key | Unique keys generated with openssl rand -hex 32 |
| DB passwords | Default to password | Strong, unique passwords per product (artifactory_db_password, xray_db_password, distribution_db_password) |
| Filestore | Local file-system storage | Cloud object storage (S3, GCS, Azure Blob) — see Filestore Configuration |
If
distribution_enabled: trueVerify entitlement and prepare external PostgreSQL
distributionDB. See External Database With Ansible.
How Do I Install?
The installation has three steps: install the collection, create your inventory, and deploy the platform.
ansible-galaxy collection install jfrog.platform
ansible-galaxy collection install community.postgresql community.general ansible.posix
To find the installed collection path, run:
ansible-galaxy collection list jfrog.platform
The collection does not ship an inventory file — create a hosts.ini with your target hosts. The playbook expects one host group per product. For more examples, see the Ansible inventory examples on GitHub.
Use separate servers per product
Run each JFrog product on a separate server to avoid port conflicts and performance bottlenecks.
Choose your deployment topology:
Includes all products. Use with playbook-platform.yml. See the full platform inventory example.
[postgres_servers]
postgres-1 ansible_host=x.x.x.x

[artifactory_servers]
artifactory-1 ansible_host=x.x.x.x

[xray_servers]
xray-1 ansible_host=x.x.x.x

[distribution_servers]
distribution-1 ansible_host=x.x.x.xSingle-server evaluation
For evaluation, all host groups can point to the same IP address. This installs every product on one machine. For production, use separate hosts per product.
RabbitMQ
Bundled with Xray and always runs on the same host — there is no separate host group for it.
What Do I Need for Production?
Production deployments require five preparation steps: set up an external PostgreSQL database, optionally configure external filestore, review and update inventory variables, generate unique security keys, and verify the pre-install checklist. The bundled PostgreSQL is for evaluation only — it uses trust authentication with no replication or backup.
Production Preparation Steps
Complete these steps before running the playbook:
1. Set up external database
Create databases and users for each product on your external PostgreSQL server. Set postgres_enabled: false in group_vars/all/vars.yml and configure artifactory_db_url, xray_db_url, and distribution_db_url to point to your external database host. See External Database With Ansible for full instructions.
Bundled PostgreSQL
The bundled PostgreSQL role is for evaluation only — it ships with
trustauthentication open to all hosts, with no replication or backup.
2. Set up external filestore (optional)
Configure S3, GCS, or Azure Blob for artifact storage by overriding the artifactory_binarystore variable. See Filestore Configuration.
3. Review variables
Open group_vars/all/vars.yml and update at minimum:
| Variable | Action |
|---|---|
master_key, join_key | Replace with unique values (passed via --extra-vars at runtime) |
postgres_enabled | Set to false for production; use an external PostgreSQL |
artifactory_db_url, xray_db_url, distribution_db_url | Point to your external database host |
artifactory_db_password, xray_db_password, distribution_db_password | Set strong passwords |
distribution_enabled | Set to false if you do not need Distribution |
Product versions, JVM options, NGINX settings, and binary storage are configurable through role defaults at roles/<product>/defaults/main.yml. For the quick start, the shipped defaults work as-is. See Ansible Advanced Topics for customization.
Ready-to-use playbooks and inventory files from the JFrog-Cloud-Installers repository:
| Example | Description |
|---|---|
| playbook-platform.yml | Full platform playbook: Artifactory, Xray, and Distribution |
| playbook-rt-xray.yml | Artifactory + Xray only |
| playbook-rt.yml | Artifactory only |
| inventory/platform/hosts.ini | Full platform inventory with all product host groups |
| inventory/rt-xray/hosts.ini | Inventory for Artifactory + Xray deployment |
| inventory/rt-ha/hosts.ini | Multi-node Artifactory HA inventory |
4. Generate security keys
export MASTER_KEY=$(openssl rand -hex 32)
export JOIN_KEY=$(openssl rand -hex 32)
Save these keys securely — you need them for upgrades and disaster recovery.
5. Pre-install checklist
Before deploying, confirm:
- SSH access from the control host to every target host (
ssh <user>@<host>works without prompts, or use--ask-pass) - Root or sudo privileges on all targets
- Firewall ports open: 8082 (Router/API), 80/443 (NGINX reverse proxy), 5432 (PostgreSQL if on a separate host)
- External PostgreSQL is reachable from all target hosts, with databases and users pre-created
- Unique
master_keyandjoin_keyvalues generated (step 4 above)
Run the playbook for your deployment type:
Generate unique master and join keys at runtime and configure external PostgreSQL in group_vars/all/vars.yml. Save these keys for future upgrades:
MASTER_KEY_VALUE=$(openssl rand -hex 32)
JOIN_KEY_VALUE=$(openssl rand -hex 32)
ansible-playbook -vv platform.yml -i hosts.ini \
  --extra-vars "master_key=$MASTER_KEY_VALUE join_key=$JOIN_KEY_VALUE"
For the full platform playbook reference, see playbook-platform.yml.
How Do I Verify the Installation?
On each target host, verify the JFrog services are active:
sudo systemctl status artifactory
sudo systemctl status xray          # on the Xray host
sudo systemctl status distribution # on the Distribution host, if enabledcurl -f http://<artifactory_host>/router/api/v1/system/healthA healthy response returns "status": "HEALTHY" for all services. If any service is unhealthy, wait 2–3 minutes and retry — services take time to initialize.
Open http://<artifactory_host> in your browser. Log in with the default credentials (admin / password), change the password immediately, and complete the Onboarding Wizard.
Common Errors and Fixes
| Error | Cause | Fix |
|---|---|---|
ansible-galaxy fails with 'CustomHTTPSConnection' object has no attribute 'cert_file' | Ansible version too old for your Python SSL library | Upgrade ansible-core: pip install --upgrade ansible-core |
| Artifactory ports not listening after install | Java binding to IPv6 on hosts with dual-stack /etc/hosts | Add -Djava.net.preferIPv4Stack=true to artifactory_extra_java_opts |
| Xray health check fails | Database not reachable or wrong xray_db_url | Verify xray_db_url points to a running PostgreSQL instance and the database/user exist |
distribution_servers group not found | distribution_enabled: true but no host group in inventory | Add a [distribution_servers] group to hosts.ini, or set distribution_enabled: false |
| Health check returns unhealthy after deploy | Services still starting | Wait 2–3 minutes for all services to initialize; check service logs with journalctl -u artifactory |
For common questions about databases, licensing, upgrades, and more, see the Quick Start FAQ.
Next Steps After Ansible Installation
After all services are healthy:
- Complete the Onboarding Wizard to configure repositories and security.
- Set TLS on the JFrog Platform to enable HTTPS via NGINX.
- To install and enable Catalog, see Installing Catalog.
- Review Ansible Advanced Topics for SSL/TLS, System YAML overrides, and Ansible Vault.
Related Ansible and Platform Topics
The following pages cover topics referenced in this guide.
| Topic | Description |
|---|---|
| External Database With Ansible | Use an external PostgreSQL instead of the bundled role |
| High Availability (HA) Ansible | Enable HA for Artifactory or Xray |
| Ansible Advanced Topics | SSL/TLS, System YAML overrides, custom binary storage, Ansible Vault, upgrades |
| Filestore Configuration | Configure S3, GCS, or Azure Blob for artifact storage |
| Install JFrog Platform via Helm [Quick Start] | Alternative installation path for Kubernetes / OpenShift |
| System Requirements | Supported platforms, hardware, and infrastructure prerequisites |
Related Topics
- Getting Started
- Install JFrog Platform via Helm [Quick Start]
- System Requirements
- Installation Method Selection
Frequently Asked Questions
This section provides answers to frequently asked questions.
FAQs
Q: What is the minimum setup needed to install the JFrog Platform via Ansible?
A: For evaluation, you need Ansible 2.13.9+, SSH access to target hosts, and root or sudo privileges. Run ansible-galaxy collection install jfrog.platform, create a hosts.ini inventory, and run ansible-playbook -vv platform.yml -i hosts.ini. The bundled PostgreSQL and default security keys work out of the box.
Q: How do I verify the JFrog Platform is running after an Ansible install?
A: Run sudo systemctl status artifactory on the Artifactory host, then check the health endpoint: curl -f http://<artifactory_host>/router/api/v1/system/health. A healthy response returns "status": "HEALTHY" for all services. If any service shows unhealthy, wait 2–3 minutes and retry.
Q: Do I need an external database for a JFrog Platform Ansible installation?
A: Not for evaluation — the bundled PostgreSQL role works out of the box. For production, configure an external PostgreSQL database by setting postgres_enabled: false in group_vars/all/vars.yml and configuring the artifactory_db_url, xray_db_url, and distribution_db_url variables. See Ansible Advanced Topics for the full configuration.
Q: What are the default admin credentials after an Ansible install?
A: The default credentials are username admin and password password. Change the password immediately after first login and complete the Onboarding Wizard.