Artifactory Backup Configuration
Schedule incremental or full Artifactory system backups outside $JFROG_HOME. Use separate filestore, database, and config for large instances.
JFrog Artifactory enables you to configure automatic backup of your system settings and then restore from that backup when needed.
Note
Starting from Artifactory 7.66, the server path to a backup can no longer start with
JFROG_HOME/artifactory.
The following topics describe system backup and restore:
- Backup Strategy Overview
- Complete System Backup
- Backing Up Large Instances
- Disaster Recovery
- Restoring a System Backup
Backup Strategy Overview
Artifactory stores binaries and metadata separately. The metadata (checksums, repository paths, timestamps) resides in a database, while the actual binaries are stored in the filestore using SHA1 checksum-based naming. This architecture enables deduplication—identical files are never stored more than once—but it also means effective backup strategies must account for both components.
Choosing the Right Backup Approach
The appropriate backup method depends on your instance size:
| Instance Size | Recommended Approach |
|---|---|
| Under 100 GB | Built-in system backups |
| 100 GB – 500 GB | Built-in system backups with monitoring, or transition to component-based backups |
| Over 500 GB or 1M+ artifacts | Component-based backups (filestore + database + Artifactory Home separately) |
Large Instance Threshold
If your instance exceeds 500 GB of storage or contains more than 1 million artifacts, switch to component-based backups. System backups at this scale can take excessive time, potentially overlapping scheduled intervals and delaying recovery when needed.
Understanding Checksum-Based Storage
Artifactory uses checksum-based storage where files are named after their SHA1 checksum and organized into folders based on the first two characters of that checksum. For example, in a default installation, the filestore is located at $JFROG_HOME/artifactory/var/data/artifactory/filestore.
This structure enables deduplication but means the filestore alone cannot identify files without the corresponding database metadata. Always back up both components together.
Complete System Backup
You can automatically and periodically back up the entire Artifactory system. The backup process creates a time-stamped directory in the target backup directory. Backup content is stored in standard file system format and can be loaded into any repository, so Artifactory never locks you out.
Note
- Backing up very large filestores: If you are backing up more than 1TB of storage, refer to this article for instructions.
- Deleting outdated files to reduce backup storage: We recommend manually deleting the access.backup.
<timestamp>.json file created during backup or system export. This file is in the$JFROG_HOME/artifactory/var/backup/access/folder.
Prerequisites
In some environments, the primary node is specifically configured with access to an NFS mount for Artifactory backups. With Cloud-Native High Availability, any node can create a backup, so all nodes must have write access to the mount. Alternatively, you can exclude all nodes from managing cluster-wide tasks except for a single node.
Path for Backup File
Starting from Artifactory version 7.66.x, the server path to backup can no longer start with
$JFROG_HOME/artifactorydirectory. Therefore, you must store the backup outside the JFrog directory. The artifactory user must have access to the backup folder.If you have any backups configured with the
$JFROG_HOME/artifactorydirectory, you need to modify the path.
If you are moving to Cloud-Native High Availability, we recommend using a shared drive path for backups. If you use a local drive path, the backup is saved on whichever node triggers the backup operation, which can lead to confusion.
Note
To define multiple backups, in the Administration module, select Artifactory | Backups. Each backup may have its own schedule and repositories to either process or exclude.
Creating a System Backup
-
In the navigation panel on the left-hand side of the screen, click Administration
 .
. -
In the General section of this screen, click Settings. The Artifactory General Settings screen appears.
-
In the Services pane, click Backups. Backup settings are displayed.
-
From the top right-hand corner of the screen, click New Backup. The Backup Settings window is displayed. If previously configured, you can also choose an existing backup and change its properties.
-
Configure backup settings as required. Click Save when done. The backup runs on the configured schedule.
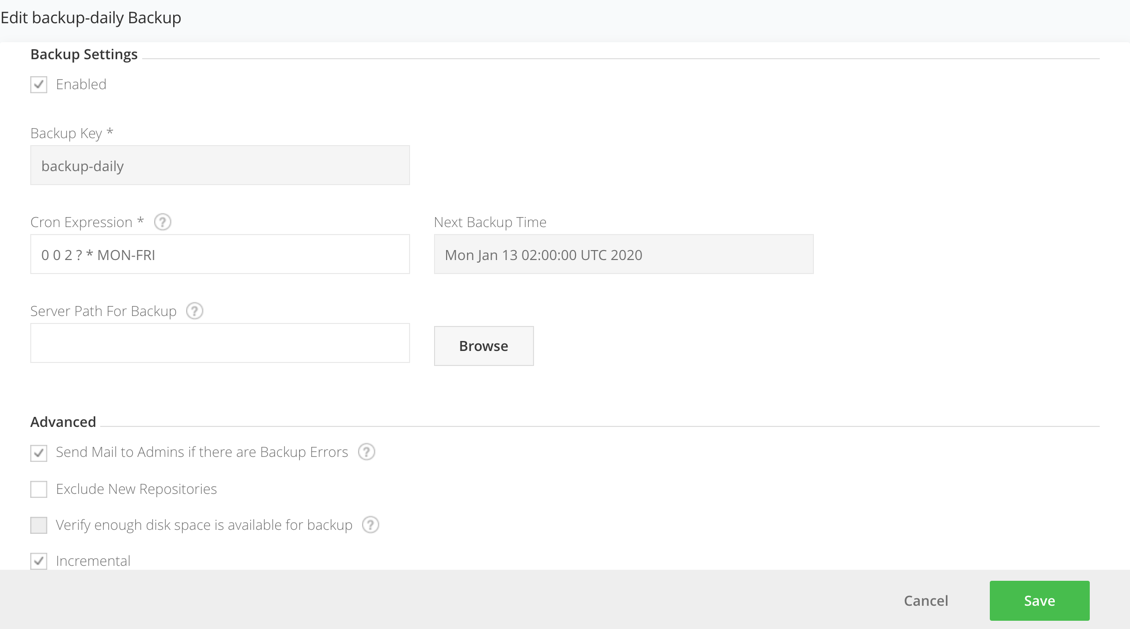
Backup Settings Reference
| Field | Description |
|---|---|
| Enabled | When selected, the backup is enabled. |
| Backup Key | A unique logical name for this backup. |
| Cron Expression | A valid CRON expression that you can use to control backup frequency. For example, to back up every 12 hours use a value of: 0 0 /12 * * ? |
| Next Time Backup | When the next backup is due to run. |
| Server Path for Backup | The directory to which local repository data should be backed up as files. Each run of this backup will create a new directory under this one with the timestamp as its name. Note: Starting from Artifactory version 7.66.x, the server path to backup can no longer start with $JFROG_HOME/artifactory directory. |
| Send Mail to Admins if there are Backup Errors | If set, all Artifactory administrators will be notified by email if any problem is encountered during backup. |
| Exclude New Repositories | To exclude new repositories, add the artifactory-build-info repository to the Excluded Repositories list. |
| Verify enough disk space is available for backup | If set, Artifactory will verify that the backup target location has enough disk space available to hold the backed up data. If there is not enough space available, Artifactory will abort the backup and write a message in the log file. |
| Incremental | When set, this backup should be incremental. Only changes from the previous run will be backed up, making the process faster. The backup directory name will be called current (as opposed to using the timestamp). The backup files can be used by any incremental file-system based backup utility. |
| Retention Period Hours | The number of hours to keep a backup before Artifactory will clean it up to free up disk space. Applicable only to non-incremental backups. Warning: Do not store any custom files under the target backup directory, since the automatic backup cleanup processes may delete them. |
| Back up to a Zip Archive (Slow and CPU Intensive) | If set, backups will be created within a Zip archive. |
Monitoring Backup Progress
During a system backup, Artifactory writes several messages to the
$JFROG_HOME/artifactory/var/log/artifactory-service.logfile. To monitor the backup process, look for messages that indicate the beginning and the end of a full system export as in the following example:2016-06-09 02:00:00,023 [art-exec-1] [INFO ] (o.a.s.ArtifactoryApplicationContext:508) - Beginning full system export... ... 2016-06-09 02:00:00,357 [art-exec-1] [INFO ] (o.a.s.ArtifactoryApplicationContext:620) - Full system export completed successfully.
System Backup Considerations
System backups create a complete duplicate of your data, including each artifact stored alongside its metadata. Because deduplication does not apply to backups, the backup size may exceed your current Artifactory storage size.
To reduce storage requirements for large instances, you can back up the filestore separately and perform a skeleton export of the database using the system export with Exclude Content enabled.
Backing Up Large Instances
For instances exceeding 500 GB or containing more than 1 million artifacts, back up each component separately: the database, the filestore, and the Artifactory Home directory.
Filestore Backup
Copy the entire filestore directory using your preferred method. A third-party backup solution with snapshot capabilities can provide better control and performance. Point it to your filestore location, which by default is $JFROG_HOME/artifactory/var/data/artifactory/filestore.
Options for filestore backup include:
- Periodic rsync to an NFS mount dedicated for snapshots
- Object storage services such as S3 with versioning enabled
- Enterprise backup solutions with snapshot capabilities
Database Backup
Back up the database using either active/passive replication or periodic snapshots. Without the database, the filestore is just a collection of checksum-named files that cannot be identified or restored.
Timing Coordination
Take database snapshots before copying the filestore, and perform both operations close together. This avoids references to non-existent binaries or missing metadata entries.
Artifactory Home Backup
Back up the Artifactory Home directory to preserve configurations, properties, and logs.
Master Key Backup
The Master Key is critical. If lost, all encrypted passwords become unrecoverable during restoration. Always maintain a secure backup of your Master Key separately from other backups.
A full snapshot of the Artifactory Home directory preserves existing properties, custom configurations, and logs.
System Export with Exclude Content
A system export with Exclude Content enabled exports metadata and configurations without the binaries. This is equivalent to a database dump plus Artifactory Home configurations, exported as XML files representing your binaries and repository locations.
This approach is useful for:
- Creating a metadata-only backup alongside a separate filestore backup
- Preparing for migrations where the filestore will be copied separately
Note
System export with Exclude Content is not recommended as your primary backup mechanism for large instances because export and restoration time increases with the number of artifacts due to database read/write operations.
Disaster Recovery
Disaster recovery (DR) ensures you can recover from events that cause irreversible damage or data loss. A DR setup also enables planned maintenance without downtime by shifting traffic to a secondary instance.
DR Architecture Options
| Setup | Description | Use Case |
|---|---|---|
| Active-Passive | Secondary instance receives synchronization and waits for traffic shift | Lower cost, simpler management |
| Active-Active | Both instances are used and synchronized | High availability, geographic distribution |
Using Federated Repositories for DR
Federated Repositories are optimized for file synchronization across multiple topologies and up to 10 different JFrog Platform Deployments (JPDs). They act like local repositories but automatically synchronize content bidirectionally.
Prerequisites:
- Instances running the same Artifactory version (for versions below 7.49.3)
- Properly synchronized clocks across instances
- Trust established via binding or circle of trust for self-hosted instances
For each deployment repository requiring DR protection, either create it as a Federated Repository or convert an existing local repository.
Terraform Backend Limitation
Federated Repositories do not support Terraform backends. The Terraform backend manages infrastructure state, and duplicating it could cause state inconsistencies. Federated repositories also do not support file locking in multi-repo environments, which Terraform requires for state consistency.
Manual DR with Replication
If Federated Repositories are not suitable, configure DR manually using repository replication:
- Local Replication: One Artifactory instance pushes artifacts to a target local repository in another instance.
- Remote Replication: A remote repository pulls artifacts from the source instance, populating its cache.
Bidirectional Sync with Replication
Replication does not natively support bidirectional sync. To achieve this, use a Virtual Repository containing both a Local Repository (for deployments) and a Remote Repository (pointing to the other site). Configure the same structure on the other site for bidirectional synchronization.
Synchronizing Security Entities
Security entities (users, groups, permissions, tokens) are not synchronized by replication or Federated Repositories. Use Access Federation to sync these entities across instances.
To configure Access Federation:
- Ensure Circle of Trust is established between instances.
- In the Administration module, navigate to Access Federation.
- Select the deployments to sync.
- Choose which entities and permissions to synchronize.
- Confirm the configuration.
Synchronizing Configurations
Repository and security entity synchronization does not include other configurations. To maintain consistent configurations across DR sites:
| Configuration | Synchronization Method |
|---|---|
| Artifactory config descriptor | API or bootstrapping |
| Crowd/LDAP/SSO settings | Bootstrap the Access YAML |
| System Properties | Manual maintenance or orchestration tooling |
| System YAML and Binarystore | Manual configuration (contains instance-specific data) |
| New repositories | Automated process using REST API to create on both instances simultaneously |
Restoring a System Backup
To restore a system backup, perform a system import. For more information, see System Import and Export.
Migration Using System Export
System exports can be used for instance migration or cloning. This approach works best when setting up a new instance to migrate data into.
Method 1: Short Downtime Migration
- Disable garbage collection on both servers: Admin > Advanced > Maintenance > Garbage Collection.
- Copy
$ARTIFACTORY_HOME/data/filestorefrom the old server to the new server's filestore folder. - Take the old server off the network to block new requests.
- On the old server, perform a full system export with Exclude Content selected.
- Shut down the old server.
- Run rsync from
$ARTIFACTORY_HOME/data/filestoreto the new server one final time. - On the new server, perform a full system import (do not select Exclude Content).
- Switch DNS or network traffic to the new server.
- Re-enable garbage collection on the new server.
Method 2: Near-Zero Downtime Migration
- Disable garbage collection on both servers.
- Copy
$ARTIFACTORY_HOME/data/filestorefrom the old server to the new server's filestore folder. - On the old server, perform a full system export with Exclude Content selected.
- On the new server, perform a full system import (do not select Exclude Content).
- Configure all local repositories on the old server to replicate to the new server with Sync Deletes disabled.
- Switch DNS or network traffic to the new server.
- Execute all replication jobs on the old server to sync the delta.
- Shut down the old server.
- Re-enable garbage collection on the new server.
Note
The near-zero downtime method uses replication to synchronize artifacts deployed during the export/import process, avoiding data loss from the transition window.
Filestore Sharding
Filestore sharding increases artifact redundancy at storage time, reducing the risk of data loss before backups occur.
A sharded filestore is implemented across multiple physical mounts (M) with configurable redundancy (R), where R ≤ M. This means each binary can be stored on multiple mounts simultaneously.
Considerations:
- Sharding adds scalability but impacts performance
- Do not exceed 10 shards
- Additional mounts can be added later as storage needs grow
- Use the rebalancing API to distribute redundancy for existing binaries after adding mounts
Sharding complements but does not replace a proper backup strategy. It provides resilience against single-mount failures but not against site-wide disasters.
Related Topics
- Artifactory Configuration
- Import and Export
- Artifactory Filestore
- General Settings
- Artifactory System YAML
- Artifactory Configuration Files
Frequently Asked Questions
This section provides answers to frequently asked questions.
FAQs
Q: Where must the backup path be stored starting from Artifactory version 7.66?
A: Starting from Artifactory 7.66.x, the server path to a backup can no longer start with $JFROG_HOME/artifactory. You must store the backup outside the JFrog directory, and the artifactory user must have write access to the backup folder.
Q: When should I switch from built-in system backups to component-based backups?
A: Switch to component-based backups when your instance exceeds 500 GB of storage or contains more than 1 million artifacts. At that scale, system backups can take excessive time and potentially overlap scheduled intervals, delaying recovery. See Artifactory Backup Configuration for the full recommendation matrix.
Q: Why must both the filestore and database be backed up together?
A: Artifactory uses checksum-based storage, where files are named after their SHA1 checksum. Without the database, the filestore is just a collection of checksum-named files that cannot be identified or restored. Always back up both components, and take database snapshots before copying the filestore.
Q: What happens to the Master Key if it is not backed up separately?
A: The Master Key is an AES secret key that Artifactory uses to encrypt and decrypt shared data in the database. If the Master Key is lost, all encrypted passwords become unrecoverable during restoration. Always maintain a secure backup of your Master Key separately from other backups.
Q: Do Federated Repositories support Terraform backends for disaster recovery?
A: No. Federated Repositories do not support Terraform backends because duplicating the Terraform state could cause state inconsistencies. Federated repositories also do not support file locking in multi-repo environments, which Terraform requires for state consistency.