RabbitMQ (Split) for Xray ( Xray Version < 3.131.x )
Install Xray and RabbitMQ on separate nodes. Connect multiple Xray nodes to a shared RabbitMQ cluster for HA.
This is a guide for installing Xray and RabbitMQ on separate nodes and connecting multiple Xray nodes to a RabbitMQ cluster (sequentially) to achieve high availability.
The setup supports native (rpm, deb), Linux archive, and docker-compose-based installation. This document uses three nodes for the application, RabbitMQ, and one Xray database node for demonstration purposes.
Benefits
-
Improved Scalability with Dedicated Resources:
Separating RabbitMQ allows for dedicated resource allocation (CPU, memory, and I/O), enabling it to scale independently from the application services.
-
Reduced Resource Contention:
When RabbitMQ and application services share the same resources, they compete for CPU, memory, and network bandwidth. Separating them eliminates this contention, ensuring more consistent and reliable performance.
-
**Simplified Troubleshooting:**A clear separation between RabbitMQ and the application makes identifying and resolving issues easier, whether they stem from RabbitMQ or the application itself.
Prerequisites
JFrog Installer Compatiility
Ensure you use the installer for the latest Xray version, which supports deploying Xray and RabbitMQ on separate nodes. Version Support for this deployment model is as follows.
| Xray Installer | Version |
|---|---|
| RPM | 3.97.8 and 3.107.18 onwards |
| Debian | 3.111.0 onwards |
| Linux Archive | 3.111.0 onwards |
| Docker Compose | 3.111.0 onwards |
Hardware Requirements
We recommend installing Rabbit MQ on at least three nodes in this deployment model. The table below lists the minimum hardware requirements for the servers. For a detailed description of the requirements, please refer to Xray System Requirements and Platform Support.
| Node Type | CPU | RAM (GB) | Disk Size (GB) |
|---|---|---|---|
| Xray Node | 6 | 12 | 250 |
| RabbitMQ Node | 4 | 8 | 250 |
PostgreSQL
JFrog Xray requires PostgreSQL as its database. You could use a managed solution or a native installation. If you prefer the latter, we recommend using a separate standalone server for the database. For more details, refer to the following document: PostgreSQL for Xray.
Artifactory
Ensure Artifactory is operational on a separate, fully configured node.
RabbitMQ New Installation Guide RPM/DEB
Installation Procedure
This process consists of two main stages: setting up the RabbitMQ cluster and configuring the Xray node cluster.
Stage 1: Setting Up the RabbitMQ Cluster
This stage focuses on configuring the RabbitMQ cluster. Since Xray relies on RabbitMQ for its operation, completing this step is crucial. Before proceeding, verify that you are logged in as the root user.
-
Download the Xray RPM/DEB-based installer(tar.gz) from the JFrog Xray Downloads page.
-
Extract the tar.gz file:
tar -xvf jfrog-xray-<version>-rpm/deb.tar.gz
From 3.107 onwards, JFrog Xray installers have organized files into designated subfolders. After extracting the tar.gz file, ensure you navigate to the xray directory.
cd jfrog-xray-<version>-rpm/deb
-
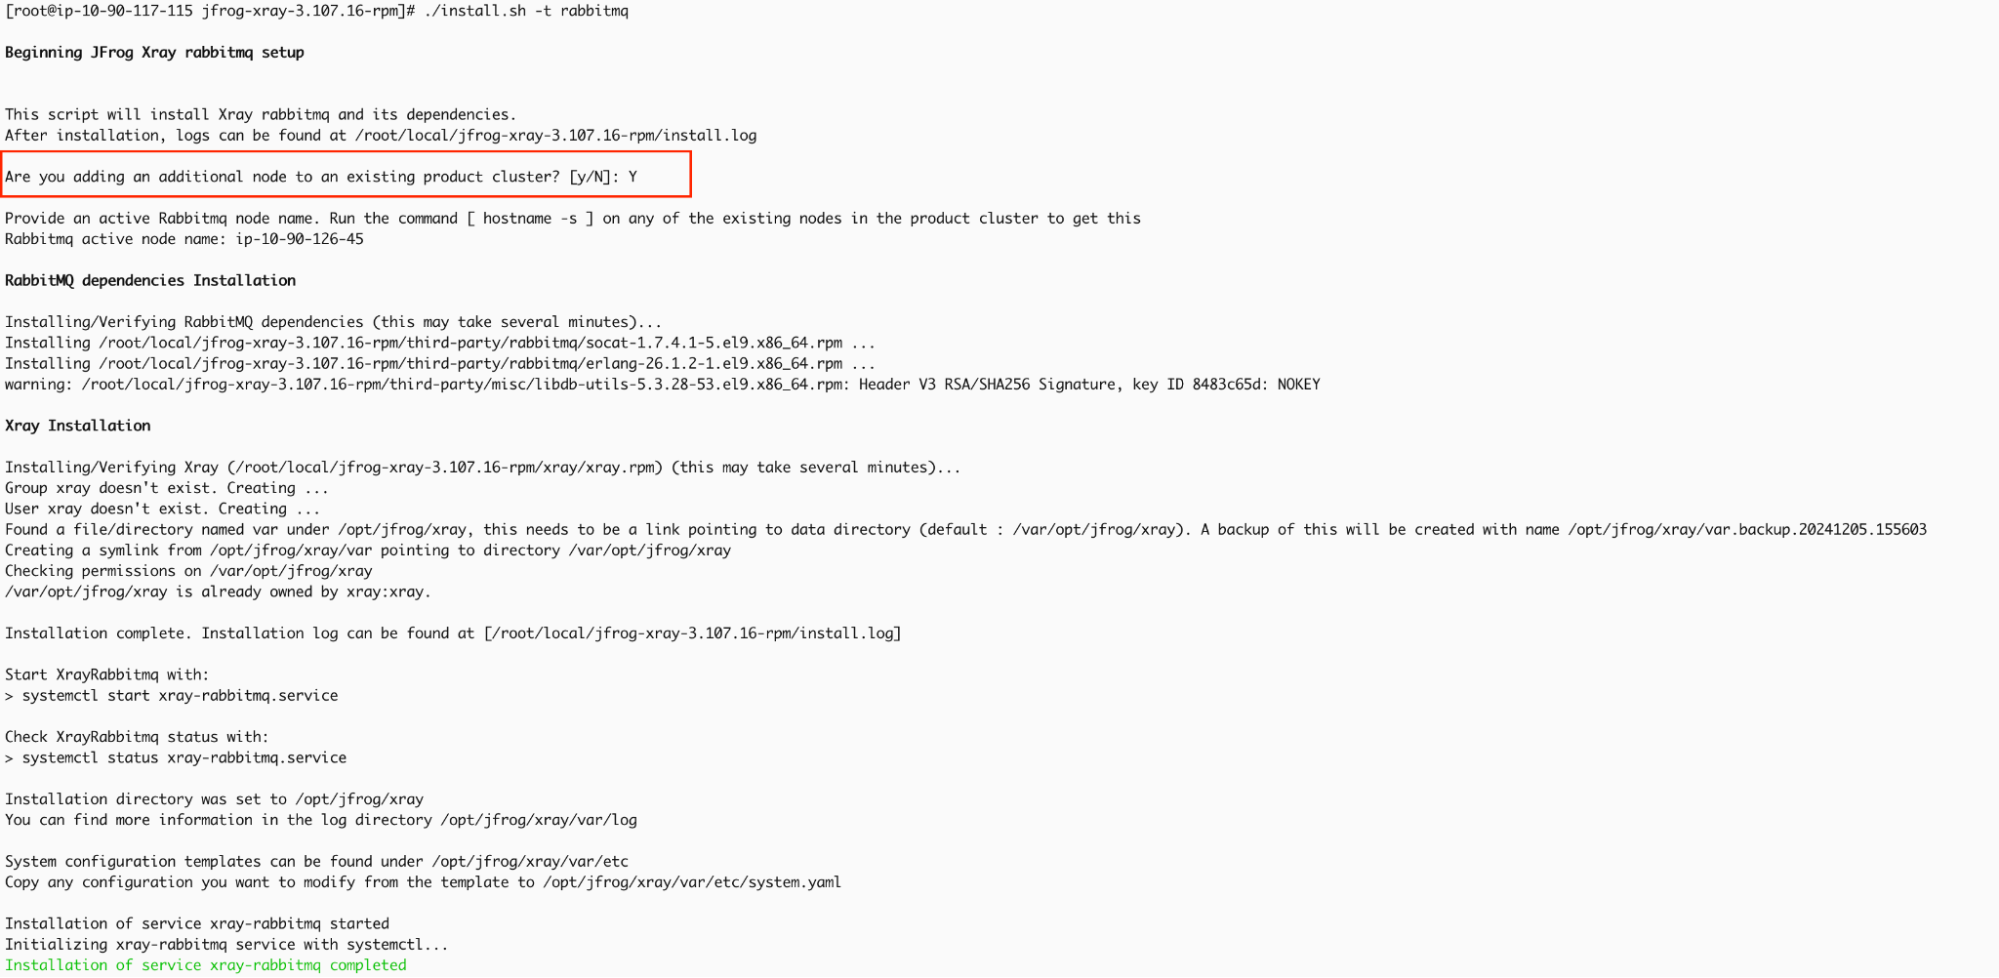
Run the install.sh
./install.sh -t rabbitmq -
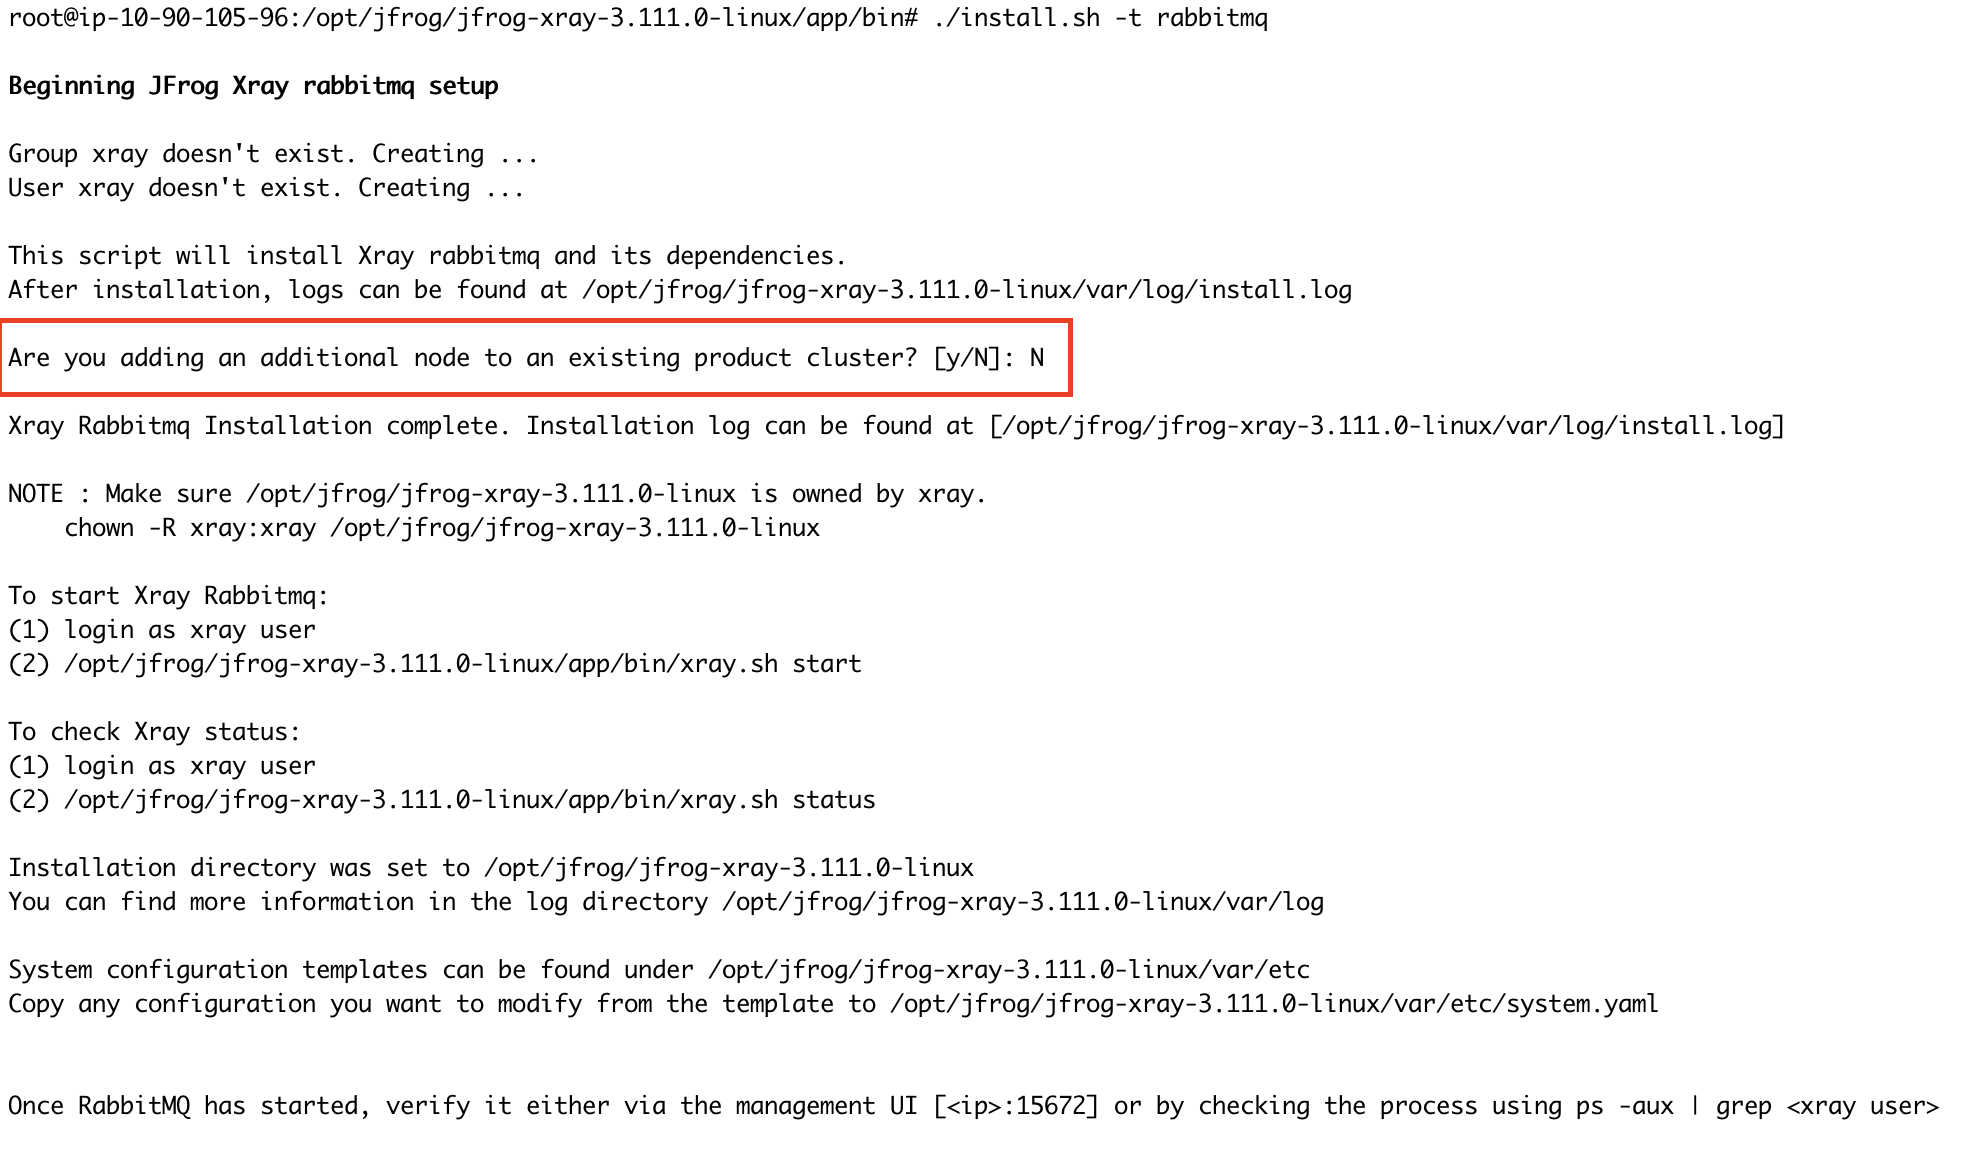
Once you run the command, you will be prompted to confirm whether this node will join an existing cluster. Since this is a fresh installation on the first node, please type "N" to indicate no.
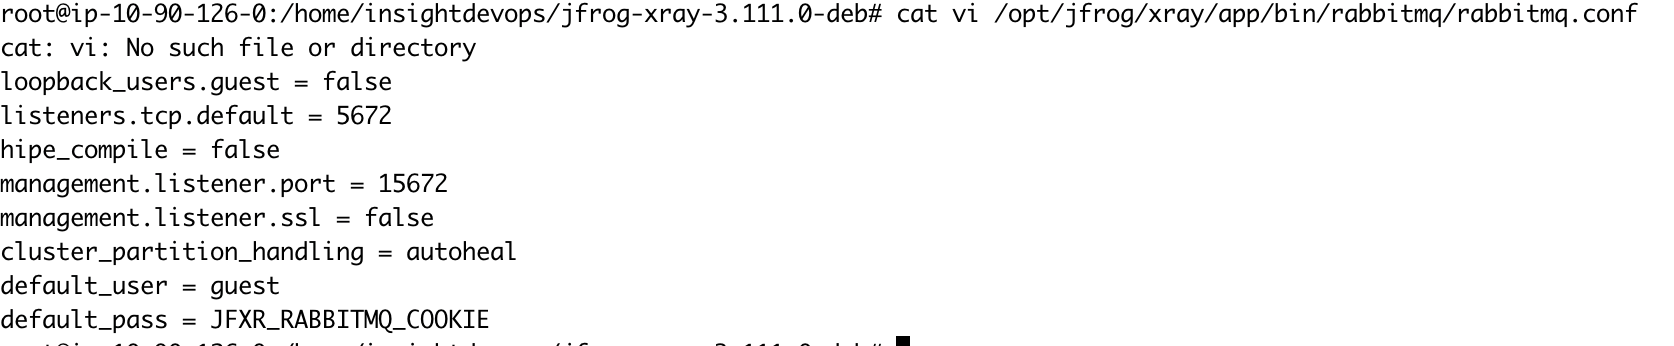
If you wish to use a custom password for RabbitMQ, perform the following steps before proceeding to Step 5:
Update the default_pass value in the rabbitmq.conf file with your desired password.
vi /opt/jfrog/xray/app/bin/rabbitmq/rabbitmq.conf
Update the system.yaml file with the same password in rabbitmq.conf.
vi /var/opt/jfrog/xray/etc/system.yaml
Ensure this step is repeated on all RabbitMQ nodes, and verify that the custom password remains consistent across the cluster.
-
Start RabbitMQ service.
systemctl start xray-rabbitmq.service -
RabbitMQ service should start; you can verify it by checking the status.
systemctl status xray-rabbitmq.service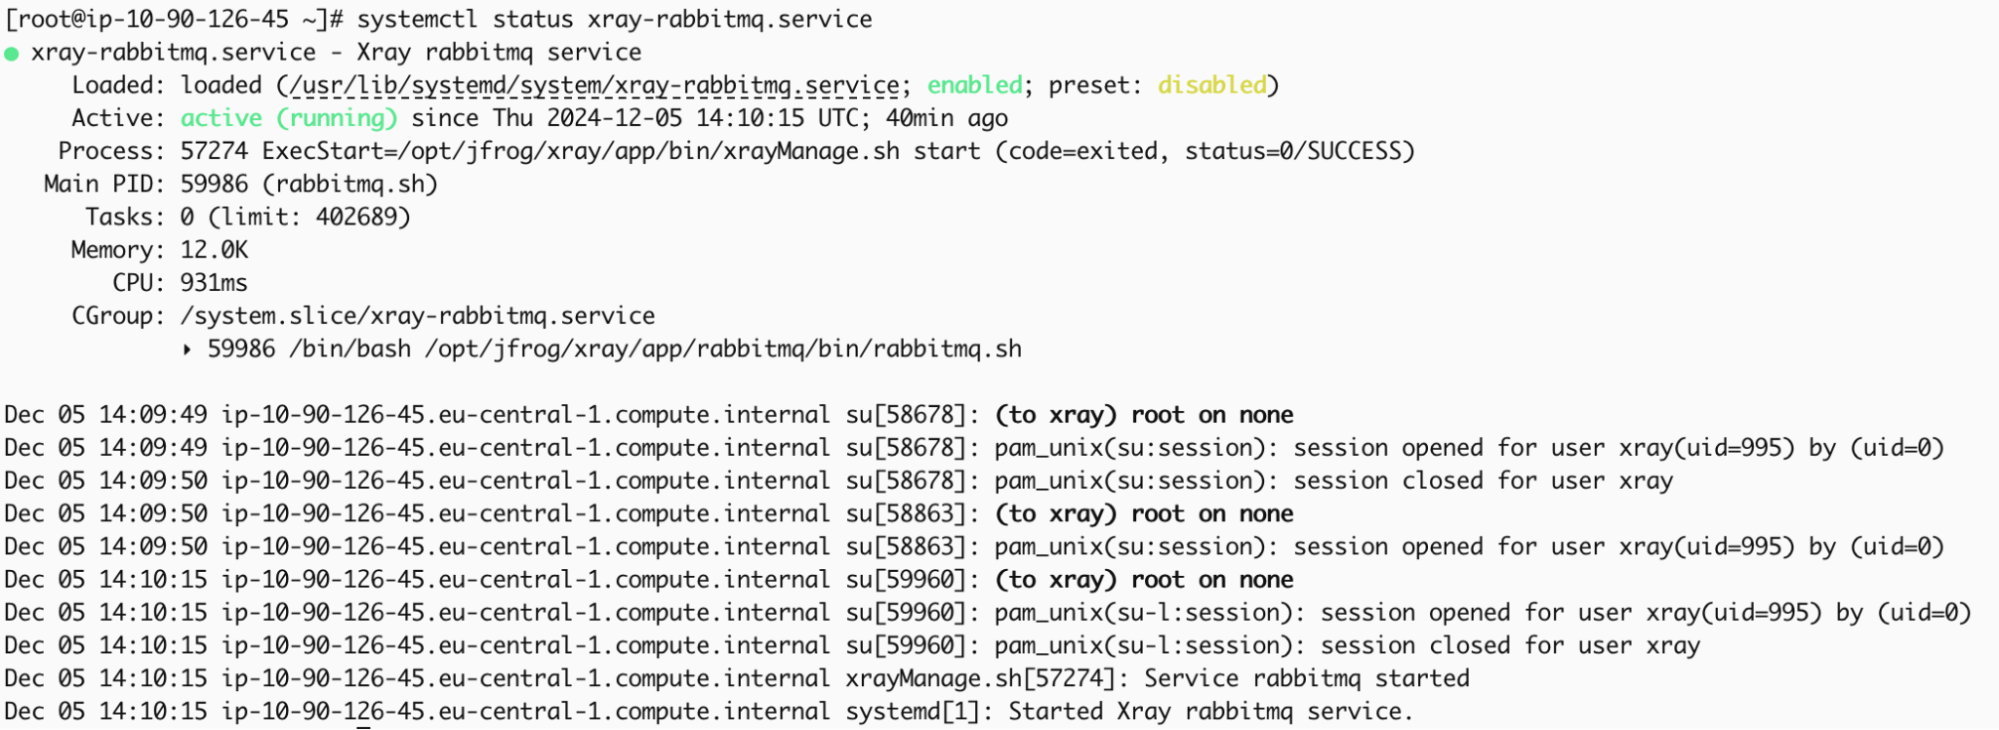
-
Access the UI through a browser to verify if the management plugin is enabled.
The credentials provided below are the default ones. If you have customized the RabbitMQ password in
/opt/jfrog/xray/app/bin/rabbitmq/rabbitmq.conf, ensure you use the correct password when accessing the management UI.http://<your-node-ip>:15672 Username: guest Password: JFXR_RABBITMQ_COOKIE
Adding Nodes to Form a RabbitMQ Cluster
Now that RabbitMQ is running on the first node, we need to install RabbitMQ on additional nodes and integrate them into the existing cluster. In this example, we will install RabbitMQ on two more nodes and join them in the cluster.
-
Repeat steps 1 to 3 from the initial node setup to obtain the Xray files on the additional node.
-
Run install.sh file
./install.sh -t rabbitmq -
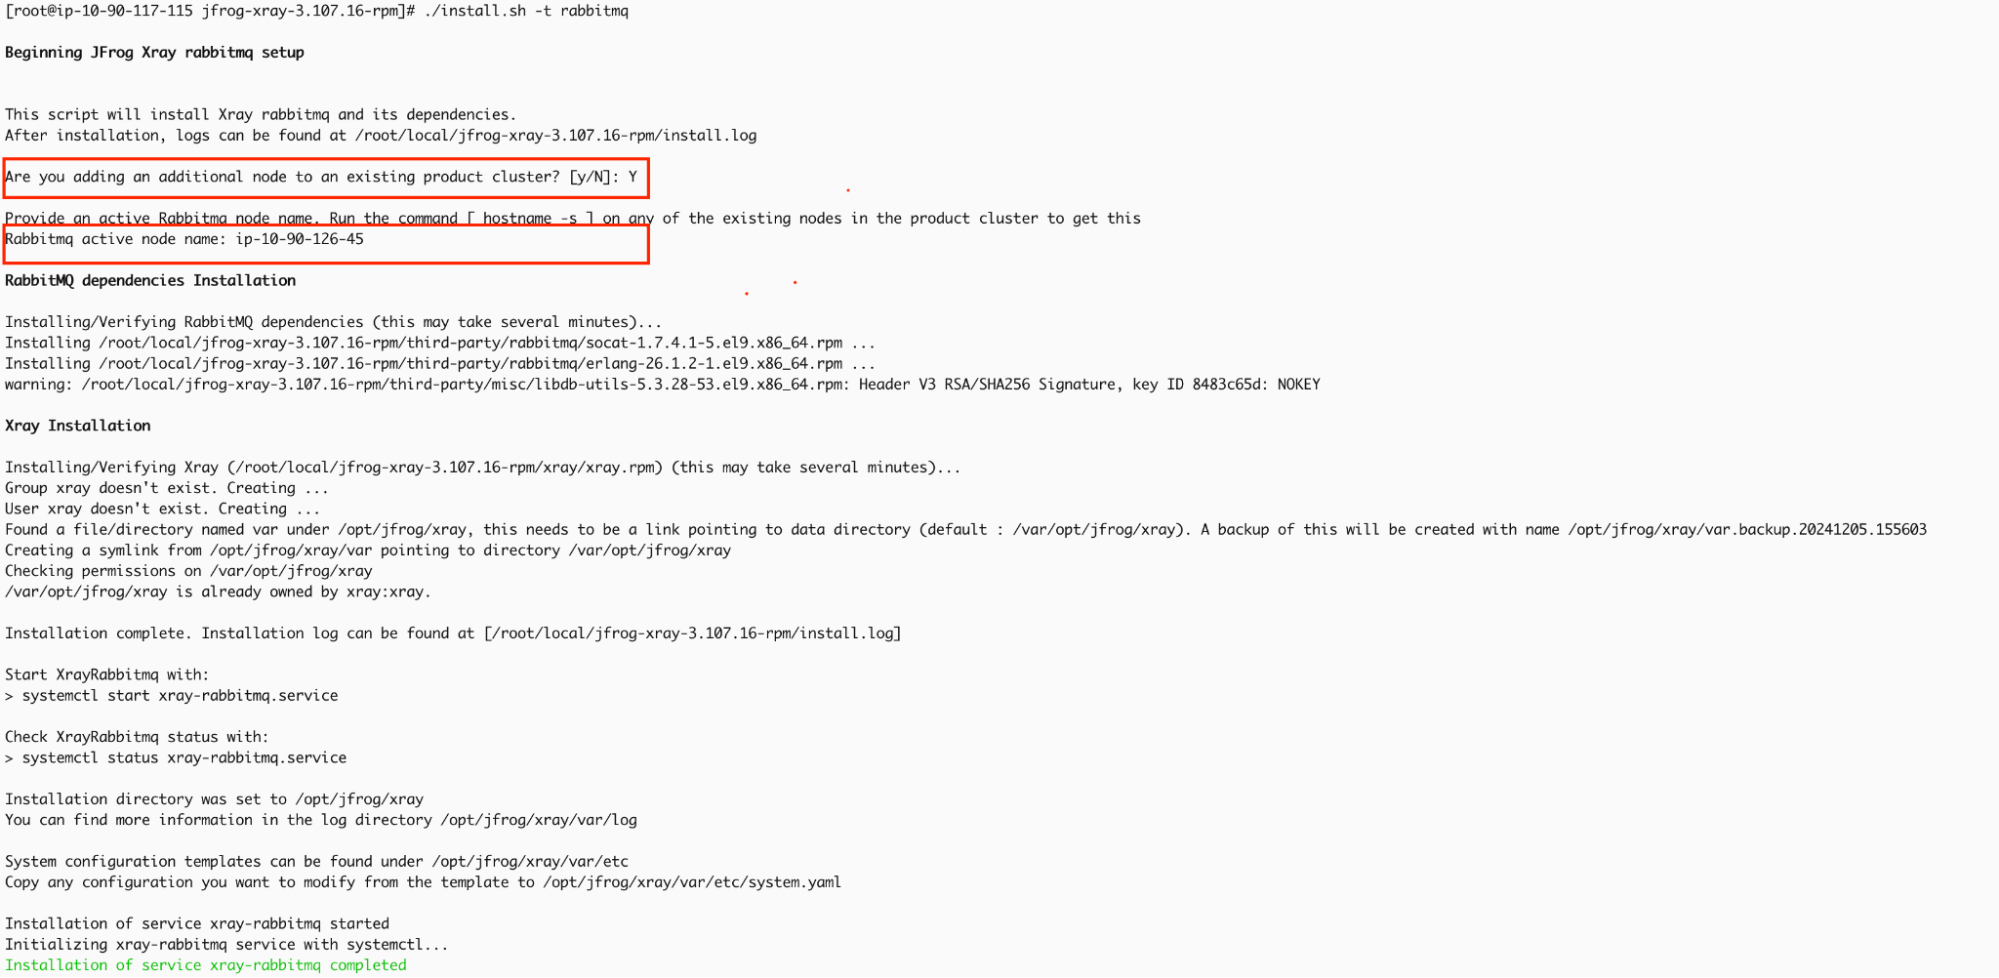
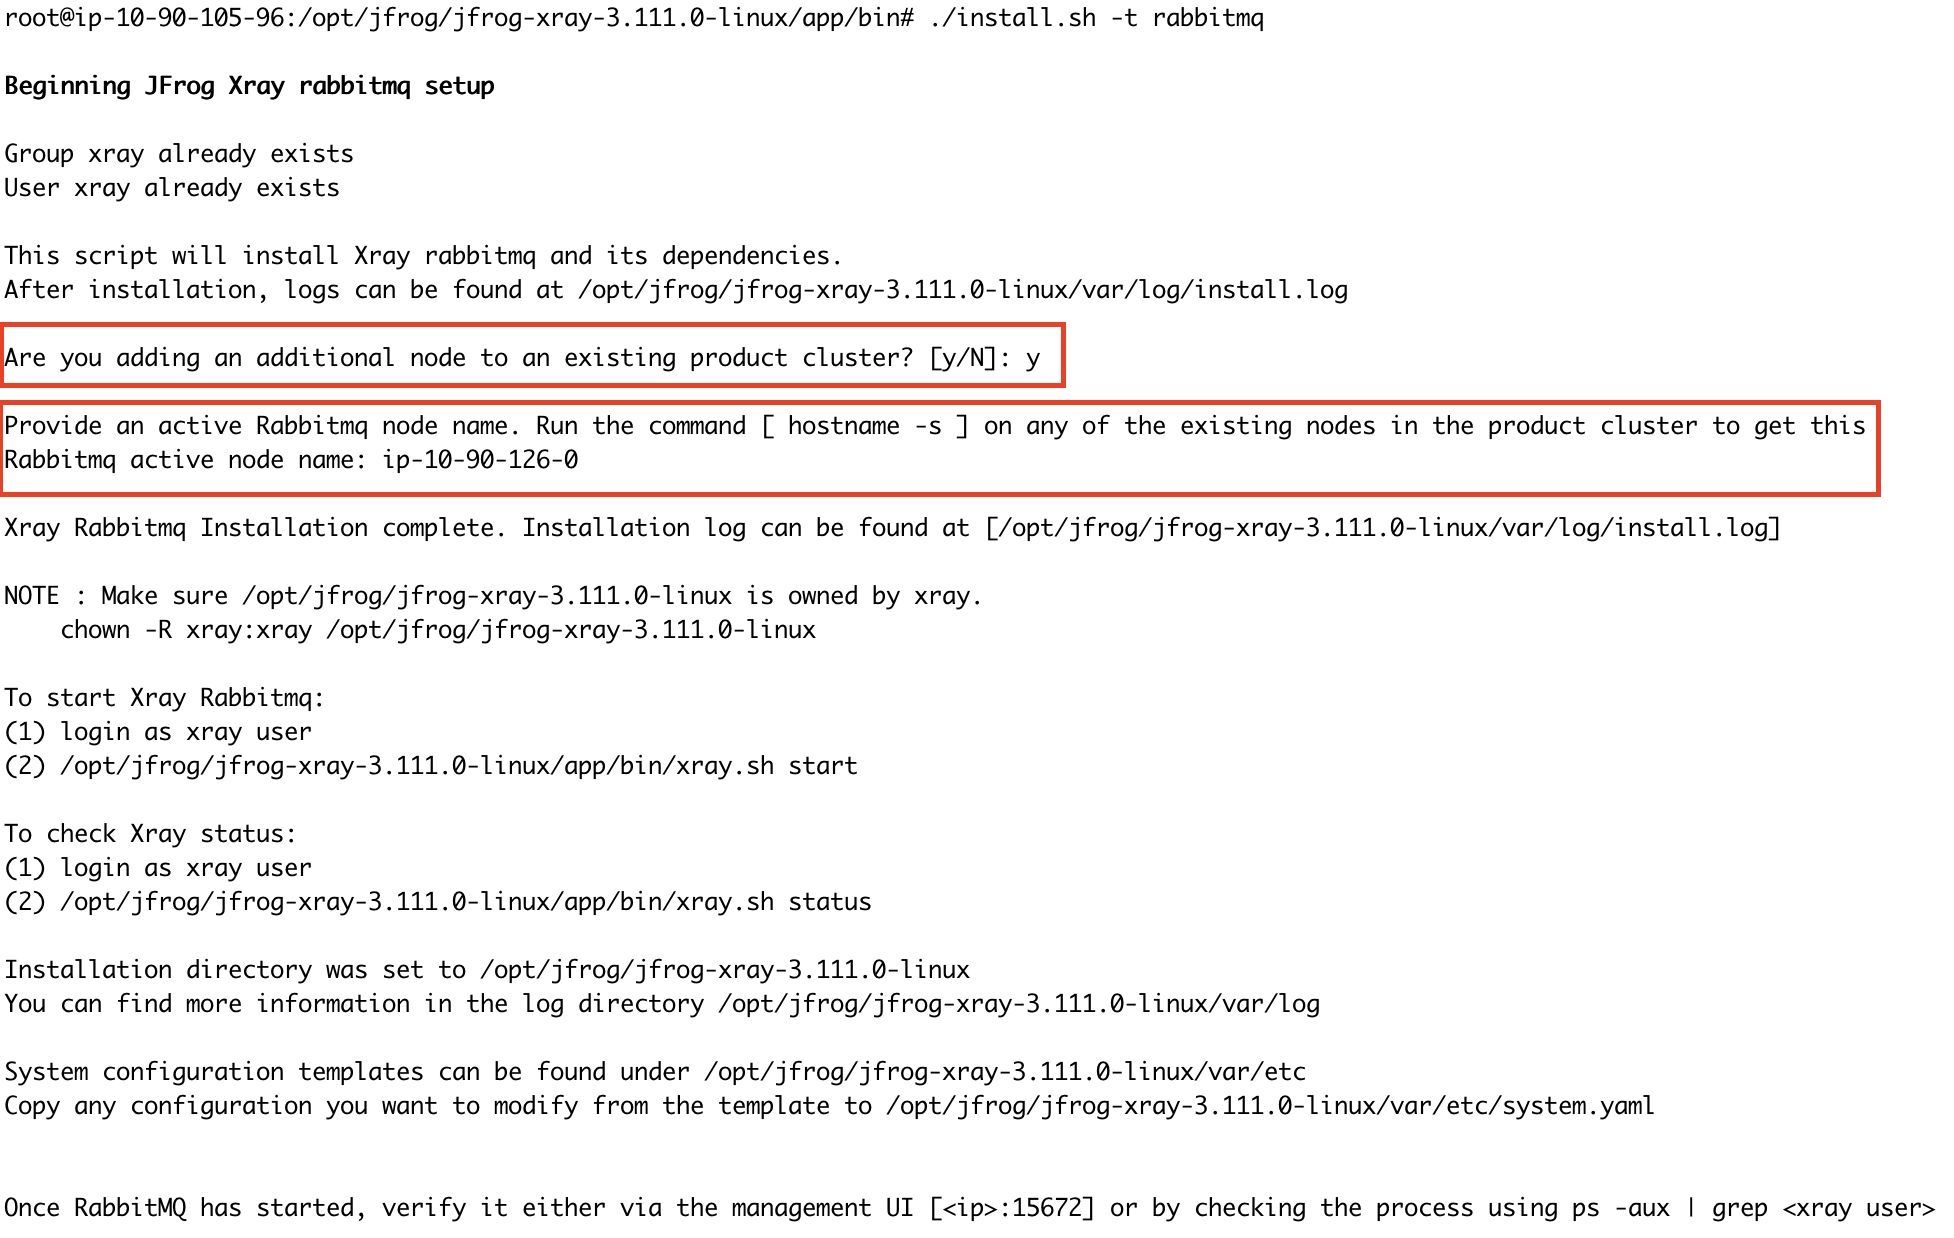
Once you execute the command, you will be prompted to confirm whether this node will join an existing RabbitMQ cluster. Since we already have an active RabbitMQ node, type Y and press Enter. Next, you will be asked to provide the name of the active RabbitMQ node. Here, you should input the hostname of the active RabbitMQ node.
-
Start RabbitMQ service.
systemctl start xray-rabbitmq.service -
RabbitMQ service should start; you can verify it by checking the status.
systemctl status xray-rabbitmq.service
Repeat steps 1 through 5 to set up the additional RabbitMQ node and integrate it into the existing cluster.
Verify the RabbitMQ cluster status.
After installing and starting RabbitMQ on all required nodes, confirm that the cluster functions correctly and all nodes are properly joined.
Since the value of $HOME differs for each user, placing a copy of the cookie file for every user who will use the CLI tools, including both non-privileged users and root, is essential.The xray user, automatically created by the installer script, can execute the cluster_status command. To switch to the xray user, run:
su xray
Navigate to the RabbitMQ sbin directory and execute the cluster_status commands.
$ cd /opt/jfrog/xray/app/third-party/rabbitmq/sbin
$ ./rabbitmqctl cluster_status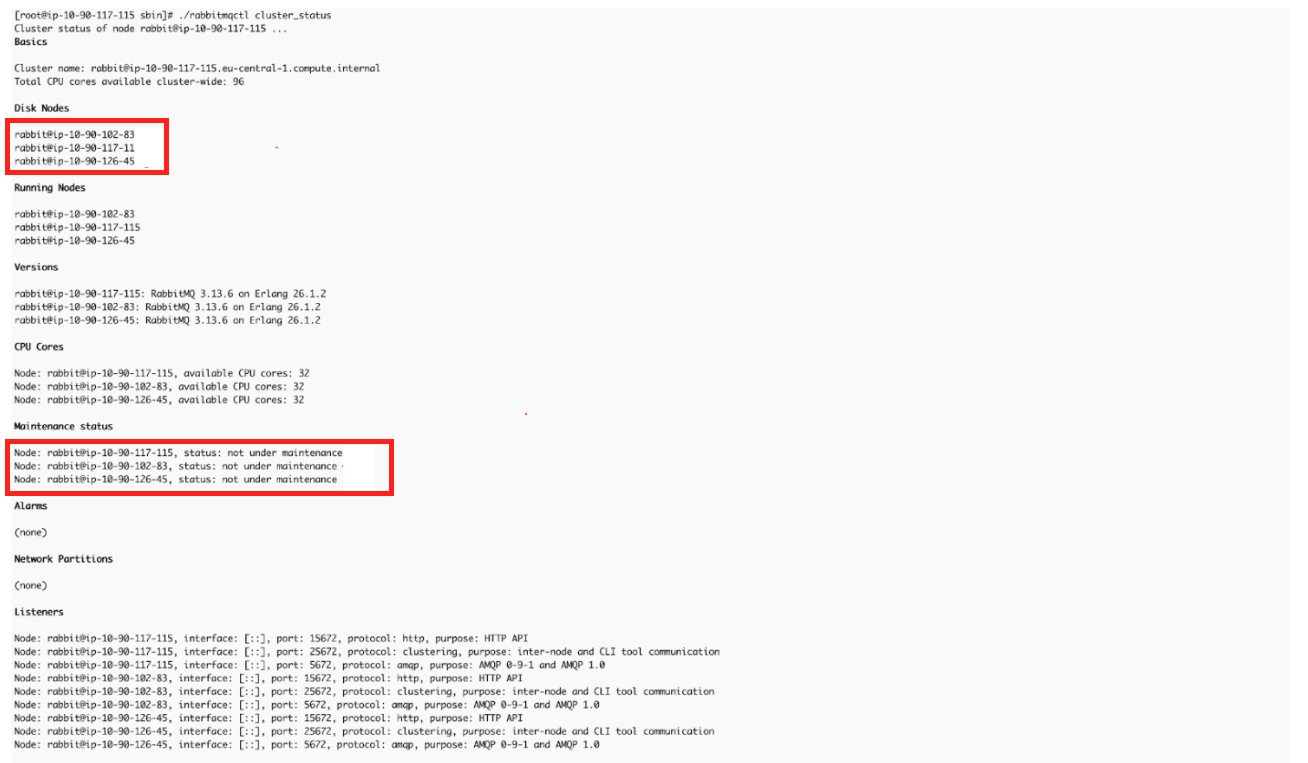
You can verify the cluster from the Management UI URL http://<RabbitMQ-Node-IP/Hostname>:15672; see the screenshot below.

Stage 2: Setting Up the Xray Node Cluster
Once the RabbitMQ cluster is successfully configured, set up the Xray node cluster, which will integrate with the previously configured RabbitMQ cluster.
-
Download the Xray RPM/DEB-based installer(tar.gz) from the JFrog Xray Downloads page.
-
Extract the tar.gz file:
tar -xvf jfrog-xray-<version>-rpm/deb.tar.gz
From 3.107 onwards, JFrog Xray installers have organized files into designated subfolders. After extracting the tar.gz file, ensure you navigate to the xray directory.
cd jfrog-xray-<version>-deb
-
Run the install.sh
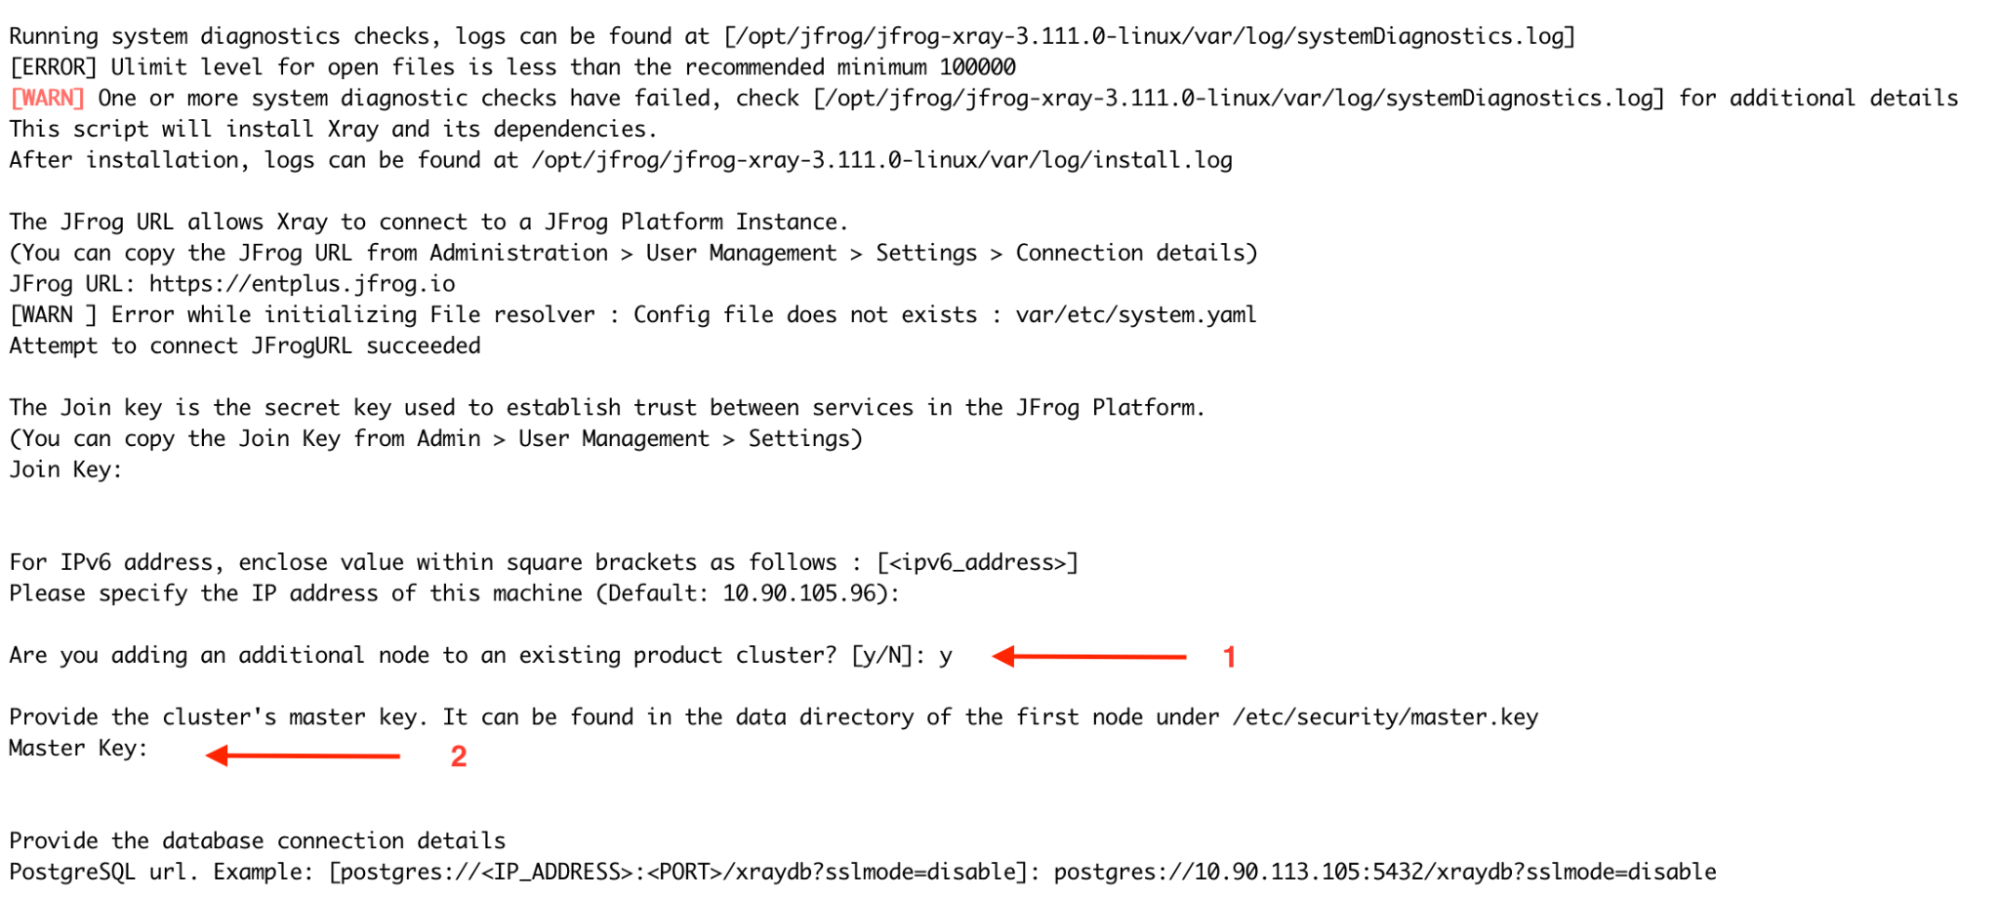
./install.sh -t xray -
Upon running the command, you will be prompted with a series of interactive installation questions; refer to the screenshot attached for details about the mentioned steps.
-
Confirm the installation directory by pressing ENTER
-
Provide the URL of your JFrog Platform( Artifactory) instance in the format:<http://artifactory_node_ip:port>
-
Obtain the Join Key by navigating to Administration > Security > General > Connection Details in Artifactory.
- Enter the platform password to access the details.
- Copy the Join Key and use it when prompted.
-
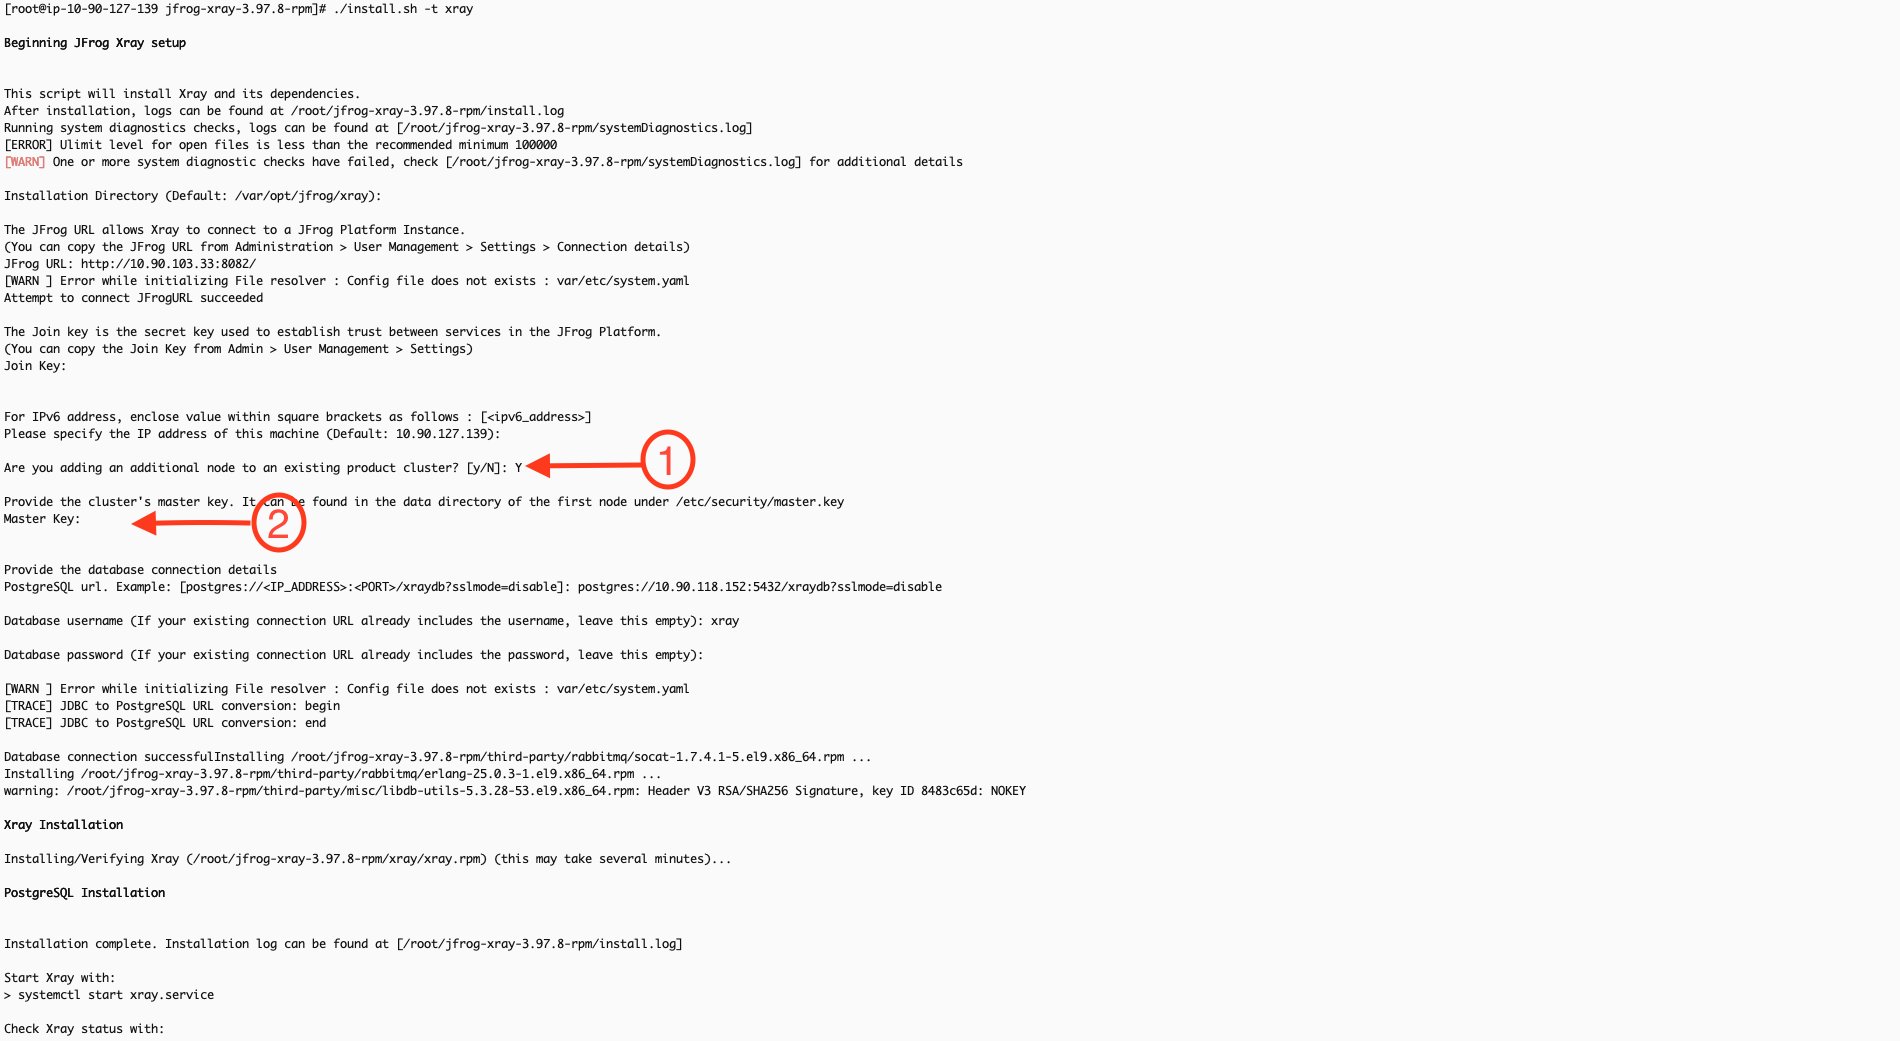
Specify the machine's IP address: You can manually input the current node's IP address or press ENTER to use the default, as the system automatically detects the current node's IP address. For IPv6, ensure the address is enclosed in square brackets: [
<ipv6_address>]. -
Are you adding an additional node to the existing product cluster? For the first node of Xray, select N (No), as this will set up a new cluster. For subsequent nodes, select Y (Yes). The process for adding additional nodes is detailed in later steps.
-
Do you want to install Postgresql? Select N (No) and press ENTER, as we use a PostgreSQL instance installed on a separate node. Provide the following database connection details:
- Connection URL: postgres://
<IP_ADDRESS>:<PORT>/<database name>?sslmode=disable - Database Username:
<YOUR_DATABASE_USERNAME> - Database Password:
<YOUR_DATABASE_PASSWORD>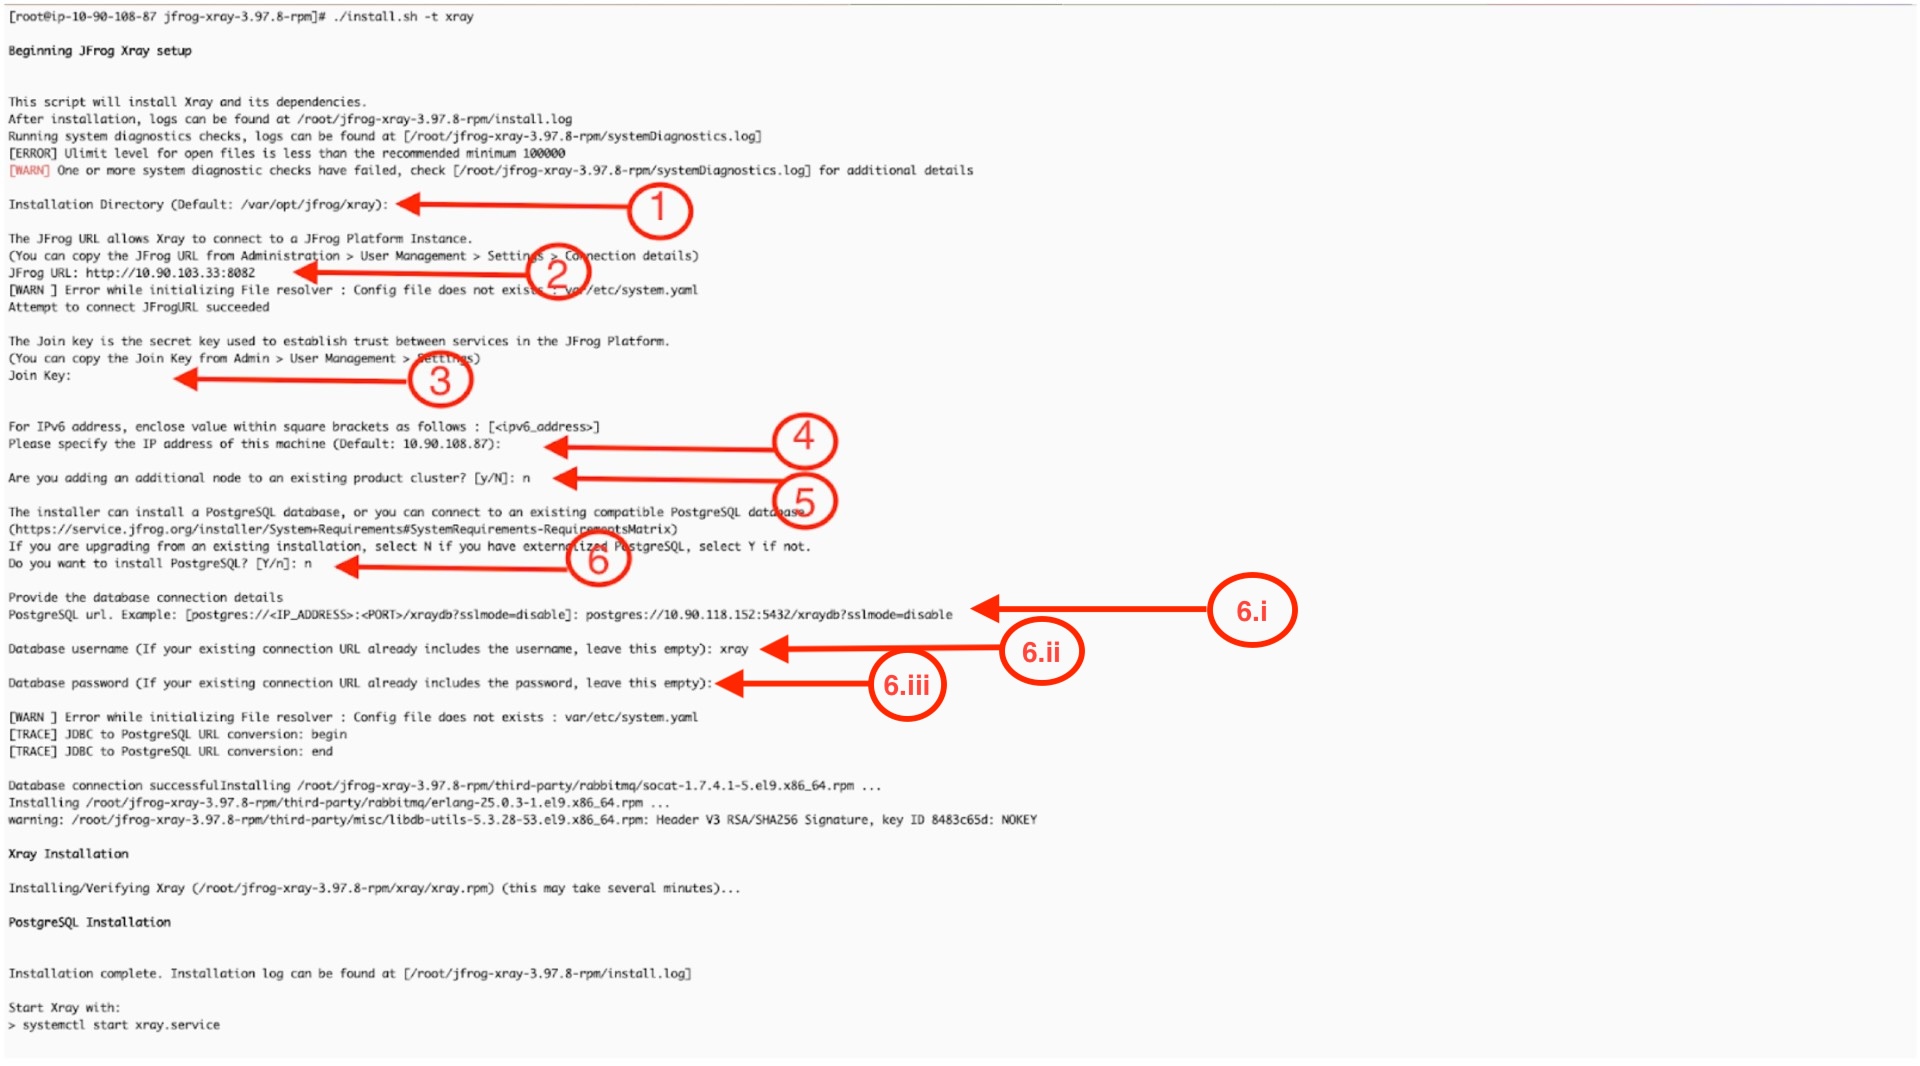
- Connection URL: postgres://
-
-
Before starting the Xray service, update the system.yaml file with the RabbitMQ cluster URLs and credentials for all nodes in the cluster. Ensure that all RabbitMQ node URLs are correctly listed and include the appropriate username and password for authentication. This configuration ensures Xray can communicate effectively with the RabbitMQ cluster and save the changes.
vi /var/opt/jfrog/xray/etc/system.yaml
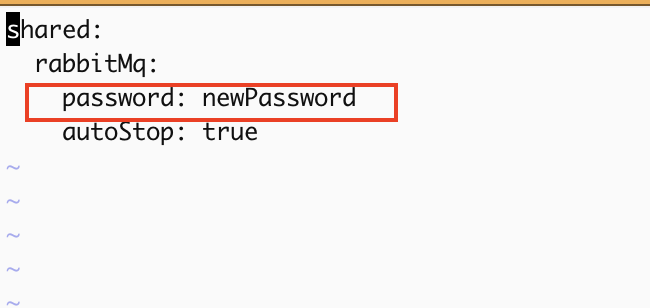
If using a custom RabbitMQ password, ensure the same password is configured in Xray’s system.yaml file under the RabbitMQ section to maintain consistency.

- Start Xray service:
systemctl start xray.service- Once the Xray service is started successfully, you can access it via the user interface or APIs.
Adding Nodes to Form an Xray Cluster:
-
Install Xray on a new node by repeating the initial Xray node setup steps. During the installation, you will be prompted to ask, "Are you adding an additional node to an existing product cluster? [y/N]?" At this point, select Y to confirm that this is an additional node for the X-ray cluster.
-
In the next step, you will be prompted to provide the master_key. You can retrieve this key from the first node by executing the following command:
cat /var/opt/jfrog/xray/etc/security/master.key
The remaining installation steps for the new node should be carried out like for the first node.
After installing, modify the system.yaml file to update the RabbitMQ URLs. Change the order of the URLs to optimize load balancing and prevent all Xray nodes from connecting to the same RabbitMQ node. For example, if the RabbitMQ node URL order in the first Xray node is 1,2,3, then in the second node, it should be 2,3,1, and in the third node, it could be 3,1,2. This ensures that each Xray node connects to different RabbitMQ nodes, improving fault tolerance and distributing the load efficiently.
vi /var/opt/jfrog/xray/etc/system.yaml
Uninstallation
Read about Uninstalling JFrog Xray.
RabbitMQ (Split) Fresh Installation Guide Linux Archive
Installation Procedure
This process consists of two main stages: setting up the RabbitMQ cluster and configuring the Xray node cluster.
Stage 1: Setting Up the RabbitMQ Cluster
This stage focuses on configuring the RabbitMQ cluster. Since Xray relies on RabbitMQ for its operation, completing this step is crucial. Before proceeding, verify that you are logged in as the root user.
-
Download the Xray linux archive based installer(tar.gz) from the JFrog Xray Downloads page.
-
Extract the tar.gz file:
tar -xvf jfrog-xray-<version>-linux.tar.gzOS user permissions for Linux archive
When running Xray, the installation script creates a user called xray by default, which must have run and execute permissions on the installation directory.
We recommend that you copy the Xray download file into a directory that gives run and execute permissions to all users such as /opt.
mkdir -p /opt/jfrog cp -r jfrog-xray-<version>-linux /opt/jfrog/ cd /opt/jfrog mv jfrog-xray-<version>-linux xray cd xray/app/bin
From 3.107 onwards, JFrog Xray installers have organized files into designated subfolders. After extracting the tar.gz file, ensure you navigate to the correct directory
-
Run the install.sh
Check prerequisites for Xray in Linux Archive before running install script.
./install.sh -t rabbitmq -
Once you run the command, you will be prompted to confirm whether this node will join an existing cluster. Since this is a fresh installation on the first node, please type "N" to indicate no.
-
Follow the on-screen instructions after the installation is completed regarding the following points
- Xray directory should be owned by the xray usereg :
chown -R xray:xray /opt/jfrog/xray - Switch to xray user, before you start the serviceeg:
su xray
- Xray directory should be owned by the xray usereg :
If you wish to use a custom password for RabbitMQ, perform the following steps before proceeding to Step 6:
Update the default_pass value in the rabbitmq.conf file with your desired password. Refer to this article for guidance.
vi xray/app/bin/rabbitmq/rabbitmq.conf
Update the system.yaml file with the same password in rabbitmq.conf.
vi xray/etc/system.yaml

Ensure this step is repeated on all RabbitMQ nodes, and verify that the custom password remains consistent across the cluster.
-
Start rabbitmq service:
xray/app/bin/xray.sh start|stop -
RabbitMQ service should start; you can verify it by checking the status.
xray/app/bin/xray.sh status -
(Optional) You can also install it as a service.
Xray is packaged as an archive file and you can use the install script to install it as a service running under a custom user. Currently supported on Linux systems.
OS User Permissions
When running Xray as a service, the installation script creates a user called xray (by default) which must have run and execute permissions on the installation directory.
We recommend extracting the Xray download file into a directory with run and execute permissions for all users, such as /opt.
To install Xray as a service, execute the following command as root.
xray/app/bin/installService.sh
-u | --user : [optional] (default: xray) user which will be used to run the product, it will be created if its unavailable
-g | --group : [optional] (default: xray) group which will be used to run the product, it will be created if its unavailableIf you wish to change the user and group, it can be passed through xray/var/etc/system.yaml as shared.user and shared.group. This takes precedence over values passed through command line on install.
The user and group is stored in xray/var/etc/system.yaml at the end of installation. To manage the service, use systemd or init.d commands depending on your system.Using systemd
systemctl <start|stop|status> xray.serviceUsing init.d
service xray <start|stop|status>- Access the UI through a browser to verify if the management plugin is enabled.
The credentials provided below are the default ones. If you have customized the RabbitMQ password in’/opt/jfrog/xray/app/bin/rabbitmq/rabbitmq.conf’, ensure you use the correct password when accessing the management UI.
http://<your-node-ip>:15672

Username:  guest
Password:  JFXR_RABBITMQ_COOKIE
Adding Nodes to Form a RabbitMQ Cluster
Now that RabbitMQ is running on the first node, we need to install RabbitMQ on additional nodes and integrate them into the existing cluster. In this example, we will install RabbitMQ on two more nodes and join them in the cluster.
-
Repeat steps for the fresh install node setup (step 1 and step 2) to obtain the Xray files on the additional node
-
Run install.sh fileCheck prerequisites for Xray in Linux Archive before running install script.
./install.sh -t rabbitmq -
Once you execute the command, you will be prompted to confirm whether this node will join an existing RabbitMQ cluster. Since we already have an active RabbitMQ node, type Y and press Enter. Next, you will be asked to provide the name of the active RabbitMQ node. Here, you should input the hostname of the active RabbitMQ node.
-
Follow the on-screen instructions after the installation is completed regarding the following points
- Xray directory should be owned by the xray usereg :
chown -R xray:xray /opt/jfrog/xray - Start rabbitmq as Xray usereg:
su xray
- Xray directory should be owned by the xray usereg :
-
If you are using a custom password, please follow the same steps done in first node
-
Start RabbitMQ service
xray/app/bin/xray.sh start|stop or via service systemctl <start|stop|status> xray.service -
Verify the cluster status from the management UI. Access the UI through a browser

The credentials provided below are the default ones. If you have customized the RabbitMQ password in’xray/app/bin/rabbitmq/rabbitmq.conf’, ensure you use the correct password when accessing the management UI.
http://<your-node-ip>:15672 Username: guest Password: JFXR_RABBITMQ_COOKIE
Stage 2: Setting Up the Xray Node Cluster
Once the RabbitMQ cluster is successfully configured, set up the Xray node cluster, which will integrate with the previously configured RabbitMQ cluster.
-
Download the Xray linux archive based installer(tar.gz) from the JFrog Xray Downloads page.
-
Extract the tar.gz file:
tar -xvf jfrog-xray-<version>-linux.tar.gz
OS user permissions for Linux archive
When running Xray, the installation script creates a user called xray by default, which must have run and execute permissions on the installation directory.
We recommend that you copy the Xray download file into a directory that gives run and execute permissions to all users such as /opt.
mkdir -p /opt/jfrog cp -r jfrog-xray-<version>-linux /opt/jfrog/ cd /opt/jfrog mv jfrog-xray-<version>-linux xray cd xray/app/binFrom 3.107 onwards, JFrog Xray installers have organized files into designated subfolders. After extracting the tar.gz file, ensure you navigate to the correct directory
-
Run the install.sh
Check prerequisites for Xray in Linux Archive before running install script.
./install.sh -t xray -
Upon running the command, you will be prompted with a series of interactive installation questions.
-
Provide the URL of your JFrog Platform( Artifactory) instance in the format http://artifactory\_node\_ip:port
-
Obtain the Join Key by navigating to Administration > Security > General > C****onnection Details in Artifactory.
- Enter the platform password to access the details.
- Copy the Join Key and use it when prompted.
-
Specify the machine's IP address: You can manually input the current node's IP address or press ENTER to use the default, as the system automatically detects the current node's IP address. For IPv6, ensure the address is enclosed in square brackets: [
<ipv6_address>]. -
Are you adding an additional node to the existing product cluster? For the first node of Xray, select N (No), as this will set up a new cluster. For subsequent nodes, select Y (Yes). The process for adding additional nodes is detailed in later steps.
-
Provide the database connection details. Postgresql should be installed separately on a different node. Provide the following database connection details:
-
Connection URL: postgres://
<IP_ADDRESS>:<PORT>/<database name>?sslmode=disable -
Database Username:
<YOUR_DATABASE_USERNAME> -
Database Password:
<YOUR_DATABASE_PASSWORD>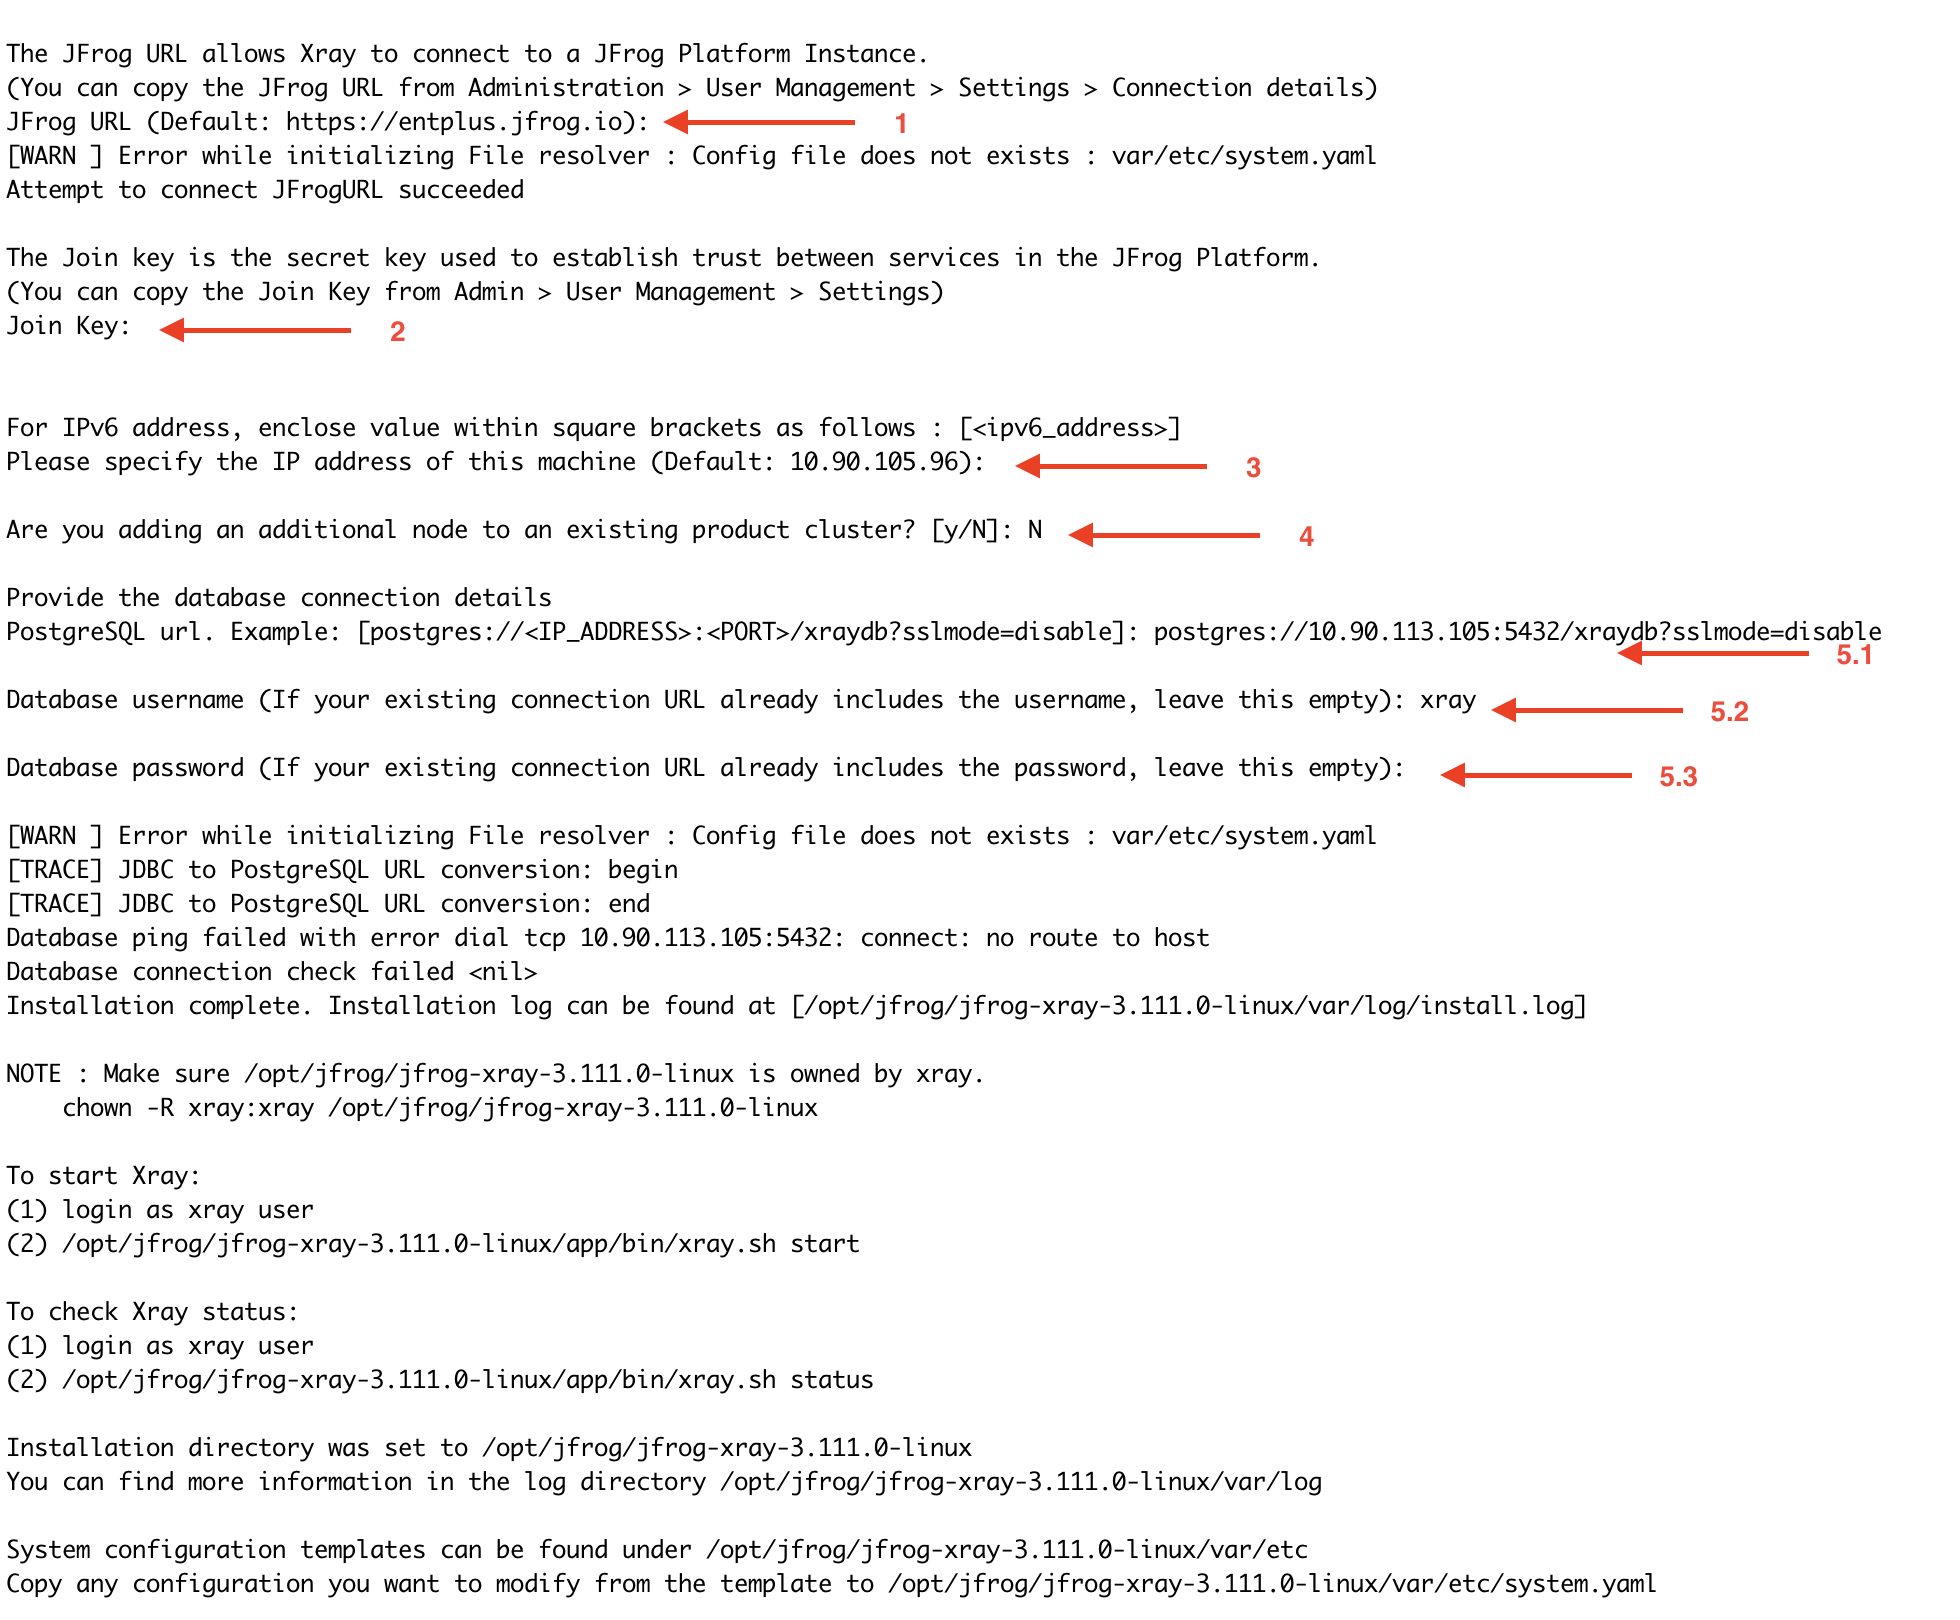
-
-
-
Follow the on-screen instructions after the installation is completed regarding the following points
- Xray directory should be owned by the xray usereg :
chown -R xray:xray /opt/jfrog/xray - Switch to xray user, before you start the serviceeg: `su xray
- Xray directory should be owned by the xray usereg :
-
Before starting the Xray service, update the system.yaml file with the RabbitMQ cluster URLs and credentials for all nodes in the cluster. Ensure that all RabbitMQ node URLs are correctly listed and include the appropriate username and password for authentication. This configuration ensures Xray can communicate effectively with the RabbitMQ cluster and save the changes.
vi xray/etc/system.yaml
If using a custom RabbitMQ password, ensure the same password is configured in Xray’s system.yaml file under the RabbitMQ section to maintain consistency.

- Start Xray service:
xray/app/bin/xray.sh start|stop
or via service
systemctl <start|stop|status> xray.service- Once the Xray service is started successfully, you can access it via the user interface or APIs.
Adding Nodes to Form an Xray Cluster:
-
Install Xray on a new node by repeating the initial Xray node setup steps.
-
During the installation, you will be prompted to ask, "Are you adding an additional node to an existing product cluster? [y/N]?" At this point, select Y to confirm that this is an additional node for the X-ray cluster.
-
In the next step, you will be prompted to provide the master_key. You can retrieve this key from the first node by executing the following command:
cat /var/opt/jfrog/xray/etc/security/master.keyThe remaining installation steps for the new node should be carried out like for the first node.
After installing, modify the system.yml file to update the RabbitMQ URLs. Change the order of the URLs to optimize load balancing and prevent all Xray nodes from connecting to the same RabbitMQ node. For example, if the RabbitMQ node URL order in the first Xray node is 1,2,3, then in the second node, it should be 2,3,1, and in the third node, it could be 3,1,2. This ensures that each Xray node connects to different RabbitMQ nodes, improving fault tolerance and distributing the load efficiently.
vi xray/etc/system.yaml Uninstallation
Read about Uninstalling JFrog Xray.
Related Topics
- Xray Installation
- Xray HA Installation
- PostgreSQL for Xray
- Xray System Requirements and Platform Support
- Quorum Queue Enablement for Xray and Platform Helm Charts
- Upgrading Xray
RabbitMQ (Split) Fresh Installation Guide Docker Compose
Installation Procedure
This process consists of two main stages: setting up the RabbitMQ cluster and configuring the Xray node cluster.
Stage 1: Setting Up the RabbitMQ Cluster
This stage focuses on configuring the RabbitMQ cluster. Since Xray relies on RabbitMQ for its operation, completing this step is crucial. Before proceeding, verify that you are logged in as the root user.
-
Download the Xray docker compose-based installer(tar.gz) from the JFrog Xray Downloads page.
-
Extract the tar.gz file:
tar -xvf jfrog-xray-<version>-compose.tar.gz
From 3.107 onwards, JFrog Xray installers have organized files into designated subfolders. After extracting the tar.gz file, ensure you navigate to the xray directory.
cd jfrog-xray-<version>-compose
-
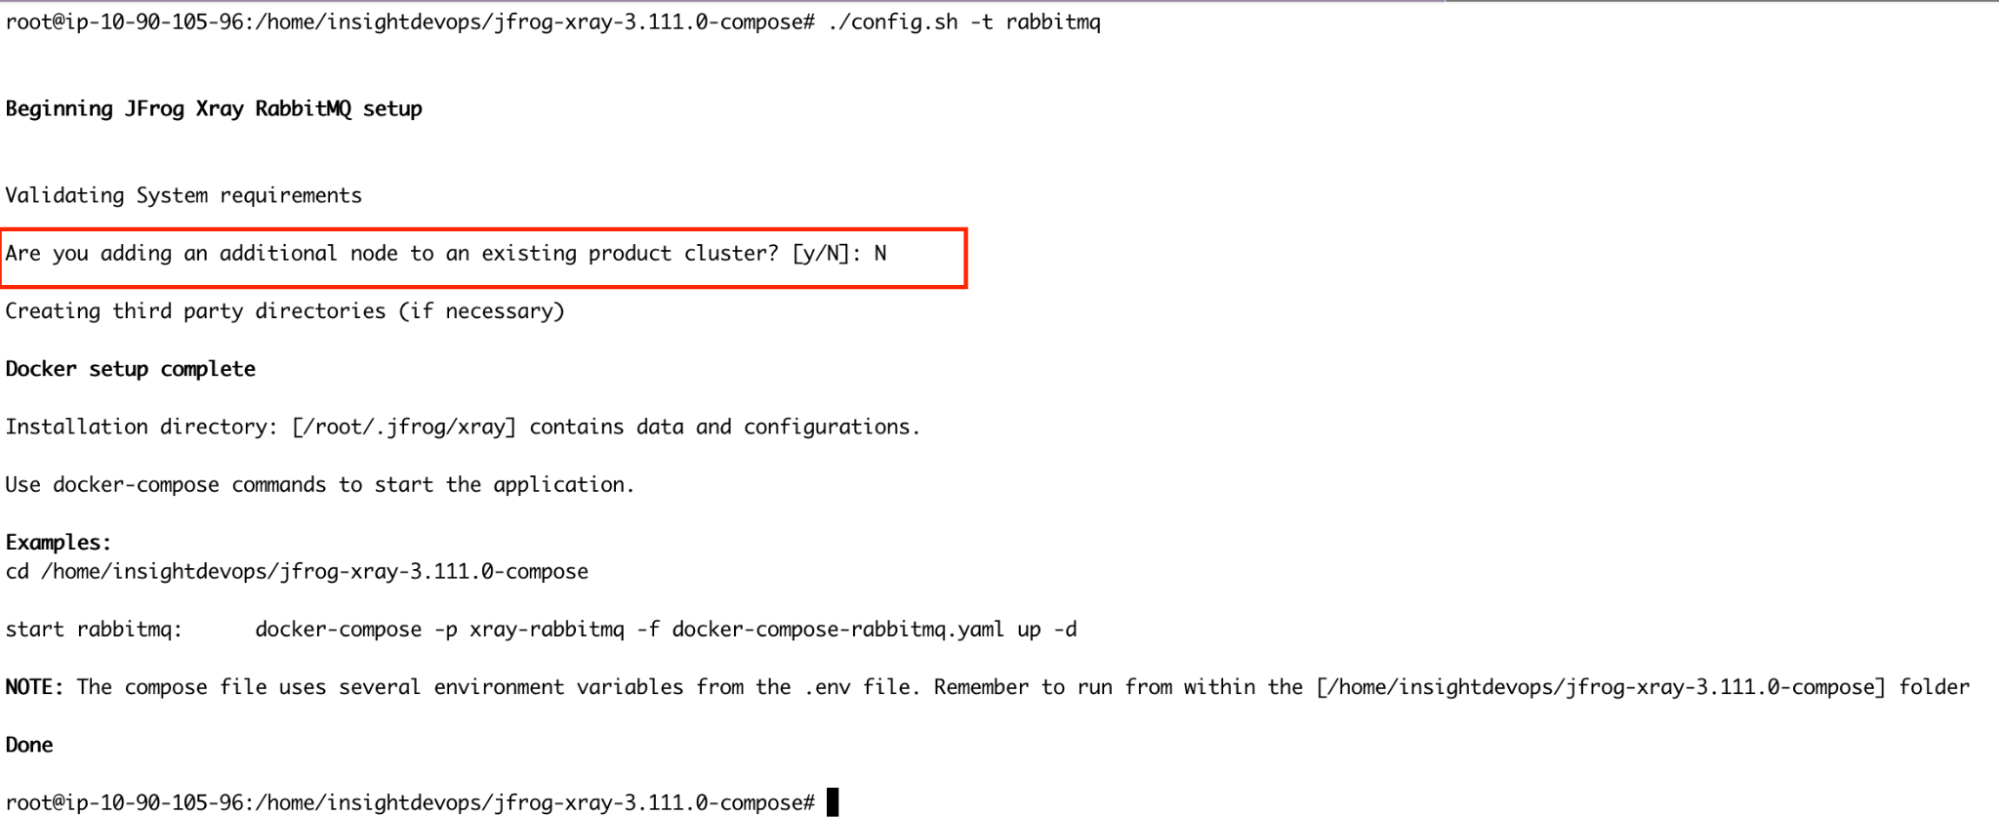
Run the config.sh
./config.sh -t rabbitmq -
Once you run the command, you will be prompted to confirm whether this node will join an existing cluster. Since this is a fresh installation on the first node, please type "N" to indicate no.
If you wish to use a custom password for RabbitMQ, perform the following steps before proceeding to Step 5:
Update the default_pass value in the rabbitmq.conf file with your desired password. This file is mounted inside the rabbitmq container. If you have changed the ROOT_DATA_DIR in the docker-compose env file, edit the rabbitmq.conf file in the right location
vi /root/.jfrog/xray/app/third-party/rabbitmq/rabbitmq.conf

Ensure this step is repeated on all RabbitMQ nodes, and verify that the custom password remains consistent across the cluster.
-
Start RabbitMQ service.
docker-compose -p xray-rabbitmq -f docker-compose-rabbitmq.yaml up -d -
RabbitMQ service should start; you can verify it by checking the logs
docker ps docker logs -f xray_rabbitmq -
Verify the cluster status from the management UI URL
http://<RabbitMQ-Node-IP/Hostname>:15672. Access the UI through a browser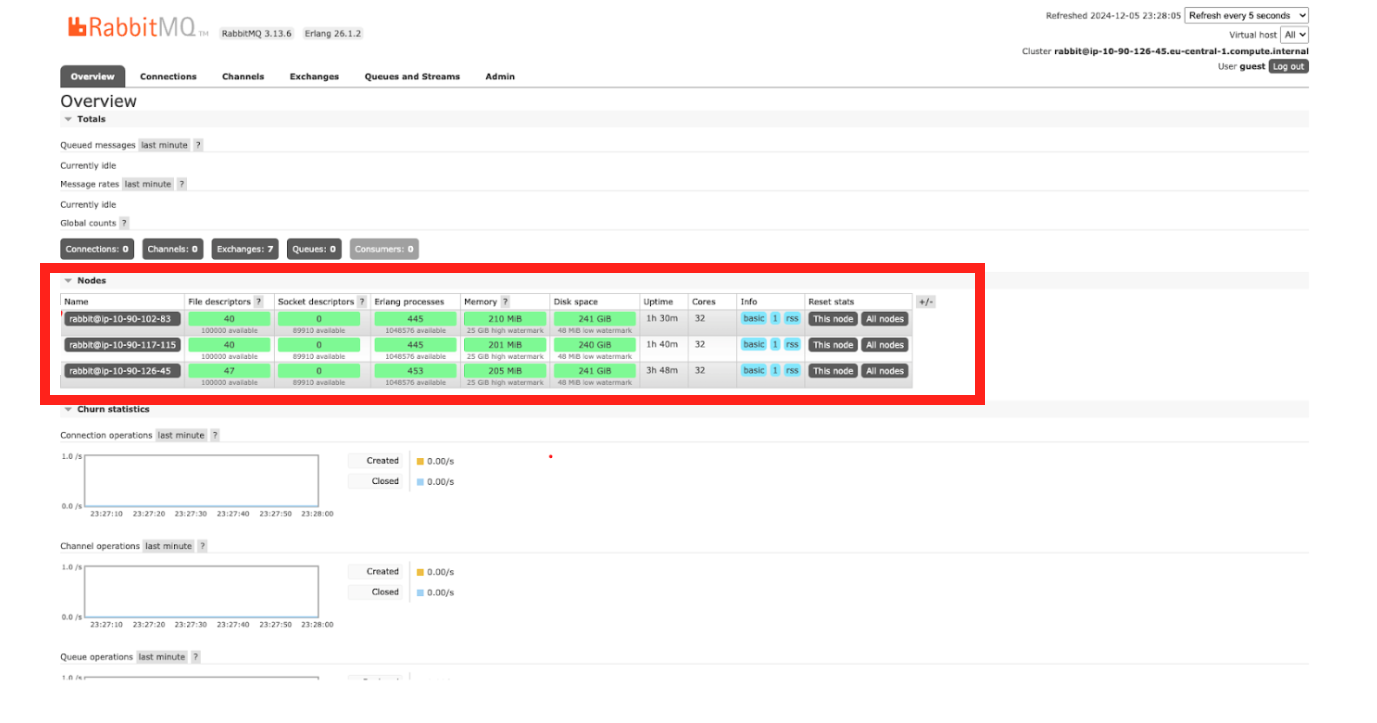
The credentials provided below are the default ones. If you have customized the RabbitMQ password in’/root/.jfrog/xray/app/third-party/rabbitmq/rabbitmq.conf’, ensure you use the correct password when accessing the management UI.
http://<your-node-ip>:15672

Username:  guest
Password:  JFXR_RABBITMQ_COOKIE
Adding Nodes to Form a RabbitMQ Cluster
Now that RabbitMQ is running on the first node, we need to install RabbitMQ on additional nodes and integrate them into the existing cluster. In this example, we will install RabbitMQ on two more nodes and join them in the cluster.
-
Repeat steps 1 to 2 from the initial node setup to obtain the Xray files on the additional node.
-
Run install.sh file
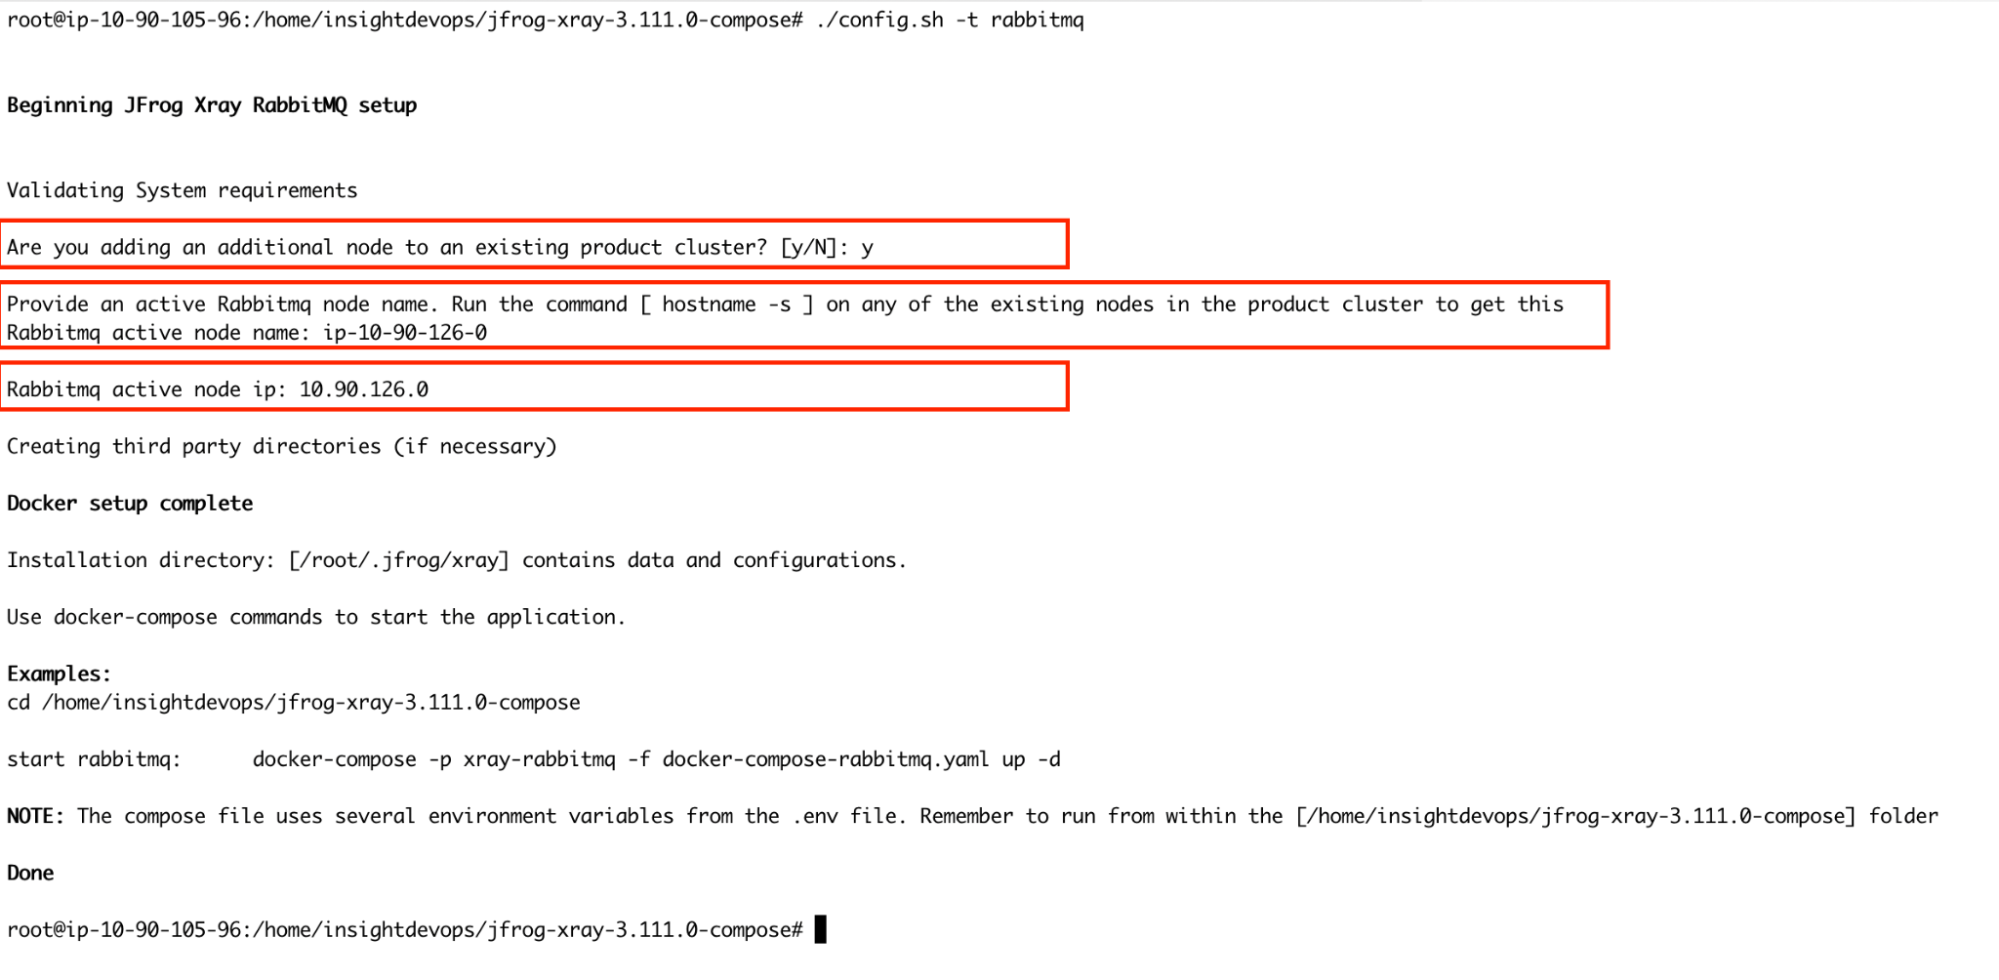
./config.sh -t rabbitmq -
Once you execute the command, you will be prompted to confirm whether this node will join an existing RabbitMQ cluster. Since we already have an active RabbitMQ node, type Y and press Enter. Next, you will be asked to provide the name of the active RabbitMQ node. Here, you should input the hostname of the active RabbitMQ node and also the IP of the active node name in the next step.
-
If you use a custom password, please follow the instructions mentioned in the initial node setup.
-
Start RabbitMQ service.
docker-compose -p xray-rabbitmq -f docker-compose-rabbitmq.yaml up -d -
RabbitMQ service should start. You can verify it by checking the logs.
docker ps docker logs -f xray_rabbitmq -
Verify the cluster status from the management UI to confirm the nodes are connected to each other
The credentials provided below are the default ones. If you have customized the RabbitMQ password in’/root/.jfrog/xray/app/third-party/rabbitmq/rabbitmq.conf’, ensure you use the correct password when accessing the management UI.
http://<your-node-ip>:15672

Username:  guest
Password:  JFXR_RABBITMQ_COOKIE
Repeat steps 1 through 7 to set up the additional RabbitMQ node and integrate it into the existing cluster.
Stage 2: Setting Up the Xray Node Cluster
Once the RabbitMQ cluster is successfully configured, set up the Xray node cluster, which will integrate with the previously configured RabbitMQ cluster.
-
Download the Xray docker compose-based installer(tar.gz) from the JFrog Xray Downloads page.
-
Extract the tar.gz file:
tar -xvf jfrog-xray-<version>-compose.tar.gz
From 3.107 onwards, JFrog Xray installers have organized files into designated subfolders. After extracting the tar.gz file, ensure you navigate to the xray directory.
cd jfrog-xray-<version>-compose
-
Run the config.sh
./config.sh -t xray -
Upon running the command, you will be prompted with interactive installation questions.
-
Before performing this upgrade, have you disconnected Artifactory Xray pairings, except one? - You can choose y. This step was added for migrating from older 2.x to 3.x versions. If you are already on xray 3.x, type y.
-
Installation Directory (Default: /root/.jfrog/xray) - Choose defaults or change if needed.
-
Provide the URL of your JFrog Platform( Artifactory) instance in the format:http://artifactory\_node\_ip:port
-
Obtain the Join Key by navigating to Administration > Security > General > Connection Details in Artifactory.
- Enter the platform password to access the details.
- Copy the Join Key and use it when prompted.
-
Specify the machine's IP address: You can manually input the current node's IP address or press ENTER to use the default, as the system automatically detects the current node's IP address. For IPv6, ensure the address is enclosed in square brackets: [
<ipv6_address>]. -
Are you adding an additional node to the existing product cluster? For the first node of Xray, select N (No), as this will set up a new cluster. For subsequent nodes, select Y (Yes). The process for adding additional nodes is detailed in later steps.
-
Provide the database connection details. Postgresql should be installed separately on a different node. Provide the following database connection details:
-
Connection URL: postgres://
<IP_ADDRESS>:<PORT>/<database name>?sslmode=disable -
Database Username:
<YOUR_DATABASE_USERNAME> -
Database Password:
<YOUR_DATABASE_PASSWORD>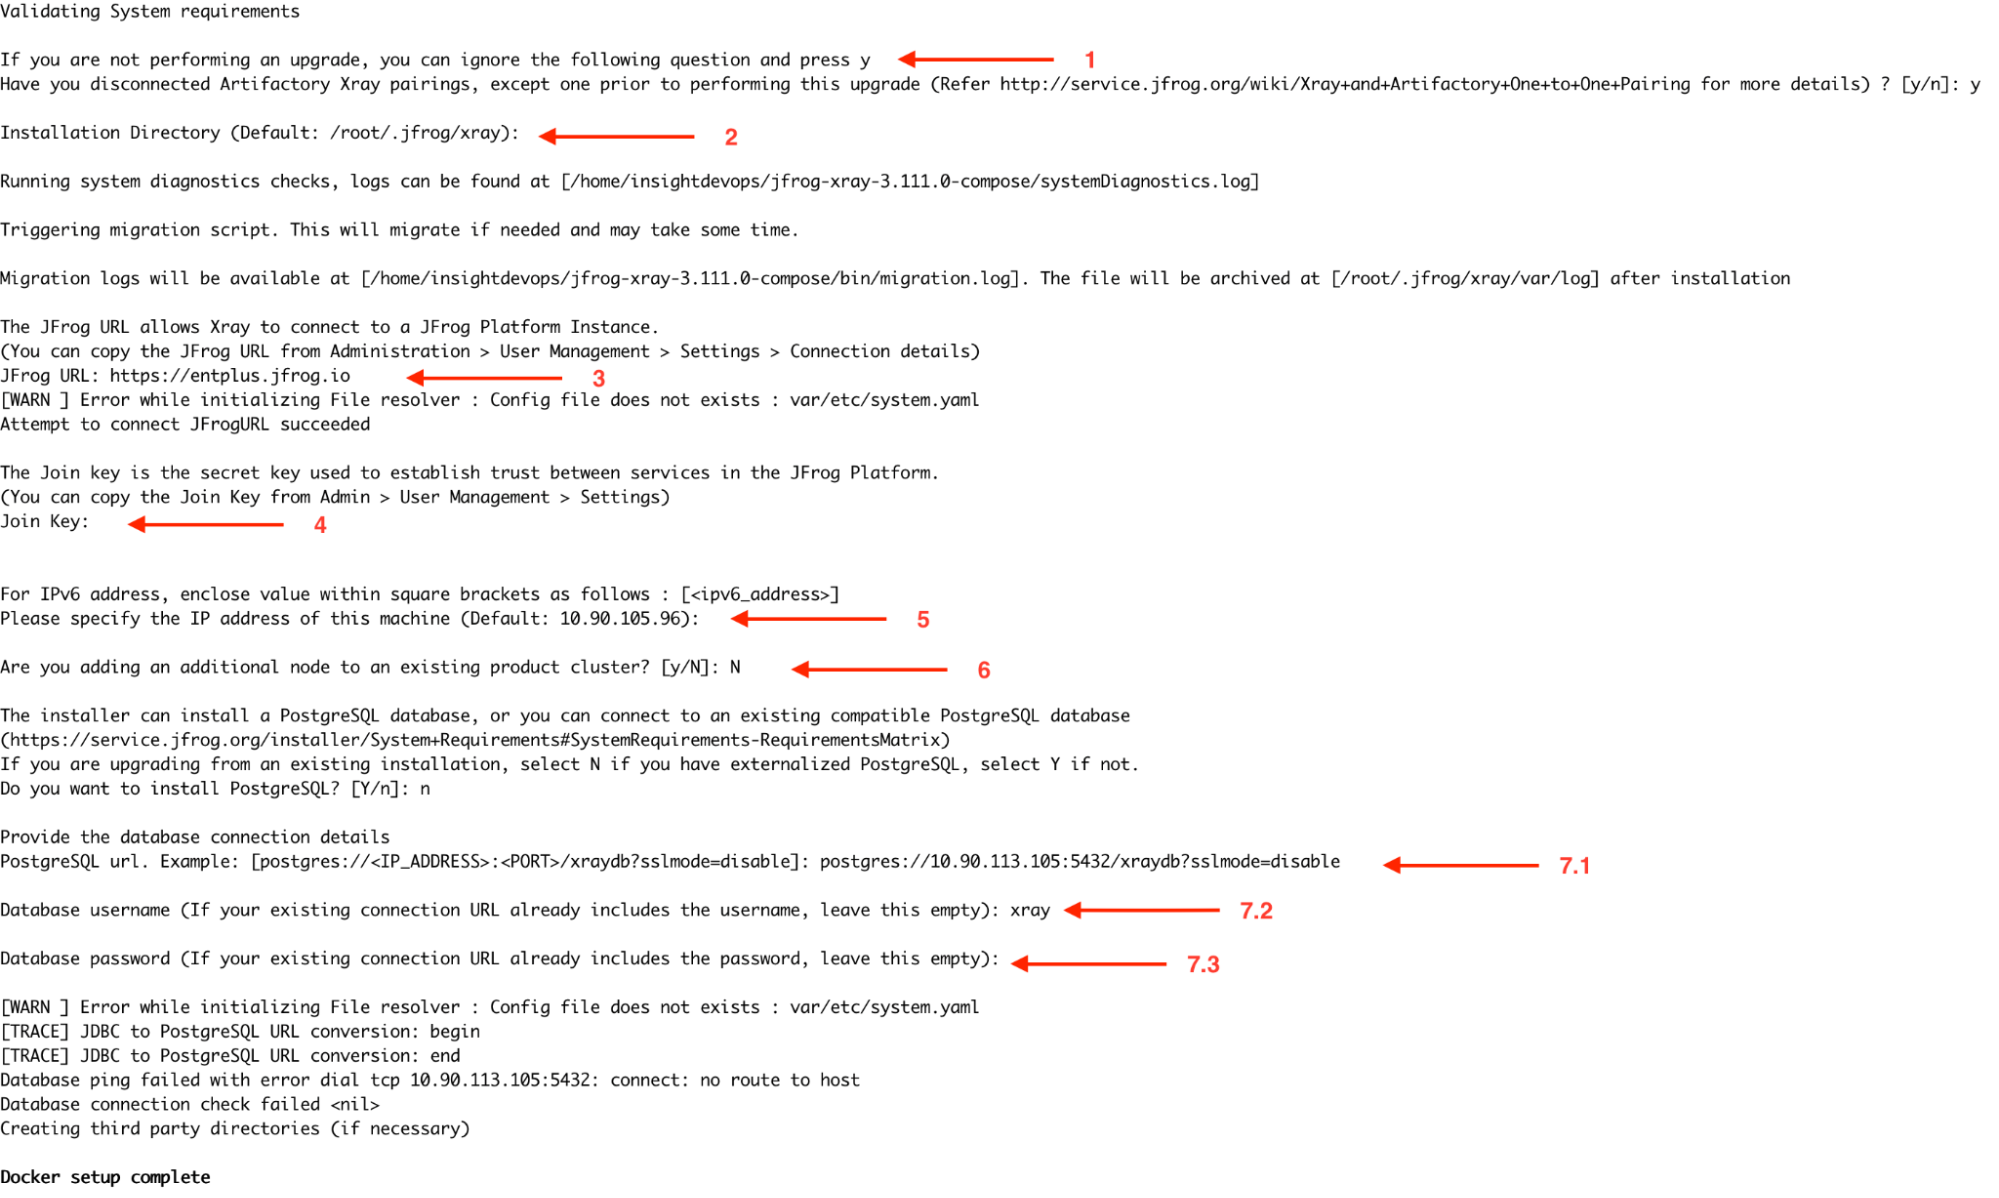
-
-
-
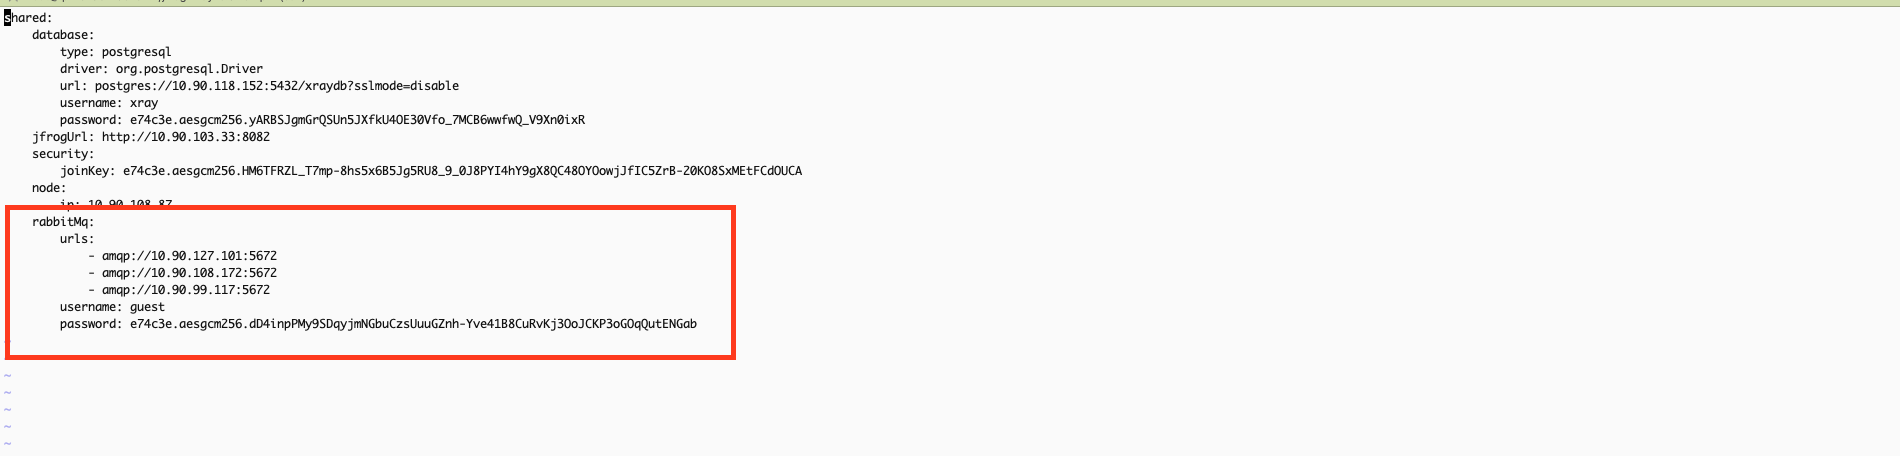
Before starting the Xray service, update the system.yaml file with the RabbitMQ cluster URLs and credentials for all nodes in the cluster. Ensure that all RabbitMQ node URLs are correctly listed and include the appropriate username and password for authentication. This configuration ensures Xray can communicate effectively with the RabbitMQ cluster and save the changes.
vi /root/.jfrog/xray/var/etc/system.yaml
If using a custom RabbitMQ password, ensure the same password is configured in Xray’s system.yaml file under the RabbitMQ section to maintain consistency.
-
Start Xray service.
docker-compose -p xray up -d -
Xray services should start; you can verify it by checking the logs.
docker ps docker logs -f xray_router ## or any other xray services.
Adding Nodes to Form an Xray Cluster:
-
Install Xray on a new node by repeating the initial Xray node setup steps. During the installation, you will be prompted to ask, "Are you adding an additional node to an existing product cluster? [y/N]?" At this point, select Y to confirm that this is an additional node for the X-ray cluster.
-
In the next step, you will be prompted to provide the master_key. You can retrieve this key from the first node by executing the following command:
cat /var/opt/jfrog/xray/etc/security/master.key
The remaining installation steps for the new node should be carried out like for the first node.
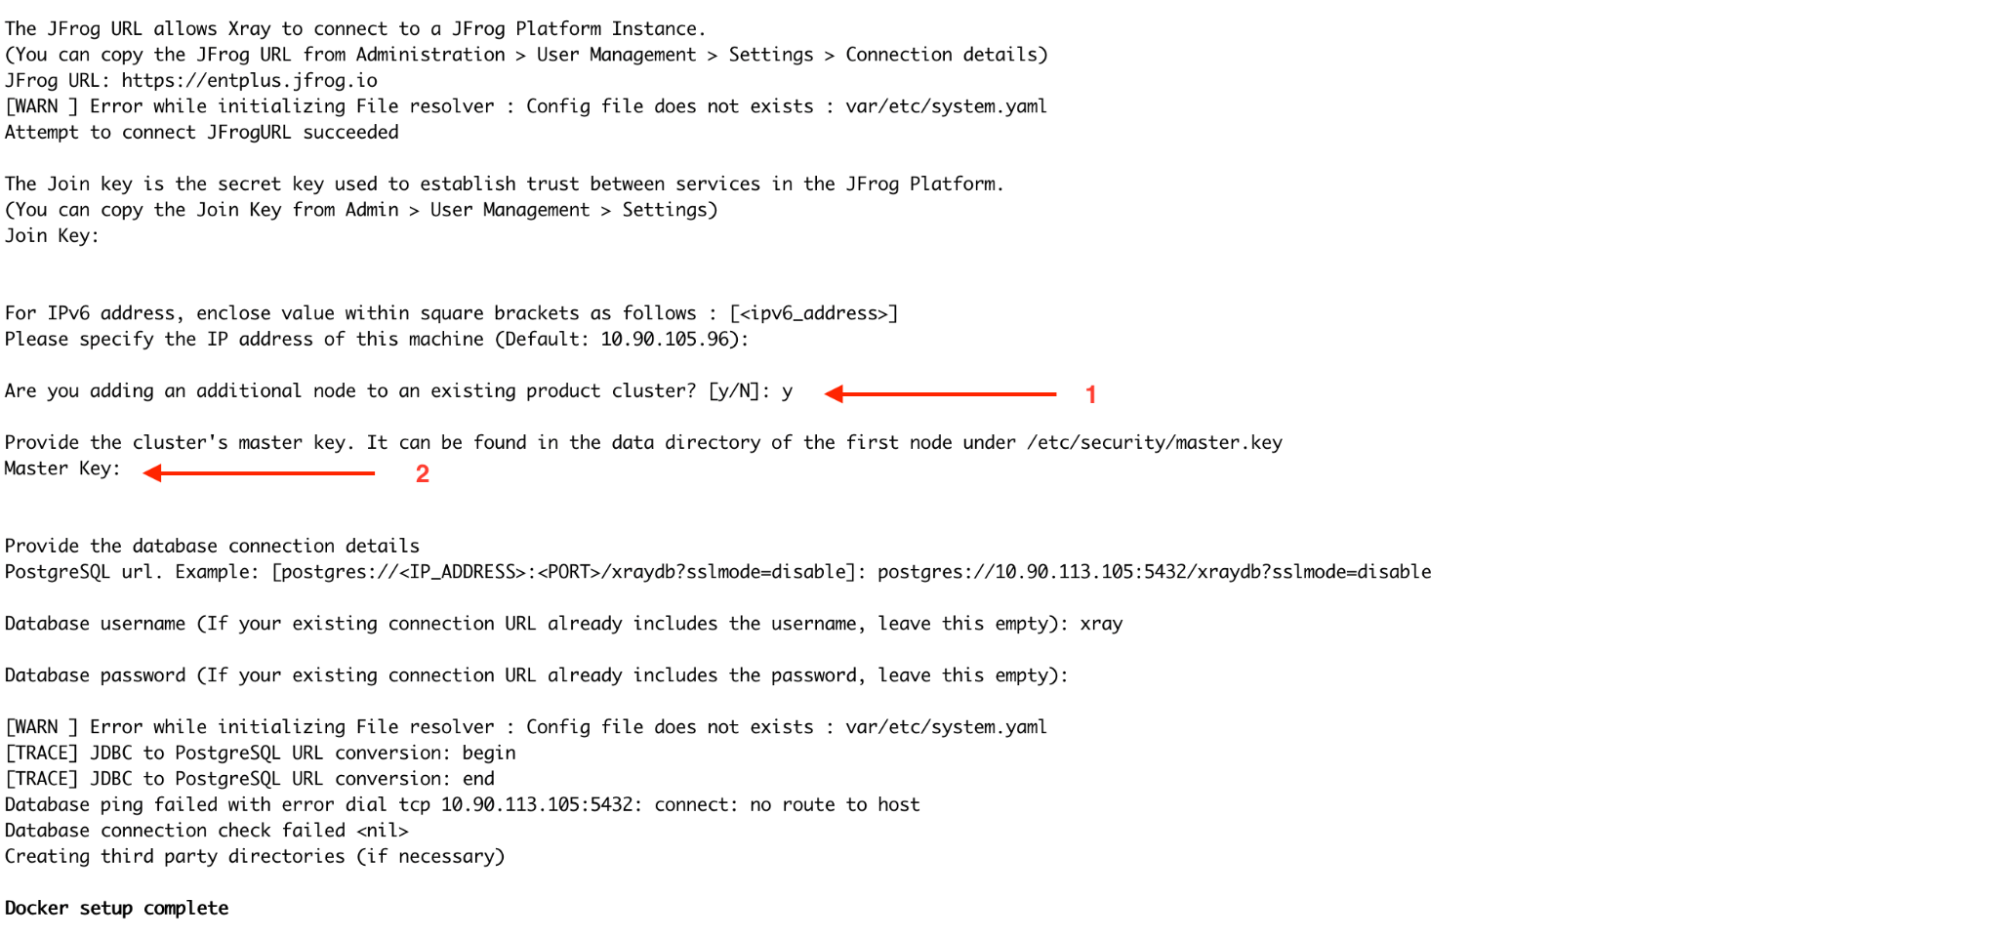
After installing, modify the system.yml file to update the RabbitMQ URLs. Change the order of the URLs to optimize load balancing and prevent all Xray nodes from connecting to the same RabbitMQ node. For example, if the RabbitMQ node URL order in the first Xray node is 1,2,3, then in the second node, it should be 2,3,1, and in the third node, it could be 3,1,2. This ensures that each Xray node connects to different RabbitMQ nodes, improving fault tolerance and distributing the load efficiently.
vi xray/etc/system.yaml
Uninstallation
Read about Uninstalling JFrog Xray.
RabbitMQ (Split) Upgrade Guide
Challenges of Default Xray Installer Deployment in Large Clusters
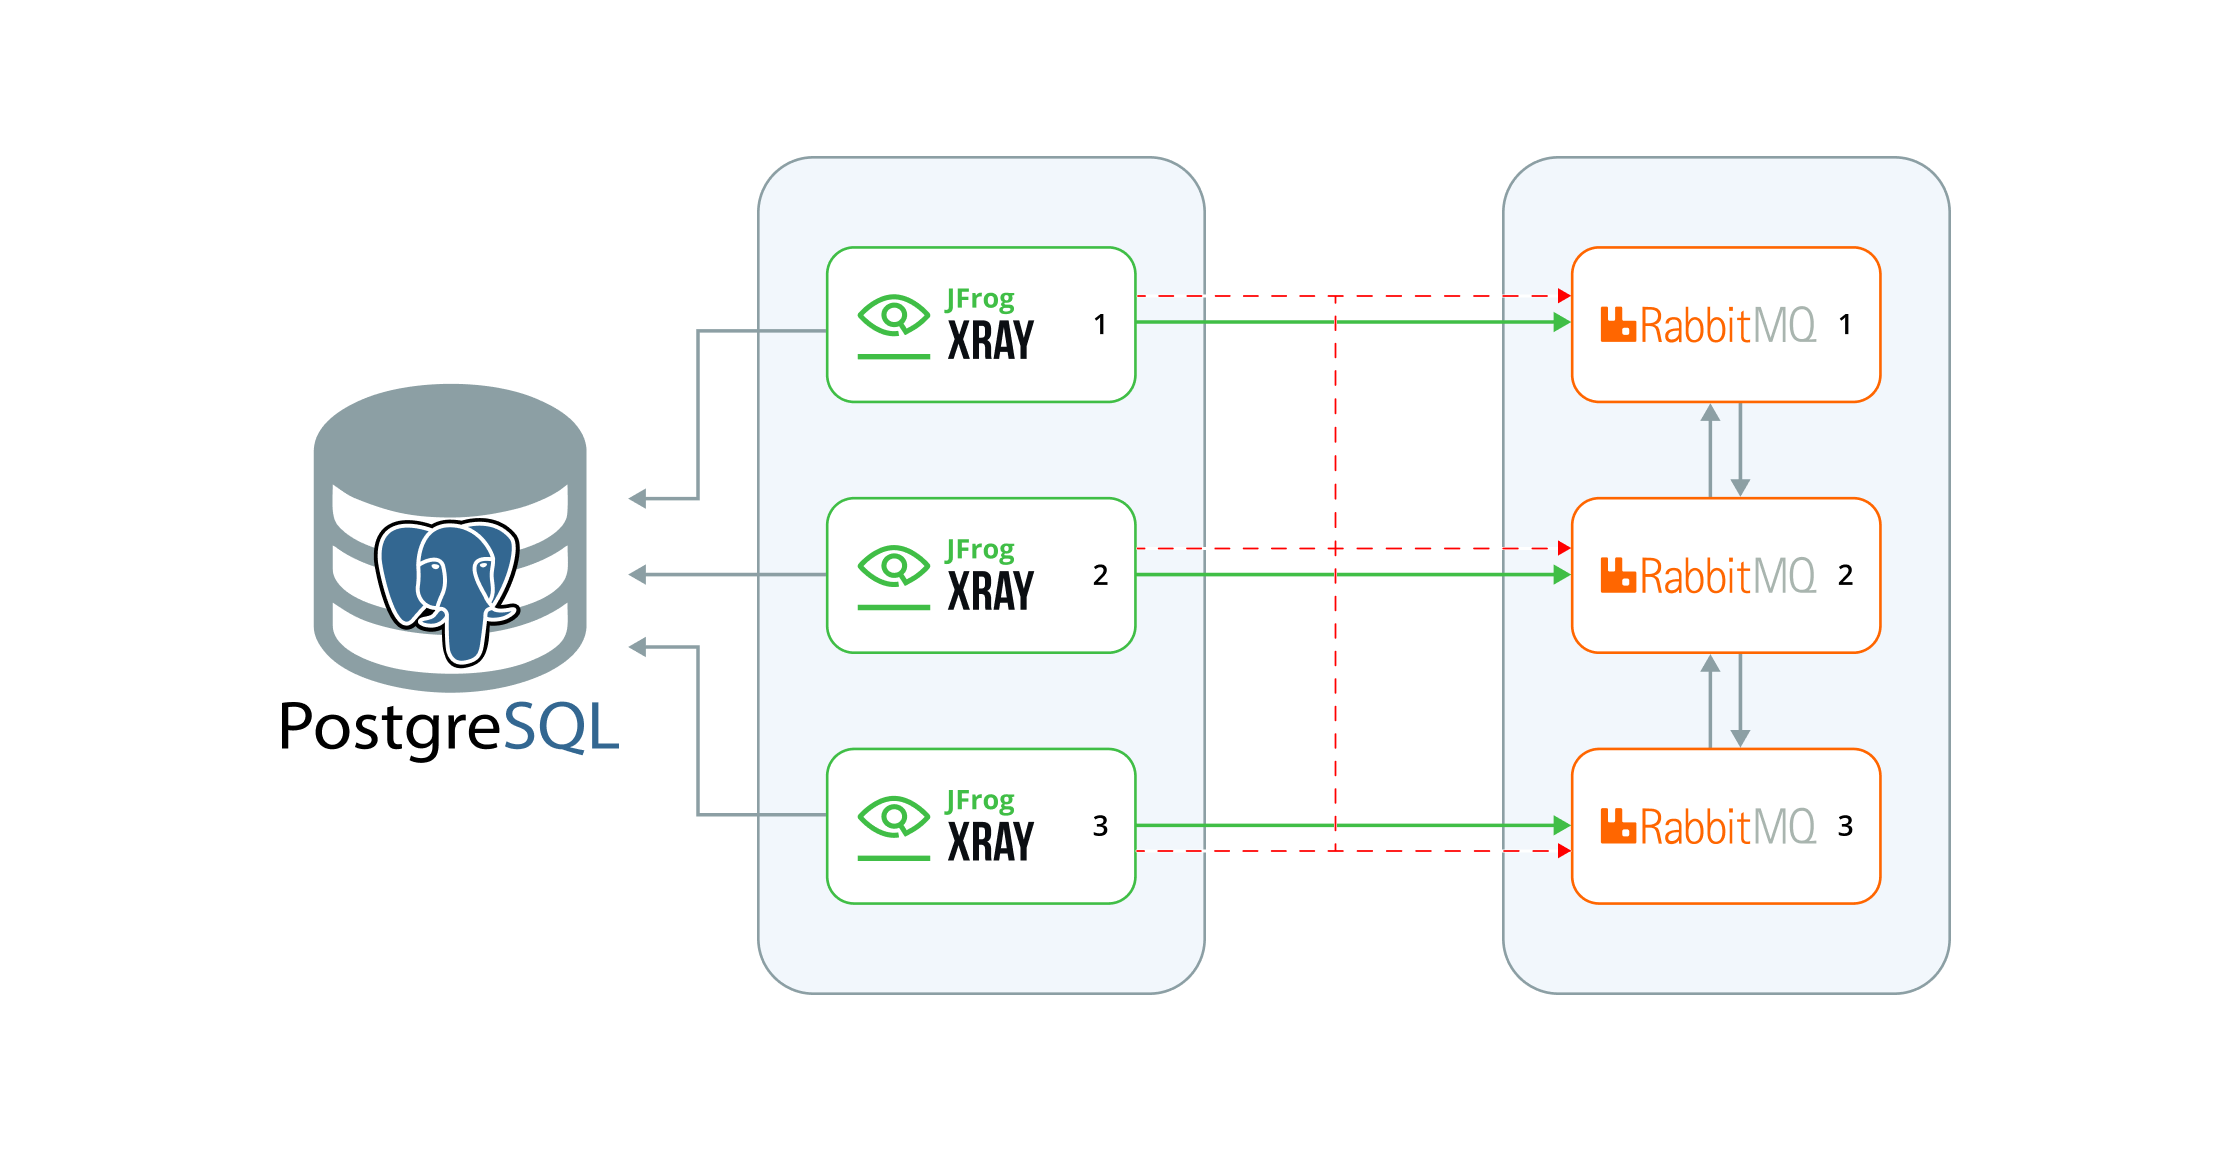
Xray installers, by default, install the Application services and Rabbit MQ on the same node, where the application connects to the local RMQ instance for message publishing and consumption. We use classic queues and mirroring to all nodes in the cluster. This deployment works well with smaller clusters. However, this could cause issues for large clusters due to synchronised writes, synchronisation latency, resource overhead, etc. Also, with high replication, the chances of network partitions increase. In a partitioned scenario, the cluster might split, leading to inconsistent states across different nodes, further complicating message delivery and queue management.
The below diagram will consider the example setup, a configuration that contains 3 nodes of Xray and MQ on every node, with an external Postgres DB. We will explore how to tune this setup for better stability and resource utilisation.
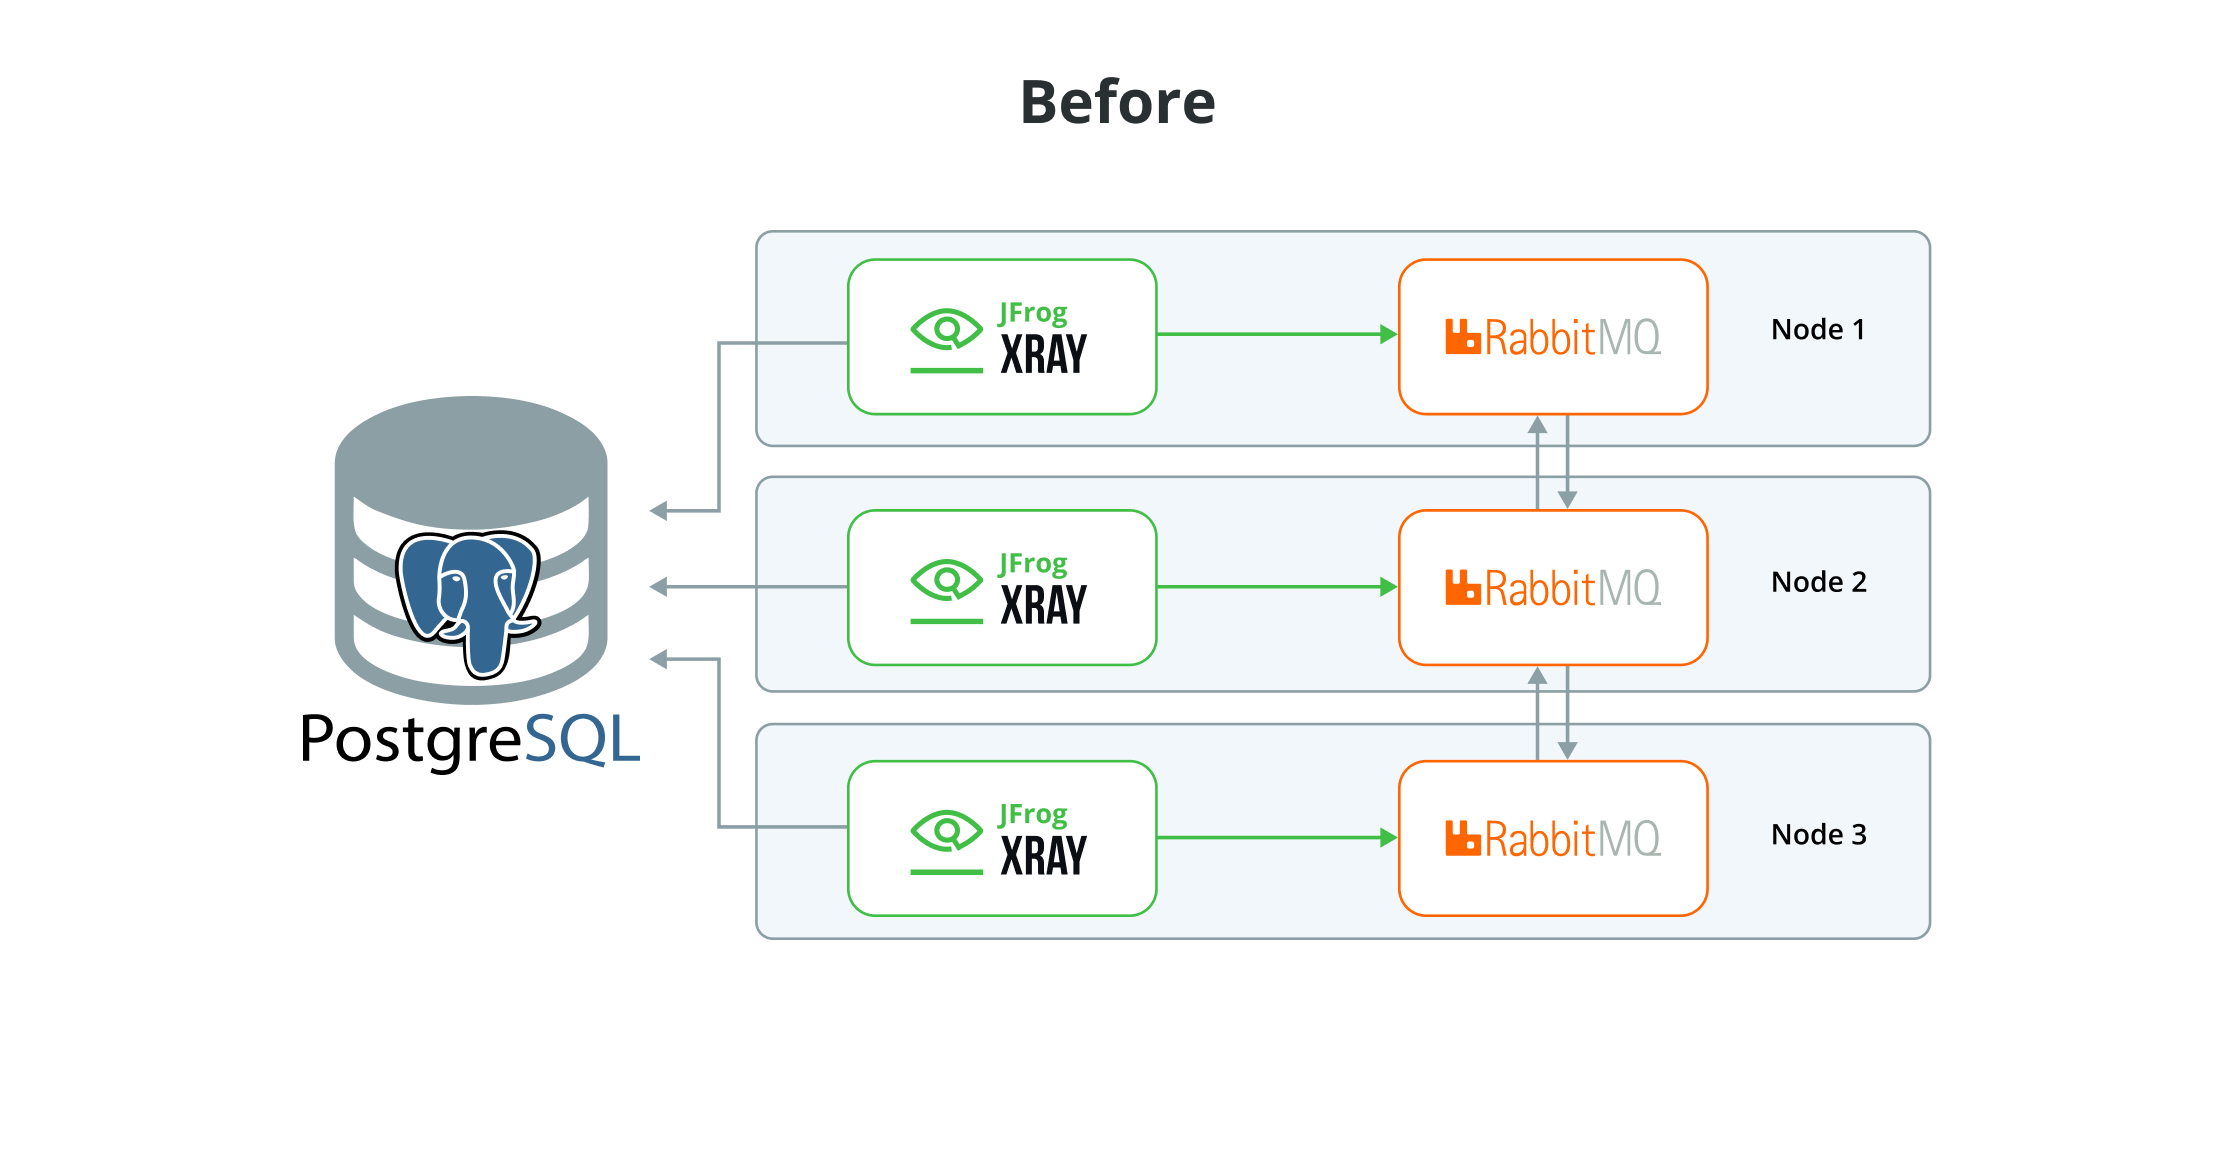
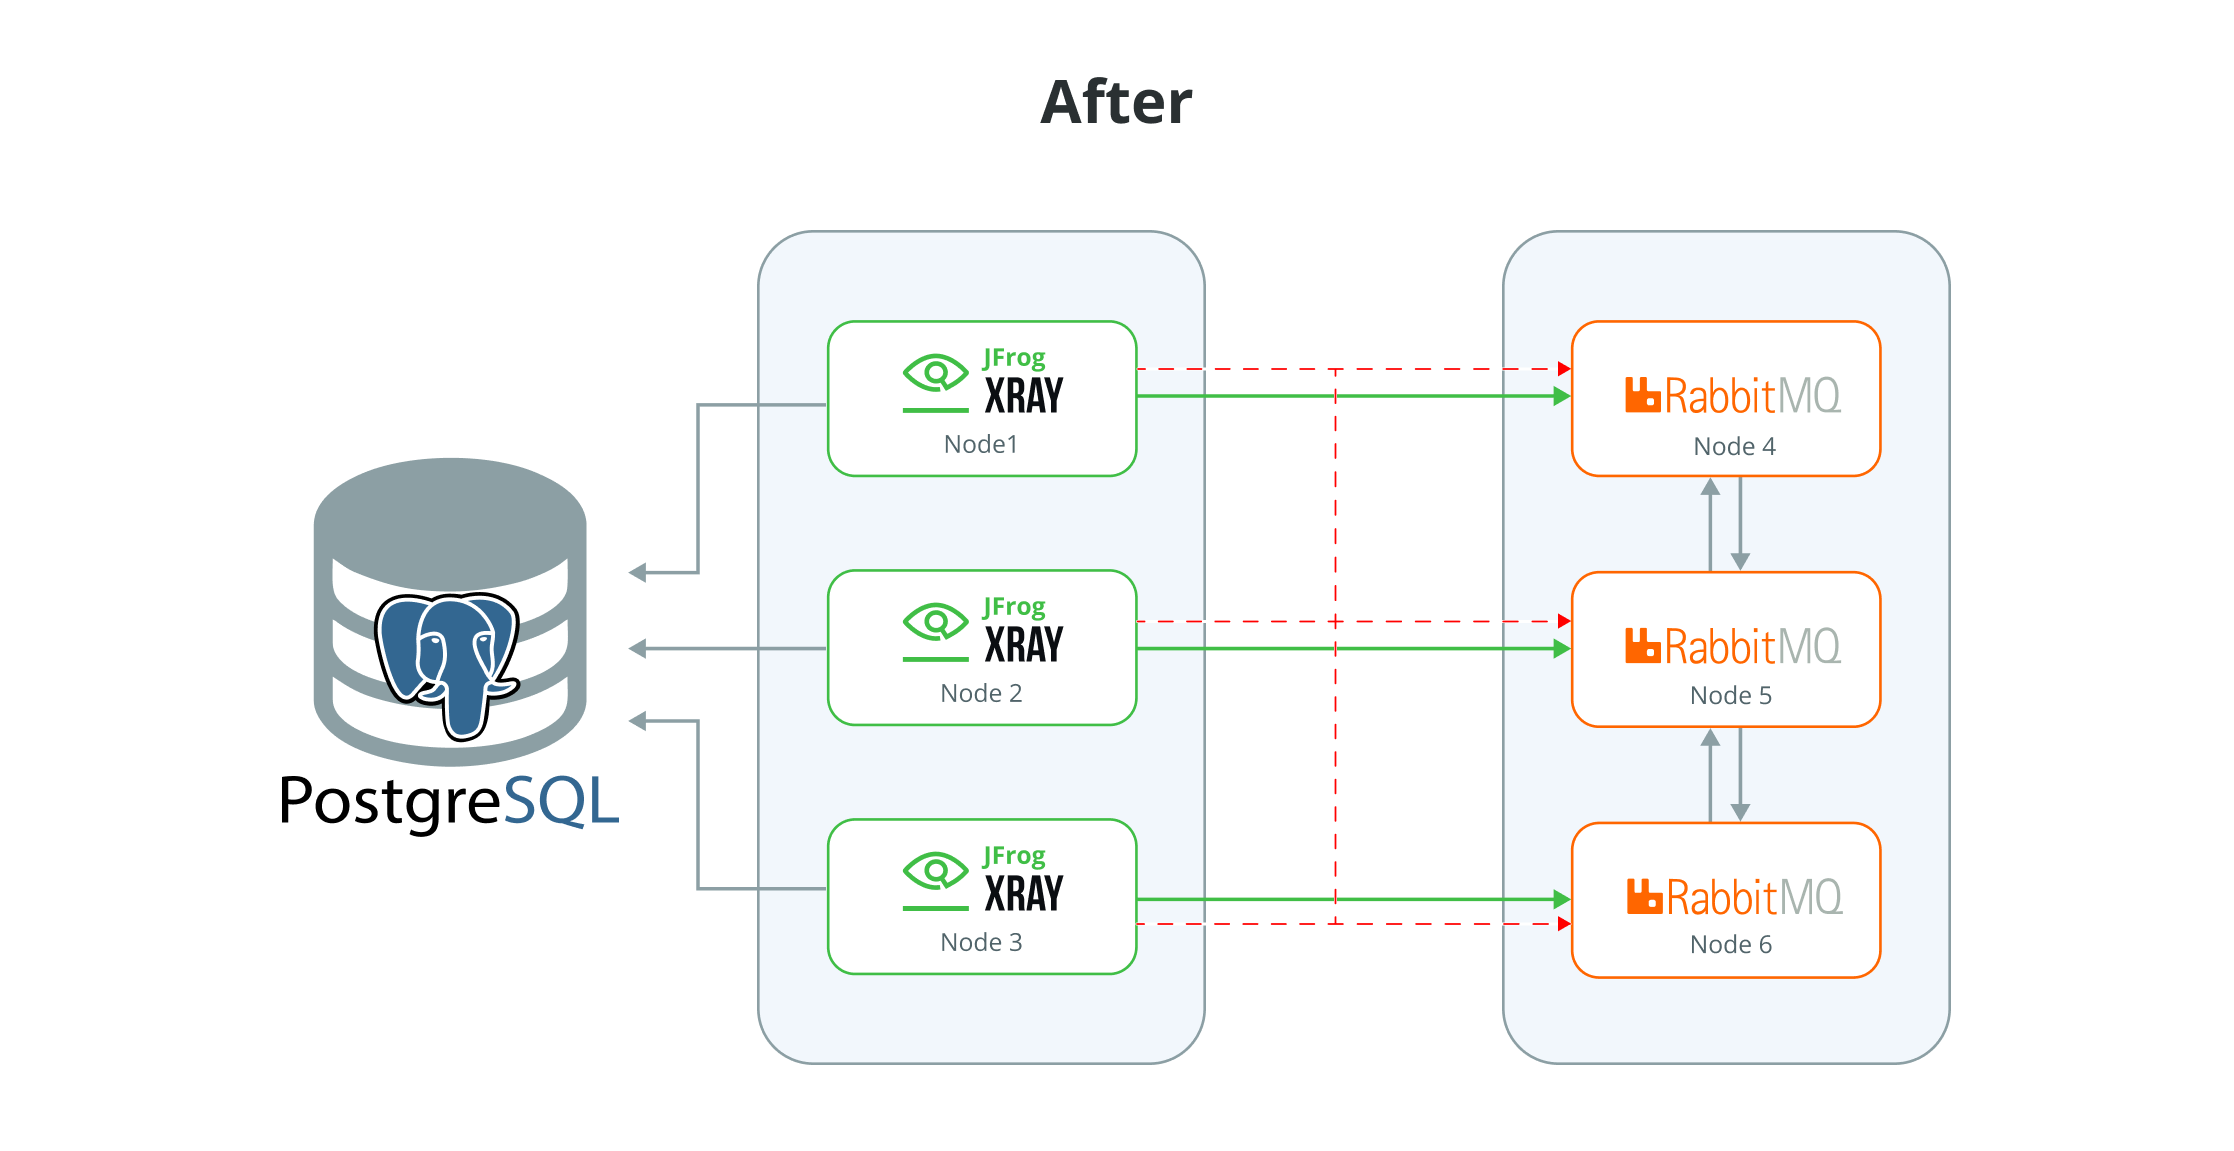
The recommendation is to re-design it as follows: move to a 3-node cluster for X-ray and a three-node cluster for Rabbit MQ. This re-design offers several benefits, including improved stability, better resource utilisation, and enhanced scalability.
This model of deployment, with separate application and rabbit-mq cluster
Installation Procedure
Upgrade can be done in two ways. Transform the existing cluster by dedicating some nodes to RabbitMQ and converting the remaining nodes into an Xray only setup.
-
Upgrade an existing node to a RabbitMQ only node
- Stop Xray and RabbitMQ.
- Run the installer to deploy only RabbitMQ.
- Verify that the RabbitMQ is online and is part of the cluster.
-
Upgrade an existing node to an Xray only node
- Stop Xray and RabbitMQ.
- Disconnect the RabbitMQ from the cluster.
- Update the system.yaml (Provide the RabbitMQ urls )
- Run the installer to deploy only Xray Instances.
See Challenges of Default Xray Installer Deployment in Large Clusters for more details
RPM/ DEB Upgrade
1) Upgrade an existing node to a RabbitMQ only node (RPM/DEB)
This scenario describes updating one of your nodes to a RabbitMQ-only node
Follow the below steps to upgrade.
-
Download the newer Xray RPM/DEB based installer(tar.gz) version from the JFrog Xray Downloads page.
-
Extract the tar.gz file:
tar -xvf jfrog-xray-<version>-rpm/deb.tar.gz
From 3.107 onwards, JFrog Xray installers have organized files into designated subfolders. After extracting the tar.gz file, ensure you navigate to the xray directory.
cd jfrog-xray-<version>-rpm/deb
-
Stop Xray and RabbitMQ.
Add autoStop: true flag and erlang cookie under RabbitMQ block in Xray system.yaml . The default cookie can be found under
xray/app/third-party/rabbitmq/.erlang.cookieshared: rabbitMq: autoStop: true erlangCookie: value:Then, run the below command.
systemctl stop xray.serviceBefore proceeding, ensure the Xray services are shut down gracefully (it may take a while when the system is running)
-
Run the installer script.
./install.sh -t rabbitmq -
Start RabbitMQ service.
systemctl start xray-rabbitmq.service -
RabbitMQ service should start; you can verify it by checking the status.
systemctl status xray-rabbitmq.service
2) Upgrade an existing node to an Xray only node (RPM/DEB)
This is a scenario where you must update one node to an Xray only node.
Follow the below steps to upgrade.
-
Download the newer Xray RPM/DEB-based installer(tar.gz) version from the JFrog Xray Downloads page.
-
Extract the tar.gz file:
tar -xvf jfrog-xray-<version>-rpm/deb.tar.gz
From 3.107 onwards, JFrog Xray installers have organized files into designated subfolders. After extracting the tar.gz file, ensure you navigate to the xray directory.
cd jfrog-xray-<version>-rpm/deb
-
Perform this step if you are upgrading from a node that has Xray + RabbitMQ Disconnect RabbitMQ from Cluster.
-
Switch to Xray user (default: xray) and navigate to rabbitmq/sbin directory.
su xray cd /opt/jfrog/xray/app/third-party/rabbitmq/sbin/ -
We will stop and remove the RabbitMQ node from the cluster in this step. Replace the
<current-node>with the node name you are working on. You can use the cluster_status command to get the correct node name. And the<active-node>can be any other node in the cluster still online../rabbitmqctl cluster_status ./rabbitmqctl stop_app -n <current-node> ./rabbitmqctl forget_cluster_node <current-node> --node <active-node> -
Verify the node is not part of the cluster and no RabbitMQ services are running.
./rabbitmqctl cluster_status --node <active-node> ps -aux | grep erl ps -aux | grep epmd
-
-
Stop Xray service
systemctl stop xray.serviceBefore proceeding, ensure the Xray services are shut down gracefully (it may take a while when the system is running)
-
Run the installer script.
./install.sh -t xray -
Before starting the Xray service, update the system.yaml file with the RabbitMQ cluster URLs and credentials for all nodes in the cluster. Ensure that all RabbitMQ node URLs are correctly listed and include the appropriate username and password for authentication. This configuration ensures Xray can communicate effectively with the RabbitMQ cluster and save the changes.
Change the order of the URLs to optimize load balancing and prevent all Xray nodes from connecting to the same RabbitMQ node. For example, if the RabbitMQ node URL order in the first Xray node is 1,2,3, then in the second node, it should be 2,3,1, and in the third node, it could be 3,1,2. This ensures that each Xray node connects to different RabbitMQ nodes, improving fault tolerance and distributing the load efficiently.
vi /var/opt/jfrog/xray/etc/system.yaml
If using a custom RabbitMQ password, ensure the same password is configured in Xray’s system.yaml file under the RabbitMQ section to maintain consistency.

- Start Xray service:
systemctl start xray.serviceLinux Archive Upgrade
1) Upgrade an existing node to a RabbitMQ only node (Linux Archive)
This scenario describes updating one of your nodes to a RabbitMQ-only node
Follow the below steps to upgrade.
-
Stop Xray and RabbitMQ.Add autoStop: true flag and erlang cookie under RabbitMQ block in Xray system.yaml . The default cookie can be found under
xray/app/third-party/rabbitmq/.erlang.cookieshared: rabbitMq: autoStop: true erlangCookie: value:Then, run the below command.
cd $JFROG_HOME/xray/app/bin ./xray.sh stop ## as xray userOr via service
systemctl stop xray.serviceWait for the services started by the Xray user to stop. Otherwise, manually kill all processes started by the Xray user.
-
Extract the contents of the compressed archive and go to the extracted folder.
mv jfrog-xray-<version>-linux.tar.gz /opt/jfrog/ cd /opt/jfrog tar -xf jfrog-xray-<version>-linux.tar.gz -
Replace the existing $JFROG_HOME/xray/app with the new app folder.For eg:
# Export variables to simplify commands export JFROG_HOME=/opt/jfrog ## this is your old xray dir export JF_NEW_VERSION=/opt/jfrog/jfrog-xray-<version>-linux # Remove app rm -rf $JFROG_HOME/xray/app # Copy new app cp -fr $JF_NEW_VERSION/app $JFROG_HOME/xray/ # Make sure to chown again to set the right permissions for xray user eg: chown -R xray:xray /opt/jfrog/xray # Remove extracted new version rm -rf $JF_NEW_VERSION -
Start Xray service
xray/app/bin/xray.sh start|stop ## As xray userOr via service
systemctl <start|stop|status> xray.service
2) Upgrade an existing node to an Xray only node (Linux Archive)
This is a scenario where you must update one node to an Xray only node.
Follow the below steps to upgrade.
-
Perform this step if you are upgrading from a node that has Xray + RabbitMQ Disconnect RabbitMQ from Cluster.
-
Switch to Xray user (default: xray) and navigate to rabbitmq/sbin directory.
su xray cd xray/app/third-party/rabbitmq/sbin/ -
We will stop and remove the RabbitMQ node from the cluster in this step. Replace the <current-node> with the node name you are working on. You can use the cluster_status command to get the correct node name. And the
<active-node>can be any other node in the cluster still online../rabbitmqctl cluster_status ./rabbitmqctl stop_app -n <current-node> ./rabbitmqctl forget_cluster_node <current-node> --node <active-node> -
Verify the node is not part of the cluster and no RabbitMQ services are running.
./rabbitmqctl cluster_status --node <active-node> ps -aux | grep erl ps -aux | grep epmd
-
-
Stop the current server.
cd $JFROG_HOME/xray/app/bin ./xray.sh stop ## as xray userOr via service
systemctl stop xray.serviceWait for the services started by the Xray user to stop. Otherwise manually kill all processes started by the Xray user.
-
Extract the contents of the compressed archive and go to the extracted folder.
mv jfrog-xray-<version>-linux.tar.gz /opt/jfrog/ cd /opt/jfrog tar -xf jfrog-xray-<version>-linux.tar.gz -
Replace the existing $JFROG_HOME/xray/app with the new app folder.
For eg:
# Export variables to simplify commands export JFROG_HOME=/opt/jfrog ## this is your old xray dir export JF_NEW_VERSION=/opt/jfrog/jfrog-xray-<version>-linux # Remove app rm -rf $JFROG_HOME/xray/app # Copy new app cp -fr $JF_NEW_VERSION/app $JFROG_HOME/xray/ # Make sure to chown again to set the right permissions for xray user eg: chown -R xray:xray /opt/jfrog/xray # Remove extracted new version rm -rf $JF_NEW_VERSION -
Before starting the Xray service, update the system.yaml file with the RabbitMQ cluster URLs and credentials for all nodes in the cluster. Ensure that all RabbitMQ node URLs are correctly listed and include the appropriate username and password for authentication. This configuration ensures Xray can communicate effectively with the RabbitMQ cluster and save the changes.
Change the order of the URLs to optimize load balancing and prevent all Xray nodes from connecting to the same RabbitMQ node. For example, if the RabbitMQ node URL order in the first Xray node is 1,2,3, then in the second node, it should be 2,3,1, and in the third node, it could be 3,1,2. This ensures that each Xray node connects to different RabbitMQ nodes, improving fault tolerance and distributing the load efficiently.
vi $JFROG_HOME/xray/var/etc/system.yaml
If using a custom RabbitMQ password, ensure the same password is configured in Xray’s system.yaml file under the RabbitMQ section to maintain consistency.
- Edit the file $JFROG_HOME/xray/var/etc/installerState.yaml and add the below line at the root level if not there or set it to a different value. Note: This step is required only to start Xray services
installation_method: xray-
Start Xray service:
xray/app/bin/xray.sh start|stop ## As xray userOr via service
systemctl <start|stop|status> xray.service
Docker Compose Upgrade
1) Upgrade an existing node to a RabbitMQ only node (Docker compose)
This scenario describes updating one of your nodes to a RabbitMQ-only node
Follow the below steps to upgrade.
-
Stop the service.
-
For Xray services
cd jfrog-xray-<version>-compose docker-compose -p xray down -
For RabbitMQ services
cd jfrog-xray-<version>-compose docker-compose -p xray-rabbitmq down
-
-
Download the newer Xray docker compose based installer(tar.gz) from the JFrog Xray Downloads page.
-
Extract the newer tar.gz file:
tar -xvf jfrog-xray-<version>-compose.tar.gz
From 3.107 onwards, JFrog Xray installers have organized files into designated subfolders. After extracting the tar.gz file, ensure you navigate to the xray directory.
cd jfrog-xray-<version>-compose
For Docker Compose upgrades, merge any customizations if you have done any in your current docker-compose.yaml file to the new extracted version of the docker-compose.yaml file.
Copy the contents of the .env file in the previous installation to the newly created .env file in this archive without copying the versions, as this will affect the upgrade.
-
Run the installer script.
./config.sh -t rabbitmq
If you use a custom password for RabbitMQ, verify that the RabbitMQ conf file has the correct password set before starting the service. Refer here for more details.
-
Start RabbitMQ service.
docker-compose -p xray-rabbitmq -f docker-compose-rabbitmq.yaml up -d -
RabbitMQ service should start; you can verify it by checking the logs
docker ps docker logs -f xray_rabbitmq -
(Optional) Access the UI through a browser to verify if the RabbitMQ nodes are up and running
The credentials provided below are the default ones. If you have customized the RabbitMQ password in’/opt/jfrog/xray/app/bin/rabbitmq/rabbitmq.conf’, ensure you use the correct password when accessing the management UI.
http://<your-node-ip>:15672

Username:  guest
Password:  JFXR_RABBITMQ_COOKIE
2) Upgrade an existing node to an Xray only node (Docker compose)
This is a scenario where you must update one node to an Xray only node.
Follow the below steps to upgrade.
-
Stop the service.
-
For Xray services
cd jfrog-xray-<version>-compose docker-compose -p xray down -
For RabbitMQ services
cd jfrog-xray-<version>-compose docker-compose -p xray-rabbitmq down
-
-
Download the newer xray docker compose based installer(tar.gz) from the JFrog Xray Downloads page.
-
Extract the newer tar.gz file:
tar -xvf jfrog-xray-<version>-compose.tar.gz
From 3.107 onwards, JFrog Xray installers have organized files into designated subfolders. After extracting the tar.gz file, ensure you navigate to the xray directory.
cd jfrog-xray-<version>-compose
For Docker Compose upgrades, merge any customizations from your current docker-compose.yaml file into the newly extracted version.
Copy the contents of the .env file in the previous installation to the newly created .env file in this archive without copying the versions, as this will affect the upgrade.
-
Run the installer script.
./config.sh -t xray -
Upon running the command, you will be prompted with a question.
- Have you disconnected Artifactory Xray pairings, except one prior to performing this upgrade? - You can choose y. This step was added for migrating from older 2.x to 3.x versions. If you are already on Xray 3.x, type y.
-
Before starting the Xray service, update the system.yaml file with the RabbitMQ cluster URLs and credentials for all nodes in the cluster. Ensure that all RabbitMQ node URLs are correctly listed and include the appropriate username and password for authentication. This configuration ensures Xray can communicate effectively with the RabbitMQ cluster and save the changes.
Change the order of the URLs to optimize load balancing and prevent all Xray nodes from connecting to the same RabbitMQ node. For example, if the RabbitMQ node URL order in the first Xray node is 1,2,3, then in the second node, it should be 2,3,1, and in the third node, it could be 3,1,2. This ensures that each Xray node connects to different RabbitMQ nodes, improving fault tolerance and distributing the load efficiently.
vi /root/.jfrog/xray/var/etc/system.yaml
If using a custom RabbitMQ password, ensure the same password is configured in Xray’s system.yaml file under the RabbitMQ section.
- Start Xray service.
docker-compose -p xray up -d-
Xray services should start; you can verify it by checking the logs.
docker ps
docker logs -f xray_router ## or any other xray services.
Updated 2 months ago