Xray Upgrade from Version 2.7 to 3.x
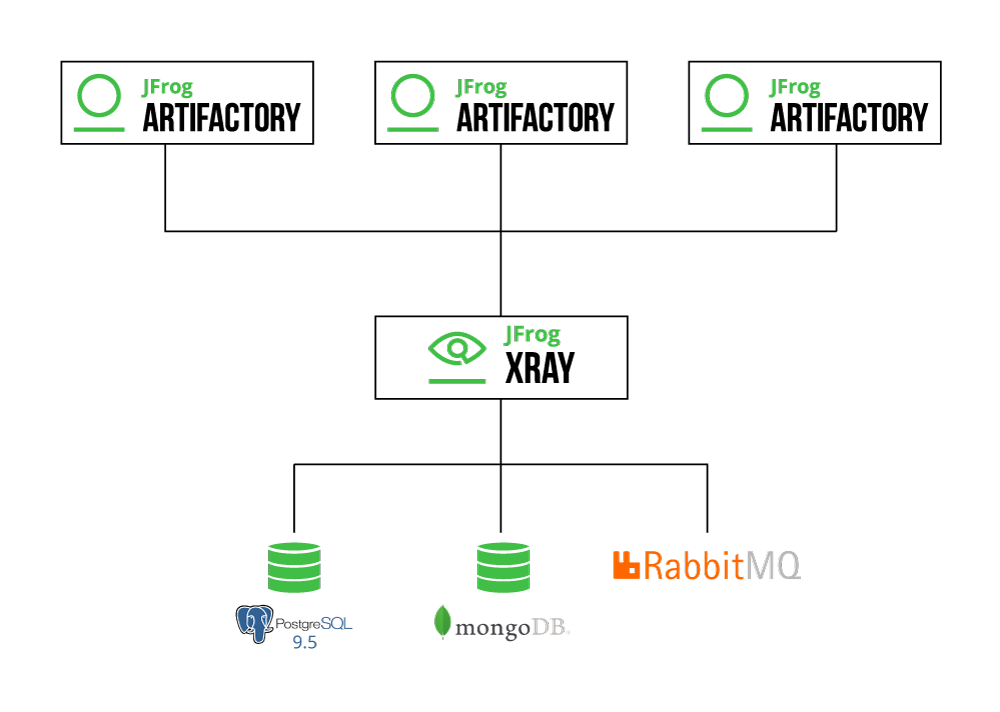
Upgrade Xray from 2.7.x to 3.x: requires Artifactory 7.x first. Migrate MongoDB data to PostgreSQL during upgrade.
JFrog Xray v3.x is only compatible with JFrog Artifactory v7.x. To upgrade, you must first install JFrog Artifactory 7.x.
Upgrading from Xray 2.x to the latest version of Xray
Starting from version Xray 3.88.10, you can no longer upgrade Xray 2.x directly to the latest version of Xray. You must upgrade from Xray 2.x to 3.87.x, and then upgrade to the latest version of Xray.
The following upgrade methods are supported:
Warning
Before you upgrade, verify that the operating system version you use is supported. See System Requirements for details on operating system support.
Migrating data from MongoDB to PostgreSQL
From version 3.x, Xray does not use MongoDB except during the migration phase. On start of version 3.x, data is automatically migrated from MongoDB to PostgreSQL. Make sure both the databases are up and running before Xray services are started. During the migration, Xray will not be accessible. The migration duration depends on the data size to be migrated.
The installer script works with all supported upgrade methods (RPM, Debian and Docker Compose). It provides you an interactive way to upgrade Xray and its dependencies.
-
Download Xray (RPM, Debian, or Docker Compose).
-
Stop the service.
Docker - Stop and remove xray containers
xray stop
docker ps -a --format '{{.Names}}' | grep ^xray_* | xargs docker rm -f
RPM/DEB
cd /opt/jfrog/xray/scripts ./xray.sh stop -
Extract the contents of the compressed archive and go to the extracted folder. The installer script is located in the extracted folder.
tar -xvf jfrog-xray-<version>-<compose|rpm|deb>.tar.gz
cd jfrog-xray-<version>-<compose|rpm|deb>
.env file included within the Docker-Compose archive
This .env file is used by docker-compose and is updated during installations and upgrades.
Notice that some operating systems do not display dot files by default. If you make any changes to the file, remember to backup before an upgrade.
-
For non Docker Compose installations, verify that MongoDB is running to ensure the migration process to PostgreSQL works.
For Docker-Compose installations, MongoDB services comes up as part of the new compose files.
-
Run the installer script.
Note: the script prompts for mandatory inputs, including the
jfrogURL(custom base URL) andjoinKey.Compose
./config.sh
.env in Docker-Compose
A .env file is included within the archive. This file is used by Docker Compose and is updated during installations and upgrades.
Some Operating Systems do not display dot files by default so please be aware of this file.
If you make changes to the file, remember to backup before an upgrade
RPM/DEB
./install.sh-
Check that the configurations migration has completed successfully, by reviewing the following files:
-
migration log:
$JFROG_HOME/xray/var/log/migration.logfile -
system.yaml configuration:
$JFROG_HOME/xray/var/etc/system.yamlThis newly created file contains your current custom configurations in the new format.
-
Warning
Specify a large file handle limit before starting Xray.
-
Start the Xray service.
systemd OS
systemctl start xray.service
Note
Starting from Xray 3.8x, stop and restart actions on Xray are not applied to the RabbitMQ process. When Xray starts, if RabbitMQ is not running, it is started automatically.
If you want the script to perform stop and restart action on RabbitMQ, set shared.rabbitMq.autoStop as true in the system.yaml. This flag is not used in Docker Compose installations.
systemv OS
systemctl start xrayDocker Compose
cd jfrog-xray-<version>-compose

# Starting from Xray 3.8x RabbitMQ has been moved to a compose file of its own, this needs to be started before starting other services
docker-compose -p xray-rabbitmq -f docker-compose-rabbitmq.yaml up -d

# Starting from Xray 3.8.x, PostgreSQL needs to be started before starting the other services.
docker-compose -p xray-postgres -f docker-compose-postgres-9-5-2v.yaml up -d

docker-compose -p xray up -d

docker-compose -p xray ps
docker-compose -p xray down-
Access Xray from your browser at:
http://<jfrogUrl>/ui/, go the Xray tab in the Application module in the UI. -
Check Xray Log.
Linux
tail -f $JFROG_HOME/var/log/console.log
Post Data Migration Steps (MongoDB to PostgreSQL)
After migration completes successfully, complete the following steps:
Validate that your Xray data has migrated successfully.
Remove MongoDB configuration from the
system.yaml.For RPM installations, uninstall the MongoDB database.
For Docker-Compose installations, you either need to remove the "mongodb" service from the docker-compose.yml files, or run the installation script again, the script will determine that MongoDB is no longer necessary and will do this automatically.
The RPM upgrade bundles Xray and all its dependencies. It is provided as native RPM packages, where Xray and its dependencies must be installed separately. Use this, if you are automating installations.
-
Download Xray (RPM).
-
Stop the current service.
cd /opt/jfrog/xray/scripts ./xray.sh stop -
Extract the contents of the compressed archive and go to the extracted folder.
tar -xvf jfrog-xray-<version>-rpm.tar.gz cd jfrog-xray-<version>-rpm -
Make sure your MongoDB is running, to ensure that the migration process to PostgreSQL will work.
-
Install Xray as a service on Red Hat compatible Linux distributions, as a root user.
yum -y install ./xray/xray.rpm -
Check that the migration has completed successfully, by reviewing the following files:
-
migration log:
$JFROG_HOME/xray/var/log/migration.logfile -
system.yaml configuration:
$JFROG_HOME/xray/var/etc/system.yamlThis newly created file will contain your current custom configurations in the new format.
-
Warning
Specify a large file handle limit before starting Xray.
-
Set the Artifactory connection details.
Xray requires a working Artifactory server and a suitable license. The Xray connection to Artifactory requires 2 parameters:
-
jfrogUrl - URL to the machine where JFrog Artifactory is deployed, or the load balancer pointing to it. We recommend using DNS names rather than direct IPs. For example: http://jfrog.acme.com or http://10.20.30.40:8082. The
/artifactorycontext is no longer required.Set it in the Shared Configurations section of the
$JFROG_HOME/xray/var/etc/system.yamlfile. -
join.key - This is the "secret" key required by Artifactory for registering and authenticating the Xray server.
You can fetch the Artifactory
joinKey(join Key) from the JPD UI in the User Management | Settings | Join Key.Set the join.key used by your Artifactory server in the Shared Configurations section of the
$JFROG_HOME/xray/var/etc/system.yamlfile.
-
-
Make sure the third party services are running.
PostgreSQL
If you had the PostgreSQL database that was packaged as part of 2.x installed, the same will be used in the current installation. It can be managed using the following commands:
service postgresql-9.5 start|stop|status
RabbitMQ
From version 3.x, RabbitMQ is packaged and managed as part of the Xray RPM. Any action (stop, start, or status) on the main Xray service is also applied to RabbitMQ. The existing RabbitMQ RPM installed as part of 2.x can be uninstalled after Xray 3.x is successfully installed and running.
Migrating data from MongoDB to PostgreSQL
From version 3.x, Xray will not use MongoDB except during the migration phase. Make sure both the databases are up and running before Xray services are started. During the migration, Xray will not be accessible. You can uninstall MongoDB after Xray 3.x is successfully installed and running.
service mongod start|stop|status
-
Start Xray.
systemd OS
systemctl start xray.servicesystemv OS
systemctl start xray -
Access Xray from your browser at:
http://<jfrogUrl>/ui/, go the Xray tab in the Application module in the UI. -
Check Xray Log.
tail -f $JFROG_HOME/xray/var/log/console.log
Post Data Migration Steps (MongoDB to PostgreSQL)
After the migration is successfully ended, it is recommended to complete the following steps:
- Validate that your Xray data has migrated successfully.
- Remove MongoDB configuration from the
system.yaml.- Uninstall the MongoDB database.
The Debian upgrade bundles Xray and all its dependencies. It is provided as native Debian packages, where Xray and its dependencies must be installed separately. Use this, if you are automating installations.
-
Download Xray (Debian).
-
Stop the current server.
cd /opt/jfrog/xray/scripts ./xray.sh stop -
Extract the contents of the compressed archive and go to the extracted folder.
tar -xvf jfrog-xray-<version>-deb.tar.gz cd jfrog-xray-<version>-deb -
Make sure your MongoDB is running, to ensure that the migration process to PostgreSQL works.
-
Install Xray as a service on a Debian compatible Linux distributions, as a root user.
Run Installation
dpkg -i ./xray/xray.deb -
Check that the migration has completed successfully, by reviewing the following files:
-
migration log:
$JFROG_HOME/xray/var/log/migration.logfile -
system.yaml configuration:
$JFROG_HOME/xray/var/etc/system.yamlThis newly created file will contain your current custom configurations in the new format.
-
Warning
Specify a large file handle limit before starting Xray.
-
Set the Artifactory connection details. Xray requires a working Artifactory server and a suitable license. The Xray connection to Artifactory requires 2 parameters:
-
jfrogUrl - URL to the machine where JFrog Artifactory is deployed, or the load balancer pointing to it. We recommend using DNS names rather than direct IPs. For example: http://jfrog.acme.com or http://10.20.30.40:8082. The
/artifactorycontext is no longer required.Set it in the Shared Configurations section of the
$JFROG_HOME/xray/var/etc/system.yamlfile. -
join.key - This is the "secret" key required by Artifactory for registering and authenticating the Xray server.
You can fetch the Artifactory
joinKey(join Key) from the JPD UI in the User Management | Settings | Join Key.Set the join.key used by your Artifactory server in the Shared Configurations section of the
$JFROG_HOME/xray/var/etc/system.yamlfile.
-
-
Make sure the third party services are running.
PostgreSQL
If you had the PostgreSQL database that was packaged as part of 2.x installed, the same will be used in the current installation. It can be managed using the following commands:
service postgresql-9.5 start|stop|status
RabbitMq
From 3.x, RabbitMQ is packaged and managed as part of the Xray DEB. Any action (stop, start, or status) on the main Xray service is also applied to RabbitMQ. The existing RabbitMQ DEB installed as part of 2.x can be uninstalled after Xray 3.x is successfully installed and running.
MongoDB
From 3.x, Xray will not use MongoDB except during migration. On start of 3.x, data will be migrated from MongoDB to PostgreSQL. Make sure both the databases are up and running before Xray services are started. You can uninstall MongoDB after Xray 3.x is successfully installed and running.
service mongod start|stop|status
-
Start Xray.
systemd OS
systemctl start xray.serviceSystemv OS
systemctl start xray -
Access Xray from your browser at:
http://<jfrogUrl>/ui/, go the Xray tab in the Application module in the UI. -
Check Xray Log.
tail -f $JFROG_HOME/xray/var/log/console.log
Post Data Migration Steps (MongoDB to PostgreSQL)
After the migration is successfully ended, it is recommended to complete the following steps:
- Validate that your Xray data has migrated successfully.
- Remove MongoDB configuration from the
system.yaml.- Uninstall the MongoDB database.
This section describes the process to upgrade your Xray High Availability cluster.
Upgrading an Xray 2.x HA Cluster
The Xray load balancer is no longer required when upgrading an Xray HA cluster from version 2.x to 3.x as all the Xray requests are now routed through the Platform Router in the JFrog Platform.
The following installation methods are supported:
Warning
Before you upgrade, ensure that the operating system version that you use is supported. See System Requirements for detailed information on operating system support.
Perform the following steps for each node in your system. When starting each node, enter the correct details for the first node or for an additional node being added to the cluster.
Note
The instructions below assume that you are upgrading from a 2.X official Docker installation.
-
Stop all the cluster nodes that are setup using HA by running the following command on each node.
./xray stop all -
Extract the contents of the compressed archive and go to the extracted folder.
tar -xvf jfrog-xray-<version>-compose.tar.gz
cd jfrog-xray-<version>-compose.tar.gz
.env file included within the Docker-Compose archive
This .env file is used by docker-compose and is updated during installations and upgrades.
Notice that some operating systems do not display dot files by default. If you make any changes to the file, remember to backup before an upgrade.
-
Run the
config.shscript to setup folders with required ownership. Note: the script will prompt you with a series of mandatory inputs, including if this is part of a cluster, and configure the neededsystem.yaml../config.shNote: For the first node upgrade, select "N" when prompted if you are adding an additional node to an existing product cluster. For additional nodes, select "Y" and provide the join key and JFrog URL.
-
Start the node.
Note
Run this command only from the extracted folder.
Manage Xray using Docker Compose commands.
cd jfrog-xray-<version>-compose

# Starting from Xray 3.8.x, PostgreSQL needs to be started before starting the other services.
if PostgreSQL 9.5.2 running use -   docker-compose -p xray-postgres -f docker-compose-postgres-9-5-2v.yaml up -d
if PostgreSQL 10.13  running use -   docker-compose -p xray-postgres -f docker-compose-postgres-10-13v.yaml up -d
if PostgreSQL 12.3   running use -   docker-compose -p xray-postgres -f docker-compose-postgres.yaml up -d

docker-compose -p xray up -d

docker-compose -p xray ps
docker-compose -p xray down-
Access Xray from your browser at:
http://<jfrogUrl>/ui/, go the Xray tab in the Application module in the UI. -
Check Xray Log.
docker-compose -p xray logs -
Stop all the cluster nodes that are setup using HA by running the following command on each node.
service xray stop
Note
Make sure your MongoDB and PostgreSQL are running in the background.
-
Extract the contents of the compressed archive and go to the extracted folder.
RPM
tar -xvf jfrog-xray-<version>-rpm.tar.gzDebian
tar -xvf jfrog-xray-<version>deb.tar.gz -
Run the
install.shscript to setup folders with required ownership../install.sh -
Add the following to the
$<PostgreSQL home folder>/data/pg_hba.conffile.host all all 0.0.0.0/0 md5 -
Add the following to the
$<PostgreSQL home folder>/data/postgresql.conffile.listen_addresses='*' -
Restart PostgreSQL.
service postgresql-<version> stop
service postgresql-<version> start
Note
From Xray version 3.x, RabbitMQ is packaged and managed as part of the Xray RPM. Any action (stop, start, or status) on the main Xray service is also applied to RabbitMQ.
The existing RabbitMQ RPM which was installed as part of Xray version 2.x can be uninstalled after Xray 3.x is successfully installed and running.
-
Start the Xray node.
systemd OS
systemctl start xray.servicesystemv OS
systemctl start xrayManage Xray using the following commands.
systemd OS
systemctl stop xray.servicesystemv OS
service xray stop|status|restart -
Access Xray from your browser at:
http://<jfrogUrl>/ui/, go the Xray tab in the Application module in the UI. -
Check Xray Log.
tail -f $JFROG_HOME/xray/var/log/console.log -
Stop all the cluster nodes that are setup using HA by running the following command on each node.
service xray stop -
Extract the contents of the compressed archive and go to the extracted folder.
RPM
tar -xvf jfrog-xray-<version>-rpm.tar.gzDebian
tar -xvf jfrog-xray-<version>-deb.tar.gz -
Run the
config.shscript to setup folders with required ownership../install.sh -
Modify the
system.yamlfile located in the$JFROG_HOME/xray/var/etcfolder with the following configurations.shared: rabbitMq: active: node: name: <node-name> (use same name across all subsequent nodes) ip: <first-node-ip> -
Start the Xray node.
systemd OS
systemctl start xray.servicesystemv OS
systemctl start xrayManage Xray using the following commands.
systemd OS
systemctl stop xray.servicesystemv OS
service xray stop|status|restart -
Access Xray from your browser at:
http://<jfrogUrl>/ui/, go the Xray tab in the Application module in the UI. -
Check Xray Log.
tail -f $JFROG_HOME/xray/var/log/console.log
Post Data Migration Steps (MongoDB to PostgreSQL)
After the migration is successfully ended, it is recommended to complete the following steps:
- Validate that your Xray data has migrated successfully.
- Remove MongoDB configuration from the
system.yaml.- Uninstall the MongoDB database.
Upgrading from Xray Version Below 2.7
To upgrade from version 2.6 and below, you first need to upgrade to version 2.7.x as described in the Upgrading Xray 2 documentation, and then continue to upgrade from version 2.7 to 3.x.
Upgrading from Xray 2.x to the latest version of Xray
Starting from version Xray 3.88.10, you can no longer upgrade Xray 2.x directly to the latest version of Xray. You must upgrade from Xray 2.x to 3.87.x, and then upgrade to the latest version of Xray.
From version 3.x, the MongoDB is not used by Xray, except during the initial migration phase from version 2.x. The data is automatically migrated from MongoDB to PostgreSQL from version 2.7x and above. After upgrading to version 2.7x, you must ensure that all data migrations are complete before proceeding to upgrade to version 3.x. The xray-migration-readiness tool enables you to verify that all data migrations are complete. Download the tool, and follow the instructions in the readme file.
Warning
Before you upgrade, ensure that the operating system version that you use is supported. See System Requirements for detailed information on operating system support.
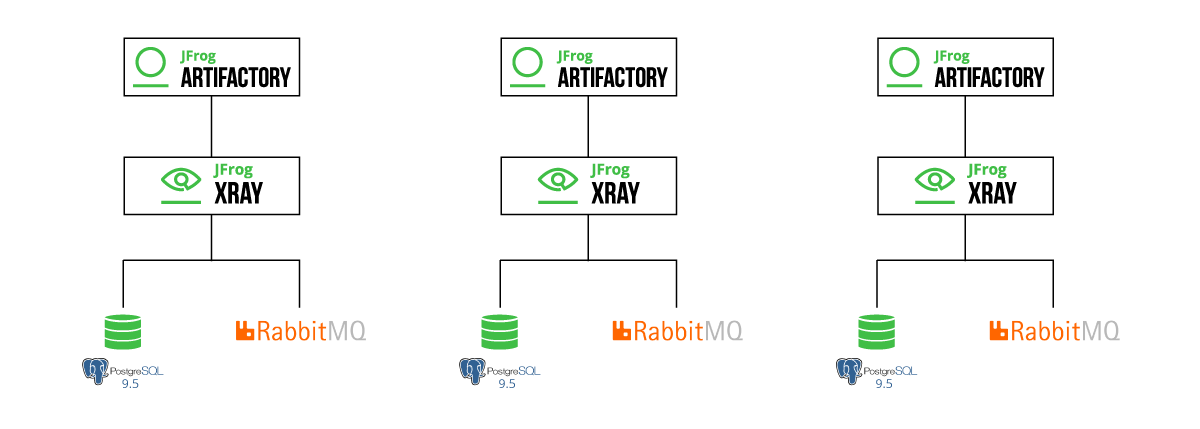
Xray and Artifactory One-to-One Pairing
The JFrog Platform requires Xray to be connected to a single Artifactory instance.
Important
This topic is applicable when you upgrade Xray 2.x to Xray 3.x. Xray 3.x and later already have one-to-one pairing with Artifactory in a JPD.
If you have one Xray instance connected to more than one Artifactory instances, before upgrading use the below procedure to move to this new requirement.
Warning
Upgrading Aritfactory or Xray without changing this requirement will cause data loss which cannot be restored.
Prerequisite
Your Xray instance must be upgraded to a version between 2.7 and 2.11.x.
Option 1: Pairing without configuration data (recommended)
This option will take you through disconnecting all Artifactory instances from your single Xray instance, except for one. Then, continuing to upgrade the disconnected Artifactory instances to version 7.x with newly installed Xray version 3.x instances.
This procedure requires re-indexing the additional Artifactory instances and causes some loss of Xray configuration data. Complete the following steps:
Many to One Pairing | One to One Pairing |
|---|---|
|
|
-
Export user-defined configurations (Optional for Xray v 2.11 and up)
You can export Xray user-defined configurations to be imported to other Xray instances using a set of dedicated REST APIs. The following settings include policies, watches, Ignore Rules, custom licenses, custom issues, webhooks, mail server, proxy configurations, and indexed resource settings.
-
Disconnect Artifactory Xray pairings, except one
Remove all Artifactory instances connected to Xray, except the one you would like to keep connected to this Xray instance. If you have an Artifactory instance that is configured as your authentication provider, keep this instance enabled with Xray.
In the Xray UI, go to Admin | A rtifactory, and delete the Artifactory instance(s) to remove.
Note: This operation will remove all data for the removed Artifactory instances.
-
Upgrade the remaining connected Xray Artifactory pairing
-
Upgrade the connected Artifactory instance to version 7.x,.
-
Upgrade the connected Xray instance to version 3.x, using this guide.
Note: Make sure to upgrade Artifactory before Xray.
-
-
Upgrade disconnected Artifactory instances to 7.x,
-
Install a new Xray 3.x instance(s) for each Artifactory cluster, using this guide.
When installing the new Xray instances, provide the base URL and join key of the Artifactory instance you want to pair with Xray.
-
Import user-defined configurations (Optional for Xray v 2.11 and up)
You can import Xray user-defined configurations, if you chose to export them in the first step.
-
Index all required resources for each one of the new Artifactory Xray pairs
In Classic Navigation, navigate to the Administration module, go to Xray Settings | General and click Indexed Resources.
In New Navigation, navigate to the Administration module, go to Xray Settings and click Indexed Resources.
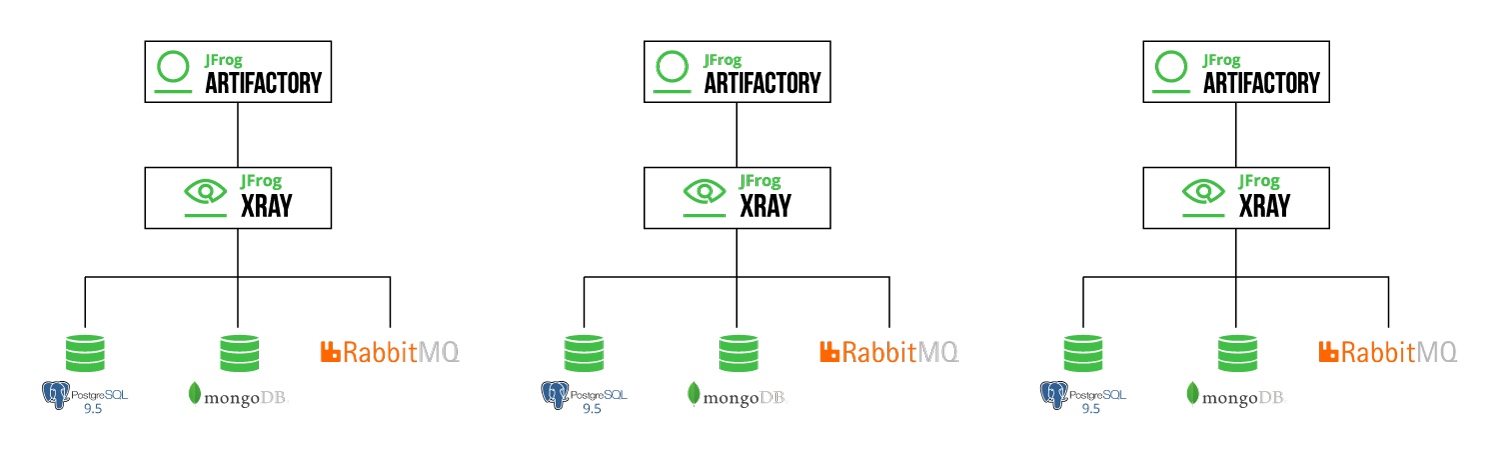
Option 2: Pairing with configuration data
This option will take you through installing additional Xray version 2.x instances for each Artifactory instance that you have, and restore all MongoDB and PostgreSQL data. Then, you can continue to upgrade each Artifactory and Xray pairs to version 7.x and version 3.x.
This procedure is more complex and is only suggested if you must keep all your Xray configurations and easily reconfigure them in the new instances.
Many to One Pairing | One to One Pairing |
|---|---|
|
|
- Stop Xray services
- Backup Xray data folder
- Install new Xray and update configuration files
- Restore MongoDB and PostgreSQL
- Start the New Xray instance
- Additional Xray instances
- Remove unnecessary Artifactory Xray Pairing
Step 1: Stop Xray Services
The following set of steps will disable your Xray instance from all except one Artifactory instance, handle pending tasks in Xray's queues, and stop the Xray service.
-
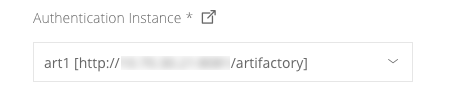
Configure one of your Artifactory instances as your authentication provider, if you do not have one already configured.
In the Xray UI, go to Admin | Authentication, and select your Artifactory instance.
-
Disable Xray integration from your Artifactory instances. If you have an Artifactory instance that is configured as your authentication provider, keep this instance enabled with Xray.
In the Artifactory UI, go to Admin | JFrog Xray, and disable the Xray integration.
-
Stop Xray.
Note: Do not stop the PostgreSQL and MongoDB.
Step 2: Backup Xray data folder
-
Compress and copy a backup file of your Xray data.
cd <XRAY_HOME> tar -zcvf xray.backup.tar.gz xray -
Create MongoDB dumps.
Create a dump file
mongodump -d xray -u xray -p password -o mongodumpCompress the dump file
tar -czvf mongodump.tar.gz mongodump -
Create PostgreSQL dumps.
Create a dump file
pg_dump -U xray xraydb > /postgresdumpCompress the dump file
tar -czvf postgresdump.tar.gz postgresdump
Step 3: Install new Xray and update configuration files
-
Install a new instance of Xray on a separate machine.
-
Unzip and Restore Xray backup data.
-
Change the new
$XRAY_HOMEfolder name toxray_tmp(this will be deleted once the configuration update is complete).Note: This folder includes the following folders:
backup,config,data,db_migraitonsmv xray xray_tmp -
Copy the Xray data backup file, from the previous installation,
xray.backup.tar.gzinto the new$XRAY_HOMEfolder. -
Extract the Xray data backup file.
tar -xvf xray.backup.tar.gz -
Verify that a new Xray folder is created, and its structure is the same as the
xray_tmpstructure. -
Remove the xray_tmp folder.
rm xray_tmp
-
-
Modify the Xray configuration file
/var/opt/jfrog/xray/config/xray_config.yamlwith thepostgres,mongodb, rabbitmq parameters.--- ver: 1.0 XrayServerPort: 8000 mqBaseUrl: amqp://guest:guest@rabbitmq:5672 mongoUrl: mongodb://xray:password@mongodb:27017/?authSource=xray&authMechanism=SCRAM-SHA-1 postgresqlUrl: postgres://xray:xray@postgres:5432/xraydb?sslmode=disable
Step 4: Restore MongoDB and PostgreSQL
MongoDB
-
Copy the MongoDB backup zip file
mongodump.tar.gzto the new machine. -
Extract the MongoDB backup file.
tar -xvf mongodump.tar.gz -
Restore MongoDB.
Go to the extracted folder, cd to every subdir until reaching the Xray directory and run the following command.
mongorestore /mongodump/xray -u xray -p password --authenticationDatabase xray --db xray --drop --batchSize=1
PostgreSQL
-
Copy the PostgreSQL backup zip file
postgresdump.tar.gzto the new machine. -
Extract the PostgreSQL backup file.
tar -xvf postgresdump.tar.gz -
Restore PostgreSQL.
psql -U xray -f postgresdump xraydb
Step 5: Start the New Xray instance
-
Remove the authentication provider configuration from the new Xray instance.
Run the following query in your MongoDB.
Note: a new authentication provider will be connected later on.
db.getCollection('configuration').deleteOne({"config_id" : "accessConfig"}) -
Modify the binary manager collection configuration in MongoDB for the new Xray instance. This step should also be done once for the initial Xray instance.
-
Run the following query in your MongoDB, to get a list of your Artifactory instances.
db.getCollection('binary_managers').find({}) -
Run the following query in your MongoDB, for each of the redundant Artifactory instances, except the selected one you are connecting to this new Xray instance.
Note: this command requires a non-existant URL to manipulate the new Xray data. These Artifactory connections will be removed once the unnecessary pairings are removed, later on in this procedure.
db.getCollection('binary_managers').update({"bin_mgr_id" : {"<Redundent-Artifactory-id-to-delete>"}}, {$set : {"bin_mgr_url" : "<non-existing-url-which-not-in-use>"}})
-
-
Start the new Xray instance.
-
Change the Xray base URL.
In the Xray UI, go to Admin | General, and disable the Xray Base URL.
-
Validate the Xray URL in Artifactory.
In the selected Artifactory UI, go to Admin | Advanced | Config Descriptor, and check the
xrayConfig. -
Enable Xray in Artifactory.
In the selected Artifactory UI, go to Admin | JFrog Xray, and set Xray to be Enabled.
-
Connect Xray to your selected authentication provider.
In the Xray UI, go to Admin | Authentication, and select your Artifactory instance.
Step 6: Additional Xray instances
Repeat steps 3 to 5 for additional Xray instances.
Once you have completed the process of pairing all new Xray instances to their Artifactory instances, go to each Xray instance (Admin | Artifactory) and check that only one Artifactory instance is connected to it.
Continue to upgrade your Artifactory and Xray instances to the new JFrog Platform.
Step 7: Remove unnecessary Artifactory Xray Pairing
Repeat the following steps for each of your Xray instances.
-
Validate that the new Xray instance is connected to the selected Artifactory instance, as an authentication provider.
Note
Before continuing to the next step, verify that JFrog Artifactory and Xray are working. Try re-indexing a repository from Artifactory and confirm it was indexed in Xray.
-
Remove all Artifactory instances connected to Xray, except the one you would like to keep connected to this Xray instance.
In the Xray UI, go to Admin | A rtifactory, and delete the Artifactory instance(s) to remove.
Note: This operation will remove all data for the removed Artifactory instances.
-
Re-index all required repositories.
In the Xray UI, go to Admin | Artifactory, click on the authentication provider Artifactory instance and select I
ndex Existingon the repositories to index.
JFrog Xray PostgreSQL Upgrade-PostgreSQL 9.x EoS
The purpose of this article is to address the fact that PostgreSQL is ending its support for some of its older versions, including 9.5 in February 2021 and 9.6 in November 2021.
PostgreSQL is supported for JFrog Xray in two ways:
- Bundled together with the Xray installation (herein referred to as internal)
- External PostgreSQL database (herein referred to as external)
Supported PostgreSQL Versions
- Xray 2.x supports the PostgreSQL versions listed in Installing Xray - Using External Databases (the earliest version of Xray 2.x that supports PostgreSQL 10-12 is Xray 2.16).
- Xray 3.x supports the PostgreSQL versions listed in the System Requirements. From Xray version 3.18 PostgreSQL 13 is also supported.
Although it is possible to upgrade incrementally from 9.5 to 9.6, JFrog recommends upgrading to the latest version supported by Xray. This will extend the time until the next PostgreSQL end of support andenables Xray to take advantage of the latest abilities provided by the new versions, such as better performance, etc.
Note
Although PostgreSQL is ending its support for the 9.x versions, JFrog will continue to support Xray customers using these versions as much as possible until the customers upgrade to a supported version.
The following workflow provides you with directions on how to upgrade the Xray database to a supported PostgreSQL version.
Important
Before upgrading PostgreSQL (using any method), we recommend reading the PostgreSQL upgrade instructions for the relevant upgrade version:
The following steps apply to both internal and external PostgreSQL and are the same for both Xray 2.x and 3.x.
Important Rules and Guidelines
- Upgrading the PostgreSQL for the Xray database requires downtime of Xray.
- Remember to back up your databasebeforebeginning the upgrade.
-
Stop Xray services.
-
Backup and upgrade the database.
- Upgrade an Internal PostgreSQL.
- Upgrade an External PostgreSQL and select the link for your external PostgreSQL version.
-
Start Xray services.
If you are running the PostgreSQL bundled with the Xray installer, follow the steps below according to your installation type. There are several upgrade methods you can use for upgrading to PostgreSQL 13. Which method to use depends on your preferences.
Note
The PostgreSQL upgrade steps below assume that the user is trying the upgrade from a PostgreSQL 9.x version to any higher version.
Docker Compose
# Create the dump from 9.x postgresql container
docker exec -it xray_postgres_1 bash -c "pg_dumpall -U xray  > pgdump"
# Note: This is one way of taking the backup; you can use any documented way.

#copy pgdump to host
docker cp xray_postgres_1:/pgdump /home/<user>/

#Stop services
For 2.x - Stop and Remove postgresql container
   ./xray.sh stop
   docker ps -a --format '{{.Names}}' | grep ^xray_* | xargs docker rm -f
For 3.x - cd into extracted folder
   docker-compose -p xray down

#Extract new compose tar.gz and cd into extracted folder
Run ./config.sh

#Cancel installation in postgres upgrade step
#Remove old postgres directory since a backup has been taken
# WARNING: Verify the data dump before uninstalling and deleting older postgres data.
rm -rf <MOUNT_DIR>/var/data/postgres/data

#copy compose templates: From Xray 3.8.x and later, the installer includes different templates for PostgreSQL, Xray, and RabbitMQ in the templates folder.
cp -f <composeExtractedDIR>/templates/docker-compose.yaml   docker-compose.yaml
cp -f <composeExtractedDIR>/templates/docker-compose-postgres.yaml   docker-compose-postgres.yaml
cp -f templates/docker-compose-rabbitmq.yaml   docker-compose-rabbitmq.yaml


#Take the docker-compose-postgres.yaml template with postgresql 12.5v
Update POSTGRES_PASSWORD with actual password in docker-compose-postgres.yaml
POSTGRES_PASSWORD: <password>

#Start Postgres
docker-compose -p xray-postgres -f docker-compose-postgres.yaml up -d


#Seed the data dump to xray_postgres container
docker exec -i xray_postgres psql -U xray -d xraydb < /home/<user>/pgdump

If the file <MOUNT_DIR>/var/etc/installerState.yaml exists
Update the postgresql latest version in this format postgresql_version: 13-2v

# Manual RabbitMQ setup steps
mkdir -p <MOUNT_DIR>/app/third-party/rabbitmq
cp -r <composeExtractedDIR>/third-party/rabbitmq <MOUNT_DIR>/app/third-party/
chown -R 999:999 <MOUNT_DIR>/app/third-party/rabbitmq/

#Restart services
docker restart xray_postgres
docker-compose -p xray-rabbitmq -f docker-compose-rabbitmq.yaml up -d
docker-compose -p xray up -d
RPM
#Stop the xray service.
/opt/jfrog/xray/scripts/xray.sh stop
#Create a data dump from postgres
/opt/PostgreSQL/<9.x>/bin/pg_dump -U xray xraydb  > /home/<user>/pgdump

# Uninstall Postgres.
# WARNING: Verify the data dump before uninstalling and deleting older postgres data.
Step 1 : yum -y update
Step 2 : yum -y install mlocate
Step 3:  updatedb
# use mlocate to find postgres uninstall script
Step 4 : locate uninstall-postgresql
Step 5:  cd /opt/PostgreSQL/<9.x> && ./uninstall-postgresql
Step 6:  Data directory need to be removed manually
#WARNING: Verify the data dump before uninstalling and deleting older postgres data.

               rm -rf  < postgres mount directory eg: /var/opt/jfrog/postgres >
               rm -rf  /var/spool/mail/postgres
               rm -rf  /opt/PostgreSQL
               rm -rf  /tmp/postgresql_installer_*
               rm -rf  /etc/selinux/targeted/active/modules/100/postgresql
# Download new xray rpm package and install postgres from the third-party folder.

# Import the dumped data in to the new postgresql
/usr/pgsql-12/bin/psql -U xray -d xraydb < /home/<user>/pgdump
# Restart postgres
systemctl restart postgresql-12.service
# Install xray from the extracted directory
<extracted directory>/install.sh
# Start xray services
systemctl start xray.service
Zip/Standalone/Linux
# Go to the zip extraction directory and create the dump from 9.x postgresql
<zip extraction directory>/app/third-party/pgsql/bin/pg_dump -U xray xraydb  > /home/<user>/pgdump
#Stop the xray service.
<zip extraction directory>/app/bin/xray.sh stop
# Stop postgres service
ps -ef | grep postgres
kill -15 <PID>
# Download and install the latest version of postgres
#WARNING: Verify the data dump before uninstalling and deleting older postgres data.
# Import the dumped data in to the new postgresql
<postgres bin path>/psql -U xray -d xraydb < /home/<user>/pgdump
#restart postgres service based on instructions for the package
# Start xray services
<zip extraction directory>/app/bin/xray.sh start
If you use an external PostgreSQL, upgrade according to the distribution you use and the official PostgreSQL documentation.