Artifactory HTTP Settings
Configure Artifactory reverse proxy (NGINX/Apache) with internal ports, load balancer, and Docker registry subdomain or port method.
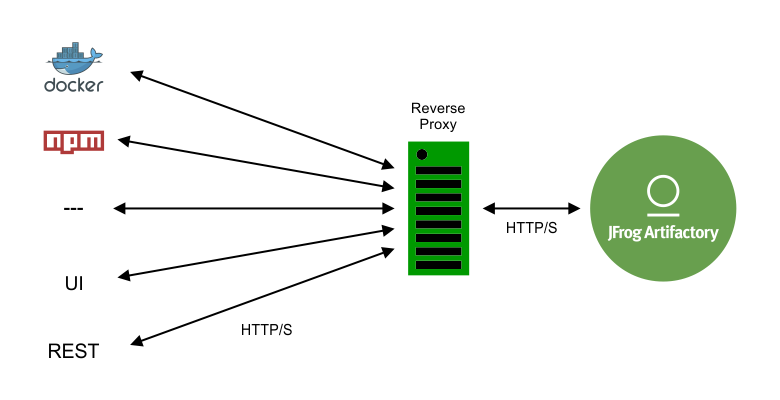
In many cases, an organization provides access to JFrog Artifactory through a reverse proxy such as NGINX or Apache. In some cases, for example when using Artifactory as a Docker registry, this setup is mandatory.
To simplify configuring a reverse proxy, Artifactory provides a Reverse Proxy Configuration Generator screen where you fill in a set of fields to generate the required configuration snippet, which you can download and install directly in the corresponding directory of your reverse proxy server. You can also use the Reverse Proxy Configuration API to manage reverse proxy configuration.
Note
- HTTP Settings including settings for Reverse Proxy, Apache and NGINX are only available with Self-Hosted deployments. These settings do not appear when working in the SaaS deployment
- For best security, when using Artifactory behind a reverse proxy, it must be co-located on the same machine as the web server, and Artifactory should be explicitly and exclusively bound to the Proxy host
- We also recommend that you set your Custom Base URL to match your Public Server Name.
The following steps configure JFrog Artifactory to work with a reverse proxy server.
NGINX and Apache Reverse Proxy Requirements
- To use NGINX as a reverse proxy to work with Docker, you need NGINX v1.3.9 or higher. The NGINX configuration file should be placed under the
sites-enableddirectory. For more information, see Configuring NGINX.- To use Apache as a reverse proxy server, you need to have a set of modules installed and activated. For more information see Apache Requirements with Reverse Proxy Configuration . For additional guidance on configuring Apache reverse proxy support, see Configure Apache.
To configure reverse proxy settings for Artifactory:
-
In the navigation panel on the left-hand side of the screen, click Administration
 .
. -
In the General pane, click HTTP Settings. The HTTP Settings screen appears.
-
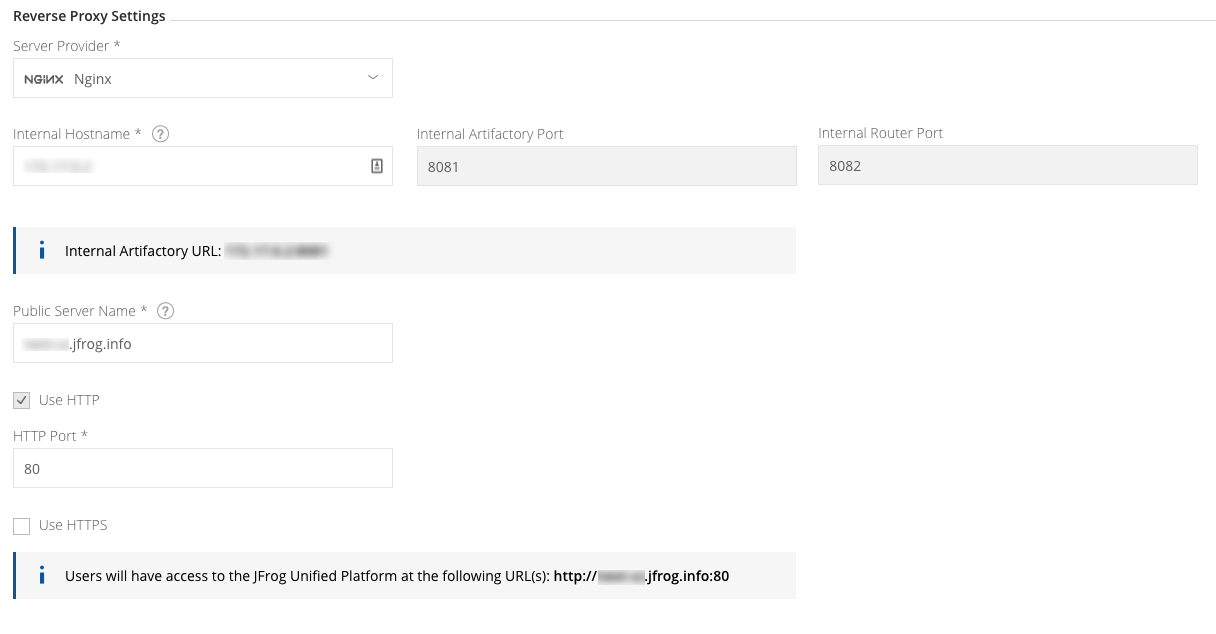
Under Server Provider, select a service provider, for example Nginx. Reverse Proxy settings are displayed.
-
Configure settings as required. Refer to the parameters in the table Table 1, Reverse Proxy Settings below, then click Save.
-
Click
Downloadto generate a reverse proxy snippet (configuration file). -
Place the configuration file in the right place under your reverse proxy server installation and reload the configuration.
For example, Nginx Server Provider: Place the configuration file (rt.conf) in the
/etc/nginx/conf.d.
Best practice
When using a reverse proxy, it is recommended to pass the
X-JFrog-Override-Base-Urlheader as follows:For NGINX:
proxy_set_header X-JFrog-Override-Base-Url $http_x_forwarded_proto://$<host>:<server port>For Apache:
RewriteCond %{REQUEST_SCHEME} (.*)RewriteRule (.*) - [E=my_scheme:%1][...]RequestHeader set X-JFrog-Override-Base-Url %{my_scheme}://<server_name>
Table 1. Reverse Proxy Settings
| Field | Description |
|---|---|
| Server Provider | Set the server provider type: Embedded Tomcat, Nginx and Apache. |
| Internal Hostname | The internal server name for Artifactory which will be used by the web server to access the Artifactory machine. If the web server is installed on the same machine as Artifactory you can use localhost, otherwise use the IP or hostname. |
| Internal Artifactory Port | Direct access to Artifactory for REST API and downloads. This can be configured from the Artifactory System YAML file. |
| Internal Router Port | Access to the JFrog Platform services REST API and web UI. This can be configured from the Artifactory System YAML file. |
| Public Server Name | The server name which will be publicly used to access Artifactory within the organization. |
| Use HTTP | When set, Artifactory will be accessible via HTTP at the corresponding port that is set. |
| Use HTTPS | When set, Artifactory will be accessible via HTTPS at the corresponding port that is set. |
| HTTP Port | The port for access via HTTP. The default value is 80. |
| HTTPS Port | The port for access via HTTPS. The default value is 443. |
Use a Load Balancer in High Availability Setups
When configuring JFrog Artifactory in a High Availability (HA) setup, Artifactory automatically adjusts the provided settings to include a Load Balancing section within the HTTP settings, allowing more than one Artifactory instance to be proxied.
Docker Reverse Proxy Settings
This section reviews Reverse Proxy settings related to Docker. When using Artifactory as a self-hosted private Docker registry, the Docker client can access Artifactory through a reverse proxy or directly through Artifactory's embedded Tomcat.
For information on accessing Docker repositories without a reverse proxy, see Get Started with Docker Without a Reverse Proxy.
JFrog Artifactory Cloud Docker Registries
Accessing an JFrog Artifactory Docker registry on a JFrog Artifactory Cloud installation does not use a reverse proxy because it is external to your organization.
The Docker client can access Artifactory through a reverse proxy using the following methods:
- Subdomain Method (recommended)
- Ports Method
For each of these methods, your Docker repositories must be configured with the corresponding Reverse Proxy settings in the Docker Repository Configuration Advanced tab.
The Reverse Proxy Configuration screen also sets up your Docker Repository configuration.
Configuring Artifactory as your Docker Registry
The following describes how to obtain your reverse proxy configuration, depending on whether you are using the subdomain method or port bindings.
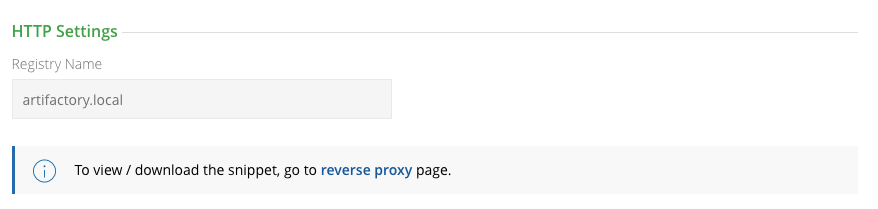
Use the Subdomain Reverse Proxy Method
If you select Subdomain as the Reverse Proxy Method, when configuring a Docker Repository, the Registry Name in the Docker Repository Configuration Advanced tab will be set automatically to the required value, and will use the Repository Key as the Subdomain.
Wildcard certificate
Using the Subdomain method requires a Wildcard certificate such as.
*. myservername.org. You also need to ensure that the certificate you use supports the number of levels used in your subdomain.
| Docker Settings in HTTP Settings | Corresponding HTTP Settings in Docker Repository Advanced Configuration |
|---|---|
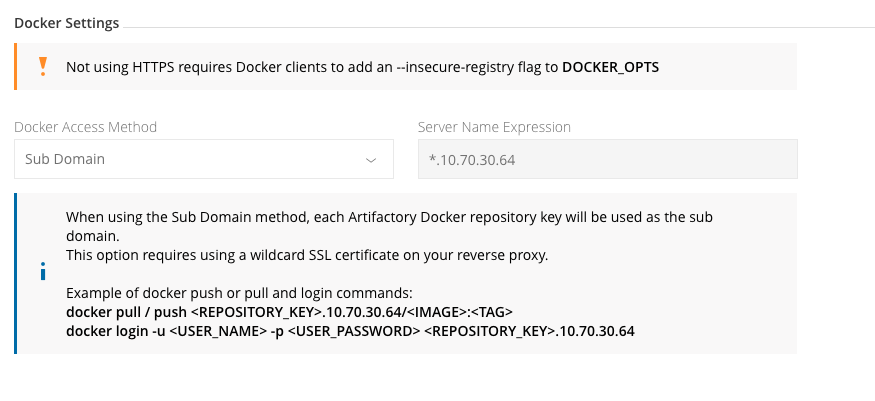 | 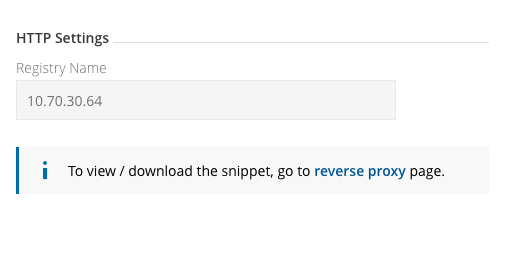 |
Use Port Bindings as Reverse Proxy Method
If you select Port as the Reverse Proxy Method, when configuring a Docker Repository, you will need to set the Registry Port in the Docker Repository Configuration Advanced tab. Together with the Public Server Name, this is the port the Docker client will use to pull images from and push images to the repository. For all Docker repositories to be included in your reverse proxy configuration, set the port for each Docker repository defined in your system before generating the reverse proxy configuration. Each repository must be bound to a unique port.
Best Practice
We recommend creating a virtual Docker repository which aggregates all of your other Docker repositories, and use that to pull and push images. This way you only need to set up the NGINX configuration for that virtual repository. For more information, see Create a Docker Repository.
| Docker Settings in HTTP Settings | Corresponding HTTP Settings in Docker Repository Advanced Configuration |
|---|---|
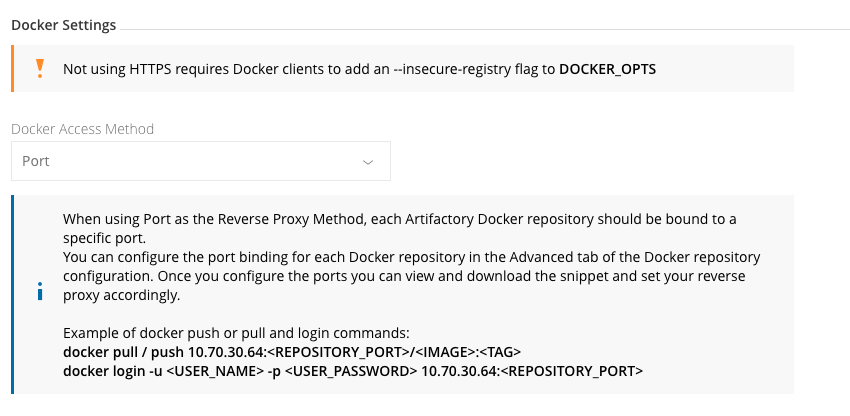 |
Use Direct Access without a Reverse Proxy
 |
|---|
Configure a Reverse Proxy to Support mTLS
From Artifactory release 7.38.4, you can also authenticate users using mTLS. This requires a reverse proxy and some setup on the front-end reverse proxy (Nginx).
Reverse Proxy for Cloud Customers
To configure a reverse proxy to support mTLS in the Cloud, contact JFrog Support.
To configure Reverse Proxy to Support mTLS Flow:
-
The client sends a request to the JFrog Platform.
-
If the request includes a client certificate:
-
The JFrog Platform will authenticate the client certificate using the configured trusted certificates and verify that the certificate has not been revoked. If the client certificate is authenticated successfully, the procedure will continue; otherwise it is blocked.
-
The JFrog Platform will then try to extract the user identity from the client certificate.
If the user identity was extracted successfully, the procedure will continue; otherwise it will fall back to relying on additional user authentication information (e.g., basic credentials, bearer token).
-
Note
If the JFrog Platform is configured to require client certificates, then the request will be blocked; otherwise it will continue with the existing authorization mechanisms without mTLS.
Configure the Nginx Proxy for Self-hosted Customers
To configure the Nginx proxy, set this configuration in the Nginx configuration file and set the Platform configuration via the system.yaml file. See Configuring Nginx for details.
-
Set up mTLS by providing a trusted certificate for the JFrog Platform to trust. The trusted certificate can be either the actual client certificate to trust or a CA certificate - to trust any certificate signed by it (preferred).
-
Then, use the client certificates to authenticate API requests with the JFrog Platform (requests from untrusted client certificates will be blocked).
-
Revoke certificates by revoking (removing) the provided trusted certificate(s). You can also revoke a specific client certificate without revoking the trusted CA certificate using the OCSP protocol.
Note
Revoke certificates by revoking (removing) the provided trusted certificate(s). You can also revoke a specific client certificate without revoking the trusted CA certificate.
Set up mTLS Verification and Certificate Termination on the Reverse Proxy
Setting up mTLS requires mTLS verification and certificate termination on your reverse proxy. For example, an Nginx configuration should include something like this:
ssl_verify_client      optional;
ssl_verify_depth       2;
ssl_client_certificate /path/to/client-ca.crt;
...
proxy_set_header X-JFrog-Client-Cert "";
proxy_set_header X-JFrog-Client-Cert $ssl_client_escaped_cert;Note
The
client-ca.crtabove is an example of a single file with all trusted client CA certificates.
The reverse proxy should be responsible (by configuration) for:
- Always removing the custom header from all incoming requests, to prevent a malicious user from adding such header on their own, tricking the platform to accept the header as an authentication and authorization mechanism
- Adding to the request the custom header with the client certificate only for requests that were successfully mTLS-verified
After setting your reverse proxy, when a request is performed with mTLS, upon successful verification, the reverse proxy must add a custom header with the client certificate in PEM format (refer to the proxy_set_header X-JFrog-Client-Cert in the code example above).
You can also set up your own custom header instead of X-JFrog-Client-Cert. If you do so, set the same header via the header-name in the system.yaml file (see configuration example below) for the JFrog Platform to use it.
Support User Identity Extraction for Request Authorization
You can use your client certificate to authenticate and authorize requests in the JFrog Platform without sending additional credentials, as long as the client certificate embeds the user identity.
To enable user-based access for client authenticating with mTLS, you can have your certificate contain a username, and the JFrog Platform will only allow access to resources to which that user has permissions.
For example, your certificate's subject might look something like this, wherebySubject: C=IL, L=Netanya, O=Maldin, OU=DO, CN=myuser@ jfrog.com, and where the username you are after is "myuser" from the Subject's CN. In this case, you can set the Access Configuration YAML File regexp to look something like this:
security:
  authentication:
    mtls: # Mutual-TLS authentication configuration
      enabled: true                        # if true then mTLS is enabled
extraction-regex: [^@]+(?=\d{0,}@) # regular expression used to extract the username from the certificate's subject CNFrom Version 7.77.x
Set the
access.config.latest.ymlto look something like this:# To change the configuration in an Access service, follow these instructions: # 1. Find the value you want to update # 2. Set the value in the access.config.latest.yml file under [$JFROG_HOME]/artifactory/var/etc/access # 3. Change access.config.latest.yml to access.config.import.yml # 4. Restart Access security: authentication: mtls: # Mutual-TLS authentication configuration enabled: true # if true then mTLS is enabled extraction-regex: [^@]+(?=\d{0,}@) # regular expression used to extract the username from the certificate's subject CN
You can also define any regular expression needed to parse the username from the subject’s CN attribute as it is defined in the JFrog Platform.
Manage Reverse Proxy via REST API
Artifactory also supports managing reverse proxy configuration through the REST API using the following endpoints:
| Endpoint | Description |
|---|---|
| Get Reverse Proxy Configuration | Retrieves the reverse proxy configuration JSON. |
| Update Reverse Proxy Configuration | Updates the reverse proxy configuration. |
| Get Reverse Proxy Snippet | Gets the reverse proxy configuration snippet in text format. |
Configure Apache
This section reviews how to configure an Apache Server as the Artifactory front end.
Note
- Reverse Proxy using Apache requires you have certain modules activated and installed. For a list of these modules see Apache Requirements with Reverse Proxy Configuration.
- Some features in the Apache configuration are only supported from Apache HTTP Server v2.4.
Configuring Apache support for Artifactory can include the following steps:
- Set Up an Apache Server using HTTP
- Set Up an Apache Server using HTTPS as a Front End
- Configure a Custom Base URL in Artifactory for Apache
Apache Requirements with Reverse Proxy Configuration
This topic lists the modules required when using Apache as your reverse proxy server. For more information on configuring Apache as your reverse proxy server, see Configure Apache.
To use Apache as your reverse proxy server, make sure you have the following modules installed and activated:
proxy_httprewritedeflateheadersproxy_balancerproxy_connectproxy_htmlssllbmethod_byrequestsslotmem_shmproxy
Set Up an Apache Server using HTTP
Apache HTTP server using AJP Protocol
From Artifactory version 7.0, the AJP connector is not supported.
You can set up Apache HTTP Server as a front end for Artifactory using the HTTP protocol.
Client ----------> HTTPD ----------> Artifactory
          HTTP            HTTP
When running Artifactory with Tomcat, we recommend setting up Apache to proxy Artifactory via HTTP.
Configure redirects correctly using the PassReverse directive, and set the base URL in Artifactory so that UI links appear correctly.
The sample virtual host assumes that Artifactory listens on port 8081 and all other services and UI are available on port 8082.
Ensuring HTTP Redirect Works Correctly
For HTTP redirects to work, you must set a PassReverse directive on Apache, otherwise the underlying container base URL is passed in redirects
In the example below it is set to
http://yourdomain.com/.
Set a PassReverse Directive on Apache
<VirtualHost *:80>
    ServerName yourdomain.com
    ServerAlias *.yourdomain.com
    ServerAdmin server@admin

    ## Application specific logs
    ## ErrorLog ${APACHE_LOG_DIR}/yourdomain.com-error.log
    ## CustomLog ${APACHE_LOG_DIR}/yourdomain.com-access.log combined

    AllowEncodedSlashes On
    RewriteEngine on

    RewriteCond %{SERVER_PORT} (.*)
    RewriteRule (.*) - [E=my_server_port:%1]
    ##  NOTE: The 'REQUEST_SCHEME' Header is supported only from apache version 2.4 and above
    RewriteCond %{REQUEST_SCHEME} (.*)
    RewriteRule (.*) - [E=my_scheme:%1]
    RewriteCond %{HTTP_HOST} (.*)
    RewriteRule (.*) - [E=my_custom_host:%1]
    RewriteRule ^(/)?$      /ui/ [R,L]

    RequestHeader set Host %{my_custom_host}e
    RequestHeader set X-Forwarded-Port %{my_server_port}e
    ## NOTE: {my_scheme} requires a module which is supported only from apache version 2.4 and above
    RequestHeader set X-Forwarded-Proto %{my_scheme}e
    RequestHeader set X-JFrog-Override-Base-Url %{my_scheme}e://yourdomain.com:%{my_server_port}e

    ProxyPassReverseCookiePath / /
    ProxyRequests off
    ProxyPreserveHost on
    ProxyPass "/artifactory/" http://<artifactory-ip>:8081/artifactory/ connectiontimeout=5 timeout=2400
    ProxyPassReverse "/artifactory/" http://<artifactory-ip>:8081/artifactory/
    ProxyPass "/" http://<artifactory-ip>:8082/ nocanon connectiontimeout=5 timeout=2400
    ProxyPassReverse "/" http://<artifactory-ip>:8082/
</VirtualHost>
Set Up an Apache Server using HTTPS as a Front End
You can set up Apache with SSL (HTTPS) as a front end for Artifactory using the HTTP protocol.
Client ----------> HTTPD ----------> Artifactory
          HTTPS           HTTP
Set SSL/TLS on Apache
<VirtualHost *:443>
    SSLEngine on
    SSLCertificateFile path/to/yourdomain.com.crt
    SSLCertificateKeyFile path/to/yourdomain.com.key
    SSLProxyEngine on

    ## Additional reverse proxy directives
</VirtualHost>
Configure a Custom Base URL in Artifactory for Apache
When using an HTTP proxy, the links produced by Artifactory and certain redirects may contain the wrong port and use http instead of https.
Configure a custom base URL as follows:
-
On the Admin tab select Configuration | General
Custom Base URLfield. -
Set the Custom Base URL field to the value used to contact Artifactory.
For example:
https://yourdomain.com
Refer to General System Settings for more details about configuring the base URL.
Configure NGINX
You can use JFrog Artifactory behind an Nginx server. When setting up Nginx as a front end for Artifactory, use HTTP or HTTPS.
Configuring Nginx support for Artifactory includes the following steps:
Set Up the NGINX Server using HTTP or HTTPS
Set the base URL in Artifactory so that the links in the user interface appear correctly.
In the example below, the configuration assumes that the Tomcat HTTP connector runs on port 8081.
Seeing timeouts on large file uploads?
Up-to-date versions of Nginx have
proxy_request_bufferingenabled by default. With request buffering enabled, Nginx buffers the entire client payload prior to sending it to the Artifactory upstream.As a result, you might see a certain stall that could range from several seconds to several minutes depending on your network performance, after the client finishes transmitting all the bytes to Nginx, as Nginx would be busy transmitting all the bytes to the Artifactory upstream at once. If this stall ranges more than a few seconds, you may start seeing client request timeouts depending on which client is used. If you are seeing timeouts, consider turning off proxy_request_buffering with the following directives:
proxy_request_buffering off;proxy_http_version 1.1;
Configure nginx to use HTTP or HTTPS
## add ssl entries when https has been set in config
ssl_protocols TLSv1 TLSv1.1 TLSv1.2 TLSv1.3;
ssl_certificate      /etc/nginx/ssl/yourdomain.com.crt;
ssl_certificate_key  /etc/nginx/ssl/yourdomain.com.key;
ssl_session_cache shared:SSL:1m;
ssl_prefer_server_ciphers   on;
## server configuration
server {
    listen 443 ssl;
    listen 80 ;

    server_name yourdomain.com;

    if ($http_x_forwarded_proto = '') {
        set $http_x_forwarded_proto  $scheme;
    }
    ## Application specific logs
    ## access_log /var/log/nginx/yourdomain.com-access.log timing;
    ## error_log /var/log/nginx/yourdomain.com-error.log;
    rewrite ^/$ /ui/ redirect;
    rewrite ^/ui$ /ui/ redirect;
    chunked_transfer_encoding on;
    client_max_body_size 0;
    location / {
        proxy_read_timeout  2400s;
        proxy_pass_header   Server;
        proxy_cookie_path   ~*^/.* /;
        proxy_pass          http://<artifactory-ip>:8082;
        proxy_next_upstream error timeout non_idempotent;
        proxy_next_upstream_tries    1;
        proxy_set_header    X-JFrog-Override-Base-Url $http_x_forwarded_proto://$host:$server_port;
        proxy_set_header    X-Forwarded-Port  $server_port;
        proxy_set_header    X-Forwarded-Proto $http_x_forwarded_proto;
        proxy_set_header    Host              $http_host;
        proxy_set_header    X-Forwarded-For   $proxy_add_x_forwarded_for;

        location ~ ^/artifactory/ {
            proxy_pass    http://<artifactory-ip>:8081;
        }
    }
}Internal Proxies
Regular expression (using
java.util.regex) that a proxy's IP address must match to be considered an internal proxy. Internal proxies that appear in theremoteIpHeaderare trusted and do not appear in theproxiesHeadervalue.If not specified, the default value of
10\.\d{1,3}\.\d{1,3}\.\d{1,3}|192\.168\.\d{1,3}\.\d{1,3}|169\.254\.\d{1,3}\.\d{1,3}|127\.\d{1,3}\.\d{1,3}\.\d{1,3}is used.
Warning
Although binary caching can be enabled on Nginx reverse proxies, it is not supported by Artifactory at this time. There are known stability problems when a cache layer is set up between a client and Artifactory, such as stale metadata and upload issues. Consider setting up a Smart Remote Repository if you wish to cache artifacts.
Configure a Custom Base URL in Artifactory for NGINX
When using an HTTP proxy, the links produced by Artifactory and certain redirects may contain the wrong port and use http instead of https.
Configure a custom base URL as follows:
-
On the Admin tab select Configuration | General
Custom Base URLfield. -
Set the Custom Base URL field to the value used to contact Artifactory.
For example:
https://yourdomain.com
Refer to General Configuration for more details about configuring the base URL.
Related Topics
- Artifactory Configuration
- General Settings
- Artifactory System YAML
- Establish TLS in Artifactory and JFrog Platform
- Artifactory Network Ports
- Artifactory Configuration Files
Frequently Asked Questions
This section provides answers to frequently asked questions.
FAQs
Q: Are HTTP Settings available for SaaS Artifactory deployments?
A: No. HTTP Settings including settings for Reverse Proxy, Apache, and NGINX are only available with self-managed deployments. These settings do not appear when working in a SaaS deployment.
Q: What NGINX version is required to use NGINX as a Docker reverse proxy?
A: You need NGINX v1.3.9 or higher to use NGINX as a reverse proxy with Docker. The generated NGINX configuration file should be placed under the sites-enabled directory.
Q: Why might large file uploads time out when using NGINX as a reverse proxy?
A: Up-to-date versions of NGINX have proxy_request_buffering enabled by default, which causes NGINX to buffer the entire client payload before forwarding it to Artifactory. This can produce a stall after the client finishes uploading. To resolve timeouts, disable request buffering with proxy_request_buffering off; and set proxy_http_version 1.1;.
Q: What is required to use the subdomain reverse proxy method for Docker?
A: The subdomain method requires a wildcard certificate such as *.myservername.org. You must also ensure the certificate supports the number of subdomain levels used in your configuration. The Registry Name in the Docker Repository Configuration Advanced tab is set automatically from the Repository Key.
Q: Is binary caching on the NGINX reverse proxy supported by Artifactory?
A: No. Binary caching on NGINX reverse proxies is not supported by Artifactory and has known stability problems including stale metadata and upload issues. If you want artifact caching, use a Smart Remote Repository instead.
Updated 2 months ago