Install JFrog Plugin for VS Code
How to install the JFrog plugin for VS Code
The JFrog plugin for VS Code Copilot enables your coding assistant to access JFrog repositories, artifact management, and governance policies—ensuring your AI-assisted development stays aligned with your organization's standards.
To install the JFrog plugin for VS Code:
Prerequisites
- GitHub organization settings: Settings > Copilot > Policies > Editor preview features:
Set to Enabled.
Install the JFrog plugin for VS Code
Choose one of the following three methods:
Install Using the Magic Link
Use the magic link by clicking the  button in the Install MCP Server pane or use the link vscode://chat-plugin/install?source=jfrog/vscode-plugin.
Install Using the VS Code Command Palette
-
Open the Quick Open palette (Cmd+Shift+P on macOS or Ctrl+Shift+P on Windows/Linux) and run the following command to install the JFrog plugin:
-
Select/enter:
Chat: Install Plugin from Source -
Enter the plugin source. When prompted, enter:
https://github.com/jfrog/vscode-plugin/ -
Click Trust.
Install from the Marketplace
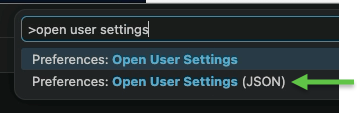
- Add the marketplace source to the VS Code settings file: open settings.json (Cmd+Shift+P and select "Open User Settings (JSON)").
-
Enter:
"chat.plugins.marketplaces": [ "https://github.com/jfrog/vscode-plugin/" ] -
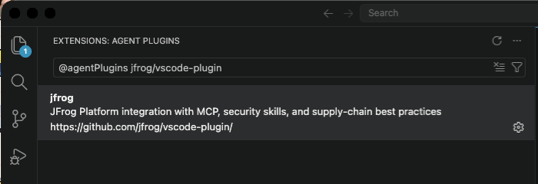
Install the plugin by opening the extensions panel (Cmd+Shift+X), and search for:
@agentPlugins jfrog/vscode-plugin -
Select the plugin.
-
Click Install.
-
If required, click Trust.
Frequently Asked Questions
FAQs
Q: My VS Code doesn't show the Chat feature. What should I do?
A: Ensure that GitHub Copilot and the Chat extension are enabled. Go to Extensions, search for "GitHub Copilot Chat", and verify it's installed and enabled. You may also need to enable Editor preview features in your GitHub organization settings (Settings > Copilot > Policies > Editor preview features = Enabled).
Q: The magic link doesn't work. What's the alternative?
A: Use the VS Code Command Palette method: press Cmd+Shift+P (macOS) or Ctrl+Shift+P (Windows/Linux), type Chat: Install Plugin from Source, and enter the repository URL https://github.com/jfrog/vscode-plugin/. Alternatively, use the Marketplace method by adding the source to your settings.json file.
Q: How do I verify the JFrog plugin is installed?
A: Open the Extensions panel in VS Code (Cmd+Shift+X), search for jfrog, and confirm the JFrog plugin appears in your installed extensions list. Once installed, you can access JFrog MCP Registry capabilities in your VS Code assistant.