Access Tokens
You can manage Access tokens through REST APIs or through the JFrog Platform UI - in the administration module, go to User Management | Access Tokens.
You must have admin privileges to create admin tokens. You can also create access tokens specific to your project if you are a project admin.
JFrog Access provides JFrog Products with access tokens as a flexible authentication mechanism with a wide range of capabilities.
-
Cross-instance authentication
Access tokens can be used for authentication, not only by the instance or cluster where they were created but also for other instances and clusters that are all part of the same circle of trust. For more information, see Circle of Trust (Cross-Instance Authentication)
-
User and non-user authentication
The case for authenticating users is clear, however, access tokens can also be assigned to non-user entities such as CI server jobs.
-
Time-based access control
Access tokens have an expiry period, so you can control how long you grant access. However, you may also delegate that control to the receiving user by making them refreshable
-
Flexible scope
By assigning Groups to tokens, you can control the level of access they provide.
-
Pairing tokens
Manage connections between different JFrog microservices.
An access token has the following properties.
Property | Description |
|---|---|
Subject | The user to which this access token is associated. If the user specified does not exist, the system will create a corresponding transient user. Administrators can assign a token to any subject (user); non-admin users who create tokens can only assign tokens to themselves. When creating the access token, the subject parameter should be the same as the username. When deleting tokens, tokens of different users with the same subject name will be deleted by design. |
Scope | The scope of access that the token provides. For more information and configuration options, see Create a Scoped Token. Since 7.21.1, access tokens are scoped tokens. Access to the REST API is always provided by default; in addition, you may specify the group memberships that the token provides. |
Audience |
|
Issuer | An identifier of the cluster on which the access token was created |
Expiry | The date and time when the token will expire.
|
Issued At | The date and time when the token was created. |
ID | The token ID |
Access Token Creation by Project Admins
Project admins can create access tokens that are tied to the projects in which they hold administrative privileges.
These tokens are associated with specific roles within the project, which provide the same permissions as the given project roles have at the time the token is used. The token gets access to all Artifactory resources (builds, repositories, and artifacts).
You can provide the project and role when you create new tokens.
The following example shows how to use Create Token API.
curl -H "Authorization: Bearer <valid access token>" -XPOST "http://localhost:8082/access/api/v1/tokens" -d "scope=applied-permissions/roles:project-key:developer,qa"The following example shows the response from Get Token API.
The project field appears in the response only if a project admin created the token.
{
  "tokens": [
    {
      "token_id": "<id>",
      "subject": "<subject>",
      "expiry": <epoch-in-secs>,       // optional
      "issued_at": <epoch-in-secs>,
      "issuer": "<issuer>",
      "description": "<description>",  // optional
      "refreshable": <true|false>,
      "project": “project-key”,
    },
    ...
  ]
}
Token Certificates
Token certificates are the key pair, comprised of the private and root certificates, which is used to sign and validate tokens. The private.key is used to sign access tokens and the root.crt is the matching public key, used to verify the token's signatures.
Note
The
root.crtwill disappear from the target's trusted folder and will be placed in the Artifactory database.
Resetting Token Certificates
Administrators can force Access to reset a token certificate.
To reset the token certificate:
- Create a file named
reset_root_keysand place it under the<VAR>/bootstrap/etc/access/keys/ directory. - Reset the Artifactory service.
Note
Resetting the token certificate will effectively revoke all of the tokens that have been generated. If you want to reset your certificates but maintain the token that were created previously, you will need to copy the old
root.crtinto the trusted directory:/var/etc/access/keys/trusted.
Certificates in HA - Key Pair Propagation in an Existing HA Cluster
When using certificates in High Availability clusters, the private.key and root.key are propagated automatically and are updated between the cluster nodes.
Basic Authentication
A reference token can be used instead of a password for basic authentication. This may be useful when you need a client (such as certain dependency managers) that only supports basic authentication to access Artifactory. In this case, it is important to access Artifactory using the same user name provided when creating the token (with -d "username=<USERNAME>").
For example, to use a reference token as a password to ping JFrog Platform URL, you could use:
curl -u<USERNAME>:<TOKEN> http://JFROG_PLATFORM_URL/router/api/v1/system/pingAuthorization Headers
An access token can be used as a bearer token in authorization headers. This is especially useful for authenticating CI servers with Artifactory instead of using credentials, since you don't need to have a user defined in Artifactory if the group provided in -d "member-of-groups:<GROUP>" is configured in that Artifactory instance. As a result, there is no need to manage fictitious users for your different automation tools that need access to Artifactory.
For example, to use an access token as a bearer token to ping Artifactory, you could use:
curl -H"Authorization: Bearer <TOKEN>" http://JFROG_PLATFORM_URL/router/api/v1/system/pingGenerate Expiring Tokens
Important
When creating a token, if the token expiry is set to a value smaller than the
revocable-expiry-thresholdparameter specified in the Access YAML Configuration, the token will be non-revocable. By default, the value of therevocable-expiry-thresholdparameter is set to 6 hours.For example, if you set an expiry that is less than 6 hours, the token will not be revocable until it expires naturally.
Limit the validity period of a token by setting the Expiration Time parameter when you create the token in the JFrog Platform interface, or using the expires_in parameter in the REST API. The token is valid until the expiration time. The default expiry is 3600 seconds (one hour). To define a non-expirable token, set the expiry to zero. The token is valid until actively revoked.
Artifactory Administrator Only
- Only an Artifactory administrator can change the validity period of a token to any value.
- Non-admin users can only set the token validity period to a value that is equal or less than the maximum allowed value set by the admin.
- From version 7.21.1, this can be specified by setting the
token.max-expiryparameter in the$JFROG_HOME/artifactory/var/etc/access/access.config.latest.ymlfile- If the
token.max-expiryis equal to 0 (which is the default), there is no limitation to the token expiry. However, if the maximum expiry is greater than 0, the user cannot create a non-expirable token.- The
token.max-expiryparameter must be set to a value higher than thetoken.default-expiryparameter value.- Prior to Artifactory version 7.21.1, the parameter to set was
artifactory.access.token.non.admin.max.expires.in.
Token expiration is affected by two configurable thresholds: the revocable expiry and persistency thresholds.
Revocable Expiry Threshold
The revocable-expiry-threshold determines whether a token can be revoked based on the token's configured Expiration Time. The threshold is the shortest token expiry period compatible with revocability.
- A token with Expiration Time shorter than the threshold cannot be revoked. It expires when it reaches its configured expiry.
- A token with Expiration Time equal to, or longer than, the threshold can be revoked at any time up to its configured expiry.
The default value is 6 hours (21,600 seconds). The following values may impact system performance and are not recommended:
- less than 2 hours.
- zero (0). All tokens are revocable. This setting triggers continuous validation checks for all tokens, and negatively impacts system performance.
- -1 or another negative value. This may impact security by allowing creation of non-revocable tokens.
Set the value of revocable-expiry-threshold in the Access YAML Configuration file.
Persistency Threshold
Thepersistent-expiry-thresholddefines a token’s persistency by defining the minimal expiry value a token must have in order to be saved in the database. If the persistent-expiry-threshold is set to a negative value, all tokens will be persistent and will be saved to the database.
The persistent-expiry-threshold default value is set to 3 hours.
Setting persistency-expiry-threshold less than or equal to zero means that all tokens that have this setting are persistent.
Important
Setting all the tokens to be persistent will affect the performance of the system, since all the tokens in the system will need to be checked directly with the database to validate that they are still persistent (including internal system ones). It is preferable to not lower this threshold to below 2 hours.
Set the Persistency Threshold
The persistent-expiry-threshold is set in seconds and is specified in the Access YAML Configuration file. A token with an expiry(expiry = expirationTime-issuedAt) below this value will not be persisted.
Relationship Between the Two Thresholds
The relationship between the thresholds is defined aspersistentExpiryThreshold <= revocableExpiryThresholdand is validated in the Access configuration.
If both persistent-expiry-threshold and revocable-expiry-threshold are positive:
The persistent-expiry-threshold MUST be smaller than or equal to the revocable-expiry-threshold(if the token is not saved in the database, it cannot be a revocable token).
This limitation is enforced in the code upon startup.
Note
If the persistency threshold is higher than the revocable when Access starts, an error will be logged and the thresholds will be aligned to the same number as the revocable threshold.
Generate Refreshable Tokens
As mentioned above, you can limit the validity period of a token by setting its expiry time. To allow extending access privileges of a token once it has expired, you can provide a refresh token which will generate a new token with the same privileges as the original one. This takes token management out of the hands of its issuer and delegates it to the user who received the token.
Who can refresh?
Only the instance (or HA cluster) that issued a refreshable token can actually refresh it.
Disabling the Option to Create Refreshable Tokens
From version, 7.21.1, an admin can disable the option to create refreshable tokens by setting the parameter
token.allow-refreshableto false in the$JFROG_HOME/artifactory/var/etc/artifactory/access.config.latest.ymlfile.
Grace Period for Extending an Expired Token
When a refreshable token expires, JFrog Access provides the user with a grace period that essentially extends the ability to refresh the token. This is done by using the parameter
token.refresh-expiryin the$JFROG_HOME/artifactory/var/etc/artifactory/access.config.latest.ymlfile. The default setting for this parameter is 24 hours.
Limitation
The integration of SCIM ensures that an external user who has created a token will not be able to refresh the token if they have been removed from the external authentication server.
However, if your organization has not enabled SCIM, an external user who has created a token will still be able to refresh it even they have been removed; therefore, it is recommended to implement SCIM in your system.
Generate Admin Tokens
In general, the scope for a token is defined by specifying the groups into which the token is included; however, an Artifactory administrator can also create a token with admin privileges. This can be useful for JFrog Mission Control and JFrog Xray since both of these complementary applications require admin permissions to work seamlessly with Artifactory. With this capability, when Mission Control or Xray connect to an instance of Artifactory, they can create an admin token and use that for authentication instead of using basic authentication with a username and password.
To create an admin token, from the administration module, go to User Management| Access Tokens | Generate Admin Token.
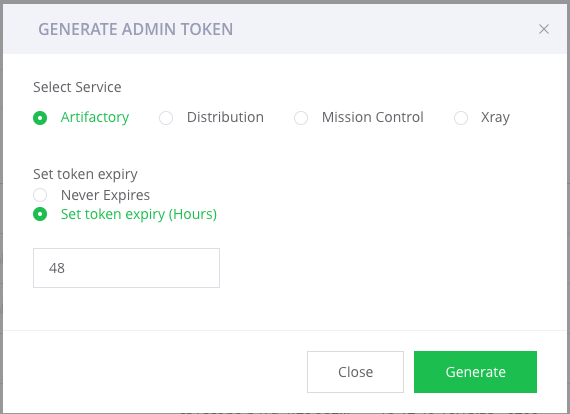
Note
The services that appear in the screen above are only those services that are available in your JFrog Platform Deployment.
Generate Scoped Tokens
The User Management function of the Administration tab provides a centralized UI for managing Scoped Tokens, which are secure access tokens that provide limited and focused permissions. Scoped tokens range from identity tokens, which any user can create for themselves (see Identity Token), to tokens that provide admin access-level permissions.
In the Administration tab, go to User Management | Access Tokens.
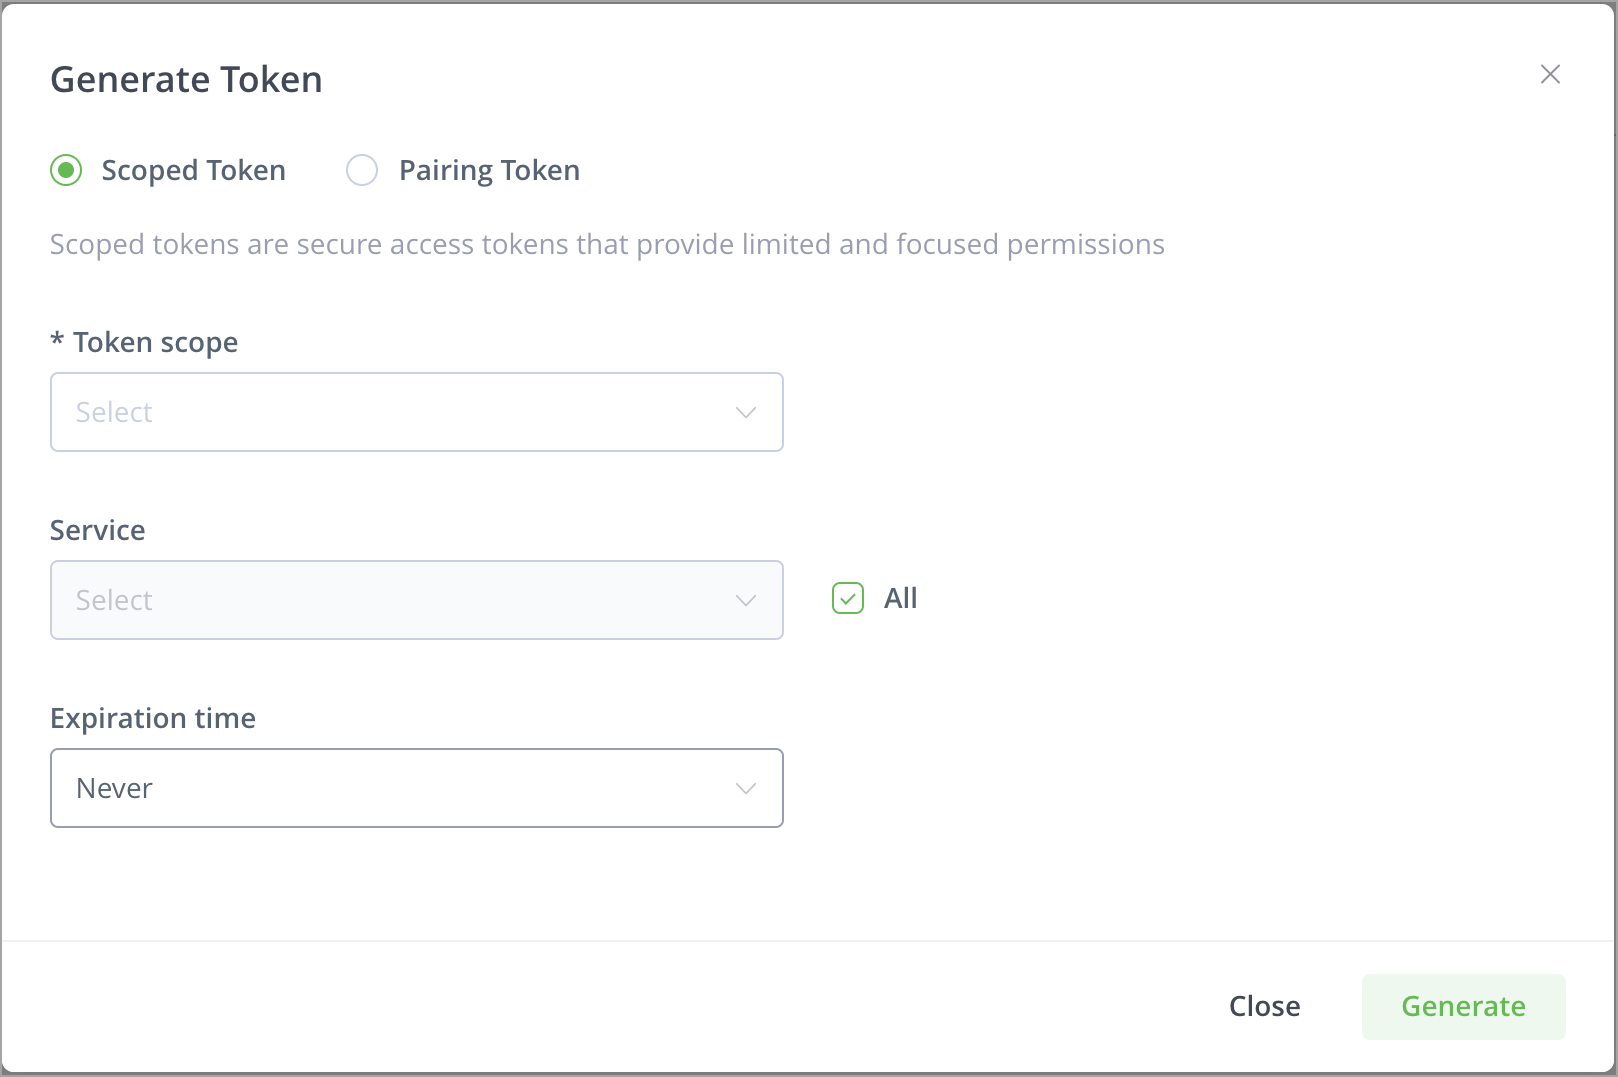
You can now create two types of tokens: an Admin token (which provides a range of permissions) or a User token.
View the Scope of a Token
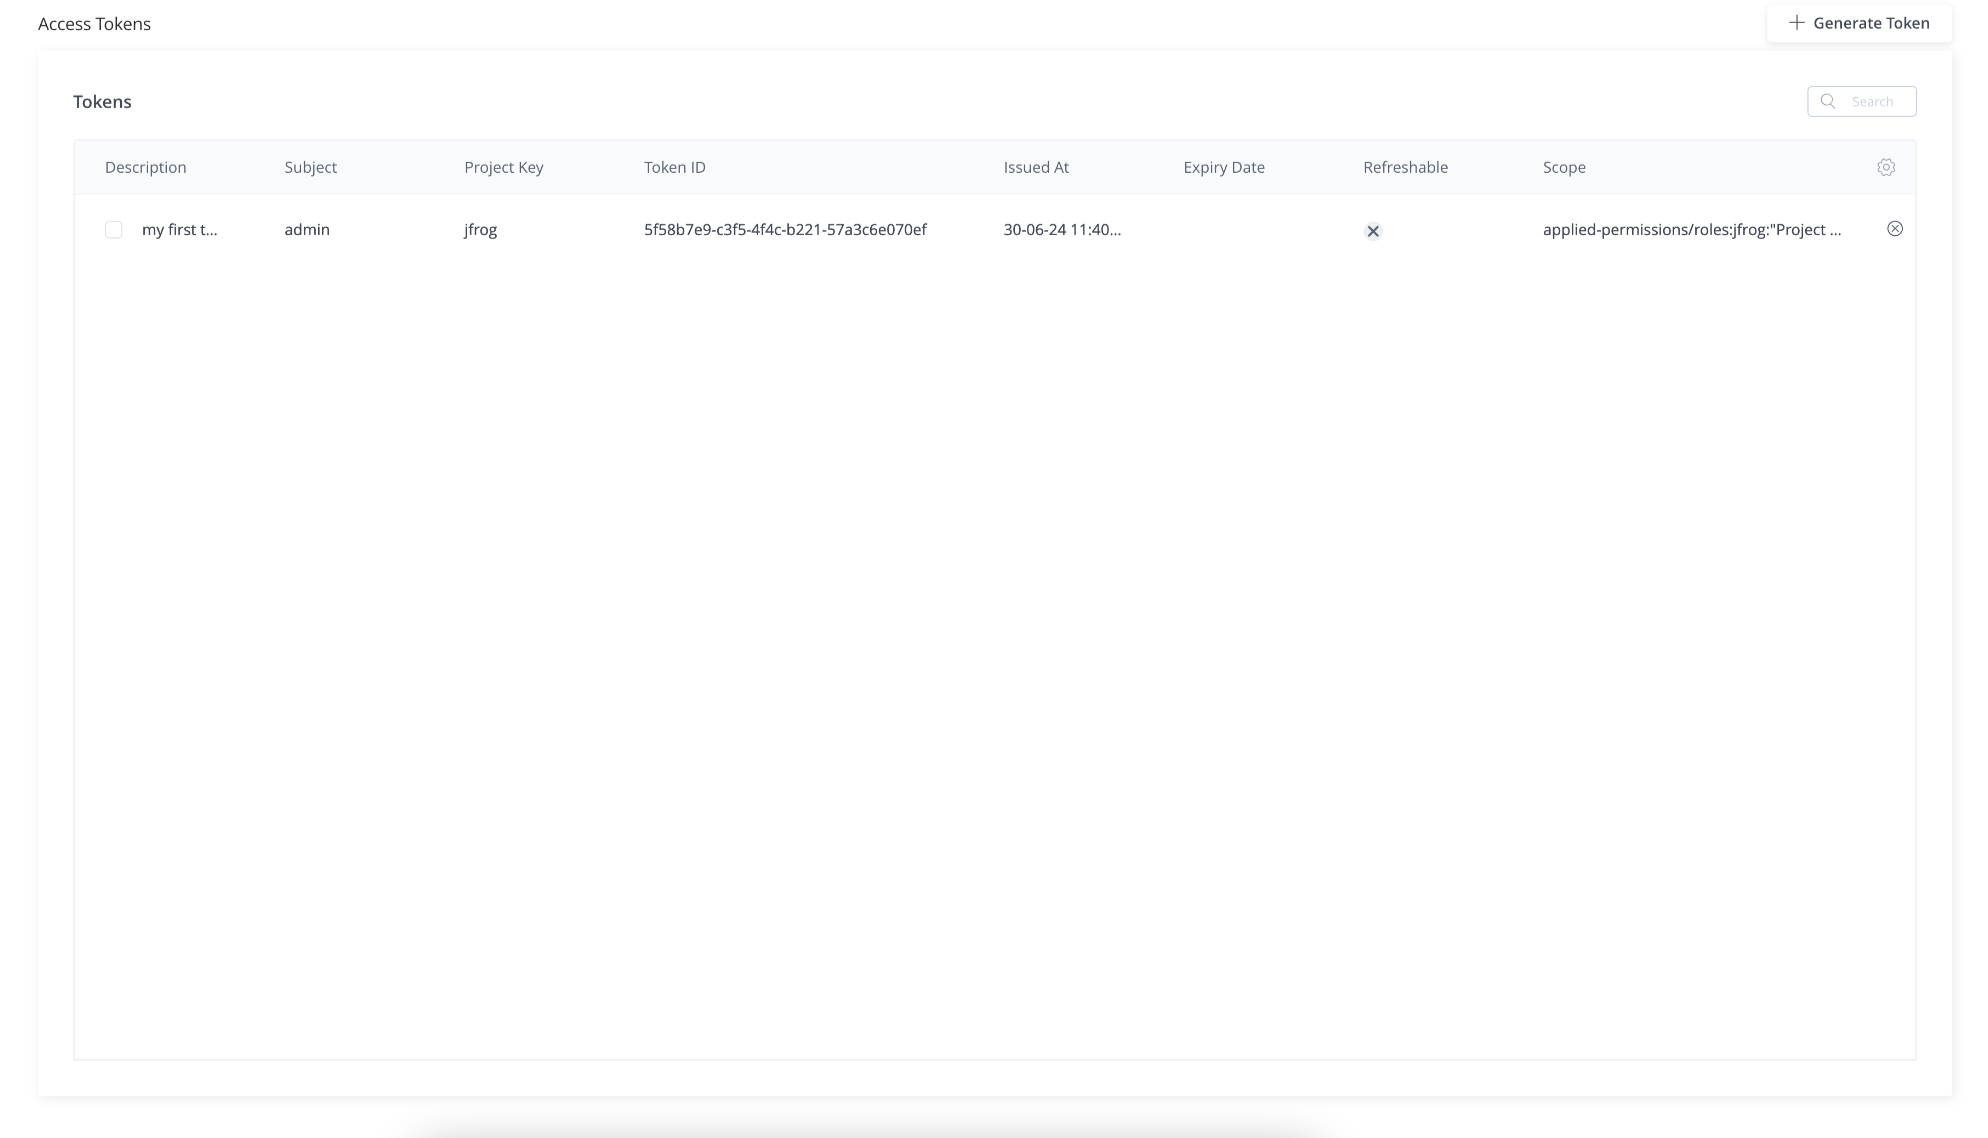
From Artifactory release 7.46.3, you can see the scope of a token in the Access Tokens UI as a column called Scope.
From Artifactory release 7.89, you can see tokens generated by Project Admins. A token generated by a Project Admin will contain project permissions and have a Project Key value and a Project Role value. It will display a value in the Project Key column, whereas for non-project admin tokens, the Project Key will be empty.
Create an Admin Scoped Token
-
In the Administration module, go to User Management | Access Tokens.
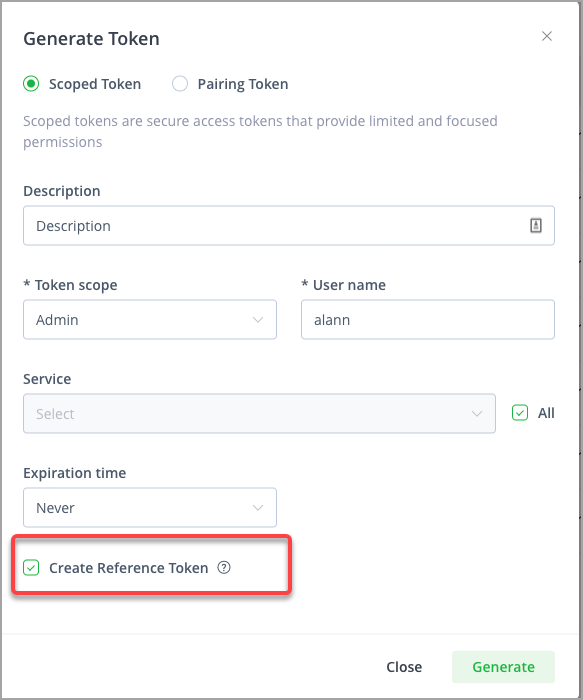
From the Token scope field, select Admin.
-
In the User name field, enter the name of the Admin user.
-
In the Service field, you can either select the checkbox All or clear the All checkbox and from the list that appears in the Service field, select the services you will the add to this user's token.
-
In the Expiration time field, set the expiration time for the token (use one of the options in the field or set a custom expiration in hours).
-
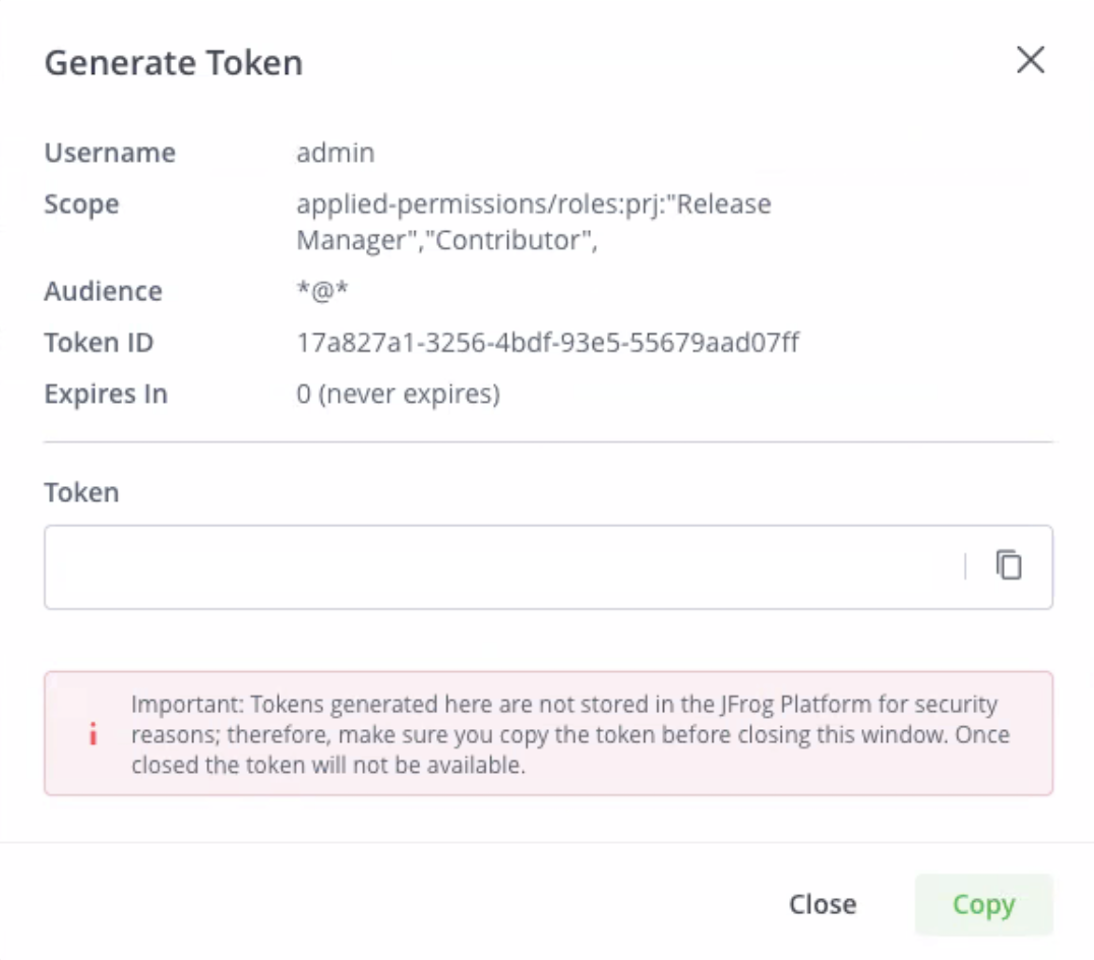
Click Generate to generate the token.
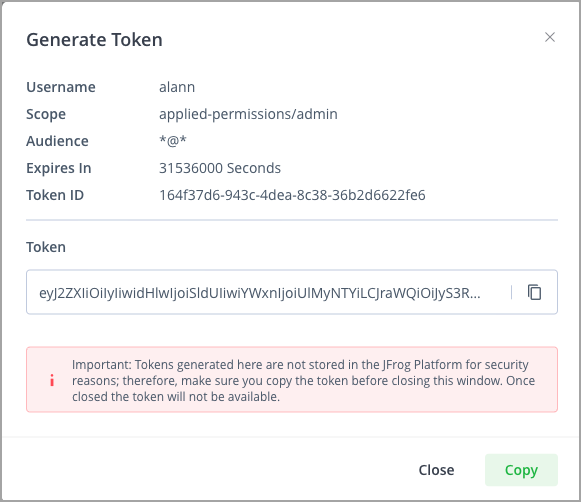
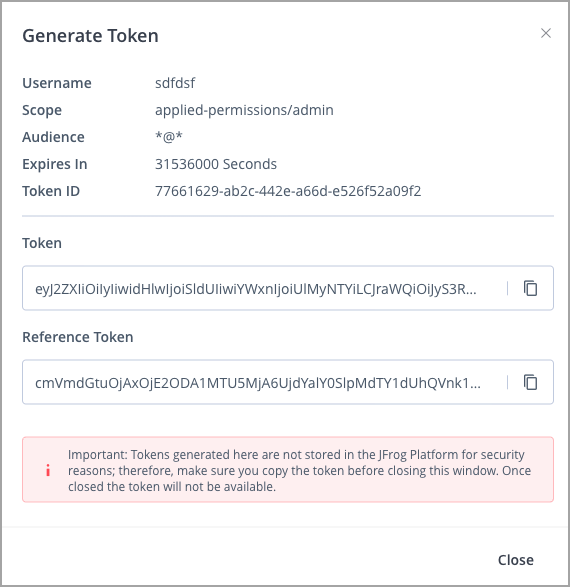
This displays the Generate Token window, which includes the username, scope, audience, expiration, token ID, and the actual token.
-
To copy the token, click the copy icon next to it or simply click Copy.
Important
Tokens generated here are not stored in the JFrog Platform for security reasons; therefore, make sure you copy the token before closing this window. Once closed the token will not be available.
Create an Admin Scoped Reference Token
From Artifactory release 7.38.4, you can choose whether to generate an extended token (as in the screen above), or to generate a Reference Token. The Reference Token is a "shortened," 128-character key, thereby providing an alias for a longer token.
Note
When creating a reference token, the maximum payload is 4,000 characters. The number or length of the groups associated with the token can affect this payload.
For SAML users, Starting from Artifactory version 7.117.1, the groups association is saved in the JFrog Platform, and does not add to the payload.
To support this option, the Generate Scoped Token UI includes an additional Create Reference Token checkbox.
-
To create a Reference Token, verify that the checkbox is selected and click Generate.
This displays the Generate Token window, which includes the username, scope, audience, expiration, token ID, the full token and the Reference token.
-
To copy either the full token or the Reference token, use the copy icon next to the token.
Important
Tokens generated here are not stored in the JFrog Platform for security reasons; therefore, make sure you copy the token before closing this window. Once closed the token will not be available.
Create a Project Admin Token
From Artifactory release 7.89, you can generate a project administrator token.
Project admins can create access tokens tied to the projects in which they hold administrative privileges. These tokens are associated with specific roles within the project, which provide the same permissions as the given project roles have at the time the token is used.
You provide the project and role when you create a token. The token gets access to all relevant Artifactory resources (builds, repositories, and artifacts) based on the project roles that are defined as part of the token creation.
-
In the Administration tab, go to User Management | Access Tokens.
-
Click + Generate Token.
This displays the Generate Token dialog.
-
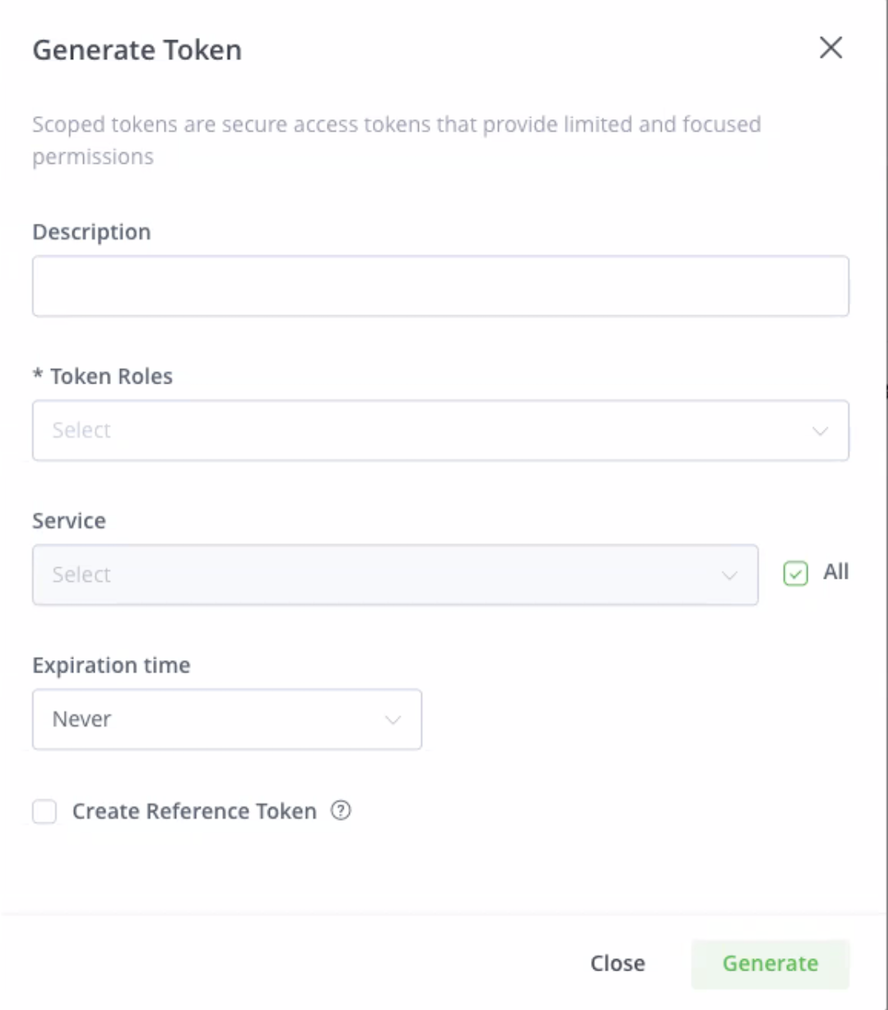
In the Description field, add a description with which to identify the token.
-
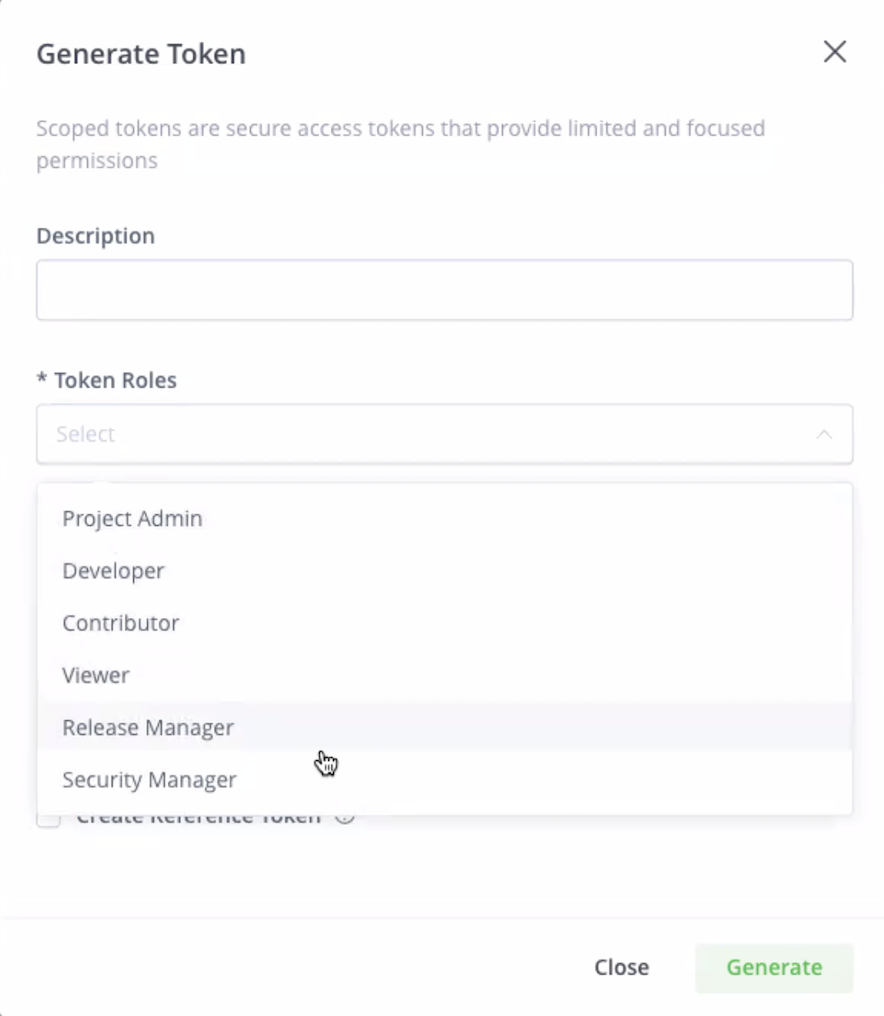
In the Token Roles field, the available project roles are displayed. The roles available can include both global and project roles.
-
In the Service field, you can either select the checkbox All or clear the All checkbox and from the list that appears in the Service field, select the services you will add to this user's token.
-
In the Expiration time field, set the expiration time for the token. Use one of the options in the field or set a custom expiration in hours. Note that there is a maximum expiration time of 24 hours, which is 1440 minutes.
-
Click Generate to generate the token.
This displays the Generate Token window, which includes the username, scope, audience, expiration, token ID, and the actual token.
Create a User Scoped Token
-
In the Administration module, go to User Management | Access Tokens. From the Token scope field, select User.
-
Select a user from the drop-down list in the Users field.
You can also type the name of the user in the field to locate the user.
-
In the Service field, you can either select All, or clear the checkbox and select the services to add to the token from the drop-down list.
-
In the Expiration time field, set the expiration time for the token.
You can use one of the options in the field or set a custom expiration in hours
-
Click Generate in order to generate the token.
The token window appears, which includes the scope, audience, expiration, token ID, and the actual token. Click Copy to copy the token.
Create a Group Scoped Token
-
In the Administration module, go to User Management | Access Tokens.
From the Token scope field, select Group.
-
Select a group from the drop-down list in the Groups field.
You can also type the name of the group in the field to locate the group.
-
In the Service field, you can either select All, or clear the checkbox and select the services to add to the token from the drop-down list.
-
In the Expiration time field, set the expiration time for the token.
You can use one of the options in the field or set a custom expiration in hours.
-
Click Generate in order to generate the token.
The token window appears, which includes the scope, audience, expiration, token ID, and the actual token. Click Copy to copy the token.
Generate Pairing Tokens
A pairing token manages connections by establishing trust between different JFrog microservices.
The pairing token is an access token that is used for the initial pairing flow. Because the token is a limited-access token, it is dedicated to a specific task and short-lived. Once trust is established, the services can continue using the standard token-based authentication for communication.
How do Pairing Tokens and Join Keys Differ?
Pairing tokens replace the join.key that was used in the past in the JFrog Platform to link between services. This type of token is only designed to link cross-topologies (i.e., locally, and not with in a JPD).
The JFrog join.key feature establishes trust between the JFrog services based on symmetric encryption (AES-128 bit or AES-256 bit). The join.key is used internally for creating trust between microservices of the same service, for example between Artifactory and Access.
Pairing tokens provide pairing for a specific purpose use case. They are revocable, and are expected to be used at most once (i.e., revoked after first pairing). The default expiry setting for these tokens is 5 minutes.
- The subject of the token is the same as the subject of the principal who requested the pairing token
- The base URL in the extension is mandatory
- The exchange URL in the extension is mandatory (since the token is signed, this URL can be assumed as trusted)
- The pairing URL is optional and is used when you need to establish a two-way trust
Master Token
The result of a pairing is the master token, which is an access token that grants the requesting service all the actions it is required to do on the issuing service, based on the given use case. The master token is usually a strong access token that can be used for several operations and is usually a long-lived token. An admin user can revoke trust by revoking this token.
Supported Pairing Tokens
Pairing tokens enable you to connect between the following:
- Between your JFrog Platform Deployment (JPD) / edge and a remote JFrog Mission Control service. The subject of the token is the same as the subject of the principal who requested the pairing token.
- Between two JPDs (two Artifactory instances) that will be used to create a JFrog Archive; in this case the pairing token that is generated will be used for the API binding process.
Pairing Tokens to Bind a JPD and a Mission Control Microservice
-
In the Administration tab, go to User Management | Access Tokens | Pairing Token.

-
In the Generate Pairing Token for field, select Mission Control (for JPDs).
-
Click Generate to generate the token.
This displays the token window, which includes the token's expiration (in seconds, set by default to 300 seconds = 5 minutes), the token ID, and the actual token, which you can copy by clicking Copy.
Pairing Tokens to Set up Cold Storage (Using the API)
- In the Administration tab, go to User Management | Access Tokens | Pairing Token.
- In the Generate Pairing Token for field, select Cold Storage.
- Click Generate to generate the token.
- This displays the token window, which includes the token's expiration (in seconds, set by default to 300 seconds = 5 minutes), the token ID, and the actual token, which you can copy by clicking Copy.
- Next, use the token you generated above and follow the steps in Setting Up Cold Artifact Storage Using REST APIs.
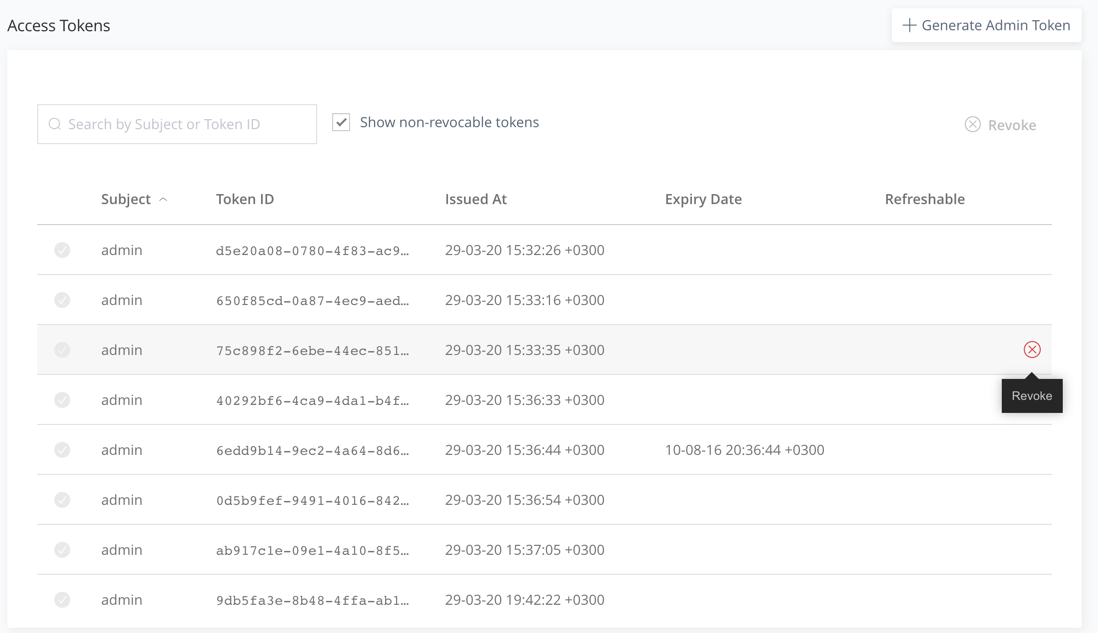
View and Revoke Tokens
Any token created with expiry greater than the revocable-expiry-threshold parameter can be revoked using the Revoke Token by ID REST API endpoint or in the Access Tokens page in the UI. Note that you can only revoke a token on the instance (or cluster) that issued it unless that instance is part of an Access Federation setup (which requires an Enterprise+ license).
Note
Since 7.21.1, access tokens are scoped tokens. Access to the REST API is always provided by default; in addition, you may specify the group memberships that the token provides. Administrators can set any scope, while non-admin users can only create Identity Tokens (user scope). See Access Token Structure for details.
A token with an expiry specified will lapse automatically upon reaching its expiry period.
A token that is not expirable (i.e., was created with its expires_in parameter set to 0) must be actively revoked to terminate its usage.
To revoke an access token:
-
From the Administration module, select User Management | Access Tokens.
-
From the list, select an access token and click Revoke.
Choosing Whether a Token Gets the "Force Revocable" Flag in the REST API
From Artifactory 7.50.x, the "force revocable" flag in the tokens has been removed as a default setting and is now a Boolean parameter called "force_revocable" in the Create Token REST API. (The "force revocable" flag previously determined whether to create an access token as “revocable”, regardless of any other configuration that might tell it otherwise.)
When this parameter is set to true, we will add the "force_revocable" flag to the token's extension. In addition, a new configuration has been added that sets the default for setting the "force_revocable" default when creating a new token - the default of this configuration will be "false" to ensure that the Circle of Trust remains in place.
Support Authentication for Non-existing Users
One of the big advantages of access tokens is the fact that you can check authorization based on a group in Artifactory, rather than on a user. When creating a group token, Artifactory will authorize with the group's permissions and that authorization will only exist as long as the token is valid. This can be useful when providing access to different tools such as a CI server coordinating a build without having to manage fake user accounts. This method is also more secure since you can assign a new token for each "job" that the external tool runs.
Artifactory Administrator Only
Note that this feature is only available for Artifactory administrators, since non-admin users can only create tokens with themselves as the Subject.
You can create a group scoped token that can be used when you want to authenticate without creating or using a specific user. The group privileges apply to the group scoped token.
To create a group scoped token using the Platform UI, see Create a Group Scoped Token.
Alternatively, you can create a group token using the Create Token REST API where the scope is as follows:
applied-permissions/group:{group_name}If there are multiple groups, the groups are separated by commas and use quotes, as in the following examples:
"applied-permissions/groups:group_1,group_2"applied-permissions/groups:"group_1,group_2"Usage Example
curl -H "Authorization: Bearer $TOKEN" -XPOST "http://artifactory-up:8082/access/api/v1/tokens" -d '{"description" : "test", "scope" : "applied-permissions/groups:group_1,group_2", "include_reference_token" : "true", "refreshable" : "true"}' -H "Content-type: application/json"Transient Users and Auto Join Groups
When a token's subject is a non-existing user, the JFrog Platform creates an in-memory transient user during authentication. This user exists only for the duration of that session and is not saved to the database.
If the token includes the applied-permissions/user scope—which is added automatically during OIDC exchanges that include a username—the transient user inherits all local Auto Join groups at authentication time.
The JWT itself does not contain these auto-join groups. Because groups are applied on the fly at authentication, different Access servers may grant different permissions for the exact same token depending on their local Auto Join configurations.
| Token type | Effective permissions |
|---|---|
Groups-only token (no applied-permissions/user scope) | Explicitly mapped groups only |
Token with applied-permissions/user scope | Explicitly mapped groups plus any local Auto Join groups |
To prevent accidental permission expansion, regularly audit your Auto Join groups—especially if you use OIDC identity mappings.
Binding Tokens
Subscription Information
This feature is supported with Enterprise X and Enterprise+ licenses.
JFrog Platform supports access tokens when configuring the different JFrog products, which provides a flexible means of authentication. With the release of JFrog Artifactory 7.33.8, JFrog introduces a type of token called a binding token, which allows trust to be bi-directional. While binding was available with the older access methods (Circle of Trust, join key, etc.), it has now been implemented as part of the JFrog Platform Deployments function in the Administration tab.
Binding tokens are managed through the JFrog Platform UI. Binding tokens require you to have an enabled Mission Control service, since the binding token is created by Mission Control. Token renewal is also handled by Mission Control.
How do Binding Tokens Differ from a Circle of Trust?
A "Circle of Trust" is established by sharing a public certificate among all participating instances. It is up to the service administrator to make sure that all participating instances are equipped with the certificates. This means that any instance can generate a token to be used with any other instance within the Circle of Trust. In essence, a Circle of Trust means that a service will verify access token signatures against all trusted certificates, including ones generated by other services and set as 'trusted' as part of the Circle of Trust.
Binding tokens provide a narrowed trust scope for those customers that do not wish to provide full access to the other JPDs, and also full self-service for Cloud Enterprise customers that can build customizable binding to the other JPDs on their own.
Binding tokens enable admins to create trust between managed JFrog Platform Deployments (JPDs) once the JPDs have been added to the Mission Control instance, thus simplifying the setup across JPDs. This makes it possible to support use cases such as Federated Repositories for Cloud customers.
Circle of Trust for Self-hosted Customers
JFrog Platform will continue to support the Circle of Trust method for Self-hosted customers that allow full access to other JPDs.
From Artifactory version 7.33.8, the JFrog Platform enables you to manage your binding tokens through both the Platform UI (in the Platform Deployments tab in the Administration module).
To create binding tokens in the UI, you will need to make sure of the following:
- You have Mission Control enabled in your Artifactory
- You have added JPDs to the Mission Control instance by registering Platform Deployments
Set Up Binding Tokens for Federated Repositories
This section describes the steps for setting up binding tokens for Federated Repositories.
When establishing trust between the two JPDs for Federated Repositories, ensure that you add the root and intermediate certificates to the Artifactory folder, security folder, key folder, and trusted folder.
Note
Binding tokens require you to have an enabled Mission Control service, since the binding token is created by Mission Control. Token renewal is also handled by Mission Control.
-
From the Administration module, click Platform Deployments | Bindings.
This displays the list of available JPDs and their bindings.
-
Click +Add Binding | Federated Repository.
This displays the Create Binding window.
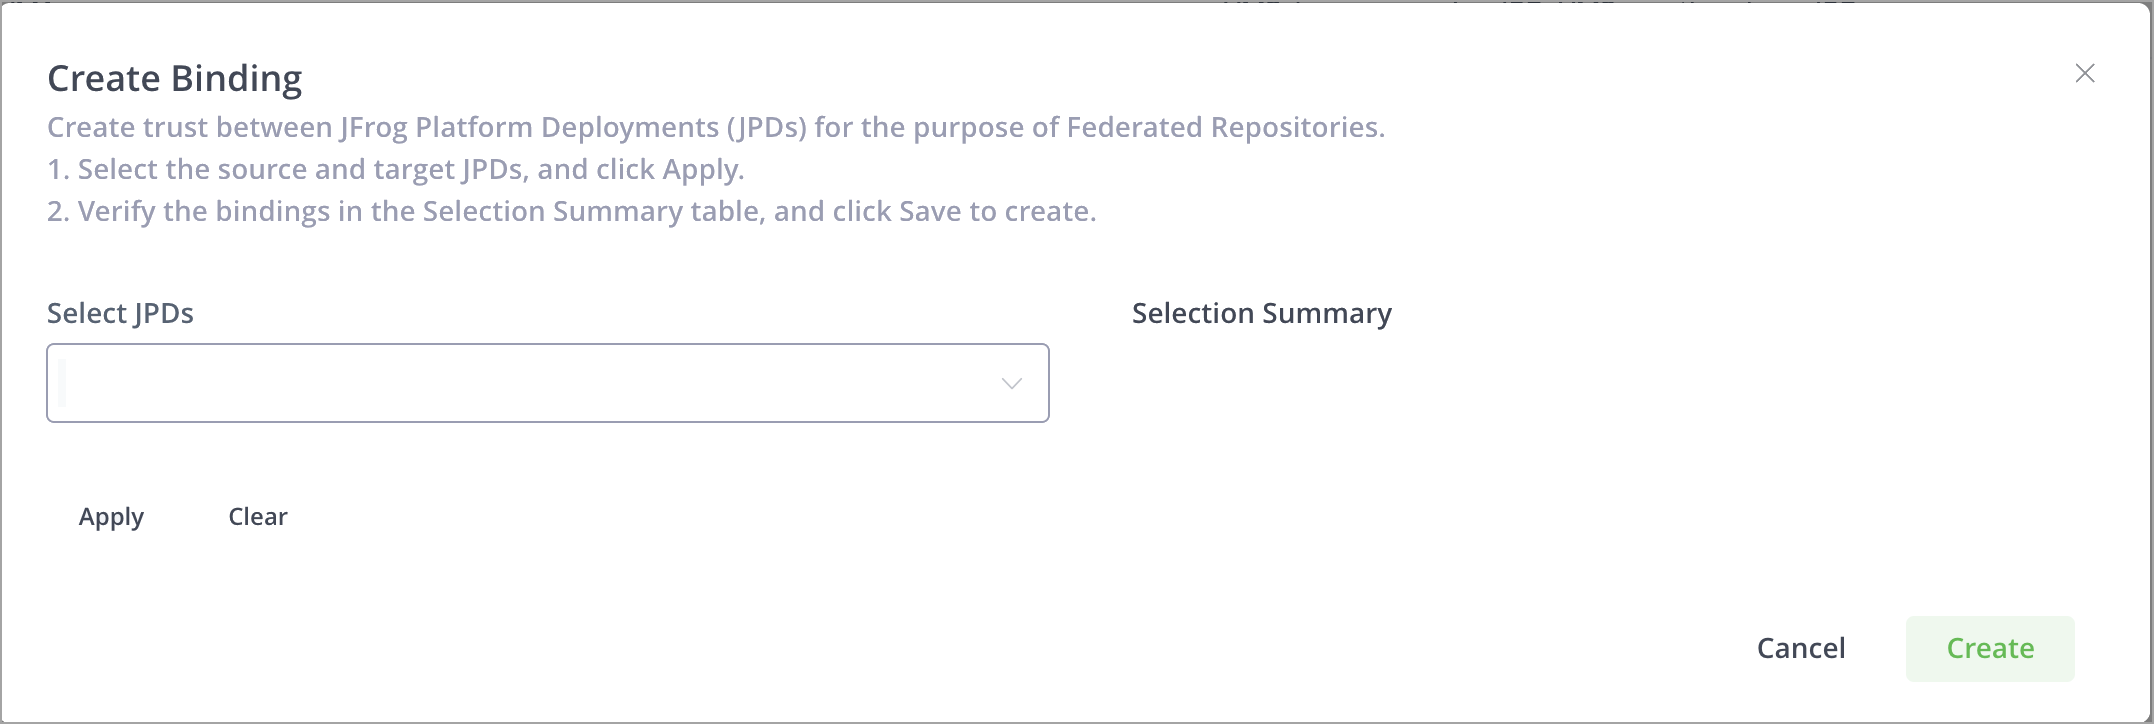
-
In the Select JPDs dropdown list, select the JPDs - source and target - that you wish to bind to each other.
-
Click Apply.
The Selection Summary now displays the target and source you selected.
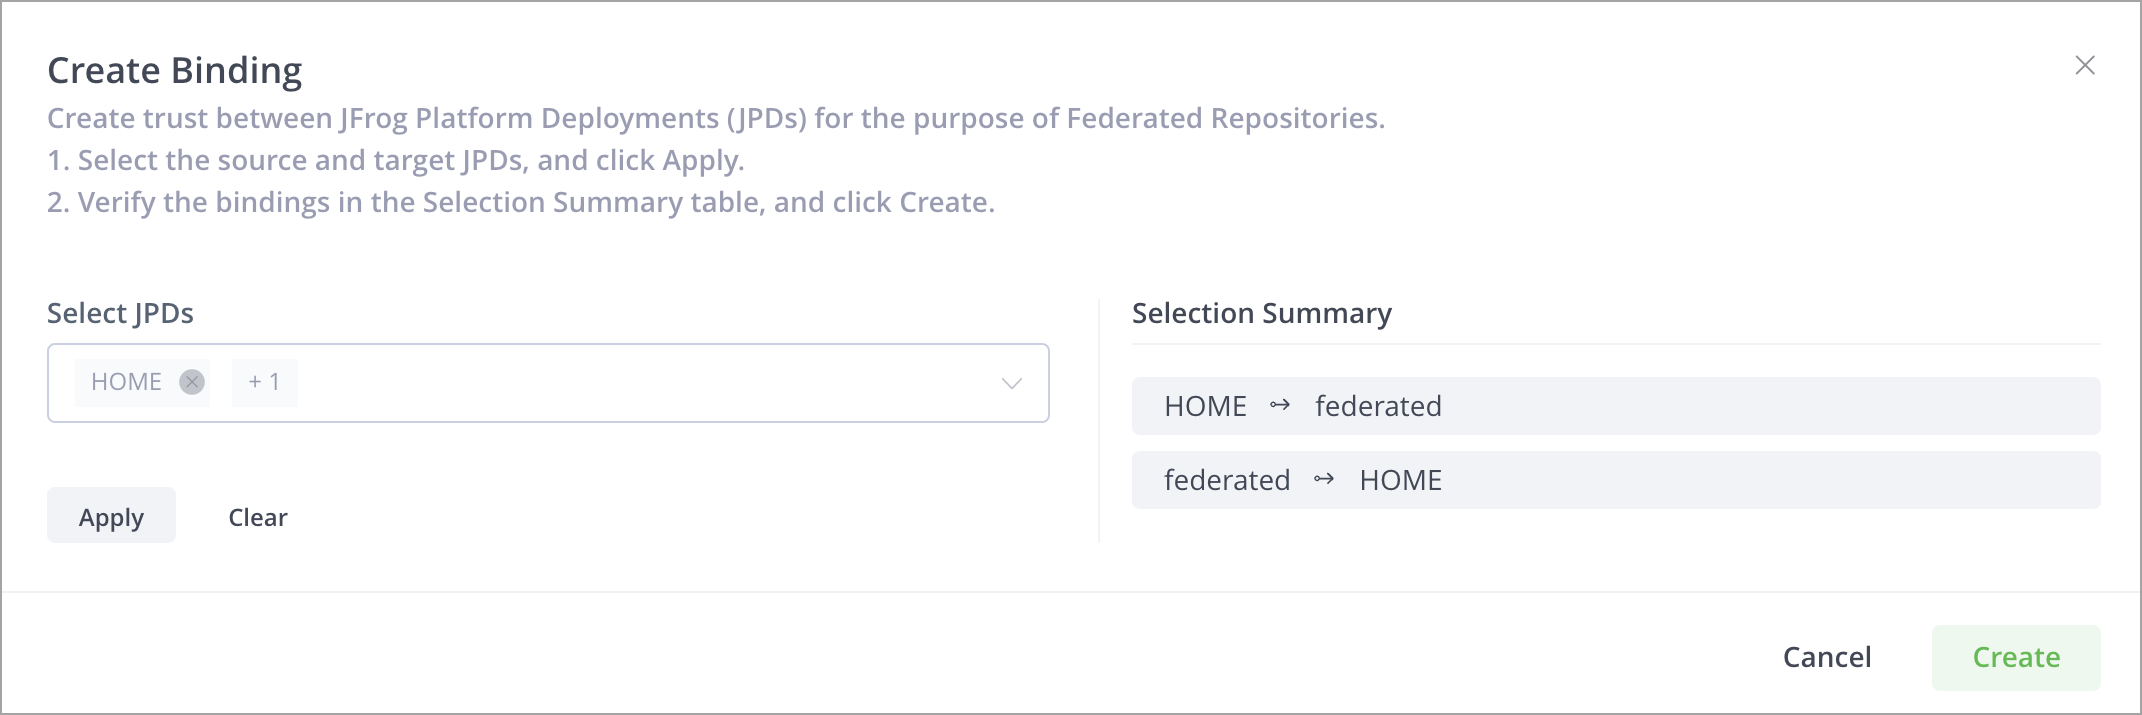
-
To add more JPDs to the binding, add them in the Select JPDs field, and then click Apply again.
-
Click Create to create the new binding.
The results of the bindings you created are displayed.
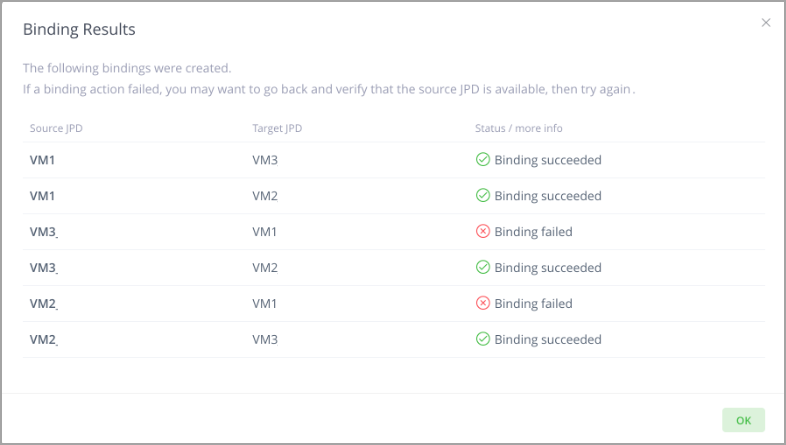
If a binding action failed, you may want to go back and verify that the source JPD is available, then try again.
Remove Bindings
Removing a binding between a source JPD and target JPD means you are deleting a bi-directional connection (from source to target and target to source).
-
From the Administration module, click Platform Deployments | Bindings.
-
In the Deployment Bindings window, select the checkboxes of the bindings you wish to remove, and then click the Delete button to the right of the binding.
-
If you are deleting multiple bindings, select all checkboxes, and at the bottom of the window, select Delete.
This displays a confirmation message that asks if you are sure you wish to remove the binding.
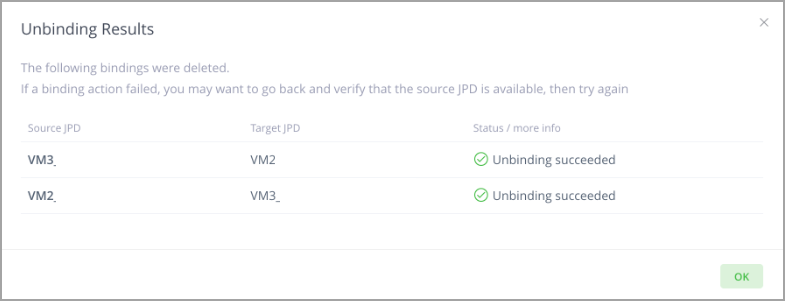
Removing a binding removes the bi-directional connection (from source to target and target to source).
-
Click OK to confirm.
Your action is applied and the results of the unbinding are now displayed.
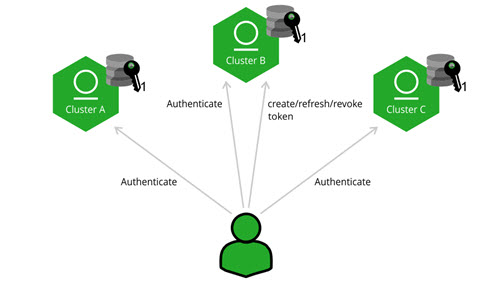
Circle of Trust (Cross-Instance Authentication)
Access tokens support cross-instance authentication through a "circle of trust", which is established by sharing a public certificate among all participating instances. In essence, a circle of trust means that a service will verify access token signatures against all trusted certificates, including ones generated by other services and set as 'trusted' as part of the circle of trust.
Note
It is up to the service administrator to make sure that all participating instances are equipped with the certificates. This means that any instance can generate a token to be used with any other instance within the circle of trust.
Why do I Need a Circle of Trust?
A circle of trust is required when you have a series of JPDs that need to be accessed using a single set of credentials. For example, a single build agent that needs to upload and download from two JPD instances. By creating a circle of trust, you can ensure that one JPD instance will trust another instance’s tokens. This is achieved by sharing the public token certificate between all instances within the circle.
Note
Trusted certificates can be loaded and removed while the server is running, and do not require a restart.
How to Establish a Circle of Trust
To establish a "Circle of Trust" between JFrog services, you will need to exchange the public token certificate between the services.
Services that are within the circle of trust have complete admin privileges on each other. To exchange the certificates, you need to copy a service’s root certificate to another service’s$JFROG_HOME/artifactory/var/etc/access/keys/trustedfolder.
The service's root certificate can be acquired in the following ways:
- found under
$JFROG_HOME/artifactory/var/etc/access/keys/root.crt(requires physical access to the server) - by calling the Get Root Certificate REST API
Note
The
root.crtwill disappear from the target's trusted folder and will be placed in the Artifactory database.
To establish a circle of trust in a Helm installation, see Add circle of trust certificates to a Helm installation.
Trust can be created between multiple services: you need to make sure that all participating instances in the circle of trust are equipped with the relevant public keys (root certificate). Note that a trust can be unidirectional or bidirectional. The service watches a directory of trusted public keys and reloads the keys when it needs to verify a token
Renaming the source service’s certificate
Since trust can be created between multiple services, you should rename each source service’s certificate with a meaningful name. For example, if one service named “us-east” should be trusted by another service named “us-west”, then
$JFROG_HOME/artifactory/var/etc/access/keys/root.crtfrom us-east, should be copied to$JFROG_HOME/artifactory/var/etc/access/keys/trusted/us-east.crton us-west.
Use the same Artifactory userid and groupid
Make sure you give the same Artifactory
useridandgroupidto the root certificate in the trusted folder ($ARTIFACTORY_HOME/access/etc/keys/trusted/*) by comparing to the other files from the previous folder ($ARTIFACTORY_HOME/access/etc/keys/).
Security Restrictions
To make JFrog access tokens as secure as possible, some configured values ensure that tokens are managed and can only be used for the right purposes:
-
Scope: If the token scope is a user or a group, you must ensure that the user or group exists on all servers in the circle of trust.
-
Revocability: For security purposes, the JFrog Platform is deployed with default configurations that set every token to be revocable. However, revocable tokens are validated against the Access database, and a token created in one JPD cannot be validated against the Access database of another JPD. Do one of the following:
- Set up Access Federation with the JPDs of the Circle of Trust. Access Federation lets you share revocable tokens and other entities among JPDs. JFrog's recommends this configuration.
- Use short-lived tokens. On each server, give the token used for the Circle of Trust an expiry that is less than the value of the
revocable-expiry-thresholdparameter in theaccess.config.yamlfile. To ensure consistent, reciprocal authentication, define the same value forrevocable-expiry-thresholdon all servers in the Circle of Trust.
-
Token type: The following types of tokens are not supported in a Circle of Trust:
- Reference tokens are not supported in a circle of trust (they always require the token to be in the instance’s database).
- UI-generated tokens: Tokens created via the User Profile page are reference tokens and are not supported in a circle of trust.
Limitations
By default, only the issuing instance can refresh a token. For synchronizing tokens across services, see Access Federation.
Access Token REST API
You can manage access tokens through the Access Token REST API.