Upgrading via installV2.sh ( Xray Version >= 3.131.x )
Use installV2.sh to upgrade JFrog Xray and optionally enable RabbitMQ Quorum Queues or upgrade to RabbitMQ 4, starting from version 3.131.x.
Upgrading from Xray Version 3.131.x to 3.131.x or above
RPM, Debian, or Docker Compose
Starting JFrog Xray version 3.131.x, the installer script will allow you to install RabbitMQ 4 and/or Quorum queues, optionally.
The installer script works with all supported upgrade methods (RPM, Debian, and Docker Compose). It provides you an interactive way to upgrade Xray and its dependencies.
Stage 1
-
Download Xray (RPM, Debian, or Docker Compose).
-
Add the following in the system.yaml
-
(Only for Docker Compose)
shared:
    rabbitMq:
        username: guest
(Default is
guest. If you override this during installation, update accordingly.) -
(Only for RPM and Debian based installation)
shared:
    rabbitMq:
        autoStop: true
-
-
Stop the service.
systemd OS
systemctl stop xray.servicesystemv OS
service xray stopDocker Compose
cd jfrog-xray-<version>-compose docker-compose -p xray down docker compose -p xray-rabbitmq -f docker-compose-rabbitmq.yaml down -
Extract the contents of the compressed archive and go to the extracted folder. The installer script is located in the extracted folder.
tar -xvf jfrog-xray-<version>-<compose|rpm|deb>.tar.gz
cd jfrog-xray-<version>-<compose|rpm|deb>For Docker Compose upgrades, merge any customizations from your current
docker-compose.yamlinto the newly extracted version before proceeding.
The newly extracted archive includes a fresh
.envfile with the latest component versions (for example,ROUTER_VERSION,OBSERVABILITY_VERSION,XRAY_VERSION).
Do not overwrite or remove these version entries as they must remain as is to ensure the correct versions are installed. Copy only the non-version settings from your previous.envfile into the new one.
Stage 2
-
Run the installer script.
If needed, the script will prompt you with a series of mandatory inputs, including the jfrogURL (custom base URL), joinKey, and the Rabbitmq Quorum queue or version migration.
Compose
./configV2.shRPM/DEB
./installV2.sh
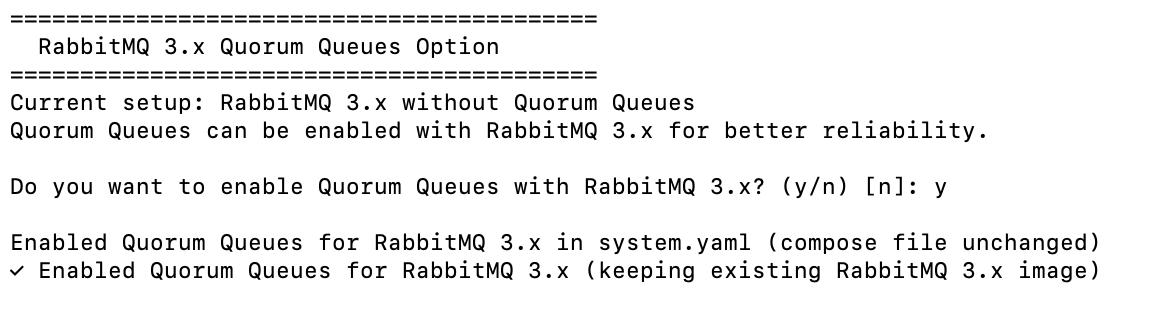
Upgrading to RabbitMQ and the Quorum queue is a 2-step process. The first time you run the upgrade script, it will ask you to optionally enable Quorum Queue with RabbitMQ3
-
Add the following section to the system.yaml file (if not present)
shared: rabbitMq: replicaCount: <your current rabbitmq node count> dataMigrations: migrate_msgs_from_other_rabbitmq: vhost: "%2F" -
(Only for Docker Compose) Edit the
docker-compose-rabbitmq.yamland add theulimitsunderservicesif not already set:services: rabbitmq: ulimits: nofile: soft: 100000 hard: 100000 -
❗ Restart Xray only after adding the above configuration to system.yaml.
-
After completing the above, proceed to the next set of nodes
Verification of Quorum Queue Migration
❗Proceed to Stage 3 - Only after all the nodes are upgraded in the cluster to quorum and the quorum migration is verified in the logs)
Quorum migration will only happen, after all the nodes are upgraded in the cluster
Follow these steps to verify:
- See Verify quorum migration in troubleshooting page
- Look for these logs in the xray-server.log: (Will take 20 minutes after the migration for these logs to appear)
RabbitMQ migration migrate_msgs_from_other_rabbitmq completed successfully
RabbitMQ migration delete_classic_queues_vhost completed successfully
Stage 3
-
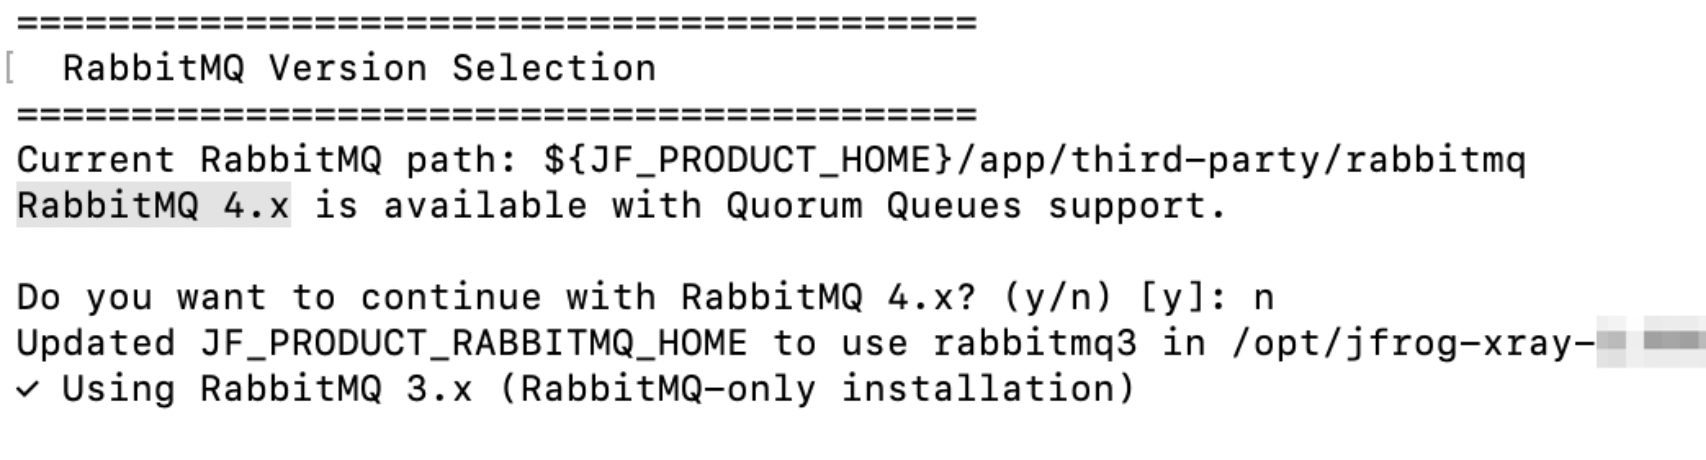
The next time you run the same script, it will optionally ask you to upgrade to RabbitMQ4
-
Stop the service.
systemd OS
systemctl stop xray.servicesystemv OS
service xray stopDocker Compose
cd jfrog-xray-<version>-compose docker-compose -p xray down docker compose -p xray-rabbitmq -f docker-compose-rabbitmq.yaml down -
Run the installer script.
Compose
./configV2.shRPM/DEB
./installV2.sh
- After the upgrade start the Xray service.
systemd OS
systemctl start xray.servicesystemv OS
systemctl start xrayDocker Compose
cd jfrog-xray-<version>-compose
docker-compose -p xray up -d
docker compose -p xray-rabbitmq -f docker-compose-rabbitmq.yaml up -d- Access Xray from your browser at:
http://<jfrogUrl>/ui/ , go the Xray tab in the Application module in the UI.
- Check Xray Log.
tail -f $JFROG_HOME/xray/var/log/console.logLinux Archive
Starting with Xray version 3.131.x, the installer script will optionally allow you to install RabbitMQ 4 and/or Quorum queues. Before proceeding with the upgrade, make sure your existing Xray deployment is using RabbitMQ version 3.11.x or higher
The installer script provides an interactive way to upgrade Xray and its dependencies. Make sure to upgrade one node at a time when upgrading a cluster of nodes.
Stage 1
-
Download Xray (Linux Archive).
-
Add the following in the system.yaml
shared: rabbitMq: autoStop: true -
Stop the service.
cd $JFROG_HOME/xray/app/bin ./xray.sh stop or systemctl stop xray.service -
Extract the contents of the compressed archive, go to the extracted folder, and replace the existing $JFROG_HOME/xray/app with the new app folder. The installer script is located in the extracted folder.
tar -xvf jfrog-xray-<version>-<linux>.tar.gz
cd jfrog-xray-<version>-<linux>

# Export variables to simplify commands
export JFROG_HOME=/opt/jfrog
export JF_NEW_VERSION=/opt/jfrog/jfrog-xray-<version>-linux

# Remove app
rm -rf $JFROG_HOME/xray/app

# Copy new app
cp -fr $JF_NEW_VERSION/app $JFROG_HOME/xray/

# Remove extracted new version
rm -rf $JF_NEW_VERSION
Stage 2
-
Run the installer script.
If needed, the script will prompt you with a series of mandatory inputs, including the jfrogURL (custom base URL), joinKey, and the Rabbitmq Quorum queue or version migration.
cd $JFROG_HOME/xray/app/bin
./installV2.sh
-
chown -R xray user:xray user $JFROG_HOME/xray
-
Add the following section to the system.yaml file (if not present)
shared: rabbitMq: replicaCount: <your current rabbitmq node count> dataMigrations: migrate_msgs_from_other_rabbitmq: vhost: "%2F" -
❗ Restart Xray only after adding the above configuration to system.yaml.
$JFROG_HOME/xray/app/bin/xray.sh start|stop or systemctl start xray.service -
After completing the above, proceed to the next set of nodes
Verification of Quorum Queue Migration
❗Proceed to Stage 3 - Only after all the nodes are upgraded in the cluster to quorum and the quorum migration is verified in the logs)
Quorum migration will only happen, after all the nodes are upgraded in the cluster
Follow these steps to verify:
- See Verify quorum migration in troubleshooting page
- Look for these logs in the xray-server.log: (Will take 20 minutes after the migration for these logs to appear)
RabbitMQ migration migrate_msgs_from_other_rabbitmq completed successfully
RabbitMQ migration delete_classic_queues_vhost completed successfully
Stage 3
- The next time you run the same script, it will optionally ask you to upgrade to RabbitMQ4
❗Erlang 27 should be installed prior to upgrading to RabbitMq 4 - Stop the service.
cd $JFROG_HOME/xray/app/bin ./xray.sh stop or systemctl stop xray.service - Run the installer script.
cd $JFROG_HOME/xray/app/bin
./installV2.sh
- After the upgrade start the Xray service.
$JFROG_HOME/xray/app/bin/xray.sh start|stop

or

systemctl start xray.service- Access Xray from your browser at:
http://<jfrogUrl>/ui/ , go to the Xray tab in the Application module in the UI.
- Check Xray Log.
tail -f $JFROG_HOME/xray/var/log/console.log