RabbitMQ (Split) for Xray ( Xray Version >= 3.131.x )
Install Xray and RabbitMQ on separate nodes. Connect multiple Xray nodes to a shared RabbitMQ cluster for HA.
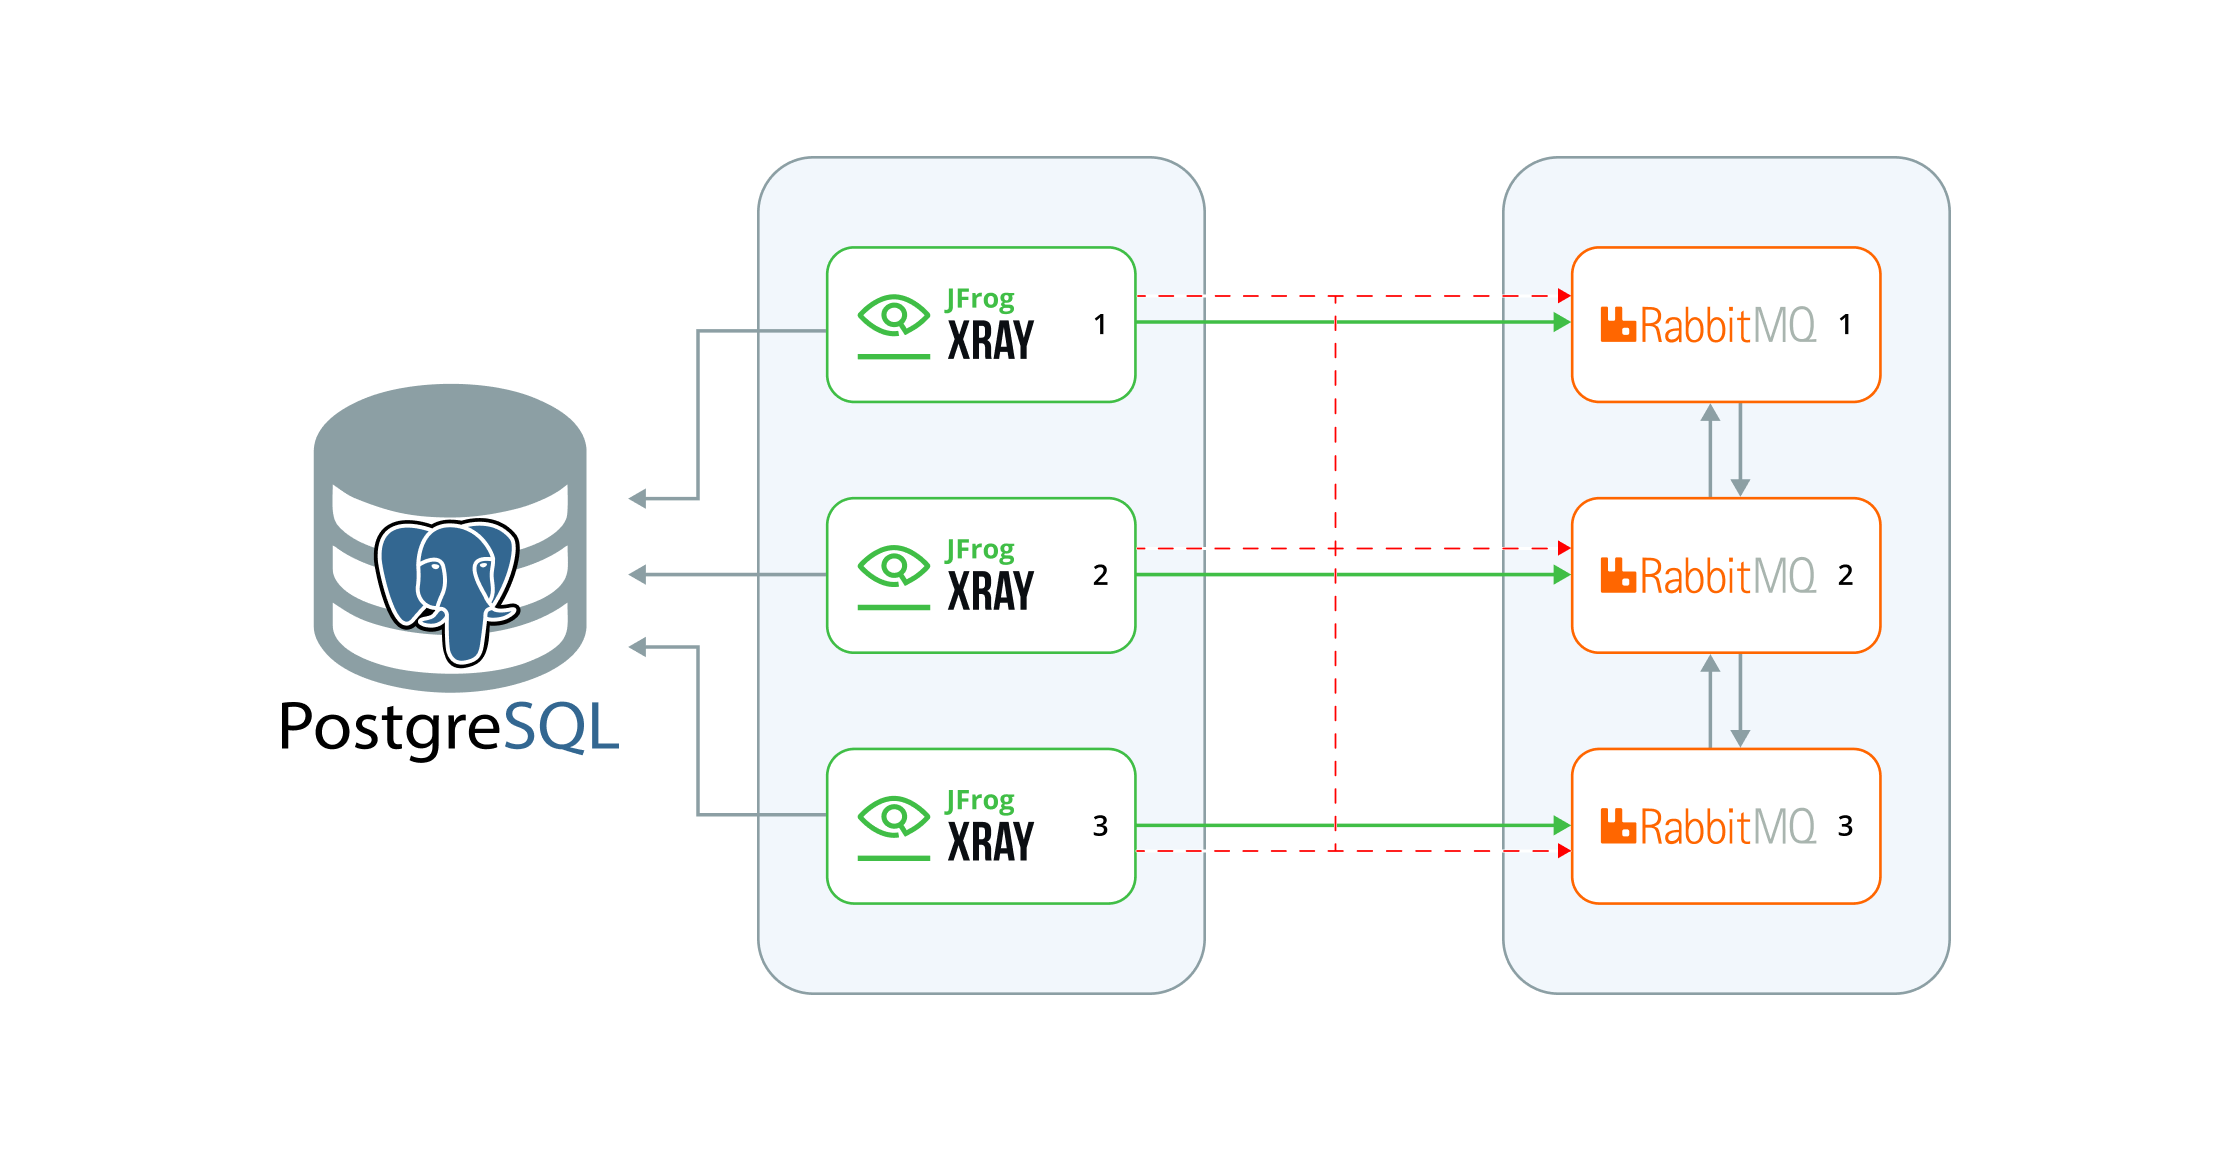
This is a guide for installing Xray and RabbitMQ on separate nodes and connecting multiple Xray nodes to a RabbitMQ cluster (sequentially) to achieve high availability.
The setup supports native (rpm, deb), Linux archive, and docker-compose-based installation. This document uses three nodes for the application, RabbitMQ, and one Xray database node for demonstration purposes.
Why separate them?
-
Improved Scalability with Dedicated Resources:
Separating RabbitMQ allows for dedicated resource allocation (CPU, memory, and I/O), enabling it to scale independently from the application services.
-
Reduced Resource Contention:
When RabbitMQ and application services share the same resources, they compete for CPU, memory, and network bandwidth. Separating them eliminates this contention, ensuring more consistent and reliable performance.
-
Simplified Troubleshooting: A clear separation between RabbitMQ and the application makes identifying and resolving issues easier, whether they stem from RabbitMQ or the application itself.
Before you start
Use a supported installer version:
| Xray Installer | Version |
|---|---|
| RPM | 3.131.x onwards |
| Debian | 3.131.x onwards |
| Linux Archive | 3.131.x onwards |
| Docker Compose | 3.131.x onwards |
Minimum hardware per node:
We recommend installing RabbitMQ on at least three nodes in this deployment model. The table below lists the minimum hardware requirements for the servers. For a detailed description of the requirements, please refer to Xray System Requirements and Platform Support.
| Node Type | CPU | RAM (GB) | Disk Size (GB) |
|---|---|---|---|
| Xray Node | 6 | 12 | 250 |
| RabbitMQ Node | 4 | 8 | 250 |
PostgreSQL
JFrog Xray requires PostgreSQL as its database. You could use a managed solution or a native installation. If you prefer the latter, we recommend using a separate standalone server for the database. For more details, refer to the following document: PostgreSQL for Xray.
Artifactory
Ensure Artifactory is operational on a separate, fully configured node.
Upgrading from Bundled Mode to Split Mode
If you are currently running Xray and RabbitMQ together on the same VM(s) and want to migrate to a split deployment, follow the guidance below based on your current cluster size.
Maintenance Window Required
Upgrading from bundled mode (Xray + RabbitMQ on the same VM) to split mode must be performed during a scheduled maintenance window. Ensure that no scans are actively running before starting the migration. You can retrigger all scans after the migration is complete.
Single Node (No HA)
If you are currently running a single combined Xray + RabbitMQ node, there is no need to migrate to split mode. Continue using your existing single-node setup as-is. The split deployment model is only beneficial when running a multi-node HA cluster.
2 or 3 Node Cluster
| Step | Action |
|---|---|
| 1 | Spin up 3 new dedicated VMs for RabbitMQ (see minimum hardware requirements). |
| 2 | Perform a fresh RabbitMQ-only installation on all 3 new VMs by following Stage 1 below. |
| 3 | Once the RabbitMQ cluster is healthy, run installV2.sh on each of your existing VMs and select the Xray only option to convert them to Xray-only nodes. See Stage 2 |
More Than 3 Nodes
| Step | Action |
|---|---|
| 1 | Spin up 3 new dedicated VMs for RabbitMQ (see minimum hardware requirements). |
| 2 | Perform a fresh RabbitMQ-only installation on all 3 new VMs by following Stage 1 below. |
| 3 | Once the RabbitMQ cluster is healthy, run installV2.sh on all existing Xray VMs and select the Xray only option to convert them to Xray-only nodes. See Stage 2 |
Regardless of how many Xray nodes you have, the RabbitMQ cluster should always consist of exactly 3 dedicated nodes. JFrog's implementation intentionally limits quorum queue membership to the first 3 nodes — this is by design to ensure cluster stability and predictable behavior. Adding more RabbitMQ nodes beyond 3 is not supported and will not improve performance.
If you require higher RabbitMQ throughput to handle a large number of concurrent scans, scale vertically by increasing the CPU and memory on your existing RabbitMQ VMs.
The Big Picture
Whichever installer you use, the process is always the same two stages:
- Stage 1 — Build the RabbitMQ cluster (first node, then add more).
- Stage 2 — Build the Xray cluster and point it at RabbitMQ.
Detailed Installation Guide
The installation follows the same two-stage process regardless of installer type. The only differences are the script name, start command, and one extra OS permissions step for Linux Archive. Refer to the table below throughout this guide.
| RPM / DEB | Linux Archive | Docker Compose | |
|---|---|---|---|
| Script | ./installV2.sh | ./installV2.sh | ./configV2.sh |
| RabbitMQ start | systemctl start xray-rabbitmq.service | xray/app/bin/xray.sh start (via xray user) or systemctl start xray.service | docker-compose -p xray-rabbitmq -f docker-compose-rabbitmq.yaml up -d |
| Xray start | systemctl start xray.service | xray/app/bin/xray.sh start (via xray user) or systemctl start xray.service | docker compose -p xray up -d |
Stage 1: Setting Up the RabbitMQ Cluster
RabbitMQ Version Selection
- Existing installation: If your Xray cluster has not yet been migrated to Quorum queues, Use default RabbitMQ 3.x. Do not use RabbitMQ 4.x until the Quorum queue migration on your Xray cluster is complete and verified.
- Fresh installation of (both Xray and Rabbitmq): Select RabbitMQ 4.x and enable Quorum queues in Stage 2 Xray cluster setup.
Adding the First Node
- Download the Xray installer (tar.gz) from the JFrog Xray Downloads page.
- Extract the tar.gz file.
Linux Archive only — Additional Setup Required
The installation script creates a user called
xrayby default, which requires run and execute permissions on the installation directory. Copy the installer into/optand navigate to the correct directory before proceeding.mkdir -p /opt/jfrog cp -r jfrog-xray-<version>-linux /opt/jfrog/ cd /opt/jfrog mv jfrog-xray-<version>-linux xray cd xray/app/binBefore proceeding, review the Linux Archive prerequisites — including file descriptor limits (ulimit), Erlang installation and version compactability with the current rabbitmq, and Hostname settings etc — to ensure your environment is ready for installation.
- Run the installer script (see table above for your installer type)
- When prompted to select the products to install, choose RabbitMQ only.
- When asked whether this node will join an existing cluster, type N — this is the first node.
- Provide a custom RabbitMQ username and password. The default username
guestis used if none is provided. - If prompted to enable RabbitMQ 4.x, select it only if your existing Xray cluster has already completed the Quorum queue migration successfully, or if this is a fresh installation of both Xray and RabbitMQ.
- Start the RabbitMQ service using the command for your installer type (see table above).
Linux Archive only — Post-Installation Steps
After installation completes, follow the on-screen instructions before starting the service: eg:
- Ensure the Xray directory is owned by the xray user:
chown -R xray:xray /opt/jfrog/xray- Switch to the xray user before starting the service:
su xrayAdditionally, you can install Xray as a system service using the install script installService.sh
- Access the management UI in a browser to verify the management plugin is enabled.
Adding Additional Nodes
Now that RabbitMQ is running on the first node, install RabbitMQ on the remaining nodes and join them to the cluster. In this example, we add two more nodes to form a 3-node cluster.
When installing an HA cluster, use the same RabbitMQ password across all nodes to successfully form the cluster.
- Repeat steps 1–2 from the first node setup to obtain the Xray installer files on the additional node.
- Run the installer script (see table above for your installer type).
- When asked whether this node will join an existing cluster, type Y, then provide the hostname of the active RabbitMQ node.
- Provide the active node port and active node management port.
- Provide the RabbitMQ username and password (must match the first node).
- Start the RabbitMQ service using the command for your installer type (see table above).
- Repeat steps 1–6 for each additional RabbitMQ node.
- Once all nodes are running, verify the cluster status and confirm all nodes are properly joined. Check in the manegement UI : http://< any rabbitmq node ip >:15672 with your username/password
RabbitMQ Cluster Size and Quorum Queues
JFrog's implementation intentionally limits quorum queue membership to the first 3 nodes — this is by design to ensure cluster stability and predictable behavior. Any additional nodes beyond 3 will not participate as quorum queue members. Adding more than 3 RabbitMQ nodes is not supported and will not improve performance.
If you require higher RabbitMQ throughput to handle a large number of concurrent scans, scale vertically by increasing the CPU and memory on your existing RabbitMQ VMs.
Stage 2: Setting Up the Xray Cluster
Once the RabbitMQ cluster is healthy and all nodes are joined, set up the Xray node cluster and point it at the RabbitMQ cluster. This stage has two sections — choose the one that applies to your setup:
Fresh Installation
Adding the First Node
- Download the Xray installer (tar.gz) from the JFrog Xray Downloads page.
- Extract the tar.gz file.
Linux Archive only — Additional Setup Required
The installation script creates a user called
xrayby default, which requires run and execute permissions on the installation directory. Copy the installer into/optand navigate to the correct directory before proceeding.mkdir -p /opt/jfrog cp -r jfrog-xray-<version>-linux /opt/jfrog/ cd /opt/jfrog mv jfrog-xray-<version>-linux xray cd xray/app/bin
-
Run the installer script (see table above for your installer type).
-
When prompted to select the products to install, choose Xray only.
-
When asked whether this node will join an existing cluster, type N — this is the first Xray node.
-
Provide the JFrog URL and the JoinKey of the Artifactory instance. Find the join key in the JPD UI under Administration > Security > General > Connection Details. Enter your login password in the Current Password field and click Unlock.
-
Provide the external RabbitMQ hostname, port, username, and password. Use the credentials configured during Stage 1.
-
If prompted to enable Quorum queues, enable them — this is a fresh installation.
Important: After enabling Quorum queues, you must also configure the additional Quorum queue settings — specifically
dataMigrationsandreplicaCount. See Stage 2 in the install V2 documentation for the required steps. Skipping this configuration will result in an incomplete setup. -
Before starting the service, verify the following configuration files:
- In
/var/opt/jfrog/xray/etc/installerState.yaml, ensure the following is set:
installation_method: xray- In
system.yaml, ensure the RabbitMQ URLs and creds are set
shared: rabbitMq: urls: - amqp://<ip1>:5672 - amqp://<ip2>:5672 - amqp://<ip3>:5672 username: <username> password: <password> - In
-
Start the Xray service using the command for your installer type (see table above).
Linux Archive only — Post-Installation Steps
After installation completes, follow the on-screen instructions before starting the service:
- Ensure the Xray directory is owned by the xray user:
chown -R xray:xray /opt/jfrog/xray- Switch to the xray user before starting the service:
su xrayAdditionally, you can install Xray as a system service using the install script installService.sh
Adding Additional Nodes
- Repeat the first node setup steps on the new node. When prompted "Are you adding an additional node to an existing product cluster? [y/N]?", select Y.
- Provide the
master_keywhen prompted. Retrieve this from the first Xray node.
Upgrading from Bundled Mode (Xray + RabbitMQ) to Xray Only
Converting (Xray + RabbitMQ) Node to Xray Only Node
- Ensure your current Xray installation is on version 3.131.x or above — this is the minimum version that supports split mode.
- Add the following in the
var/etc/system.yaml
shared:
    rabbitMq:
autoStop: true-
Stop the xray sevice
-
Before starting the installV2.sh script, change the the following configuration files:
- In
var/etc/installerState.yaml, ensure the following is set:
installation_method: xray- In
var/etc/system.yaml, ensure the RabbitMQ URLs and creds are set
shared: rabbitMq: urls: - amqp://<ip1>:5672 - amqp://<ip2>:5672 - amqp://<ip3>:5672 username: <username> password: <password> - In
-
Run the installer script (see table above for your installer type).
-
The script will not prompt additional questions, it will take the values already set in system.yaml
-
If prompted to enable Quorum queues, you may enable them. If your current deployment is still using Classic queues, it is important to migrate to Quorum queues.
Important: After enabling Quorum queues, you must also configure the additional Quorum queue settings — specifically
dataMigrationsandreplicaCount. See Stage 2 in the install V2 documentation for the required steps. Skipping this configuration will result in an incomplete setup. -
Start the Xray service using the command for your installer type (see table above).
Linux Archive only — Post-Installation Steps
After installation completes, follow the on-screen instructions before starting the service:
- Ensure the Xray directory is owned by the xray user:
chown -R xray:xray /opt/jfrog/xray- Switch to the xray user before starting the service:
su xrayAdditionally, you can install Xray as a system service using the install script installService.sh
For Additional Nodes
- Repeat the same procedure as the first node
Upgrading in Split Mode
Upgrade order: Always upgrade the RabbitMQ cluster first. Once all RabbitMQ nodes are back up and healthy, proceed with upgrading the Xray cluster.
Once the split mode setup is complete, follow the standard Xray upgrade process (but continue to use installV2.sh). Refer to the Upgrading from Xray version 3.131.x and above guide for detailed steps.
Since the installerState.yaml already defines the installation method and all required inputs are present in system.yaml, the installer script will not prompt you for configuration questions again — it will proceed directly with the upgrade.
Follow any on-screen prompts for additional information during the process.