

Create and Manage Workers
You can create and manage every Worker type (Event-driven, HTTP-triggered, and Scheduled) with any of the methods below. The Worker types and TypeScript runtime are the same regardless of method. For a description of the types themselves, see Worker Types.
Recommended for production
Use the JFrog CLI when you want version-controlled Worker code, local tests, CI/CD deployment, and the same Worker across multiple JPDs. The Platform UI remains an excellent way to explore and validate Workers quickly.
Choose a Method
| Method | What it offers | Jump to |
|---|---|---|
| JFrog CLI (recommended for production) | Local project scaffold, unit tests, dry-run, and deploy from the terminal or CI | JFrog CLI |
| JFrog Platform UI | In-browser TypeScript editor, autocompletion, and a testing pane | JFrog Platform UI |
| REST API | Full programmatic create, update, test, execute, and history | REST API |
| MCP Server | Natural-language Worker tasks in a compatible MCP client | MCP Server |
| Terraform | Declarative Workers as infrastructure alongside other platform resources | Terraform |
Capabilities Shared by Every Method
No matter which method you choose, you can:
- Create Event-driven Workers for Artifactory, Access, and Runtime events
- Create HTTP-triggered Workers (
GENERIC_EVENT) - Create Scheduled Workers (
SCHEDULED_EVENT) - Supply TypeScript source, secrets, filters, and enable/disable the Worker
- Use the same code samples and event catalog
What differs is how you author, test, and deploy, not which Worker types you can build.
Shared References
- Worker Types: Event-driven, HTTP-triggered, and Scheduled
- Worker Event Types: Full event catalog
- TypeScript Code for Workers: Runtime APIs
- Workers Code Samples: Sample scripts
- Getting Started With Workers: First Worker walkthrough
JFrog CLI
Use the JFrog CLI (jf worker) to create and manage Workers from your terminal or CI pipeline. This method is recommended for production.
About This Method
The CLI gives you a full local development loop:
- Scaffold a Worker project (
jf worker init) withmanifest.json,worker.ts, and unit-test stubs - Test with
jf worker dry-run/test-runbefore you deploy - Deploy the same project to one or more JPDs (
jf worker deploy) - Operate: list events and Workers, view execution history, edit schedules, execute HTTP-triggered Workers
That makes it easier to version-control Worker code, review changes in pull requests, and automate rollout in CI/CD.
Typical Workflow
- Initialize a Worker workspace:
jf worker init(see Initialize JFrog Worker). Choose an action such asBEFORE_DOWNLOAD,GENERIC_EVENT, orSCHEDULED_EVENT. - Author TypeScript in
worker.ts. See TypeScript Code for Workers and Workers Code Samples. - Test locally:
jf worker dry-run/test-run(see Test-Run JFrog Worker). - Deploy:
jf worker deploy(see Deploy JFrog Worker). - Manage: list events, list Workers, execution history, edit schedule, execute HTTP-triggered Workers (commands below).
You can also author with natural language via the MCP Server, then deploy with the CLI.
Initialize JFrog Worker
This command is used to initialize a new JFrog worker.
| Parameter | Command / Description |
|---|---|
| Command name | worker init |
| Abbreviation | worker i |
| Command options: | |
--server-id | [Optional] Server ID configured using the config command. |
--timeout-ms | [Default: 5000] The request timeout in milliseconds. |
--force | [Default: false] Whether to overwrite existing files. |
--no-test | [Default: false] Whether to skip test generation. |
--application | [Optional] The application that provides the event. If omitted the service will try to guess it and raise an error if no application is found. |
--project-key | [Optional] The key of the project that the worker should belong to. |
| Command arguments: | |
| action | The name of the action to init (eg: BEFORE_DOWNLOAD). To have the list of all available actions use jf worker list-event. |
| worker-name | The name of the worker. |
This command generates the following files:
manifest.json: Contains the Worker specification, including its name, code location, secrets, and other data useful to the Worker.package.json: Describes the development dependencies of the Worker. This file is not used when executing your Worker in the runtime.worker.ts: The Worker source code, populated with sample code for the event.worker.spec.ts: The source code for the Worker's unit tests.tsconfig.json: The TypeScript configuration file.types.ts: A file containing the event's specific types that can be used in the Worker code.
Example: Initialize a BEFORE_DOWNLOAD Worker
BEFORE_DOWNLOAD WorkerThis example initializes a new BEFORE_DOWNLOAD Worker named my-worker.
jf worker init BEFORE_DOWNLOAD my-workerTest-Run JFrog Worker
Use this command to test-run a Worker. You must initialize the Worker before running this command. The command executes the Worker with its local content, so you can use it to test the Worker's execution before pushing local changes to the server.
| Parameter | Command / Description |
|---|---|
| Command name | worker test-run |
| Abbreviation | worker dry-run, worker dr, worker tr |
| Command options: | |
--server-id | [Optional] Server ID configured using the config command. |
--format | [Default: json] Output format. Supported values: json, table. Available from JFrog CLI 2.105.0. |
--timeout-ms | [Default: 5000] The request timeout in milliseconds. |
--no-secrets | [Default: false] Do not use registered secrets. |
| Command arguments: | |
| json-payload | The json payload expected by the worker. Use - to read the payload from standard input. Use @<file-path> to read from a file located at . |
Test-Run JFrog Worker Example
This example test-runs a Worker that has been initialized in the current directory, using a payload from a file named payload.json in the same directory.
jf worker dry-run @payload.json--format json output (default)
{
  "key": "my-worker",
  "workerKey": "my-worker",
  "triggeredByEvent": "BEFORE_DOWNLOAD",
  "statusCode": 200,
  "status": "STATUS_SUCCESS",
  "warnings": [],
  "errors": [],
  "debug": []
}
--format table output
jf worker dry-run @payload.json --format tablekey workerKey triggeredByEvent statusCode status warnings errors debug
my-worker my-worker BEFORE_DOWNLOAD 200 STATUS_SUCCESSDeploy JFrog Worker
This command is used to update the worker definition (code, description , filter, secret ...) on your Artifactory instance.
| Parameter | Command / Description |
|---|---|
| Command name | worker deploy |
| Abbreviation | worker d |
| Command options: | |
--server-id | [Optional] Server ID configured using the config command. |
--format | [Optional] Use --format json to return the response as JSON. Available from JFrog CLI 2.105.0. |
--timeout-ms | [Default: 5000] The request timeout in milliseconds. |
--no-secrets | [Default: false] Do not use registered secrets. |
Deploy JFrog Worker Example
Deploy a worker to the server with id my-server.
jf worker server deploy --server-id my-server--format json output
jf worker server deploy --server-id my-server --format json{
"status_code": 200,
"content": "{\"key\":\"my-worker\",\"version\":\"1\"}"
}Add Secrets to JFrog Worker
This command is used to edit a worker manifest in order to add or edit a secret that can be used for deployment and/or execution.
Secrets are stored encrypted with a master password that will be requested by the command.
Once secrets are added to the manifest, the master password will be required by the deploy and test-run commands.
| Parameters | Commands / Description |
|---|---|
| Command name | worker add-secret |
| Abbreviation | worker as |
| Command options: | |
--edit | [Default: false] Whether to update an existing secret. |
| Command arguments: | |
| secret-name | The secret name |
Add Secrets to JFrog Worker Example
Add the secret name my-secret to a worker initialized in the current directory.
jf worker add-secret my-secretUndeploy JFrog Worker
This command is used to remove a registered worker from you Artifactory instance.
| Parameter | Command / Description |
|---|---|
| Command name | worker undeploy |
| Abbreviation | worker rm |
| Command options: | |
--server-id | [Optional] Server ID configured using the config command. |
--format | [Optional] Use --format json to return the response as JSON. Available from JFrog CLI 2.105.0. |
--timeout-ms | [Default: 5000] The request timeout in milliseconds. |
--project-key | [Optional] The key of the project that the worker belongs to. |
| Command arguments: | |
| worker-key | [Optional] The worker key. If not provided, it will be read from the manifest.json in the current directory. |
Undeploy JFrog Worker Example
Undeploy a worker named my-worker from an Artifactory instance identified by my-server.
jf worker undeploy --server-id my-server my-worker--format json output
jf worker undeploy --server-id my-server my-worker --format json{
"status_code": 200,
"message": "OK"
}Execute an HTTP-Triggered Worker
Execute an HTTP-triggered worker.
| Parameter | Command / Description |
|---|---|
| Command name | worker execute |
| Abbreviation | worker exec, worker e |
| Command options: | |
--server-id | [Optional] Server ID configured using the config command. |
--format | [Default: json] Output format. Supported values: json, table. Available from JFrog CLI 2.105.0. |
--timeout-ms | [Default: 5000] The request timeout in milliseconds. |
--project-key | [Optional] The key of the project that the worker belongs to. |
| Command arguments: | |
| worker-key | The worker key. If not provided it will be read from the manifest.json in the current directory. |
| json-payload | The json payload expected by the worker. Use - to read the payload from standard input. Use @<file-path> to read from a file located at . |
Execute an HTTP-Triggered Worker Example
Execute an HTTP-triggered worker initialized in the current directory, with a payload located in a file named payload.json from the same directory.
jf worker execute @payload.jsonExecute an HTTP-triggered worker with a payload from the standard input.
jf worker execute - <<EOF
{
  “a”: “key”,
  “an-integer”: 14
}
EOF
Execute an HTTP-triggered worker by providing the payload as an argument.
jf worker execute ‘{“my”:”payload”}’--format json output (default)
{
  "key": "my-worker",
  "workerKey": "my-worker",
  "triggeredByEvent": "BEFORE_DOWNLOAD",
  "statusCode": 200,
  "status": "STATUS_SUCCESS",
  "warnings": [],
  "errors": [],
  "debug": []
}
--format table output
jf worker execute @payload.json --format tablekey workerKey triggeredByEvent statusCode status warnings errors debug
my-worker my-worker BEFORE_DOWNLOAD 200 STATUS_SUCCESSList Available Events
This command list all the available events on the platform.
| Parameter | Command / Description |
|---|---|
| Command name | worker list-event |
| Abbreviation | worker le |
| Command options: | |
--server-id | [Optional] Server ID configured using the config command. |
--format | [Default: table] Output format. Supported values: table, json. Available from JFrog CLI 2.105.0. |
--timeout-ms | [Default: 5000] The request timeout in milliseconds. |
--project-key | [Optional] List events available to a specific project. |
List Available Events Example
List event supported by a server identified by my-server.
jf worker list-event --server-id my-server--format table output (default)
name                  label                     supportedFilterCriteria
BEFORE_DOWNLOAD       Before Download           repoPath,repoKey
AFTER_CREATE          After Artifact Created    repoPath,repoKey
GENERIC_EVENT         Generic Event
--format json output
jf worker list-event --server-id my-server --format json[
{
"name": "BEFORE_DOWNLOAD",
"label": "Before Download",
"supportedFilterCriteria": ["repoPath", "repoKey"]
},
{
"name": "AFTER_CREATE",
"label": "After Artifact Created",
"supportedFilterCriteria": ["repoPath", "repoKey"]
}
]List Registered Workers
List workers saved on your Artifactory instance. The default output is a table (CSV) with columns name, action, description, enabled, sorted by worker name. Use --format json for full JSON output.
Warning
The
--jsonboolean flag has been removed as of JFrog CLI 2.105.0 and replaced by--format json. If your scripts use--json, update them to use--format json.
| Parameter | Command / Description |
|---|---|
| Command name | worker list |
| Abbreviation | worker ls |
| Command options: | |
--server-id | [Optional] Server ID configured using the config command. |
--format | [Default: table] Output format. Supported values: table, json. Available from JFrog CLI 2.105.0. |
--timeout-ms | [Default: 5000] The request timeout in milliseconds. |
--project-key | [Optional] List the events created in a specific project. |
List Registered Workers Example
List all workers registered in a platform named my-platform.
jf worker list --server-id my-platform--format table output (default)
my-worker,BEFORE_DOWNLOAD,Intercepts download requests,true
another-worker,AFTER_CREATE,Post-creation hook,false
--format json output
jf worker list --server-id my-platform --format json{
"workers": [
{
"key": "my-worker",
"description": "Intercepts download requests",
"debug": false,
"enabled": true,
"sourceCode": "...",
"action": "BEFORE_DOWNLOAD",
"secrets": [],
"projectKey": ""
},
{
"key": "another-worker",
"description": "Post-creation hook",
"debug": false,
"enabled": false,
"sourceCode": "...",
"action": "AFTER_CREATE",
"secrets": [],
"projectKey": ""
}
]
}Show Worker Execution History
Display the execution history of a specific worker.
| Parameter | Command / Description |
|---|---|
| Command name | worker execution-history |
| Abbreviation | worker exec-hist, worker eh |
| Command options: | |
--server-id | [Optional] Server ID configured using the config command. |
--format | [Default: json] Output format. Supported values: json, table. Available from JFrog CLI 2.105.0. |
--timeout-ms | [Default: 5000] The request timeout in milliseconds. |
--project-key | [Optional] List events available to a specific project. |
--with-test-runs | [Default: false] Whether to include test-runs entries. |
| Command arguments: | |
| worker-key | [Optional] The worker key. If not provided, it will be read from the manifest.json in the current directory. |
Show Worker Execution History Example
Retrieves the execution history of a worker named my-worker, including test runs.
jf worker execution-history --with-test-runs my-worker--format json output (default)
[
  {
    "workerKey": "my-worker",
    "workerType": "BEFORE_DOWNLOAD",
    "workerProjectKey": "",
    "executionStatus": "STATUS_SUCCESS",
    "startTimeMillis": 1730460000000,
    "endTimeMillis": 1730460001234,
    "triggeredBy": "[email protected]",
    "testRun": false,
    "executedVersion": "3",
    "traceId": "abc123def456"
  }
]
--format table output
jf worker execution-history --with-test-runs my-worker --format tableWorker Key Worker Type Project Key Status Started At Ended At Triggered By Test Run Executed Version Trace ID
my-worker BEFORE_DOWNLOAD STATUS_SUCCESS 2024-11-01T12:00:00Z 2024-11-01T12:00:01Z [email protected] false 3 abc123def456Edit Worker Schedule
Edit the manifest of a SCHEDULED_EVENT worker to update the schedule criteria.
The worker should be deploy afterward with jf worker deploy for the change to be applied to the server.
| Parameter | Command / Description |
|---|---|
| Command name | worker edit-schedule |
| Abbreviation | worker es |
| Command options: | |
--cron | [Mandatory] A standard cron expression with minutes resolution. Seconds resolution is not supported by Worker service. |
--timezone | [Default: UTC] The timezone to use for scheduling. |
Edit Worker Schedule Example
Edit a worker manifest so that it is executed every minute.
jf worker edit-schedule --cron "* * * * *"JFrog Platform UI
Use the JFrog Platform UI to create and test Workers in the browser.
About This Method
The Platform UI makes it easier to:
- Browse available events and start from a skeleton or the code gallery
- Edit TypeScript with autocompletion in the built-in editor
- Test a Worker with a simulated payload and inspect results, logs, and metrics before enabling it
- Manage enable/disable, secrets, repository filters, and schedules without leaving Administration
Code samples are not UI-only: they live in Workers Code Samples for every method.
Configure Workers in the UI
Use the sections below for UI steps. Shared TypeScript samples: Workers Code Samples.
- Configure Event Driven Workers for Artifactory
- Configure Event Driven Workers for Access
- Configure Event Driven Workers for Runtime
- Configure Scheduled Worker
- Configure HTTP-Triggered Worker
- Trigger HTTP-Triggered Worker From a Webhook
Configure Event Driven Workers for Artifactory
This topic provides a step-by-step instruction to configure a custom event-driven Worker for Artifactory. Event-driven Workers are a powerful tool that allows you to automate actions in response to specific events occurring within your Artifactory environment.
Prerequisite
Before starting the configuration, ensure that you have selected the desired project for which you want to apply the worker.
To configure an event driven worker for Artifactory, follow these steps:
Step 1: Navigate to the Workers Configuration
-
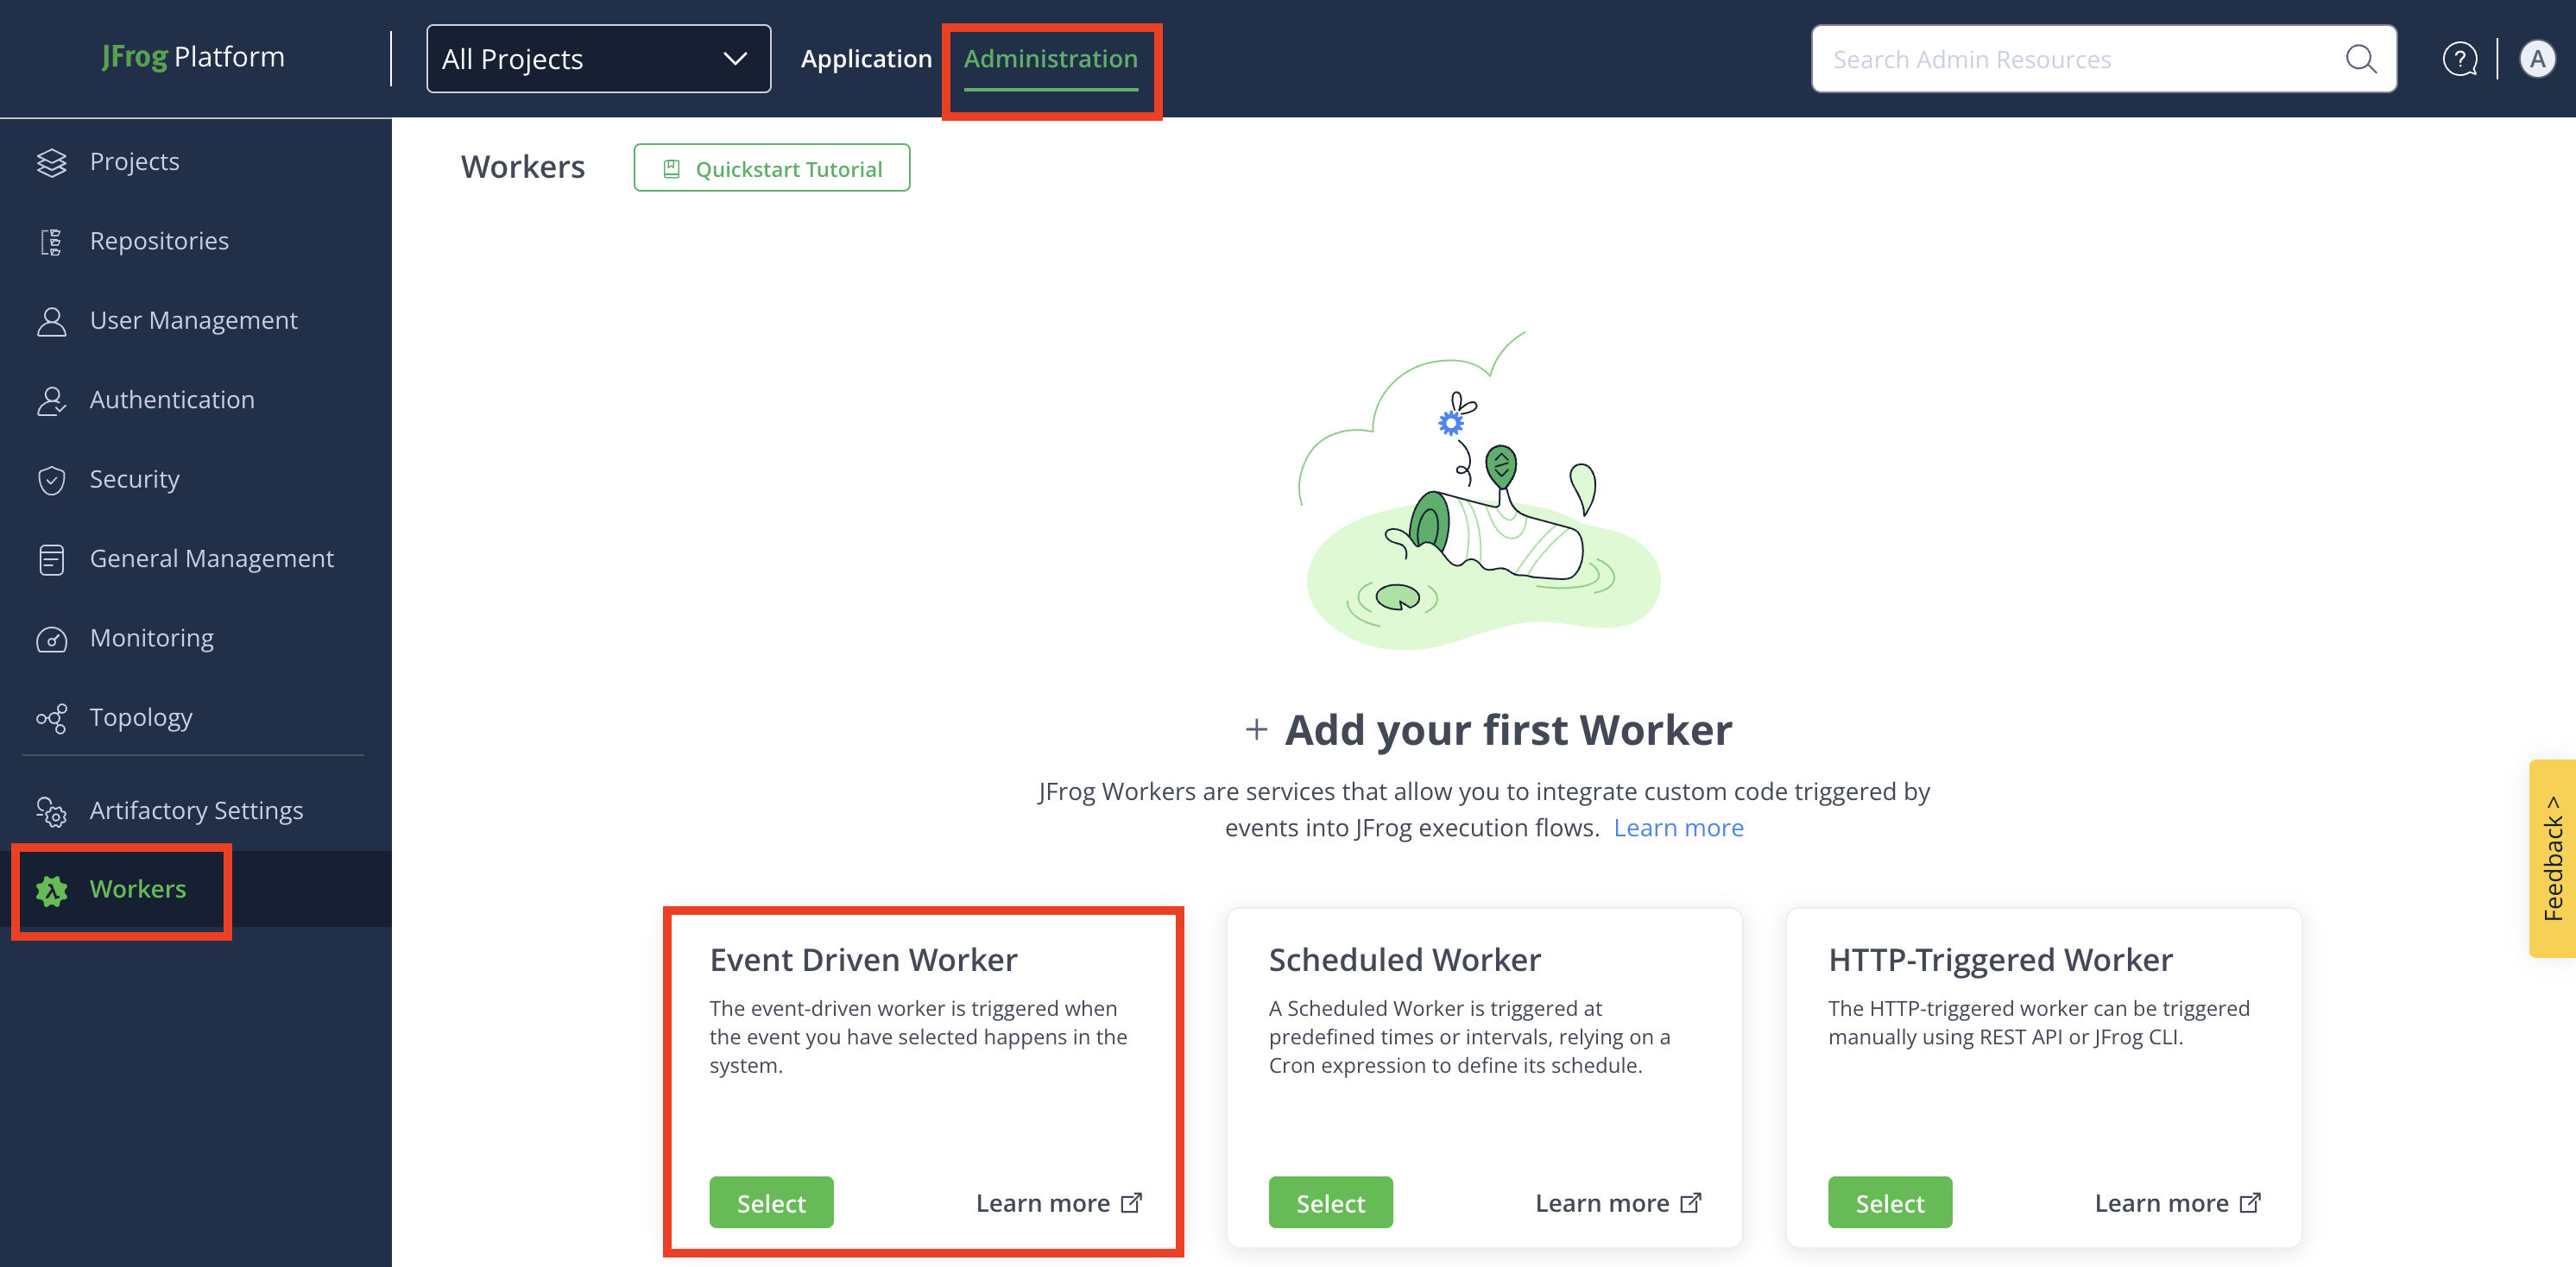
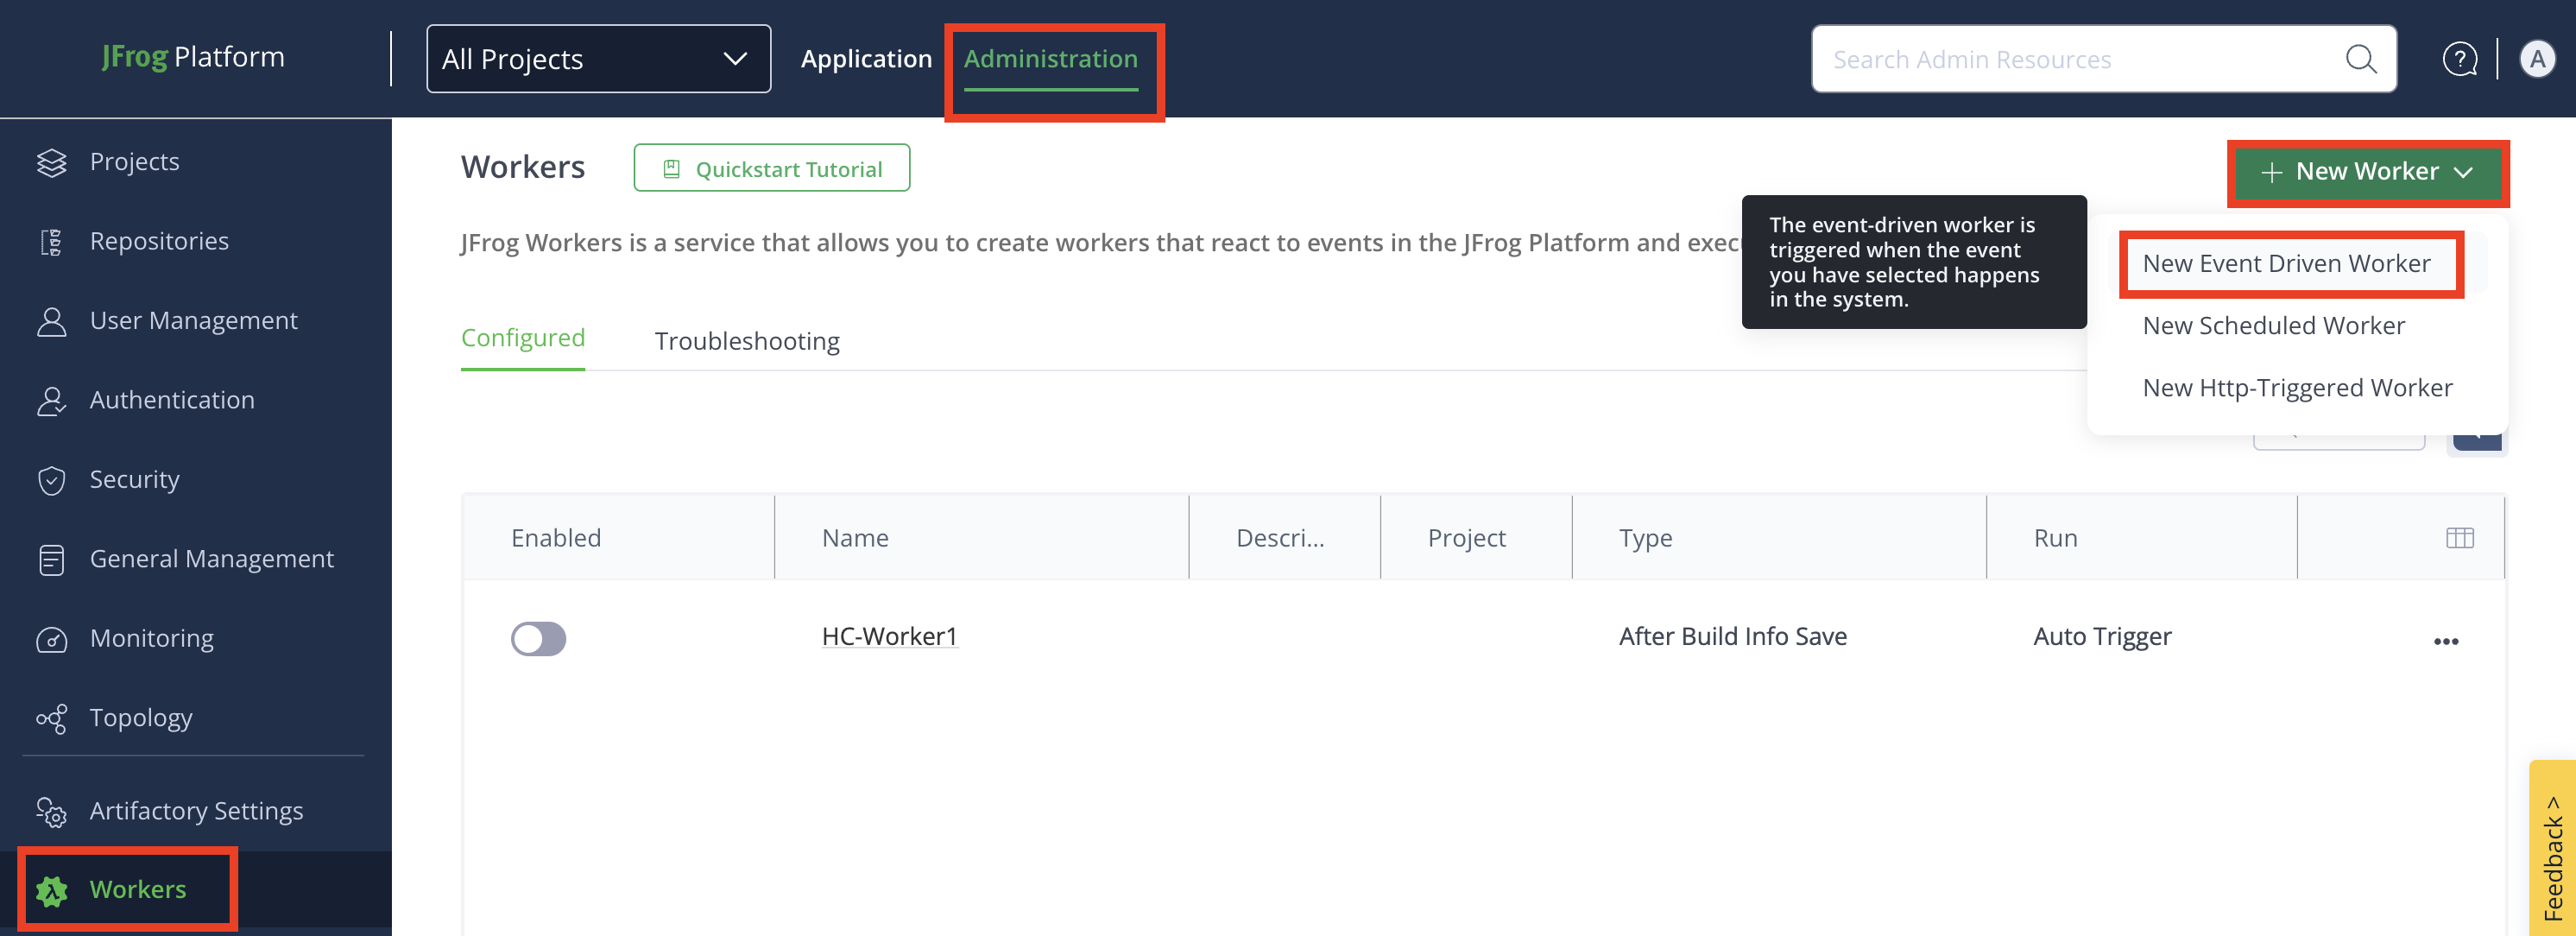
Navigate to the Administration module and click Workers.
-
+ Add your first Worker: If you are creating a worker for the first time, click the Select button in the Event Driven Worker tile.
-
+ Add Additional Worker: To create more Workers after the first one, click + New Worker, and then click New Event Driven Worker.
-
-
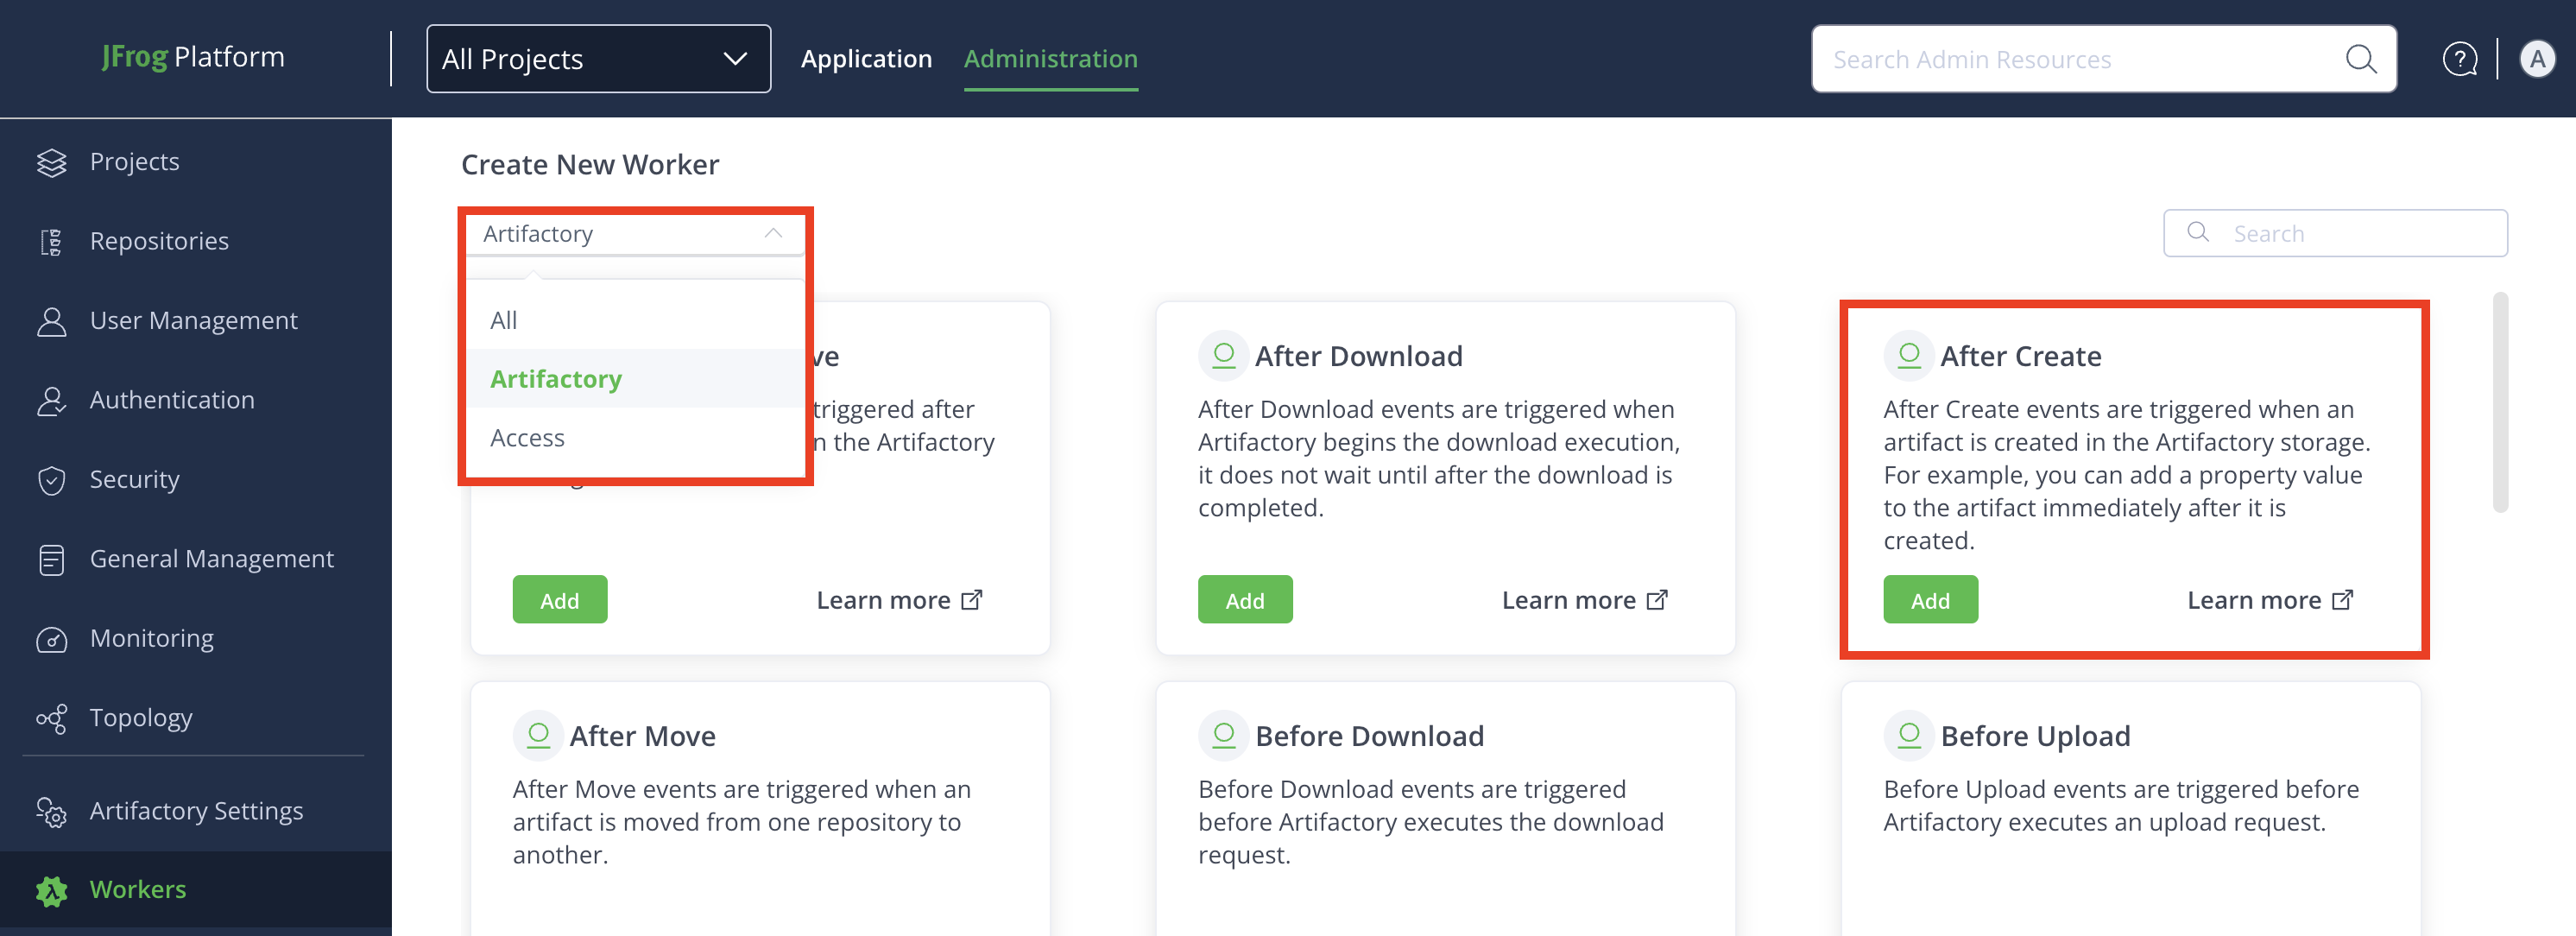
From the Create New Worker drop-down, click Artifactory to see available Artifactory Workers.
-
Locate the desired Artifactory Worker, and then click Add.
-
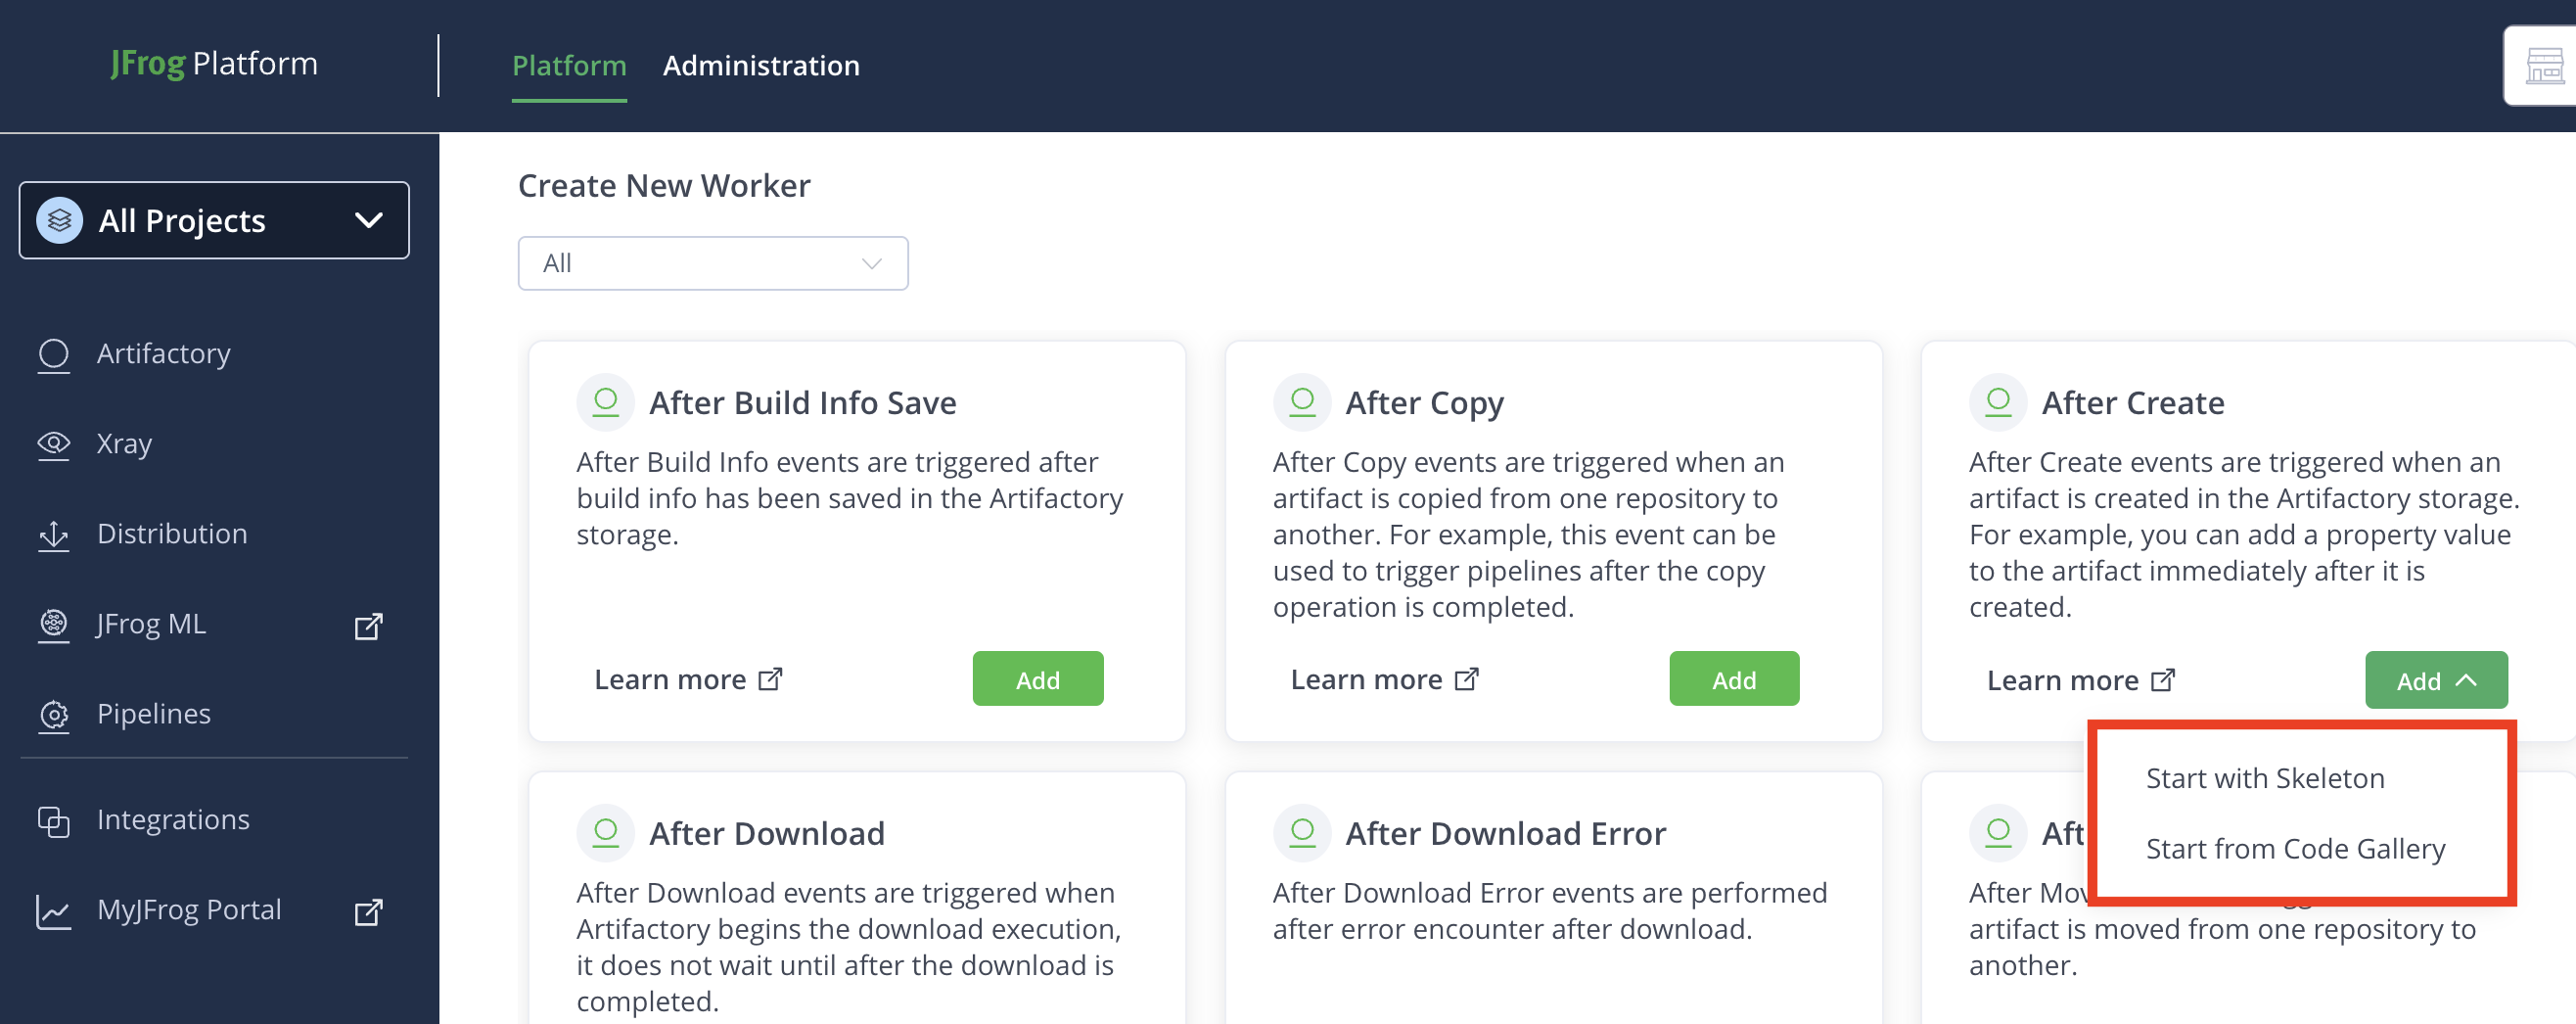
(Optional): Some Workers have a code gallery of ready-made code samples, Worker script examples that you can use to inspire and accelerate your work. To use code samples, select Start with Code Gallery from the drop-down menu. Select a code sample from the list and click Apply: the code sample will appear in the Script field in the Worker menu, and you can edit it there.
Note
The code gallery samples are for reference only, aimed to accelerate your development work using real-world examples.
To use an empty, 'Hello-world' example, select Start with Skeleton.
Step 2: Configure Worker Fields
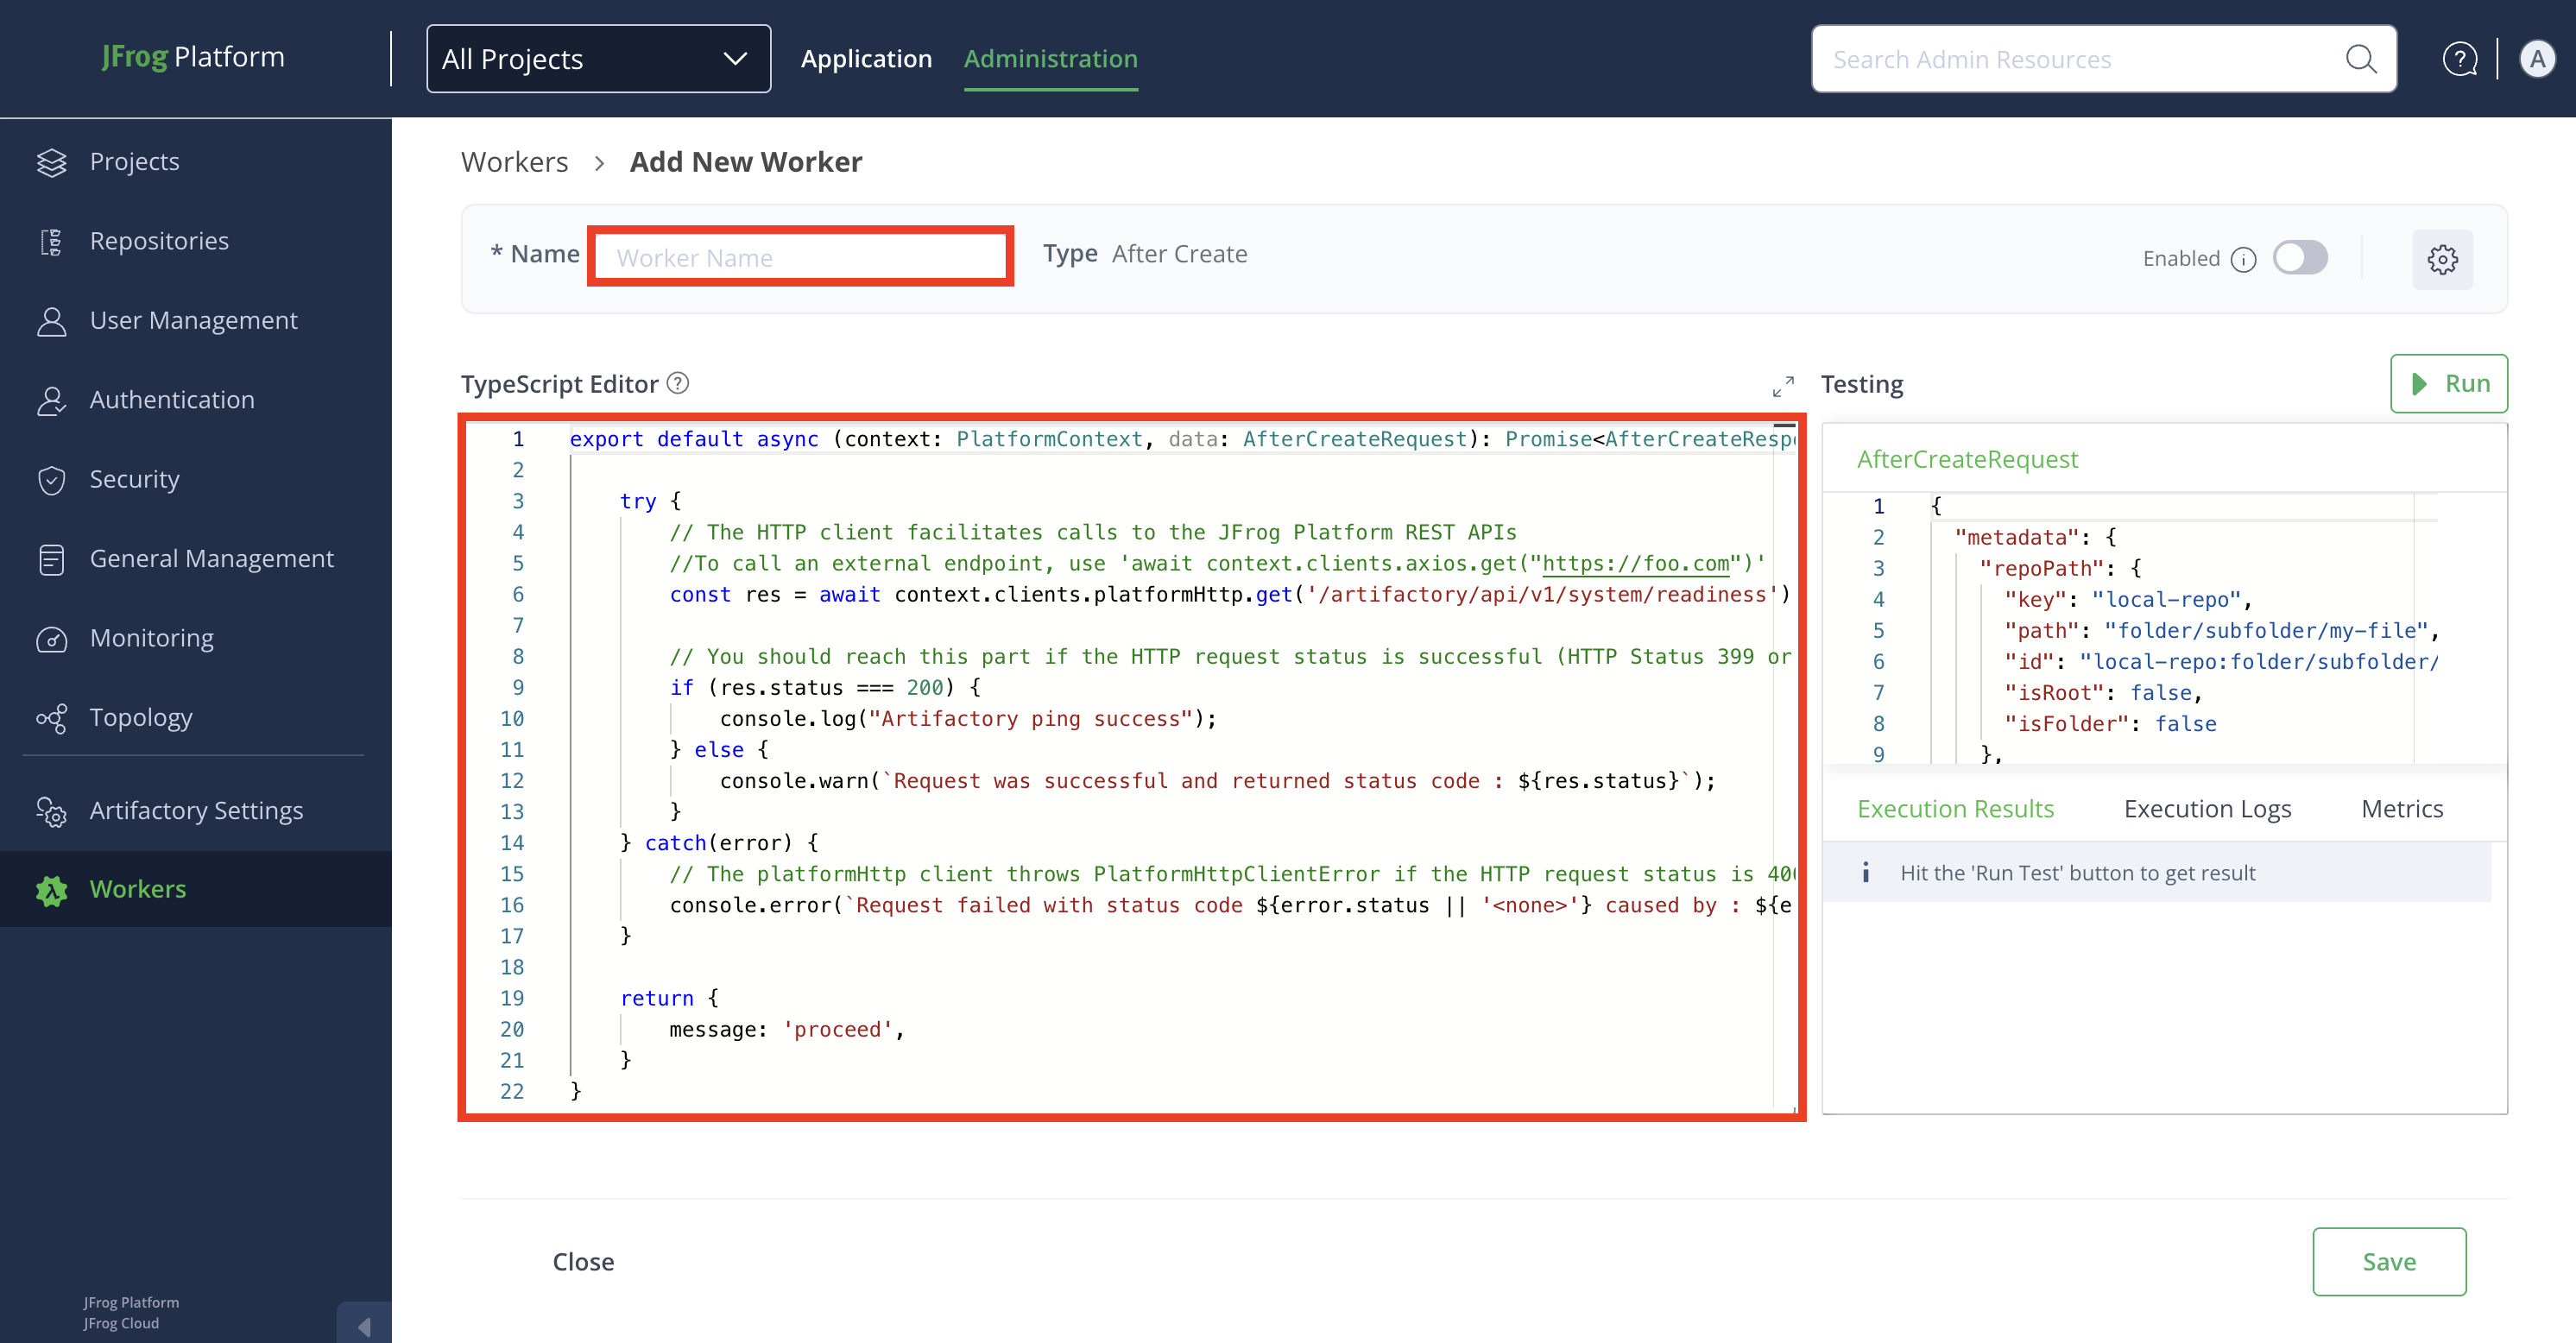
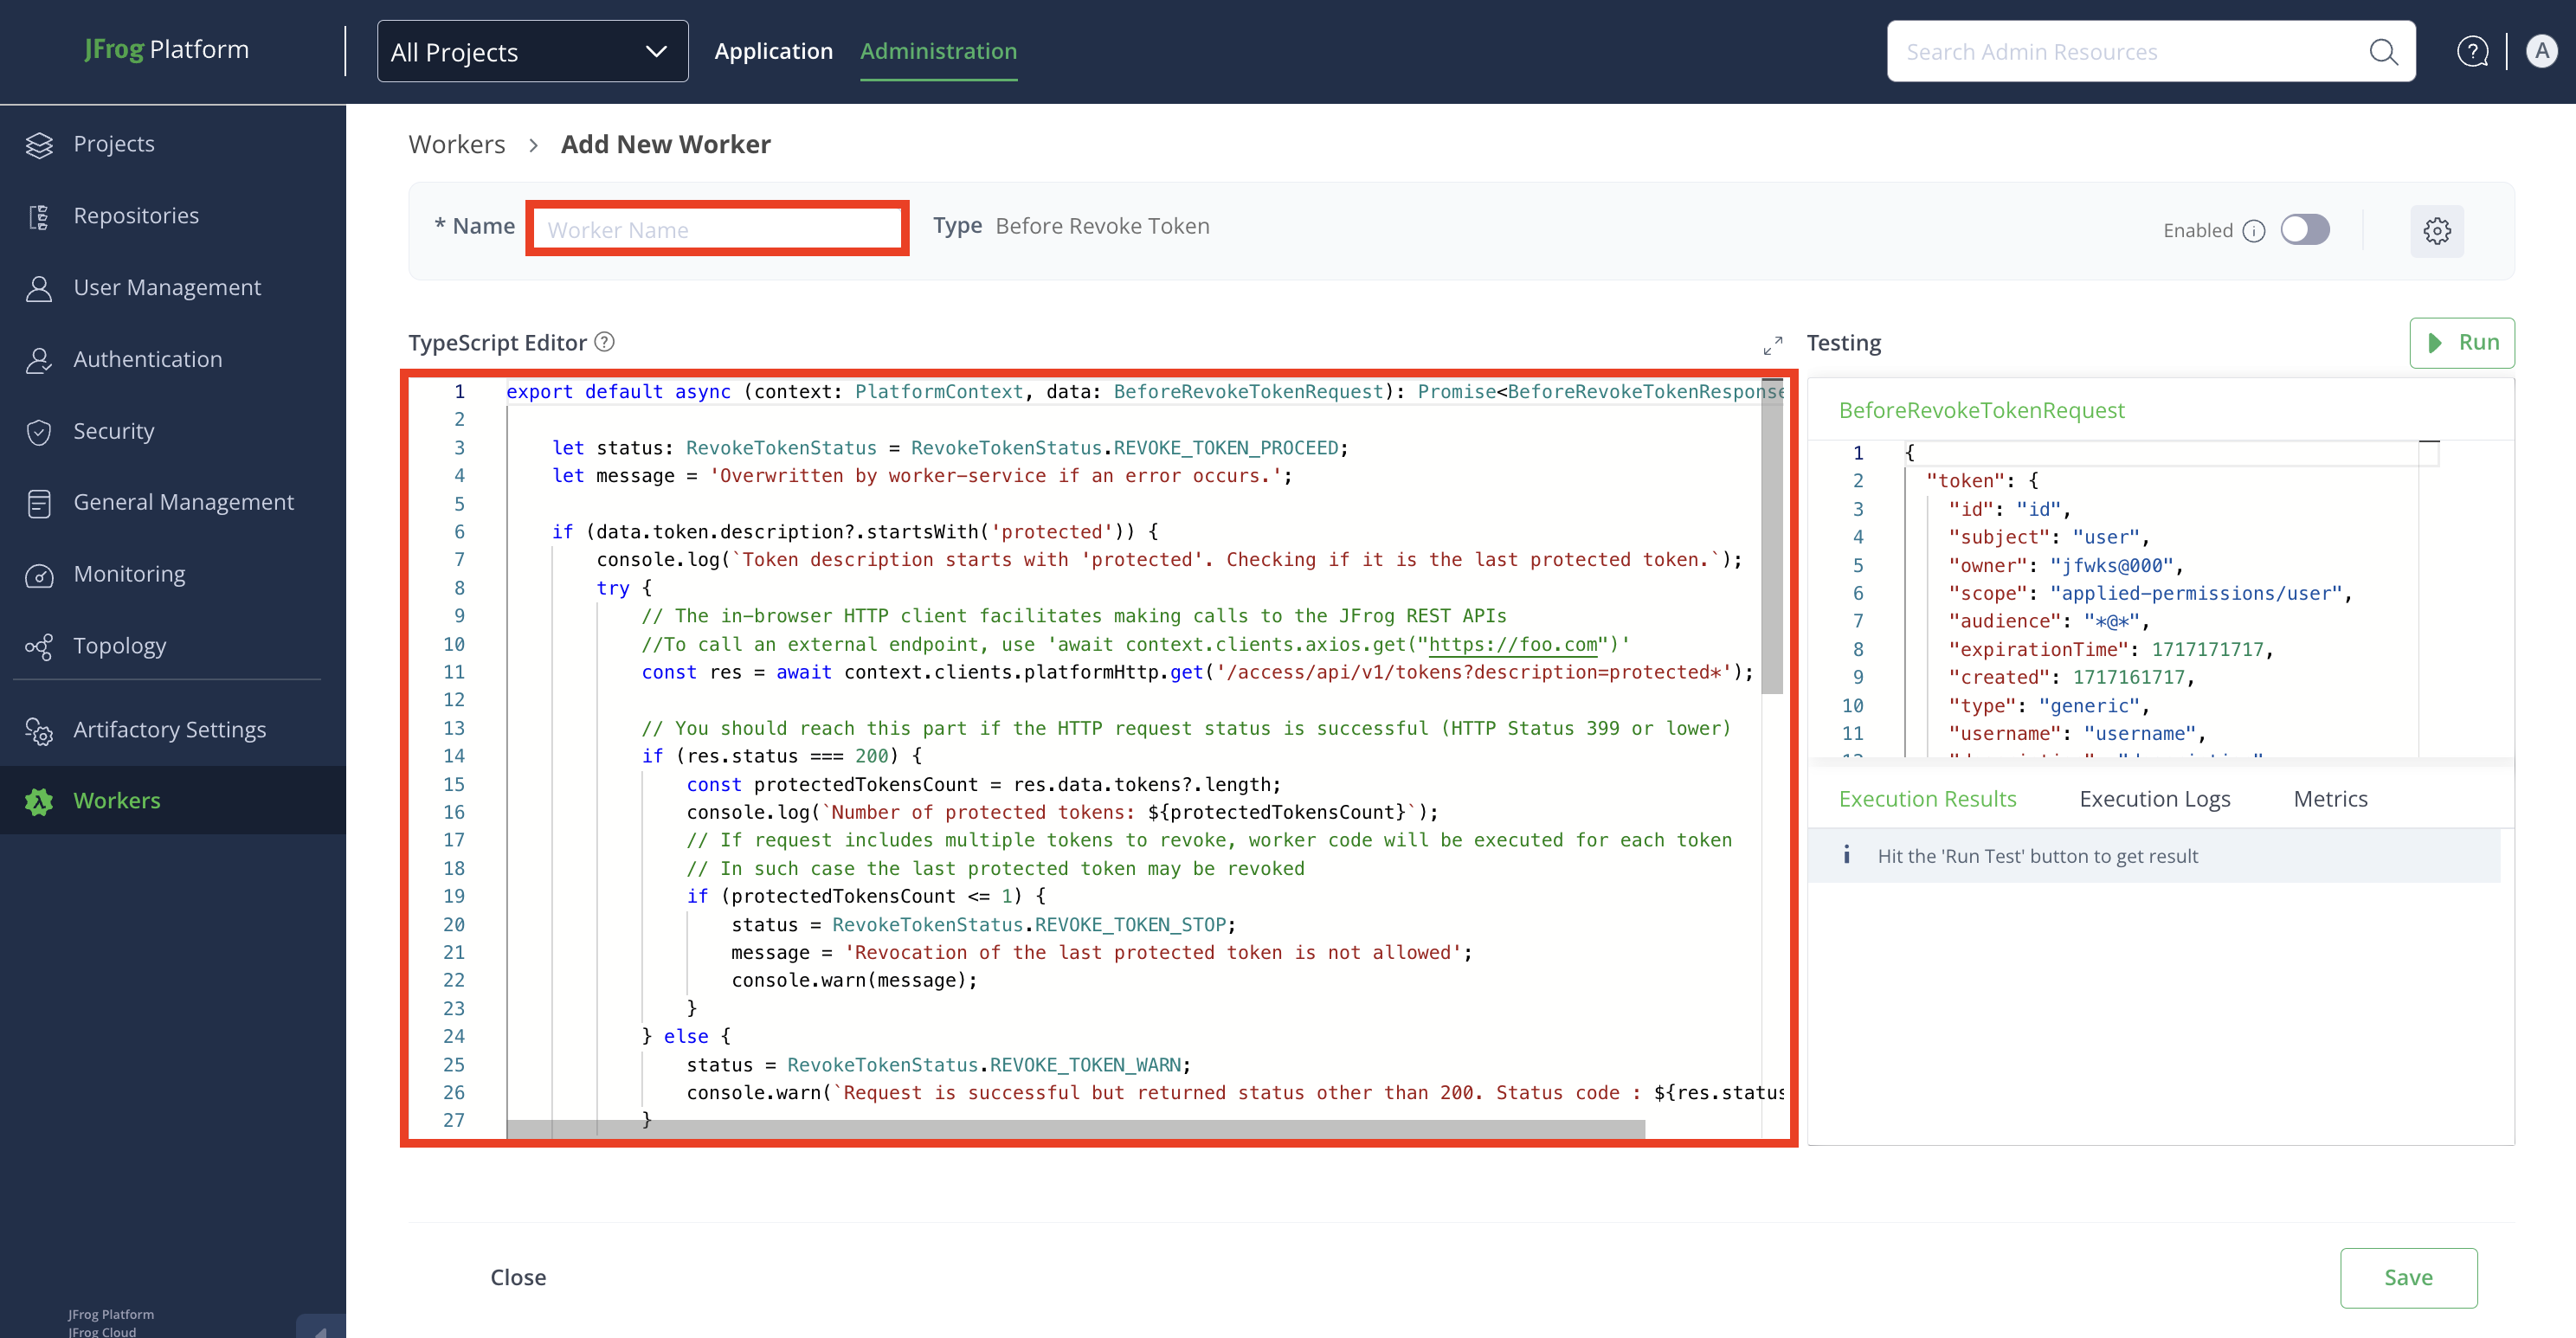
In the Add New Worker window, enter the details in the relevant fields:
- Name: Enter a descriptive name for the worker.
- Script: Enter or modify the script in the TypeScript Editor. Use the auto-complete function for improved efficiency while coding.
Worker Settings
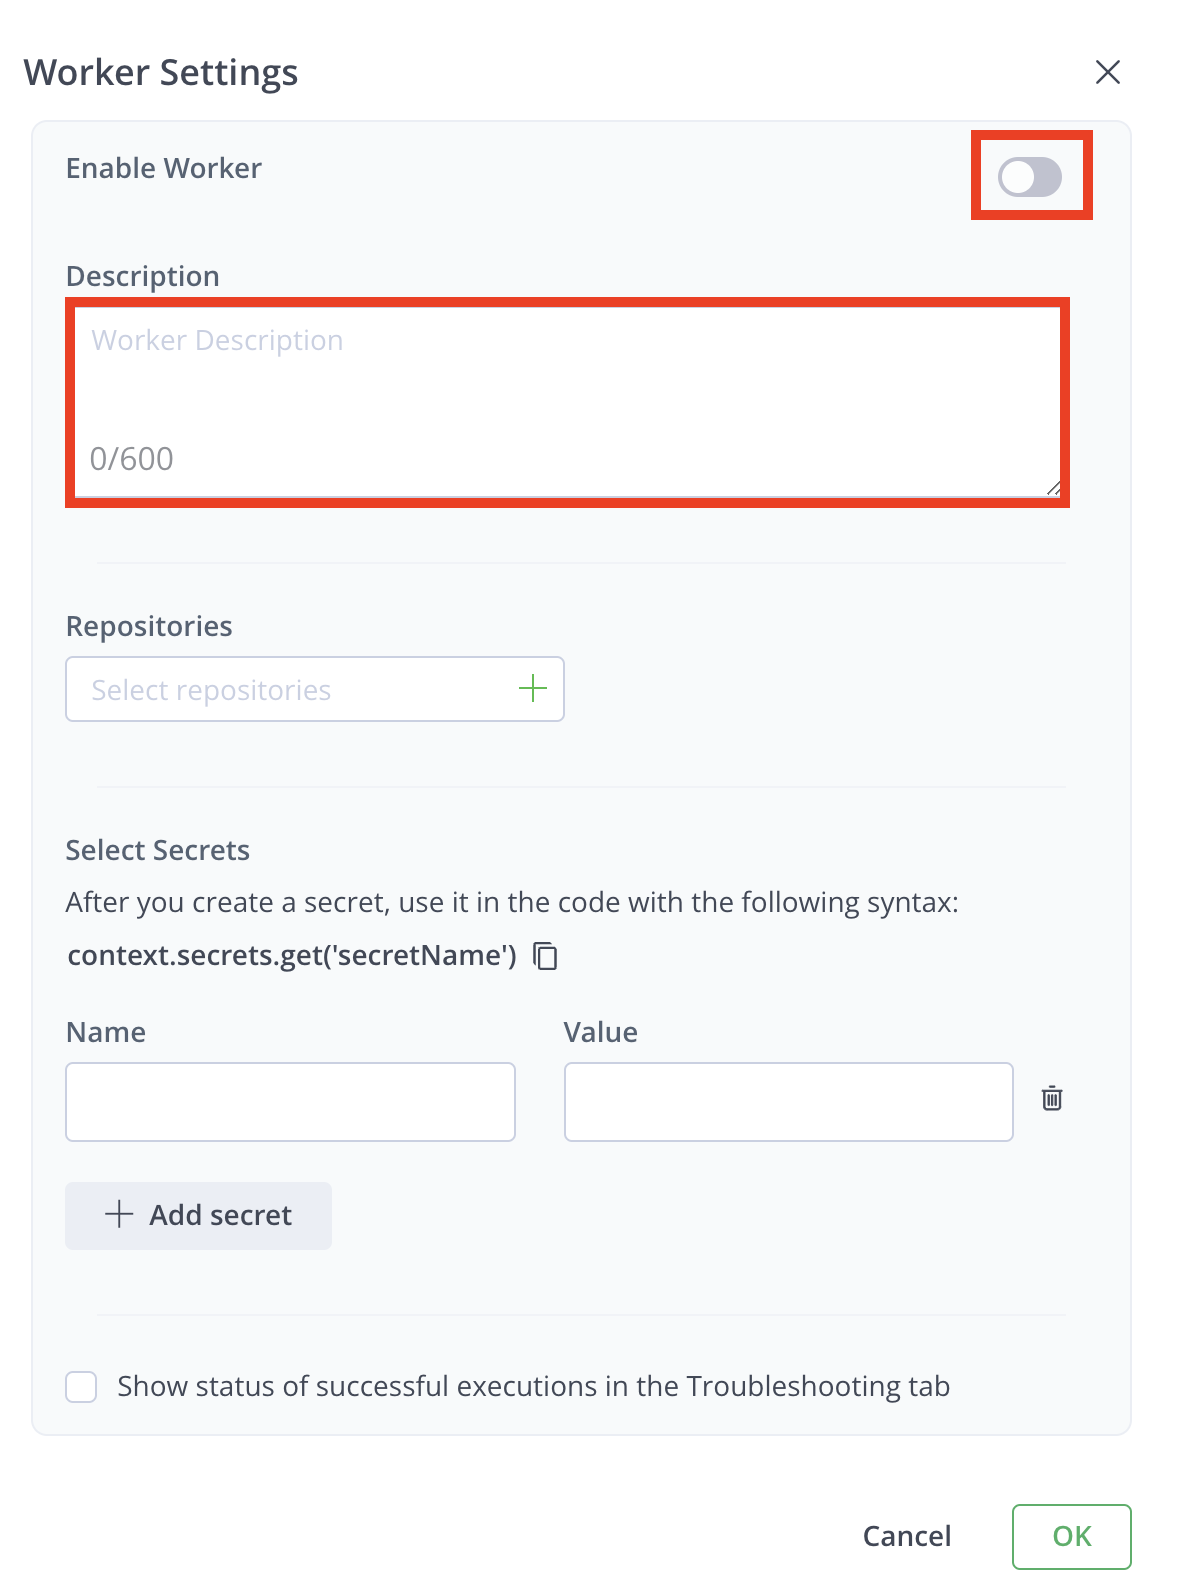
Click the Settings icon from the top-right corner of the window, and then enter the details in the relevant fields:

- Enable Worker: Enable the worker in the Worker Settings modal by clicking the toggle button.
Note
The worker can also be enabled later from the Add New Worker window or Configured window. Repositories must be selected to enable the worker. Once enabled, the worker triggers when a predefined event occurs.
-
Description: Enter a brief description of the worker.
-
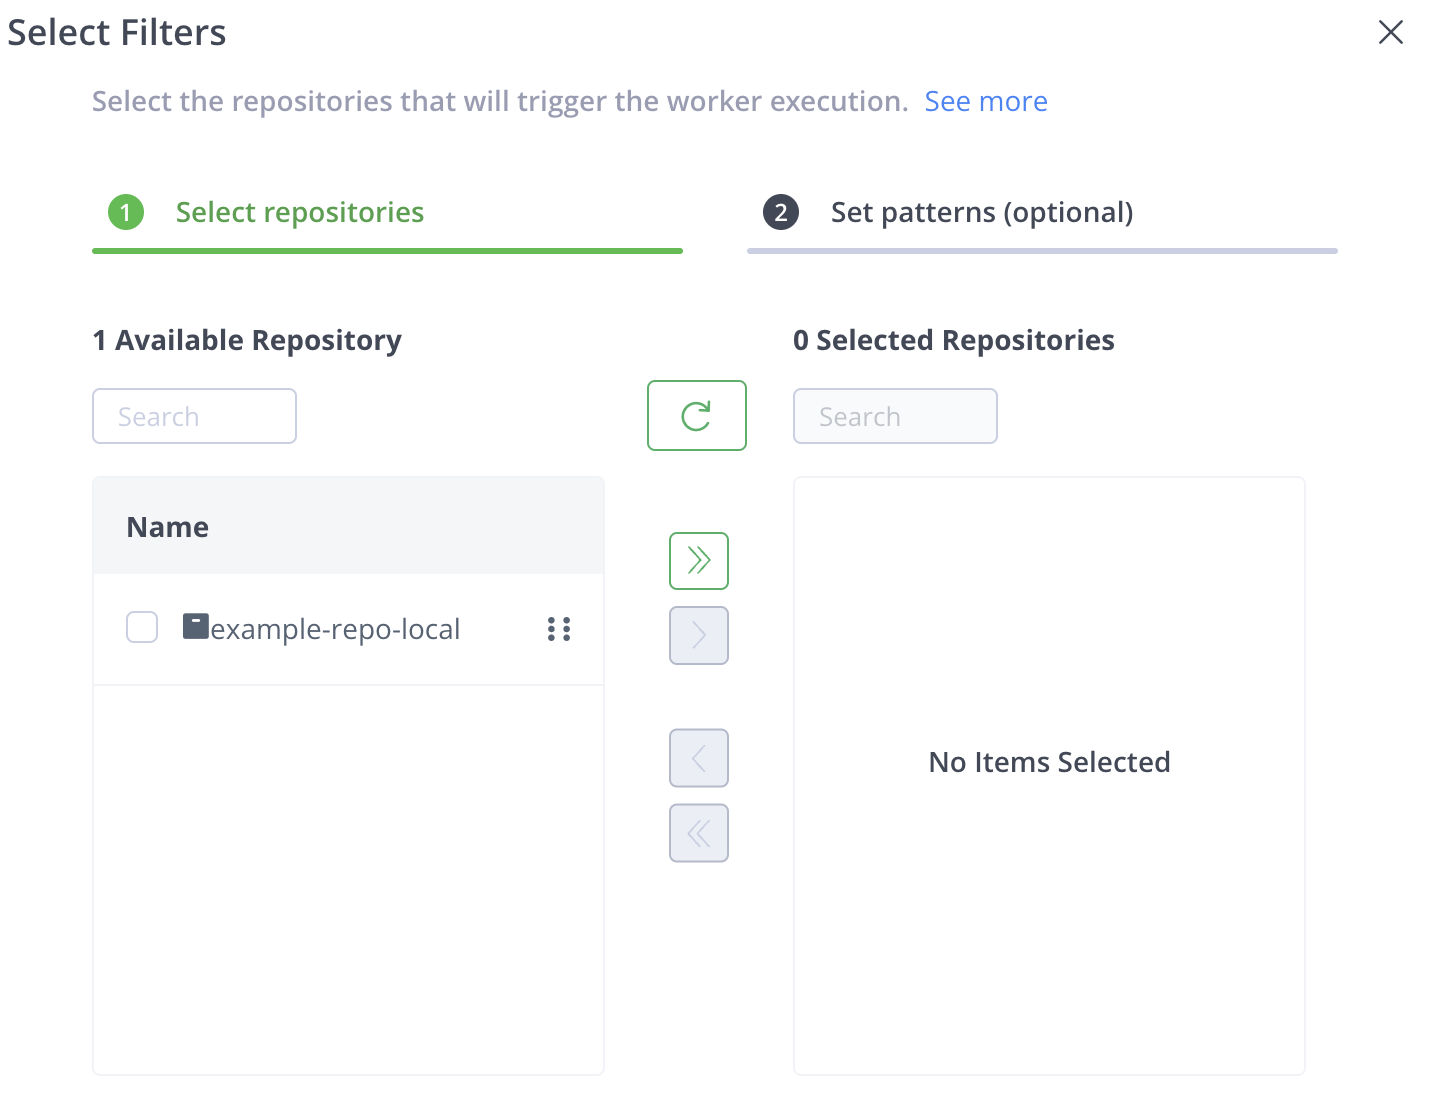
Repositories: Click the + icon in the Repositories field.
Note
When creating a Worker within a project, you can select only repositories that are directly within the project, and not ones that are shared with the project.
You can either:
-
Select Repositories: Move selected repositories from the Available Repositories list.
-
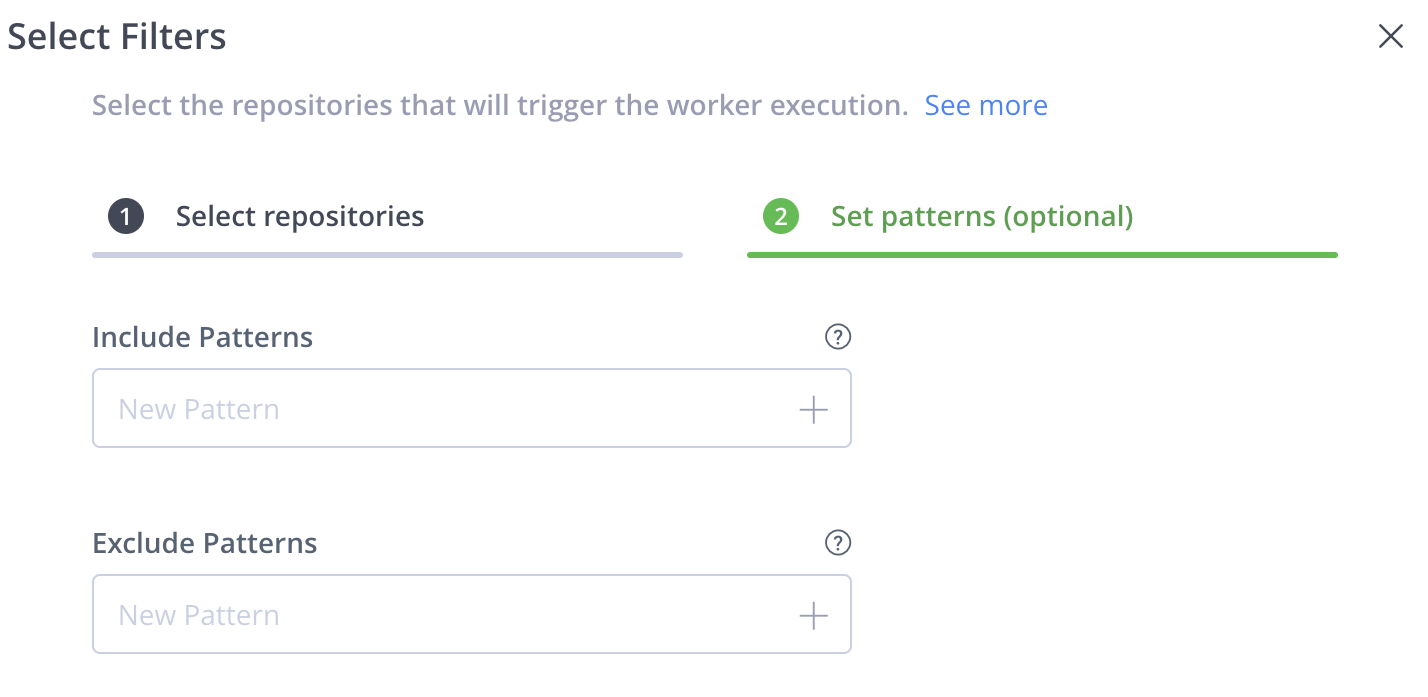
Set Patterns: Use wildcards (for example, , *, ?) to define patterns for repository selection.
Example Patterns:
com/t?st.zip- Matchescom/test.zip,com/tast.zip, etc.com/*.zip- Matches all.zipfiles in the com directory.com/**/test.zip- Matches alltest.zipfiles in subdirectories ofcom.
You can add multiple patterns to the filter. After you enter a pattern, click + to add that pattern to the filter.
Note
For more information, see AntPathMatcher Documentation.
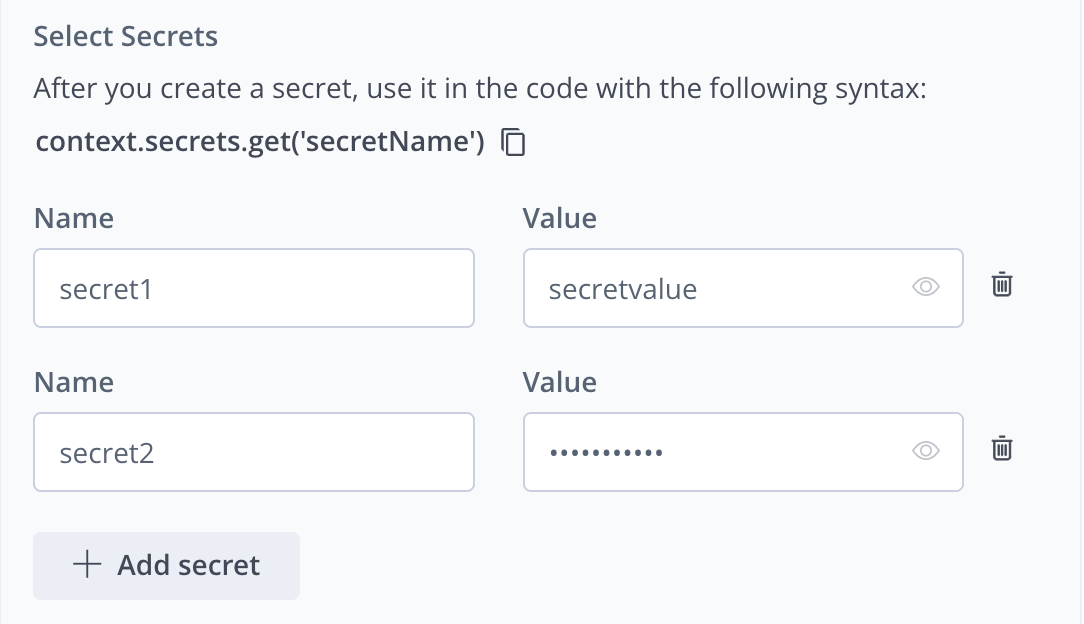
- Select Secrets: Secrets are stored securely and not in plain text. The secret's clear-text value is never returned in an API or UI and will be masked from all the logs.
To add a secret:
- Enter the Name and Value of the secret.
- Click + Add secret to add more secrets.
- Click Delete icon to remove any secret.
Note
Use secrets in your code with the syntax:
context.secrets.get('secretName').
-
Enable Debugging: Click the checkbox for Show Status of Successful Executions in the Troubleshooting tab to view successful execution results. By default, only unsuccessful executions are shown.
-
Click OK when done.
Step 3: Testing pane
Edit the JSON payload used to simulate the worker's events.
Click Run to test the worker.
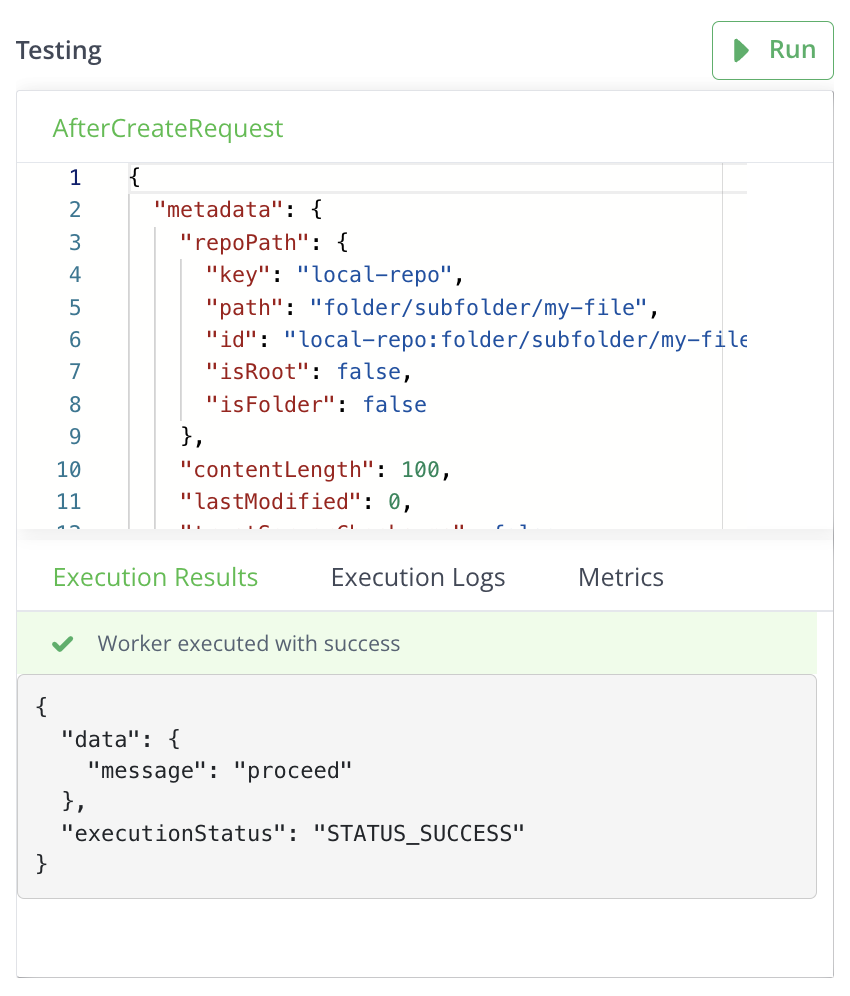
Review results in:
- Execution Results tab: for responses
- Execution Logs tab: for logs
- Metrics tab: for run time, memory, and CPU utilization details.
Step 4: Save Your Configuration
- Click Save to finalize the worker configuration.
- To cancel the configuration, click Close, and then click Discard to discard changes.
Related Information
Configure Event Driven Workers for Access
This topic provides a step-by-step instruction to configure a custom event-driven Worker for Access. Event-driven Workers are a powerful tool that allows you to automate actions in response to specific events occurring within your Access environment.
Prerequisite
Before starting the configuration, ensure you have selected the project you want to apply the worker to.
To configure an event driven worker for Artifactory, follow these steps:
Step 1: Navigate to the Workers Configuration
-
Navigate to the Administration module and click Workers.
-
+ Add your first Worker: If you are creating a worker for the first time, click the Select button in the Event Driven Worker tile.
-
+ Add Additional Worker: To create more Workers after the first one, click + New Worker, and then click New Event Driven Worker.
-
-
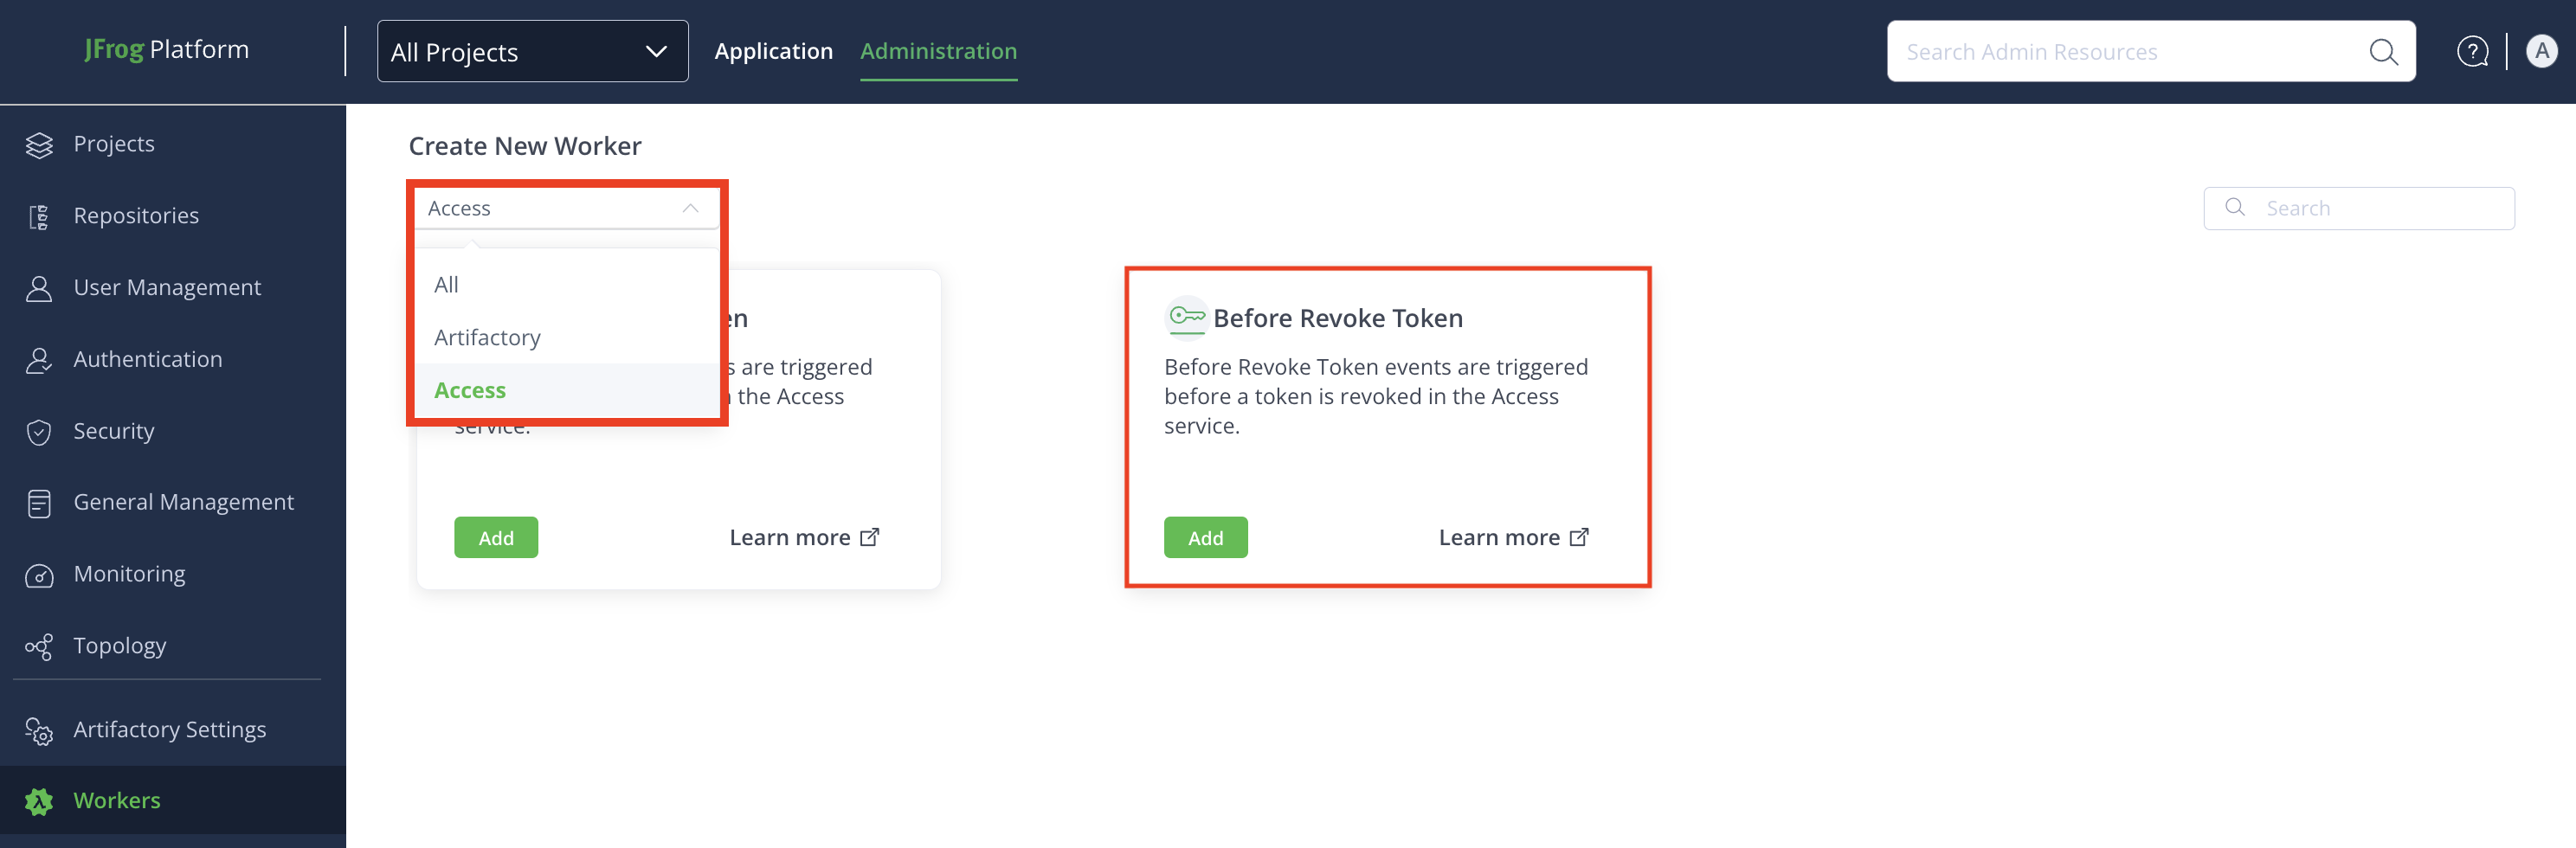
From the Create New Worker drop-down, click Access to see available Access Workers.
-
Locate the desired Access Worker, and then click Add.
-
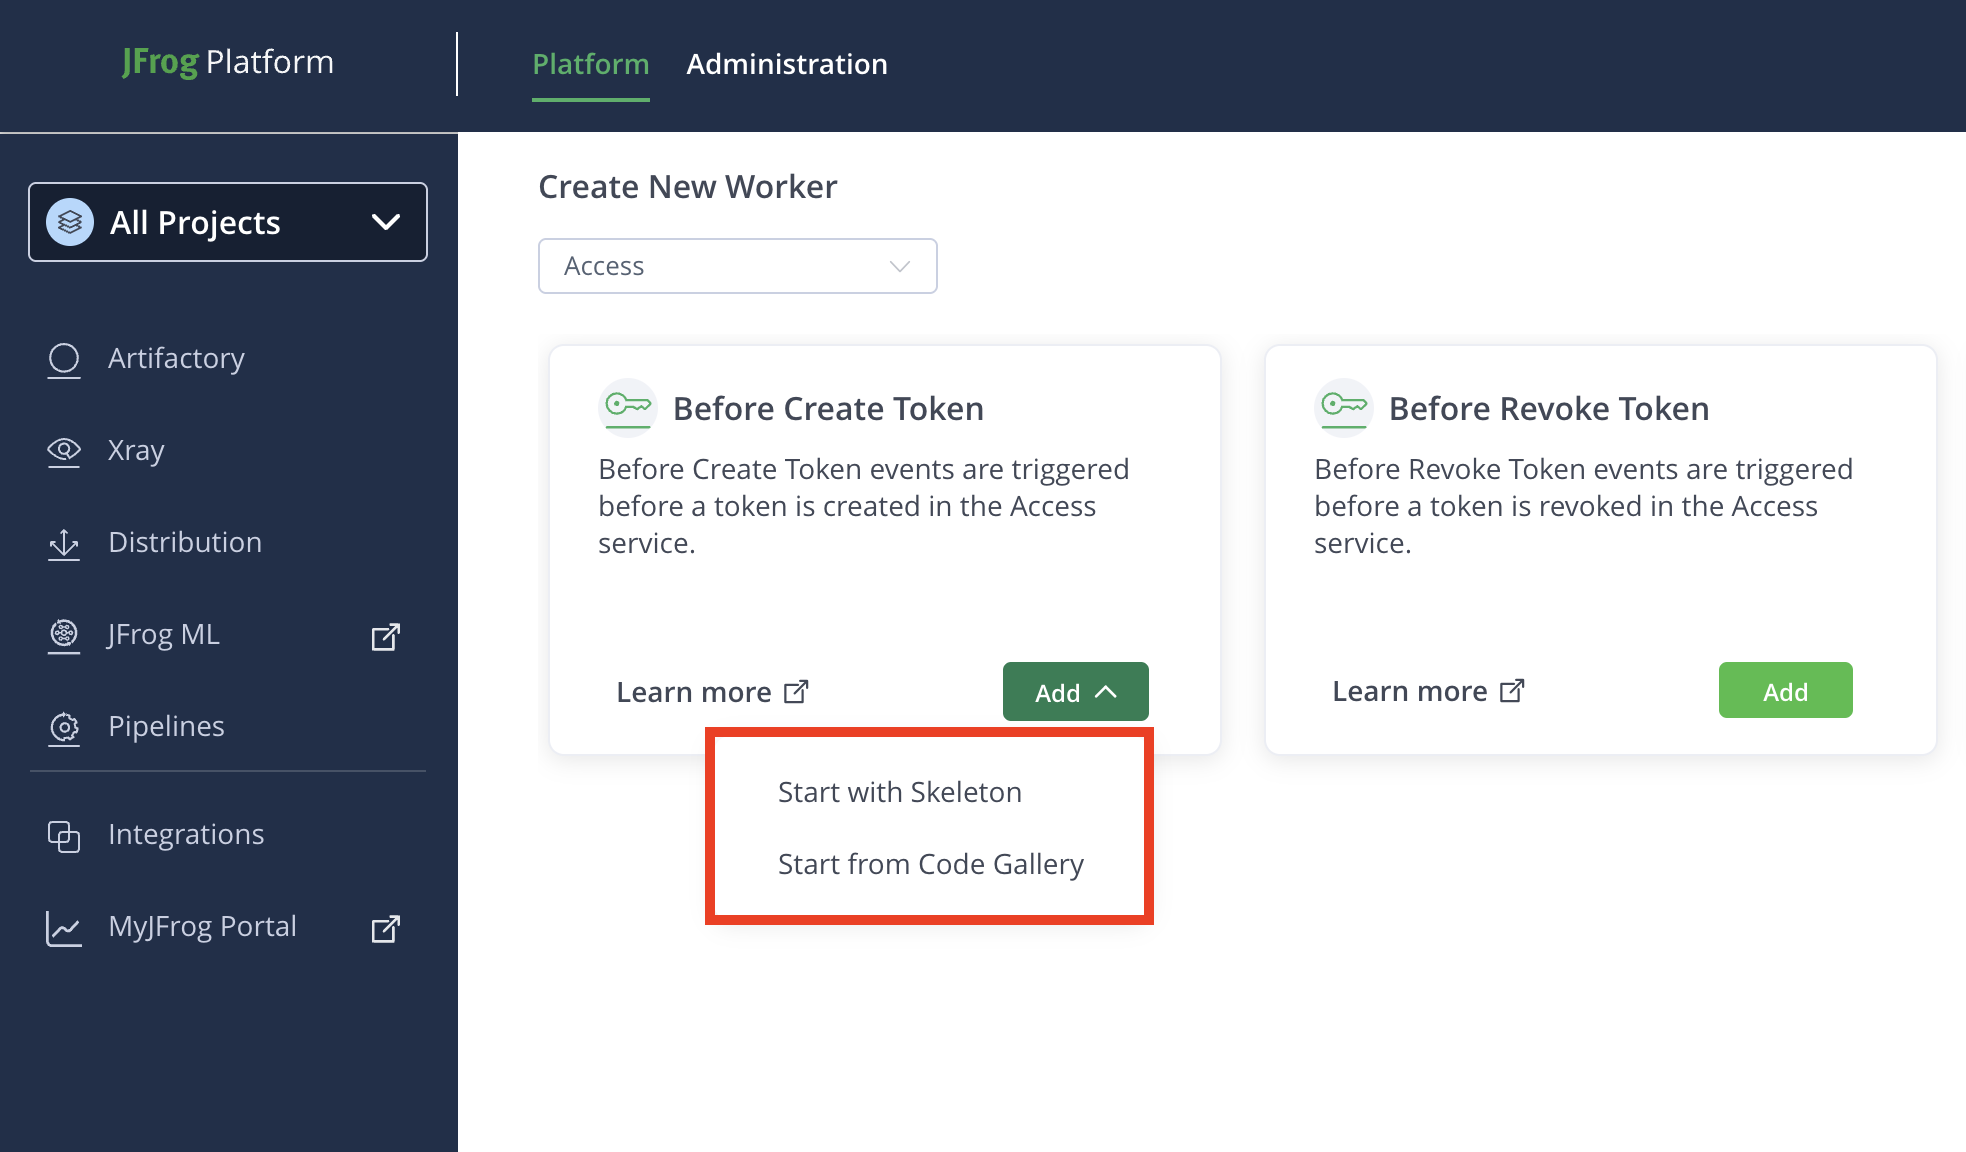
(Optional): Some Workers have a code gallery of ready-made code samples, Worker script examples that you can use to inspire and accelerate your work. To use code samples, select Start with Code Gallery from the drop-down menu. Select a code sample from the list and click Apply: the code sample will appear in the Script field in the Worker menu, and you can edit it there.
Note
The code gallery samples are for reference only, aimed to accelerate your development work using real-world examples.
To use an empty, 'Hello-world' example, select Start with Skeleton.
Step 2: Configure Worker Fields
In the Add New Worker window, enter the details in the relevant fields:
- Name: Enter a descriptive name for the worker.
- Script: Enter or modify the script in the TypeScript Editor. Use the auto-complete function for improved efficiency while coding.
Worker Settings
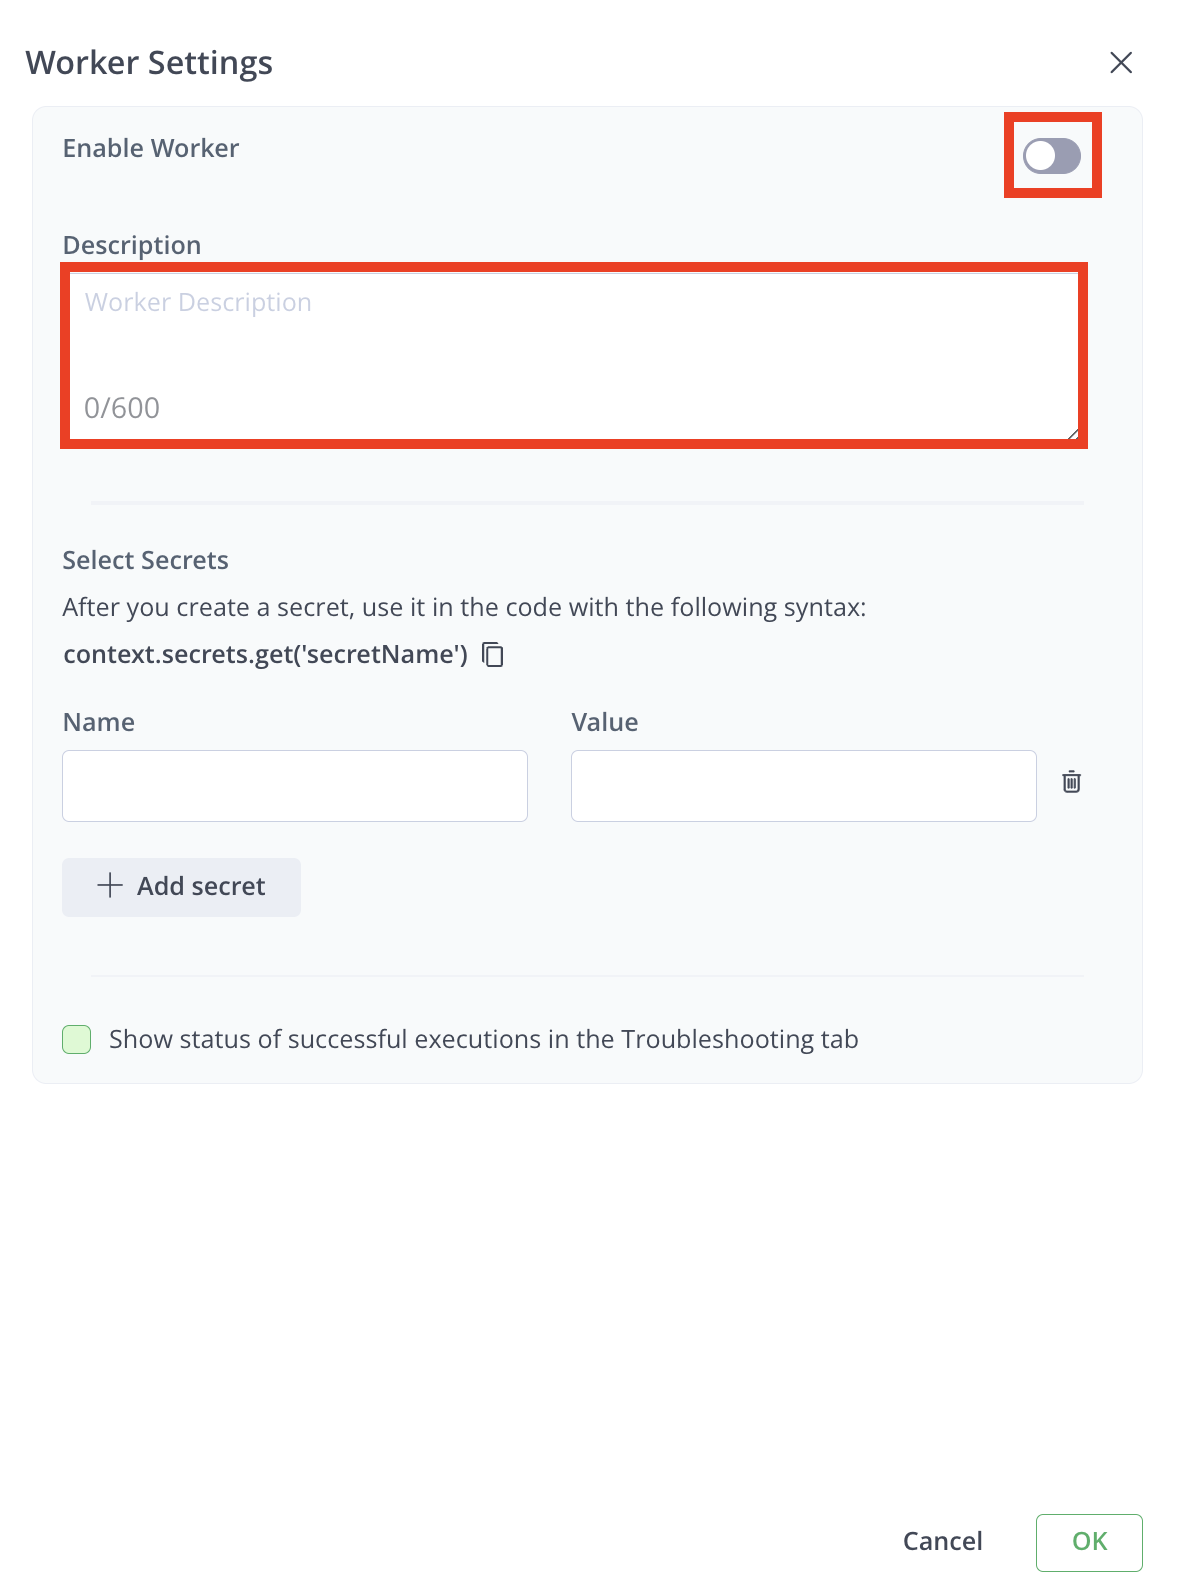
Click the Settings icon from the top-right corner of the window, and then enter the details in the relevant fields:

- Enable Worker: Enable the worker in the Worker Settings modal by clicking the toggle button.
Note
The worker can also be enabled later from the Add New Worker window or Configured window. Repositories must be selected to enable the worker. Once enabled, the worker triggers when a predefined event occurs.
-
Description: Enter a brief description of the worker.
-
Select Secrets: Secrets are stored securely and not in plain text. The secret's clear-text value is never returned in an API or UI and will be masked from all the logs.
To add a secret:
- Enter the Name and Value of the secret.
- Click + Add secret to add more secrets.
- Click Delete icon to remove any secret.
Note
Use secrets in your code with the syntax:
context.secrets.get('secretName').
- Enable Debugging: Click the checkbox for Show Status of Successful Executions in the Troubleshooting tab to view successful execution results. By default, only unsuccessful executions are shown. 5. Click OK when done.
Step 3: Testing Pane
Edit the JSON payload used to simulate the worker's events.
Click Run to test the worker.
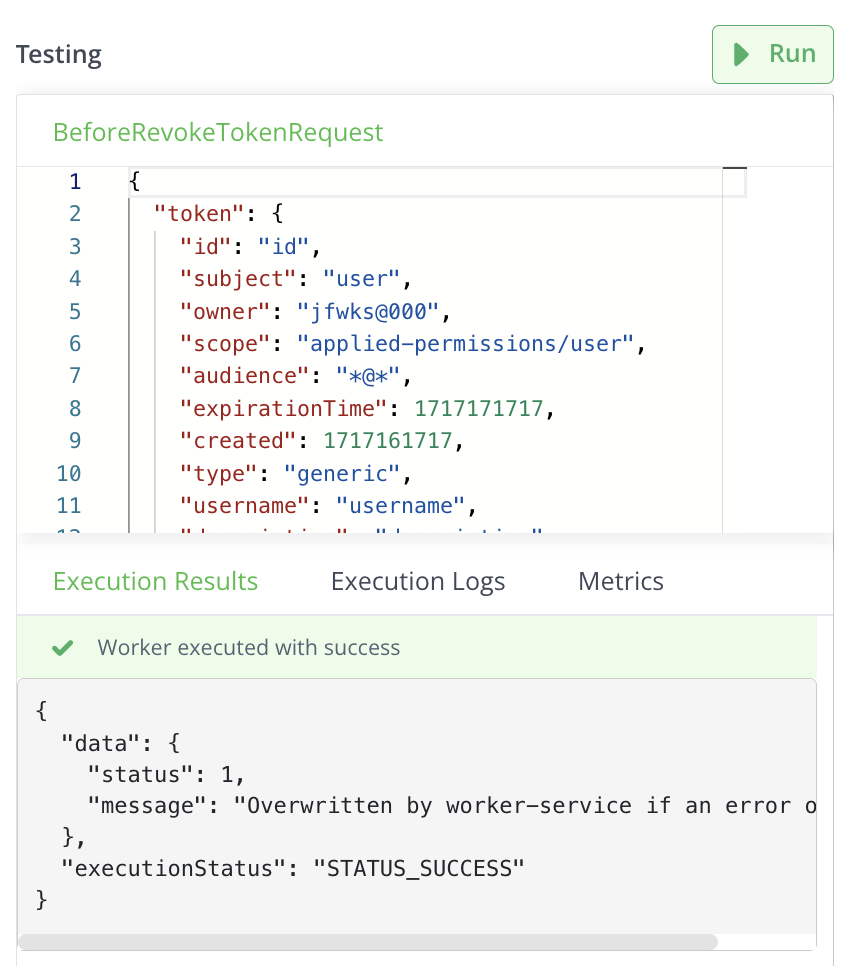
Review results in:
- Execution Results tab: for responses
- Execution Logs tab: for logs
- Metrics tab: for run time, memory, and CPU utilization details.
Step 4: Save Your Configuration
- Click Save to finalize the worker configuration.
- To cancel the configuration, click Close, and then click Discard to discard changes.
Related Information
Configure Event Driven Workers for Runtime
This topic provides step-by-step instructions for configuring a custom event-driven Worker for Runtime. Event-driven Workers are a powerful tool that allows you to automate actions in response to specific events occurring within your Runtime environment.
Prerequisite
Before starting the configuration, ensure you have selected the project you want to apply the worker to.
To configure an event driven worker for Artifactory, follow these steps:
Step 1: Navigate to the Workers Configuration
-
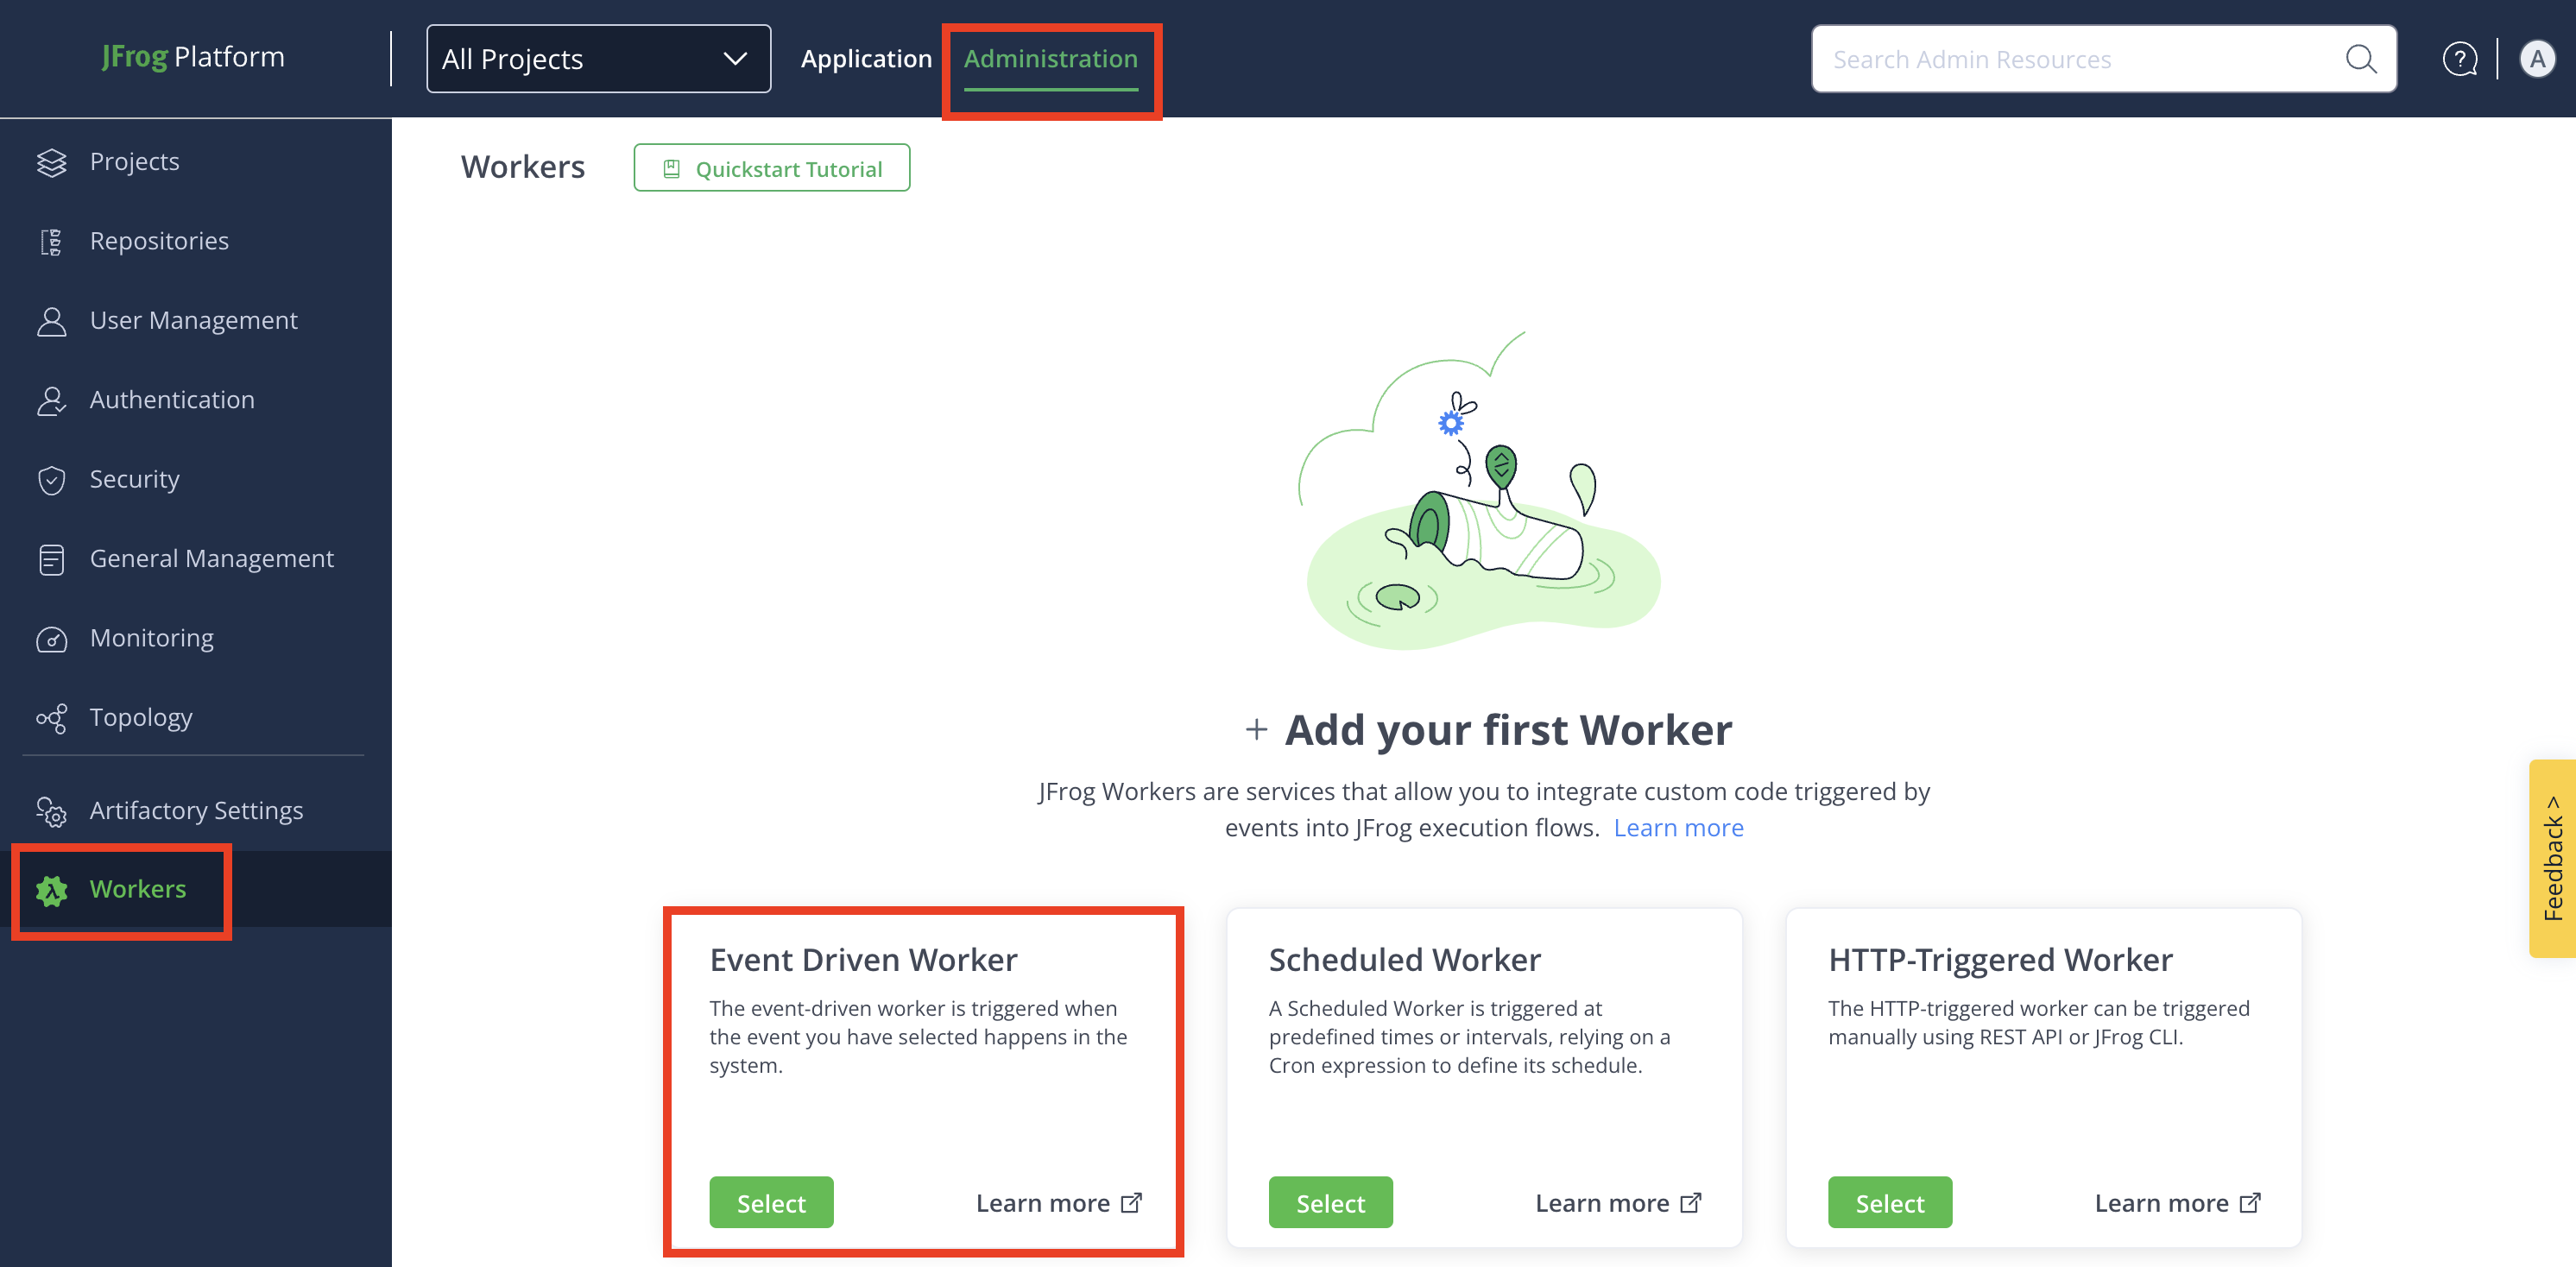
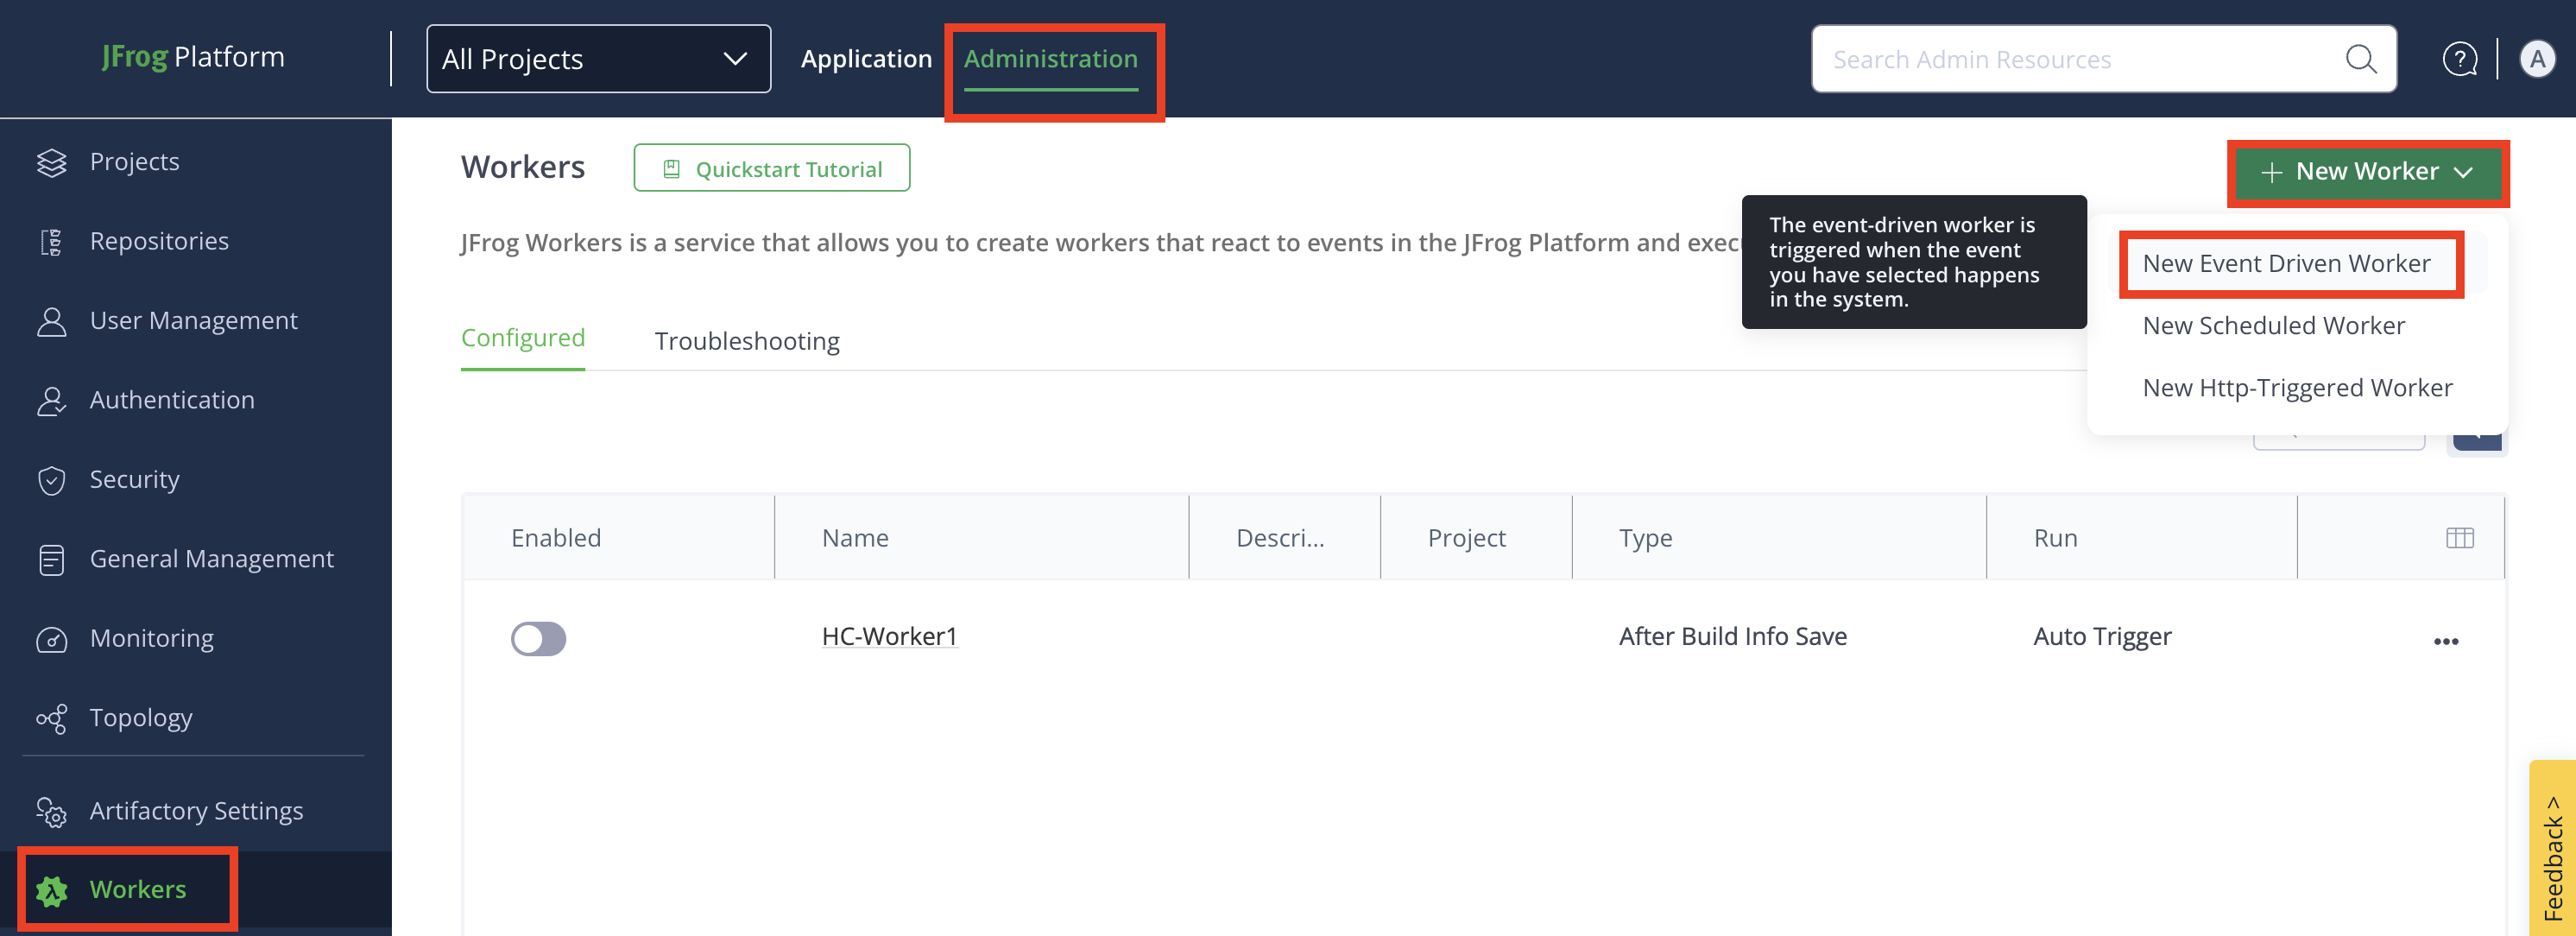
Navigate to the Administration module and click Workers.
-
+ Add your first Worker: If you are creating a worker for the first time, click the Select button in the Event Driven Worker tile.
-
+ Add Additional Worker: To create more Workers after the first one, click + New Worker, and then click New Event Driven Worker.
-
-
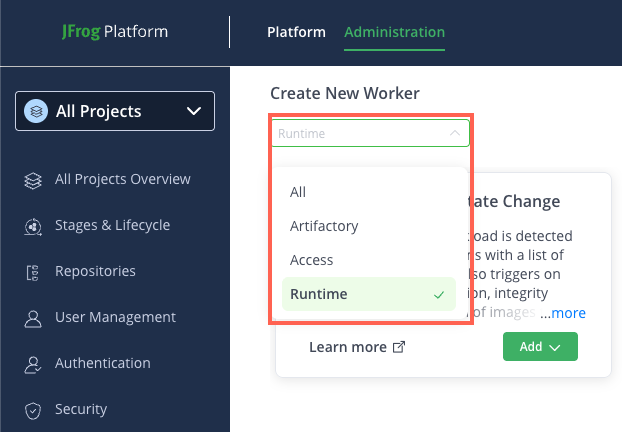
From the Create New Worker drop-down, click Runtime to see available Runtime Workers.
-
Locate the desired Runtime Worker, and then click Add.
-
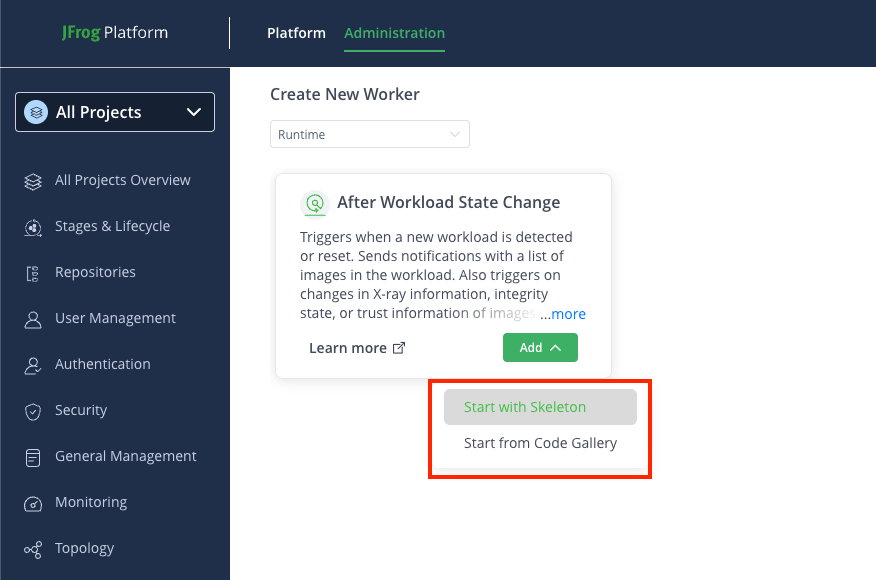
(Optional): Some Workers have a code gallery of ready-made code samples, Worker script examples that you can use to inspire and accelerate your work. To use code samples, select Start with Code Gallery from the drop-down menu. Select a code sample from the list and click Apply: the code sample will appear in the Script field in the Worker menu, and you can edit it there.
Note
The code gallery samples are for reference only, aimed to accelerate your development work using real-world examples.
To use an empty, 'Hello-world' example, select Start with Skeleton.
Step 2: Configure Worker Fields
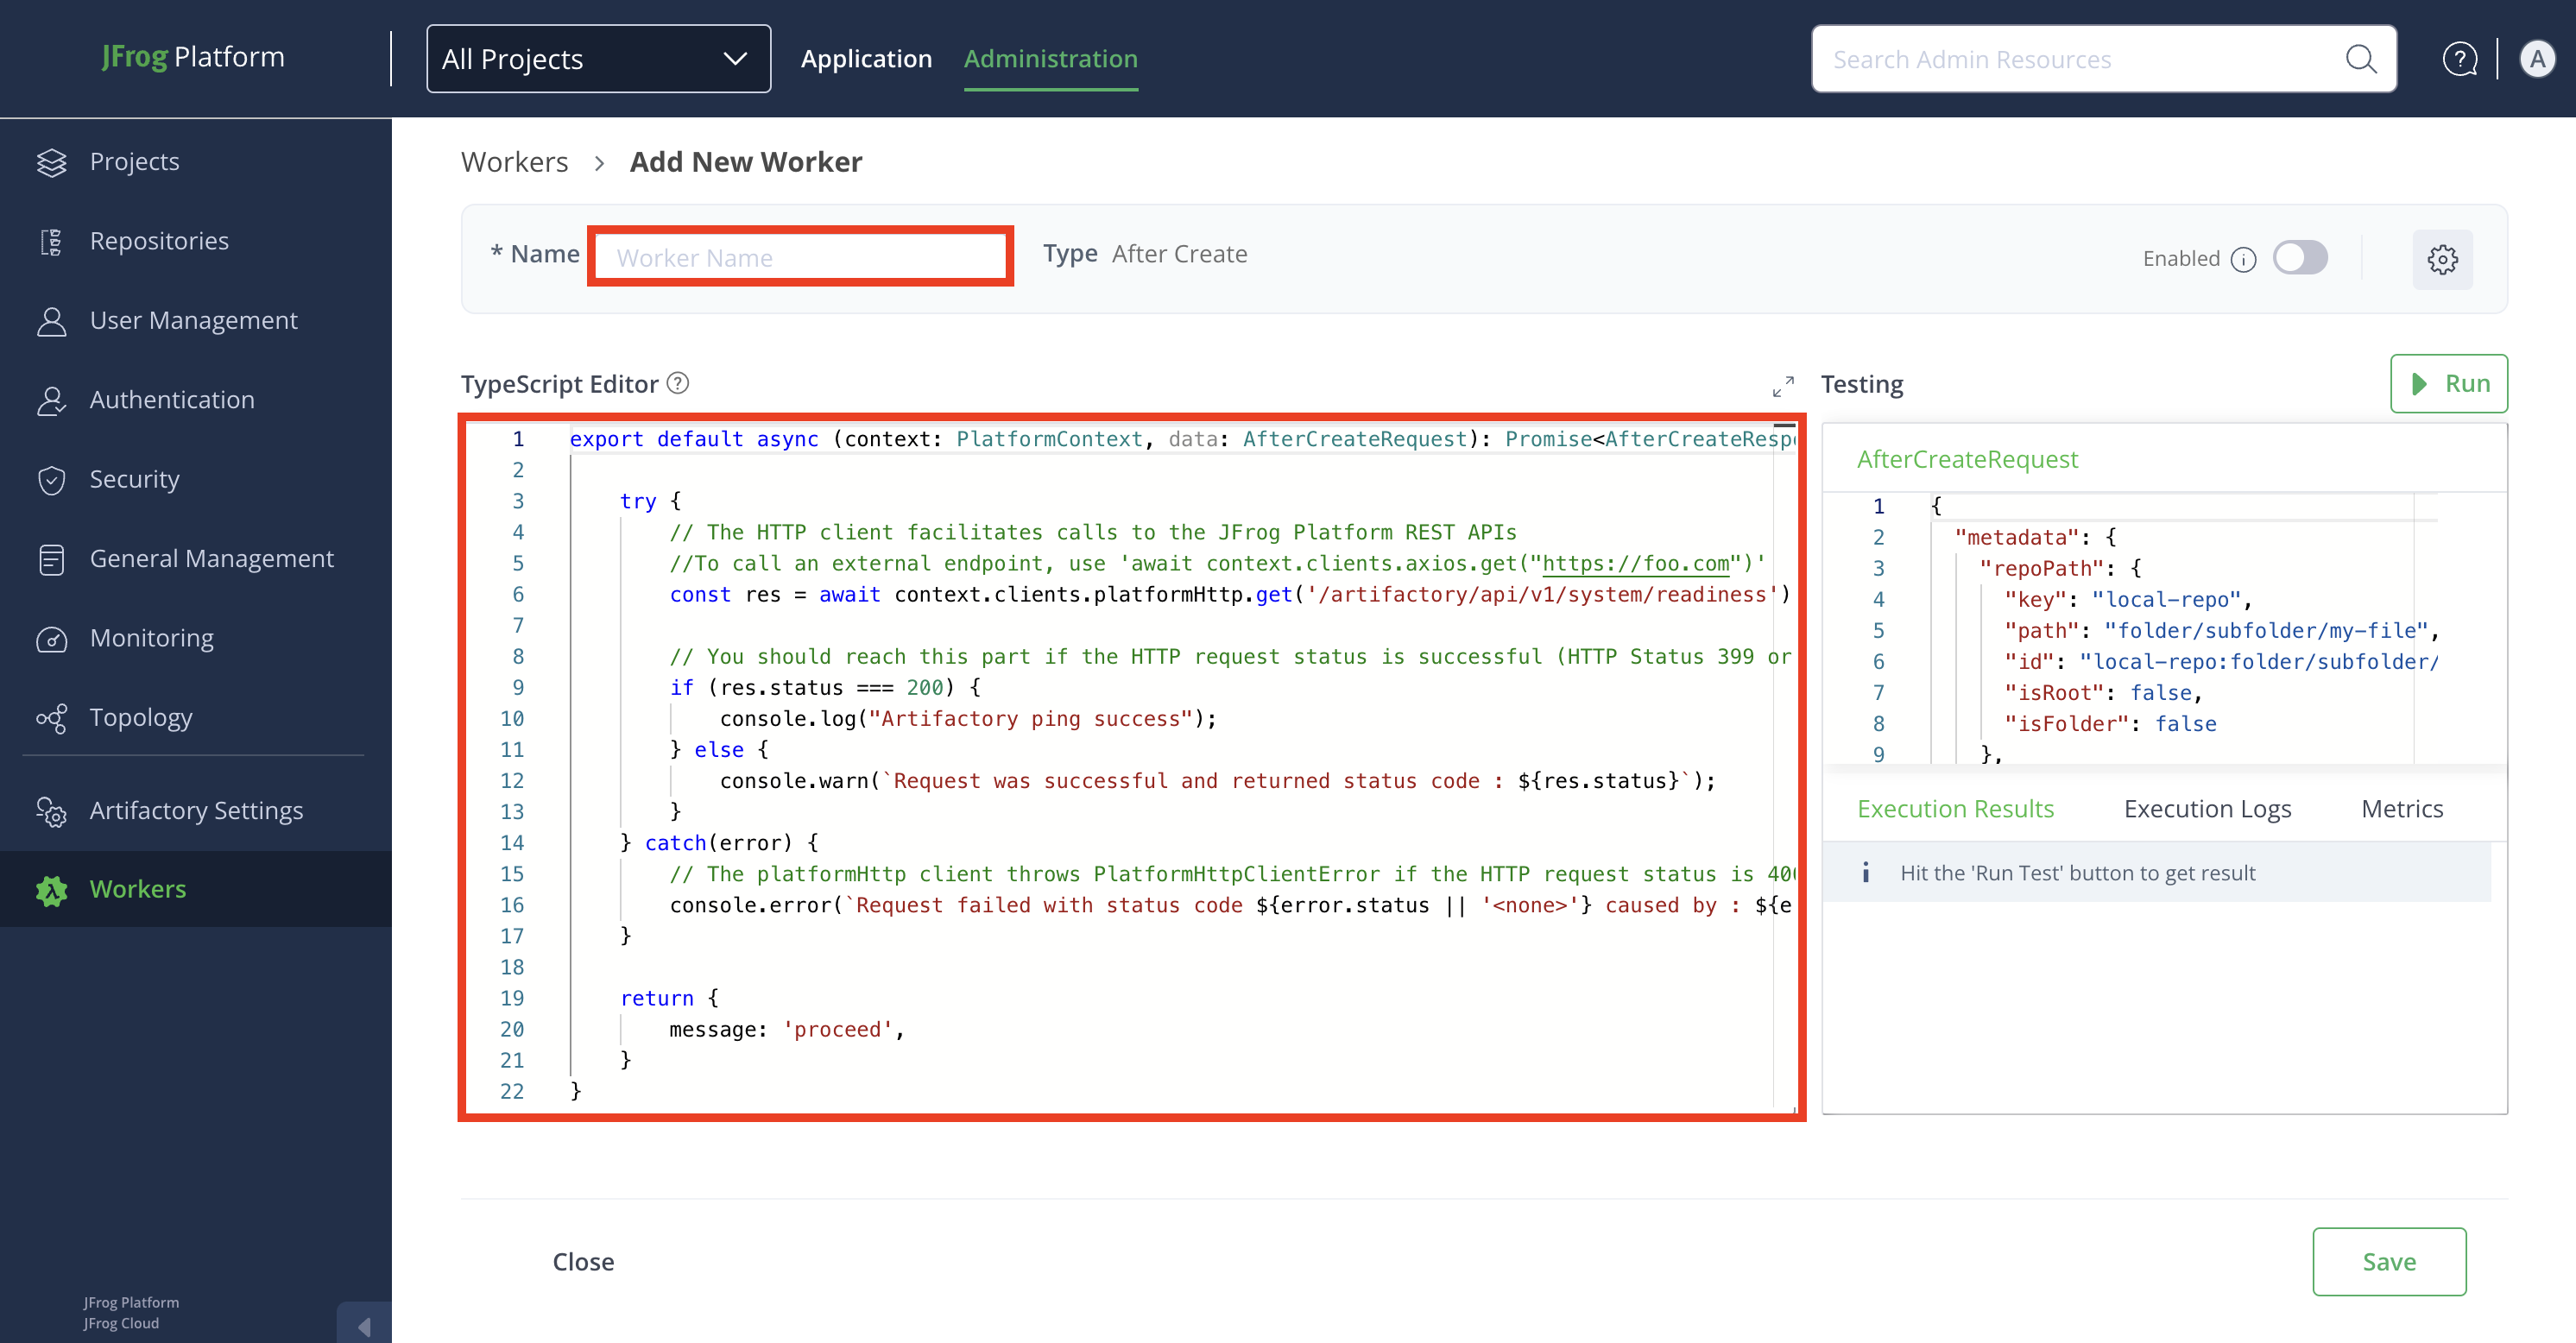
In the Add New Worker window, enter the details in the relevant fields:
-
Name: Enter a descriptive name for the worker.
-
Script: Enter or modify the script in the TypeScript Editor. Use the auto-complete function for improved efficiency while coding.
Worker Settings
Click the Settings icon from the top-right corner of the window, and then enter the details in the relevant fields:

-
Enable Worker: Enable the worker in the Worker Settings modal by clicking the toggle button.
Note
The worker can also be enabled later from the Add New Worker window or Configured window. Repositories must be selected to enable the worker. Once enabled, the worker triggers when a predefined event occurs.
-
Description: Enter a brief description of the worker.
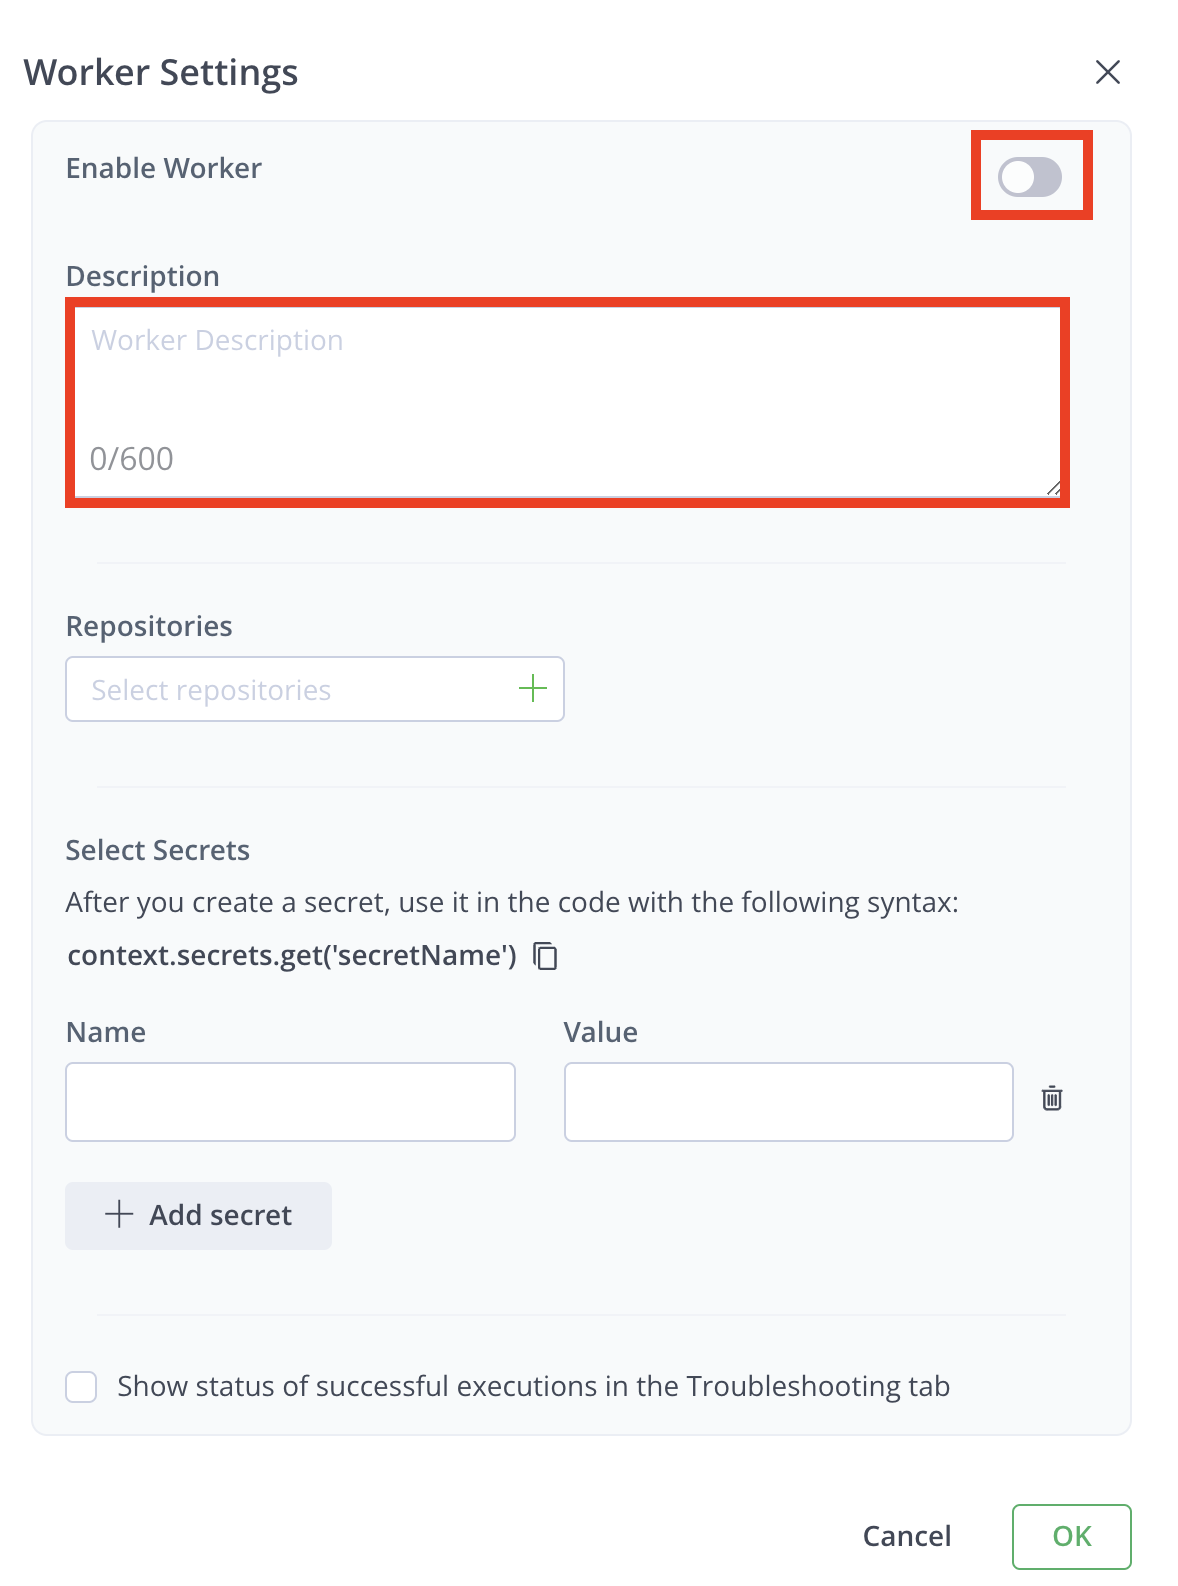
-
Repositories: Click the + icon in the Repositories field.
Note
When creating a Worker within a project, you can select only repositories that are directly within the project, and not ones that are shared with the project.
You can either:
-
Select Repositories: Move selected repositories from the Available Repositories list.
-
Set Patterns: Use wildcards (for example, , *, ?) to define patterns for repository selection.
Example Patterns:
com/t?st.zip- Matchescom/test.zip,com/tast.zip, etc.com/*.zip- Matches all.zipfiles in the com directory.com/**/test.zip- Matches alltest.zipfiles in subdirectories ofcom.
You can add multiple patterns to the filter. After you enter a pattern, click + to add that pattern to the filter.
Note
For more information, see AntPathMatcher Documentation.
-
Select Secrets: Secrets are stored securely and not in plain text. The secret's clear-text value is never returned in an API or UI and will be masked from all the logs.
To add a secret:
- Enter the Name and Value of the secret.
- Click + Add secret to add more secrets.
- Click Delete icon to remove any secret.
Note
Use secrets in your code with the syntax:
context.secrets.get('secretName').
-
Enable Debugging: Click the checkbox for Show Status of Successful Executions in the Troubleshooting tab to view successful execution results. By default, only unsuccessful executions are shown.
-
Click OK when done.
Step 3: Testing pane
Edit the JSON payload used to simulate the worker's events.
Click Run to test the worker.
Review results in:
- Execution Results tab: for responses
- Execution Logs tab: for logs
- Metrics tab: for run time, memory, and CPU utilization details.
Step 4: Save Your Configuration
- Click Save to finalize the worker configuration.
- To cancel the configuration, click Close, and then click Discard to discard changes.
Related Information
Configure Scheduled Worker
This topic provides a step-by-step instruction to configure a custom scheduled Worker. Scheduled Workers are a powerful tool that allows you to trigger at predefined times or intervals, which you can define using cron expressions.
Prerequisite
Before starting the configuration, ensure that you have selected the desired project for which you want to apply the worker.
To configure a scheduled worker for Artifactory, follow these steps:
Step 1: Navigate to the Workers Configuration
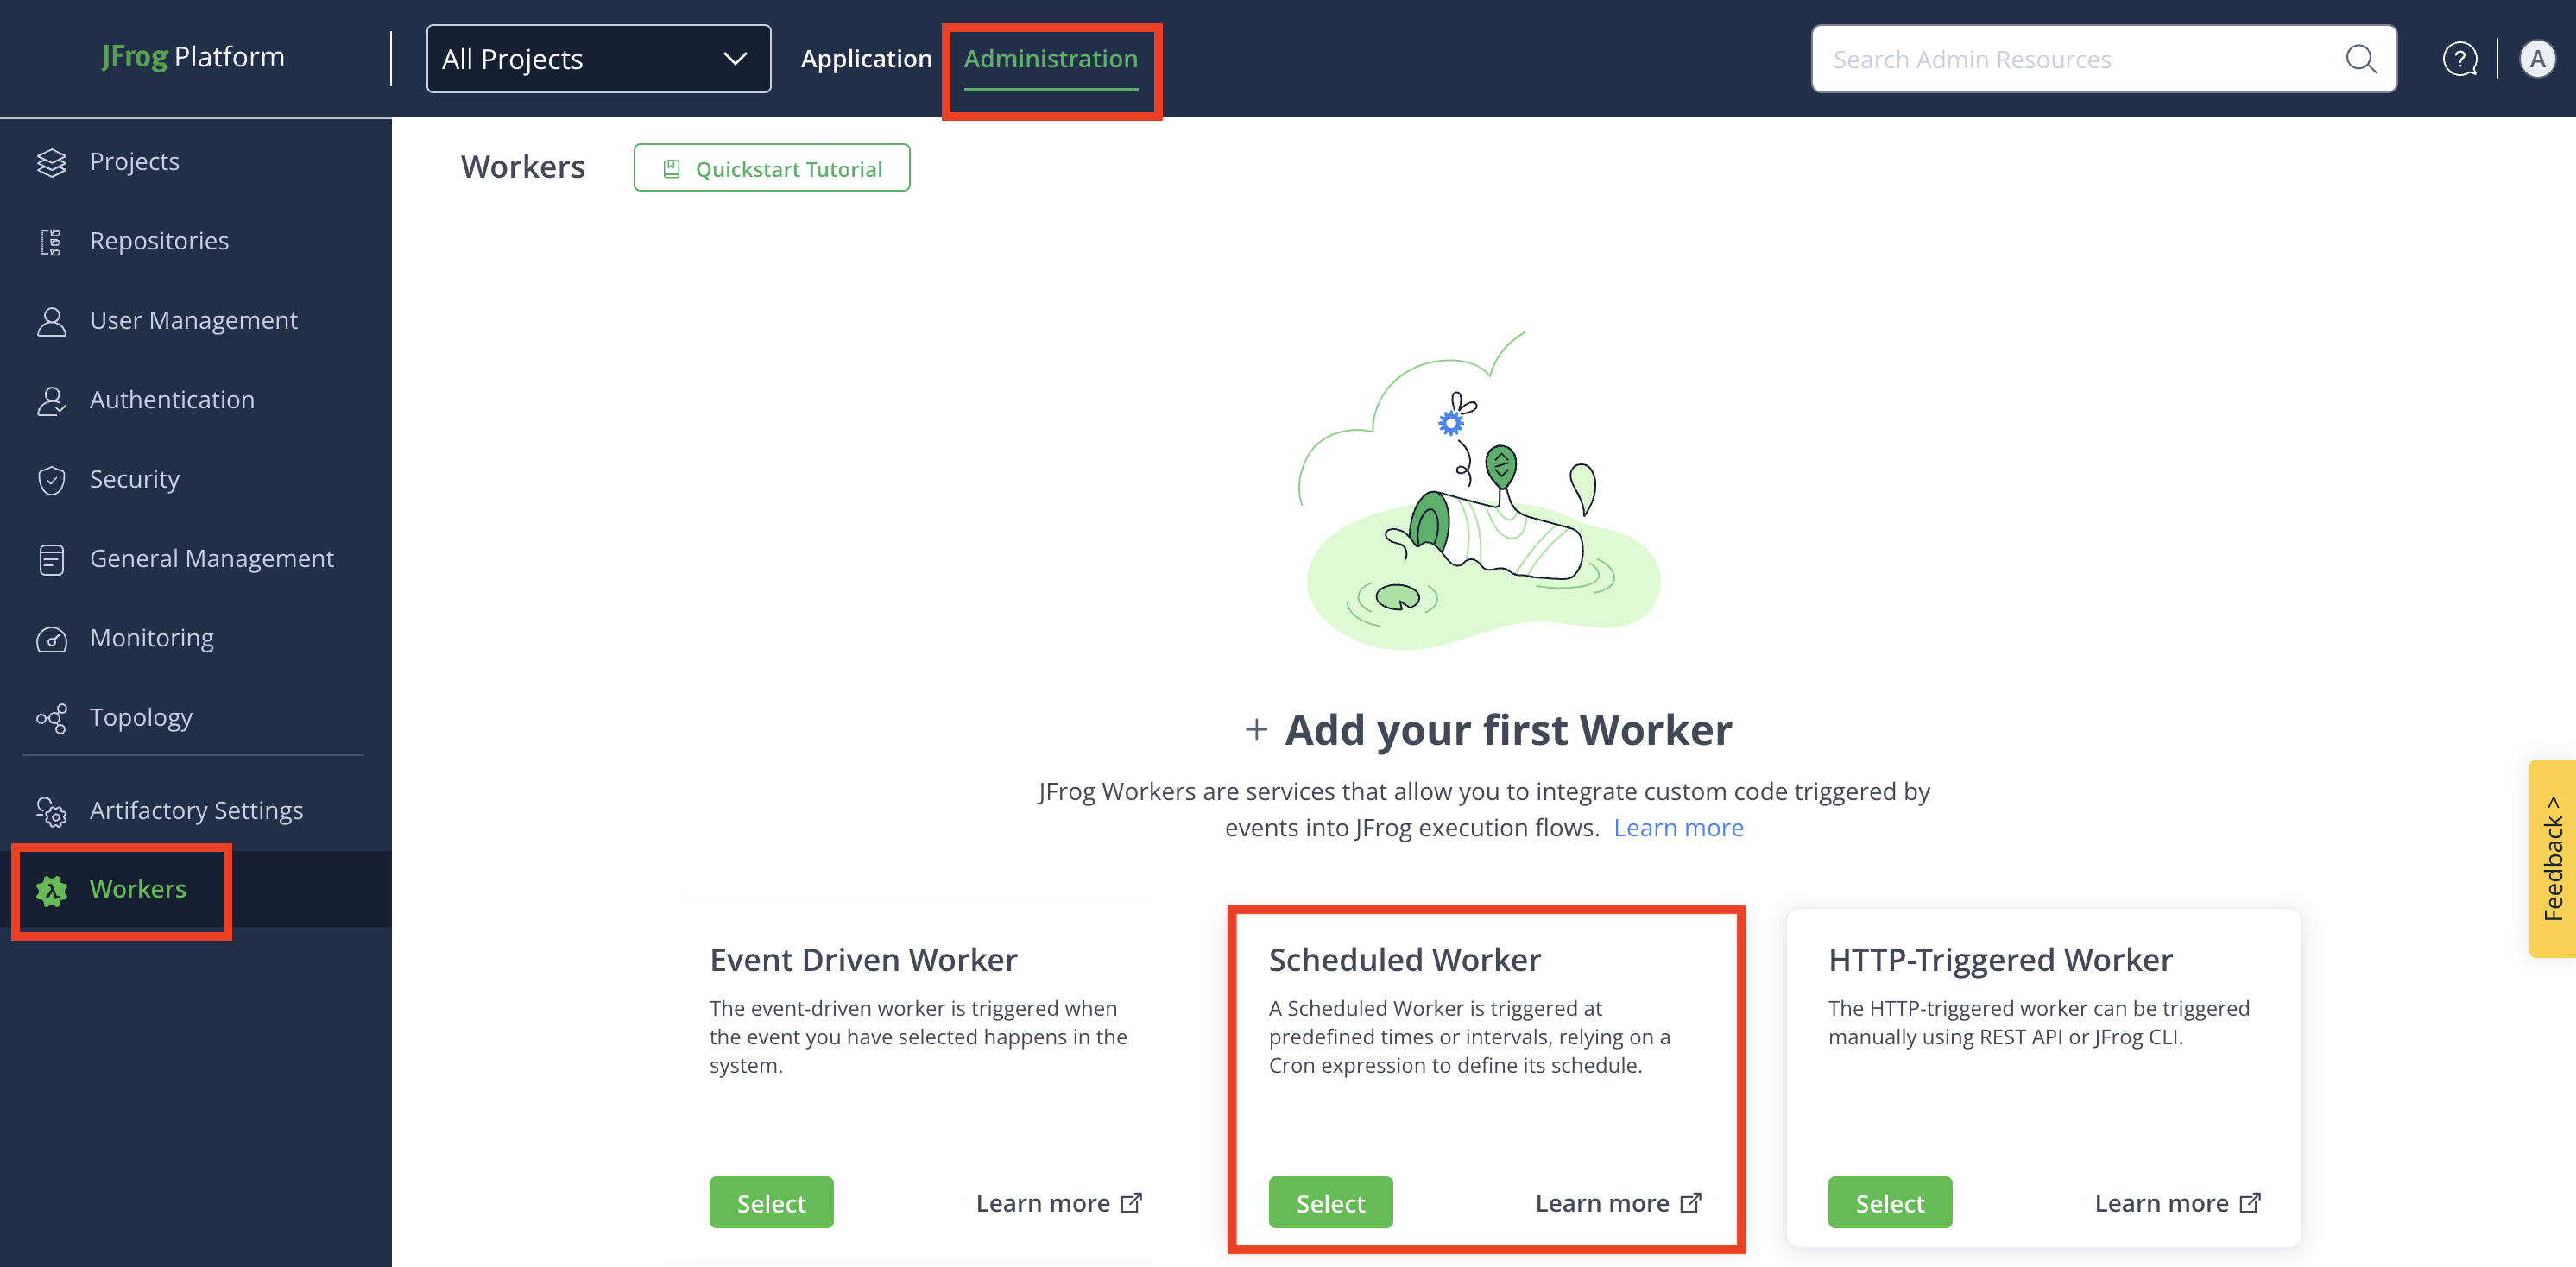
Navigate to the Administration module and click Workers.
+ Add your first Worker: If you are creating a worker for the first time, click Select button in the Scheduled Worker tile.
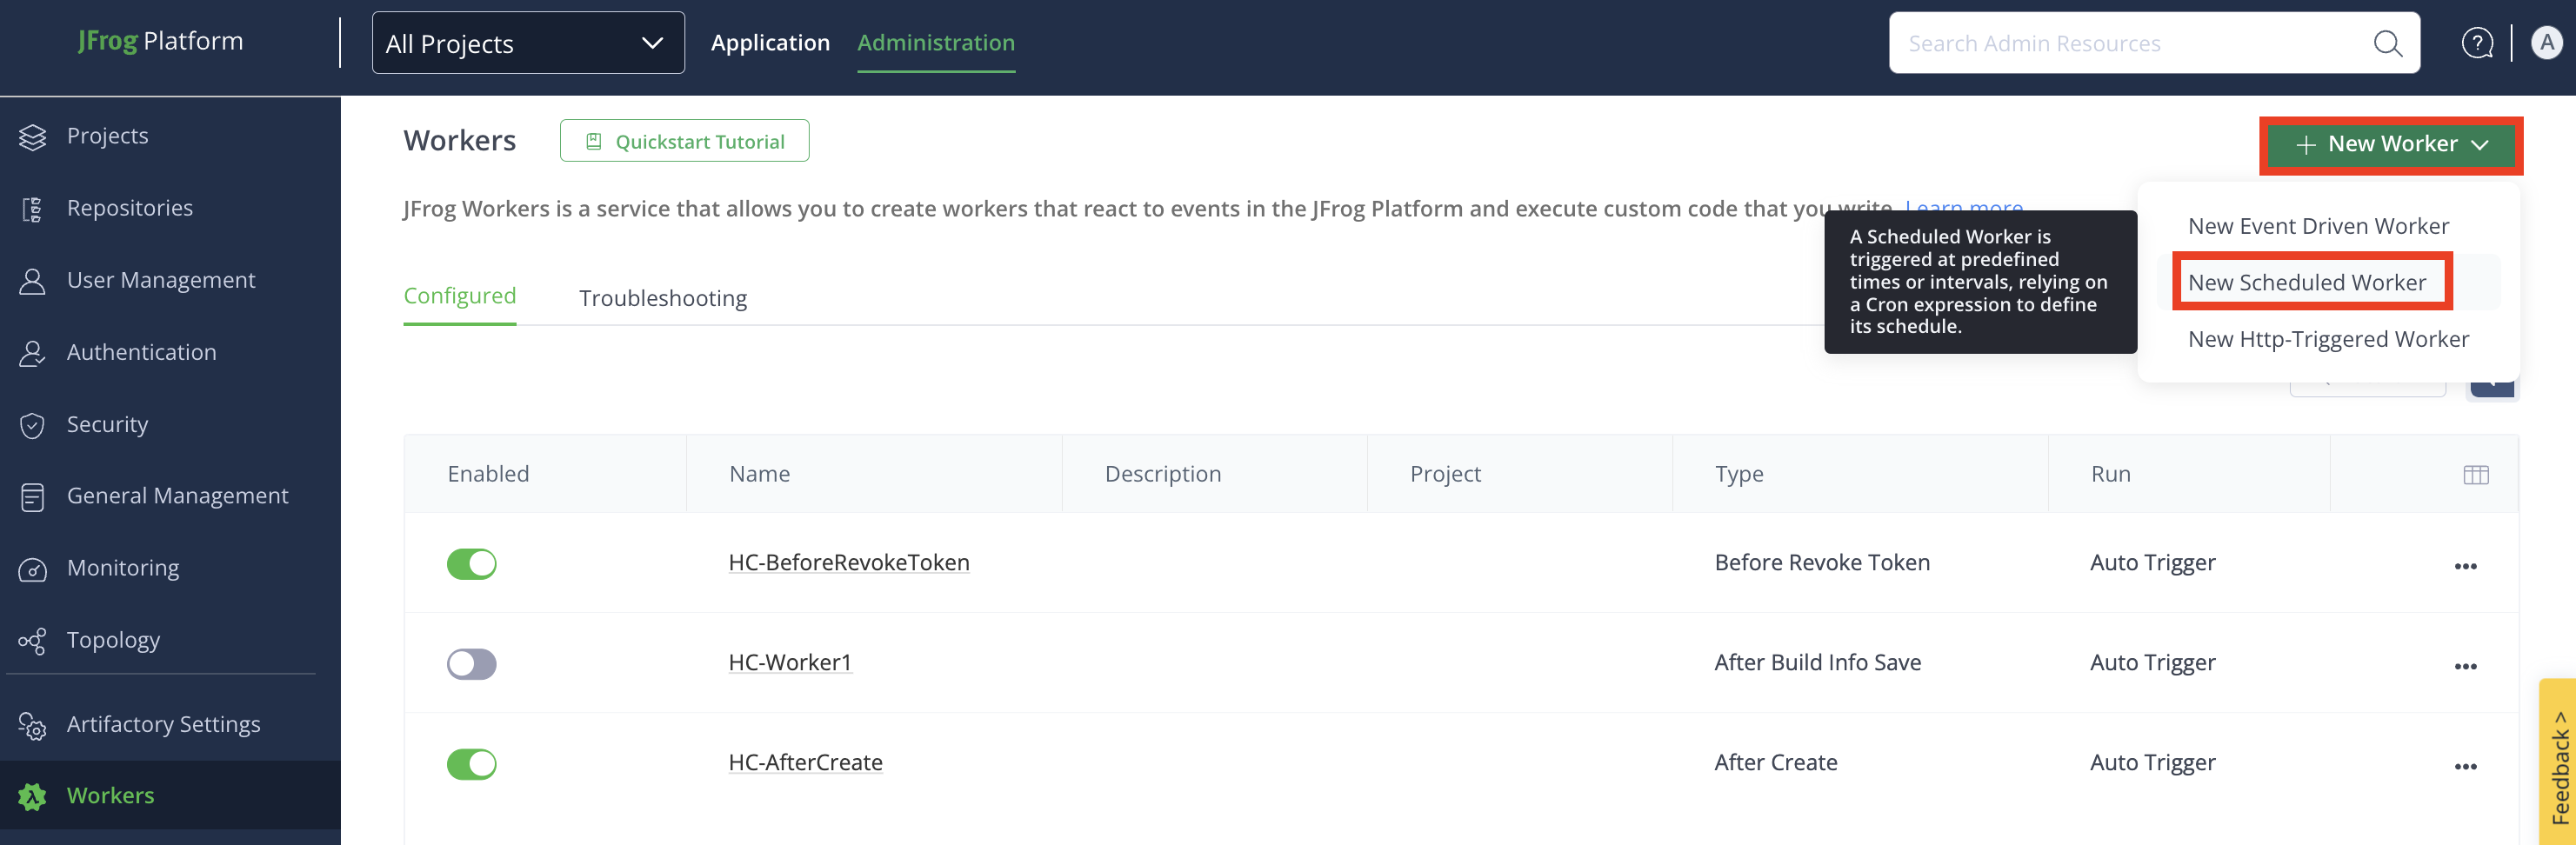
+ Add Additional Worker: For the second and more workers, click + New Worker, and then click New Scheduled Worker.
Step 2: Configure Worker Fields
In the Add New Worker window, enter the details in the relevant fields:
-
Name: Enter a descriptive name for the worker.
-
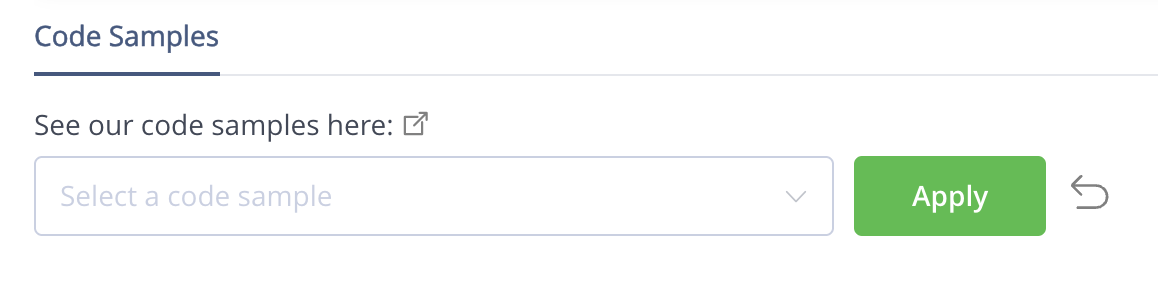
(Optional) To use code samples, go to the Code Samples section, select the event you want to use from the drop-down menu, and click Apply. To see the full sample details, and the link to view it on GitHub, click See More. The code sample will be populated in the Script field, and you can modify it there.
-
Script: Enter or modify the script in the TypeScript Editor. Use the auto-complete function for improved efficiency while coding.
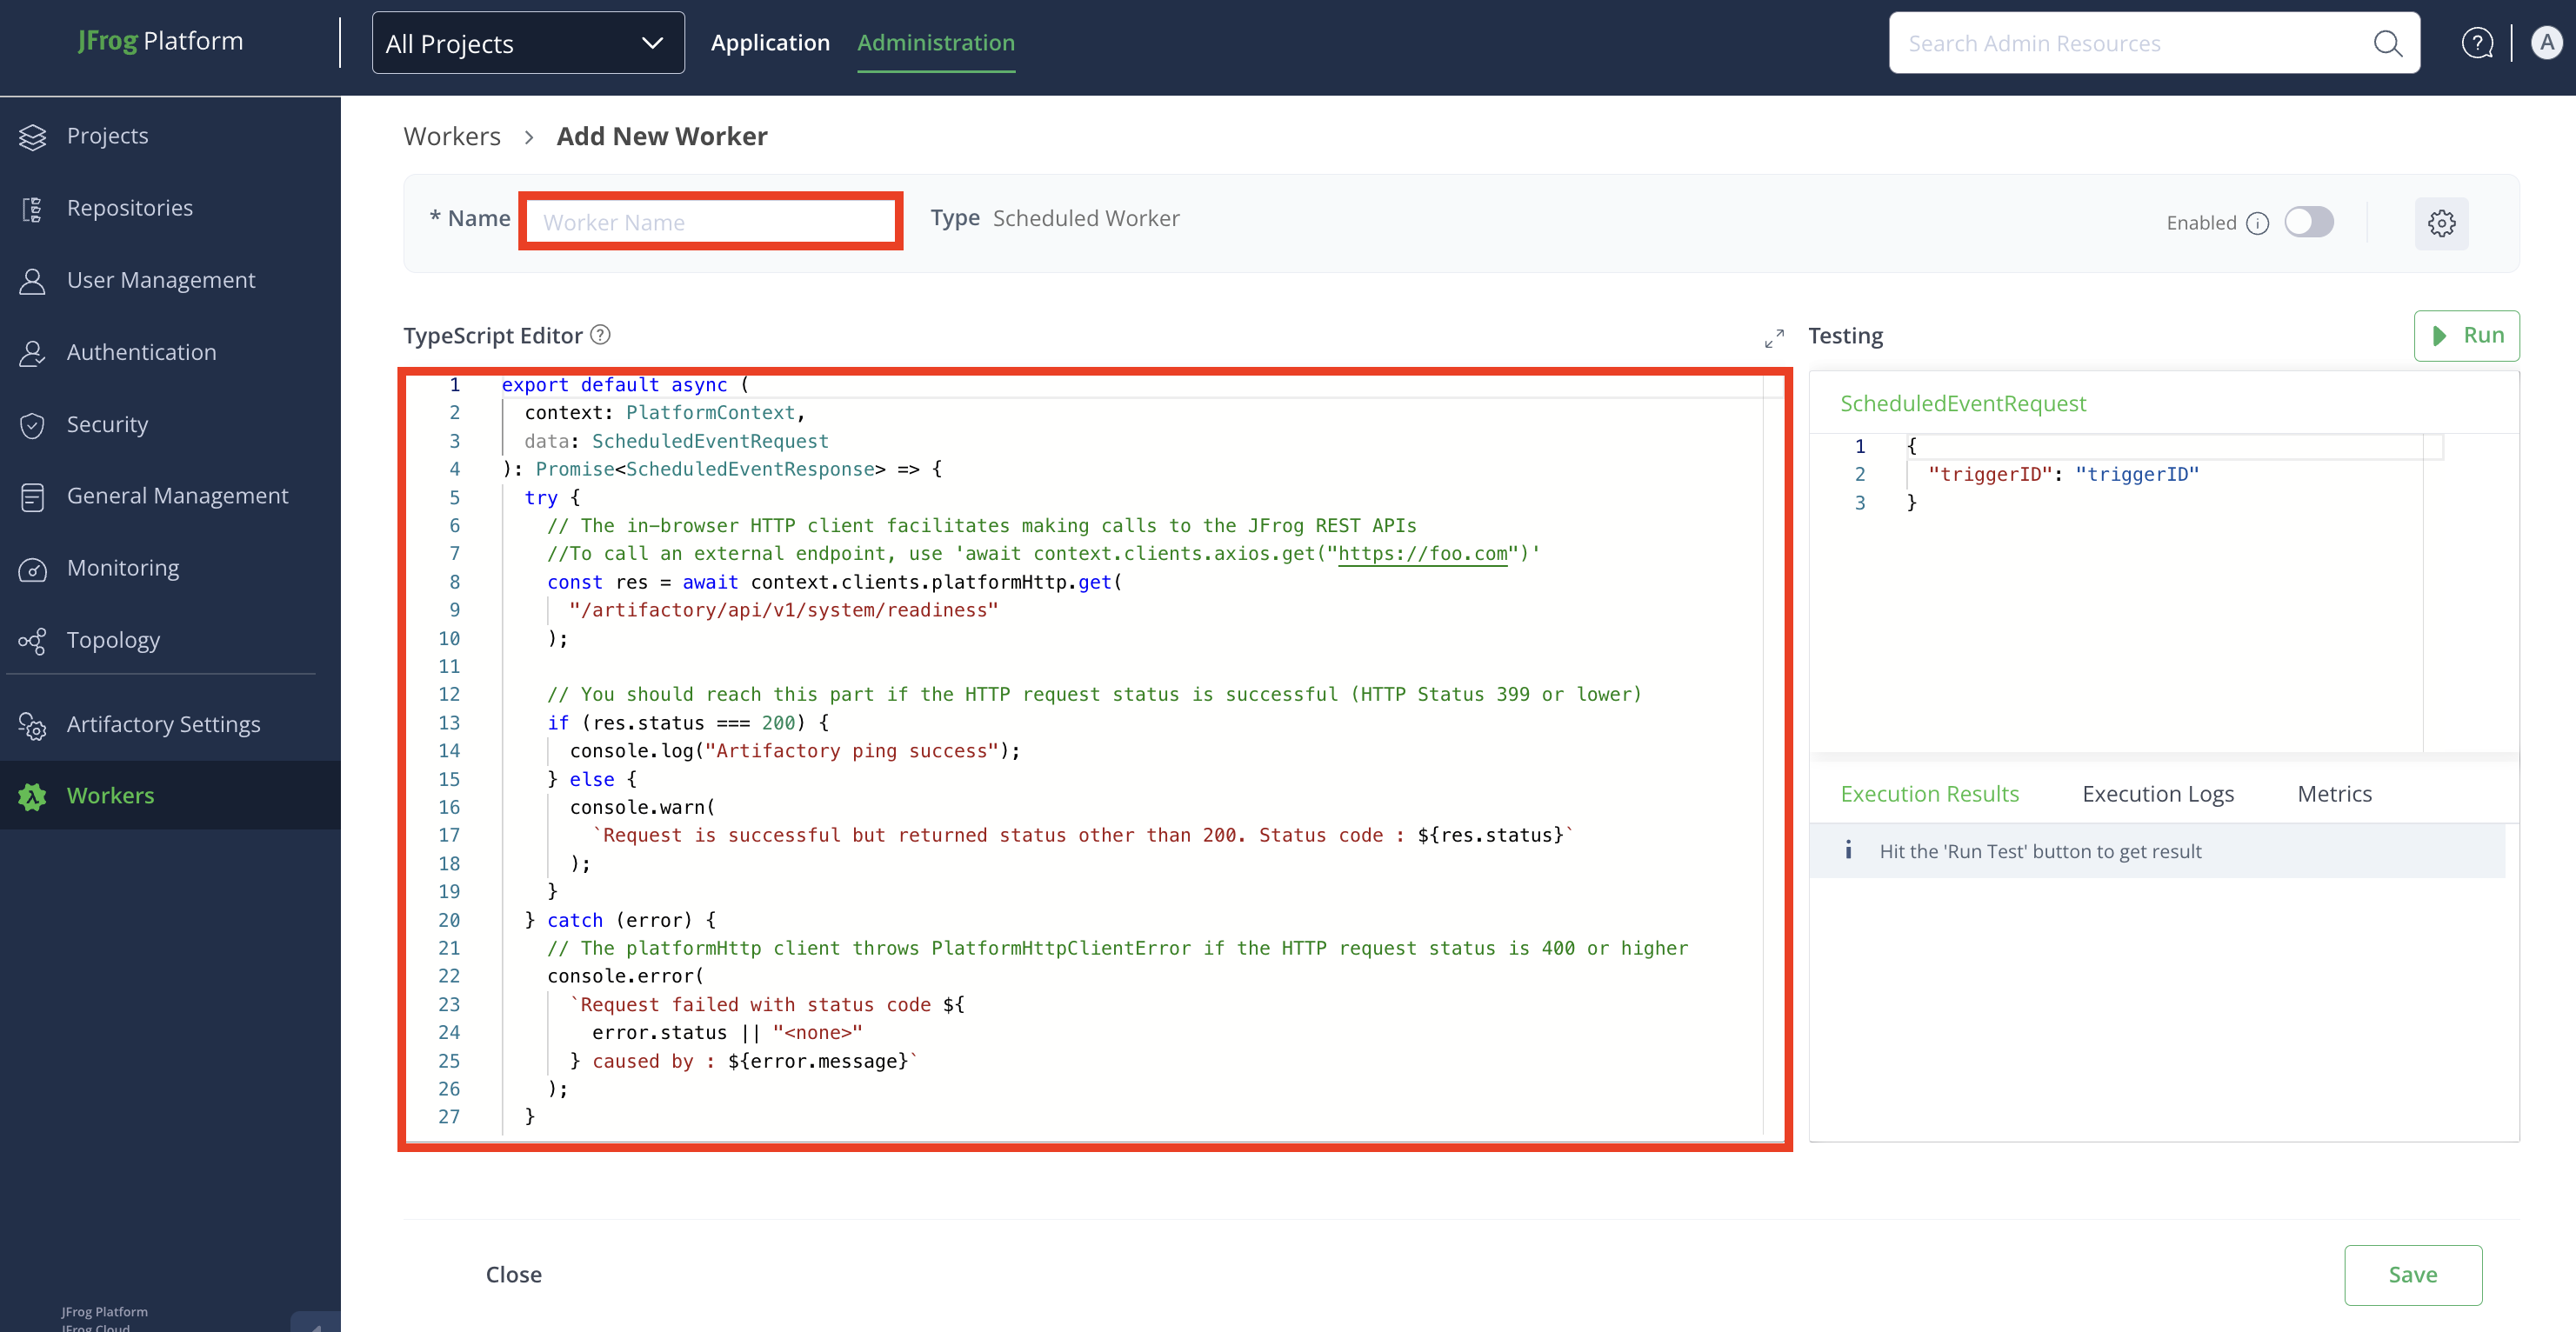
Worker Settings
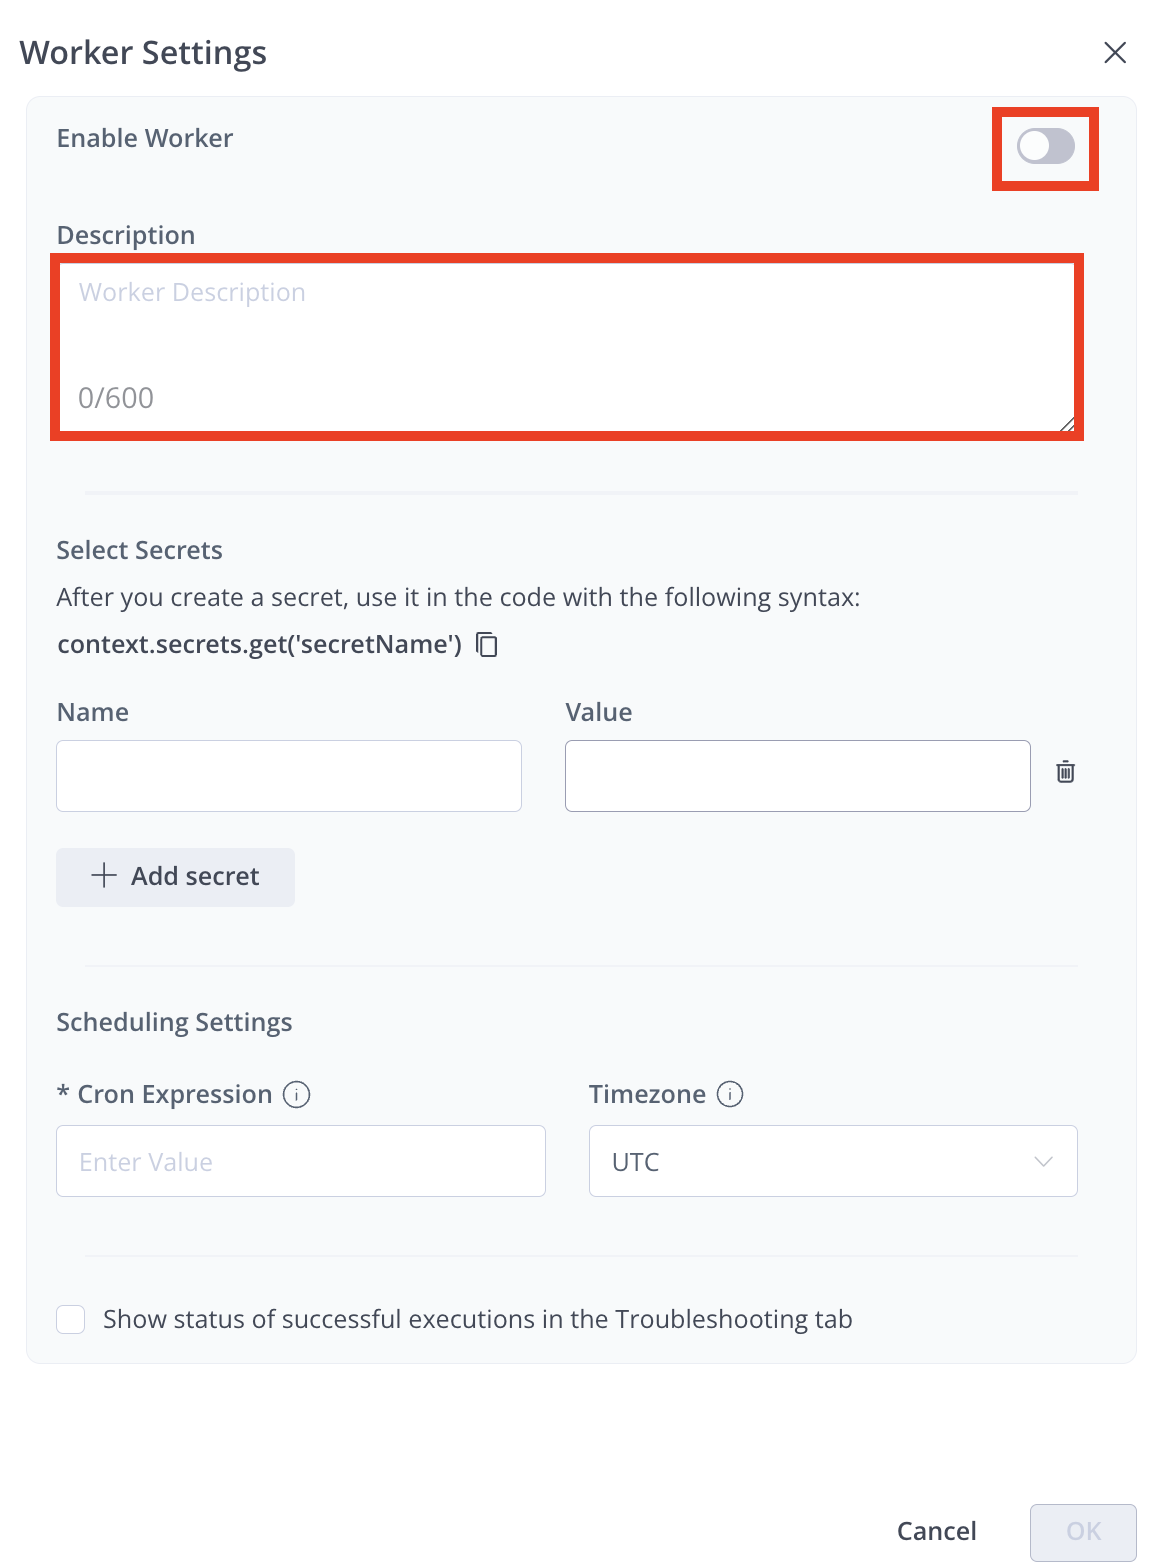
Click the Settings icon from the top-right corner of the window, and then enter the details in the relevant fields:

- Enable Worker: Enable the worker in the Worker Settings modal by clicking the toggle button.
Note
The worker can also be enabled later from the Add New Worker window or Configured window. Repositories must be selected to enable the worker. Once enabled, the worker triggers when a predefined event occurs.
-
Description: Enter a brief description of the worker.
-
Select Secrets: Secrets are stored securely and not in plain text. The secret's clear-text value is never returned in an API or UI and will be masked from all the logs.
To add a secret:
- Enter the Name and Value of the secret.
- Click + Add secret to add more secrets.
- Click Delete icon to remove any secret.
Note
Use secrets in your code with the syntax:
context.secrets.get('secretName').
-
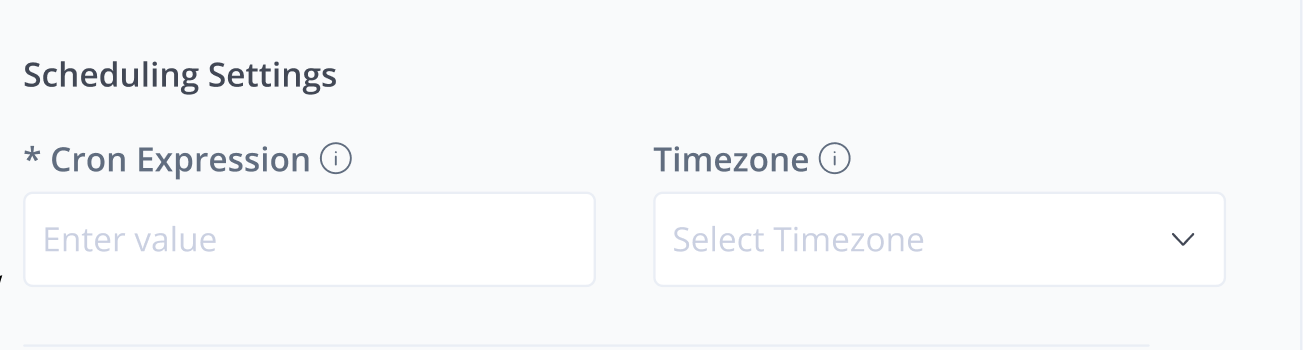
Scheduled Settings:
-
In the Cron Expressions, enter the cron expression that you want the worker to follow. For more information, see cron expressions
-
Under Timezone, select the timezone the worker will use from the drop-down menu. By default, the timezone is UTC.
-
Enable Debugging: Click the checkbox for Show Status of Successful Executions in the Troubleshooting tab to view successful execution results. By default, only unsuccessful executions are shown.
-
Click OK when done.
Step 3: Testing Pane
Edit the JSON payload used to simulate the worker's events.
Click Run to test the worker.
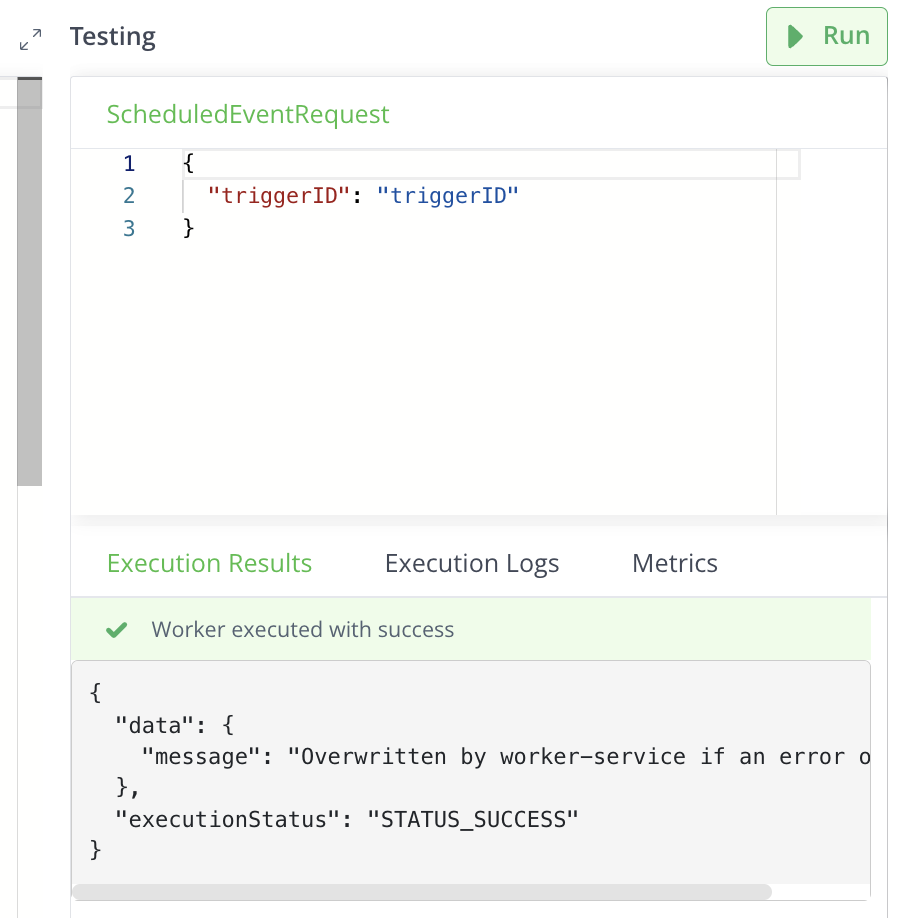
Review results in:
- Execution Results tab: for responses
- Execution Logs tab: for logs
- Metrics tab: for run time, memory, and CPU utilization details.
Step 4: Save Your Configuration
- Click Save to finalize the worker configuration.
- To cancel the configuration, click Close, and then click Discard to discard changes.
Related Information
Configure HTTP-Triggered Worker
This topic provides a step-by-step instruction to configure a custom HTTP-triggered Worker. These Workers can execute custom code independent of any events in the JFrog Platform. Generic event Workers are launched on demand. You can choose permissions for generic event Workers and determine whether they can be run by admin or non-admin users.
Prerequisite
Before starting the configuration, ensure that you have selected the desired project for which you want to apply the worker.
To configure an HTTP-Triggered worker for Artifactory, follow these steps:
Step 1: Navigate to the Workers Configuration
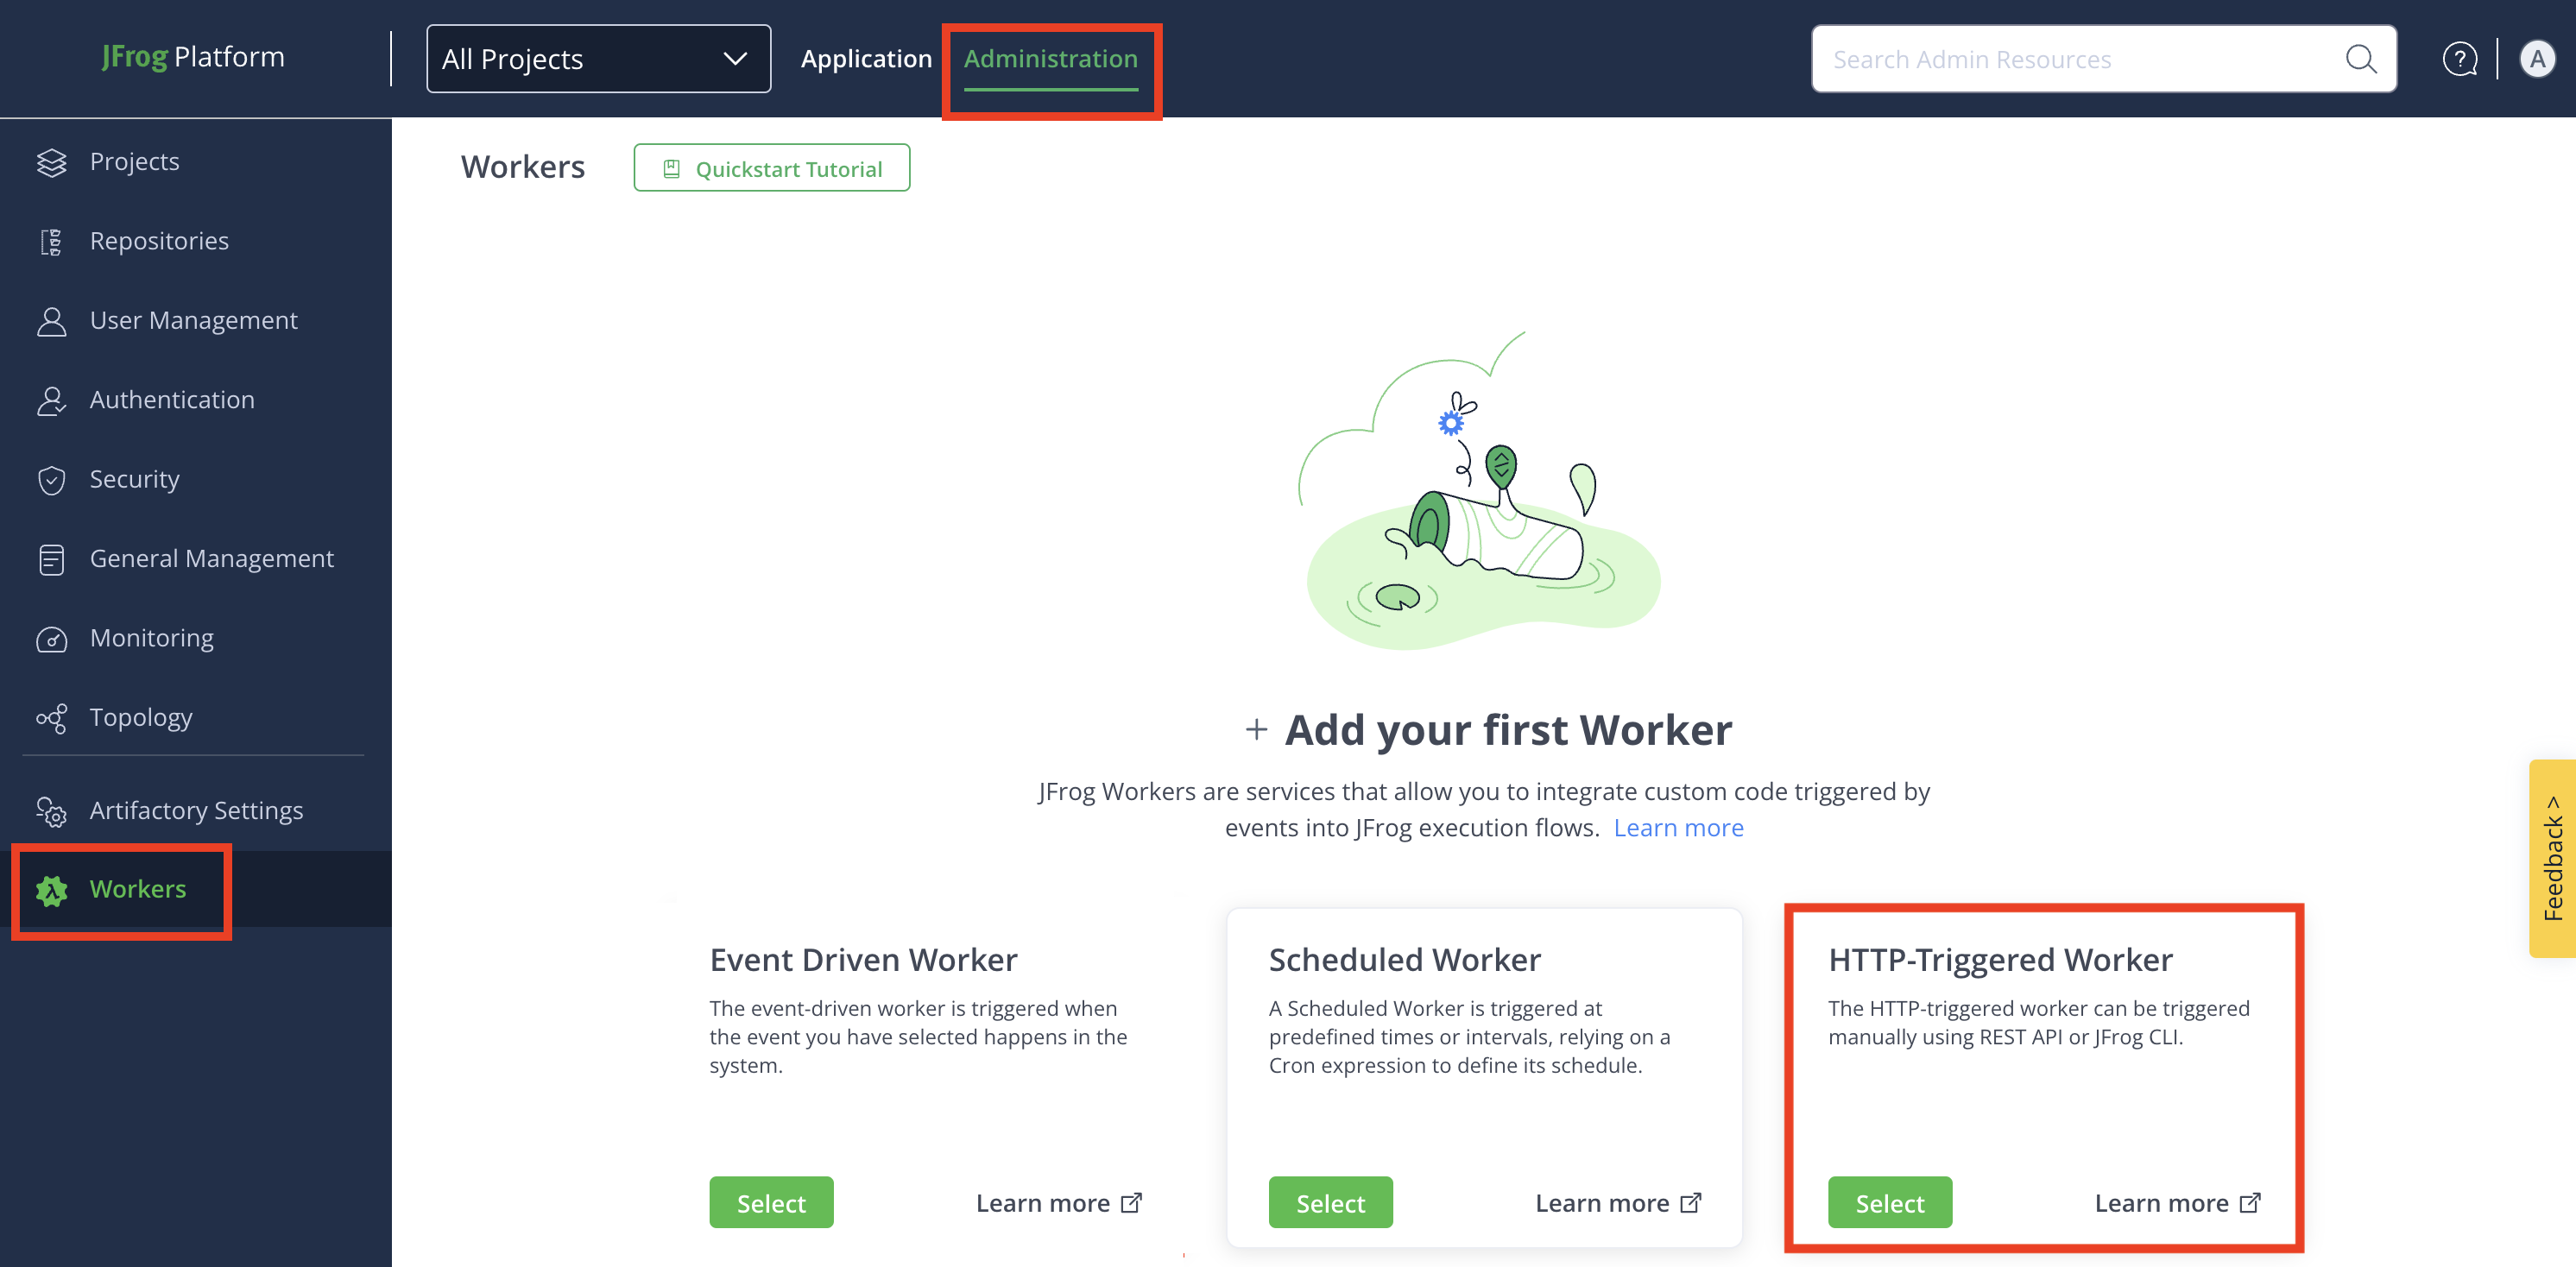
Navigate to the Administration module and click Workers.
+ Add your first Worker: If you are creating a Worker for the first time, click Select button in the HTTP-Triggered Worker tile.
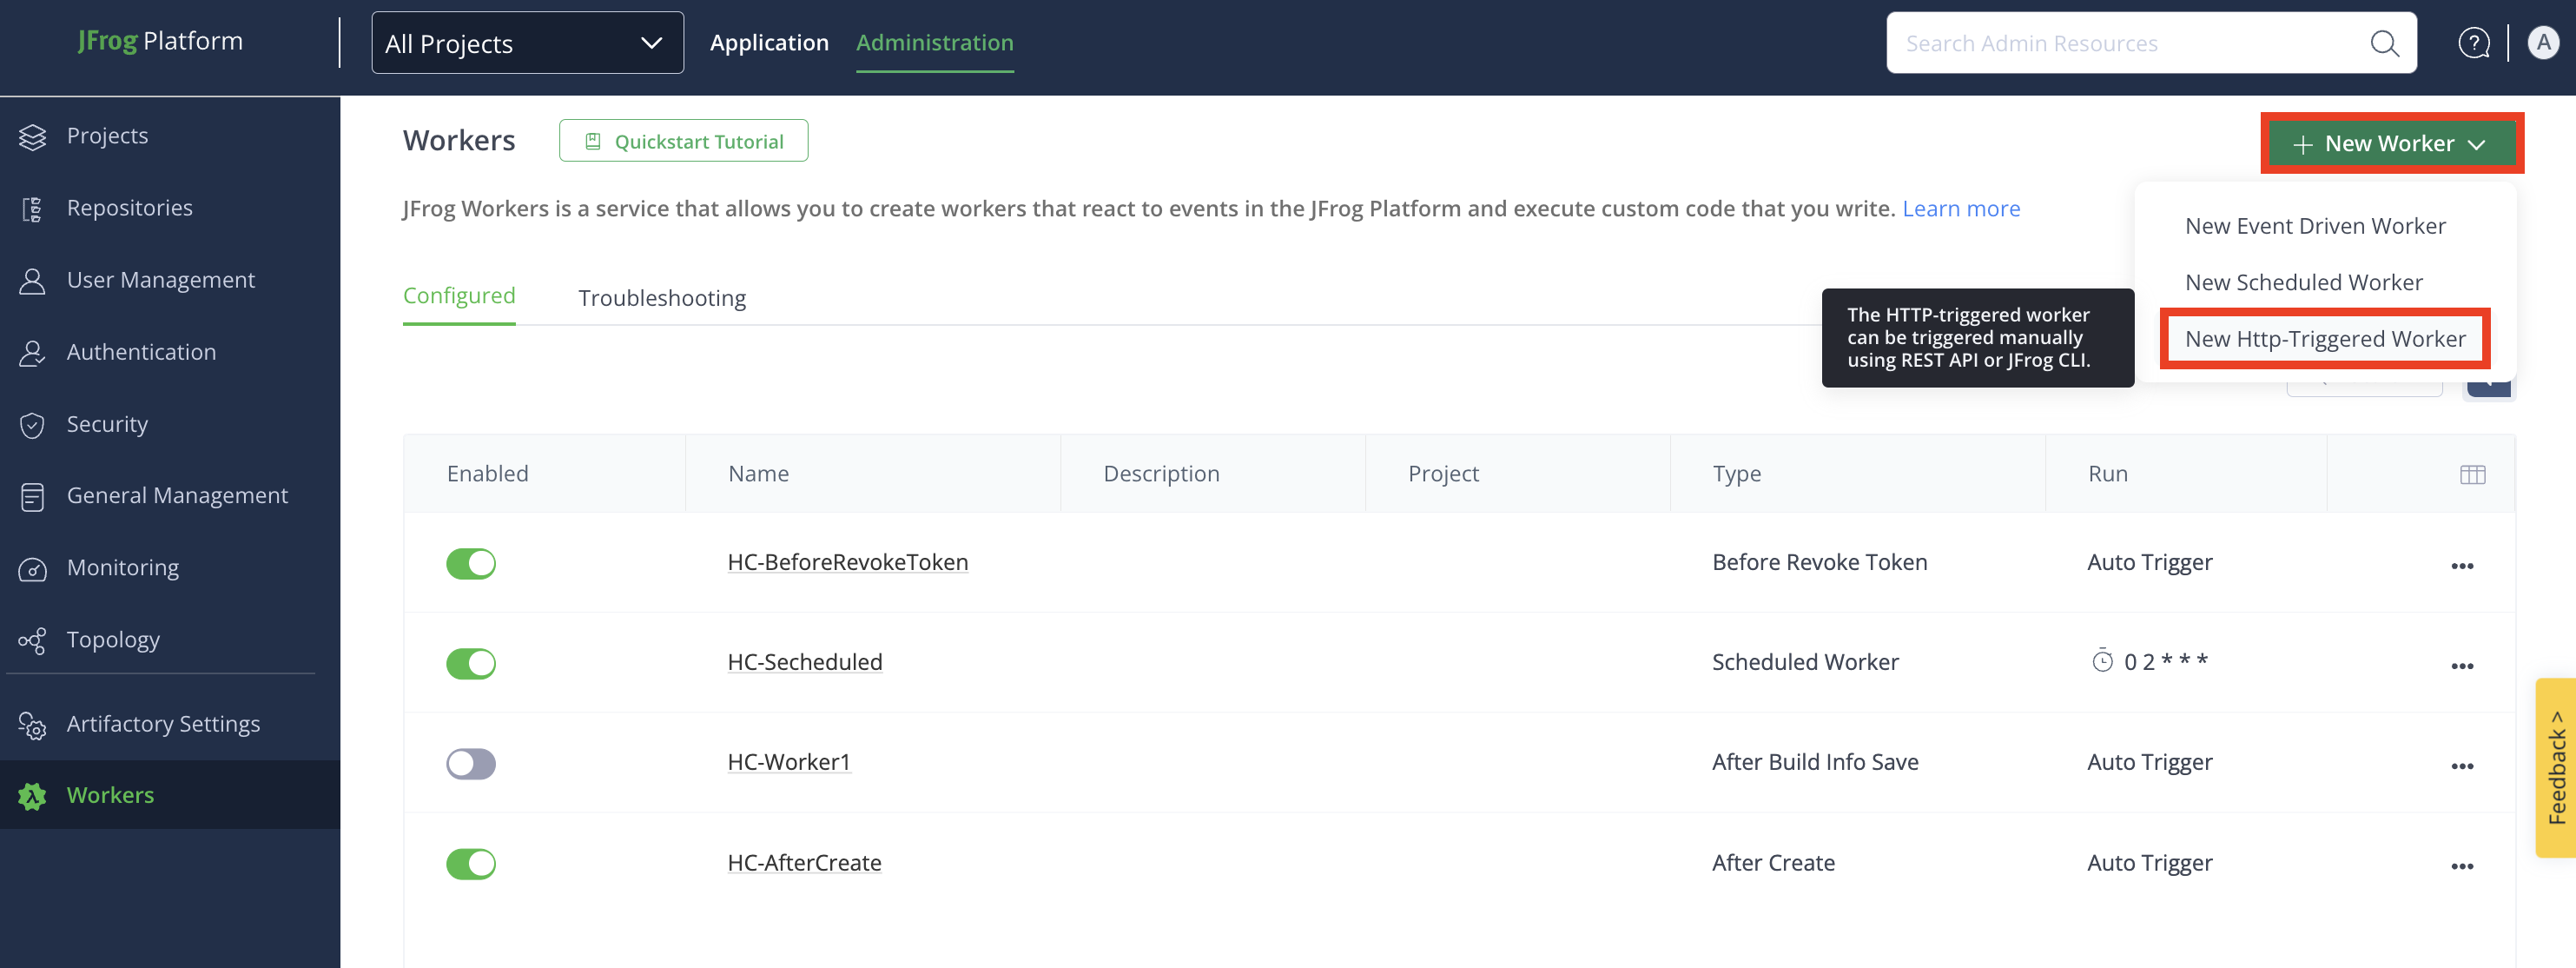
+ Add Additional Worker: For the second and more workers, click + New Worker, and then click HTTP-Triggered Driven Worker.
Step 2: Configure Worker Fields
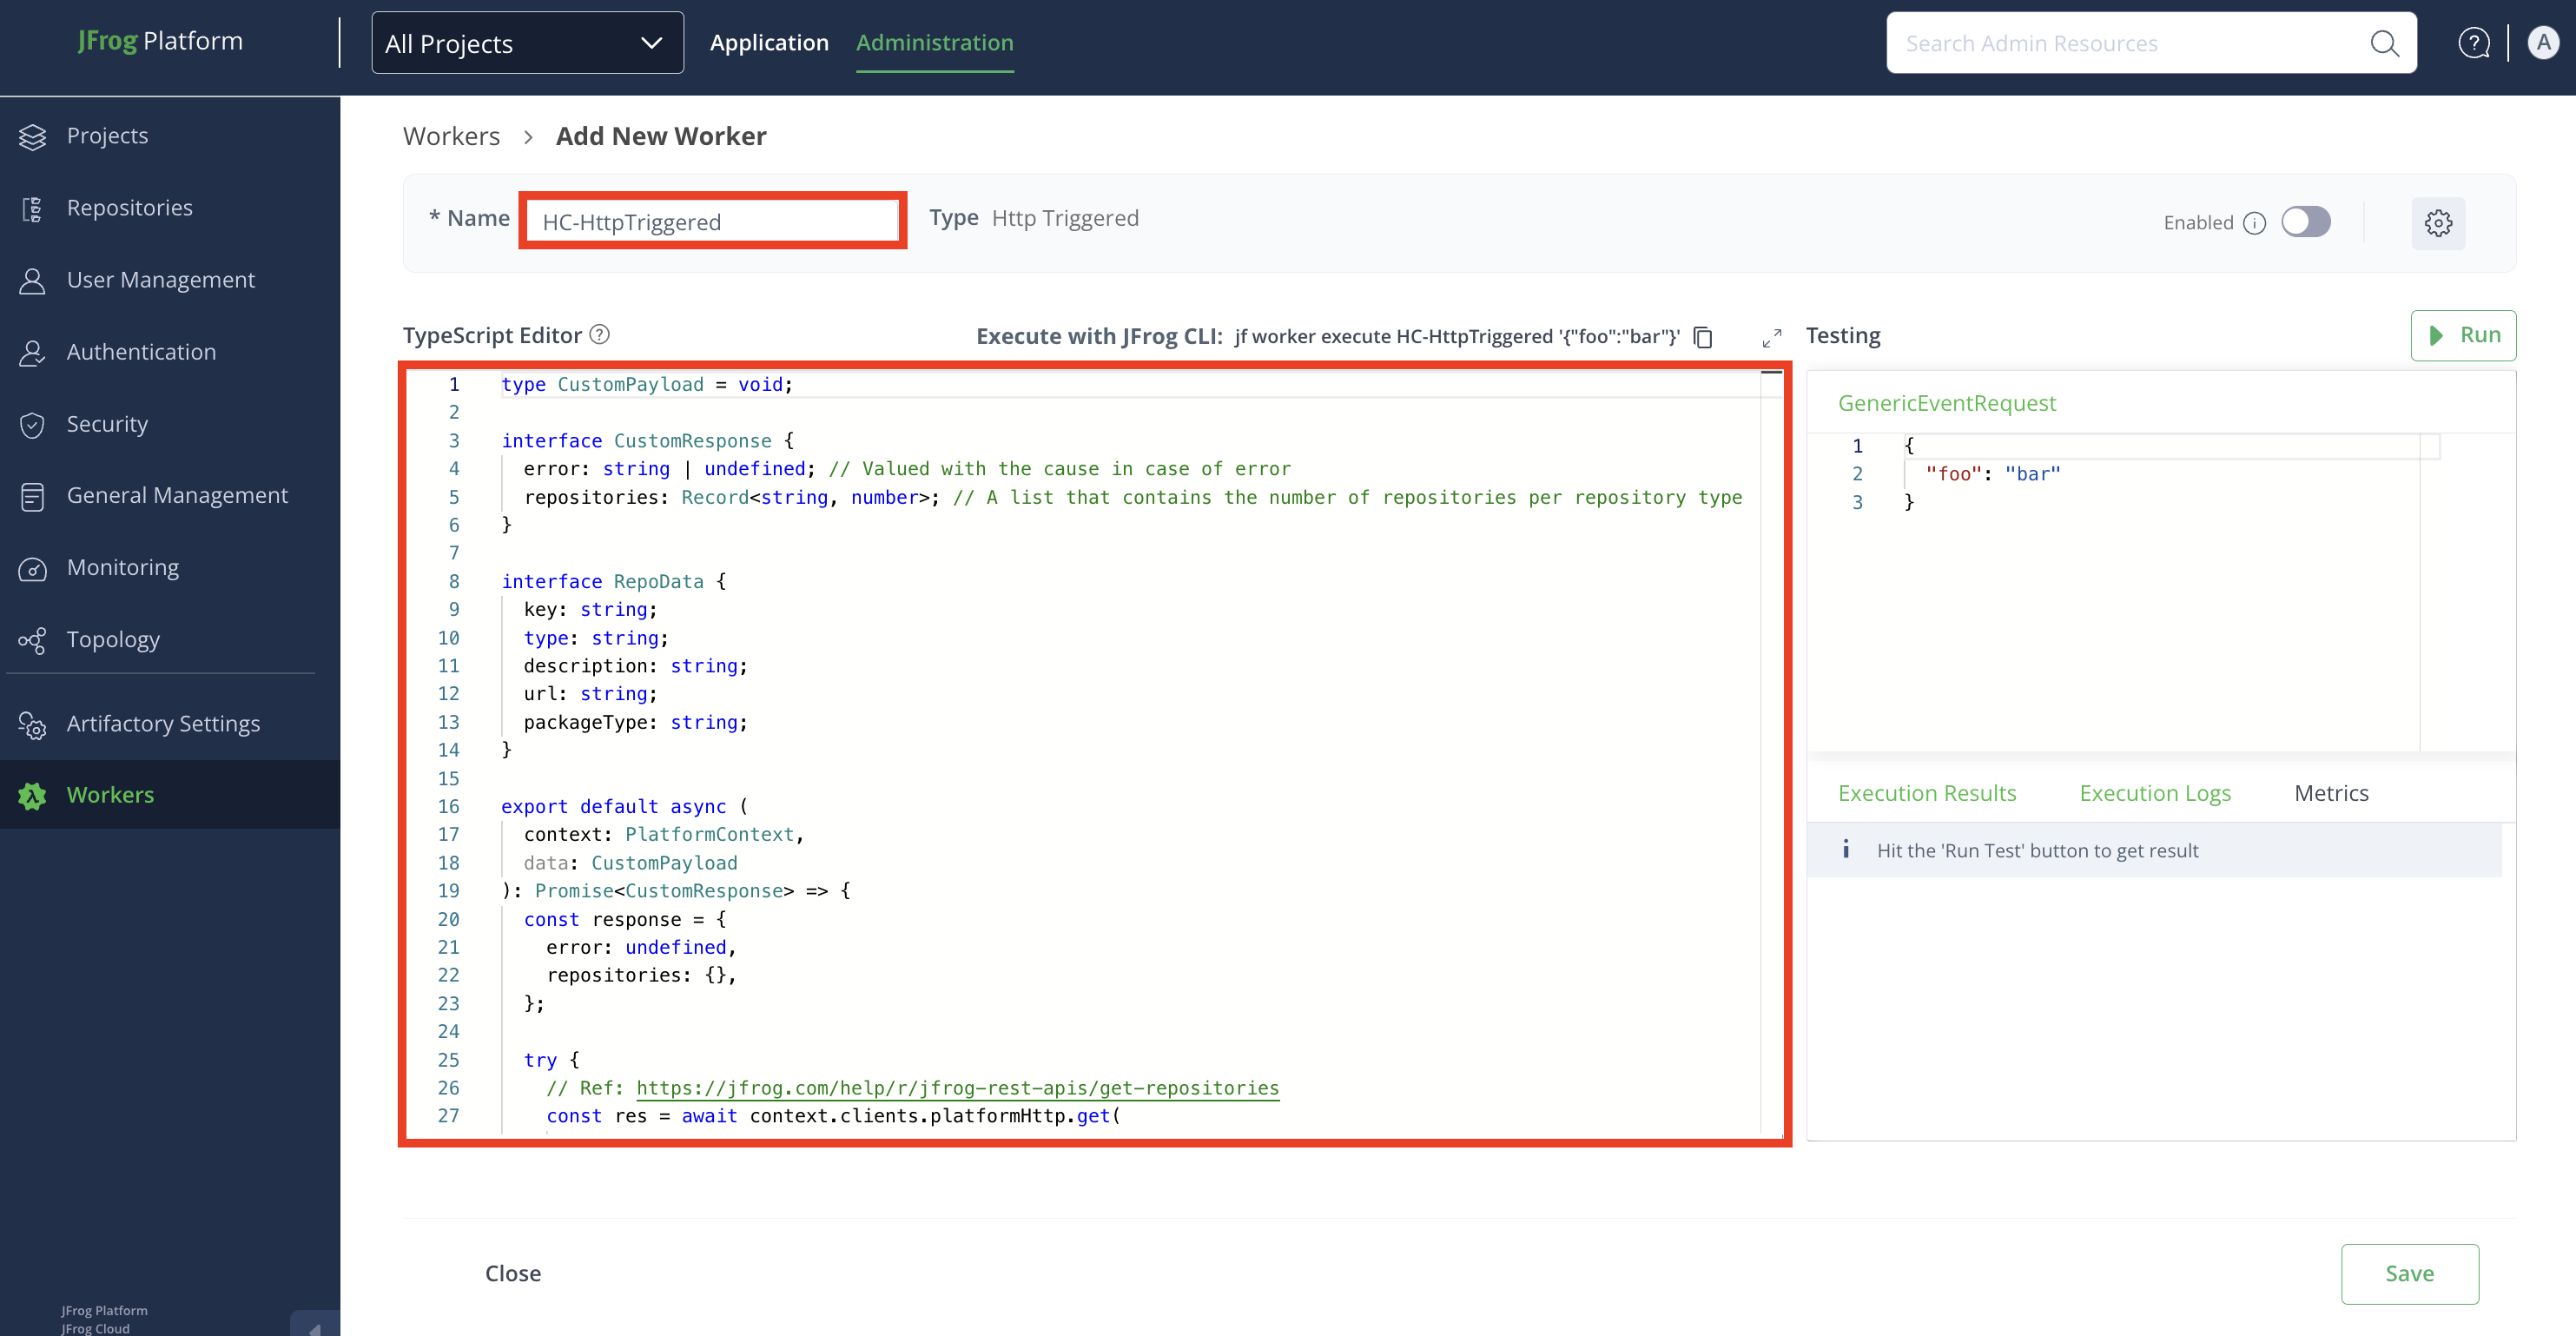
In the Add New Worker window, enter the details in the relevant fields:
-
Name: Enter a descriptive name for the worker.
-
(Optional) To use code samples, go to the Code Samples section, select the event you want to use from the drop-down menu, and click Apply. To see the full sample details, and the link to view it on GitHub, click See More. The code sample will be populated in the Script field, and you can modify it there.
-
Script: Enter or modify the script in the TypeScript Editor. Use the auto-complete function for improved efficiency while coding.
Worker Settings
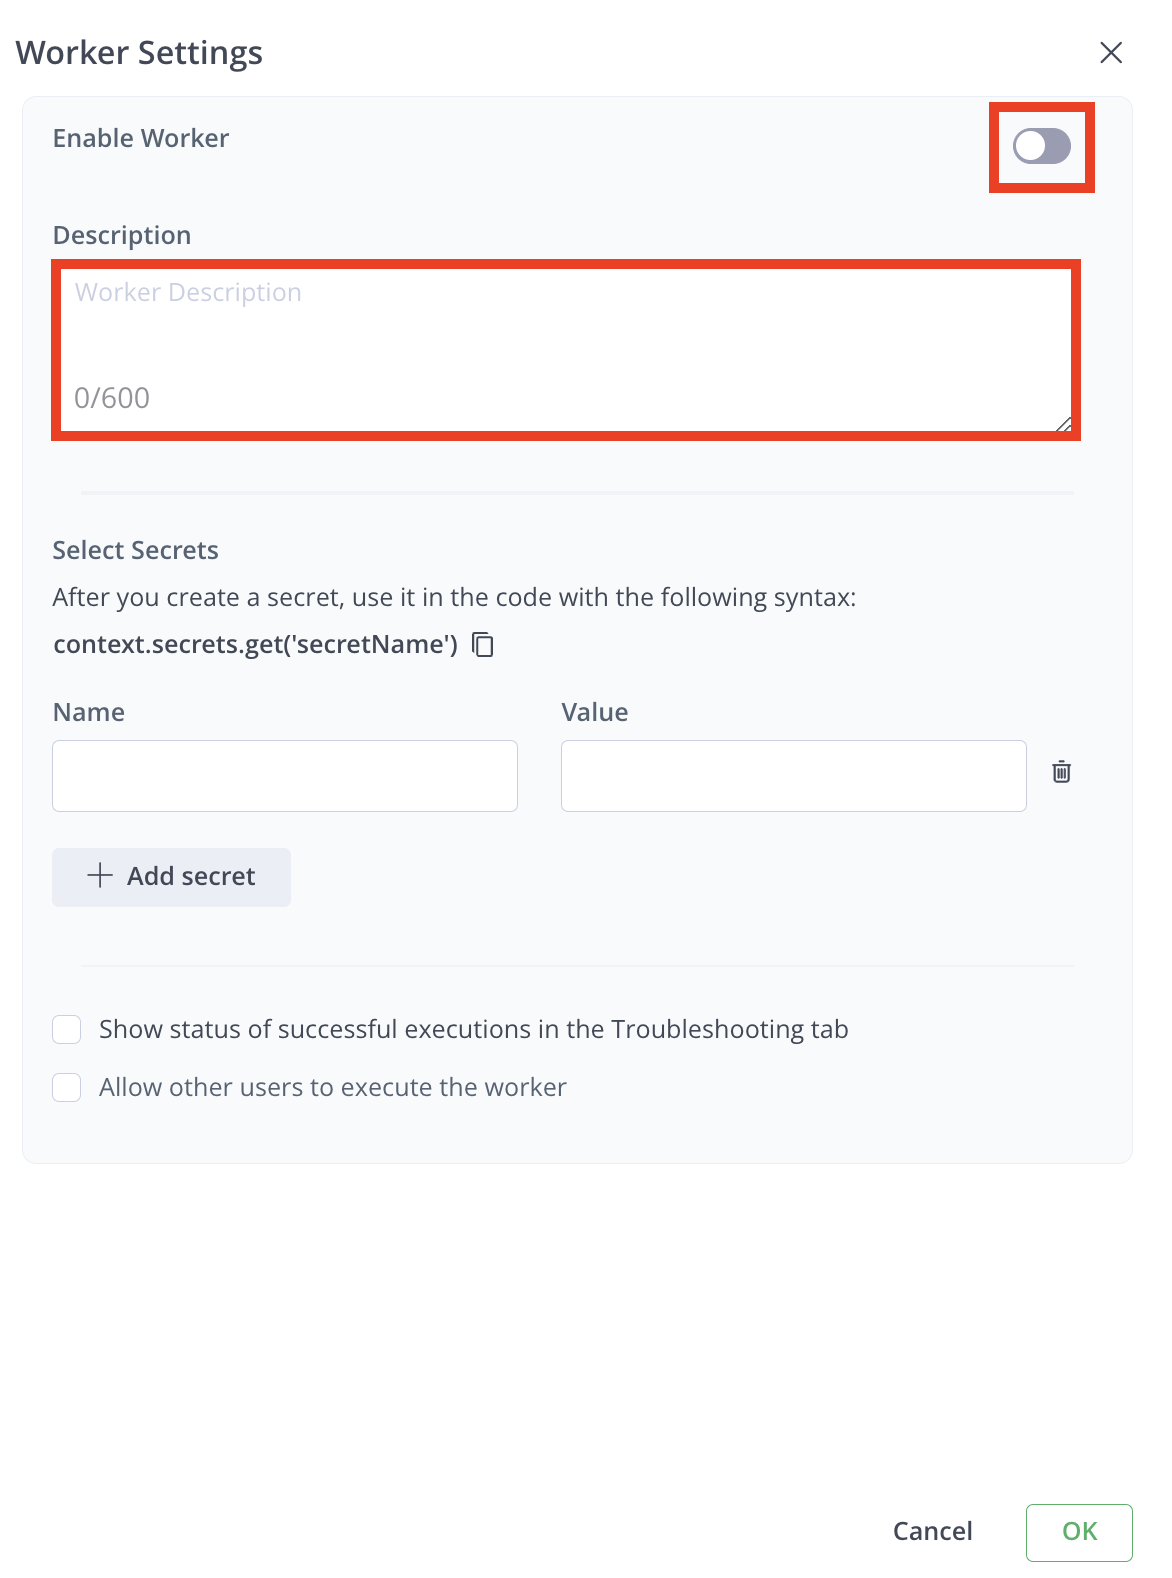
Click the Settings icon from the top-right corner of the window, and then enter the details in the relevant fields:

- Enable Worker: Enable the worker in the Worker Settings modal by clicking the toggle button.
Note
The worker can also be enabled later from the Add New Worker window or Configured window. Repositories must be selected to enable the worker. Once enabled, the worker triggers when a predefined event occurs.
-
Description: Enter a brief description of the worker.
-
Select Secrets: Secrets are stored securely and not in plain text. The secret's clear-text value is never returned in an API or UI and will be masked from all the logs.
To add a secret:
- Enter the Name and Value of the secret.
- Click + Add secret to add more secrets.
- Click Delete icon to remove any secret.
Note
Use secrets in your code with the syntax:
context.secrets.get('secretName').
- Enable Debugging: Click the checkbox for Show Status of Successful Executions in the Troubleshooting tab to view successful execution results. By default, only unsuccessful executions are shown. 5. Allow other Users: To enable the worker to be run by non-admin users, click the checkbox Allow other users to execute the worker. 6. Click OK when done.
Step 3: Testing Pane
Edit the JSON payload used to simulate the worker's events.
Click Run to test the worker.
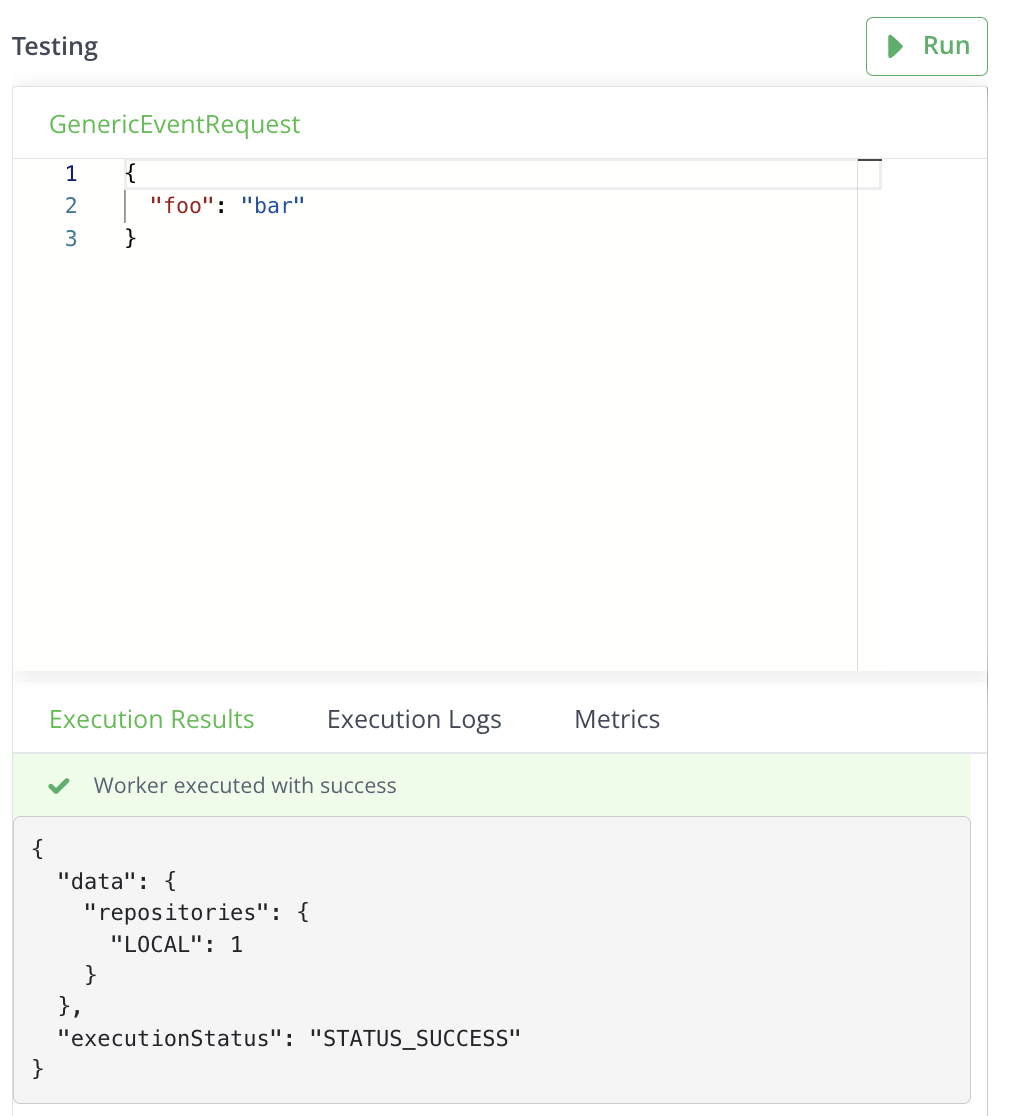
Review results in:
- Execution Results tab: for responses
- Execution Logs tab: for logs
- Metrics tab: for run time, memory, and CPU utilization details.
Step 4: Save Your Configuration
- Click Save to finalize the worker configuration.
- To cancel the configuration, click Close, and then click Discard to discard changes.
Related Information
Trigger HTTP-Triggered Worker From a Webhook
You can set webhooks to trigger Workers. This is useful when you want Workers to respond to events that are not pre-configured in Workers, such as a Docker tag push.
For example, to set a worker that is triggered by a webhook whenever a Docker tag is pushed:
-
Create an HTTP-triggered worker and add your worker logic. You can build your JSON payload to get details about the event inside your worker code:
type DockerPushPayload = { "repo_key": string, "path": string, "name": string, "image_name": string, "tag": string } // This worker does something after a docker push export default async (context: PlatformContext, data: DockerPushPayload): Promise<any> => { console.log(data) return {}; } -
Create a custom webhook with the following settings:
| Field Name | Setting |
|---|---|
| Name | Enter a name for your webhook |
| URL | https://<your_instance_url>/worker/api/v1/execute/<your_worker_key> |
| Method | POST |
| Event | Select your event from the drop-down menu: for example, a Docker tag was pushed. |
| Secrets | Enter your token as a secret: Name: “token” Value: Enter a token with admin privilege |
| Headers | Enter these two headers:
|
- Click Test on the Webhook page to verify that the webhook is triggering the worker as expected
- Click Save. Now your worker will be triggered when a Docker tag is pushed.
REST API
Use the Workers REST API to create and manage Workers from scripts, internal tools, or custom pipelines.
About This Method
The REST API is the programmatic interface to the Workers service. It makes it easier to:
- Automate create, update, delete, and enable/disable outside the UI
- Discover actions and sample payloads at runtime (
/worker/api/v2/actions) - Test Workers and execute HTTP-triggered Workers from any HTTP client
- Pull execution history into your own monitoring or ops tooling
Authentication uses an access token as a bearer token. Unless noted otherwise, Workers APIs require Platform Admin privileges (Project Admins can create Workers when projectKey is set). Full schemas are in the Workers API reference and workers-api.yaml.
Set the action field on Create Worker to the event or trigger you need. For definitions, see Worker Types.
| Worker type | How you specify it in the API |
|---|---|
| Event-driven | An Artifactory, Access, or Runtime action (for example, BEFORE_UPLOAD) |
| HTTP-triggered | GENERIC_EVENT |
| Scheduled | SCHEDULED_EVENT |
Typical Workflow
- Discover the action: Get Actions Metadata.
- Create the Worker with
sourceCode,action,enabled, and optionalfilterCriteria: Create Worker. - Test: Execute Test or Execute Test for Worker.
- Update as needed: Update Worker.
- Execute HTTP-triggered Workers on demand: Execute an HTTP-Triggered Worker.
- Monitor: Get Worker Execution History; optionally Rerun Worker.
API Quick Reference
| Task | API |
|---|---|
| Create Worker | Create Worker |
| List Workers | Get Workers |
| Get one Worker | Get Specified Worker |
| Update Worker | Update Worker |
| Delete Worker | Delete Worker |
| List actions | Get Available Actions |
| Action metadata | Get Actions Metadata |
| Execute test | Execute Test, Execute Test for Worker |
| Execute HTTP-triggered Worker | Execute an HTTP-Triggered Worker |
| Execution history | Get Worker Execution History |
| Rerun | Rerun Worker |
| Readiness / liveness | Workers Service Readiness, Workers Service Liveness |
MCP Server
Use the JFrog MCP Server to create and manage Workers from a compatible MCP client (for example, an AI-assisted IDE). With MCP, you describe what you want in natural language, such as creating a Before Upload Worker or listing Workers in a project, and the client calls the Workers MCP tools on your behalf.
About This Method
The MCP Server exposes Workers operations as tools your AI client can invoke. That makes it easier to:
- Discover available trigger actions without memorizing API names
- Draft and apply Worker TypeScript with help from the model
- Create, inspect, and review execution history without leaving your editor
MCP uses the same Worker model as the CLI and REST API. Workers are still defined by an action (event), TypeScript source, and optional filters and secrets. For production rollout at scale, many teams author with MCP and deploy with the JFrog CLI or REST API in CI/CD.
Workers MCP Tools
Available from Workers 1.0. See JFrog MCP Server Tools: Workers for parameter details.
| Tool | Purpose |
|---|---|
worker_list_actions | List trigger actions (events) you can bind a Worker to |
worker_create | Create a Worker (created disabled; supply action, application, and TypeScript source) |
worker_list_all | List Workers on the platform (optionally by project) |
worker_get_specific | Retrieve full details for one Worker by key |
worker_get_execution_history | Retrieve execution history (optionally filtered) |
Typical Workflow
- Set up the JFrog MCP Server in your MCP client: JFrog MCP Server Tools.
- Ask the client (in natural language) to list actions or create a Worker for your use case.
- Provide or refine TypeScript using Workers Code Samples and TypeScript Code for Workers.
- Review the created Worker (
worker_get_specific), then enable it when ready (UI, CLI, or REST API). - Check runs with
worker_get_execution_historyor Platform troubleshooting.
Terraform
About This Method
Terraform makes it easier to:
- Manage Workers declaratively next to repositories and other platform resources
- Review Worker changes in the same plan/apply workflow as the rest of your IaC
- Reproduce the same Worker configuration across environments from version-controlled
.tffiles
The Platform provider resource platform_workers_service holds the Worker key, action, TypeScript source_code, filters, and secrets. Prefer Terraform (or CLI) for ongoing edits if you manage the Worker as code. Changing the same Worker only in the UI can cause resource drift.
Prerequisites
Install Terraform: Ensure you have Terraform installed and configured. You can find installation instructions and tutorials on the HashiCorp Terraform website.
JFrog Terraform Provider: Familiarize yourself with the available JFrog Terraform providers.
Configuring workers with JFrog Platform Terraform Provider broadly includes the following steps:
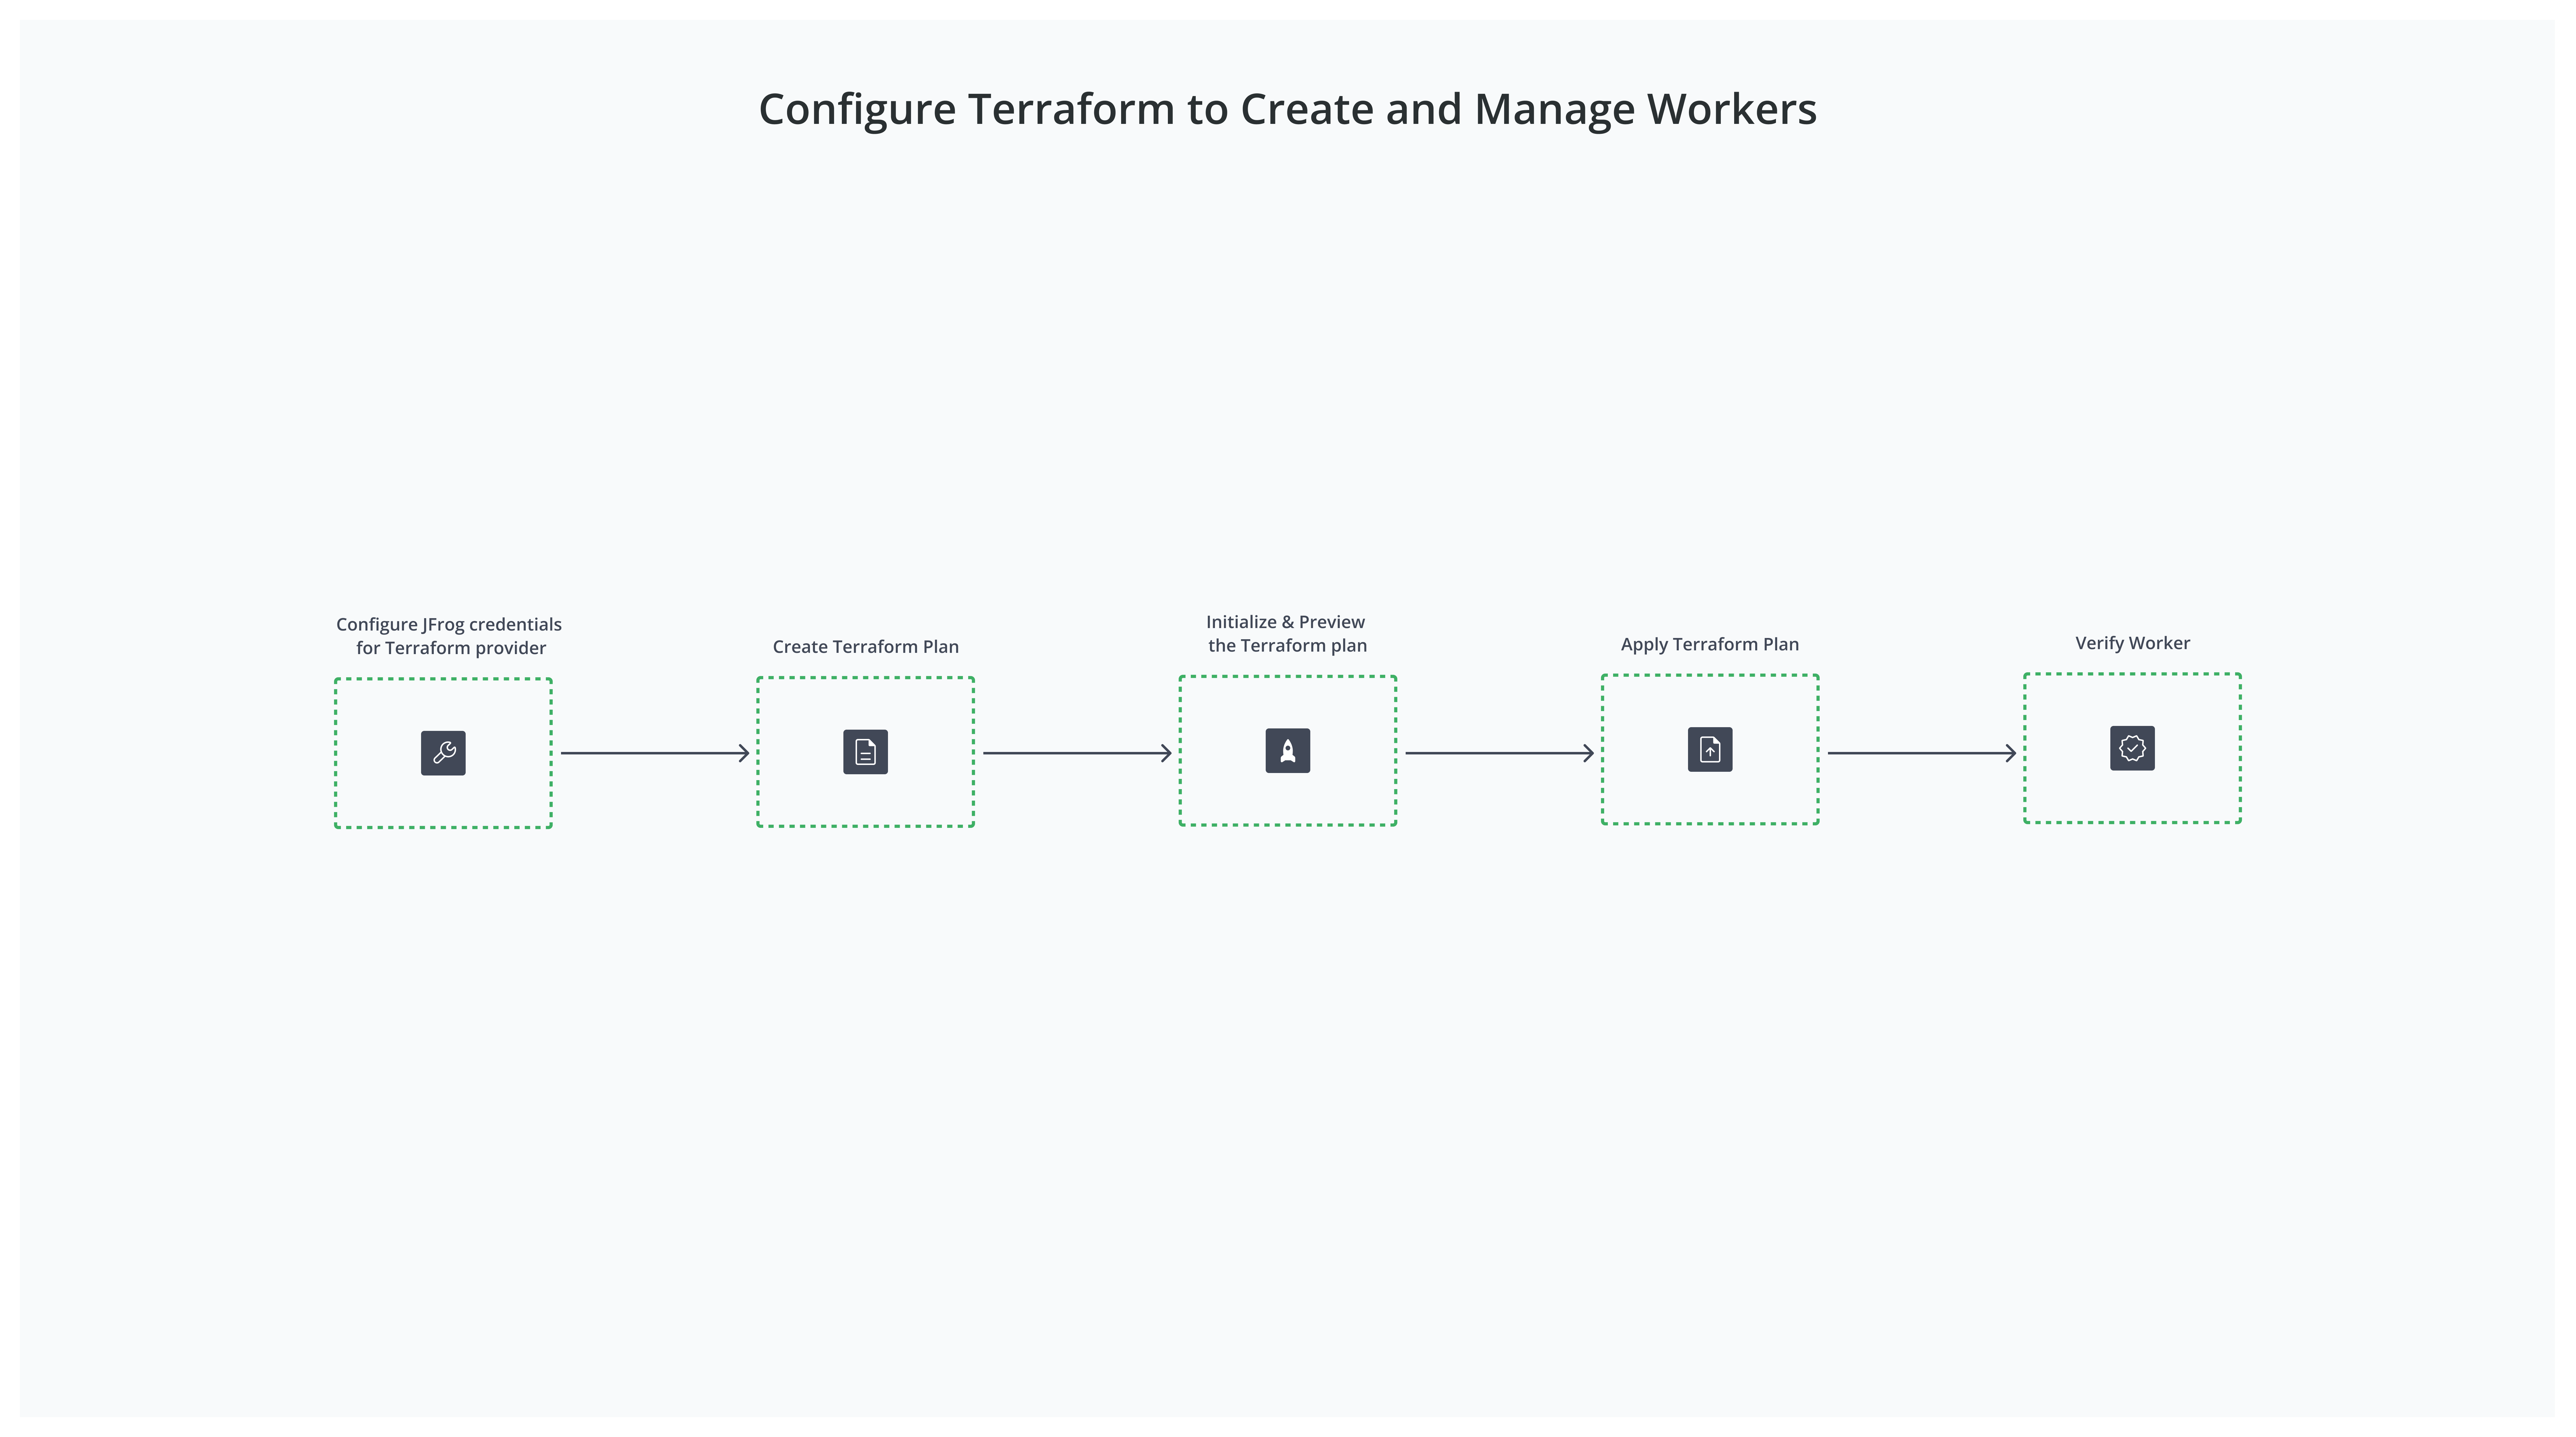
- Step 1: Configure JFrog Credential for Terraform Provider
- Step 2: Create Terraform Plan
- Step 3: Initialize and Preview the Terraform Plan
- Step 4: Apply Terraform Plan
- Step 5: Verify Worker
Step 1: Configure JFrog Credential for Terraform Provider
This topic describes how to configure JFrog credentials for Terraform Provider.
The provider requires the JFrog platform URL and an access token to make changes on the JFrog Platform. You can find more information about the JFrog Credential for Terraform Provider here.
You can use the following methods to manage these sensitive data.
- Environment variables
- HashiCorp Vault provider
- Input variables with
.tfvarsfile
For environment variables, set JFROG_URL and JFROG_ACCESS_TOKEN to your JFrog Platform URL and access token.
export JFROG_URL=https://myexample.jfrog.io
export JFROG_ACCESS_TOKEN=<your access token>Note
The access token needs to have admin permission.
Step 2: Create Terraform Plan
This topic describes how to create Terraform Plan.
Open your preferred text editor, create a new file named main.tf, and add the following sample configuration, which includes providers for managing a local generic repository in Artifactory and a Workers Service resource using the Platform provider.
The following example configuration creates a local generic repository resource using the Artifactory Terraform provider, and then uses the Platform provider to create a Workers Service resource.
terraform {
  required_providers {
    artifactory = {
      source  = "registry.terraform.io/jfrog/artifactory"
      version = "12.7.1"
    }
    platform = {
      source  = "registry.terraform.io/jfrog/platform"
      version = "2.2.0"
    }
  }
}

provider "artifactory" {
  url           = "<artifactory_url>"
  access_token  = "<access_token>"
}

provider "platform" {
  url           = "<platform_url>"
  access_token  = "<access_token"
}

resource "artifactory_local_generic_repository" "my_generic_local1" {
  key = "my-generic-local1"
}

resource "platform_workers_service" "my_workers_service" {
  key         = "my-workers-service"
  enabled     = true
  description = "My workers service"
  source_code = <<EOF
export default async (context: PlatformContext, data: BeforeDownloadRequest): Promise<BeforeDownloadResponse> => {
  console.log(await context.clients.platformHttp.get('/artifactory/api/system/ping'));
  return { status: 'DOWNLOAD_PROCEED', message: 'proceed' };
}
EOF
  action      = "BEFORE_DOWNLOAD"

  filter_criteria = {
    artifact_filter_criteria = {
      repo_keys = [artifactory_local_generic_repository.my_generic_local1.key]
    }
  }

  secrets = [
    {
      key   = "my-secret-key-1"
      value = "my-secret-value-1"
    },
    {
      key   = "my-secret-key-2"
      value = "my-secret-value-2"
    }
  ]
}
Step 3: Initialize and Preview the Terraform Plan
This topic describes how to initialize and preview Terraform Plan.
The results should match what you are planning to create. If not, adjust the configuration and run terraform plan.
-
Run
terraform initto initialize your configuration.This examines your configuration and downloads any required providers.
jfrog ~/Desktop/WorkersTF $ terraform init Initializing the backend... Initializing provider plugins... - Finding jfrog/artifactory versions matching "12.7.1"... - Finding jfrog/platform versions matching "2.2.0"... - Installing jfrog/platform v2.2.0... - Installed jfrog/platform v2.2.0 (signed by a HashiCorp partner, key ID 2FA4D2A520237FA7) - Installing jfrog/artifactory v12.7.1... - Installed jfrog/artifactory v12.7.1 (signed by a HashiCorp partner, key ID 2FA4D2A520237FA7) Partner and community providers are signed by their developers. If you'd like to know more about provider signing, you can read about it here: https://www.terraform.io/docs/cli/plugins/signing.html Terraform has created a lock file .terraform.lock.hcl to record the provider selections it made above. Include this file in your version control repository so that Terraform can guarantee to make the same selections by default when you run "terraform init" in the future. Terraform has been successfully initialized! You may now begin working with Terraform. Try running "terraform plan" to see any changes that are required for your infrastructure. All Terraform commands should now work. If you ever set or change modules or backend configuration for Terraform, rerun this command to reinitialize your working directory. If you forget, other commands will detect it and remind you to do so if necessary. -
Run
terraform planto preview the changes.jfrog ~/Desktop/WorkersTF $ terraform plan Terraform used the selected providers to generate the following execution plan. Resource actions are indicated with the following symbols: + create Terraform will perform the following actions: # artifactory_local_generic_repository.my_generic_local1 will be created + resource "artifactory_local_generic_repository" "my_generic_local1" { + archive_browsing_enabled = false + blacked_out = false + cdn_redirect = false + download_direct = false + id = (known after apply) + includes_pattern = "**/*" + key = "my-generic-local1" + priority_resolution = false + project_environments = (known after apply) + repo_layout_ref = "simple-default" + xray_index = false # (4 unchanged attributes hidden) } # platform_workers_service.my_workers_service will be created + resource "platform_workers_service" "my_workers_service" { + action = "BEFORE_DOWNLOAD" + description = "My workers service" + enabled = true + filter_criteria = { + artifact_filter_criteria = { + repo_keys = [ + "my-generic-local1", ] } } + key = "my-workers-service" + secrets = [ + { + key = "my-secret-key-1" + value = "my-secret-value-1" }, + { + key = "my-secret-key-2" + value = "my-secret-value-2" }, ] + source_code = <<-EOT export default async (context: PlatformContext, data: BeforeDownloadRequest): Promise<BeforeDownloadResponse> => { console.log(await context.clients.platformHttp.get('/artifactory/api/system/ping')); return { status: 'DOWNLOAD_PROCEED', message: 'proceed' }; } EOT } Plan: 2 to add, 0 to change, 0 to destroy.
Step 4: Apply Terraform Plan
This topic describes how to apply Terraform Plan.
-
Run
terraform applyto apply the configuration and create the repository and worker on your JFrog platform if you are satisfied with the configuration.jfrog ~/Desktop/WorkersTF $ terraform apply Terraform used the selected providers to generate the following execution plan. Resource actions are indicated with the following symbols: + create Terraform will perform the following actions: # artifactory_local_generic_repository.my_generic_local1 will be created + resource "artifactory_local_generic_repository" "my_generic_local1" { + archive_browsing_enabled = false + blacked_out = false + cdn_redirect = false + download_direct = false + id = (known after apply) + includes_pattern = "**/*" + key = "my-generic-local1" + priority_resolution = false + project_environments = (known after apply) + repo_layout_ref = "simple-default" + xray_index = false # (4 unchanged attributes hidden) } # platform_workers_service.my_workers_service will be created + resource "platform_workers_service" "my_workers_service" { + action = "BEFORE_DOWNLOAD" + description = "My workers service" + enabled = true + filter_criteria = { + artifact_filter_criteria = { + repo_keys = [ + "my-generic-local1", ] } } + key = "my-workers-service" + secrets = [ + { + key = "my-secret-key-1" + value = "my-secret-value-1" }, + { + key = "my-secret-key-2" + value = "my-secret-value-2" }, ] + source_code = <<-EOT export default async (context: PlatformContext, data: BeforeDownloadRequest): Promise<BeforeDownloadResponse> => { console.log(await context.clients.platformHttp.get('/artifactory/api/system/ping')); return { status: 'DOWNLOAD_PROCEED', message: 'proceed' }; } EOT } Plan: 2 to add, 0 to change, 0 to destroy. Do you want to perform these actions? Terraform will perform the actions described above. Only 'yes' will be accepted to approve. Enter a value: yes artifactory_local_generic_repository.my_generic_local1: Creating... artifactory_local_generic_repository.my_generic_local1: Creation complete after 0s [id=my-generic-local1] platform_workers_service.my_workers_service: Creating... platform_workers_service.my_workers_service: Creation complete after 1s Apply complete! Resources: 2 added, 0 changed, 0 destroyed. -
Enter
Yesto apply the changes.
The worker should now be created on your JFrog Platform.
Step 5: Verify Worker
This topic describes how to verify the worker created via Terraform.
Note
If you make any changes to the worker in the JFrog UI, you will get a resource drift next time you run
terraform planorterraform run.
Updated 2 months ago