Permissions
The JFrog Platform features a flexible permissions model that allows administrators to exercise fine-grained control over user and group access to various resources, including repositories, builds, Release Bundles, and Edge node destinations.
The next generation of permission model (Permissions V2) is now available in the JFrog Platform for JFrog Cloud and JFrog Self-Hosted (from Artifactory 7.77.2). The new model is fully backwards compatible with the legacy permissions (Permissions V1) model. The new model simplifies the UI user flows to configure all resource types. For the legacy permissions model (Permissions V1), see Legacy Permissions.
Note
In Permissions V1, a user with the
managepermission was able to grantmanageand other permissions to other users. This behavior was a security issue and has been fixed with permissions V2. A user withmanagepermissions can grant all permissions except themanagepermission.Starting from Artifactory version 7.117.1, you can revert to the previous behavior, which is not recommended. To revert to the less secure functionality, set one of the following feature flags in your Access Configuration YAML file:
permissions:
    manage-user-permission-type: "<type>"  # permission type from the following list:
# exclude-manage - Default setting for Permissions V2. Users with manage permissions can grant only permissions that they have, except for manage permissions
# any-action-excluding-manage - users with manage permissions can grant any permissions, except for manage permissions
# any-action-including-manage - users with manage permissions can grant any permissions, including manage permissions
How Permissions Work
In the JFrog Platform, permissions are managed from a central location, where you can control how users or groups can view and perform actions.
Tip
You can use the JFrog Platform UI or the JFrog REST API to manage permissions.
You can control permissions at the granular level through repository settings, or on the project level using Role-based access control (RBAC). For more information, see Manage Project Roles and Members.
By defining permission targets, you can set the physical resources, such as repositories, and select users or groups with a corresponding set of permissions, defining how they can access the specified repositories.
For example, if your environment includes two engineering teams using several repositories, you can create a group of users for each team. Then, you can create a permission target with a set of those repositories, in which you can grant access to the relevant resources with the appropriate permissions for each group.
Note
Starting from Artifactory 7.84.3, the anonymous user is removed from the Anything and Any Remote permissions by default. To grant permissions to anonymous users, the best practice is to create a new permission target containing the anonymous user and to assign it with read-only access to the relevant repositories.
Create and Manage Permissions
Permissions are additive and must be explicitly granted. If a checkbox is not set for a user, then that user does not have the corresponding permission.
Workflow to create permission targets is as follows.
-
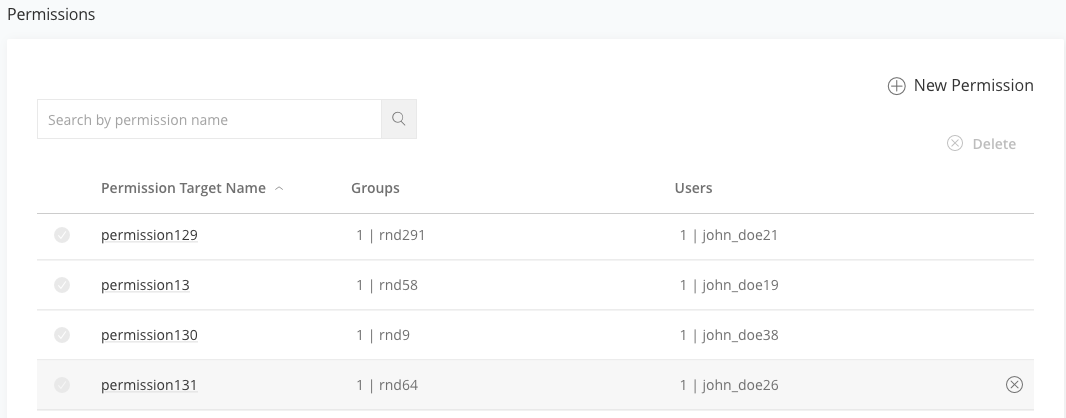
In the Administration module, select User Management| Permissions.
Navigate to Administration Module | User Management | Permissions, if you use the classic navigation. Classic navigation is available for JFrog self-hosted customers with version 7.90 or previous only.
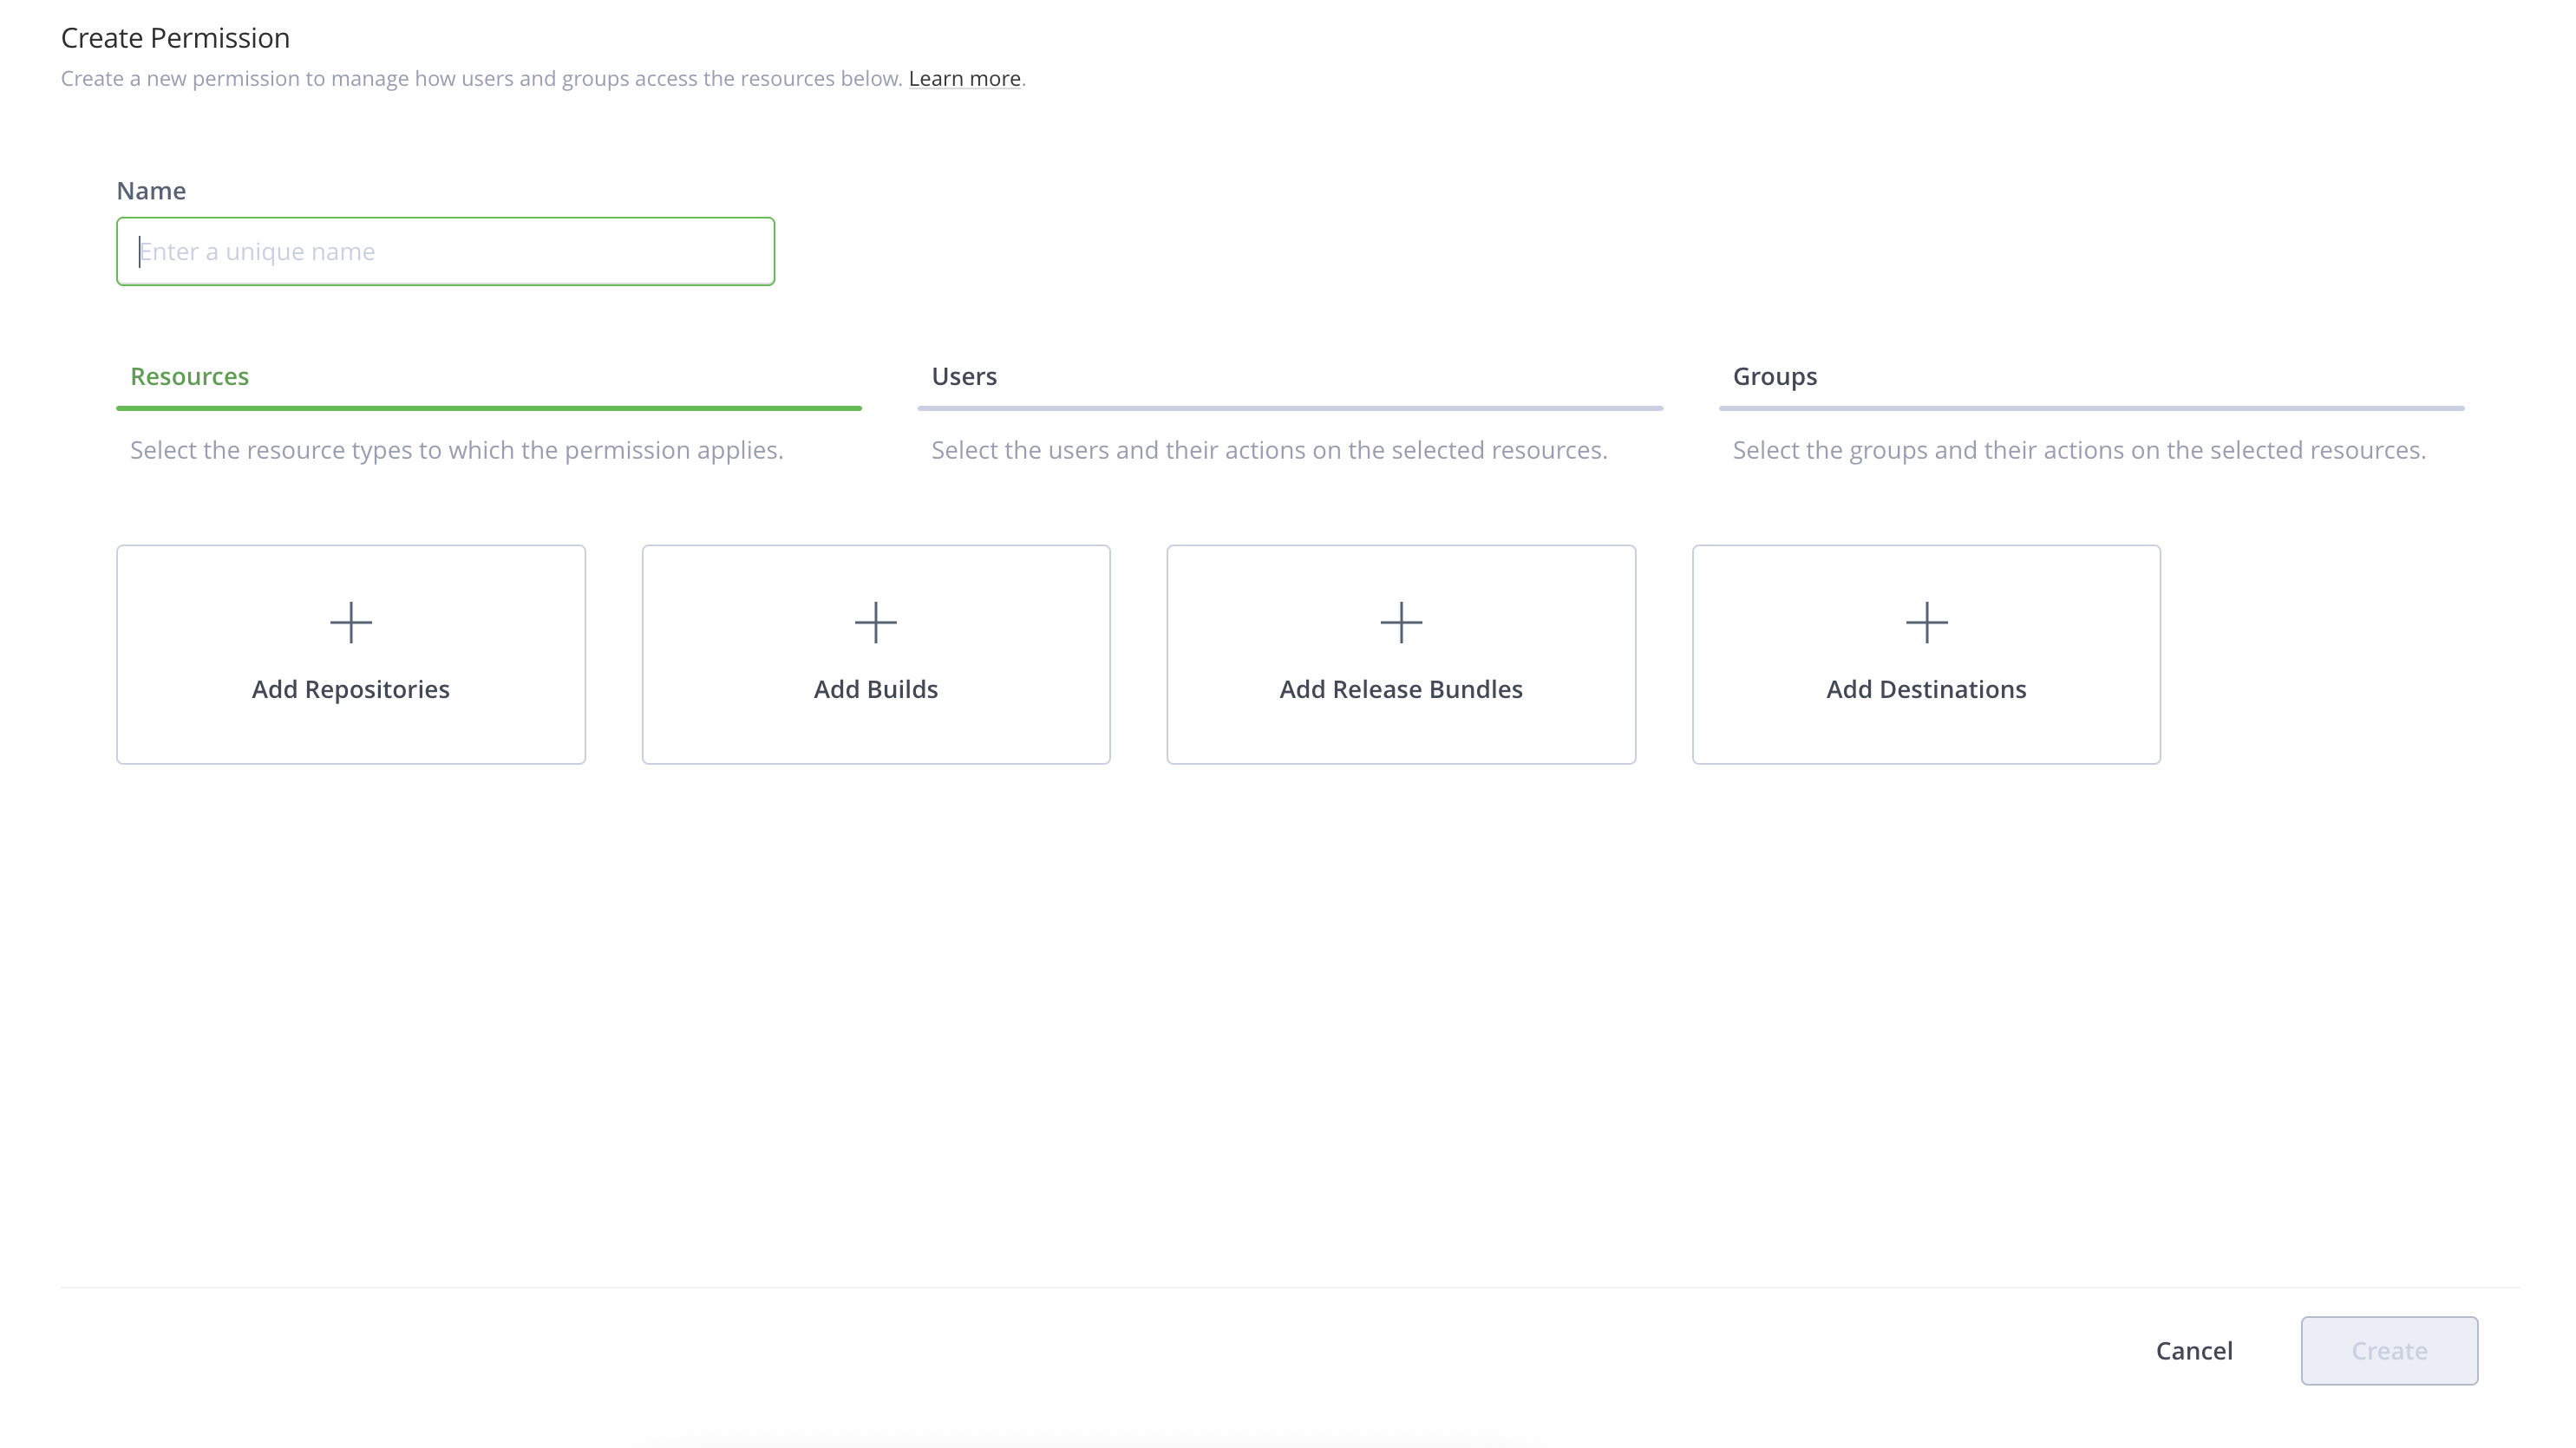
-
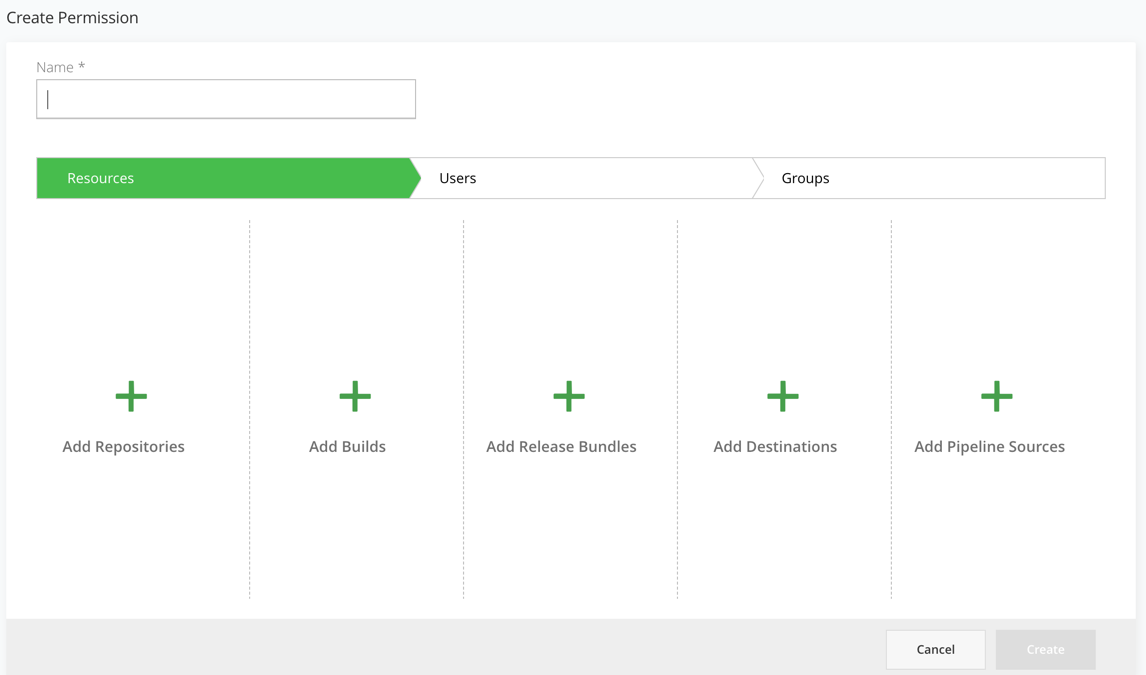
Enter a unique meaningful name for the permission target that helps you manage and detect the required permission.
For example: RnD_India, Project-X, DevOps_US.
-
Add resources in the Resources tab.
After you apply the permission to the user, the resources that you select are available to the user.
You can add the following resources to a permission.
- Repositories
- Builds
- Release Bundles
- Destinations
- Pipeline Sources
For more information, see Select Resources.
-
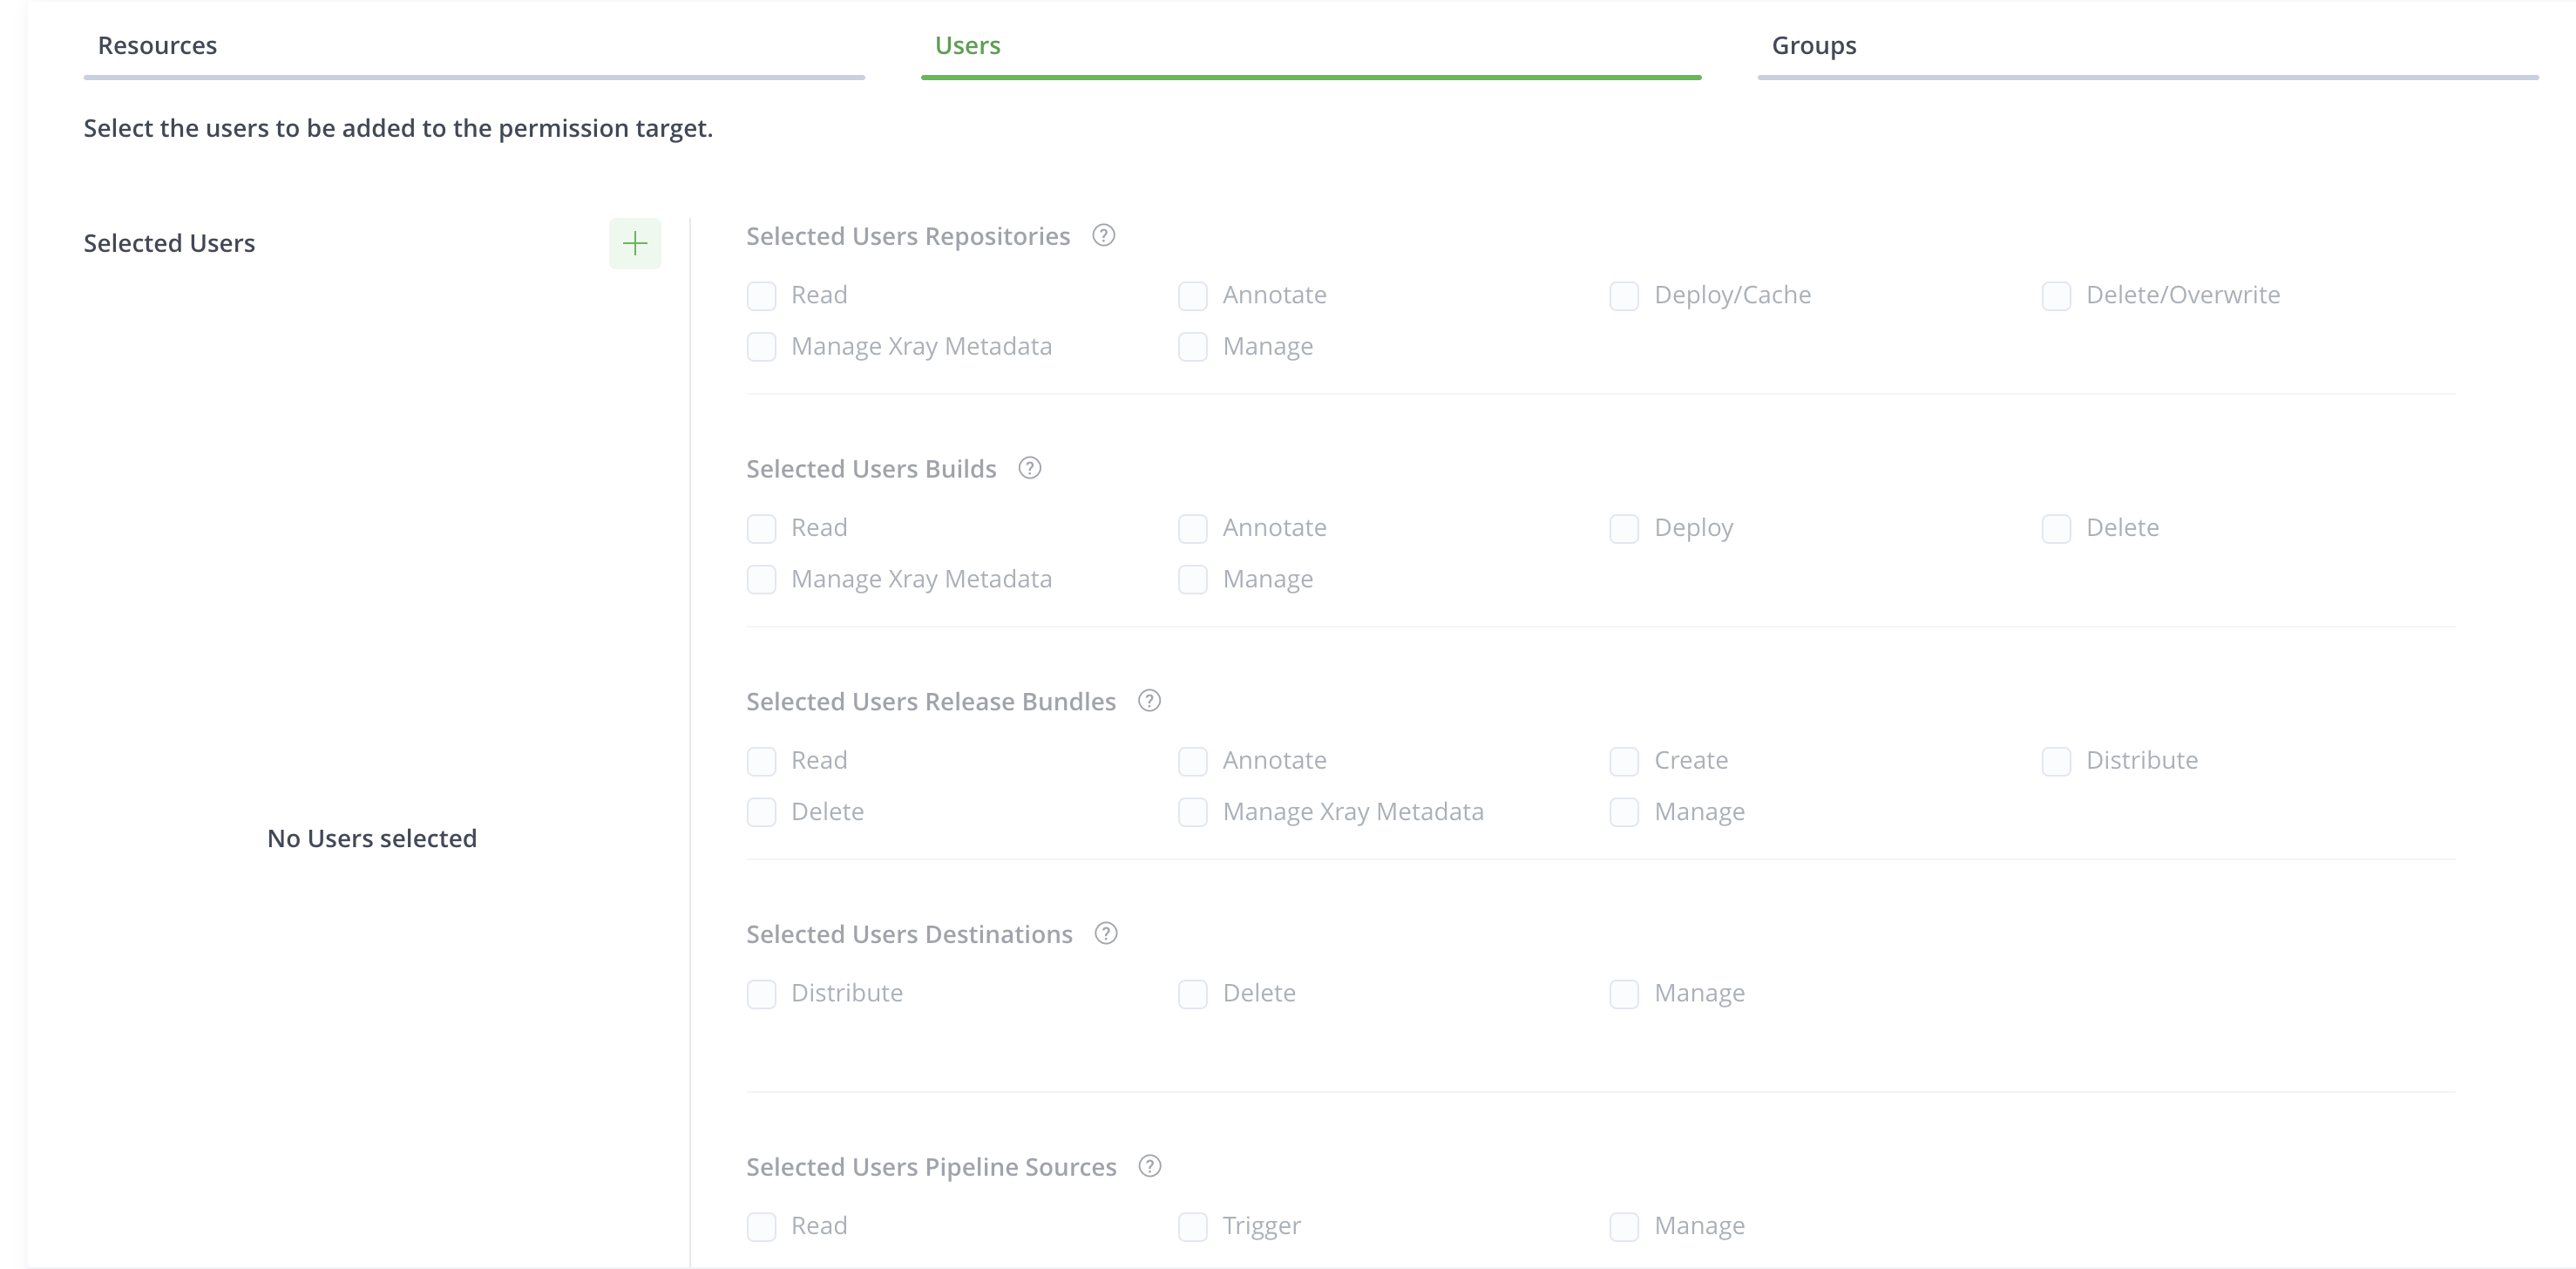
Click the Users tab to add users on which the permissions are applied.
For more information, see Select Users and Assign Permission Actions.
-
Click the Groups tab to add groups on which the permissions are applied.
For more information, see Select Groups and Assign Permission Actions.
-
Click Create.
Select Resources
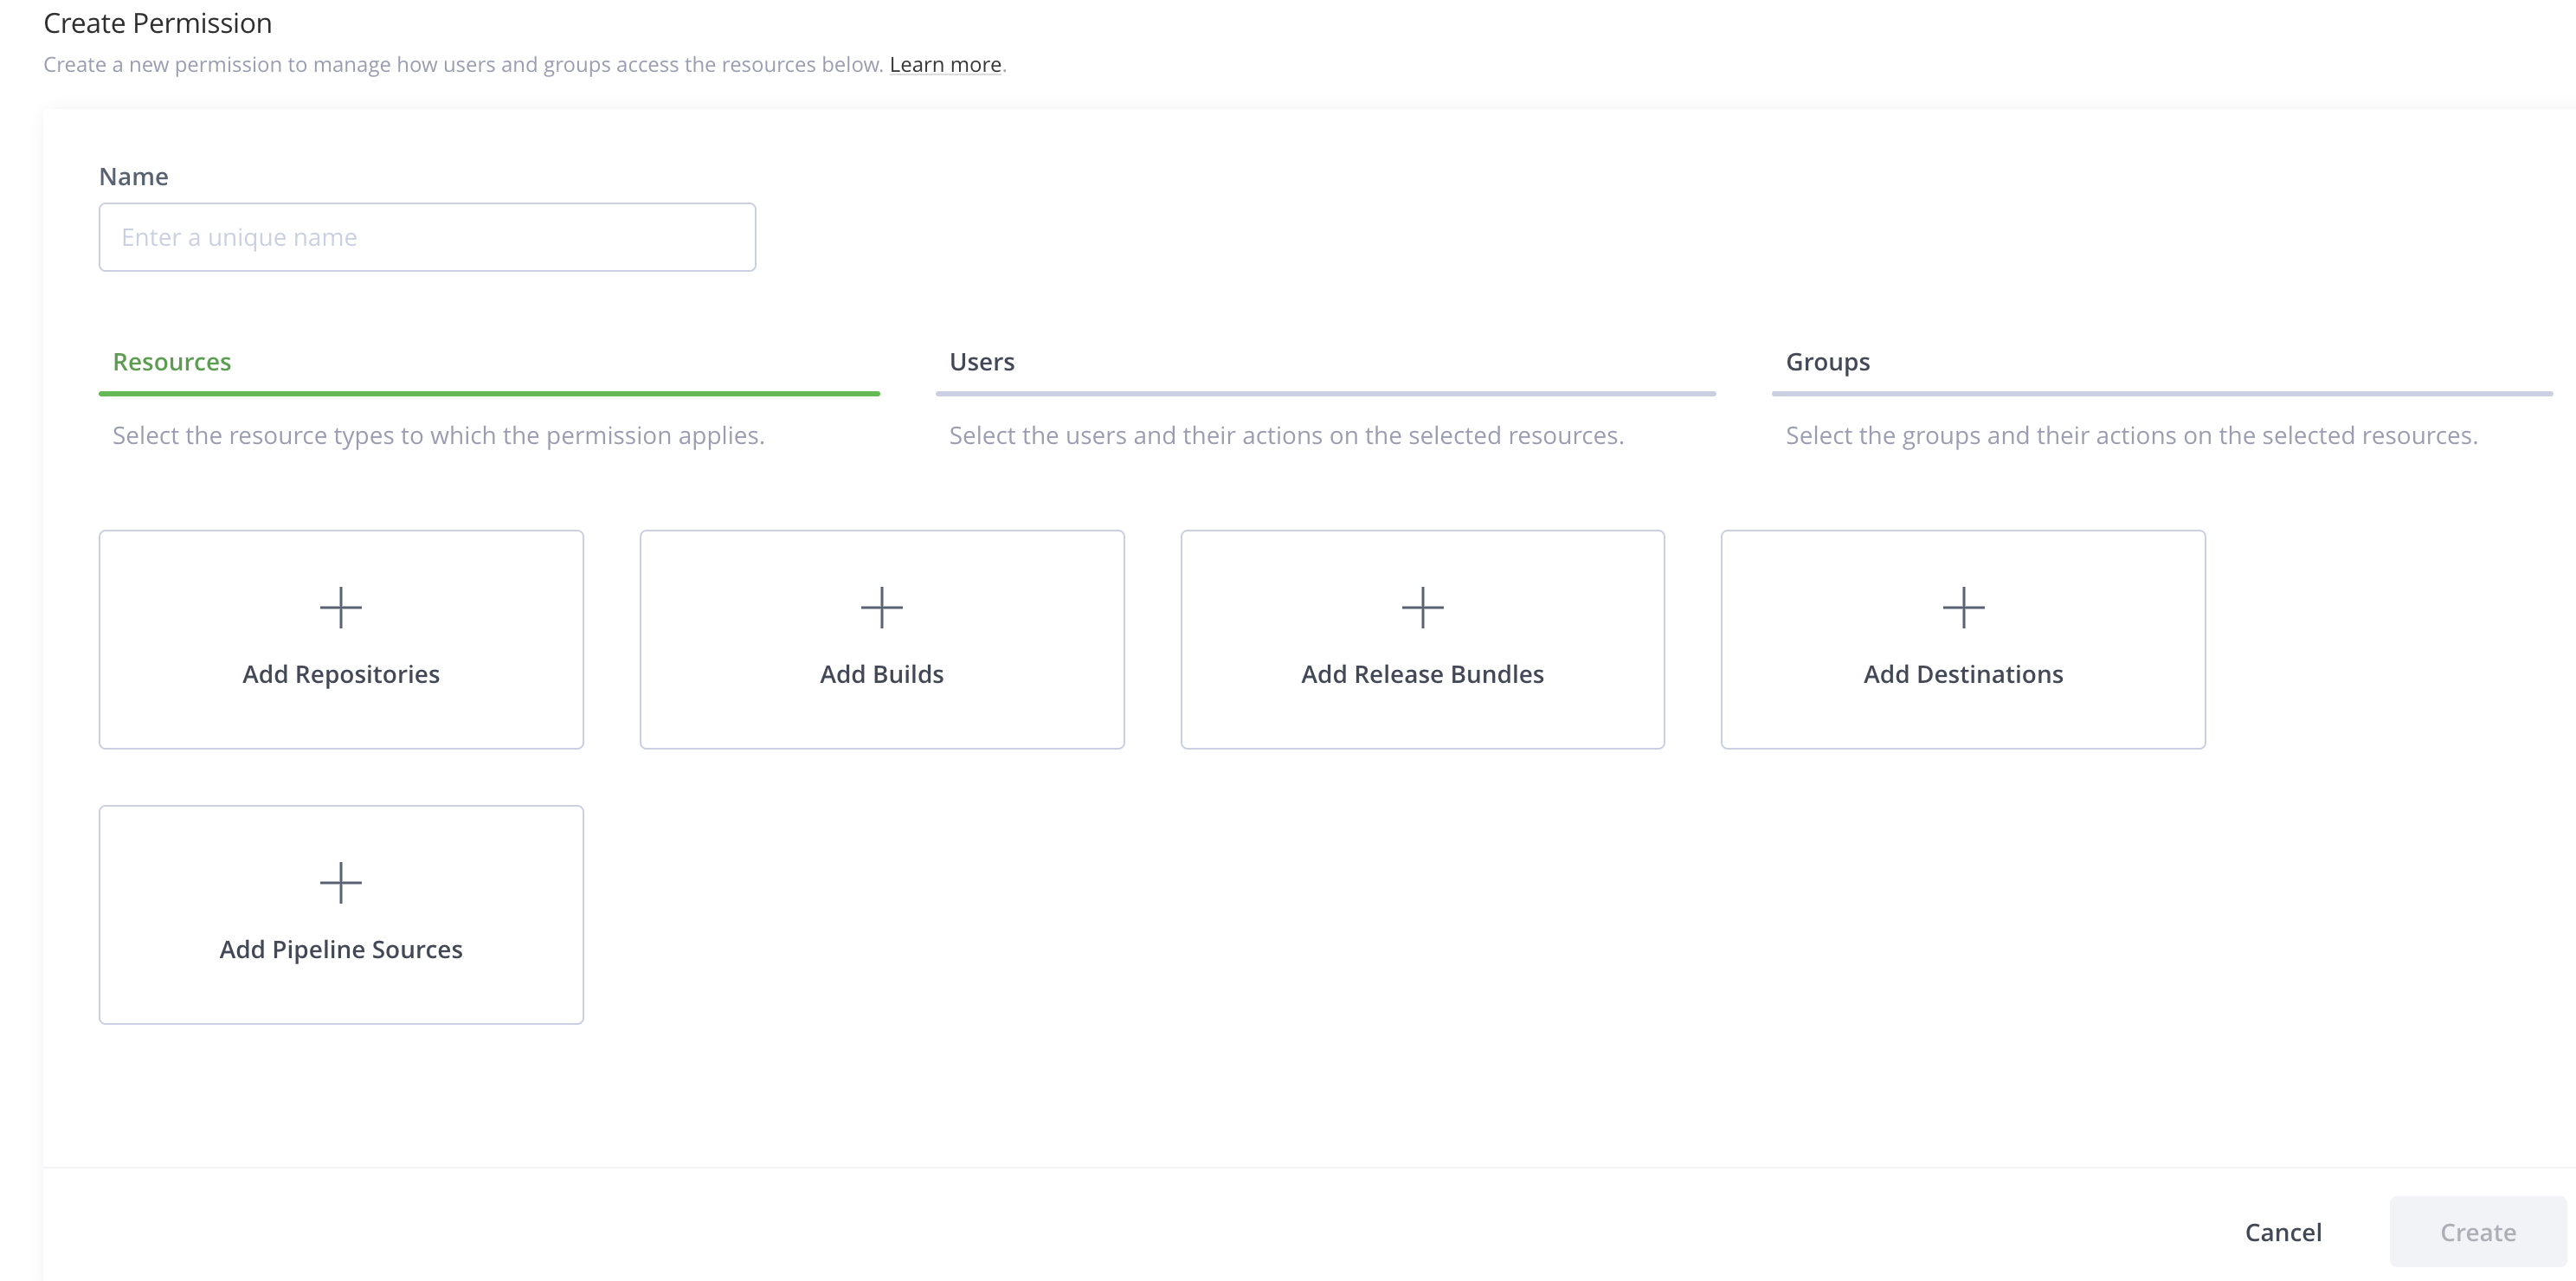
Click the Resources tab to add resources in the New Permissions page.
Click the resource type that you want to add to the permission.
You can add the following types of resources to a permission.
- Repositories
- Builds
- Release Bundles
- Destinations
- Pipeline Sources
Add Repositories
Click Add Repositories to select repositories. You can filter the repositories to which the permission apply.
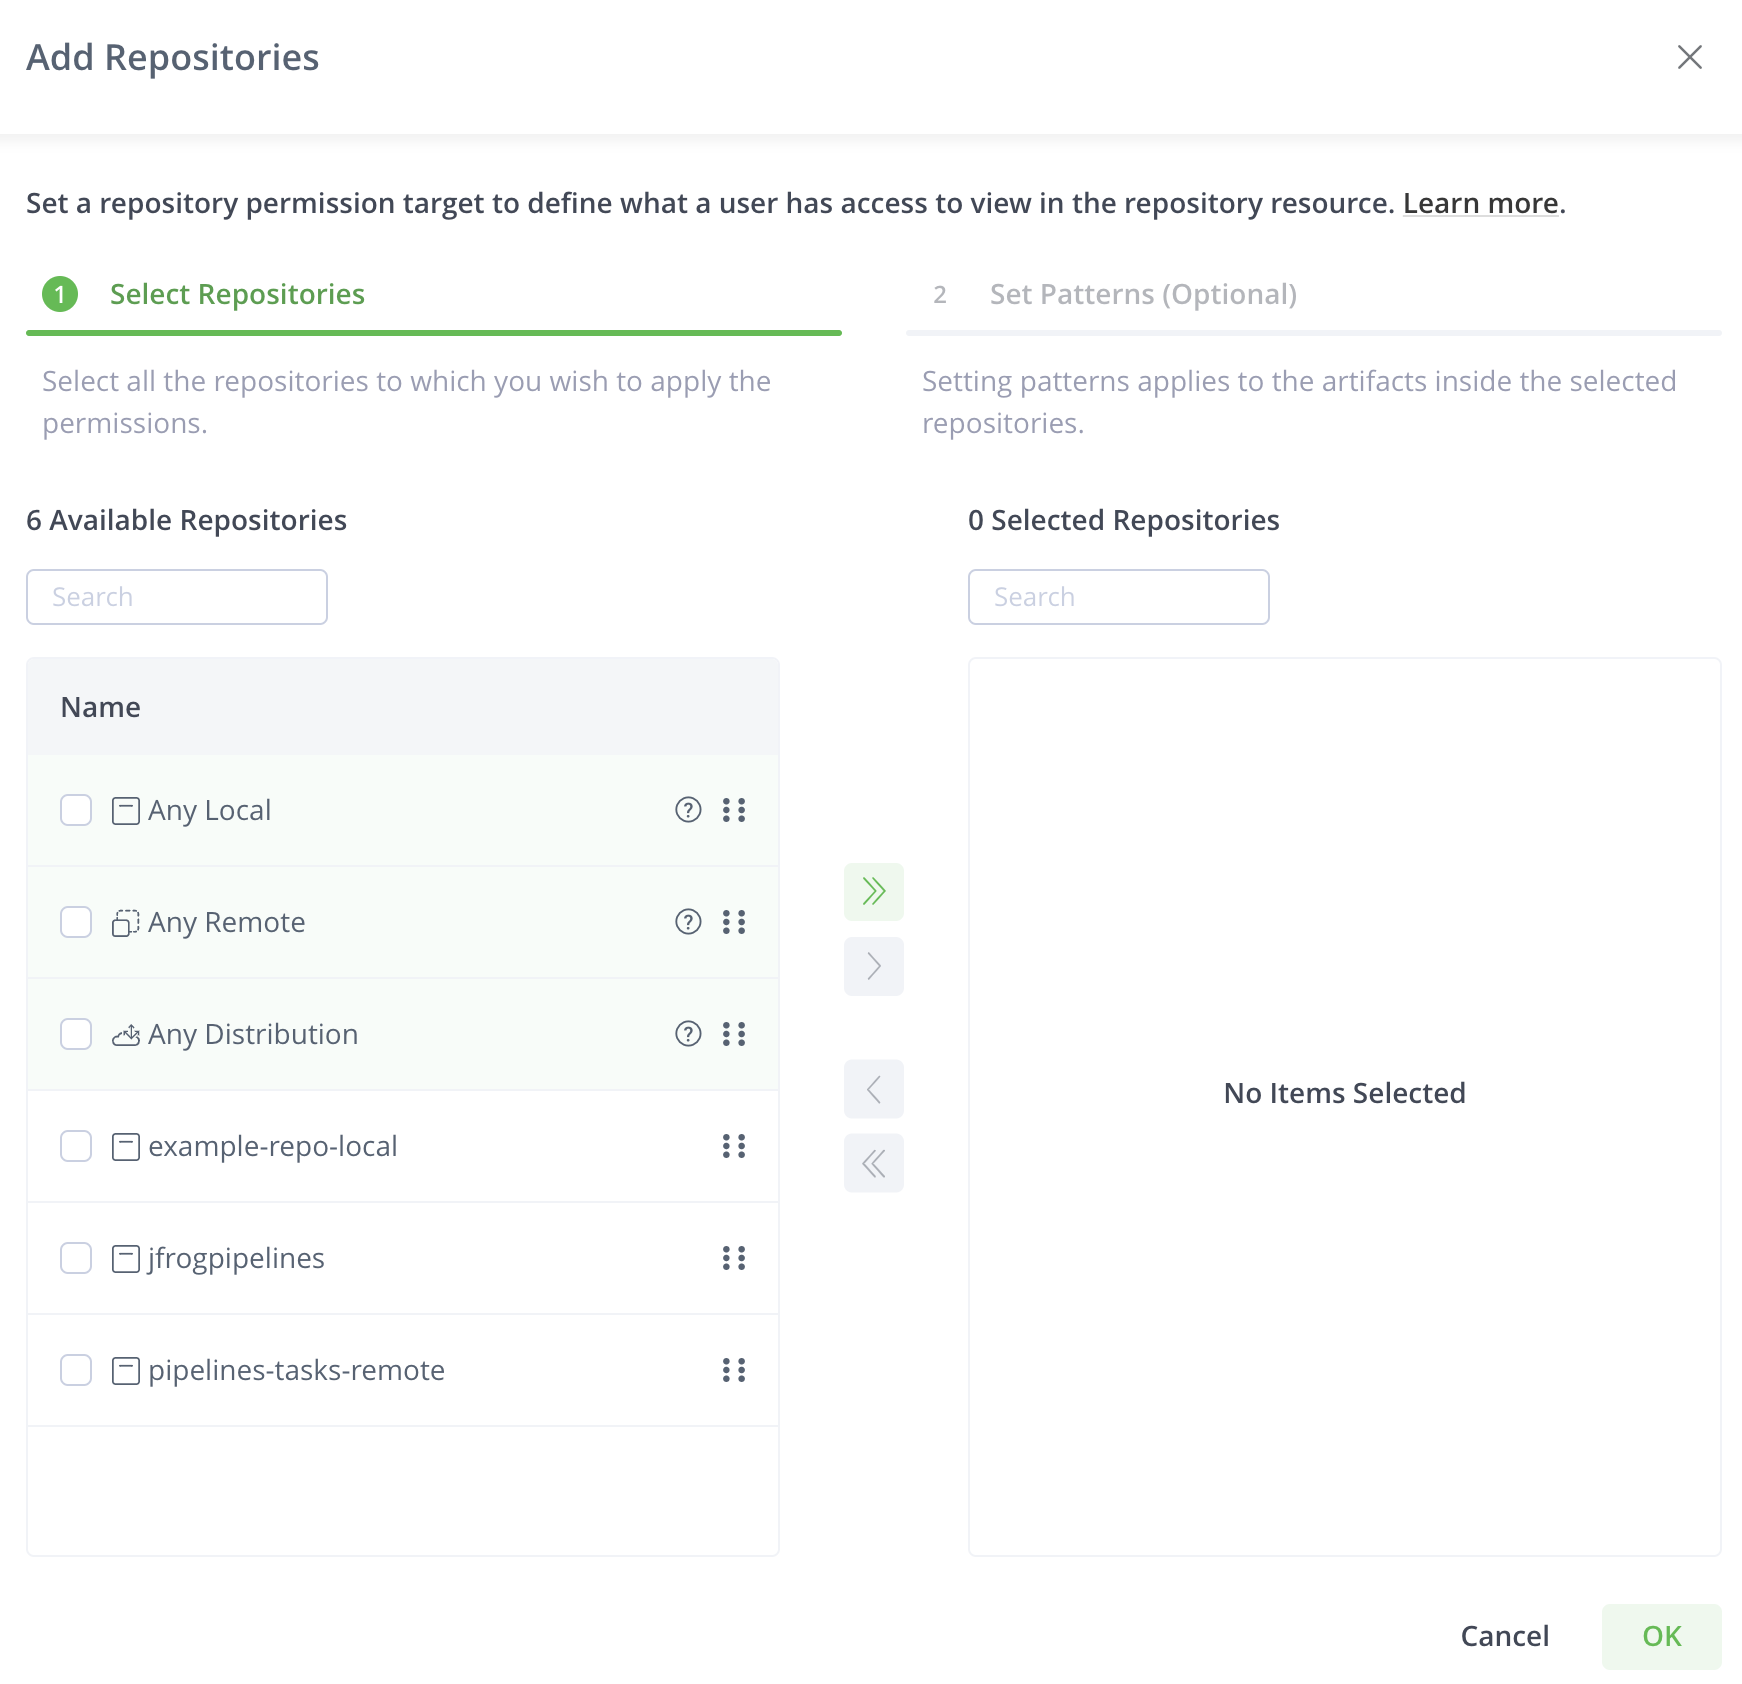
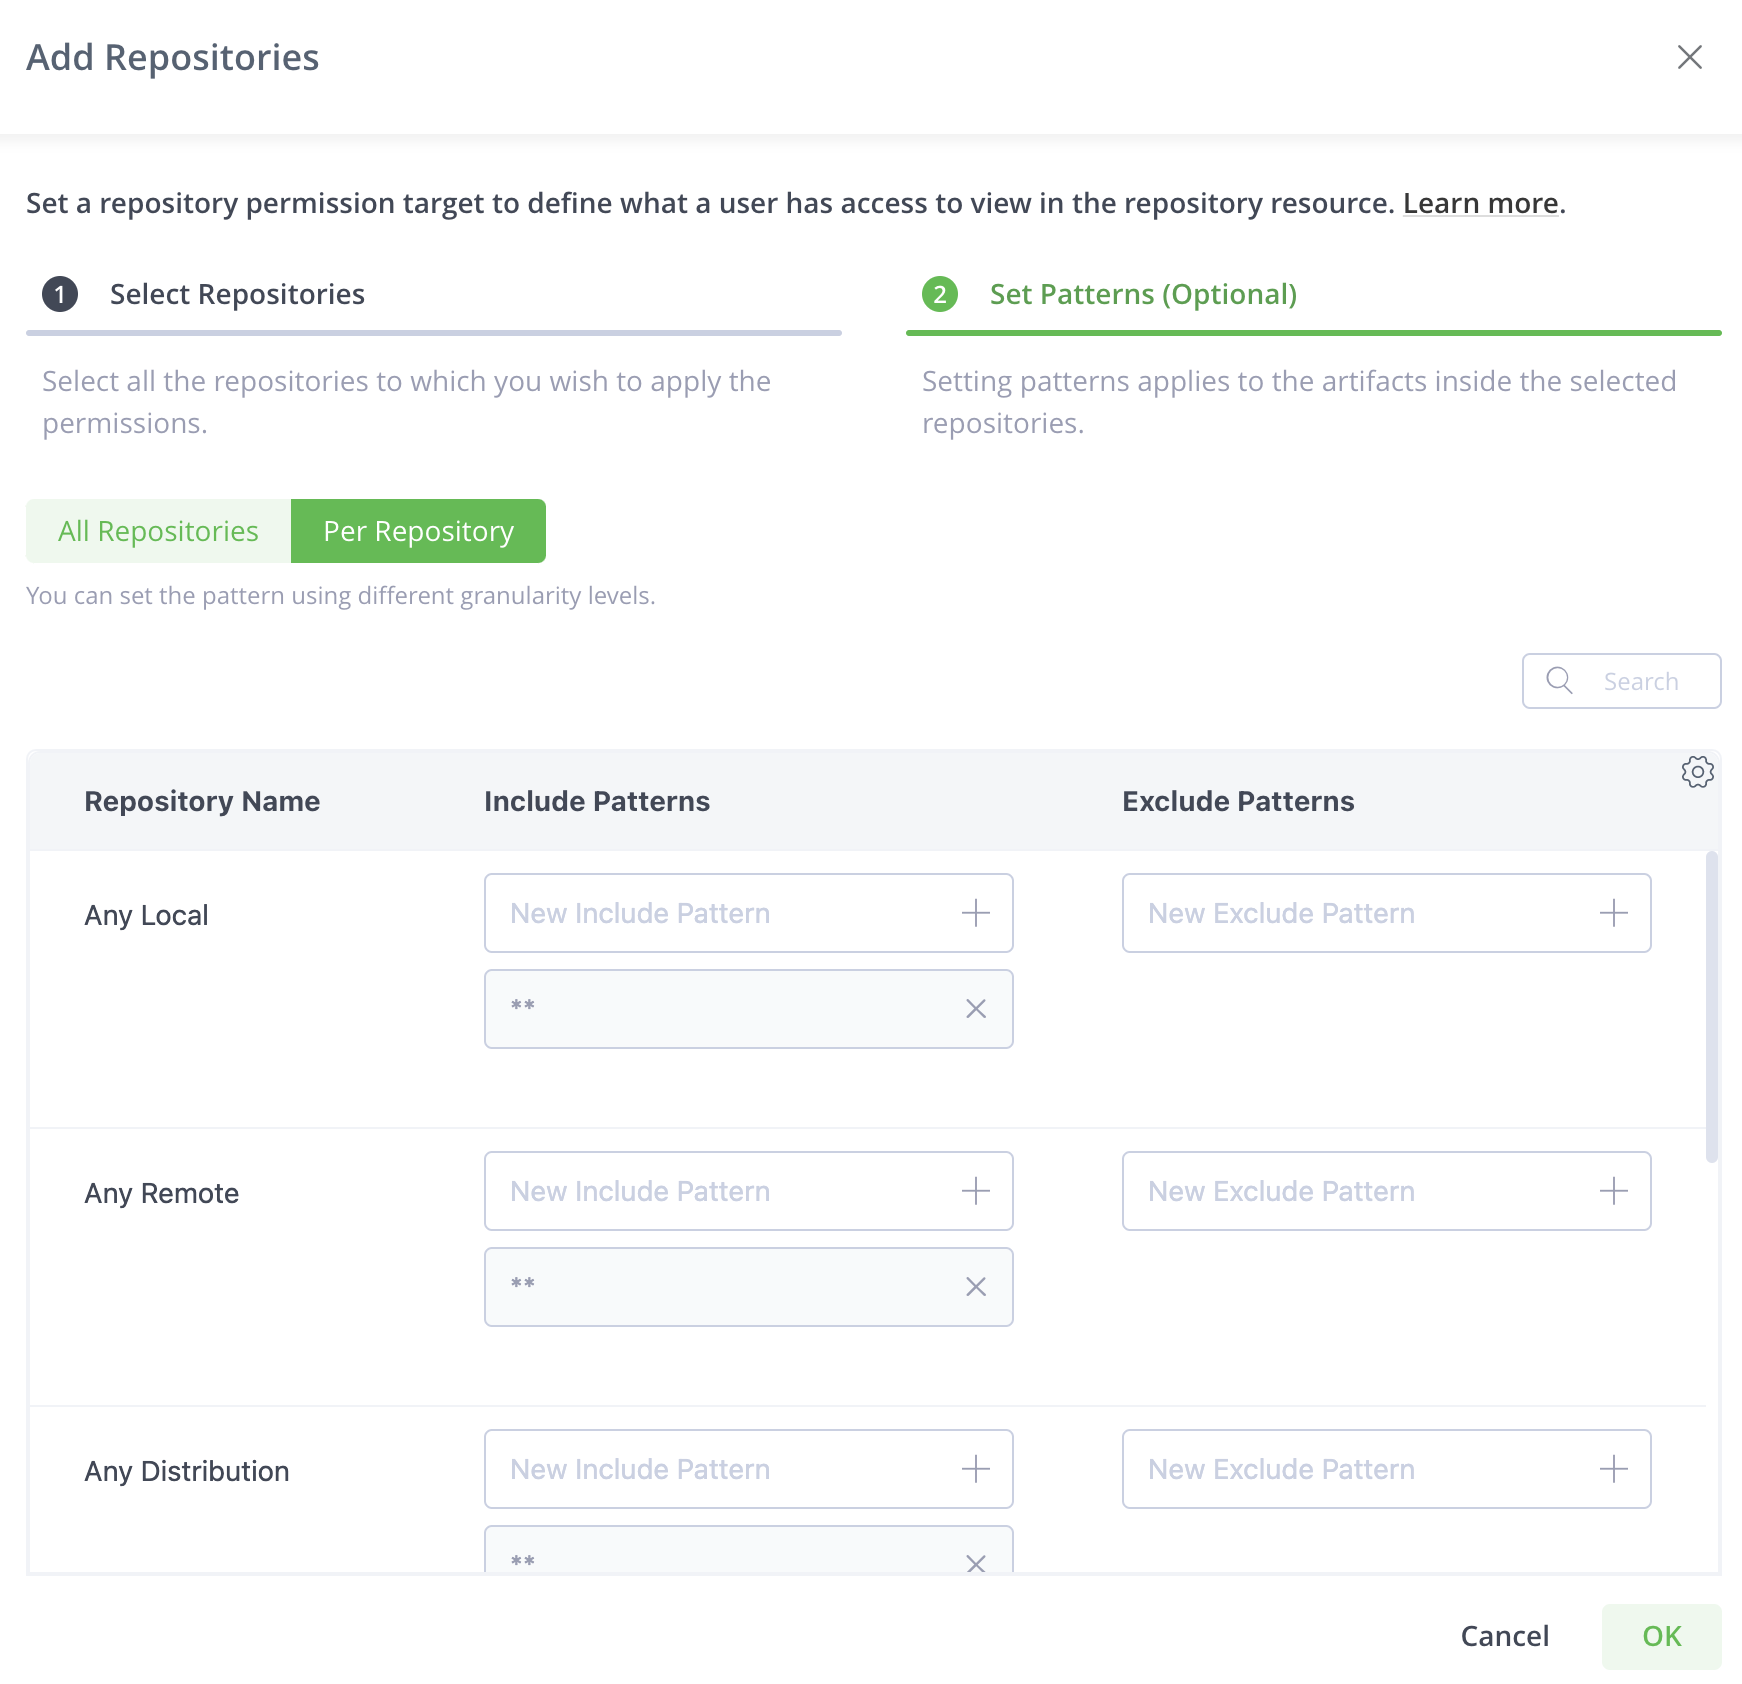
The Select Repositories tab displays repositories in the system. You can search for repositories and select according to your requirements.
You can select Any Local Repository or Any Remote Repository or Any Distribution Repository. Selecting these options, adds all the existing and future repositories of the selected type to this permission.
After you select the repositories, you can apply patterns to restrict the permission to provide access on specific paths inside the selected repositories.
Click Set Patterns (Optional) to apply patterns.
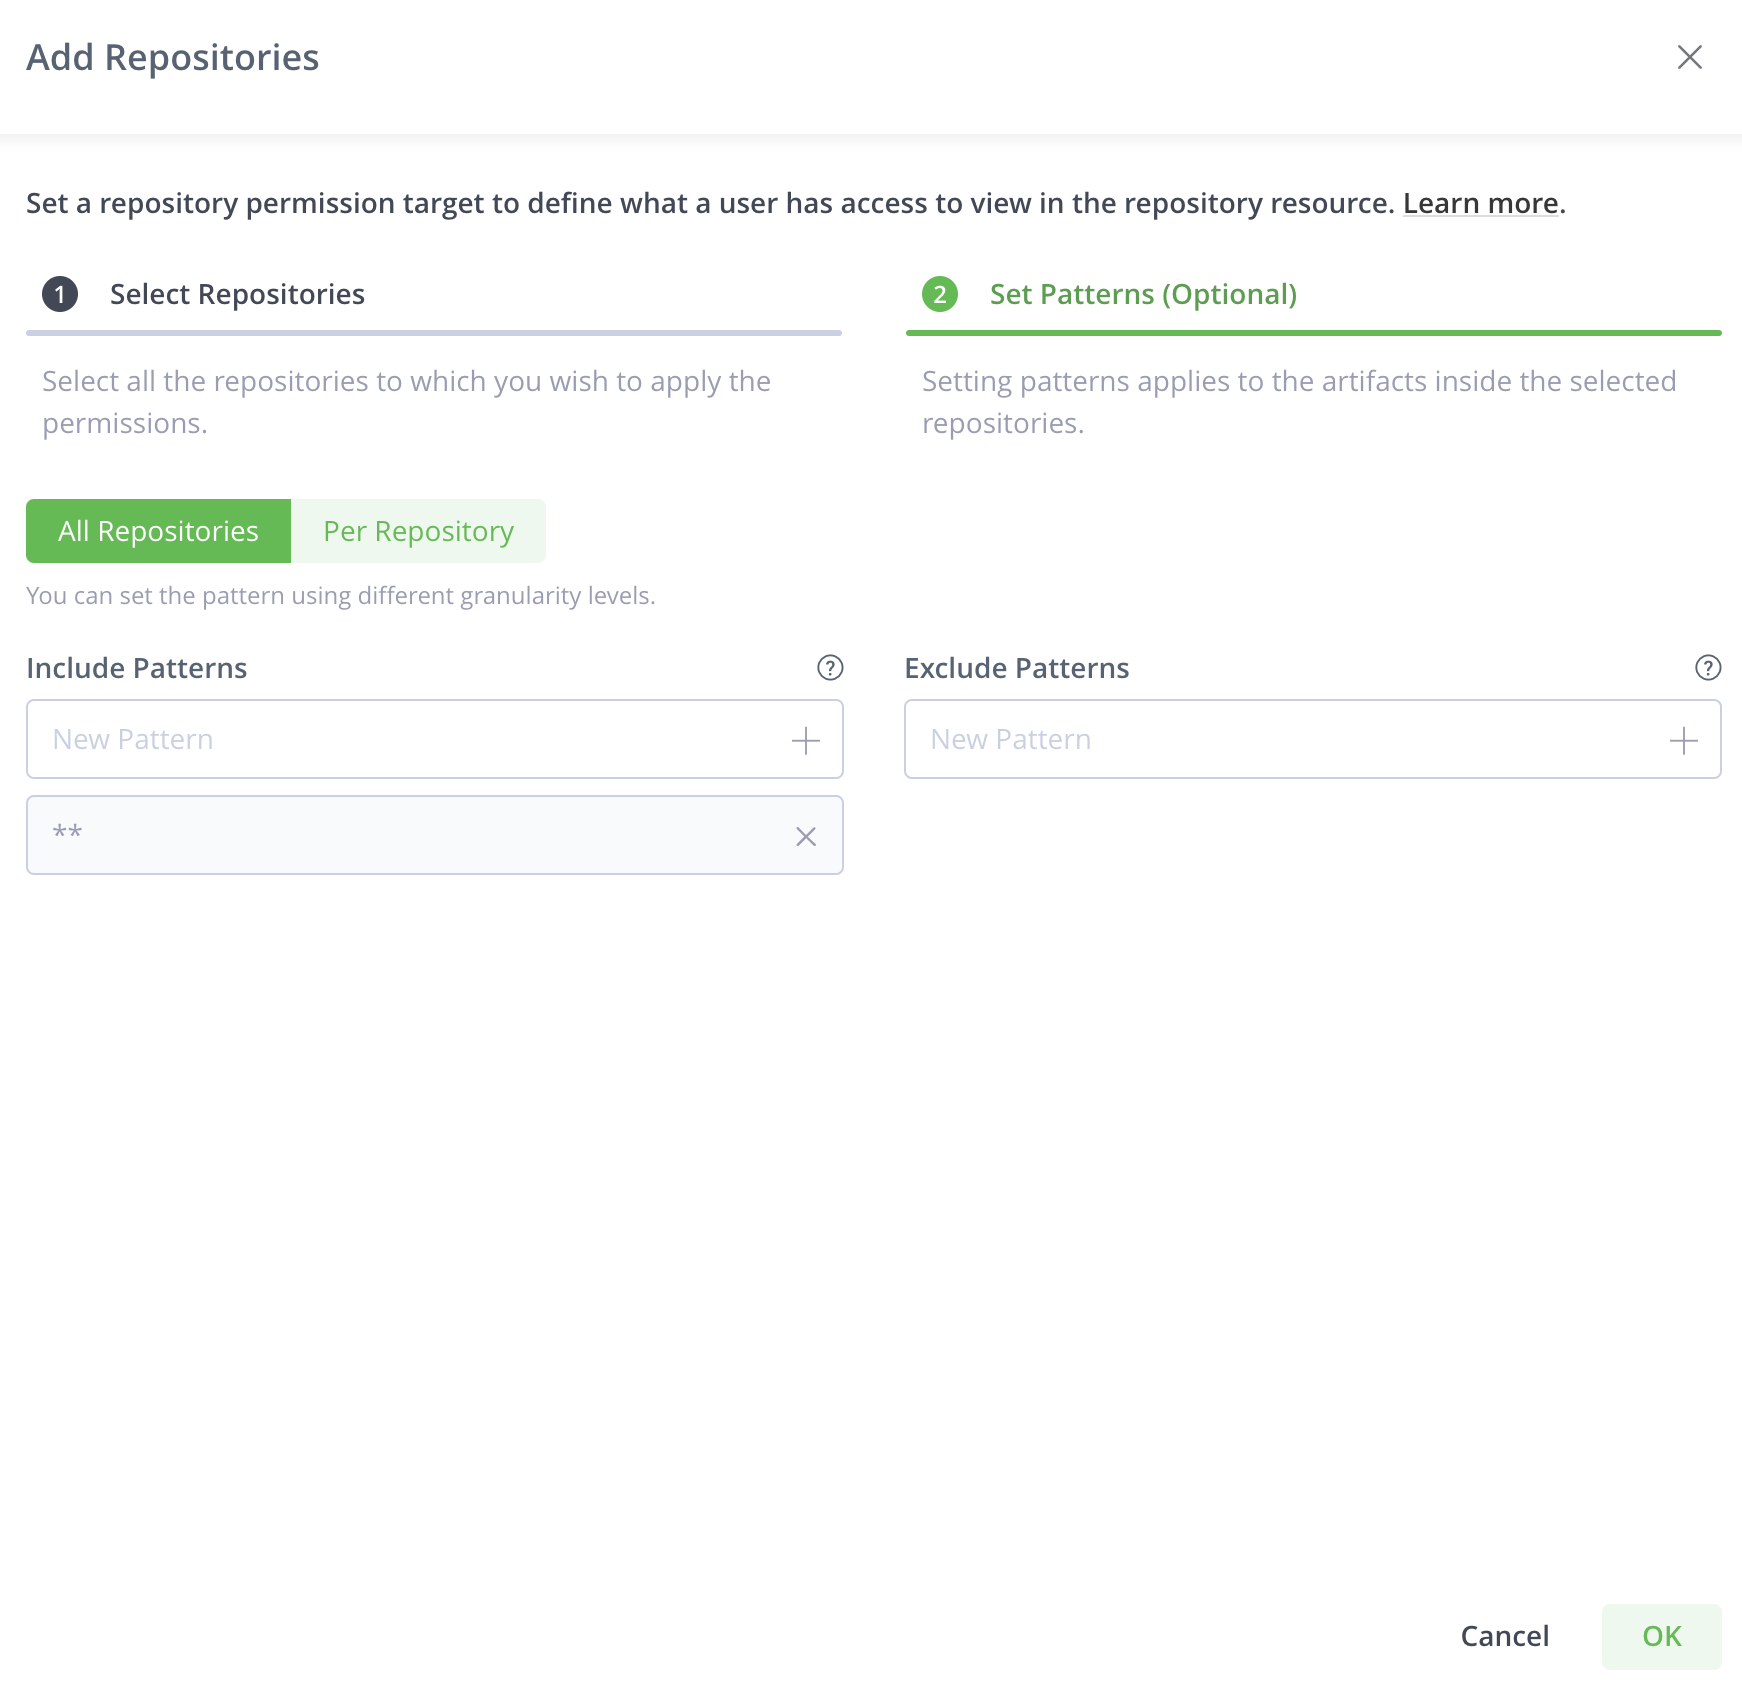
The Patterns tab enables you to include or exclude paths in the selected repositories based on wildcard patterns. Ant-style path expressions are supported (, *, ?) like org/apache/**. For more information, see AntPathMatcher Documentation. The include and exclude patterns are limited to 1024 characters.
For example, you can create a permission that allows user "Builder" and group "Deployers" to read from and deploy artifacts to the libs-releases repository. You can then add org/apache/** as an include pattern to the aforementioned permission target causing users in this permission target to only have access to paths under org/apache/** in the libs-releases repository.
You can add more than one pattern. After you enter a pattern, click + or hit the enter key to add that pattern to the filter.
You can create patterns that apply to all the repositories or set patterns per selected repository.
Add Builds
The build permission defines what a user has access to view in the Builds resource.
You can select builds by selecting them or by setting patterns.
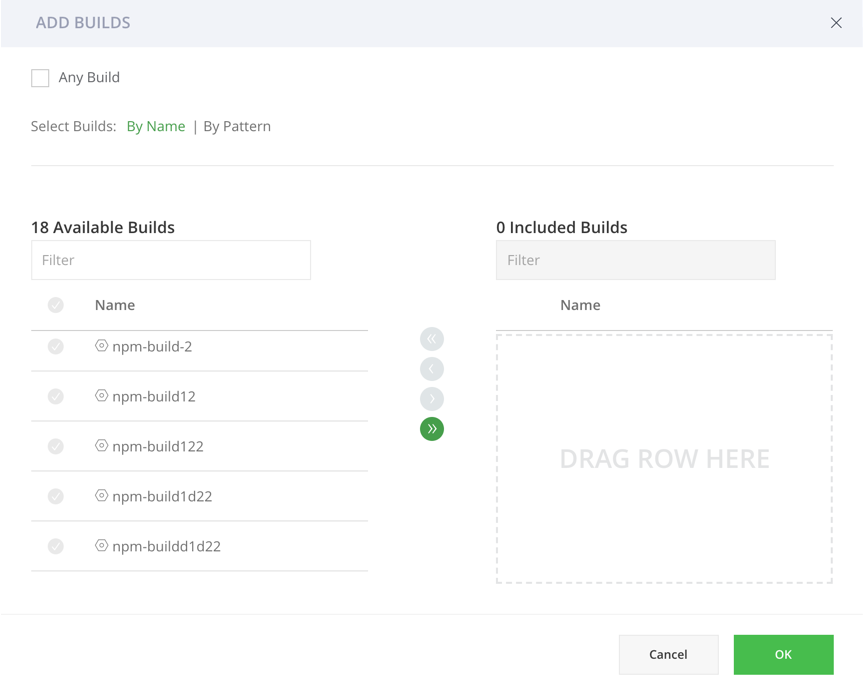
Click Add Builds and select the builds to which the permission applies.
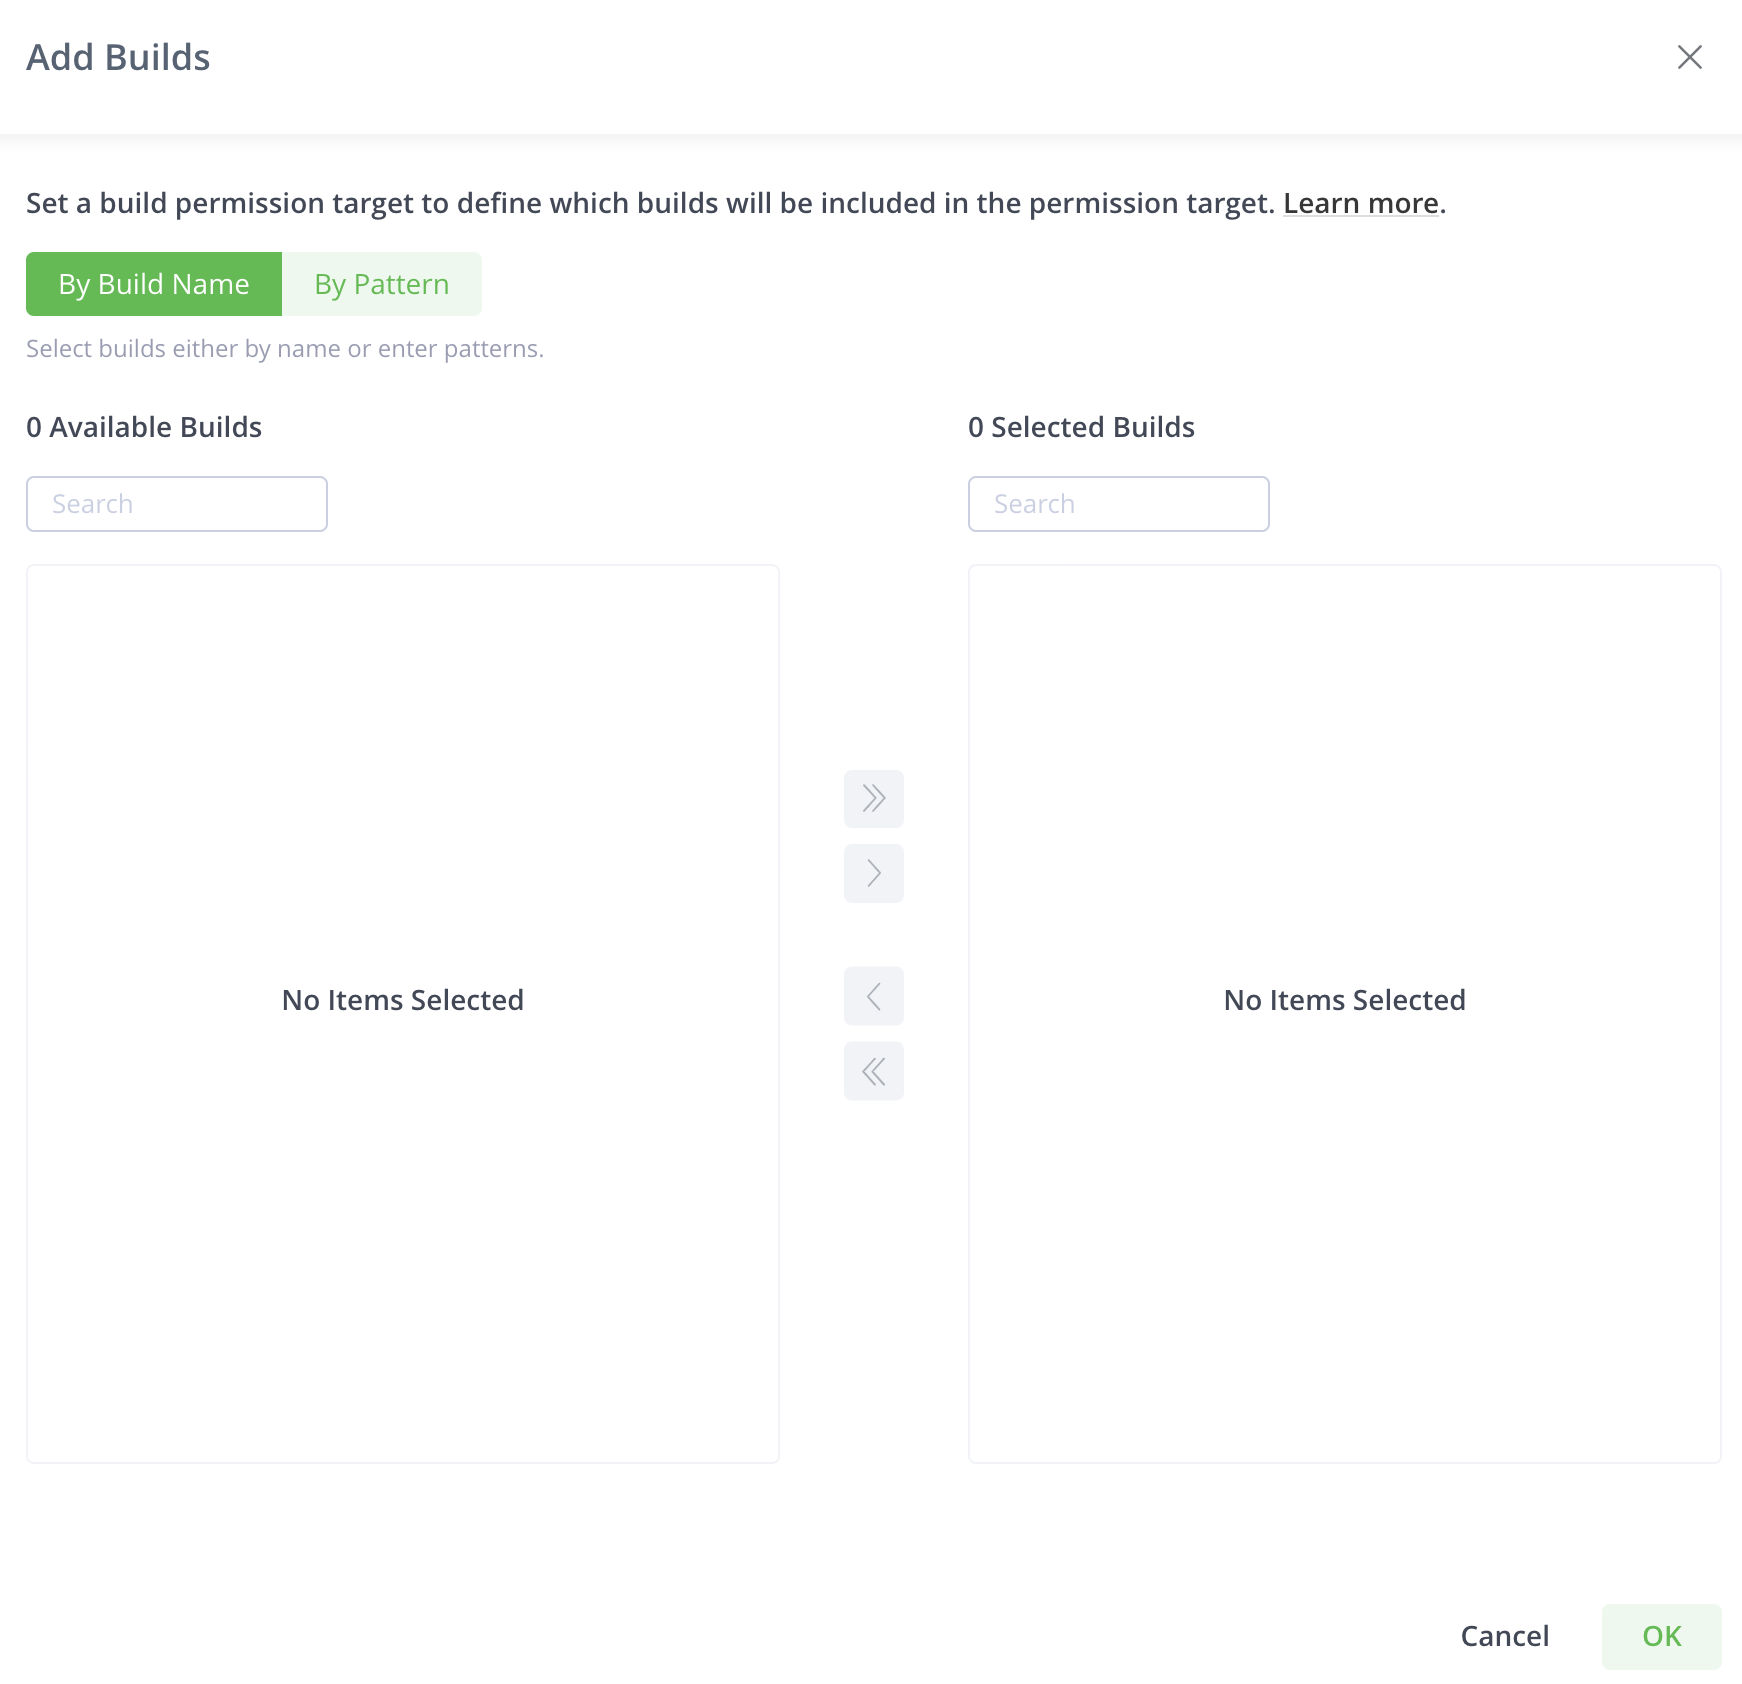
All the current builds in the system appear.
Note
This list will only show builds from the default
artifactory-build-inforepository, or All Projects scope: to assign build permissions for a specific project, use project roles.
You can choose builds either by name or by pattern.
You can select the builds from the list or search for the builds that you wish to select.
Click By Pattern to select builds according to a pattern or to select all the builds.

Select Include All Builds to include all the builds in the permission. You can use the exclude pattern to exclude certain builds from the selection.
The Patterns tab enables you to include or exclude builds based on wildcard patterns. Ant-style path expressions are supported (, *, ?). For more information, see AntPathMatcher Documentation. The include and exclude patterns are limited to 1024 characters. When providing the Read permission to the selected builds (patterns), the user sees those builds in the Builds page and also have access to the relevant build in the artifactory-build repository. To add all builds that start with apache (regardless if they already exist in Artifactory or not), use the following include pattern: apache**/**. Granting the 'Read and Deploy' permission for this build pattern, provides users with access to all builds that start with apache and allows them to upload build-info files that start with the term apache in the build name.
You can add more than one pattern. After you enter a pattern, click + or hit the enter key to add that pattern to the filter.
Note
The
artifactory-build-inforepository is not included in the repositories permissions since it is automatically part of the build permissions. i.e. after assigning a permission on Builds section, the user will get the corresponding permission to the relevant builds under the repository. Adding a build provides the specified users/groups in this permission target, access to the corresponding path in the artifactory-build-info repository.
Important
When you include or exclude patterns for builds, all current and future builds are affected by the permission.
The Preview table lists all builds that fit the pattern.
You can also choose to select Include All Builds so that existing and future builds are added to the permission.
Add Release Bundles
You can assign permissions to manage the Release Bundles resource (both V1 and V2). Release Bundles are part of the Distribution process and are the entities that group together the contents that are part of your release, providing the bill of materials for your software releases. For example, you can group together the different build artifacts, such as Docker images, that make up your software release that can then be pushed to your point-of-sale devices. The Release Bundle is secure and immutable, ensuring that no manipulation can be made by unauthorized users. For more information, see Distributing Release Bundles.
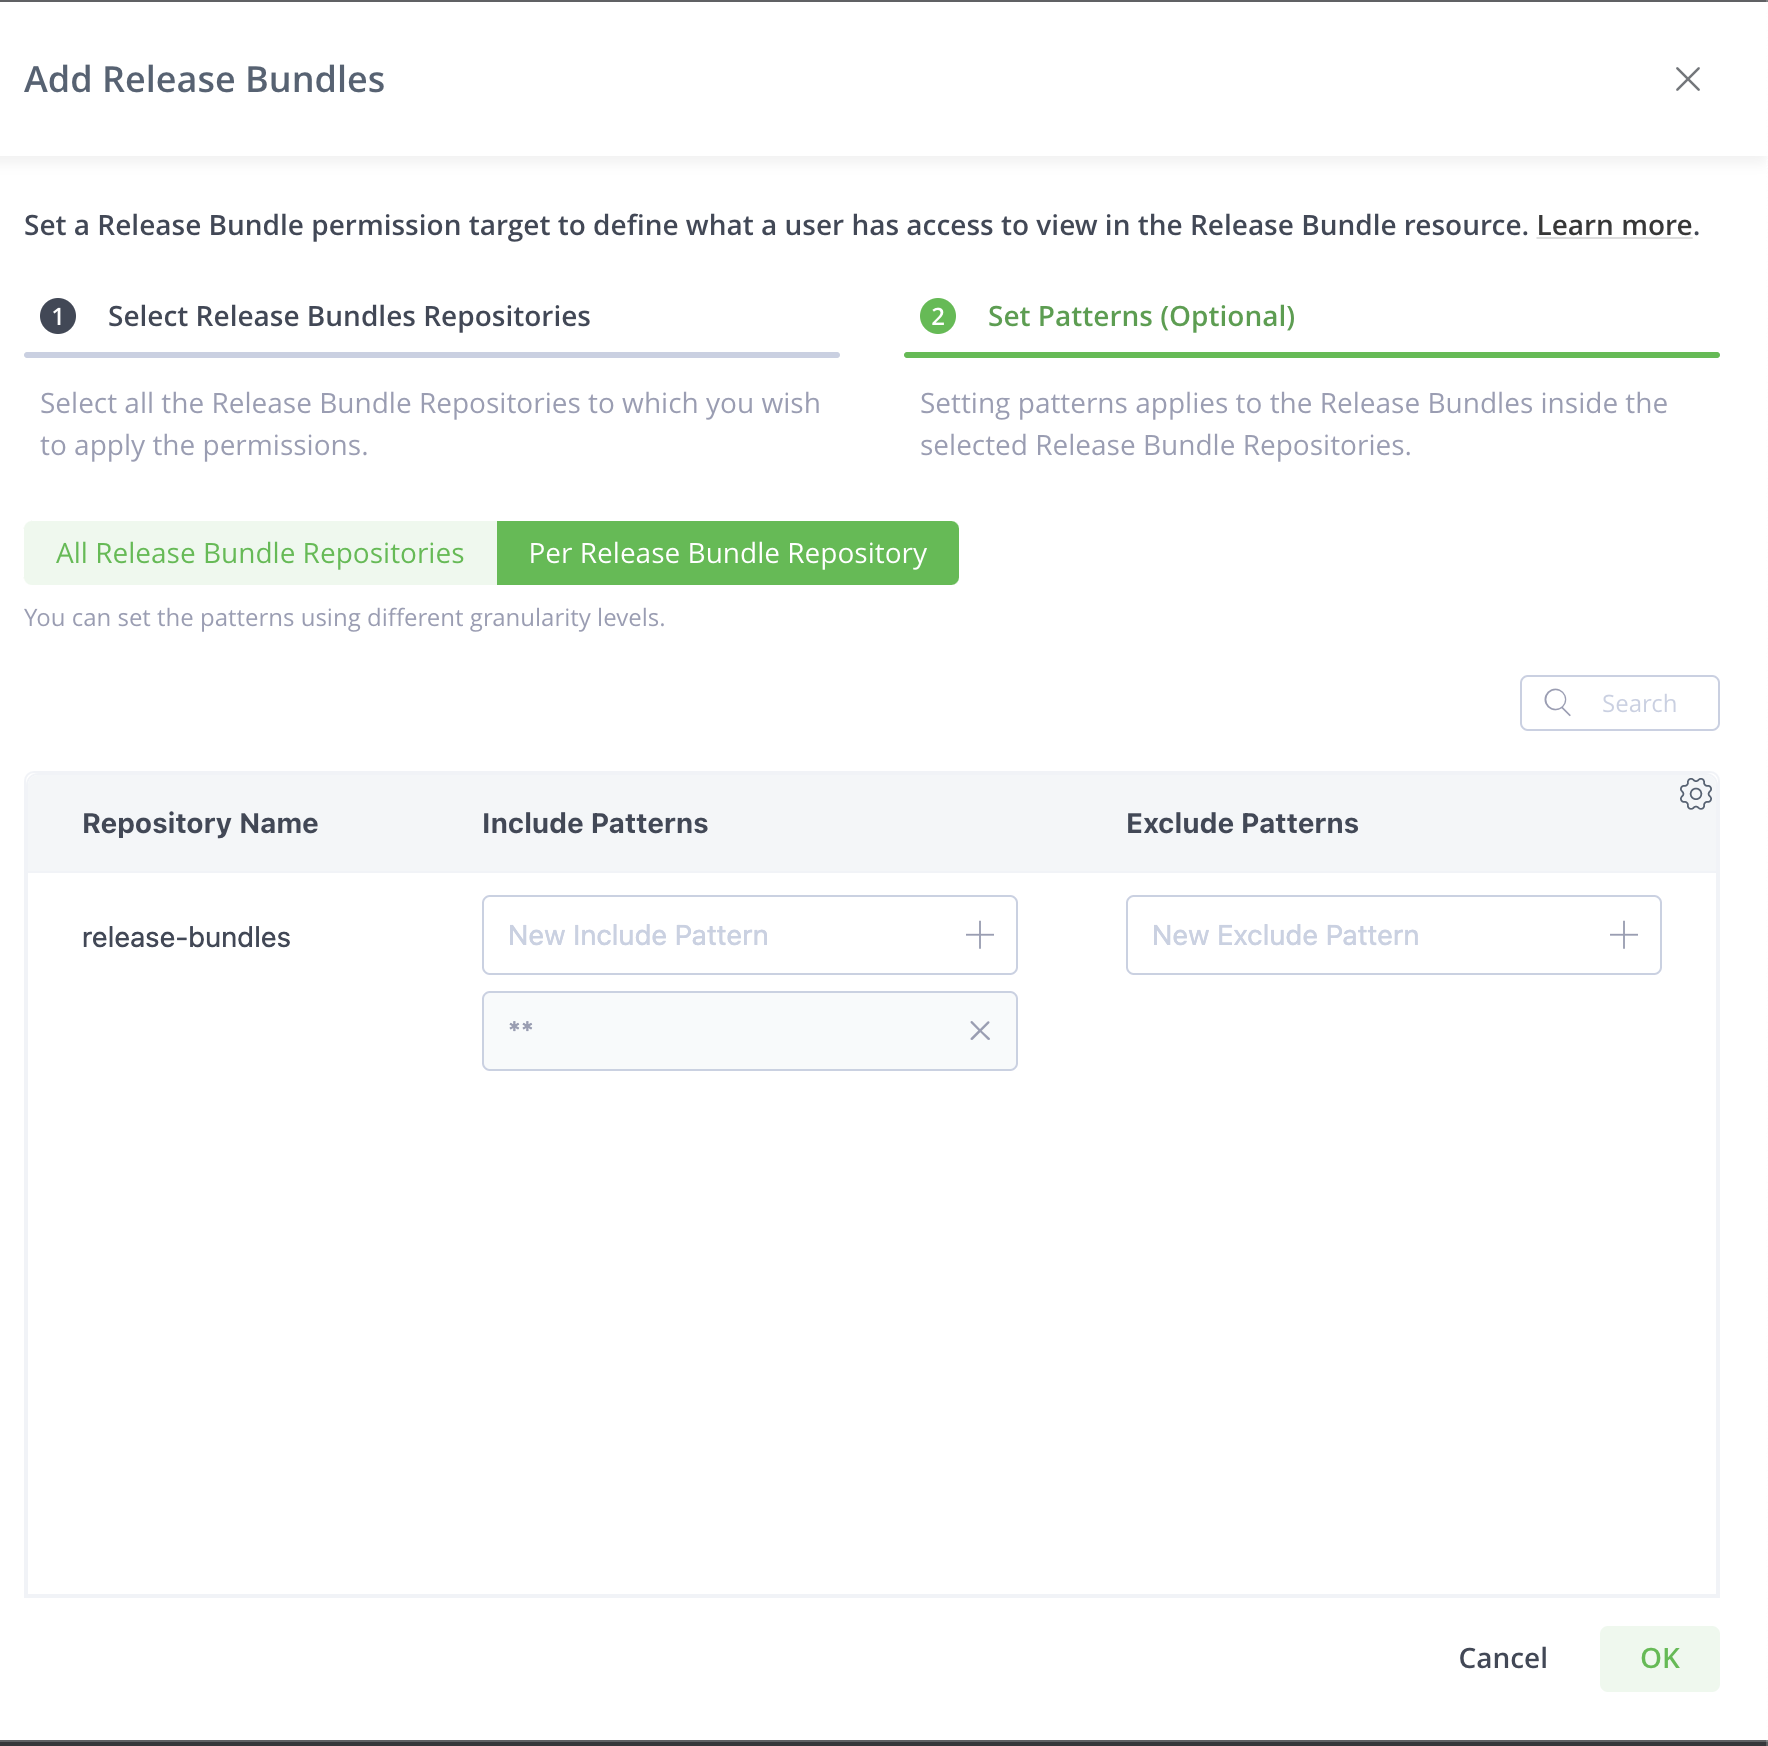
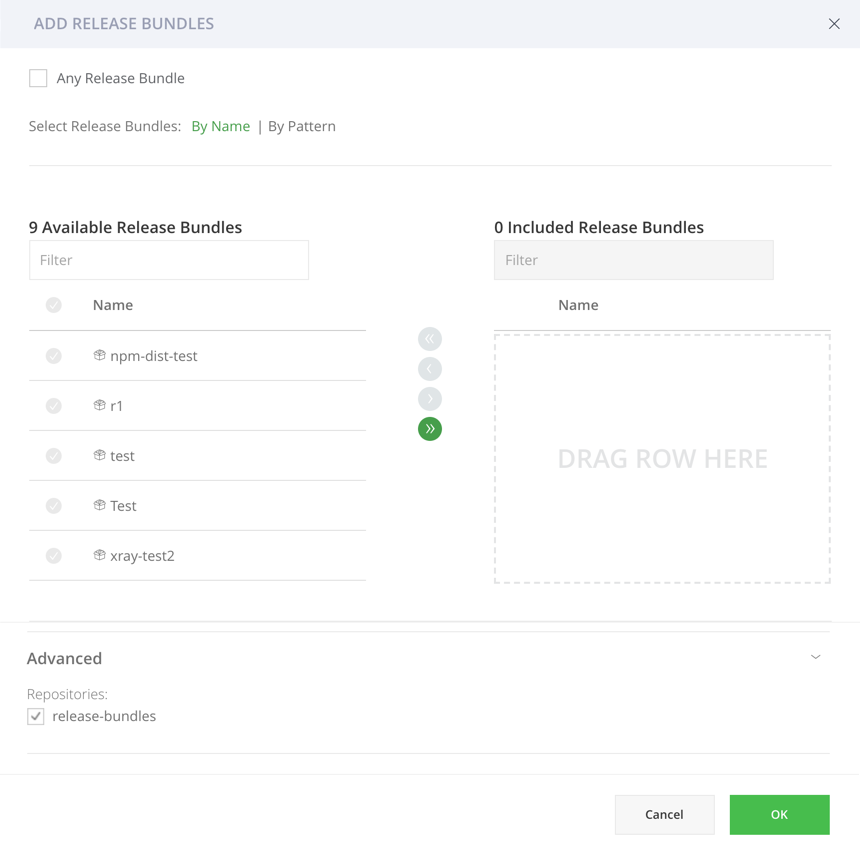
Click Add Release Bundles to select the release bundle repositories to which the permission apply.
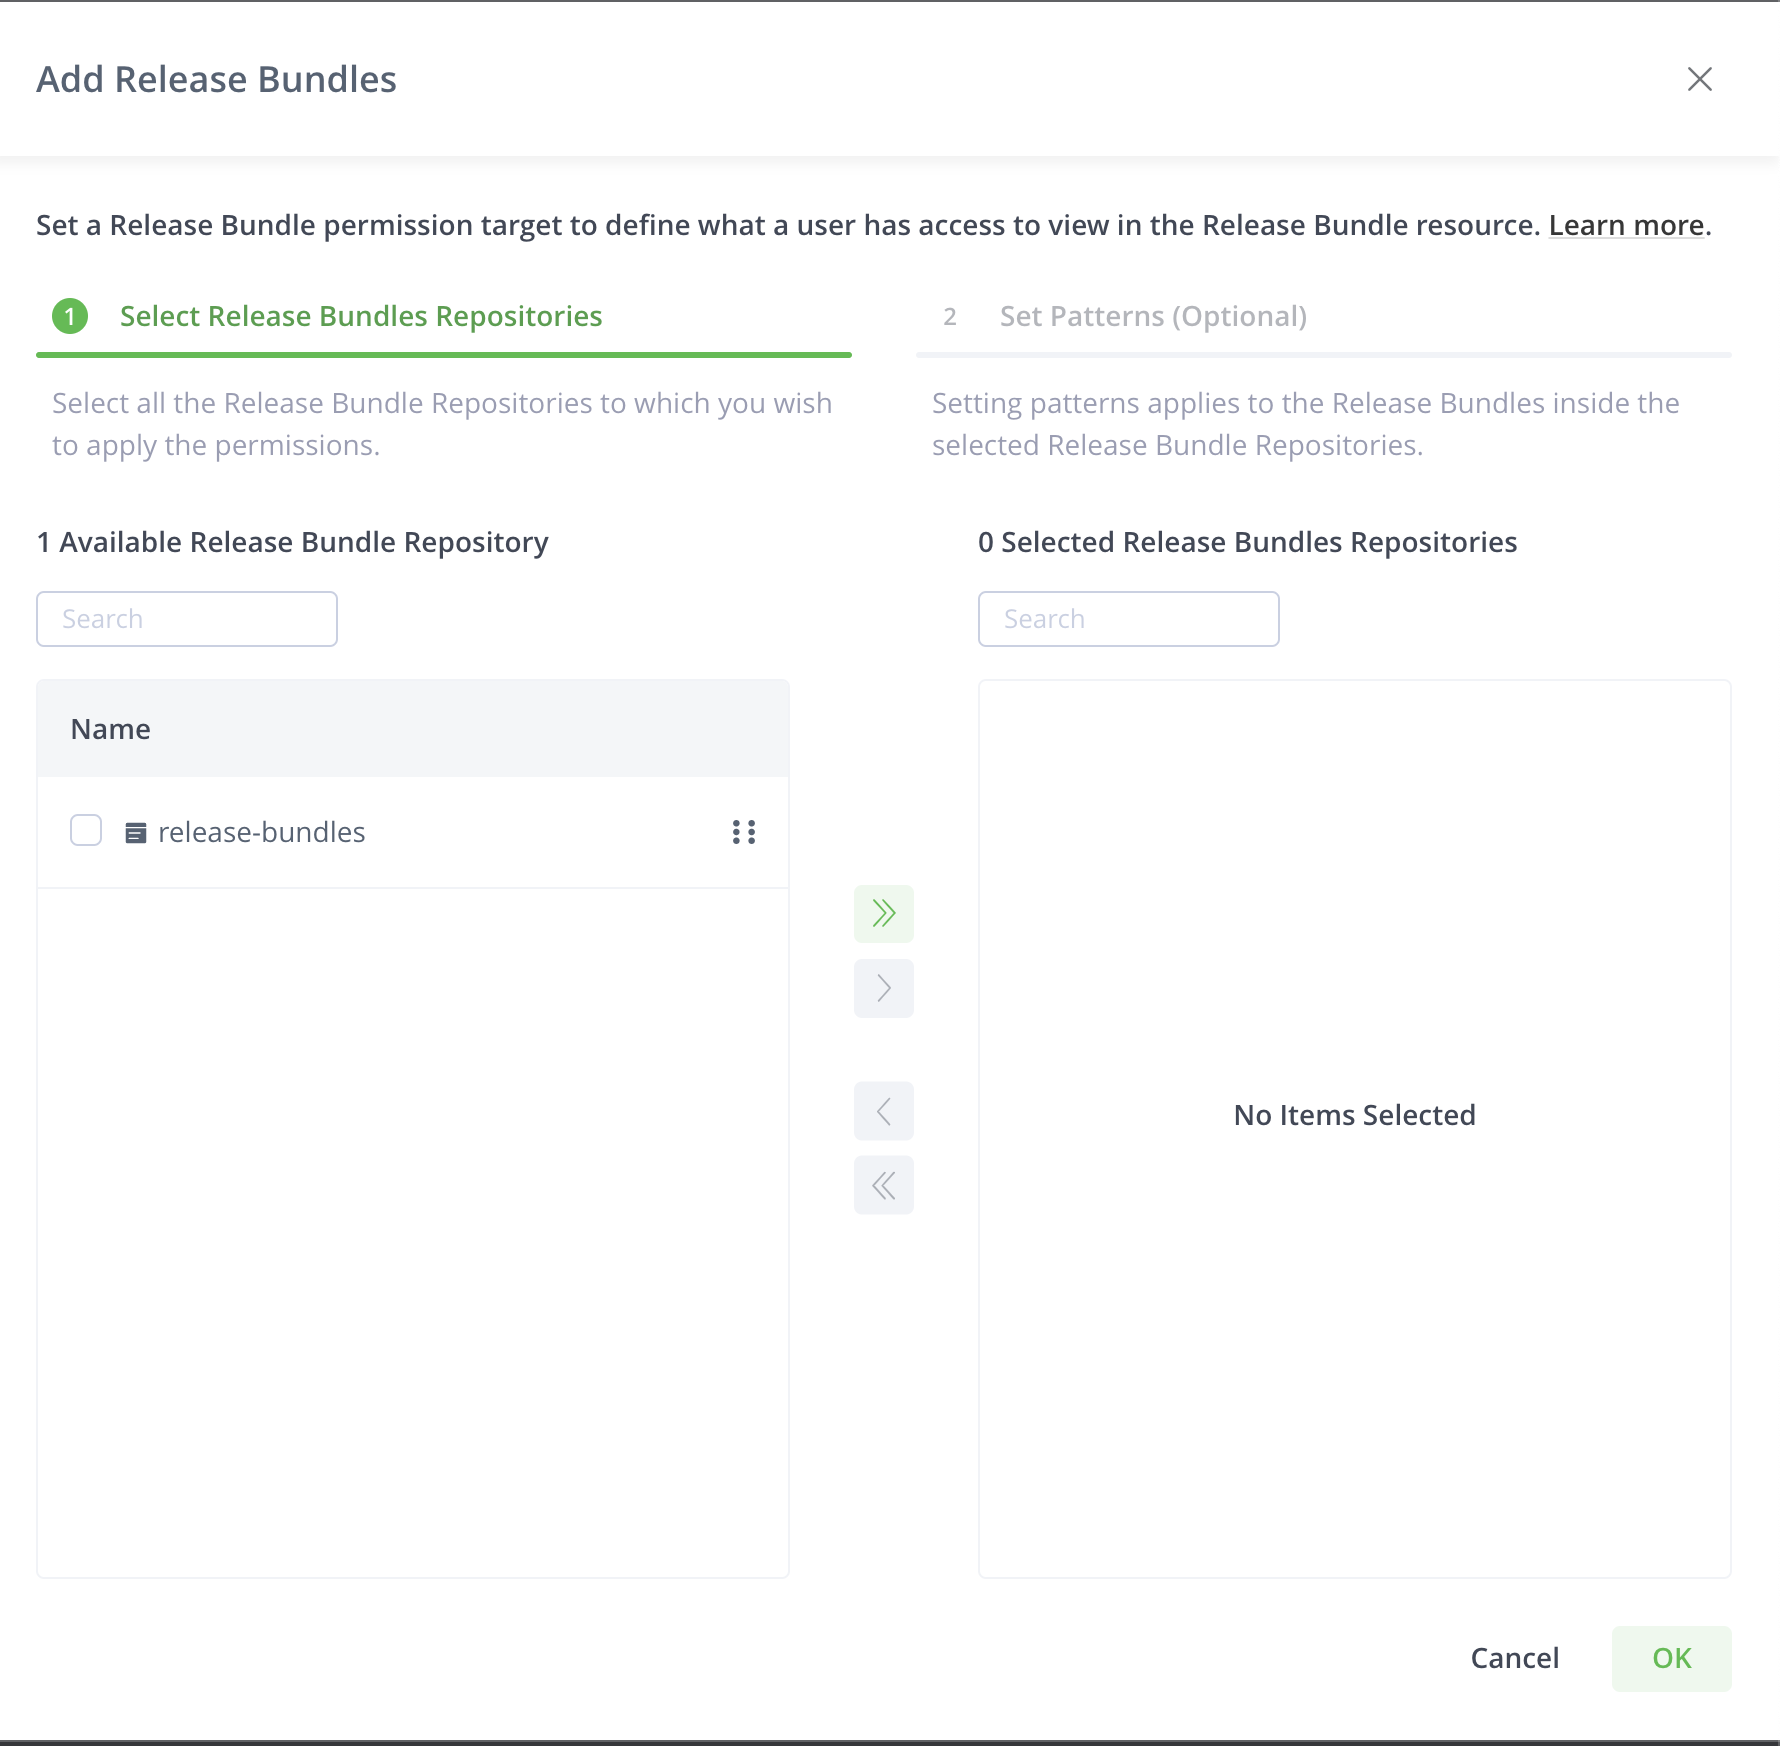
Select Release Bundles Repositories tab displays the release bundle repositories in the system. You can search and select according to your requirements.
After you select the release bundles, you can apply patterns to restrict the permission to certain release bundles within the release bundle repositories based on patterns.
Click Set Patterns (Optional) to apply patterns.
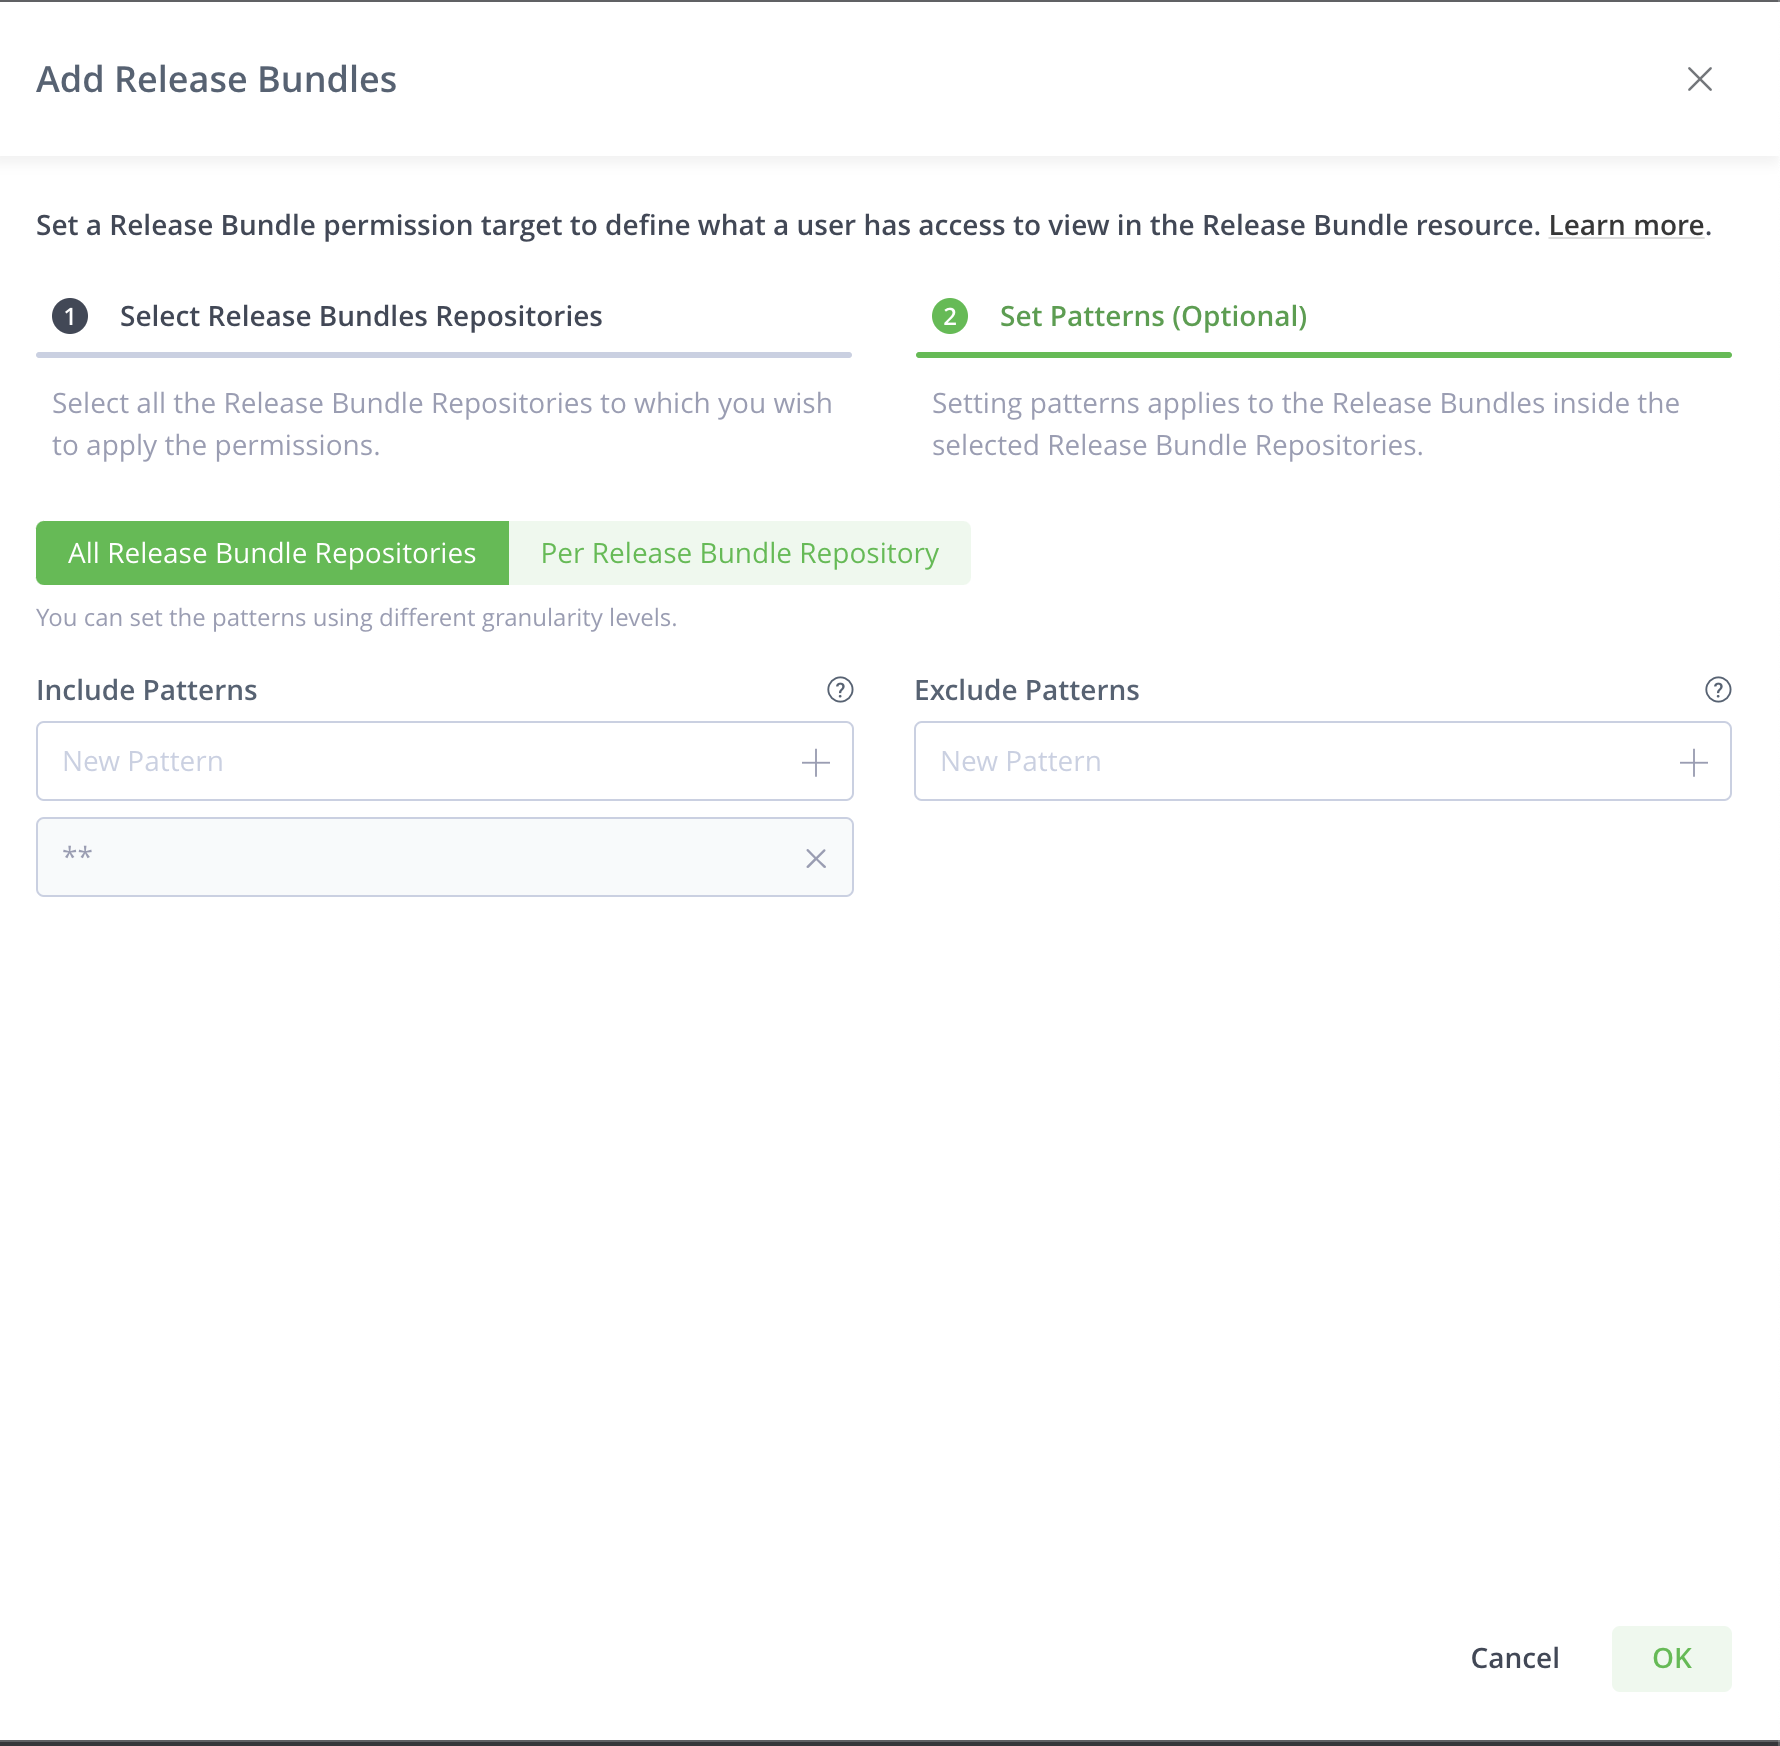
The Patterns tab enables you to include or exclude release bundles in the selected repositories based on wildcard patterns. Ant-style path expressions are supported (, *, ?) like org/apache/**. For more information, see AntPathMatcher Documentation. The include and exclude patterns are limited to 1024 characters.
For example, to add all Release Bundles that start with apache (whether or not they exist in Artifactory), add the following include pattern: apache**/**. Granting the Read and Deploy permission for this Release Bundle pattern, for example, provides users access to all Release Bundles that start with apache and allow them to create Release Bundles containing apache.
When you start adding a pattern, autocompletion occurs based on the release bundles in the repository.
You can add more than one pattern. After you enter a pattern, click + or hit the enter key to add that pattern to the filter.
You can also apply patterns at a more granular level for each repository.
Click Per Release Bundle Repository to apply patterns for each repository.
Add Destinations
Requires an Enterprise+ license.
A destination is a target Artifactory Edge to which you can distribute release bundles. Administrators can assign users and groups permissions to specific destinations and actions such as creating, deleting and distributing Release Bundles. Available only if at least one Release Bundle was created.
What is a JFrog Artifactory Edge node?
JFrog Artifactory Edge (an "Edge node") is an edition of JFrog Artifactory whose available features have been customized to serve the primary purpose of distributing software to a runtime such as a data center, a point-of-sale or even a mobile device. All packages hosted in an Edge node are Release Bundle which is a secure and immutable collection of software packages that make up a release to be provisioned.
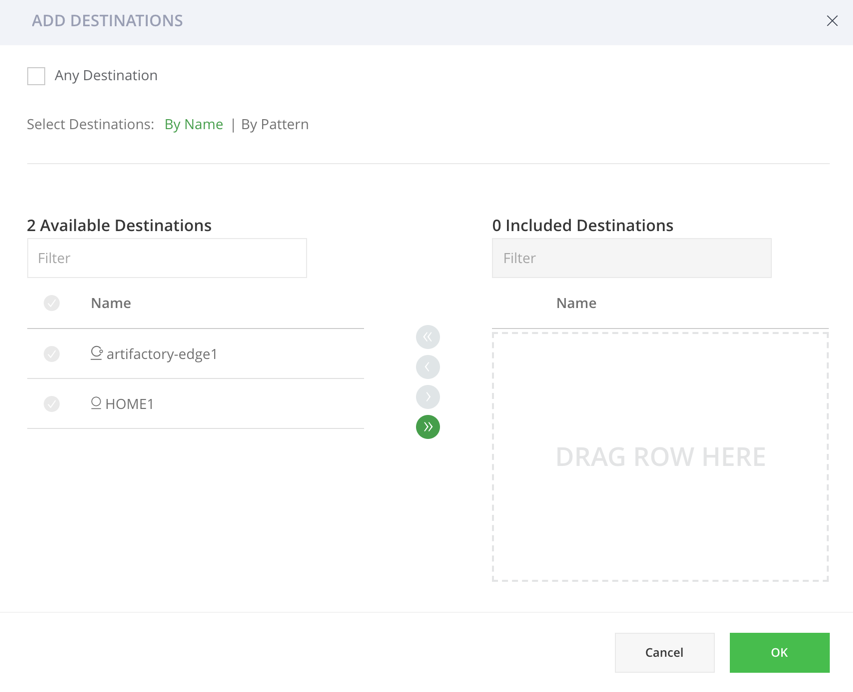
Click Add Destinations to select target Artifactory Edge nodes to which the permission should apply.
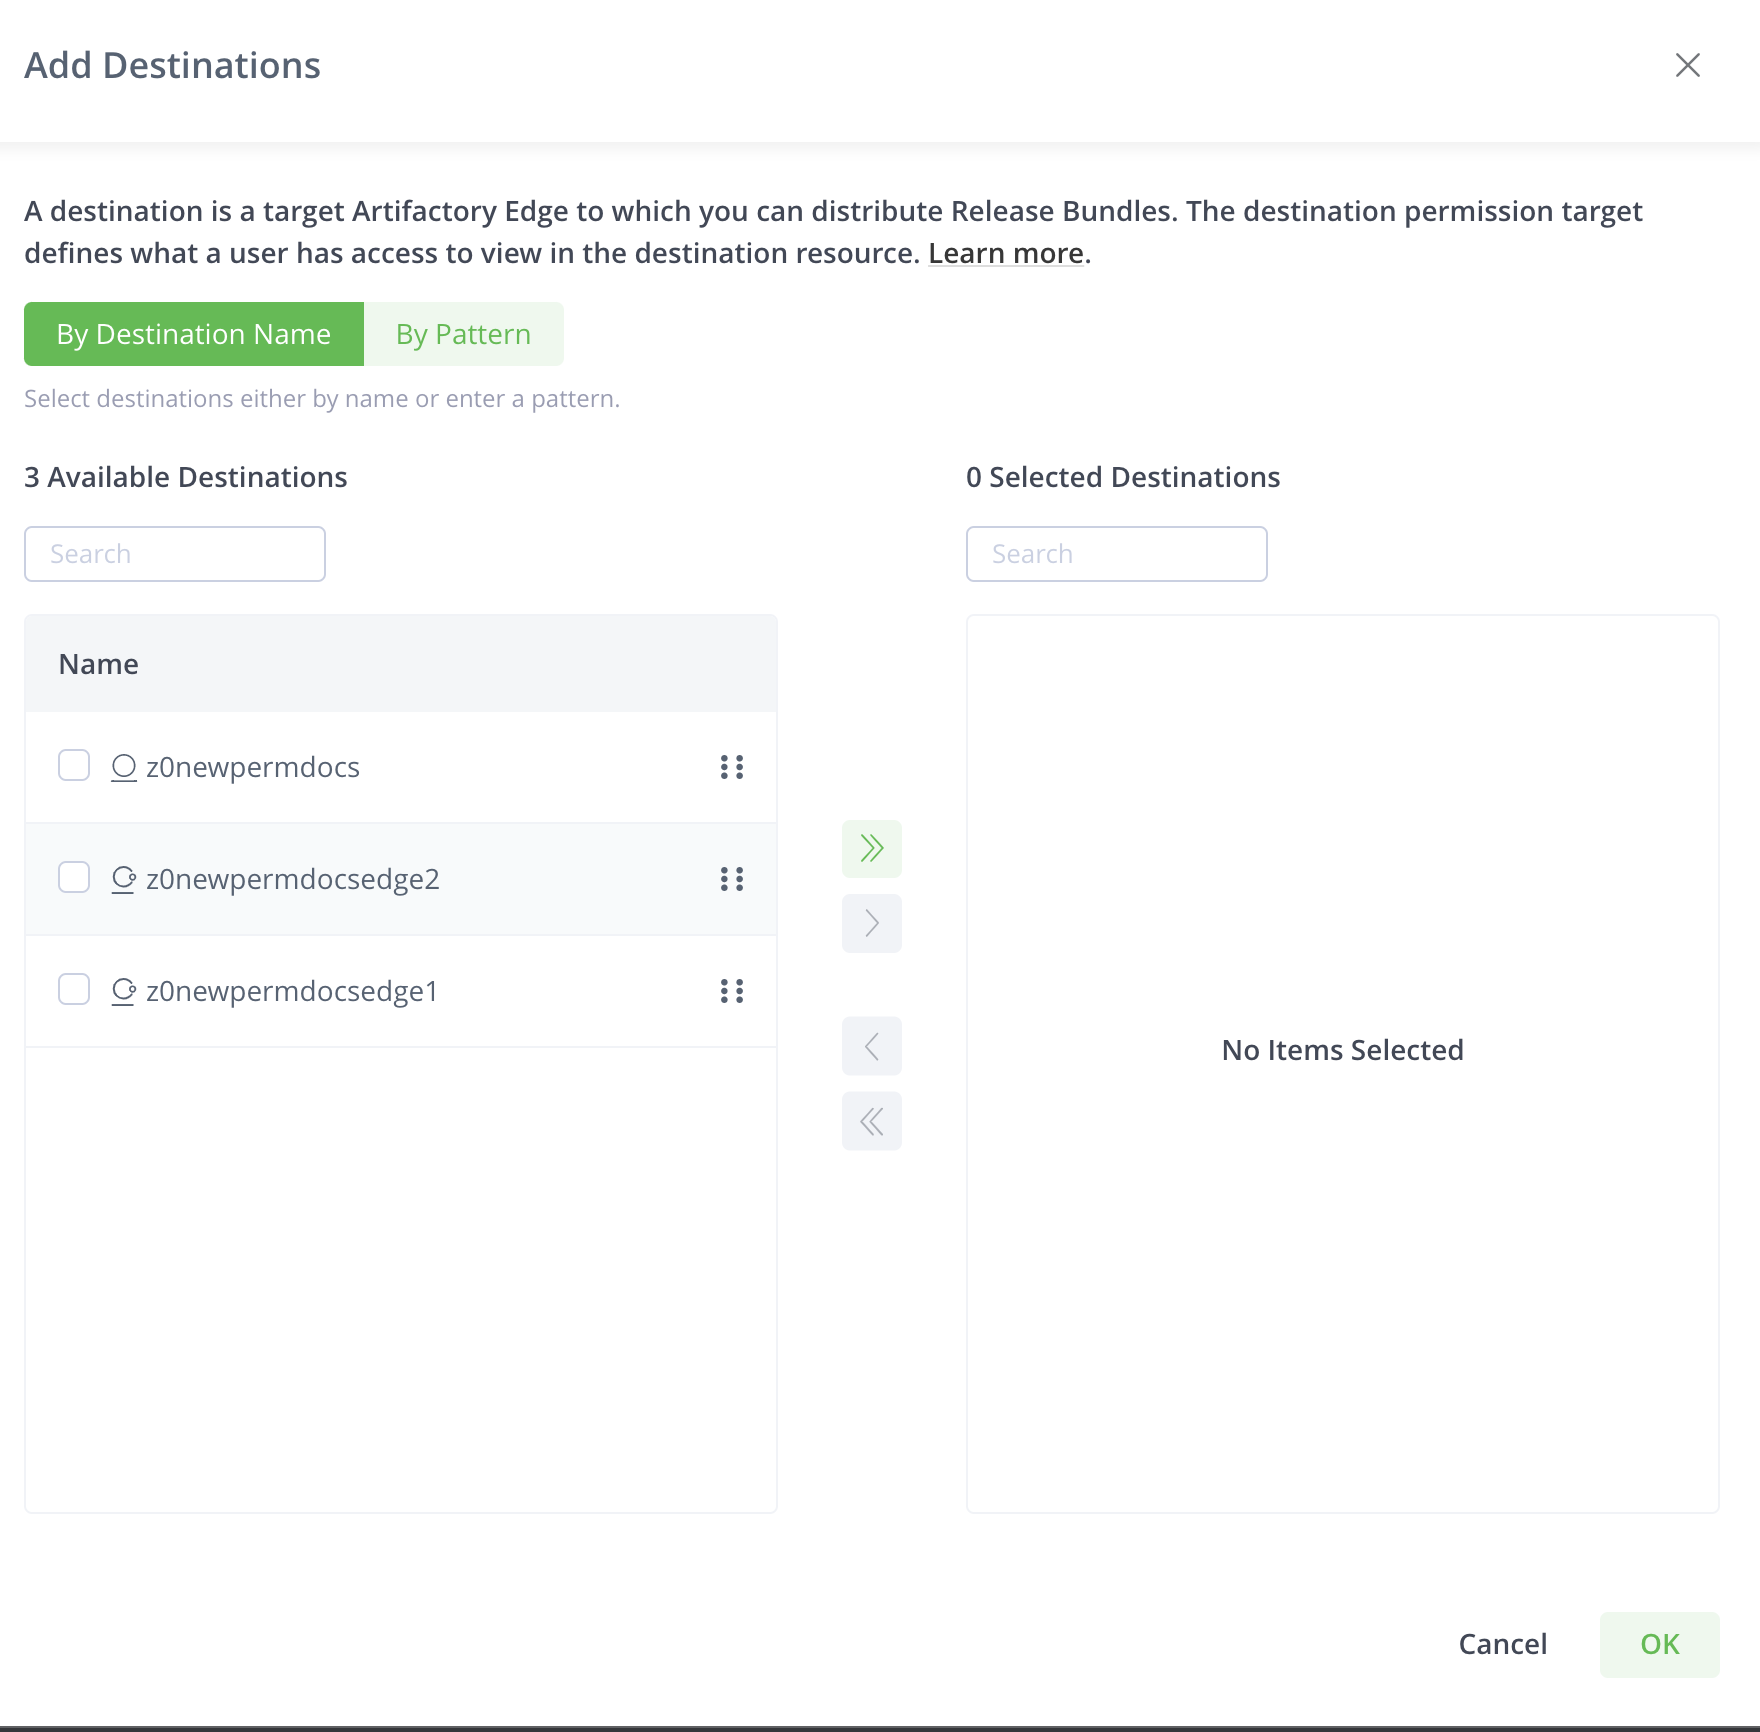
You can select destinations either by name or by setting patterns.
The By Destination Name tab displays all the destinations in the system. You can search for destinations and select according to your requirement.
Click By Patterns to select destinations that fulfill the rules that you set or to select all destinations.
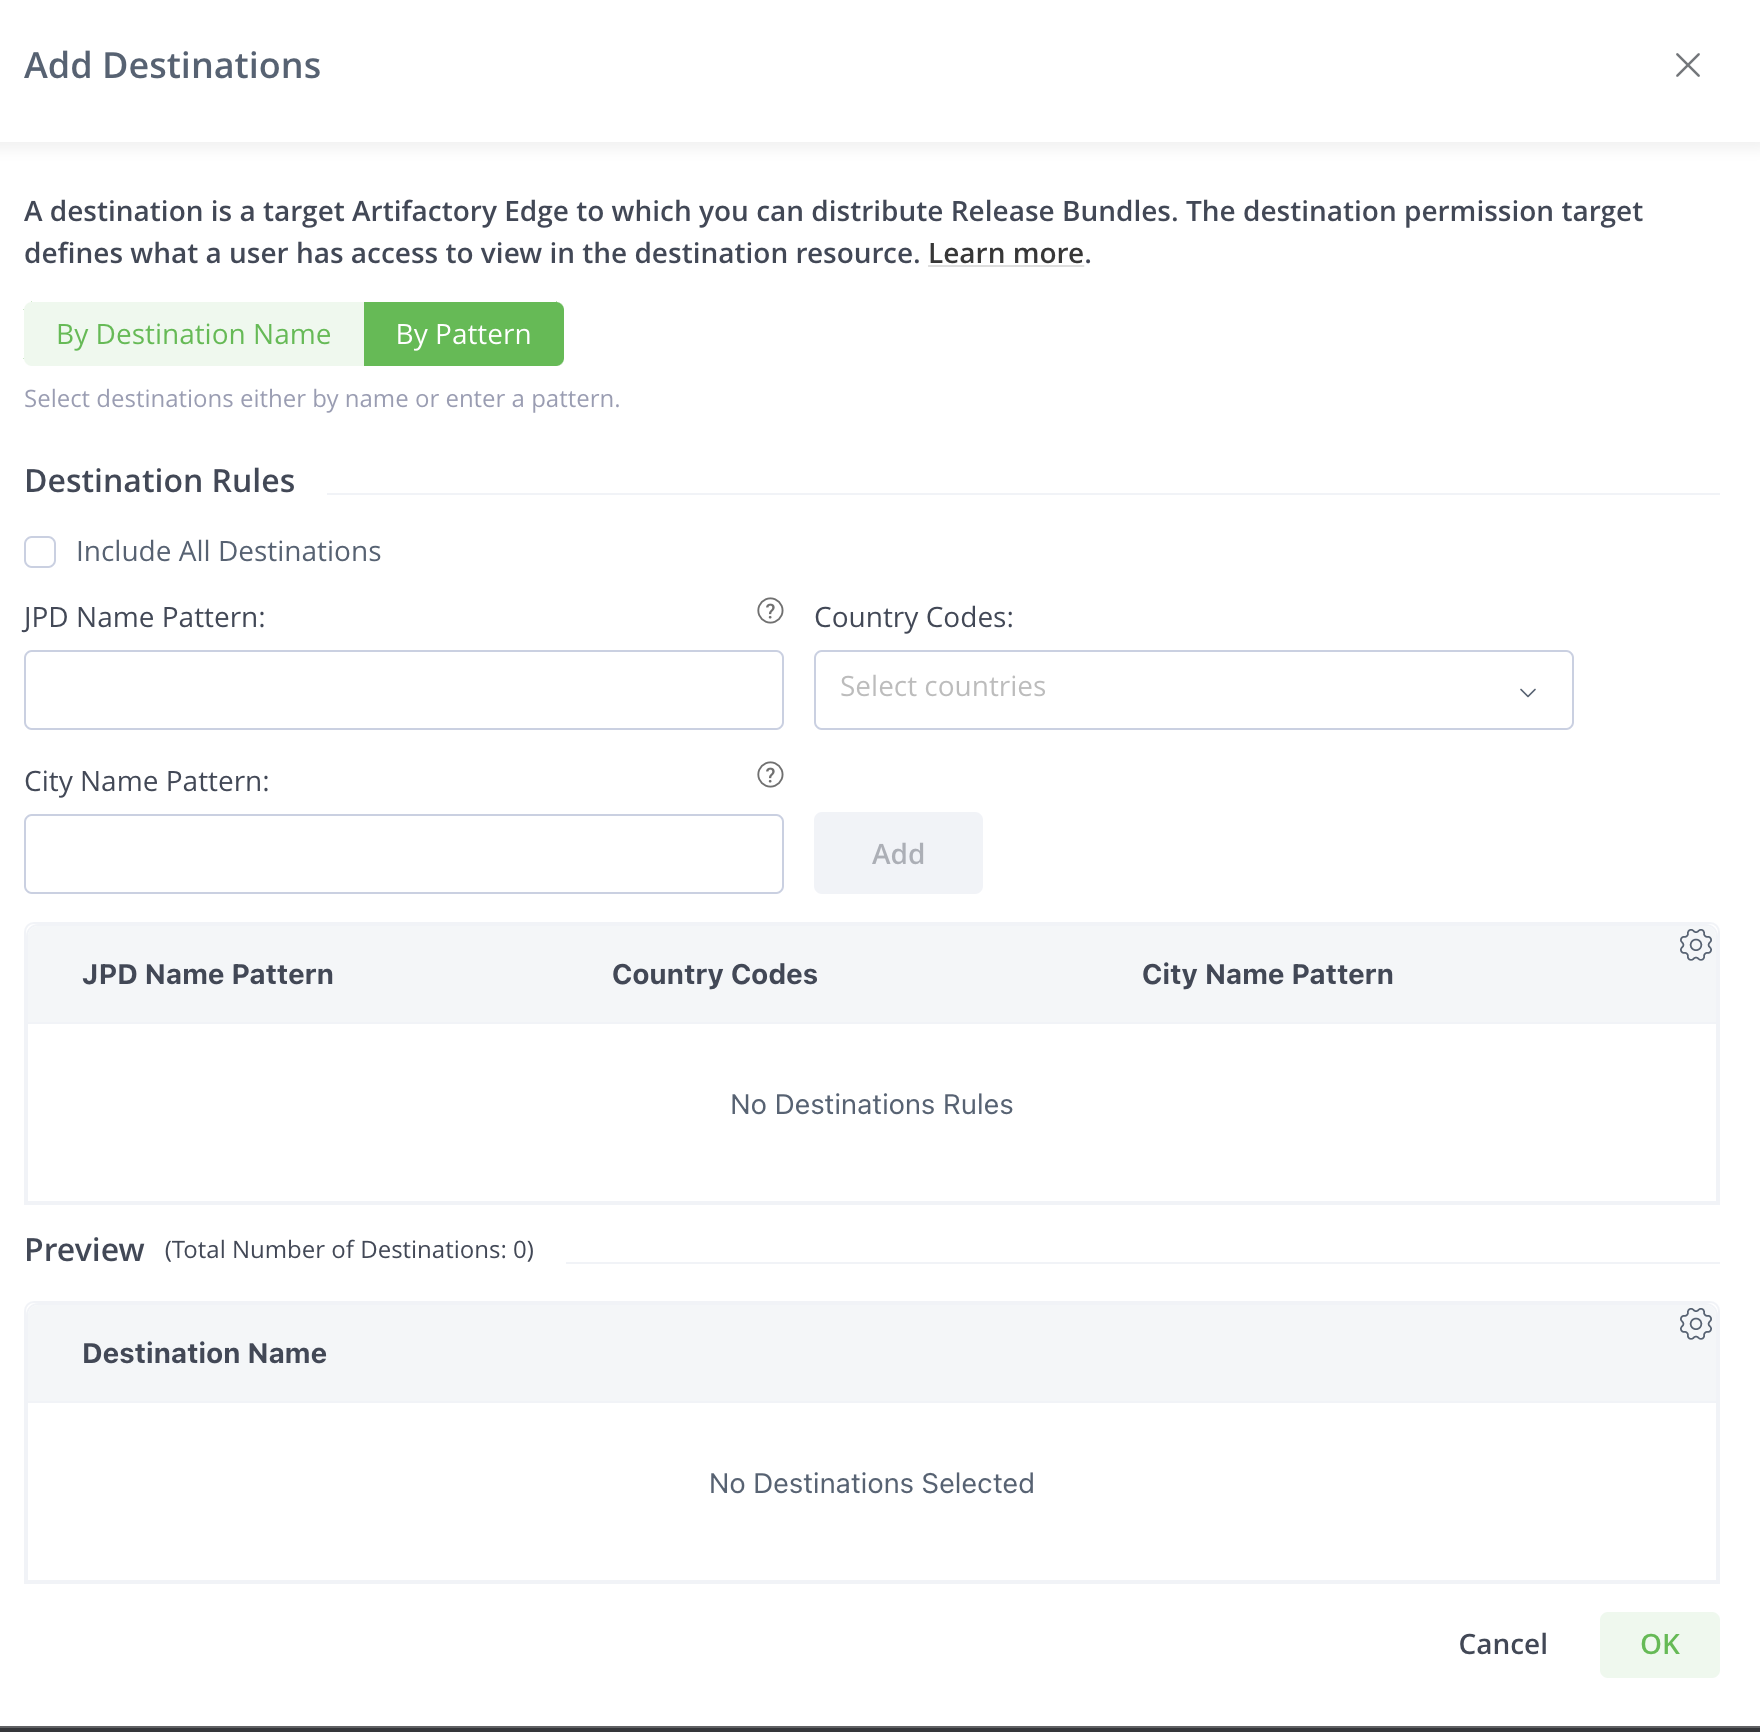
Select Include All Destinations to select all the configured destinations and future destinations to the permission.
You can set patterns to apply the following rules that select destinations.
-
JPD Name Pattern: A JPD is the JFrog Deployment Unit. Enter a pattern based on wildcard patterns. Ant-style path expressions are supported (, *, ?) like
org/apache/**. For more information, see AntPathMatcher Documentation.To select all JPD, use the pattern:
*.For example, providing a user with the Distribute permission to the selected Destinations, allows the user to distribute to Edge nodes that correspond with the pattern. To select all JPD, use the pattern:
*. To distribute to all destinations (Edge nodes) that start with DevCenter1, use the following pattern:DevCenter**. -
Country Codes: Select one or more countries from the available list. All existing and future Destinations that are located in the selected countries in JPD will be part of the Permission Target. To select all country codes, use the pattern :
*. -
City Name Pattern: Enter a pattern based on wildcard patterns. Ant-style path expressions are supported (*, , ?) like "org/apache/". For more information, see AntPathMatcher Documentation. When providing the Distribute permission to the selected Destinations (according to City Name Patterns), you can distribute to Edge nodes that meet the pattern. For example, to distribute to all destinations (Edge nodes) that are located in London, add the following pattern:
London**.To select all cities, use the pattern:
**.
You can add more than one rule for JPD and City Name. After you enter a rule, click Add to add to the filter.
You can use any or all combinations of these fields.
Click Add after you enter JPD name pattern, country code, or city name pattern.
The Preview table lists all destinations that fulfill the rules.
Add Pipeline Sources
Requires an Enterprise+ license.
A pipeline source is a Git repository containing pipeline definition files. Administrators can assign users and group permissions to specific pipeline sources. For more, see Managing Pipeline Sources.
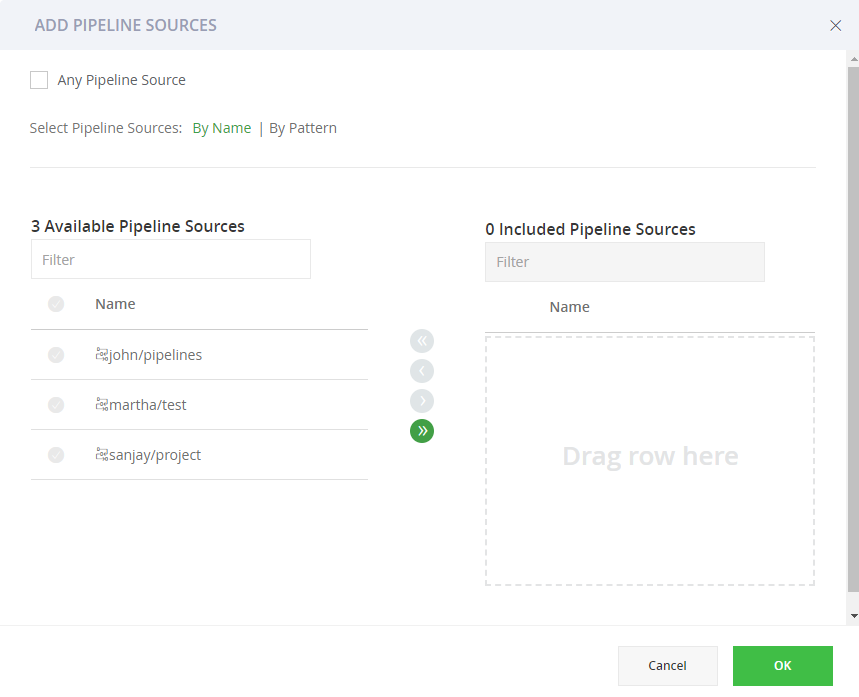
Click Add Pipeline Sources and select the pipeline sources to which the permission should apply.
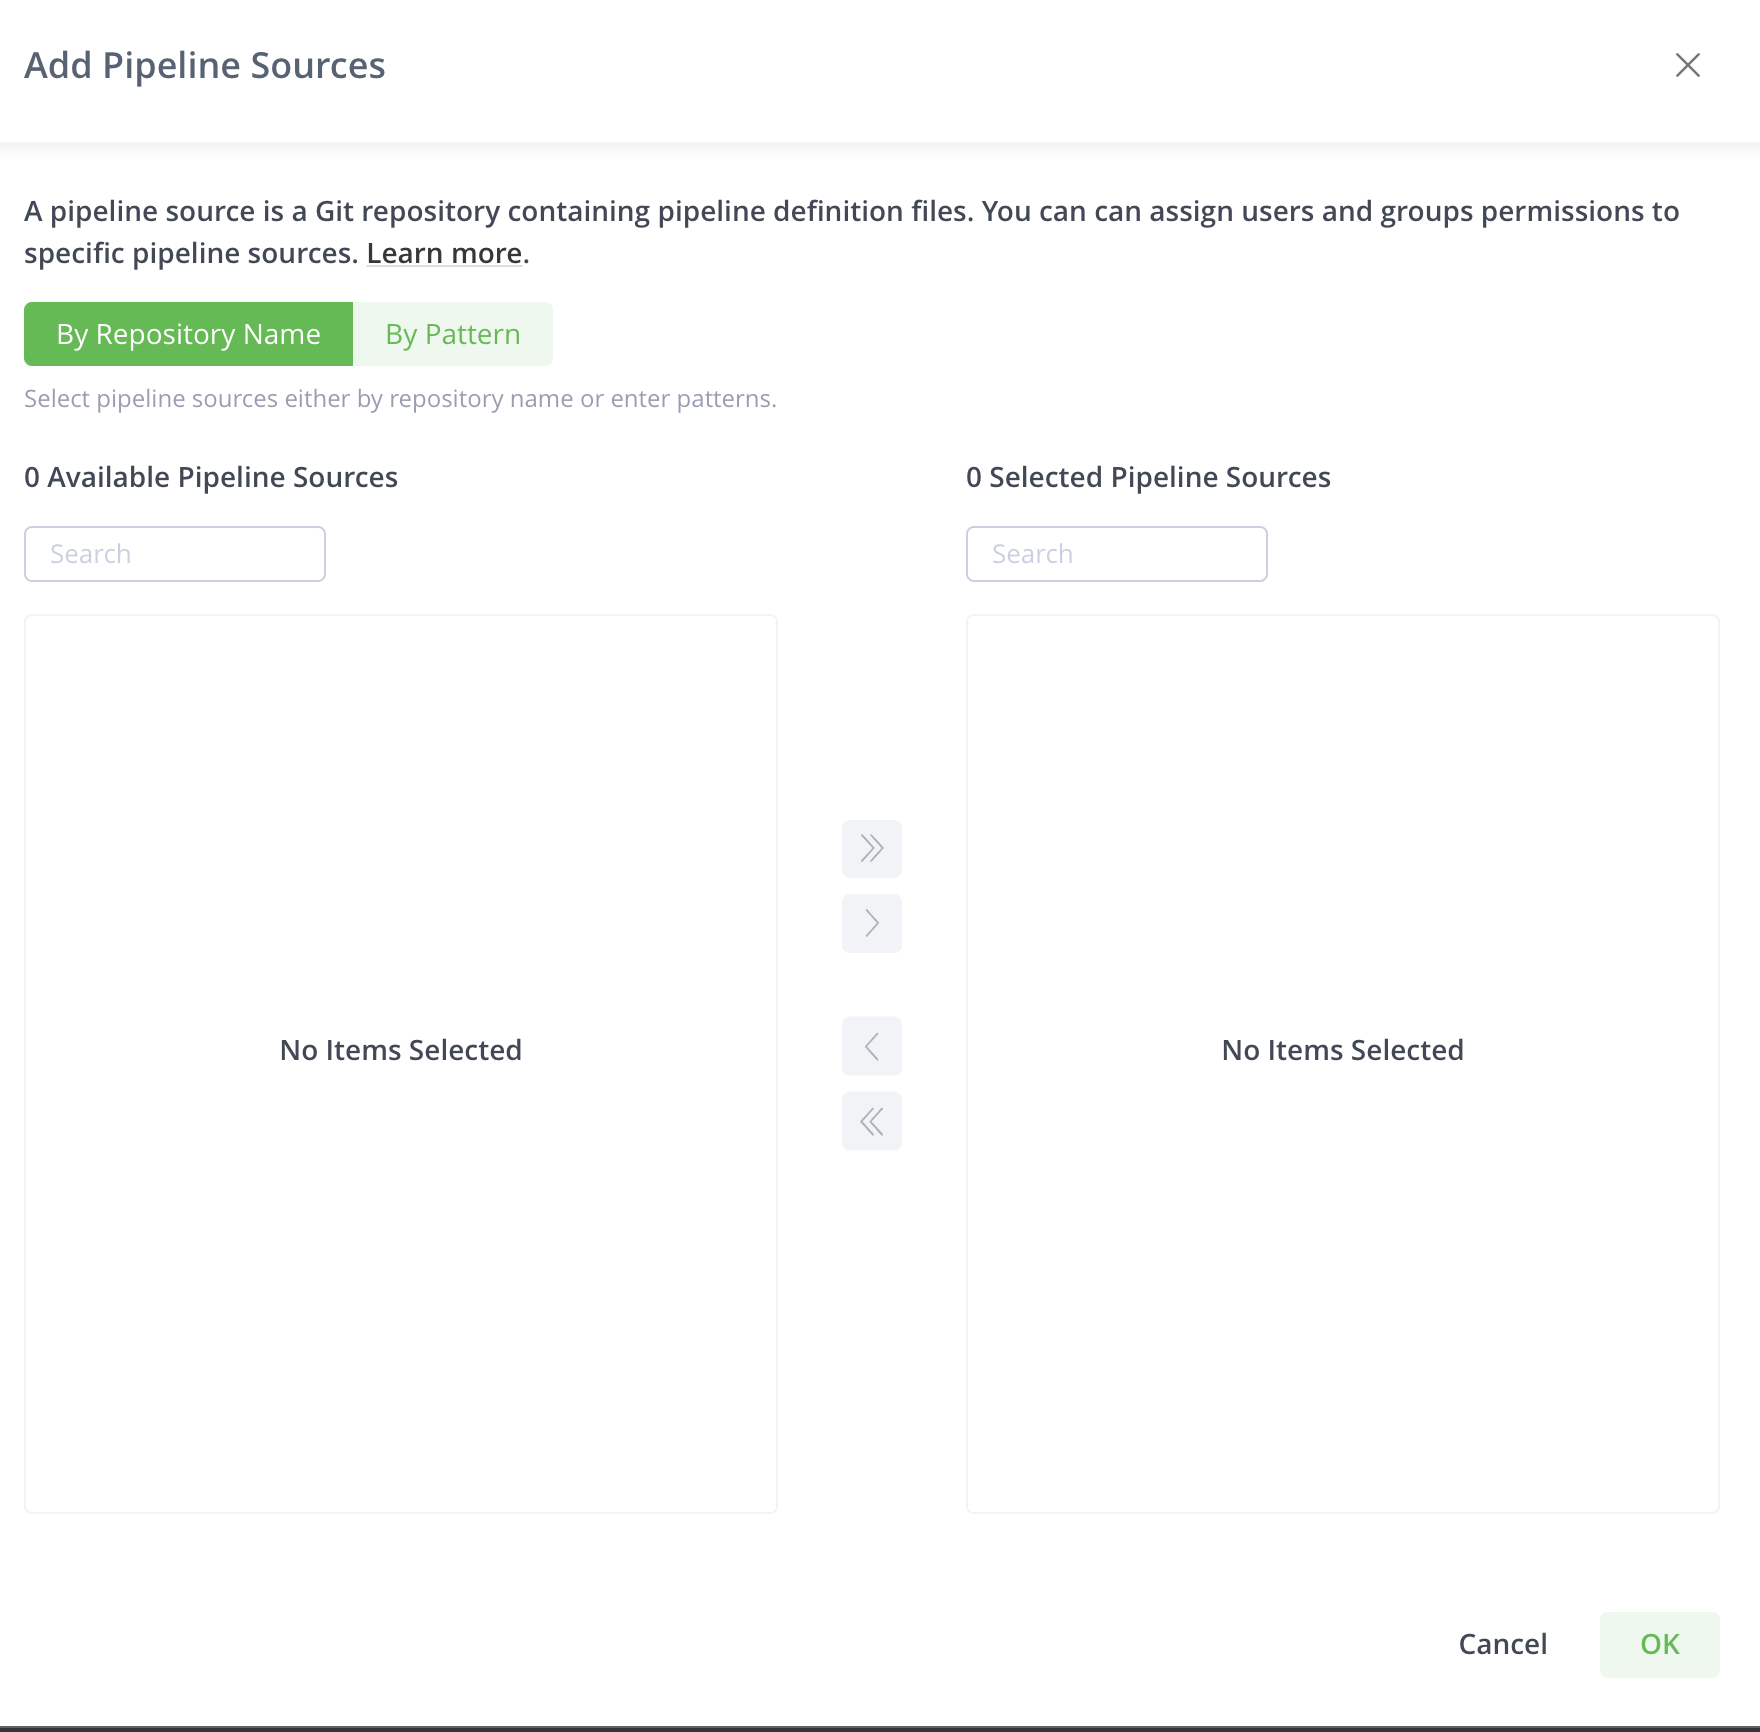
You can select the pipeline sources by name or by pattern.
The By Repository Name tab displays all pipeline sources configured in the system. You can search and select according to your requirements.
You can select the pipelines from the list or search for the pipeline sources that you wish to select.
Click By Pattern to select pipeline sources according to a pattern or select all pipeline sources.
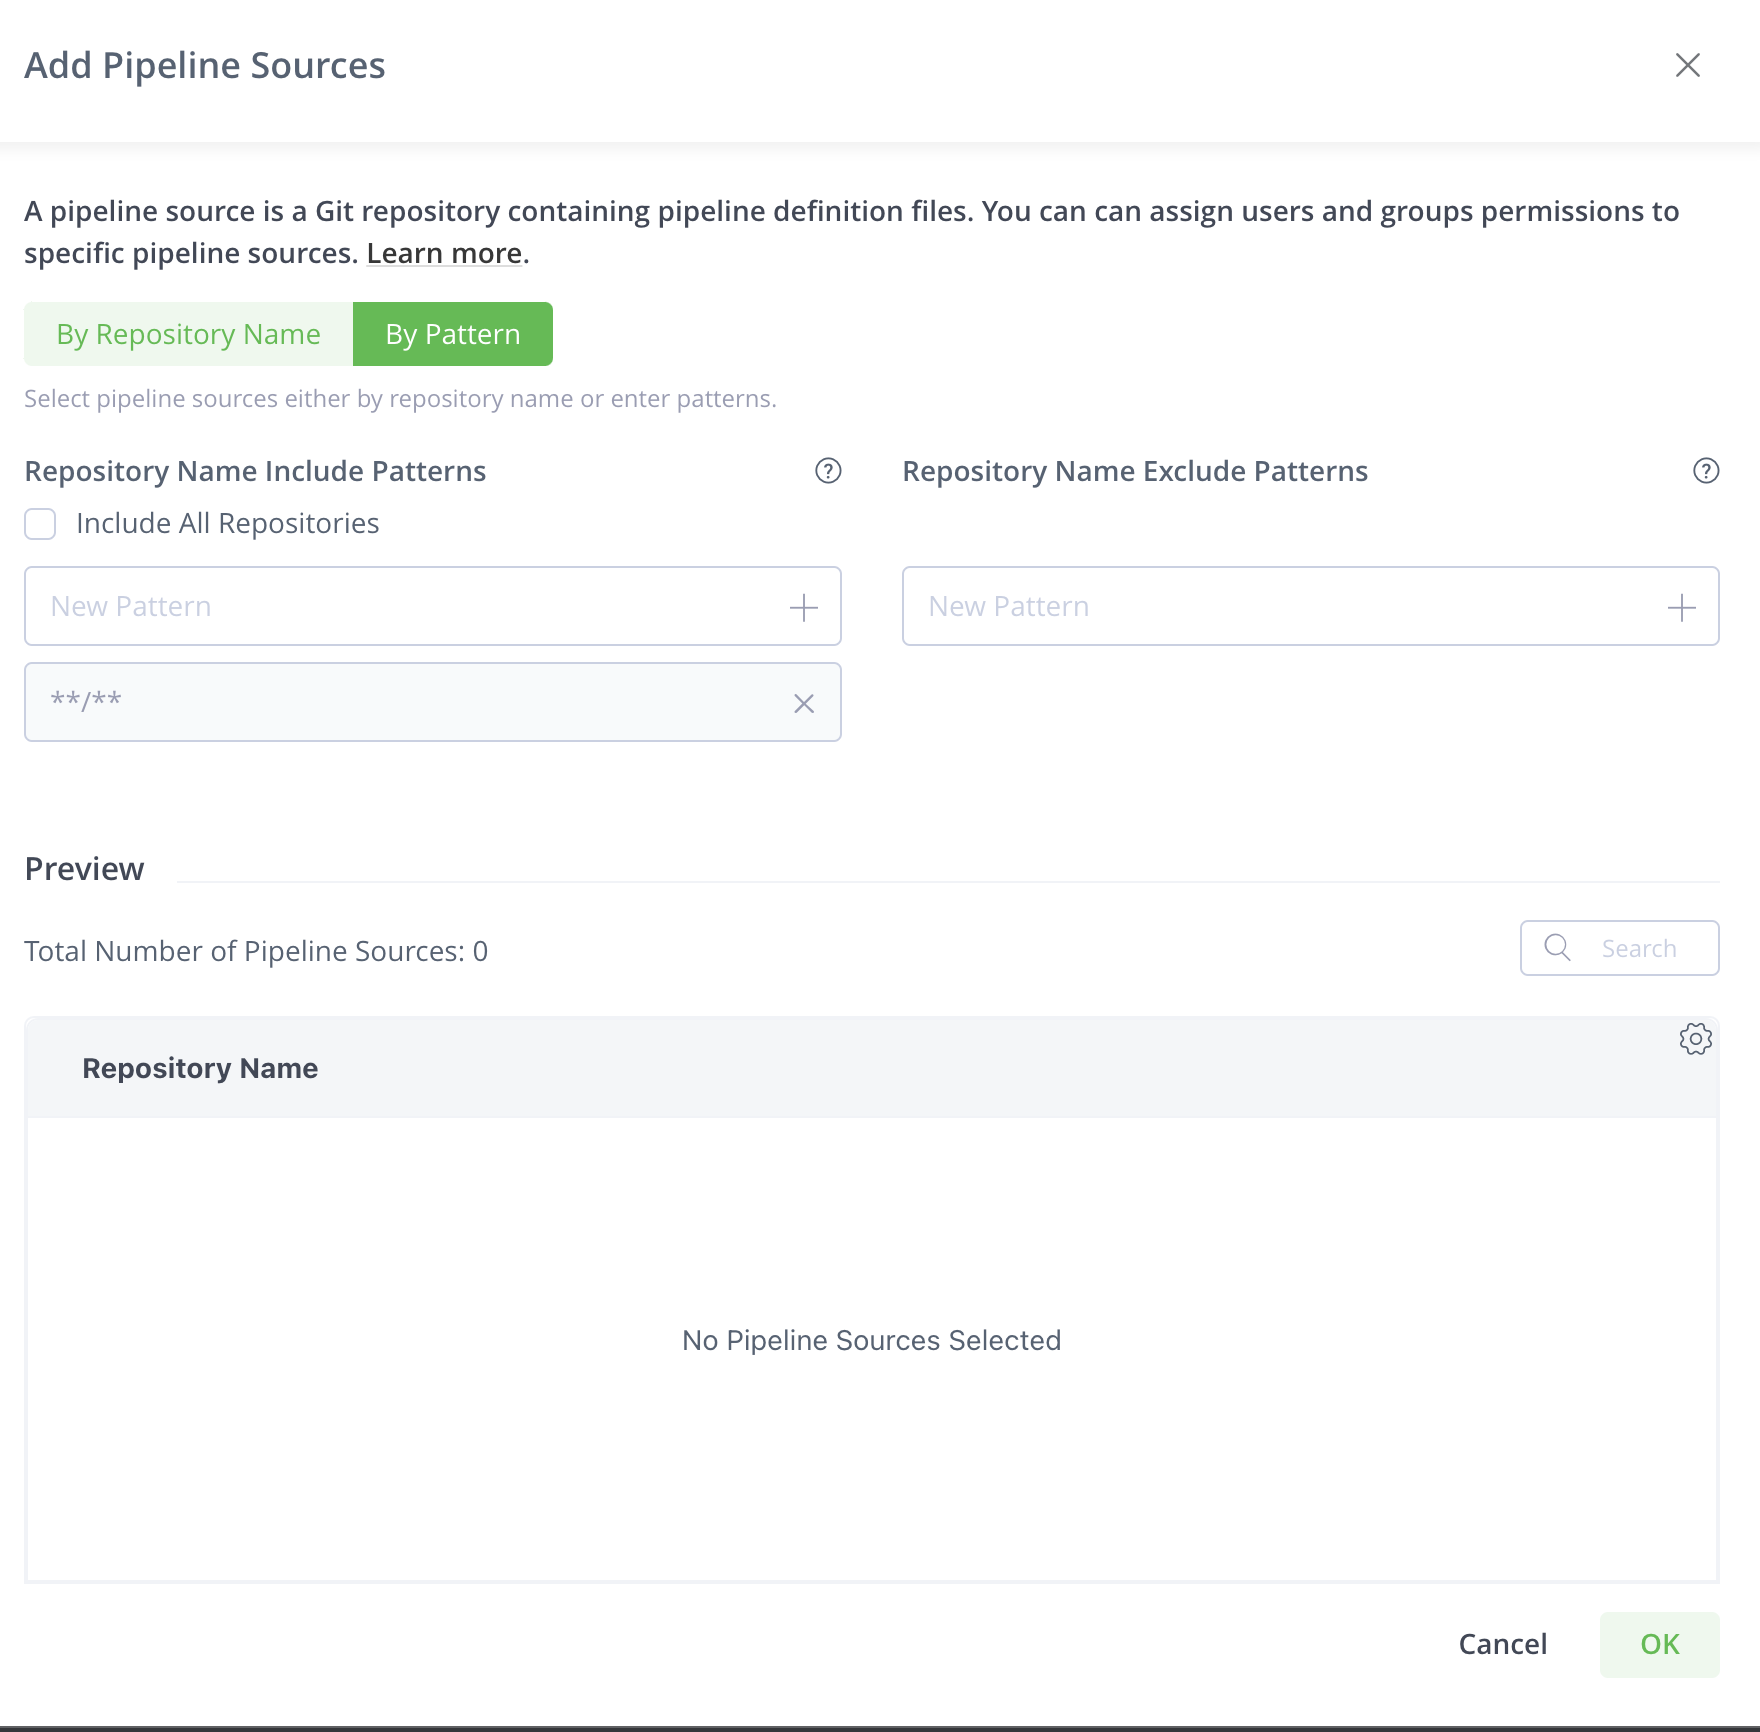
Select Include All Repositories to include all pipeline sources in the permission. You can use the exclude patterns to exclude certain pipeline sources from all the pipeline sources.
The Patterns tab enables you to include or exclude pipeline sources based on wildcard patterns. Ant-style path expressions are supported (, *, ?). For more information, see AntPathMatcher Documentation. For example, to include (or exclude) all pipeline sources that start with paulg , use the following include pattern: paulg**/**.
You can add more than one pattern. After you enter a pattern, click + or hit the enter key to add that pattern to the filter.
The Preview table lists all pipeline sources that fulfill the patterns.
Instead of setting patterns, you can also select Include All Repositories to select all pipeline sources in the system.
Select Users and Assign Permission Actions
-
Click the Users tab to configure the users assigned to the permission target.
-
Click
 to attach users to the permission action.
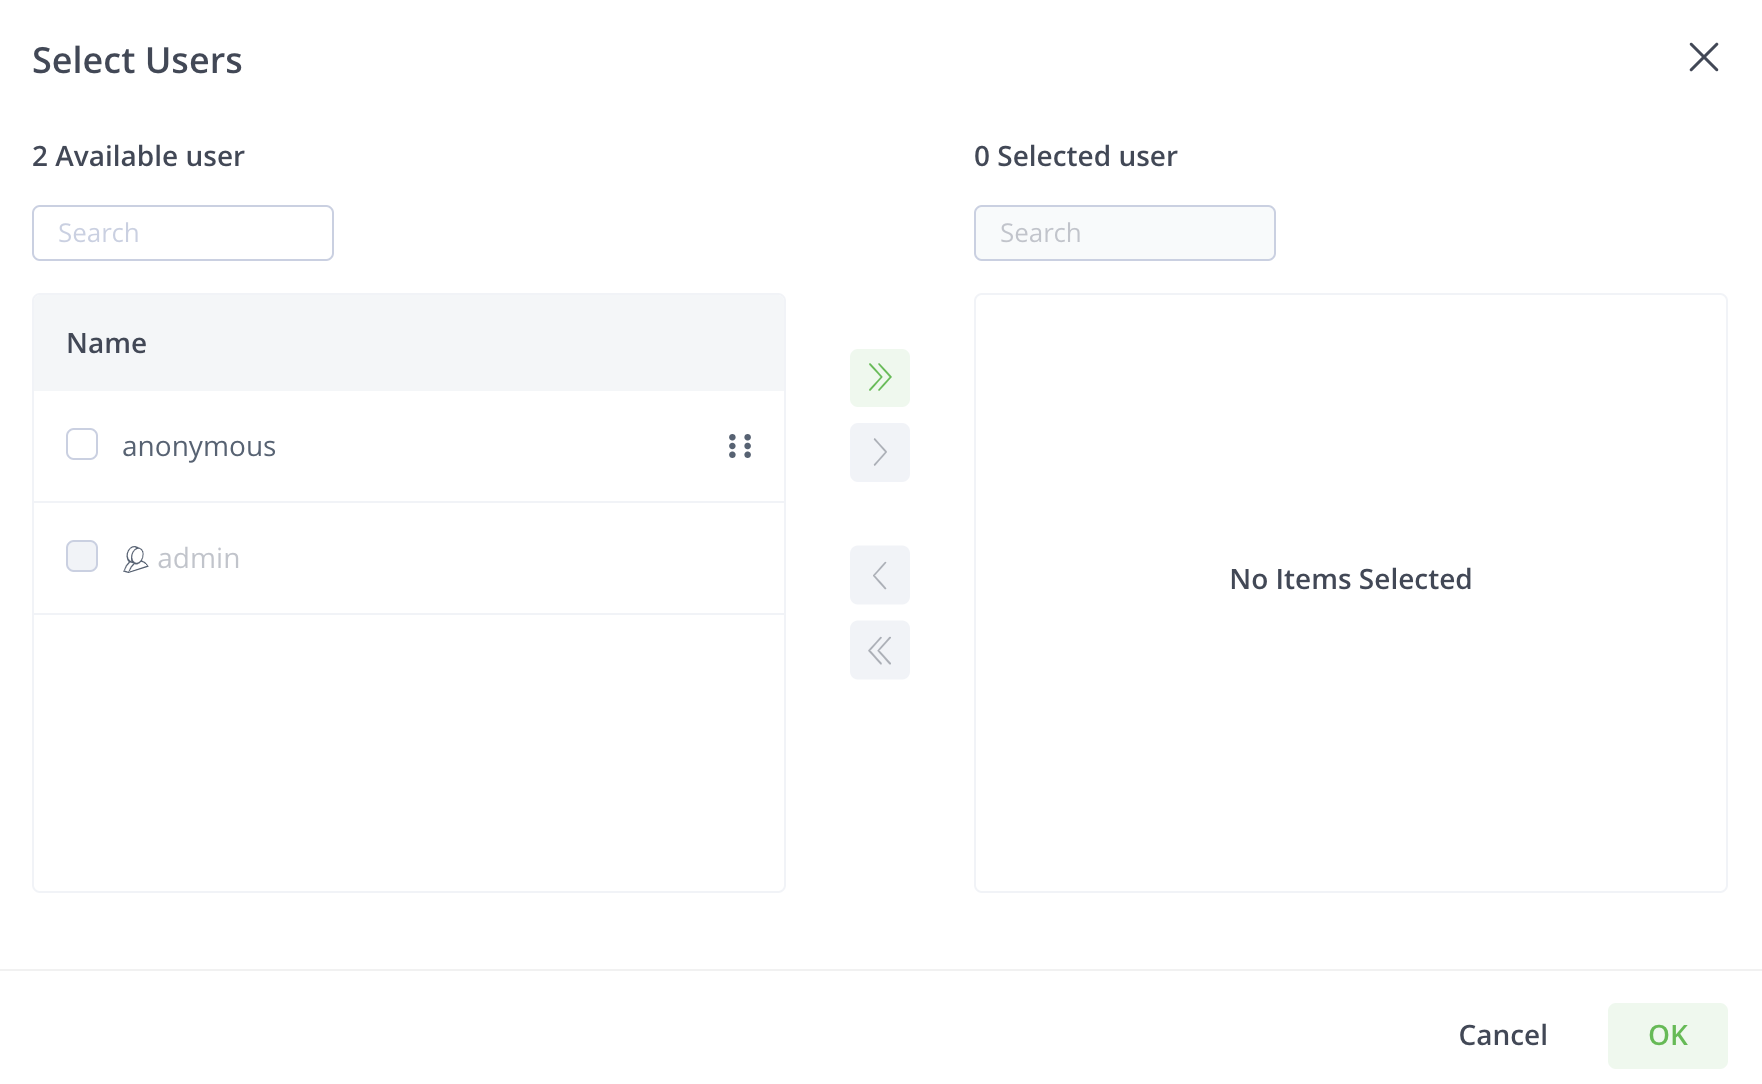
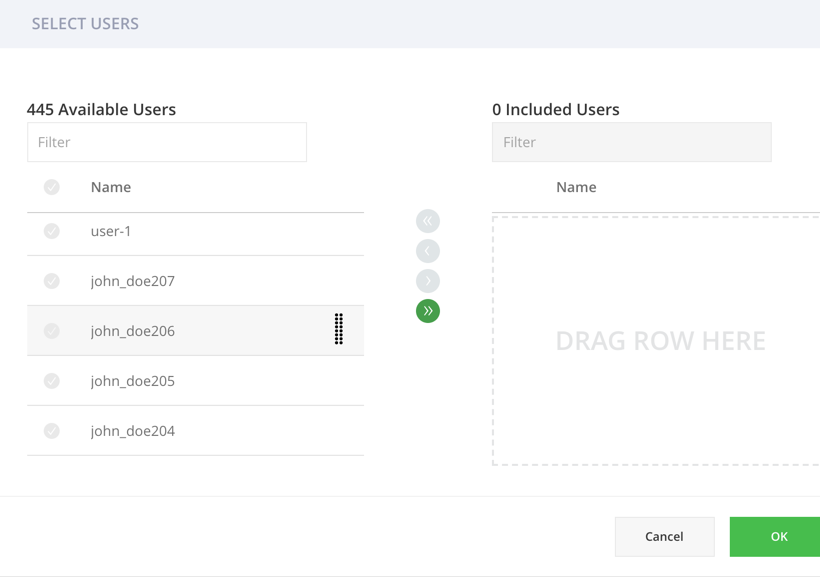
The Select Users dialog box appears.
-
Select the users you want to add to the permission action.
You can use the onscreen arrow buttons or drag and drop the users.
-
Click OK to add the users to the permission action.
You can select permission actions only after you add users.
-
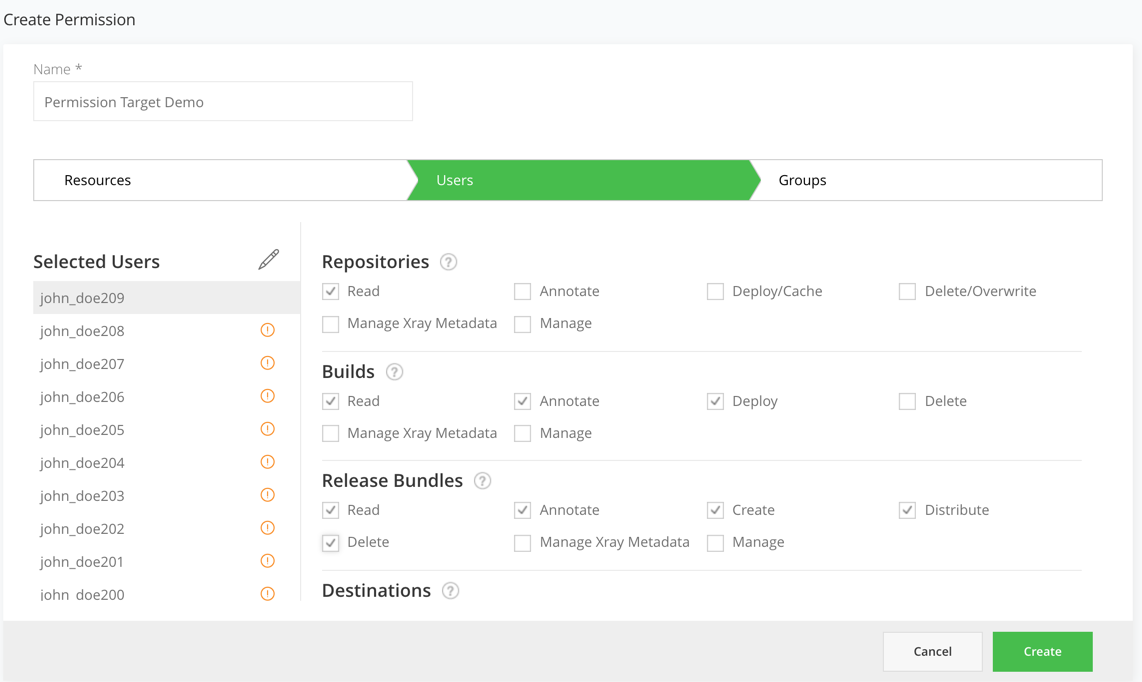
Select the permission actions that you want to assign to the user.
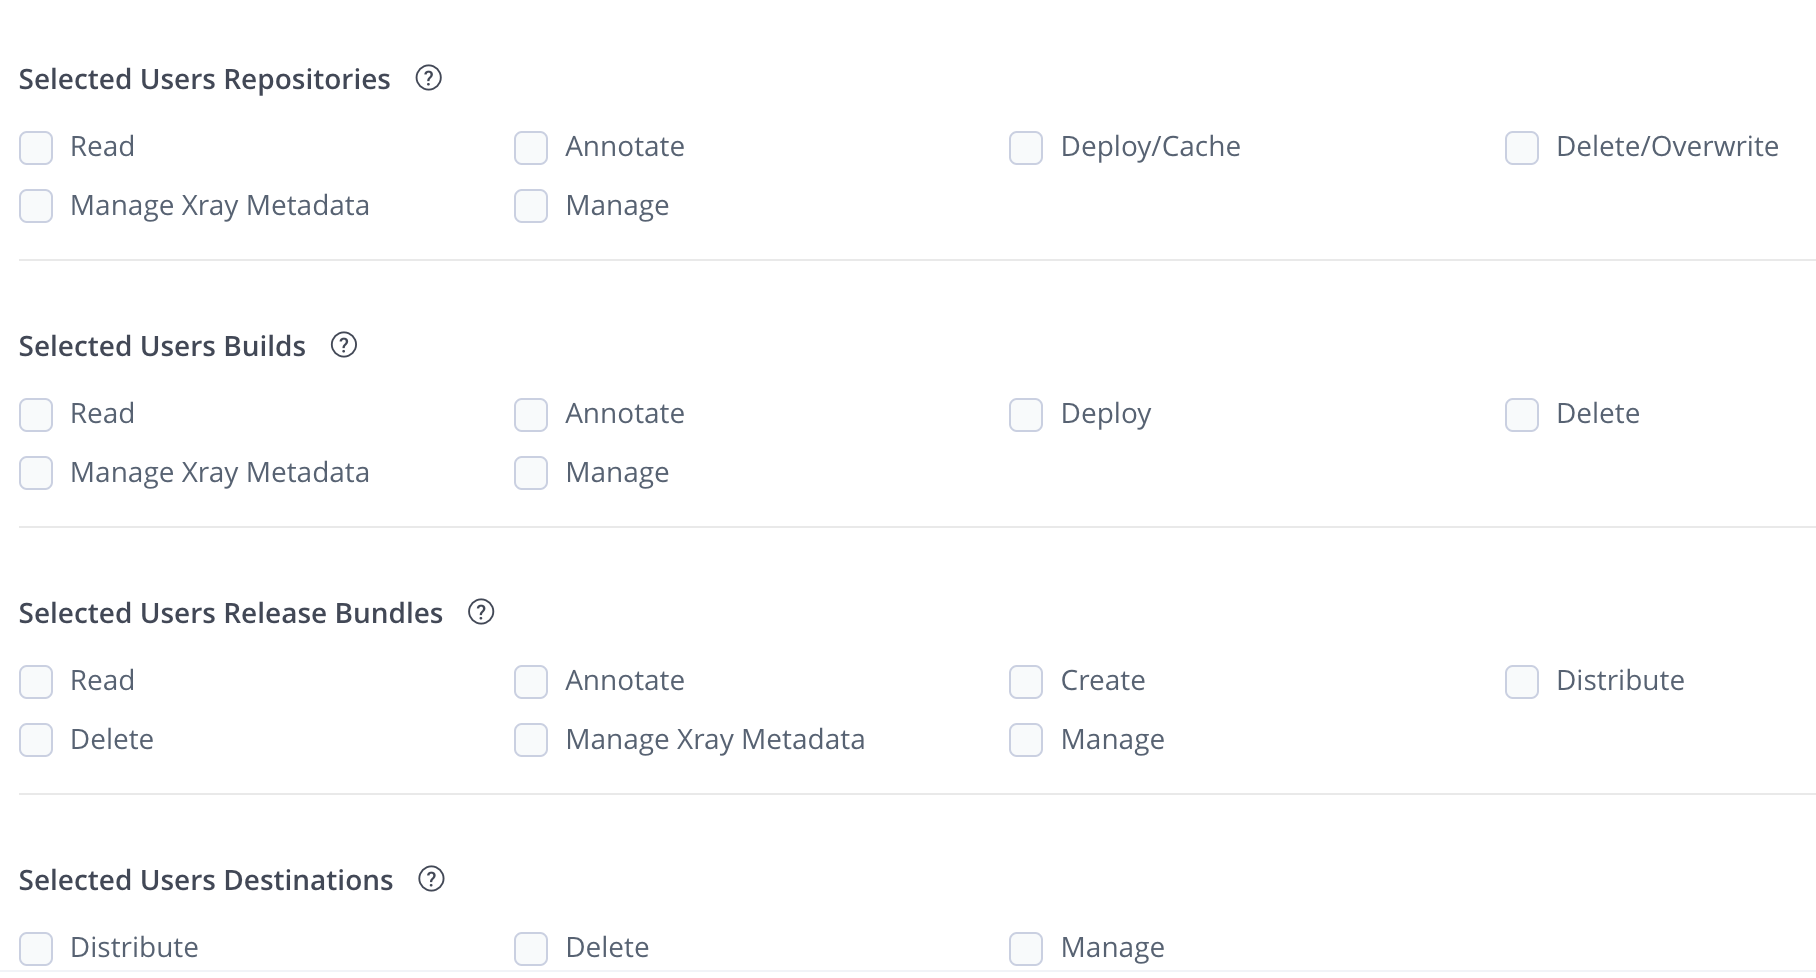
Each resource has a set of dedicated permission actions. You can select the permission actions granted to a user or a group based on each of the resource types. Since an admin is privileged and has all permission actions, you cannot add a user with admin privileges to a Permission Target.
Select Groups and Assign Permission Actions
-
Click the Groups tab to configure the users assigned to the permission target.
-
Click
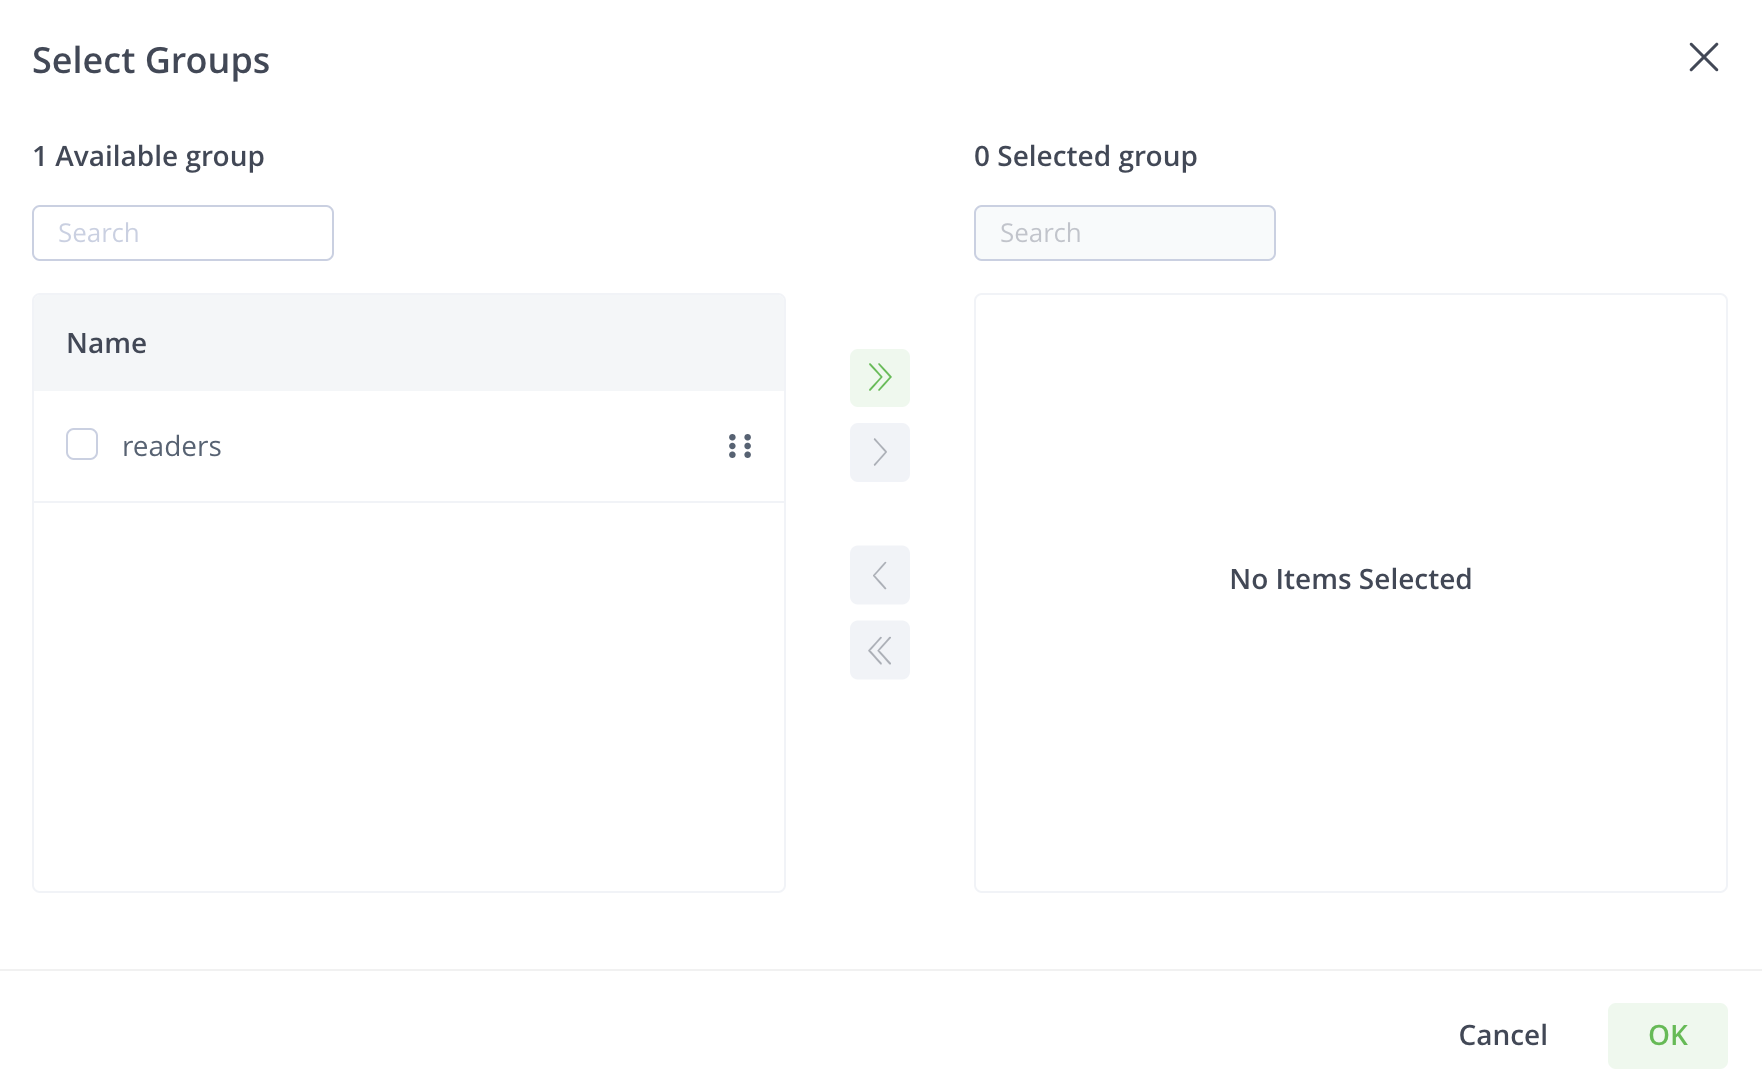
to attach users to the permission.The Select Groups dialog box appears.
-
Select the groups you want to add to the permission.
You can use the onscreen arrow buttons or drag and drop the groups.
-
Click OK to add the users to the permission.
You can select permissions only after you add users.
-
Select the permissions that you want to assign to the group.
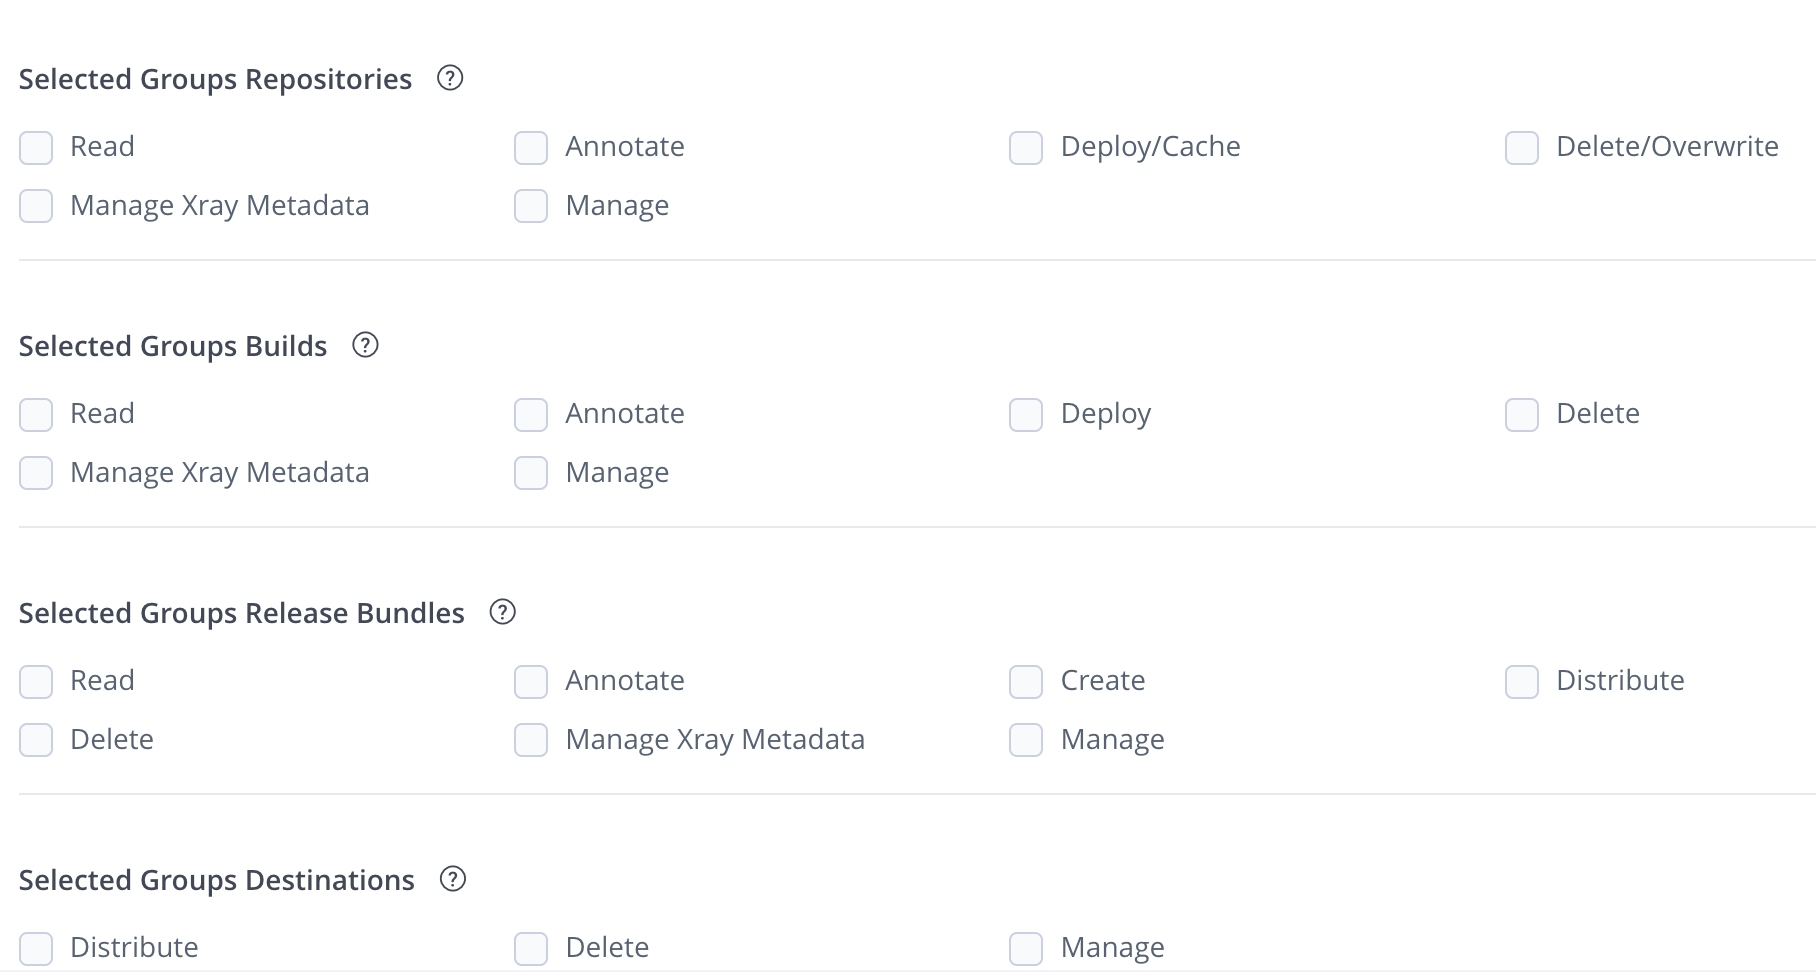
Each resource has a set of dedicated permission actions. You can select the permission actions granted to a group based on each resource type.
Permission Details
Expand the following sections to view the details of permission types.
Repository Permissions
| Permission | Description |
|---|---|
| Read | Download artifacts and read the metadata. For remote repositories, the Read permission only allows downloading from the remote cache (i.e. artifacts that were already downloaded from the upstream and exist in Artifactory’s remote cache). This permission will not allow downloading new artifacts that do not exist in the Artifactory remote cache. For this, you will need to grant the Deploy/Cache permission. For more information on remote repositories, see Basic Settings for Remote Repositories |
| Annotate | Annotate artifacts and folders with metadata and properties. |
| Deploy/ Cache | Deploy artifacts & deploys to remote repository caches. In remote repositories, the Deploy/ Cache Permission allows caching artifacts from the upstream (for example, Docker Hub, npmjs.com) to the remote repository cache in Artifactory. For more information on remote repositories, see Basic Settings for Remote Repositories |
| Delete/ Overwrite | Delete or overwrites artifacts. You can prevent a user or group from overwriting a deployed release or unique snapshot by not granting the Delete permission. Non-unique Maven snapshots can always be overwritten (provided the Deploy permission is granted). |
| Manage Xray Metadata | Trigger Xray scans on previously scanned artifacts in repositories. Users can create and delete custom issues and licenses. Xray scanning requires Artifactory Pro X, Enterprise with Xray, or an Enterprise+ license. |
| Manage | Allows changing the permission settings for other users on this permission target. Note that it does not permit adding/removing resources to the permission target. Perform admin-related tasks in the Artifact browser such as managing 'Followers' or restoring artifacts from the trash can. By assigning the Manage permission to a user, you may designate them as the Permission Target Manager. These users may assign and modify permissions granted to other users and groups for this Permission Target. Users with the manage permission cannot grant or revoke the manage action. If a manage user has read, write and manage, then that user can only give read and write to other users/groups. Note: The user who is currently logged into the JFrog Platform can only make changes to the permissions of other users and groups. The option to edit their own permissions is disabled in the UI not for security reasons, but to protect users from taking irrevocable actions that may inadvertently lock them out of the system. |
Build Permissions
| Permission | Description |
|---|---|
| Read | View and download build info artifacts from the artifactory-build-info default repository and reads the corresponding build in the Builds page. |
| Annotate | Annotate build-info artifacts and folders with metadata and properties. |
| Deploy | Allows uploading and promoting build info artifacts |
| Delete | Delete build-info artifacts |
| Manage Xray Metadata | Trigger Xray scans on builds. Create and delete custom issues and licenses. Manage Watch is a Role Manage Xray Data is a role and is set on the User or Group level. Xray scanning requires Artifactory Pro X, Enterprise with Xray, or an Enterprise+ license. |
| Manage | Allows changing build-info permission settings for other users in this permission target. It does not permit adding/removing resources to the permission target. By assigning the Manage permission to a user, you may designate them as the Permission Target Manager. These users may assign and modify permissions granted to other users and groups for this Permission Target. |
Release Bundle Permissions
| Permission | Description |
|---|---|
| Read | View and download Release Bundle artifacts from the relevant Release Bundle repository and read the corresponding Release Bundles on the Distribution page on the JFrog Platform. Note: You need read access in every JPD where you want to view Release Bundles, not only the Source instance. |
| Annotate | Annotate Release Bundle artifacts and folder with metadata and properties |
| Create | Create Release Bundles |
| Delete | Delete Release Bundles |
| Distribute | Distribute Release Bundles |
| Manage Xray Data | Trigger Xray scans on Release Bundles. Create and delete custom issues and licenses. Manage Watch is a Role Manage Xray Data is a role and is set on the User or Group level. |
| Manage | Allows changing Release Bundle permission settings for other users in this permission target. It does not permit adding/removing resources to the permission target. By assigning the Manage permission to a user, you may designate them as the Permission Target Manager. These users may assign and modify permissions granted to other users and groups for this Permission Target. |
Destination Permissions
| Permission | Description |
|---|---|
| Distribute | Requires an Enterprise+ license. Distribute Release Bundles according to their destination permissions |
| Delete | Delete Release Bundles from the selected destinations |
| Manage | Add and delete users who can distribute release bundles on assigned destinations By assigning the Manage permission to a user, you may designate them as the Permission Target Manager. These users may assign and modify permissions granted to other users and groups for this Permission Target. |
Pipeline Permissions
| Permission | Description |
|---|---|
| Read | View the available pipeline sources |
| Trigger | Manually trigger execution of steps |
| Manage | Create and edit pipeline sources |
JFrog Platform Permission Migration
JFrog Access is the service that manages all aspects of authentication and authorization for all JFrog services under the hood. It stores all users, groups, permissions, and Access tokens generated by any connected JFrog service.
As part of the upgrade to the JFrog Platform, several changes were made to the permissions handled by Access. This document provides a detailed explanation of the permission migrations for the JFrog products in the JFrog Platform.
JFrog Artifactory Migration
Permissions for Artifactory in Access did not change in the move from 6.x to 7.x.
JFrog Xray Migration
The following permissions changed in Xray.
| Previous Permission | New Permission |
|---|---|
| “Admins” | “old-xray-admins”. |
| “Global” | The new permissions are created for each resource type (repo, build) on any resource. |
| “Resources” |
|
The following Xray actions changed.
| Old Action | New Action | Description |
|---|---|---|
| View_watch_issues | read | Read performs the following actions:
|
| View_component | read | See above |
| manage_component | mxm (manage_xray_metadata) | Permission to trigger Xray scans on artifacts in repositories, creates and delete custom issues and license |
| manage_policies | policy_manager role (user/group custom data) | Permission to create , edit and view Policies |
| manage_watch_issues | removed | |
| view_reports | removed | The Xray 2.0 Reports functionality was deprecated in 3.0. The Xray 3.0 Reports, which are a new functionality, require new permissions. |
| admin | policy_manager role + mxm + read | Permission to create , edit and view Policies, triggers Xray scans + perform the read actions above |
The following resource types changed in Distribution.
| Old Resource Type | New Resource Type |
|---|---|
| RELEASE_BUNDLES | release_bundle |
| DISTRIBUTION_SITES | destination |
The following Distribution actions changed.
| Old Action | Action Description | New Action |
|---|---|---|
| a | admin | "r", "w", "x", "d" |
| w | write/create/edit | “r”, “w” |
| d | delete | “r”, “d” |
| x | distribute | “r”, “x” |
| r | read | “r” |
JFrog Mission Control Migration
All permissions have been deleted.
Migration Conflicts
In cases of conflicts in the display name, an index (1,2...) will be added to the display name.
Legacy Permissions
Important
This section provides information about the legacy permissions model (Permissions V1) screen. For the new permissions model (Permissions V2), see Permissions
The JFrog Platform provides a flexible permissions model that gives administrators fine-grained control over how users and groups access the different resources- repositories, builds, Release Bundles, Edge node destinations, and Pipeline Sources. Permissions are managed from a central location, where you can control how users or groups can view and perform activities.
By defining Permission Targets, you can set the physical resources, for example, repositories, and select users or groups with a corresponding set of permissions defining how they can access the specified repositories. A classic example would be if you have two engineering teams using either Go or Docker repositories. You can create a Permission Target for each group (i.e. for each engineering team), in which you grant access to the relevant resources with the appropriate permissions.
The JFrog Platform supports these main permission categories:
-
CRUD Permissions: A set of predefined CRUD permissions that can be applied to each of the resources including Read, Deploy/Cache, Delete/Overwrite, Annotate, and Manage.
-
Product-based Permissions: A set of product-specific permissions that are available if the product is installed on your system.
For example, if you have installed:
- JFrog Xray: The Manage Xray Metadata permissions is supported.
- JFrog Distribution: The Distribute permission is supported.
- JFrog Pipelines: The Trigger Pipeline permission is supported.
-
Role-based Permissions: A global permission that is set on the User or Group level. Manage Policies and Manage Watches are the only role-based permissions in the Platform and are available when installing JFrog Xray.
Create and Manage Permissions
Permissions are additive and must be explicitly granted. If a checkbox is not set for a user, then that user does not have the corresponding permission.
Permissions are centrally managed in the Administration module under User Management | Permissions.
The workflow for creating permission targets is:
- Select resources
- Assign users or groups
- Assign permissions
From the Administration module, navigate to User Management | Permissions and click New Permission.
Step 1: Select Resources
Type a unique meaningful name for the permission target that will easily help you manage and detect the required permission. For example: RnD_India, Project X, DevOps_US.
Click + plus sign to assign resources to the permission target.
Repositories
The Repository permission targets define what a user has access to view in the repository resource.
Click + Add Repositories and select the repositories to which this Permission Target will apply.

The following methods are supported for repositories in your Permission Target.
-
Selecting Repositories from a list of existing repositories.
-
Filter by Repository Type: You can select Any Local Repository or Any Remote Repository or Any Distribution Repository. Selecting either of these options will add all the existing and future repositories including in the selected type to this permission target. For example, selecting Any Local Repository will add all of the existing local repositories to the Permission Target and future local repositories.
-
Include and Exclude Patterns: The include and exclude patterns are based on "Ant-like" expressions, allowing you to restrict (i.e. whitelist / blacklist) the access for users or groups only to specific paths in the selected repositories. The include and exclude patterns are limited to 1024 characters.
For example, you can create a permission target that allows user "Builder" and group "Deployers" to read from and deploy artifacts to the
libs-releasesrepository. You can then add "org/apache/" as an include pattern to the aforementioned permission target causing users in this permission target to only have access to paths under "org/apache/" in thelibs-releasesrepository.
Builds
The build permission targets define what a user has access to view in the Builds resource.
Click + Add Builds and select the builds to which this Permission Target will apply.
The following methods are supported for including builds in your Permission Target.
- Any Build: You can select Any Build to add all the existing and future build including to this permission target.
- By Name: You can select existing builds from the Available Builds list. Selecting a build means that future builds runs for this build will be included in the permission target.
- Include and Exclude Patterns (By Patterns): Based on "Ant-like" expressions, allowing you to specify any number of Include or Exclude Patterns in the corresponding entry field. Patterns are limited to 1024 characters. When providing the Read permission to the selected builds (i.e. patterns), the user will see those builds in the Builds page and also have access to the relevant build in the
artifactory-buildrepository. To add all builds that start with 'apache'(regardless if they already exist in Artifactory), use the following include pattern: "apache**/**". Granting the 'Read and Deploy' permission for this build pattern, provides users with access to all builds that start with 'apache' and allows them to upload build-info files that start with the term 'apache' in the build name.
Note
The
artifactory-build-inforepository is not included in the repositories permissions since it is automatically part of the build permissions. i.e. after assigning a permission on Builds section, the user will get the corresponding permission to the relevant builds under the repository. Adding a build provides the specified users/groups in this permission target, access to the corresponding path in the artifactory-build-info repository.
Release Bundles
Requires an Enterprise+ license.
You can assign permissions to manage the Release Bundles resource. Release Bundles are part of the Distribution process and are the entities that group the contents that are part of your release, providing the bill of materials for your software releases. For example, you can group the different build artifacts, such as Docker images, that make up your software release which can then be pushed to your point of sale devices. The Release Bundle is secure and immutable, ensuring that no manipulation can be made by unauthorized users. For more information, see Release Bundles.
Click + Add Release Bundles and select the Release Bundles to which this Permission Target will apply.
The following methods are supported for including Release Bundles in your Permission Target.
- Any Release Bundle: You can select Any Release Bundle to add all the existing and future Release Bundles to this permission target.
- By Name: You can select existing Release Bundles from the Available Release Bundles list. Selecting a Release Bundle means that all versions of the Release Bundles will be included in the permission target.
- Include and Exclude Patterns (By Pattern): Based on "Ant-like" expressions, allowing you to specify any number of Include or Exclude Patterns in the corresponding entry field. Patterns are limited to 1024 characters. When providing the Read permission to the selected Release Bundles (i.e. patterns), the user will see those Release Bundles in the Distribution page in the UI. For example, to add all Release Bundles that start with 'apache' (whether or not they exist in Artifactory), add the following include pattern: 'apache**/**. Granting the Read and Deploy permission for this Release Bundle pattern, for example, will provide users access to all Release Bundles that start with 'apache' and allow them to create Release Bundles containing 'apache'.
- Change the Default Release Bundle Source Repository: Scroll down to the Advanced section in the Add Release Bundles page, remove the release-bundles check box and select another Release Bundles Source repository.
Destinations
Requires an Enterprise+ license.
What is an JFrog Artifactory Edge node?
JFrog Artifactory Edge (an "Edge node") is an edition of JFrog Artifactory whose available features have been customized to serve the primary purpose of distributing software to a runtime such as a data center, a point-of-sale or even a mobile device. All packages hosted in an Edge node are Release Bundle which is a secure and immutable collection of software packages that make up a release to be provisioned.
A destination is a target Artifactory Edge to which you can distribute release bundles. Administrators can assign users and groups permissions to specific destinations and actions such as creating, deleting and distributing Release Bundles. Available only if at least one Release Bundle was created.
Click + Add Destinations and select the Destinations to which this Permission Target will apply.
The following methods are supported for including Destinations (Edge Nodes) in your Permission Target.
-
Any Destination: You can select Any Destination to add all the existing and future Destination Edge Nodes to this permission target.
-
By Name: You can select existing Edge nodes (i.e. Destinations) from the Available Destinations list.
-
By Pattern:
- JPD Name Pattern: A JPD is the JFrog Deployment Unit. Based on "Ant-like" expressions, allowing you to specify any number of patterns in the corresponding entry field with each pattern limited to 1024 characters. For example, providing a user with the Distribute permission to the selected Destinations (i.e. according to JPD Name Patterns), allows the user to distribute to Edge nodes that correspond with the pattern. To distribute to all destinations (i.e. Edge nodes) that start with 'DevCenter1', use the following pattern: "DevCenter**".
- Country Codes: Select one or more countries from the available list. All existing and future Destinations that are located in the selected countries in JPD will be part of the Permission Target.
- City Name Pattern: Based on "Ant-like" expressions, you can specify any number of patterns in the corresponding entry field (limited to 1024 characters). When providing the Distribute permission to the selected Destinations (i.e. according to City Name Patterns), the user will be able to distribute to Edge nodes that meet the pattern. For example, to distribute to all destinations (i.e. Edge nodes) that are located in London, add the following pattern: "London**".
Pipeline Sources
Requires an Enterprise+ license.
A pipeline source is a Git repository containing pipeline definition files. Administrators can assign users and group permissions to specific pipeline sources.
Click + Add Pipeline Sources and select the Pipeline Sources to which this Permission Target will apply.
The following methods are supported for including Destinations (Edge Nodes) in your Permission Target.
- Any Pipeline Source: You can select Any Pipeline Source to add all the existing and future Pipeline Sources to this permission target.
- By Name: You can select existing Pipeline Sources from the available Pipeline Sources list.
- Include and Exclude Patterns (By Patterns): Based on "Ant-like" expressions, allowing you to specify any number of Include or Exclude Patterns in the corresponding entry field. Patterns are limited to 1024 characters. To include (or exclude) all pipeline sources that start with '
paulg', use the following include pattern: "paulg**/**".
You can now proceed to assign users or groups to the resources you have included in the Permission Target.
Step 2: Select Users or Groups and Assign Permissions
Each resource has a set of dedicated permissions. Using the corresponding tabs, you can set the permissions granted to a user or a group based on each of the resource types. Double-click the user or group you want to modify, and then check the permissions you wish to grant. Only permissions associated with an installed service are displayed in the list. At least one user or group has to be selected to create a permission. Since an admin is privileged and has all permissions, you cannot add a user or group with admin privileges to a Permission Target.
The following example displays applying permissions to users. The identical workflow applies when assigning permissions to groups.
In the Create Permission page, click the Users tab.
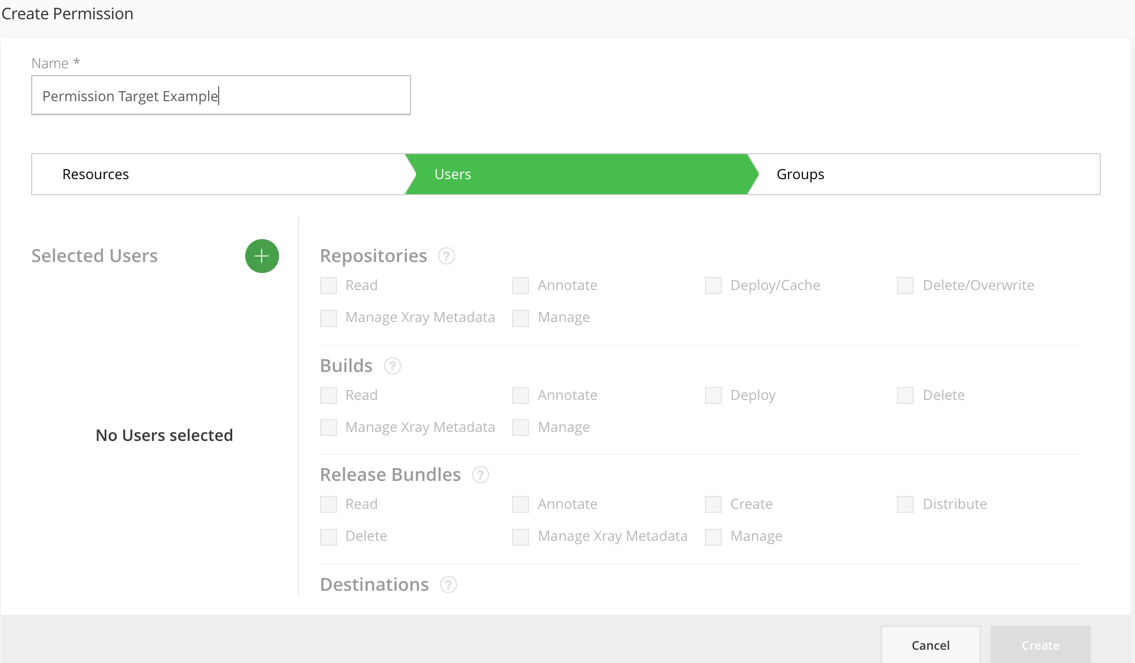
Click the Selected Users + icon in the left panel to add users.
Select the users in the Select Users dialog and click OK.
Assign the permissions to the users according to the resource type.
You can assign the following permissions by resource type:
Resource Permissions
To grant the following permissions, go to Administration module in the User Management | Users / Groups, select a user or a group and select the relevant permissions.
| Permission | Description |
|---|---|
| Manage Resources | Manage Resources including create, edit, and delete permissions on any resource type including Pipeline resources (Integration, Source, and Node Pools).
|
| Manage Policies | Manage, delete and modify Xray policies.
Xray scanning requires Artifactory Pro X, Enterprise with Xray, or an Enterprise+ license. |
| Manage Watches | Add, edit and delete Watches on repositories.
Xray scanning requires Artifactory Pro X, Enterprise with Xray, or an Enterprise+ license. |
| Manage Reports | Create and generate Xray reports
Xray scanning requires Artifactory Pro X, Enterprise with Xray, or an Enterprise+ license. |
Repository Permissions
| Permission | Description |
|---|---|
| Read | Download artifacts and read the metadata.
|
| Annotate | Annotate artifacts and folders with metadata and properties. |
| Deploy/ Cache | Deploy artifacts & deploys to remote repository caches.
|
| Delete/ Overwrite | Delete or overwrites artifacts.
|
| Manage Xray Data | Trigger Xray scans on artifacts in repositories. Users can create and delete custom issues and licenses. Xray scanning requires Artifactory Pro X, Enterprise with Xray, or an Enterprise+ license. |
| Manage | Allows changing the permission settings for other users on this permission target. Note that it does not permit adding/removing resources to the permission target. Perform admin-related tasks in the Artifact browser such as managing 'Followers' or restoring artifacts from the trash can.
|
Build Permissions
| Permission | Description |
|---|---|
| Read | View and download build info artifacts from the artifactory-build-info default repository and reads the corresponding build in the Builds page. |
| Annotate | Annotate build-info artifacts and folders with metadata and properties. |
| Deploy | Allows uploading and promoting build info artifacts |
| Delete | Delete build-info artifacts |
| Manage Xray Data | Trigger Xray scans on builds. Create and delete custom issues and licenses.
Xray scanning requires Artifactory Pro X, Enterprise with Xray, or an Enterprise+ license. |
| Manage | Allows changing build-info permission settings for other users in this permission target. It does not permit adding/removing resources to the permission target.
|
Release Bundle Permissions
| Permission | Description |
|---|---|
| Read | View and download Release Bundle artifacts from the relevant Release Bundle repository and read the corresponding Release Bundles on the Distribution page |
| Annotate | Annotate Release Bundle artifacts and folder with metadata and properties |
| Create | Create Release Bundles |
| Delete | Delete Release Bundles |
| Distribute | Distribute Release Bundles |
| Manage Xray Data | Trigger Xray scans on Release Bundles. Create and delete custom issues and licenses.
Xray scanning requires Artifactory Pro X, Enterprise with Xray, or an Enterprise+ license. |
| Manage | Allows changing Release Bundle permission settings for other users in this permission target. It does not permit adding/removing resources to the permission target.
|
Destination Permissions
| Permission | Description |
|---|---|
| Distribute | Requires an Enterprise+ license. Distribute Release Bundles according to their destination permissions |
| Delete | Delete Release Bundles from the selected destinations |
| Manage | Add and delete users who can distribute release bundles on assigned destinations
|
Pipeline Permissions
| Permission | Description |
|---|---|
| Read | View the available pipeline sources |
| Trigger | Manually trigger execution of steps |
| Manage | Create and edit pipeline sources |
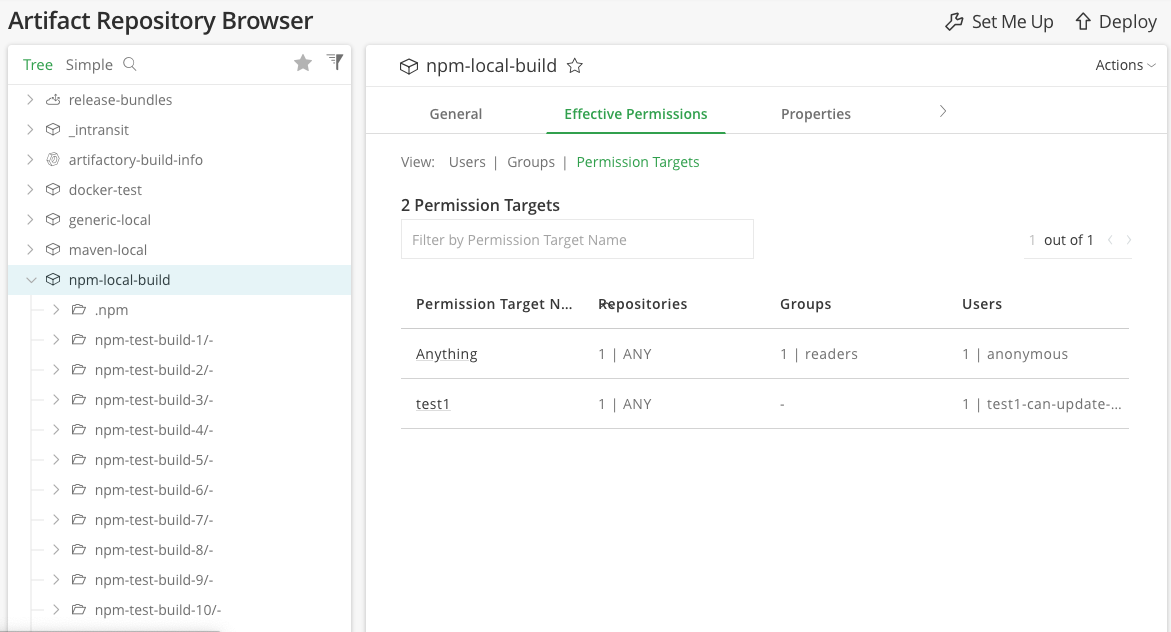
View Effective Permissions
You can view the effective permissions on each of the resources for users, groups, and Permission Targets in the Effective Permissions tab under the Artifacts, Builds and Distribution pages.
Updated 6 days ago