OAuth SSO
Subscription Information
This feature is supported with Enterprise X and Enterprise+ licenses.
JFrog Platform is integrated with OAuth allowing you to delegate authentication requests to external providers and let users login to the system using their accounts with those providers.
Currently, the provider types supported are Google, OpenID Connect, GitHub Enterprise, and Cloud Foundry UAA. You may define as many providers of each type as you need.
Note
Enabling OAuth disables internal password authentication by default. For more information, see Disable Basic Authentication Method.
Automatic Pairing for OAuth SSO Users
Starting from Artifactory 7.80.0 for JFrog Cloud, you can now automatically pair OAuth SSO users when they log in to the JFrog Platform with their JFrog Platform user based on their email address. No configuration change is required to enable the feature.
From December 2021, JFrog Cloud users (only) can also join through an invite, and to then log in using Personal OAuth such as Google or GitHub. See Enable and Disable Personal OAuth SSO for details.
OpenID Connect Integration
If you use OpenID Connect system like GitHub Actions, you can use OpenID Connect Integration so that you can allow the application to download and publish artifacts without storing JFrog passwords, tokens, or API keys.
OAuth SSO Usage
When OAuth is enabled in the JFrog Platform, users may choose to sign in through any of the supported OAuth providers. To log in through a provider, users click on the provider's button in the login screen and are redirected to the login screen of the corresponding provider.
Users that are already logged in to any of that provider's applications you will not need to log in again, but you may have to authorize the JFrog Platform to access your account information, depending on the provider type.
Configure OAuth
Custom URL base
For your OAuth settings to work, make sure you have your Custom Base URL configured.
WebUI Changes implemented in Artifactory 7.38.x and above
Security is now called Authentication Providers. All the relevant text and images on this page have been updated to reflect this change.
In the Administration module, select Authentication > OAuth SSO. The General OAuth Settings page displays the following fields.
| General OAuth Setting | Description |
|---|---|
| Enable OAuth | When selected, authentication with an OAuth provider is enabled and the system will display all OAuth providers configured. If not checked, authentication is by Artifactory user/password. |
| Auto Create System Users | When set, the system will automatically create new users for those who have logged in using OAuth, and assign them to the default groups. |
| Default Provider | Specifies the provider through which different clients (such as npm, for example) should authenticate their login to gain access to the JFrog Platform. Currently, only a GitHub Enterprise OAuth provider may be defined as the Default Provider. |
| Allow Created Users Access To Profile Page | When selected, users created after authenticating using OAuth, will be able to access their profile. |
The Providers section lists providers defined in the JFrog Platform.
Add a New OAuth Provider
To add a new provider, in the Providers section click New. The Add New OAUTH Provider dialog appears. Enter the provider details. These may vary slightly from the values in the following table for some providers.
| Required Setting | Description | GitHub.com | GitHub Enterprise | Cloud Foundry UAA | OpenID | |
|---|---|---|---|---|---|---|
| Enabled | If selected, this OAuth provider is enabled and will appear in the login dialog. | √ | √ | √ | √ | √ |
| PKCE Enabled | If selected, this OAuth provider will use an authorization code flow with PKCE (Proof Key for Code Exchange). The Secret field is disabled. | X | X | √ | √ | √ |
| Provider Name | A logical name for this provider. For example, "Google OAuth", "GitHub OAuth". This must be unique within JFrog Platform. | √ | √ | √ | √ | √ |
| Provider Type | The provider type. Currently GitHub, Git Enterprise, Google, OpenID, and Cloud Foundry are supported. | √ | √ | √ | √ | √ |
| Client ID | The identity with which you identify your organization to the provider. This is provided by the OAuth provider when you set up your account with them. | √ | √ | √ | √ | √ |
| Secret | The secret allocated to your organization by the provider. This is provided by the OAuth provider when you set up your account with them. | √ | √ | √ | √ | √ |
| Domain | Specifies a domain filter which defines from which domains users may be authenticated. Normally, this will be your domain name. For example | X | X | √ | X | X |
| Docker Login | Support for Docker login | X | √ | X | X | X |
| npm Login | Support for npm login | X | √ | X | X | X |
| Basic URL | The base URL of the Git server which should be used for authentication. | https://github.com/ | <Server Base URL> | X | X | X |
| Auth URL | The URL through which the provider redirects you to the authentication page. |
Note: GitHub.com Accounts Any GitHub.com account that has access to the Artifactory URL will be allowed to login, including accounts that are outside your GitHub.com organization scope. | <Server Base URL>/login/oauth/authorize | https://accounts.google.com /o/oauth2/auth | <Server Base URL>/oauth/authorize | √ |
| API URL | The URL through which Artifactory can get extra information that it not directly available via OAuth. | https://api.github.com/user | <Server Base URL>/api/v3/user | https://www.googleapis.com /oauth2/v1/userinfo | <Server Base URL>/userinfo | √ |
| Token URL | The URL that Artifactory will use to get a token to use the API. | https://github.com/login /oauth/access_token | <Server Base URL>/login/oauth/ access_token | https://www.googleapis.com /oauth2/v3/token | <Server Base URL>/oauth/token | √ |
Use Query Params for OAuth
You may pass query params along with the Authorization URL, as shown in the following example:
https://github.com/login/oauth/authorize?realm=EmployeesMultiple query params should be separated with an ampersand, as shown in the following example:
https://github.com/login/oauth/authorize?realm=Employees?client_id=XXXXXXXXXXX&scope=openid%20profile%20emailEnable and Disable Personal OAuth SSO
WebUI Changes implemented in Artifactory 7.38.x and above
Identity & Access is now called User Management. All the relevant text and images on this page have been updated to reflect this change.
- To enable Personal OAuth SSO, in the Administration module, select Security > General.
- Scroll down to Personal Sign On, and select Enable sign up via external providers.
This option is available on Trial subscriptions only.
- From the Providers dropdown list, select the providers you wish to enable in the sign-up screen, such as Google, GitHub, and others.
Binding Existing User Accounts
To log in using any of your OAuth provider accounts If you already have an internal (not external realms such as LDAP, SAML...) account in the system, bind your JFrog Platform account to the corresponding account.
To bind your account, go to your Profile page and enter your JFrog Platform password to unlock it.
Under OAuth User Binding, select Click to bind next to the OAuth provider you wish to bind to.
Create OAuth Provider Accounts
In order to use OAuth authentication, you need to set up an account with each OAuth provider you wish to use in order to get the various parameters (such as Provider ID and Secret) you will need to set up OAuth integration in the system.
GitHub OAuth Setup
Caution: Access to GitHub.com Accounts
Any GitHub.com account that has access to the JFrog Platform URL will be allowed to log in, including accounts that are outside your GitHub.com organization scope. Please ensure that you fill in the Organization field when completing provider credentials. Leaving the Organization field blank is regarded as a security vulnerability, as it allows unrestricted access for all GitHub.com users to log in to Artifactory.
To set up your OAuth account on GitHub:
-
Log in to your GitHub account. Under your personal profile settings, select Applications and click the Developer Applications tab.
-
Click Register new application.
-
Set the Application name. For example, the JFrog Platform Cloud OAuth.
-
Set the Homepage Url. This is your Artifactory server host URL (
https://<artifactory-server>/).For example,
https://mycompany.jfrog.io/mycompany/ -
Set the Authorization Callback URL as follows:
-
For self-hosted installation:
http://<server_host>/artifactory/api/oauth2/loginResponse. For example,http://mycompany.artifactory.com/artifactory/api/oauth2/loginResponse -
For cloud:
https://<server_name>.jfrog.io/artifactory/api/oauth2/loginResponseFor example,
https://mycompany.jfrog.io/artifactory/api/oauth2/loginResponse
-
-
Click Register application to generate your Client ID and Client Secret.
Make a note of these; you will need them to configure OAuth authentication through GitHub on the JPD.
Google OAuth Provider Setup
To set up your OAuth account on Google, execute the following steps:
-
Login to Google Developer Console.
-
Create a new project. For example, "Artifactory OAuth".
-
Once the project is created, in the left navigation bar, select APIs & auth > Credentials.
-
Select the OAuth consent screen tab and configure the consent page that the end users will see when logging in with the Google credentials.
-
In the Credentials tab, Click Add Credential and select OAuth 2.0 client ID.
-
Under Create client ID, select Web application.
-
Enter a Name and set the Authorized redirect URIsFor self-hosted:
https://<server_host>/artifactory/api/auth/oauth2/loginResponseFor cloud:
https://<server_name>.jfrog.io/artifactory/api/oauth2/loginResponse. -
Click Create to generate your Client ID and Client Secret.
Make a note of these; you will need them to configure OAuth authentication through Google on the JFrog Platform.
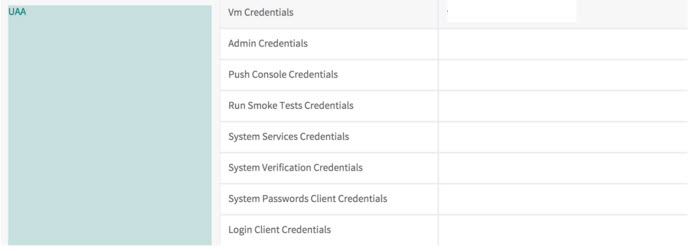
Cloud Foundry UAA OAuth Setup
OAuth authentication with Cloud Foundry UAA is supported.
To setup your OAuth authentication with Cloud Foundry UAA, fill in the fields as needed.
Use Secure OAuth
To use secure OAuth with a valid certificate from a CA trusted by Java, all you need to do is use a secure OAuth URL in your settings.
If you want to use OAuth with a non-trusted (self-signed) certificate, please see Trusting a Self-Signed Certificate or a New CA.
Use API Key with OAuth Users
While OAuth provides access to the UI, it is also possible for OAuth users to generate an API Key that can be used instead of a password for basic authentication or in a dedicated REST API header, this is very useful when working with different clients, e.g. docker, npm, maven, etc. or using Artifactory REST API.
In order to allow OAuth users access to an API key you will need to make sure that the "Auto Create System Users" and "Allow Created Users Access To Profile Page" check boxes are checked. This means that OAuth users are also saved in the database and can access their profile page in order to generate, retrieve and revoke their API key.
Use OAuth on High Availability Setup
The OAuth protocol requires the client to give permission to a specific application. JPD will redirect the user to the configured application URL and one permission is granted user will be navigated back.
The limitation on this process when working in High Availability setup is that the user must return to the same node, otherwise the authentication process will fail, in order to achieve this a sticky session configuration should include the /artifactory/api/oauth2/.
The example below shows NGINX configuration.
NGINX Reverse Proxy Configuration
location ~ (/artifactory/webapp/|/artifactory/ui/|/artifactory/api/oauth2/) {
        proxy_http_version      1.1;
        proxy_pass              http://<UPSTREAM_NAME>;
        proxy_intercept_errors  on;
        proxy_pass_header       Server;
        proxy_connect_timeout   75s;
        proxy_send_timeout      2400s;
        proxy_read_timeout      2400s;
        proxy_set_header        Host $host;
        proxy_set_header        X-Forwarded-For $proxy_add_x_forwarded_for;
        proxy_set_header        X-Forwarded-Proto $http_x_forwarded_proto;
        proxy_set_header        X-Real-IP $remote_addr;
        proxy_set_header        X-JFrog-Override-Base-Url $http_x_forwarded_proto://$host;
}
Updated about 1 month ago