SAML SSO
Subscription Information
This feature is supported on the SaaS platform with an Enterprise X or Enterprise+ license, and on the Self-Managed platform with a Pro X, Enterprise X , or Enterprise+ license.
SAML (Security Assertion Markup Language) is an XML standard that allows you to exchange user authentication information between web domains.
The JFrog Platform offers a SAML-based Single Sign-On service allowing federated JFrog partners (identity providers) full control over the authentication process.
Using SAML, the JFrog Platform acts as a service provider that receives users' authentication information from external identity providers. In this case, JFrog is no longer responsible for the authentication of the user although it still has to redirect the login request to the identity provider and verify the integrity of the identity provider’s response.
Note
Before creating multiple SAML configurations, JFrog recommends deleting the old configuration and reconfiguring it with a different setting name other than Default.
Breaking Change for SAML SSO
Starting from Artifactory version 7.98.7, As notified in SAML SSO configuration, if you have configured SAML authentication in your environment, make sure to configure a Custom Base URL to prevent a 500 error.
Navigate to the Administration module, then select Authentication > SAML SSO.
The list of provider configurations defined in Artifactory is displayed in the SAML SSO list section.
You can add new SAML SSO provider configurations, or edit or delete existing ones.
Enable the SAML integration as a whole by toggling the Enable SAML SSO toggle switch.
Note
Enabling SAML disables internal password authentication by default. For more information, see Disable Basic Authentication Method.
Caution
You can add new SAML SSO provider configurations, or edit or delete existing ones.
The following table describes the settings displayed for providers:
Item | Description |
|---|---|
Enable SAML SSO | Enable the SAML integration as a whole by toggling this switch. |
Using Encrypted Assertion | When enabled, an X.509 public certificate will be created by Artifactory. Download this certificate and upload it to your IDP and choose your own encryption algorithm. This process will let you encrypt the assertion section in your SAML response. This certificate will apply to all SAML SSO configurations. |
Service Provider Name | The SAML service provider name. This should be a URI that is also known as the entityID, providerID, or entity identity. SAML v2 specification |
Encrypted Assertion | When set, an X.509 public certificate will be created by Artifactory. Download this certificate and upload it to your IDP and choose your own encryption algorithm. |
Auto User Creation | When set, the system will automatically create new users for those who have logged in using SAML, and assign them to the default groups. |
Auto Login Redirect | When set, the system will redirect you to the SAML login URL upon session expiry: this does not occur after a manual logout. To enable this, select the SAML icon during your first login to save your preference in a browser cookie.
|
Enabled | When selected, this SAML integration is enabled, and users may be authenticated via a SAML server. |
SAML SSO Configuration
Note
Before creating multiple SAML configurations, JFrog recommends deleting the old configuration and reconfiguring it with a different setting name other than Default. If you reconfigure your SAML configuration, you must also update the relevant information in the Identity Provider server.
-
Login to the system with administrator privileges.
-
In the Administration module, select Authentication > SAML SSO.
-
To add a new provider configuration, click Add Settings.
-
Provide a name for the specific SAML SSO configuration in Display Name. Create a name that will help you identify between multiple SAML settings. This name should be used to configure the Single Sign-On URL on the Identity provider.
-
Provide the SAML Login URL and SAML Logout URL.
SAML Logout URL
Configure the SAML Logout URL to log out users from both your SAML provider and the JFrog Platform at the same time. If you don't set this field, users stay logged in with the SAML provider even after they log out of the platform.
In multi-node environments, set the SAML Logout URL to
{baseUrl}to create a dynamic redirect. This ensures that users are redirected back to the specific node they were using after they log out.
-
Provide the service provider name (Platform name in SAML federation)
-
If you enable Using Encrypted Assertion, when set, an X.509 public certificate will be created by Artifactory. You will need to download the X.509 certificate that contains the public key and provide it to your identity provider (IDP).
The public key can use either the DSA or RSA algorithms. The Platform uses this key to verify SAML response origin and integrity. Make sure to match the embedded public key in the X.509 certificate with the private key used to sign the SAML response.
Select if t refresh the X.509 certificate that contains the public key. If you refresh the certificate, this will affect all SAML provider configurations which are enabled for encrypted assertions. You will need to download the updated X.509 certificate that contains the public key and provide it to your identity provider (IDP).
-
Enable or disable Allow Created Users Access to Profile Page. If enabled users will be able to access their profile without having to provide a password.
-
Enable or disable Auto Create Artifactory Users (Using SAML login). If enabled, new users will persist in the database.
Custom URL base
For your SAML SSO settings to work, make sure you have your Custom Base URL configured.
Signed and encrypted Assertions
Make sure your SAML IdP (Identity Provider) provides a signed login Assertion. This is mandatory for the Assertion verification by the Platform.
Signed Logout is currently not supported by the Platform.
SAML SSO Setting | Description |
|---|---|
Enable SAML Integration | When selected, SAML integration is enabled and users may be authenticated via a SAML server. |
SAML Login URL | The SAML login URL. |
SAML Logout URL | The SAML logout URL. |
SAML Service Provider Name | The SAML service provider name. This should be a URI that is also known as the entityID, providerID, or entity identity. SAML v2 specification |
Use Encrypted Assertion | When set, an X.509 public certificate will be created by Artifactory. Download this certificate and upload it to your IDP and choose your own encryption algorithm. This process will let you encrypt the assertion section in your SAML response. |
SAML Certificate | The X.509 certificate that contains the public key. |
Auto Associate Groups | When set, in addition to the groups the user is already associated with, they will also be associated with the groups returned in the SAML login response. From Artifactory version 7.116.0, SAML group association is persistent in the JFrog Platform. Only new group additions are synced to the JFrog Platform; any SAML groups that were removed in the external provider won't be synced automatically. For more information, see Supported Access Configurations. Note that until Artifactory version 7.116.0, the user’s association with the returned groups is not persistent. It is only valid for the current login session in the browser (i.e. this will not work for logins using the SAML user id and API Key). Also, the association will not be reflected in the UI's Groups settings page. Instead, you can see this by enabling this SAML logger in your
|
Group Attribute | The group attribute in the SAML login XML response. Note that the system will search for a case-sensitive match to an existing group. |
Email Attribute | If Auto Create Artifactory Users is enabled or an internal user exists, the system will set the user’s email to the value in this attribute that is returned by the SAML login XML response. When using Email Attribute in the SAML SSO integration, JFrog will require users to verify their email address using a one-time password. This helps enhance security and reduce risks to your environment, and is essential for MyJFrog admins to better manage the environment. |
Auto Create Artifactory Users | When set, the system will automatically create new users for those who have logged in using SAML, and assign them to the default groups. |
Allow Created Users Access To Profile Page | When selected, users created after authenticating using SAML, will be able to access their profile. This means they are able to generate their API Key. If Auto Create Artifactory Users is enabled, once logging into the system, users can set their password for future use. |
Auto Redirect Login Link to SAML Login | When checked, clicking on the login link will direct the users to the configured SAML login URL.
|
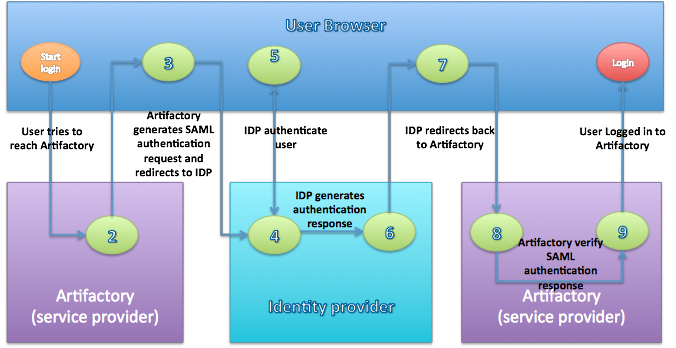
SAML-Based SSO Login Process
-
The user attempts to reach a hosted JFrog Platform, Home Page.
-
The Platform generates a SAML authentication request.
-
The SAML request is encoded and embedded into the identity provider URL.
-
The Platform sends a redirect to the user's browser. The redirect URL includes the encoded SAML authentication request that should be submitted to the identity provider.
-
The identity provider decodes the SAML message and authenticates the user. The authentication process can proceed by asking for valid login credentials or by checking for valid session cookies.
-
The identity provider generates a SAML response that contains the authenticated user's username. In accordance with the SAML 2.0 specification, this response is digitally signed with the identity provider’s private DSA/RSA keys.
-
The identity provider encodes the SAML response and returns that information to the user's browser. The identity provider redirects back to the Platform with the signed response.
-
The Platform’s ACS verifies the SAML response using the partner's public key. If the response is successfully verified, the ACS redirects the user to the destination URL.
-
The user has been redirected to the destination URL and is logged in to the Platform.
SAML SSO Configuration with Azure
This procedure describes how to configure JFrog Artifactory SAML SSO with Azure Active Directory.
Note
This procedure is for Artifactory versions that support multiple SAML SSO configurations.
Before creating multiple SAML configurations, JFrog recommends deleting the old configuration and reconfiguring it with a different setting name other than Default. If you reconfigure your SAML configuration, you must also update the relevant information in the Identity Provider server.
To set up Azure to work with Artifactory versions that support single SAML SSO configuration, see https://jfrog.com/help/r/artifactory-how-to-configure-artifactory-saml-sso-with-azure-ad.
To set up Azure to work with SAML SSO:
-
In the Azure portal, on the JFrog Artifactory application integration page, in the Manage section, select Single sign-on and then select SAML.
-
To edit the settings, in the Set up Single Sign-On with SAML page, in the Basic SAML Configuration section, click the Edit icon.
-
In the Identifier text box, enter your JFrog Platform URL.
$JFROG-URLFor JFrog Cloud users, that would be:
https://<servername>.jfrog.io -
In the Reply URL text box, enter the SAML URL for your JFrog Platform service.
For Self-Hosted users, use the following:
$JFROG-URL/ui/api/v1/auth/saml/loginResponse/<setting_name>For JFrog Cloud users, that would be:
https://<servername>.jfrog.io/ui/api/v1/auth/saml/loginResponse/<setting_name>
-
-
To change the user attributes, in the User Attributes section, click the Edit icon. In the User Attributes & Claims dialog, add the details to your SAML token attributes configuration. Save this information, as these details will also be added in the JFrog platform.
-
In the Set up Single Sign-On with SAML page, in the SAML Signing Certificate section, locate the Certificate (Base64) and download it to a local drive. You will later need to insert the certificate on the JFrog Platform.
-
In the Set up JFrog Artifactory section, fill in the appropriate URLs based on your requirements. Save these URLs, as these details will also be added in the JFrog platform.
-
Copy the data from the text boxes so that you can later paste them in Artifactory's SAML SSO settings.
-
Finish and save your settings.
With Azure Active Directory configured, we can now set up the SAML SSO on the JFrog Platform to work with it.
To set up the JFrog Platform to work with Azure Active Directory:
-
Login to the system with administrator privileges.
-
In the Administration module, go to Authentication Providers > SAML SSO.
-
To add a new provider configuration, click Add Settings.
-
In the SAML SSO Configuration dialog, define a SAML SSO configuration with the following details:
| Artifactory | Copy from Azure |
|---|---|
| SAML Login URL | Login URL |
| SAML Logout URL | Logout URL |
| SAML Service Provider Name | Entra ID Identifier |
| SAML Certificate | Base64 Certificate |
- To enable the configuration, click Enable SAML Integration.
- Fill in the SAML Service Provider Name with the same URL used in the Entra ID Identifier field in the Azure setup.
- For the SAML Login URL and SAML Logout URL, provide the Login URL and Logout URL from the Azure setup.
Note
The SAML Logout URL handles what happens when you log out as a SAML user. When using the above URL, the user will be logged out of other Azure applications as well. To only log out of your JFrog Platform, replace the logout URL with
$JFROG-URL/ui/login/
-
For the SAML Certificate, upload the Base64 certificate previously downloaded during the Azure setup.
-
The Group Attribute field is set to the group attribute in the SAML login XML response.
-
Define the Email Attribute.
If the Auto Create Artifactory Users option is enabled or an internal user exists, Artifactory will set the user's email to the value in this attribute that is returned by the SAML login XML response.
-
Select whether to enable the Auto Create Artifactory Users option. When the Auto Create Artifactory Users option is enabled, authenticated users are automatically created in Artifactory. When not enabled, for every request from an SSO user, the user is temporarily associated with default groups (if such groups are defined), and the permissions for these groups apply. Without automatic user creation, you must manually create the user inside Artifactory to manage user permissions not attached to their default groups Auto Create Artifactory Users.
-
Select whether to enable the Allow Created Users Access To Profile Page option. When the Allow Created Users Access To Profile Page setting is selected, automatically created users will have access to their profile page and will be able to perform actions such as generating an API key.
-
Click Save.
SAML SSO Configuration with Google
This procedure describes how to configure JFrog Artifactory SAML SSO with Google.
Note
This procedure is for Artifactory versions that support multiple SAML SSO configurations. From Artifactory version 7.83.1, the ability to create multiple configurations for SAML SSO providers is gradually being rolled out to Cloud only. For more information about multiple SAML SSO configurations see SAML SSO.
Before creating multiple SAML configurations, JFrog recommends deleting the old configuration and reconfiguring it with a different setting name other than Default. If you reconfigure your SAML configuration, you must also update the relevant information in the Identity Provider server.
For more information about Google setup information, see Google Support.
To obtain setup information from Google:
-
Sign in to the Google Admin console.
-
Go to Menu > Apps > Web and mobile apps. Then select Apps > SAML App.
-
Select the option Add a service/App to your domain link or click the plus + icon in the bottom corner.
-
Click Setup My Own Custom App.
-
The Google IDP Information window will open with the SSO URL and the Entity ID URL fields automatically filled in.
Select Option 1 for the Artifactory SAML setup. Copy the SSO URL and Entity IDand download the Certificate.
To set up the JFrog Platform to work with Google, in a separate browser tab or window, you need to sign in to Artifactory and enter the information you copied:
-
Log into Artifactory with administrator privileges.
-
To set up your Artifactory Custom Base URL, see General System Settings.
Note
For Cloud instances, the Artifactory Custom Base URL is the same as the instance URL.
-
In the Administration module, go to Authentication > SAML SSO.
-
To add a new provider configuration, click Add Settings. In the SAML SSO Configuration dialog, define a SAML SSO configuration with the following details:
| Artifactory | Copy from Google |
|---|---|
| SAML Login URL | SSO URL field from the Google IDP Information window |
| SAML Logout URL | https://accounts.google.com/logout |
| SAML Service Provider Name | Entity ID from the Google IDP Information window |
| SAML Certificate | Certificate from the Google IDP Information window |
- To enable the configuration, click Enable SAML Integration.
- Configure options related to processing user accounts by Artifactory.
- Click Save.
Continue to set up Google to work with SAML SSO:
Note
The SAML Service Provider Name is the Custom URL Base, which is
https://test.jfrog.io.
-
Click Continue to reach Step 3.
In Step 3 name the application as Artifactory and add a description. Optionally, upload an image file to serve as an icon.
-
Click Continue to reach Step 4. Configure the following values in the Service Provider Details window.
| Details | |
|---|---|
| ACS URL | The service provider's Assertion Consumer Service URL receives the SAML response. It should be in the format <CustomURL>/ui/api/v1/auth/saml/loginResponse/<saml_display_name > , for example https://test.jfrog.io/ui/api/v1/auth/saml/loginResponse/<saml_display_name> |
| Entity ID | The globally unique name. Use the Custom Base URL, for example https://test.jfrog.io |
| Start URL | Leave empty. This sets the RelayState parameter in a SAML Request, which can be a URL to redirect to after authentication. |
| Signed Response | Leave empty. If this is unchecked (the default), only the assertion within the response is signed. |
-
Click Continue and Finish.
-
To turn on your SAML App, in the Google Admin console, go to Menu > Apps > Web and mobile apps. Select the SAML app that you created.
-
Click Settings.
-
Click User access.
-
To turn a service on or off for everyone in your organization, click On for everyone or Off for everyone, and then click Save. Alternatively, you can change the settings only for some users.
-
To turn a service on or off for an organizational unit, do the following:
- At the left, select the organizational unit.
- To change the Service status, select On or Off.
- Click Save.
Note
Ensure that your user account email IDs match those in your Google Apps domain when trying to log in to Artifactory.
SAML SSO Configuration with Okta
Note
If you create multiple SAML configurations, JFrog recommends deleting the old configuration and reconfiguring it with a different setting name other than Default. If you reconfigure your SAML configuration, you must also update the relevant information in the Identity Provider.
This procedure describes how to configure Artifactory SAML SSO with Okta.
To use SAML SSO with Okta:
-
Log in to Okta with administrator privileges.
-
In the Applications tab, select Add Application > Create New App > SAML 2.0.
-
Enter the App name:
<desired_app_name>, and click Next. -
In the SAML Settings enter the following:
-
Single Sign-On URL for Artifactory 6.X version.
https://${ARTIFACTORY_URL}/artifactory/webapp/saml/loginResponseExample
https://yourcompany.jfrog.io/artifactory/webapp/saml/loginResponse -
Single Sign-On URL for Artifactory 7.x version.
https://${ARTIFACTORY_URL}/ui/api/v1/auth/saml/loginResponse/<saml_display_name>Example
https://yourcompany.jfrog.io/ui/api/v1/auth/saml/loginResponse/samldisplayname -
Audience URI (SP Entity ID).
https://${ARTIFACTORY_URL}Example
https://yourcompany.jfrog.io/ -
Name ID Format: Unspecified
-
Application username: Okta username
-
Note
You can log into Artifactory with Okta by using the username of a user's email address (i.e. "admin" from "[email protected]"). Choose Custom instead of Okta username and add String.substringBefore(user.email, "@") into the Custom Rule.
- Click Next and then click Finish. A SAML 2.0 frame is displayed under the Settings frame.
- Click View Setup Instructions.
- Copy the data from the text boxes and paste it in Artifactory's SAML SSO settings.
To use SAML SSO with Artifactory.
-
Log in to Artifactory with administrator privileges.
-
From Administration > Authentication > SAML Integration define the fields as below.
| Okta | Artifactory |
|---|---|
| Identity Provider Single Sign-On URL | SAML Login URL |
https://<Account_Name>. okta.com | SAML Logout URL |
| Identity Provider Issuer | SAML Service Provider Name |
| X.509 Certificate | SAML Certificate |
- Click Save.
- Log out of Artifactory and go to the Login page.
- Click SSO Login.
Note
Okta users need to be assigned with permissions for Artifactory. For more information see Group Sync (for Artifactory versions 5.3.0 and above.
SAML SSO Configuration With Keycloak
Follow the steps below to configure Artifactory with Keycloak as a SAML SSO authentication provider.
-
In Keycloak, enter the Administration Console
-
Select your realm from the drop-down menu or click Create Realm to create a new one
-
Go to Clients > Create client to Create a new client
-
Change the client type to SAML and select the custom base URL of the Artifactory instance (for example “https://yourcompanyname.jfrog.io “). Then, click Save to save the changes.
-
After creating the client, you will be directed to the client settings page. Ensure that Sign Assertions is enabled while Force POST Binding and Front Channel Logout are disabled.
-
In Valid Redirect URIs, enter your JFrog host URL followed by a wildcard (for example, “
https://artifactory.jfrog.io/*” or “http://IP:PORT/*”). In Root URL and Home URL, enter this URL:<CUSTOM_URL>/ui/api/v1/auth/saml/loginResponse/<SAML_DISPLAY_NAME>
Note
Make sure to replace the placeholders in
<angle brackets>with your own custom URL and SAML display name.
-
Navigate to Clients > Keys and switch the Client Signature Required toggle to Off.
-
Go to the Advanced tab, scroll down to Fine Grain SAML Endpoint Configuration and in both Logout Service POST Binding URL and Logout Service Redirect Binding URL as your JFrog host URL followed by “
/ui/login” (For example: “https://artifactory.jfrog.io/ui/login”). -
Click Save to save the changes made to the client settings.
-
Navigate to Realm Settings > Keys, and copy the RSA-generated certificate.
-
Log in to the JFrog Platform and navigate to the Administration > Authentication Provider and then select SAML SSO.
-
Select the Enable SAML Integration checkbox, and click +Add SAML SSO Configuration. There, enter the following values:
For Keycloak versions ≤ 16:
- In SAML Login URL, enter
<KEYCLOAK_URL>/auth/realms/<REALM>/protocol/saml - In SAML Service Provider Name, enter
<KEYCLOAK_URL>/auth/realms/<REALM> - In SAML Certificate, enter the certificate you copied from Keycloak in step 10.
For Keycloak versions ≥ 17:
- In SAML Login URL, enter
<KEYCLOAK_URL>/realms/<REALM>/protocol/saml - In SAML Service Provider Name, enter
<KEYCLOAK_URL>/realms/<REALM> - In SAML Certificate, enter the certificate you copied from Keycloak in step 10.
- In SAML Login URL, enter
-
Click Save to create the configuration.
To configure the Keycloak integration with JFrog, you will need to configure a group mapper, an attribute that is used to associate the realm groups with Artifactory. To configure a basic group mapper
- In Keycloak, go to Client scopes and click role_list (make sure the scope protocol is SAML)
- In the Client scope details menu, go to the Mappers tab and click Add Mapper > By Configuration, and select Group list from the table.
- Enter any name for the mapper, and the group attribute name. This attribute name will be used to associate the realm groups in Artifactory.
- Switch the Full group path toggle to Off and click Save.
- In the JFrog Platform, go to Administration > Authentication > SAML SSO and edit your SAML configuration.
- Select the Auto Associate Groups checkbox
- In Group Attribute, enter the value you entered for Group Attribute Name in Keycloak in step 3.
- Click Save.
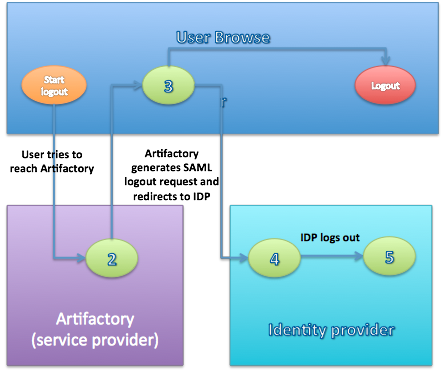
SAML-Based SSO Logout Process
-
The user attempts to reach a hosted JFrog Platform logout link.
-
The Platform logs the client out and generates a SAML logout request.
-
The Platform redirects to the identity provider with the encoded SAML logout request.
-
The identity provider decodes the SAML message and logs the user out.
-
The user is redirected to the configured URL in the identity provider.
SAML Profiles and Bindings
The JFrog Platform currently supports the Web Browser SSO and Single Logout Profiles.
The Web Browser SSO Profile uses HTTP redirect binding to send the AuthnRequest from the service provider to the identity provider, and HTTP POST to send the authentication response from the identity provider to the service provider.
Similar to the previous profile, the Single Logout Profile uses HTTP redirect binding to send the LogoutRequest from the service provider to the identity provider and HTTP POST to send the logout response from the identity provider to the service provider.
If your IDP supports uploading service provider metadata, you can use the following metadata XML:
Artifactory SP metadata XML
<ns2:EntityDescriptor xmlns="http://www.w3.org/2000/09/xmldsig#" xmlns:ns2="urn:oasis:names:tc:SAML:2.0:metadata"    entityID="<SP_NAME_IN_FEDERATION>">
    <ns2:SPSSODescriptor WantAssertionsSigned="true" AuthnRequestsSigned="false" protocolSupportEnumeration="urn:oasis:names:tc:SAML:2.0:protocol">
        <ns2:NameIDFormat>urn:oasis:names:tc:SAML:1.1:nameid-format:unspecified</ns2:NameIDFormat>
        <ns2:AssertionConsumerService index="1" Location="<CustomURL>/ui/api/v1/auth/saml/loginResponse/<saml_display_name>" Binding="urn:oasis:names:tc:SAML:2.0:bindings:HTTP-POST"/>
    </ns2:SPSSODescriptor>
</ns2:EntityDescriptor>
To use the service provider metadata:
Do not forget to update the following fields in the service provider metadata XML.
entityID: the Platform ID in the federation. Must match SAML Service Provider Name in the Platform's SAML configuration page.Location: the Platform home URL, after SAML Setup
Using SAML, the Platform automatically redirects the request to IDP which authenticates the user and, after a successful login, redirects back to the Platform.
If Anonymous User is enabled, the Platform doesn’t have to authenticate the user therefore it doesn’t redirect to the IDP. If the user still wants to sign in through SAML, they can do so by clicking the SSO login link in the login page.
SAML Login Failure
In case of IDP failover or bad configuration, the JFrog Platform allows you to bypass SAML login by using the JFrog Platform login page:
http://<SERVER_HOSTNAME>:8082/ui/login
This URL can be used by internal users who need to log in directly to the JFrog Platform.
Using API Key with SAML Users
While SAML provides access to the JFrog Platform UI, it is also possible for SAML users to generate an identity token, or an API key that can be used instead of a password for basic authentication or in a dedicated REST API header. JFrog recommends using an identity token rather than an API key. This can be useful when working with different clients, such as Docker, npm, Maven, etc., or using REST API.
In order to allow SAML users access to an API key, you will need to make sure that the Auto Create Artifactory Users and Allow Created Users Access To Profile Page check boxes are checked. This means that SAML users are also saved in the Platform database and can access their User Profile in order to generate, retrieve, and revoke their API key.
Enabling Synchronization of LDAP Groups for SAML SSO
Starting with Artifactory version 7.98, the deprecated user plugin synchronizeLdapGroups will no longer be used for SAML SSO user login. As an alternative, the functionality of the plugin has been implemented as part of the SAML SSO provider in Access.
Follow these steps to enable synchronize LDAP group for SAML SSO.
-
In the Access YAML Configuration, set the
synchronize-ldap-groupskey totrue.security: authentication: saml: synchronize-ldap-groups: true -
You can use the Update SAML Setting REST API to update the SAML SSO provider and configure the relevant LDAP group settings, as in the following example.
Sample UsagePUT access/api/v1/saml/{setting_name} { "name" : "okta", "ldap_group_settings" : [ "group1", "group2" ] }