Smart Archiving
Archiving transfers data from an active server to a backup system to free up space, enhance performance, and ensure data is available for future retrieval (for example, to audit regulatory compliance).
Archive in JFrog
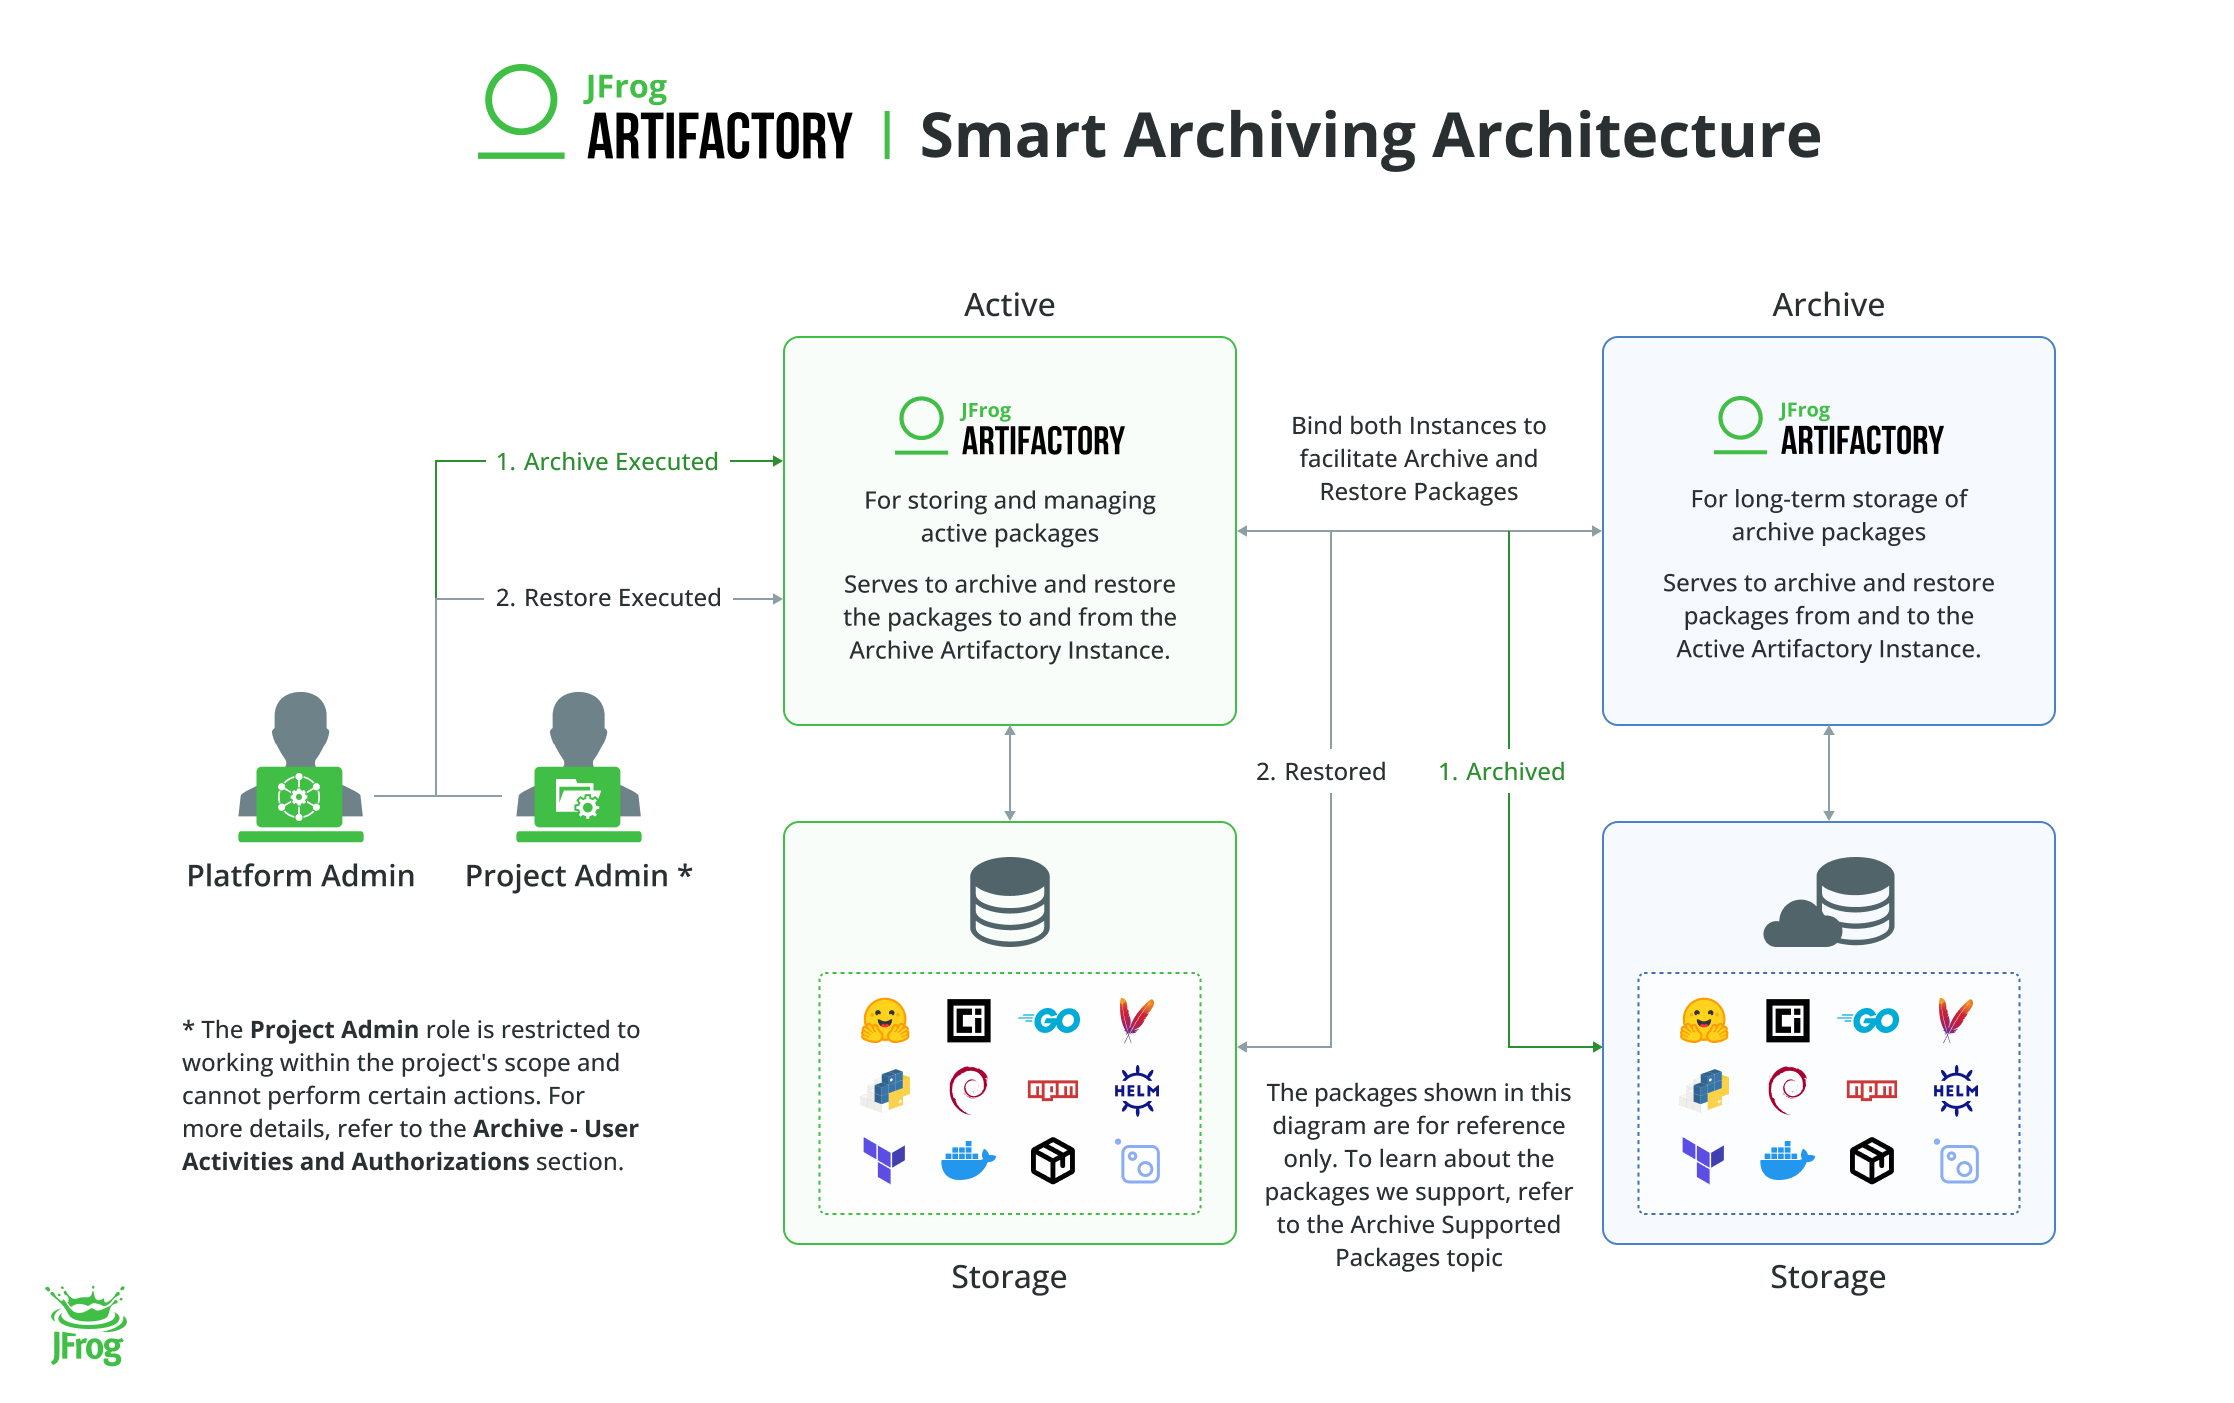
The JFrog Smart Archiving solution facilitates the seamless transfer of critical but inactive packages from an Active Artifactory instance to a dedicated Archive instance. This architectural separation allows organizations to strictly enforce long-term retention policies for regulatory compliance, while simultaneously protecting the speed and performance of their active CI/CD pipelines.
Archive Policies enable Platform and Project Administrators to define customized rules for archiving dormant binaries based on specific criteria across the JFrog platform. This approach offers the following benefits:
- Reduced storage costs: Enhances system performance and improves loading times within the JFrog Platform.
- Boosted efficiency: Enhances system performance and improves loading times within the JFrog Platform.
- Enhanced user experience: Minimizes the number of items to navigate, saving time and improving overall user experience.
- Ensure compliance: Ensures compliance by archiving artifacts and restoring them when needed.
Smart Archiving is a new solution that enhances user experience, features, and infrastructure while addressing current limitations. Upgrade for better performance.
Learn more about Smart Archiving at JFrog Academy!
Subscription Information
Currently, this feature is supported from 7.111 for the Multi-Cloud platform, with an Enterprise+ license. Supported cloud providers are as follows:
- AWS
- GCP
- Azure
For a Hybrid Self-hosted Platform, it is supported from 7.117.14.
Smart Archiving Features
This topic outlines smart archiving features. It includes archiving, searching and restoring packages.
-
Archive Policy
Archive policies define which packages need to be archived. When the policy is executed, packages are moved from the Active Artifactory Instance to the Archive Artifactory Instance, while the corresponding packages are stored in the Storage connected to the Archive Artifactory Instance.
Scheduled Execution: Scheduling enables you to configure the periodic execution of a policy that can be set to any frequency defined by a cron schedule. You can also define when (or after what period) the policy execution will be stopped, which enables you to perform archiving execution during weekends or maintenance windows.
Note
If required, you can run the archive policy manually. To learn more, refer to the Run Smart Archiving Policy Manually
After packages are successfully archived in the Archive Artifactory Instance, the archived items and corresponding metadata are deleted from the original repository in the Active Artifactory Instance. If the archive process fails, items and the corresponding metadata are not removed, and the incident is logged with an appropriate error message.
As the archive process progresses, the system generates detailed logs in the Artifactory service logs in the Active Artifactory Instance.
Admins can manage archive policies, such as create, view, edit, and delete, using the UI or APIs. To learn more, refer to Manage Smart Archiving - Policies.
Note
Only Platform and Project admins can create and manage archive policies. To learn more about authorizations, refer to Smart Archiving - User Activities and Authorizations
-
Archive Search
Admins can use the search feature to perform dedicated archive searches in the Active Artifactory Instance, allowing them to locate and restore packages as needed. For more information, refer to Search Archived Packages.
-
Restore Archived Packages
After searching for archived packages, admins can restore them from the Archive Artifactory Instance to the Active Artifactory Instance.
Note
Restore action does not delete the packages in the Archive Artifactory Instance.
When performing a restore action, the admin can choose one of the following destinations:
- Restore items to their original repository and provide a fallback repository (if the original repository was deprecated)
- Restore all the items to a new repository
The system performs the restore operation in the background and updates the Artifactory service logs in the Archive Artifactory instance.
To learn more, refer to Restore Archived Packages.
Note
- The restore process may take from a few minutes to several hours, depending on the number of items being restored and the cloud provider.
- If an error occurs during the restore, the process will fail, and error messages will be logged.
Smart Archiving Limitations
This topic outlines the limitations of the smart archiving feature.
Supported Repositories
- Supports Local and Federated repositories. Does not support Remote and Virtual repositories.
Note
When archiving Federated repositories, the run (dry or actual) can take significantly longer compared to Local repositories. This is because the archive workflow must check the last download status of each package across all federation members. The more members involved, the longer the process will take.
Recommendations to Optimize Archive:
- Adjust Policy Conditions: Narrow the scope of your archive policies to reduce the number of packages to be archived in each run. This can significantly speed up the run.
- Increase Run Frequency: Run archive policies more often to process smaller sets of packages. This helps prevent large backlogs and improves long-term performance.
Package Verification
There is no verification if packages are part of a Release Bundle or build. A package-level Archive policy may impact build or release bundle promotion.
Archive Limits
An archive policy can archive up to 100,000 packages in a single run.
Progress Notifications
Notifications on the progress of an archive policy run and restore run are unavailable.
Visibility of Run Results
Run results for global policies are visible only to Platform admins globally.
Archive Policy
The Archive policy does not execute when an ongoing mandatory task is in progress (for example, Garbage Collection).
Search
A project admin can only perform searches within their project context and does not have access to the global scope.
Archive Evidence
From Artifactory Version 7.117, added support for the archival of evidence associated with any packages. This enhancement ensures that relevant evidence is preserved as part of your archiving strategy, streamlining your package management process.
Note
Please note that in Artifactory versions prior to 7.117, if you archive packages that have associated evidence, the evidence will not be archived. When restoring packages archived in these earlier versions, only the packages themselves will be restored, and any associated evidence will not be restored.
Concurrent Execution and Queuing of Archive Policies
- Archive Policies can run concurrently up to a specified maximum. When this limit is reached, additional triggered policies are queued. Any further triggered policies will be skipped entirely if the queue reaches its maximum capacity.
- In the current version of Artifactory, queued or skipped policy runs do not appear in the Runs view. You can find a log of skipped policies in the Artifactory Service log. For example, you might see a message like:
"Policy: test_policy run: 1 has been rejected since allowed 3 concurrent runs are already in progress."
Supported Topology
-
1-to-1 Connection
Only one Active Artifactory Instance can be paired with one Archive Artifactory Instance.
-
Active Artifactory Configuration
Active Artifactory Instance can only be a Platform or a Mothership, not an Edge
Provider and Region Restriction
Archive Artifactory Instance must be of the same provider and region as the Active Artifactory Instance.
No Unbinding
Unbinding an Archive Artifactory Instance is not supported.
Conversion Restriction
Archive Artifactory Instance cannot be converted to other JPD types.
Unbinding Deleted/unavailable Archive Artifactory Instance
When an Active Artifactory Instance and an Archive Artifactory Instance are paired, and the Archive Artifactory Instance is no longer available (for example, it has been decommissioned or is unreachable), the usual binding revocation may fail. This is because the revocation request relies on the existence of the Archive Artifactory Instance to complete. If the Archive Artifactory Instance no longer exists, the binding cannot be deleted through standard means. Workaround: Refer to the Solution.
Smart Archiving Known Issues
This topic outlines the known issues of the smart archiving solution.
SBT Package
-
When SBT packages are uploaded with the
sbt-defaultrepository layout, they are not resolved during archive actions.Workaround: Choose Recommended Repository Layouts as described in the Create an sbt Repository.
Smart Archiving Use Cases
This topic outlines sample use cases for creating archive policies. It includes the type of use case, the scenario, the solution, and the expected result. These examples help you understand how to configure archive policies based on specific conditions for archiving packages.
Use Case | Scenario | Solution | Result |
|---|---|---|---|
| Archiving Stale Packages | Large repositories with many stale packages. | Create an archive policy to archive stale packages |
|
| Archiving Deprecated/EOL Versions of Packages | Deprecated versions of packages that are no longer needed. | Create an archive policy to archive deprecated/EOL versions. | |
| Automating Archiving Old Packages | Required to retain packages for a set period (for example, 6 months) for compliance. | Create an archive policy to automate archiving packages based on:
|
|
| Archiving for Compliance and Audit Purposes | Required to retain packages for auditing or legal reasons. | Create an archive policy to archive all packages older than a set number of years (for example 2 years). |
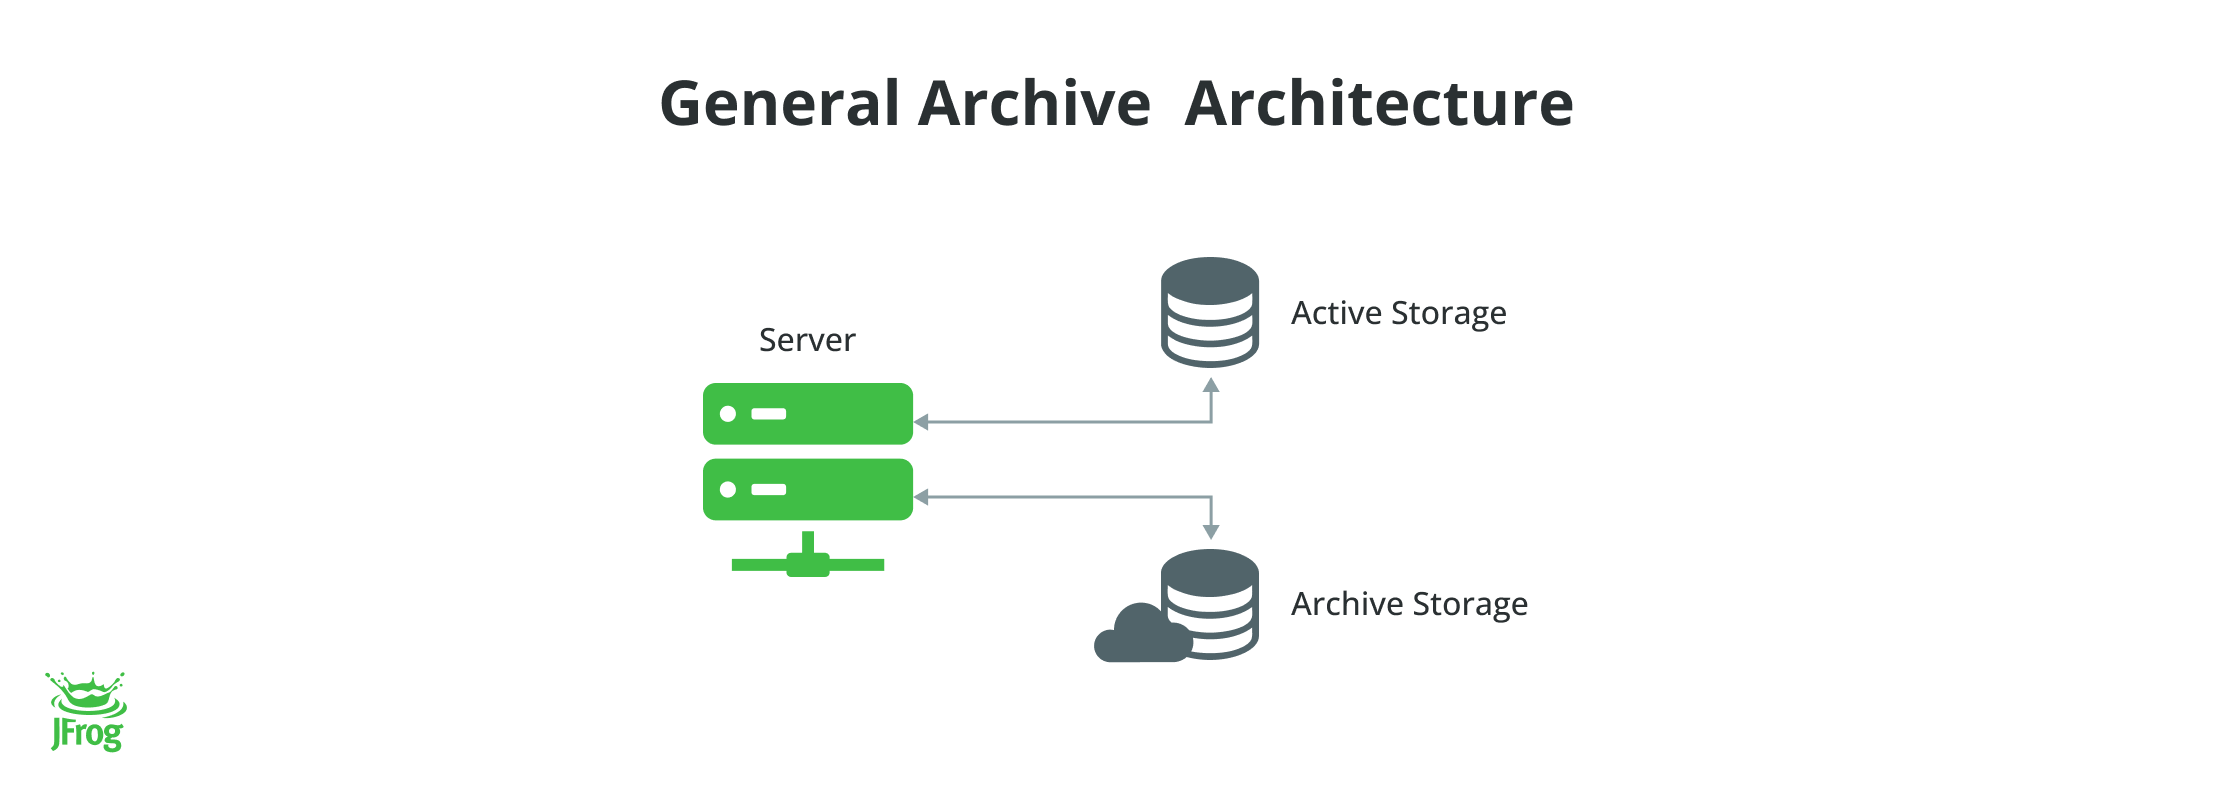
Smart Archiving Architecture
This topic outlines smart archiving architecture and its components.
The smart archiving solution is comprised of three main components:
-
Active Artifactory Instance
Active Artifactory Instance is a standard Artifactory instance, the packages will be archived and restored Archive Artifactory Instance.
-
Archive
The Archive policy periodically offloads packages based on specific criteria to the Archive Artifactory Instance. Moving these packages can enhance usability, search capabilities, and performance in the Active Artifactory Instance by reducing maintenance load. To learn more, refer to Manage Smart Archiving - Policies
-
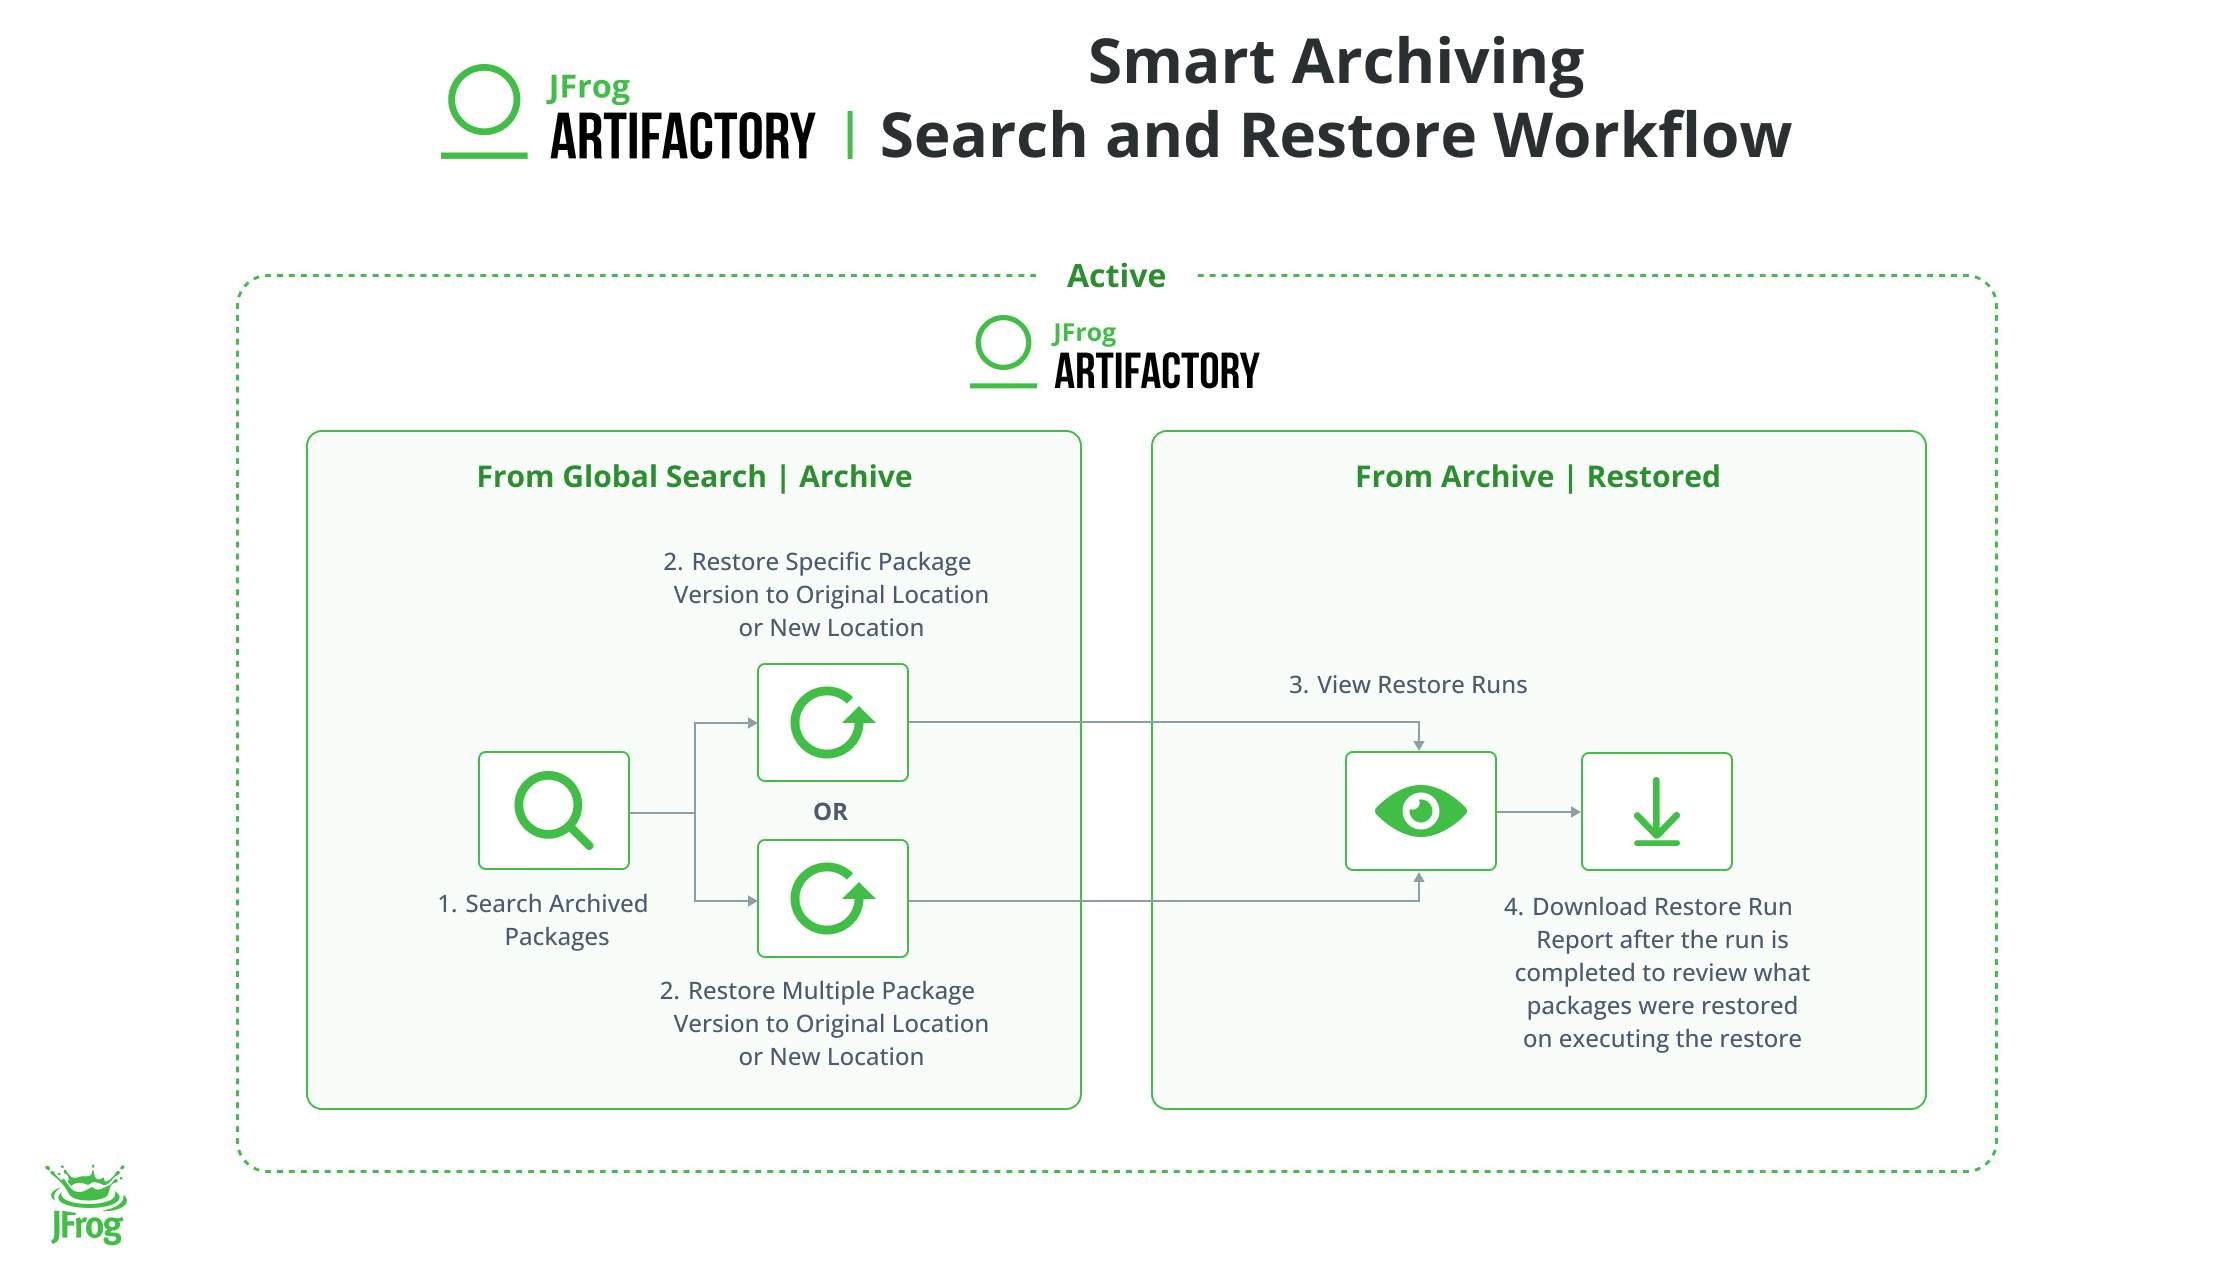
Search and Restore
You can search for and restore archived packages. Restorations can be directed to the original location in the Active Artifactory Instance or to a new destination. The restore process runs in the background, while metadata associated with archived packages remains intact for continued access after restoration.
To learn more, refer to Manage Restore Runs.
-
-
Archive Artifactory Instance
Archive Artifactory is a simplified version of an Artifactory instance designed specifically for archiving. It operates as a dedicated Artifactory instance connected to a binary storage provider, such as GCP Storage.
Note
An Archive Artifactory instance can connect to only one Active Artifactory instance. Each Artifactory cluster that requires archiving needs its own Archive Artifactory instance with a dedicated license.
Archive Topology
The smart archiving supports the topology of one Active Artifactory instance connecting to one Archive Artifactory instance.
Topology Not Supported
Smart Archiving does not support many Active Artifactory instances connecting to one Archive Artifactory instance.
Smart Archiving Supported Packages
This topic outlines the supported packages for smart archiving. It includes the policy conditions that apply to each package type.
| Package Type | Supported Release Version | Lead Artifact | Age (Packages Older Than) | Usage (Packages Not Downloaded Since) | Version (Number of Latest Versions to Keep) |
|---|---|---|---|---|---|
| Alpine | 7.111.1 | .tar.gz, .apk |  | | |
| Docker | 7.111.1 | manifest.json | | | Note: Supported from V 7.115.1 |
| Maven | 7.111.1 | .pom | | | |
| Ansible | 7.111.1 | tar.gz | | | |
| npm | 7.111.1 | .tgz | | | |
| Gradle | 7.111.1 | .pom | | | |
| Generic | 7.111.1 | - | | |  |
| RPM | 7.111.1 | .rpm | | | |
| Conan | 7.111.1 | conanfile.py | | | |
| NuGet | 7.111.1 | .nupkg | | | |
| PyPI | 7.111.1 | tar.gz, tgz, gz, whl, egg, bz2 | | | |
| Helm | 7.111.1 | .tgz | | | |
| Go | 7.111.1 | .mod | | | |
| Debian | 7.111.1 | .deb, .ddeb | | | |
| Gems | 7.111.1 | .gem | | | |
| Cargo | 7.111.1 | .crate | | | |
| HuggingFaceML | 7.111.1 | .jfrog_huggingface_model_info.json, .jfrog_huggingface_dataset_info | | | |
| Machine Learning | 7.111.1 | model-manifest.json | | | |
| CocoaPods | 7.111.1 | .tar.gz, .tgz | | | |
| Terraform | 7.111.1 | .zip | | | |
| Terraform BE | 7.111.1 | .json | | | |
| OCI | 7.111.1 | manifest.json | | | Note: Supported from V 7.115.1 |
| Helm OCI | 7.111.1 | manifest.json | | | Note: Supported from V 7.115.1 |
| Conda | 7.111.1 | tar.bz2 | | | |
| Hex | 7.111.1 | - | | | |
| SBT | 7.111.1 | .pom, .xml | | | |
| Vagrant | 7.111.1 | - | | | |
| Swift | 7.114.1 | - | | | |
| Composer | 7.116 | - | | | |
| Agent Plugins | 7.157 | .zip | | | |
Docker Archive Method
Docker images can have multiple tags and use list.manifests to support different architectures. Each list.manifest points to several specific manifests for various systems.
Learn how the policy executes for the following conditions:
Avoid Policies with Conflicting Criteria
We recommend to avoid configuring two different policies with conflicting criteria (For example, Last N Versions and Not Downloaded Since) for the same Docker, OCI, or Helm OCI repository.
-
Time-based Condition: Time-based condition archives images and tags that have not been used within a certain period. This helps keep the connections between tags intact and ensures the stability of multi-architecture references. We recommend using the Packages Not Downloaded Since condition to prevent the archiving of images that are currently in use.
-
Version-based Condition: From Artifactory V 7.115.1, we support Version-based policy conditions for Docker, OCI, and Helm OCI. It allows you to keep a specified number of image versions in the Docker repository, which considers the structure of Docker images when deciding what to archive. If a Docker image is a
list.manifest, it will either be archived with all of its related sub-manifests or not archived at all. This approach maintains the relationships between images. This provides greater control over image management and helps maintain tag relationships and multi-architecture references.On the other hand, time-based conditions treat each manifest and
list.manifestseparately, without considering their hierarchical structure. Each one is evaluated independently based on its status.
Note
Tag Retention Logic: When this logic is enabled, previous tag revisions (tag retentions) will be archived only when the most recent revision of a tag is archived.
Max Unique Tags Logic: When this logic is enabled, the Last N Versions policy will take precedence.
Example: With Last N Versions set to 2 and Max Unique Tags set to 5, retains only 2 versions/tags of the same image after the policy is executed.
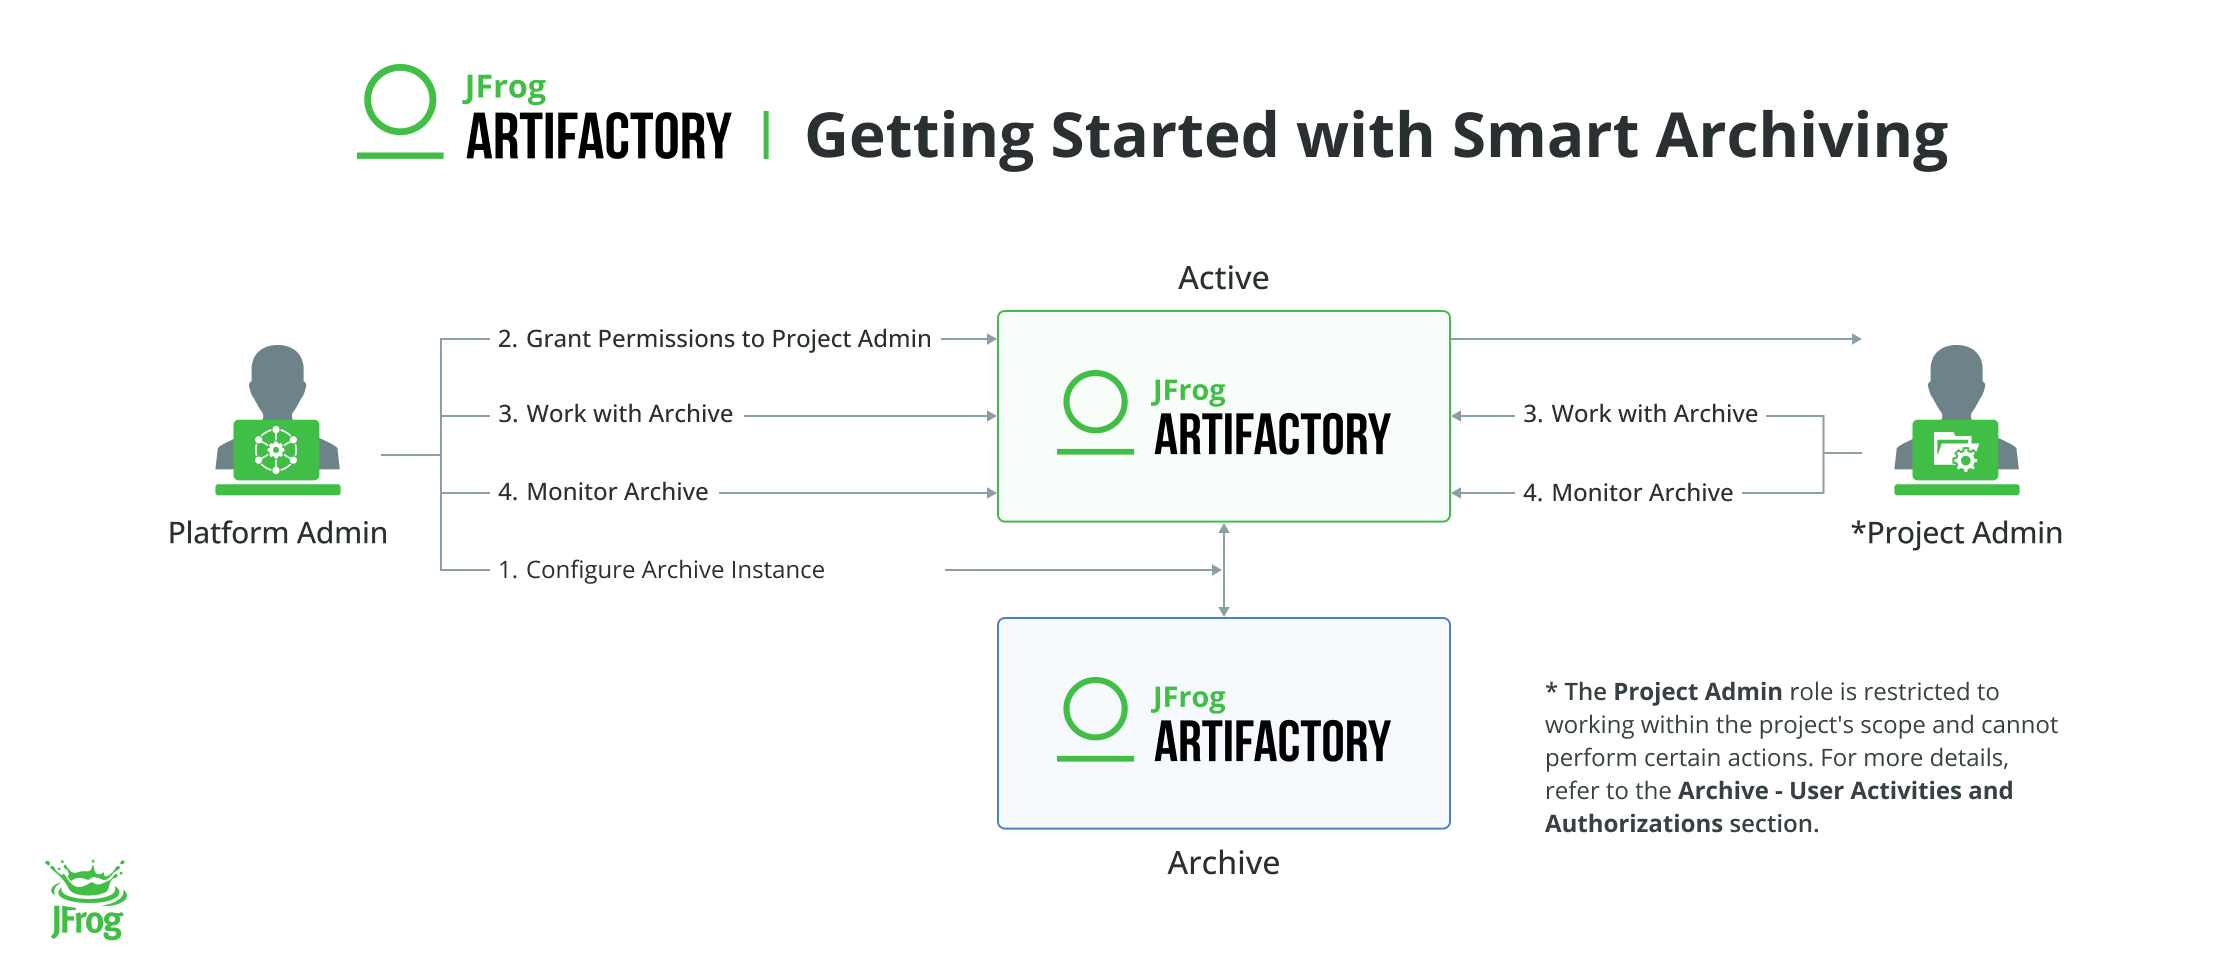
Get Started with Smart Archiving
This topic outlines how to get started with smart archiving. It includes how to configure the smart archiving solution, grant permission to a project admin, work with archive and restore, and monitor archive and restore operations.
Task | Description | Reference Links | |
|---|---|---|---|
1 | Configure Archive Instance | This topic describes how to create a new archive instance and connect it to an active instance. The archive instance is used in the smart archiving solution to offload archive items from the active instance. | Configure Smart Archiving Instance |
2 | Grant Permission to a Project Admin to Create and Edit Archive Policies | This topic outlines how to grant permission to a project admin. Platform admins can enforce and manage archive policies across multiple projects or all projects on the JFrog platform and thereby gain full control over organizational storage management (Global Policies). Platform admins can also delegate permissions to Project admins to manage policies on their project scope only (Project Policies), and Project admins have visibility on Global Policies affecting their projects. | Grant Permission to Project Admin |
3 | Work with Archive and Restore | This section outlines working with Archive and Restore. It includes creating and managing archive policies, managing archive runs, searching and restoring archived packages and managing restore runs. | Work with Smart Archiving and Restore |
4 | Monitor Archive and Restore | This section outlines monitoring archive storage, archive and restore runs. | Monitor Smart Archiving and Restore |
Configure Smart Archiving Instance
This section describes how to create a new archive instance and connect it to an active instance. The archive instance is used in the smart archiving solution to offload archive items from the active instance.
Follow the relevant instructions for your deployment model to configure smart archiving:
Configure Cloud Smart Archiving Instance
Use this path when both your active JFrog Platform and archive instance run on JFrog Cloud (SaaS). Create the archive server and associate it with your active Platform server in MyJFrog Topology.
To configure a cloud smart archiving instance:
- Follow the procedure in Add Servers to Your Cloud Topology.
When you add the server, select Smart Archiving as the deployment type and associate it with your active JFrog Platform server in the Associated Server field.
Next steps:
Configure Hybrid Smart Archiving Instance
Hybrid Smart Archiving is supported on the Self-hosted platform with E+ from version 7.117.14.
Prerequisite: You must have an active Artifactory instance. Contact your Account Manager to purchase a JFrog E+ Hybrid subscription for your JFrog Smart Archive instance.
Use this path when your active Artifactory instance is self-hosted and the archive instance is deployed in JFrog Cloud. Complete the following tasks to set up hybrid smart archiving:
To revoke a binding or re-establish trust after initial setup, see Manage Hybrid Smart Archiving Bindings.
Provision the Archive Instance in MyJFrog
After you purchase a JFrog E+ Hybrid subscription, provision the archive instance in MyJFrog.
Important
Upon successful purchase, you will receive an email from JFrog with the subject line Activate Your JFrog Hybrid Subscription.
To provision the archive instance in MyJFrog:
- Click Go to MyJFrog in the received email.
- Log in to MyJFrog Your Customer Portal with your registered credentials.
- In the My JFrog Dashboard, click Topology.
- On the Topology page, click Configure Now.
- Scroll down on the Configure JPDs page to the Available Smart Archiving Instance (x) section.
- In the Archive Name field, enter a meaningful name for the archive instance. The name must follow these conventions:
- Unique name
- 3-32 characters long
- Start with a letter
- Contain only lowercase letters or numbers
- From the Provider list, select the cloud provider.
- From the Region list, select the region.
- Enter Password and Validate Password. The password must meet these criteria:
- 8-32 characters long
- At least one uppercase and one lowercase character
- At least one number
- At least one special character
- Click Update.
After you enter all required information, the dialog displays an All Set indicator. The Topology tab shows an indicator at the top that the JPDs are being added and the environment is being updated. This process may take a few minutes.
When the configuration completes:
- A tree structure displays the archive instance status as Active.
- Upon successful Smart Archiving JPD creation, you will receive an email from JFrog with the subject line Your New JFrog Instance Is Ready.
Note
No changes are allowed to the instance configuration once configured. For changes, contact Customer Success.
Next steps:
Archive instance fields
The Topology page displays the following information for each configured archive instance:
-
JPD Name: The name of the active instance.
-
Type: Indicates the type of JPD.
-
Provider: Indicates the type of Cloud provider.
-
Region: Indicates the region of the deployed instance.
-
Status: Indicates the status of the instance.
- Active: The archive instance is available to bind with the active instance.
Bind Archive Instance
You can bind the archive instance using one of these methods:
Bind Archive Instance via UI
To bind the archive instance via the UI:
- On the archive instance, generate a pairing token:
-
From Administration, click User Management > Access Tokens > Pairing Token.
-
From Generate Pairing Token, click Cold Storage.
-
Click Generate.
The token window is displayed. It includes the token expiration (in seconds, set by default to 300 seconds = 5 minutes), the token ID, and the token value, which you can copy by clicking Copy.
-
- On the active instance, establish trust with the archive instance:
-
From Administration, click Topology > Deployment Bindings.
-
Click the Archive tab. In the top right corner, click + Add Binding, and select Archive from the dropdown list.
-
In the Create Binding modal, do the following:
-
From Source JPD (Live Instance), select the active instance.
-
From Target JPD (Cold Instance), select the archive instance.
-
Click Apply.
The Summary displays the target and source you selected.
-
-
Click Create.
-
Check the Binding Results.
Bind Archive Instance via API
To bind the archive instance via the API:
On the archive instance, execute the following POST request to generate the pairing token:
curl -u admin:password -X POST https://<archive_instance>/artifactory/api/v1/service_trust/pairing/artifactory-coldWhere:
<archive_instance>: The URL of the archive Artifactory instance
For example:
{ "pairing_token":"IiwiYWxnIjoiUlMyNTYiLCJraWQiOiJaWkhkQzBzenlqd2d..."}On the active instance, use the generated pairing token to execute the following PUT request:
curl -u admin:password -X PUT -H "Content-Type: application/json" -d '{"pairing_token" : "<pairing_token>"}' https://<active_instance>/artifactory/api/v1/service_trust/pairing/artifactory-coldWhere:
<active_instance>: The URL of the active Artifactory instance<pairing_token>: The pairing token returned from the archive instance
For example:
curl -u admin:password -X PUT -H "Content-Type: application/json" -d '{"pairing_token" : "IiwiYWxnIjoiUlMyNTYiLCJraWQiOiJaWkhkQzBzenlqd2d..."}' https://<active_instance>/artifactory/api/v1/service_trust/pairing/artifactory-coldIf the two instances are paired successfully, the request returns the following status:
Trust with service artifactory-cold was established successfully
Next steps:
Manage Hybrid Smart Archiving Bindings
Use this section after initial setup when you need to revoke a binding or re-establish trust between the active and archive instances—for example, when a pairing token was mistakenly revoked.
To revoke the binding between the active and archive Artifactory instances:
Note
You cannot remove the binding between the Active Artifactory Instance and Archive Artifactory Instance if the Archive Artifactory Instance is no longer available.
Perform the following steps on the active Artifactory instance:
-
From Administration, click Topology > Deployment Bindings, and then click the Archive tab.
-
Select the checkbox for the bindings you wish to remove, and then click the Delete icon.
-
Click OK to confirm.
Your action is applied and the results of the unbinding are now displayed.
To re-establish trust between the active and archive Artifactory instances:
Re-establish trust when the pairing was revoked, such as when a token has been mistakenly revoked.
Follow the same steps performed while binding for the first time as described in Bind Archive Instance.
Grant Permission to Project Admin
This topic outlines how to grant permission to a project admin. Platform admins can enforce and manage archive policies across multiple projects or all projects on the JFrog platform and thereby gain full control over organizational storage management (Global Policies). Platform admins can also delegate permissions to Project admins to manage policies on their project scope only (Project Policies), and Project admins have visibility on Global Policies affecting their projects.
Global Policy: For maintaining consistent archive policies across multiple projects, ensuring compliance and standardization.
- Scope: Applies to all packages across the entire Artifactory instance.
- Configuration: Set by platform administrators and affects all projects at global level.
Project Policy: For addressing unique archive policies for a project that differ from the global standard, allowing flexibility to project administrators.
- Scope: Applies to individual projects.
- Configuration: Set by project/platform administrators for specific needs and requirements of a project.
To grant permissions to project admins, follow these steps:
-
From the Administration module, click Projects.
-
In the Projects screen, select the project where you want to give permissions to the Project Admin.
The project details appear in read-only mode.
-
Click Edit Settings in the upper right of the project details screen.
-
Go to the section Project Admins, and then click Manage Resources.
-
Add the user to the project from the Users tab.
-
Click Save.
Smart Archiving - User Activities and Authorizations
This topic outlines smart archiving user activities and their authorizations.
Configure Archive Instance and Grant Permission to Project Admin
| Activity | Platform Admin | Project Admin | Application User |
|---|---|---|---|
| Configure Smart Archiving Instance | | | |
| Grant Permission to Project Admin | | | |
Create Archive Policy
Activity | Platform Admin | Project Admin | Application User |
|---|---|---|---|
| Create Smart Archiving Policy |
|
Note: Only from allocated projects |
|
Manage Smart Archiving - Policies
Activity | Platform Admin | Project Admin Note: Applicable within the scope of your project context | Application User |
|---|---|---|---|
| Edit Smart Archiving Policy |
|
|
|
|
|
| |
|
|
| |
| Run Smart Archiving Policy Manually |
|
|
|
| Edit Smart Archiving Policy |
|
|
|
| Stop Running Smart Archiving Policy |
|
|
|
| Delete Smart Archiving Policy |
|
|
|
| Download Smart Archiving Policy Last Run Report |
|
|
|
| Disable All Smart Archiving Policies |
Note: This option is shown from the Global Context only. |
|
|
| Search Smart Archiving Policy |
|
|
|
Note: This option is shown from the Global Context only. |
|
|
Manage Smart Archiving - Runs
Activity | Platform Admin | Project Admin Note: Applicable within the scope of your project context | Application User |
|---|---|---|---|
|
|
| |
|
|
| |
|
|
|
Search and Restore Archived Packages
Activity | Platform Admin | Project Admin Note: Available from Version 7.123 | Application User |
|---|---|---|---|
|
|
| |
|
|
|
Manage Restore Runs
Activity | Platform Admin | Project Admin Note: Applicable within the scope of your project context | Application User |
|---|---|---|---|
|
|
| |
|
|
|
Monitor Smart Archiving and Restore
Activity | Platform Admin | Project Admin Note: Applicable within the scope of your project context | Application User |
|---|---|---|---|
Note: This option is shown from the Global Context only. |
|
| |
|
|
|
As per the User persona, you can perform the operations described in this section within the contexts described below:
Global Context
Project Context
Work with Smart Archiving and Restore
This section outlines working with Archive and Restore. It includes creating and managing archive policies, managing archive runs, searching and restoring archived packages and managing restore runs.
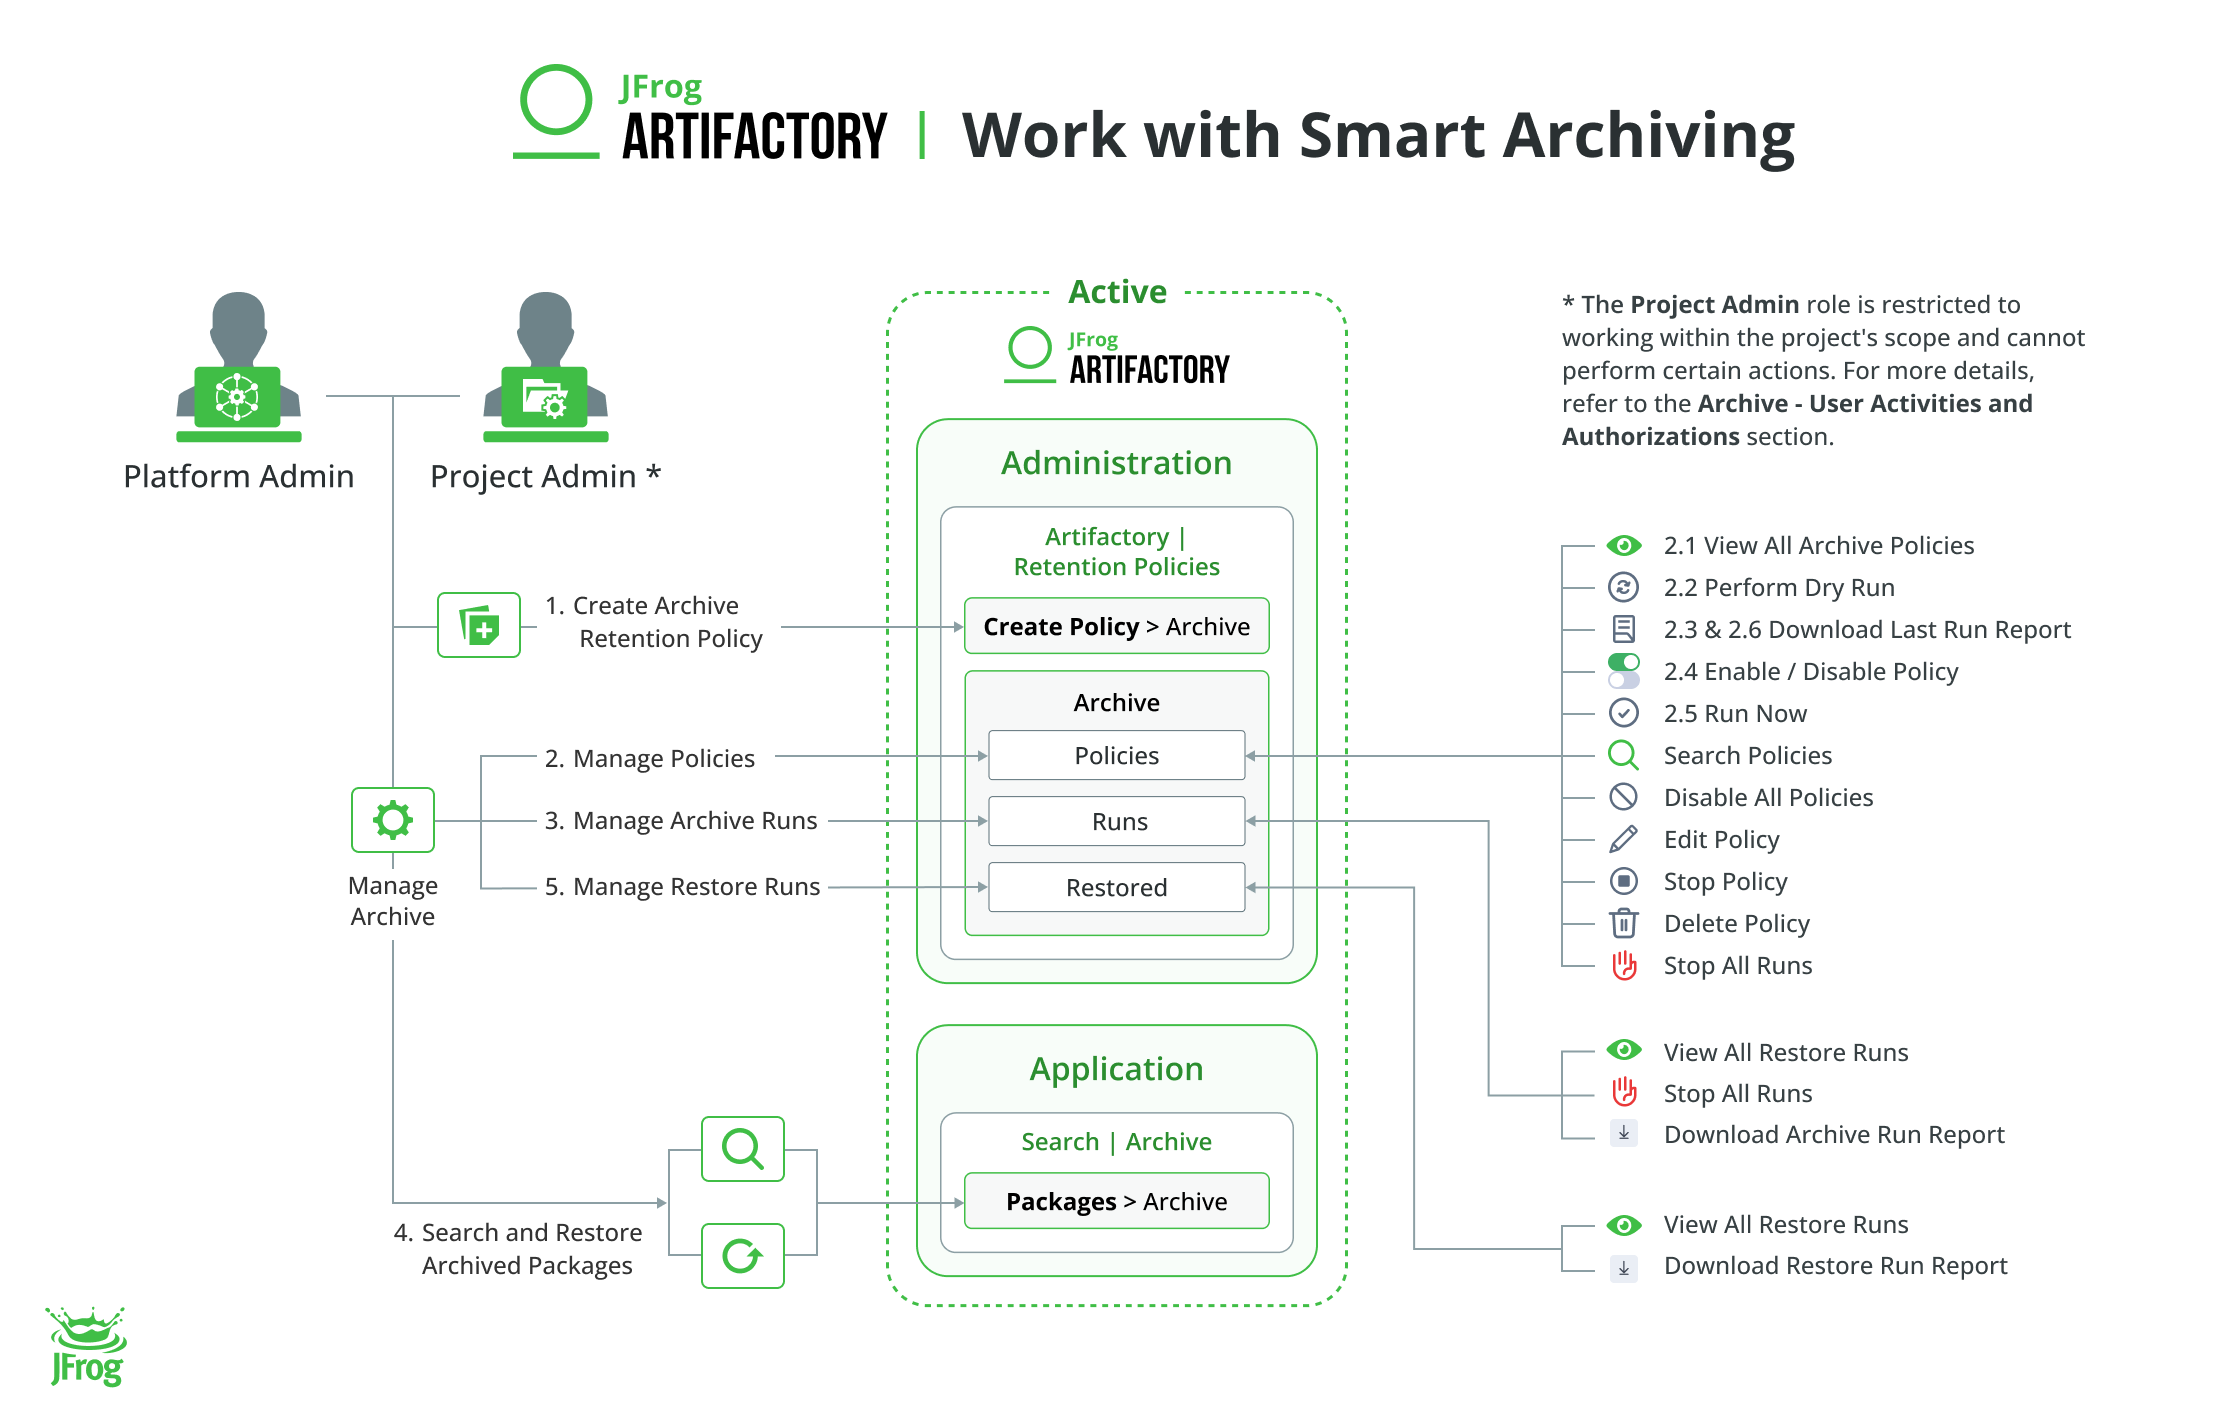
Task | Description | For UI, see... | For API, see... | |
|---|---|---|---|---|
1 | Create Smart Archiving Policy | This topic outlines how to create a smart archiving policy. You create the smart archiving policy to archive unintended packages from Active Artifactory Instance to Archive Artifactory Instance. | ||
2 | Manage Smart Archiving - Policies | This section outlines the actions you can perform on the smart archiving Policies from the Active Artifactory Instance. It includes enable/disable, search, manual run, dry run, edit, stop, delete, view and delete policies. | N/A | |
3 | Manage Smart Archiving - Runs | This section outlines the actions you can perform on the smart archiving Runs from the Active Artifactory Instance. It includes view, stop all runs and downloading run reports. | N/A | |
4 | Search and Restore Archived Packages | This section outlines the actions you can perform on the global search bar from the Active Artifactory Instance. It includes searching and restoring archived packages. | ||
5 | Manage Restore Runs | This section outlines the actions you can perform on the Restore Runs from the Active Artifactory Instance. It includes view, stop all runs and downloading run reports. | N/A |
Create Smart Archiving Policy
This topic outlines how to create a smart archiving policy. You create the smart archiving policy to archive packages from Active Artifactory Instance to Archive Artifactory Instance.
Authorization
Activity | Platform Admin | Project Admin | Application User |
|---|---|---|---|
| Create Smart Archiving Policy |
|
Note: Only from allocated projects |
|
To create Archive policies:
Important
Archive Evidence
From Artifactory Version 7.117, added support for the archival of evidence associated with any packages. This enhancement ensures that relevant evidence is preserved as part of your archiving strategy, streamlining your package management process.
Note
Please note that in Artifactory versions prior to 7.117, if you archive packages that have associated evidence, the evidence will not be archived. When restoring packages archived in these earlier versions, only the packages themselves will be restored, and any associated evidence will not be restored.
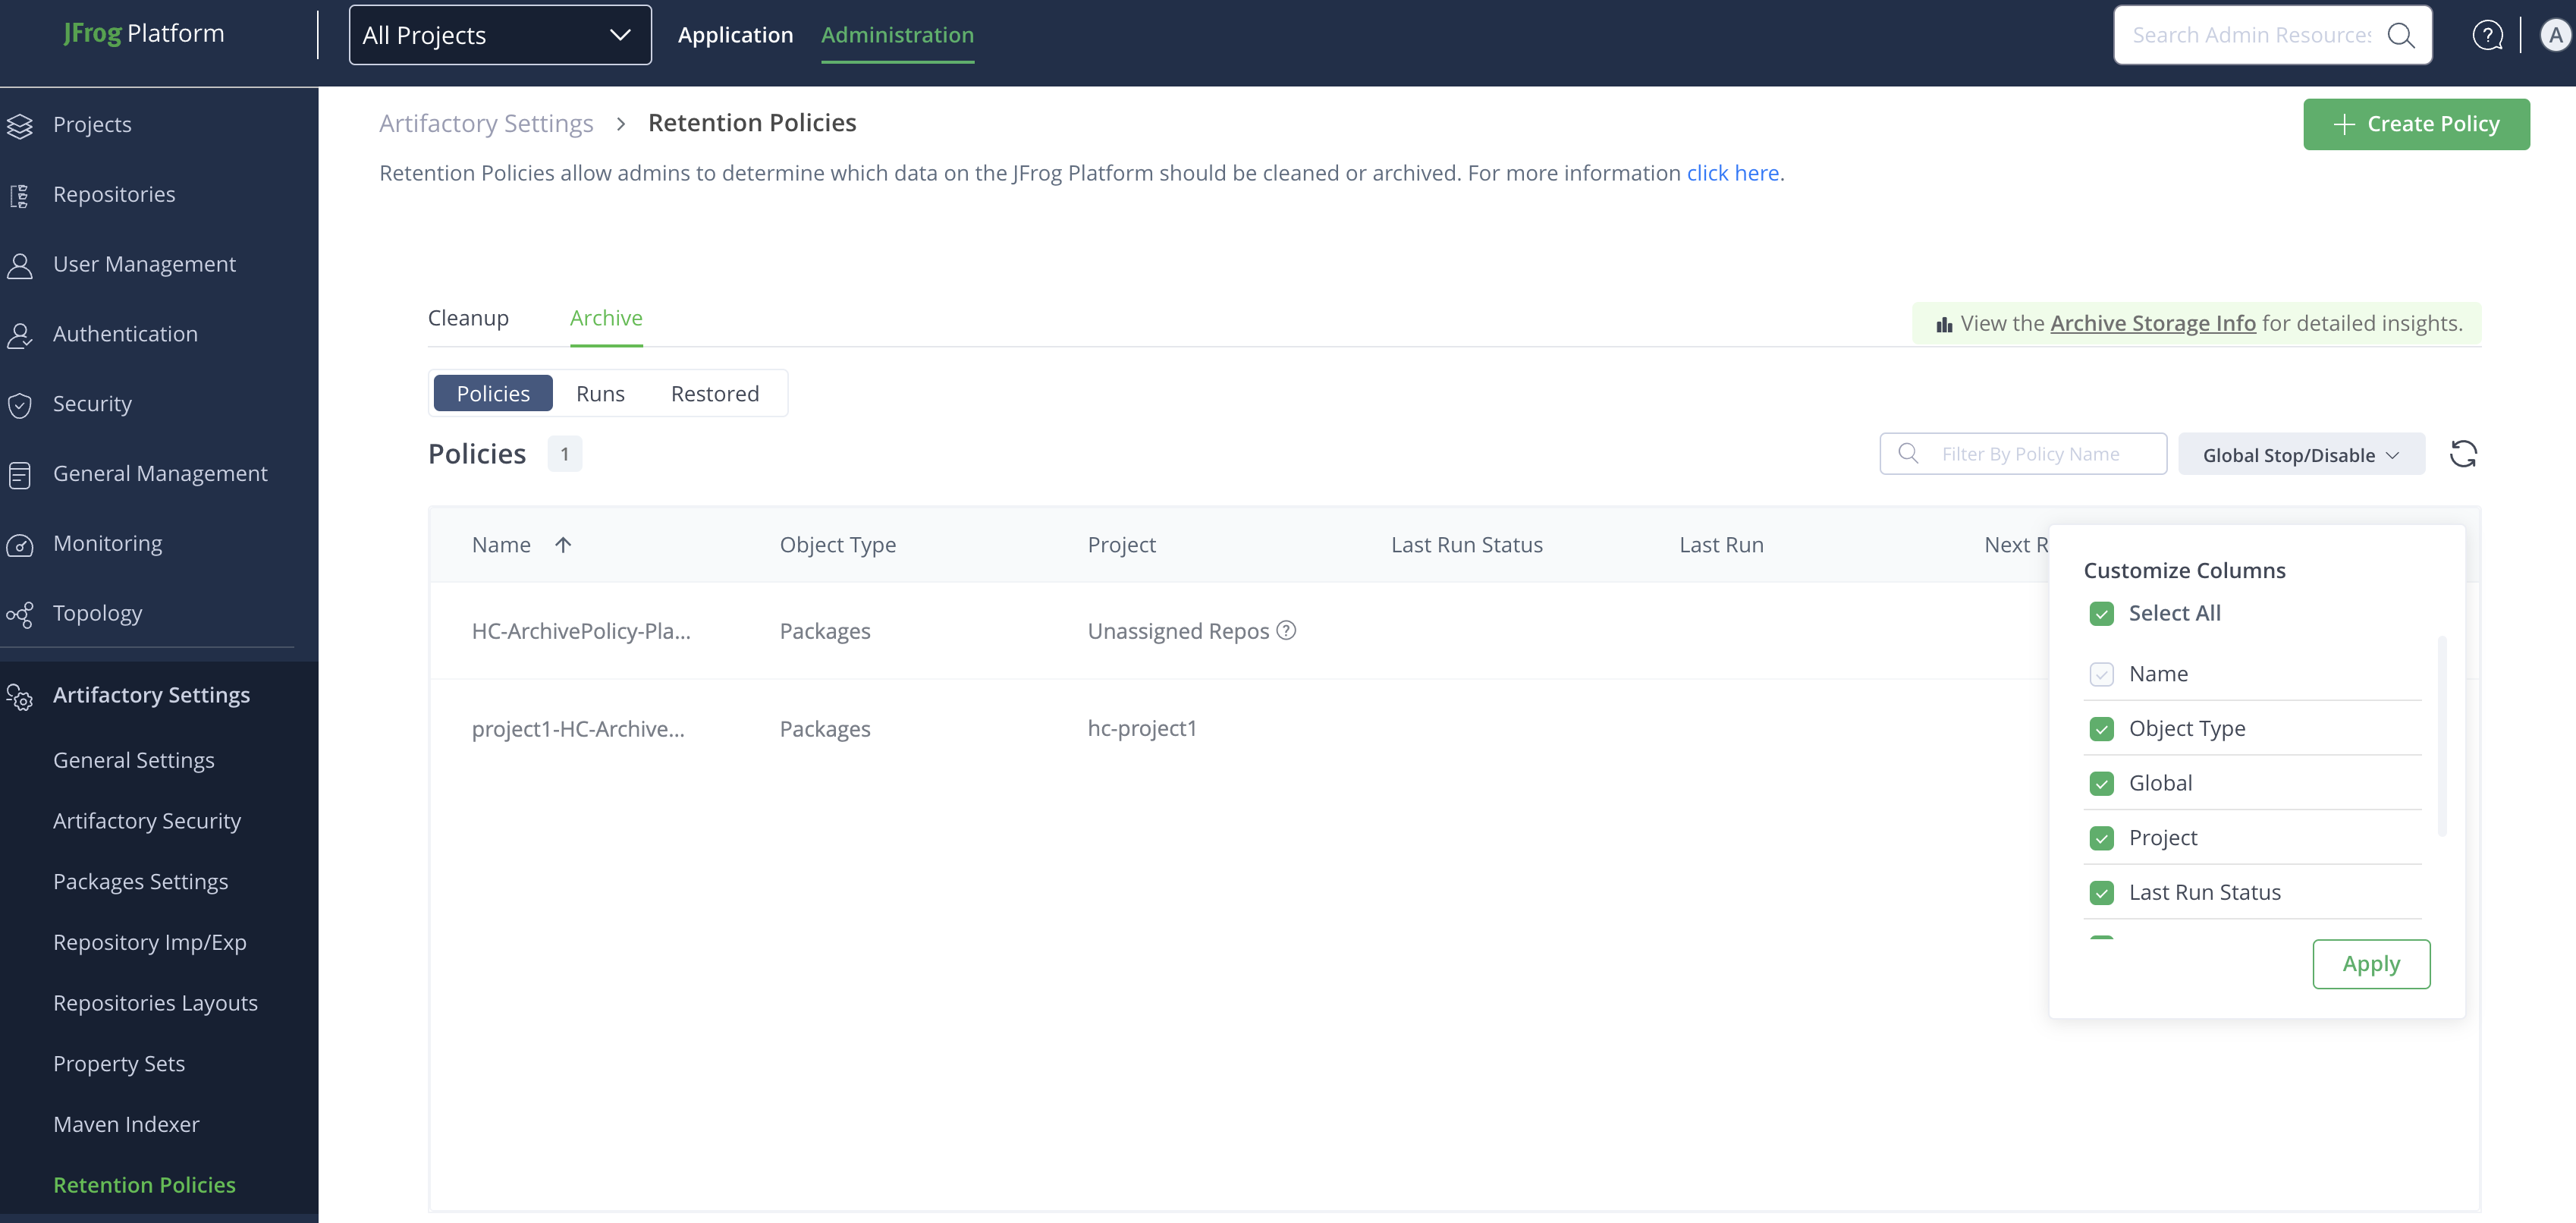
- From the Administration module, select Artifactory > Retention Policies.
- In the Retention Policies page, from the Create Policy dropdown list, click Archive Policy.
- Configure the following in the Create New Archive Policy page:
Field | Description | Media |
|---|---|---|
Policy Name | Enter a unique and meaningful name for the policy. | 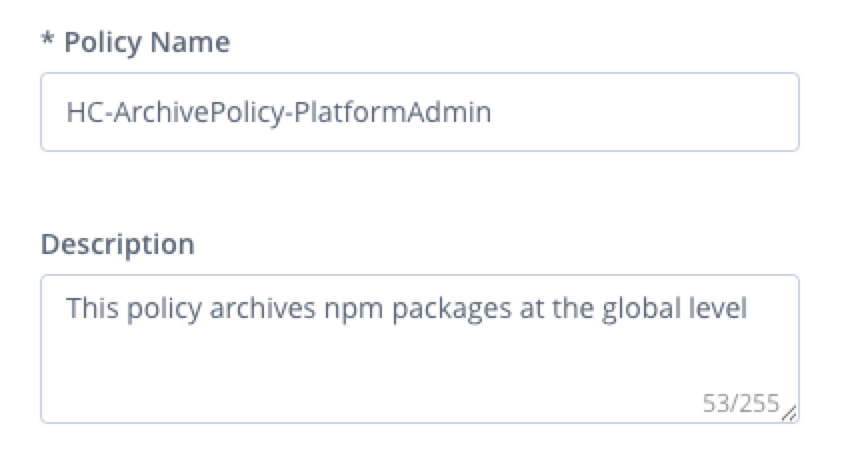 |
Description | Enter information regarding why this policy was created, and details that help users understand its configuration. | |
Policy Scope | 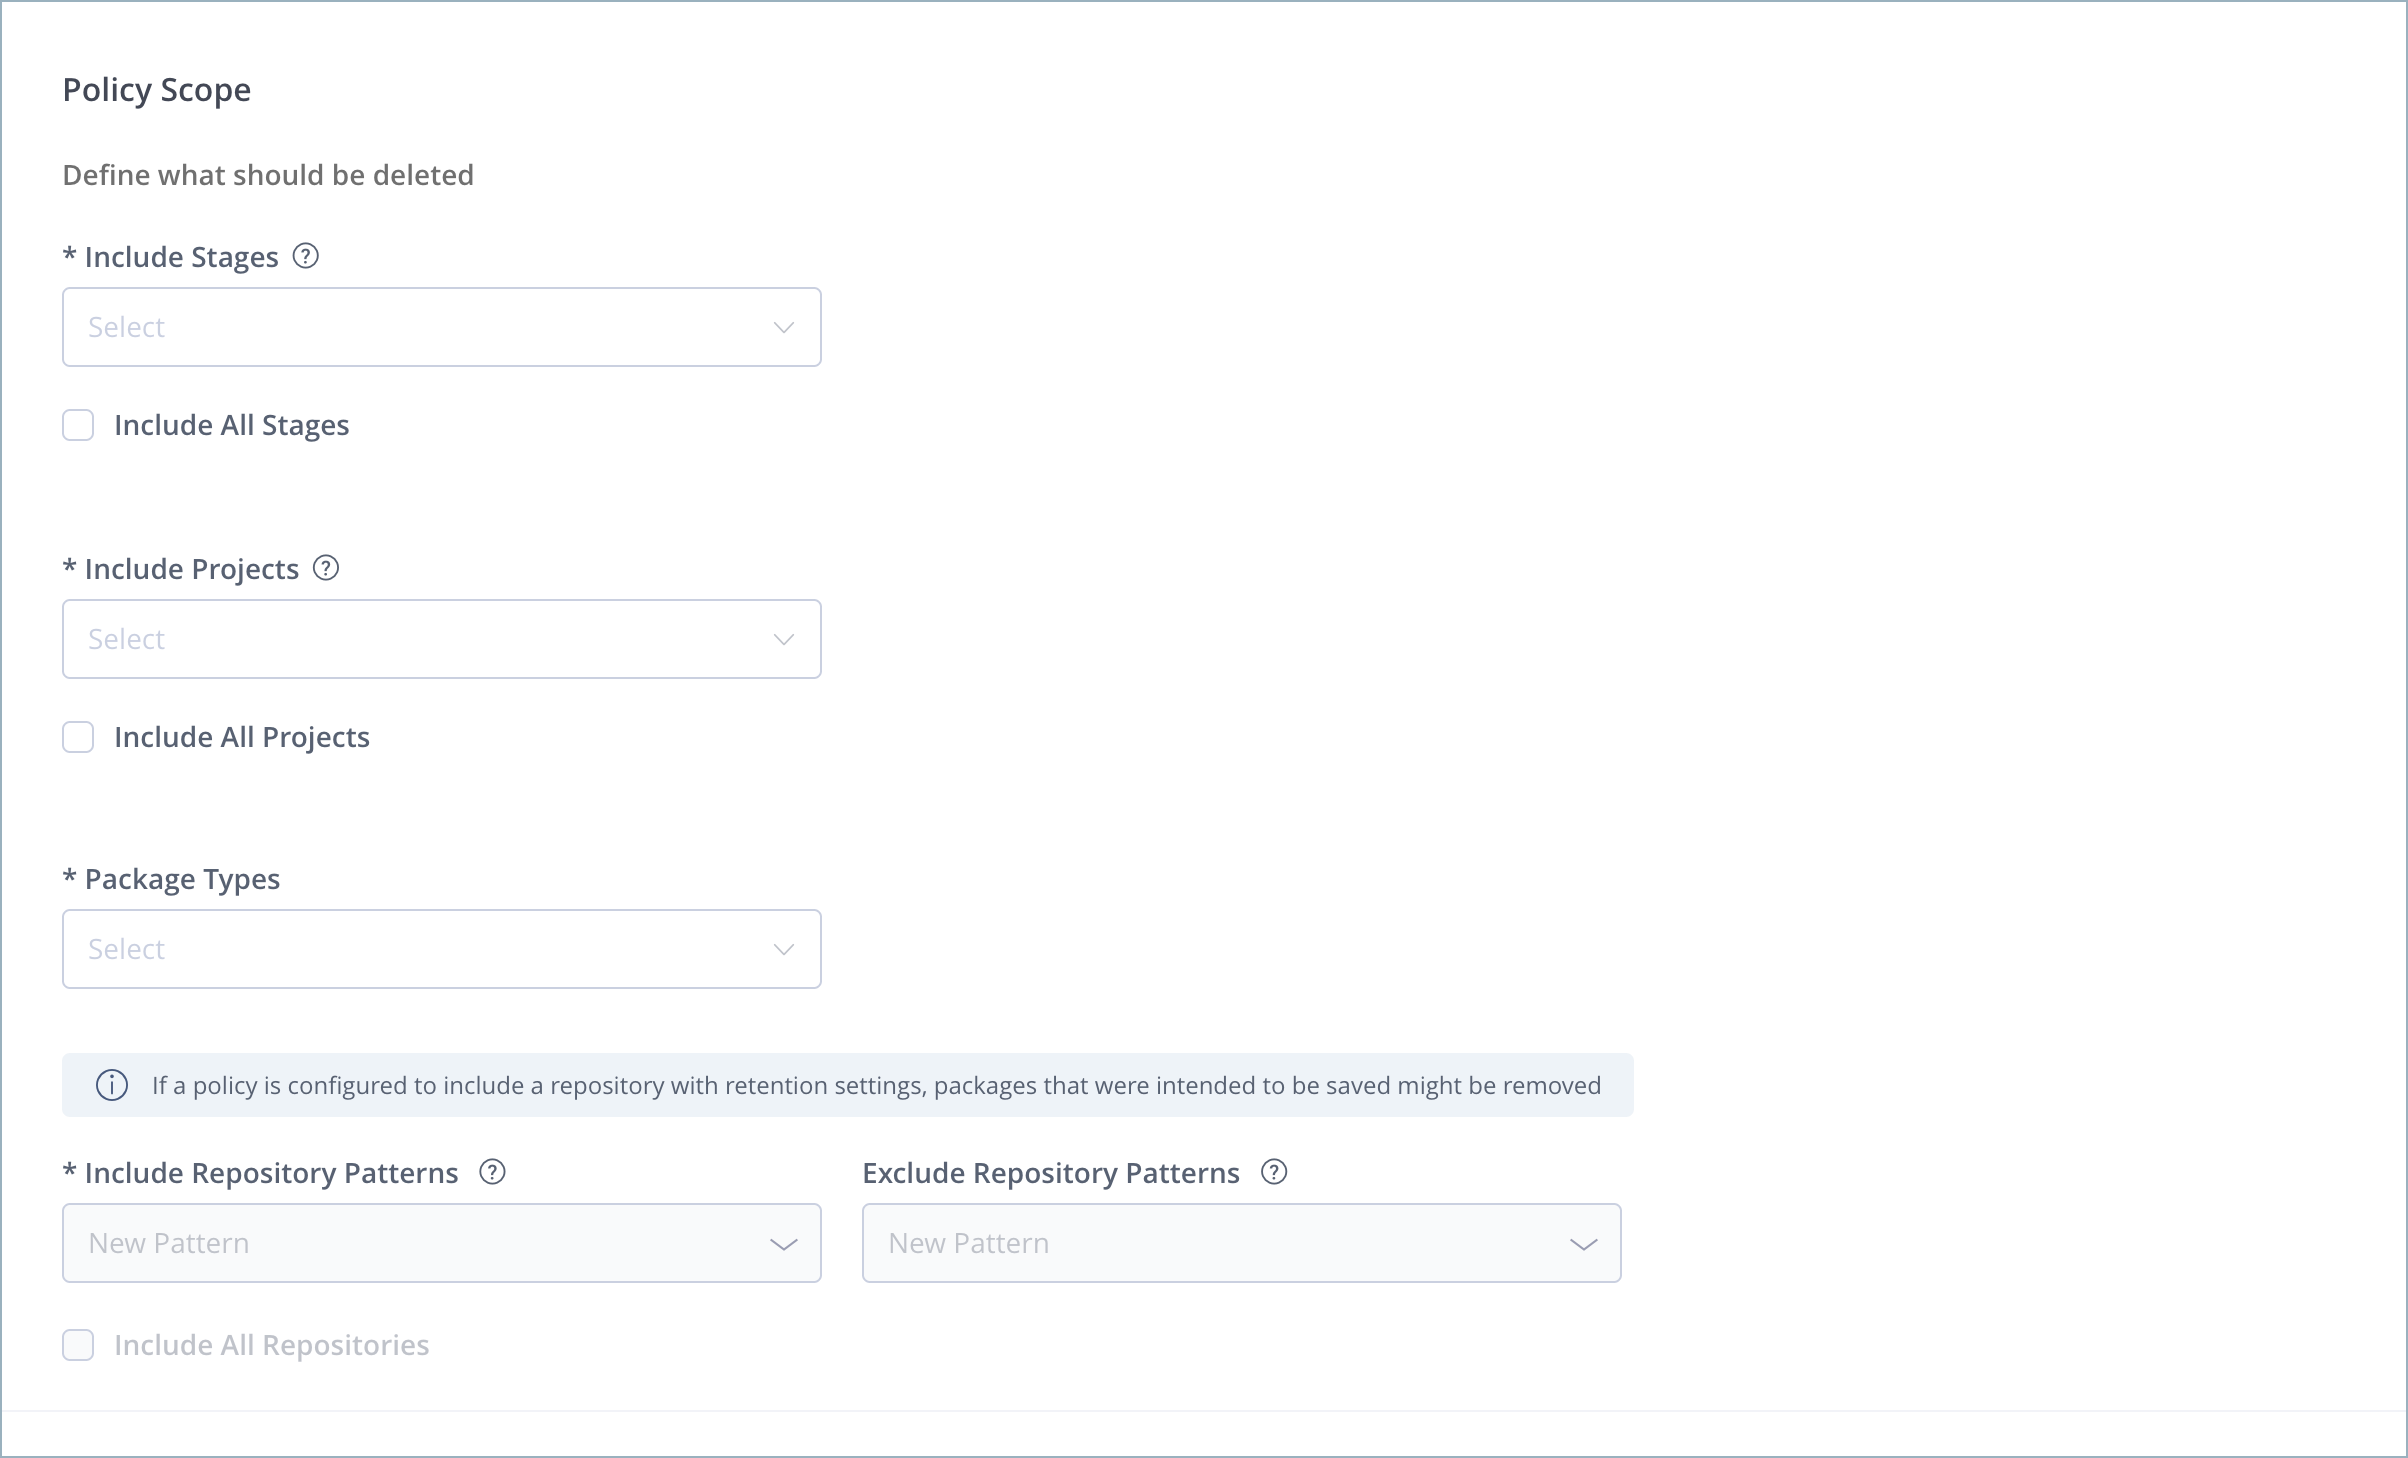 | |
Include Stages / Include All Stages | Select the stages to which the policy should apply, or choose Include All Stages to run the policy across all stages on the platform | |
Include Projects / Include All Projects |
Select the projects to which the policy should apply, or choose Include All Projects to run the policy across all projects on the platform. You can also select Unassigned Repositories to apply the policy to repositories not linked to any projects. | |
Package Types | Select one or more of the package types you want to archive.
| |
Include Repository Patterns |
| |
Exclude Repository Patterns | Enter patterns or explicit repository names to exclude from the archive policy. Auto-complete will suggest options based on the project and package type.
| |
Include Path Patterns | (Optional) Enter one or more folder paths to include in the cleanup policy. Use this option to narrow the policy scope to specific repository paths within the defined repositories.
| |
Exclude Path Patterns | (Optional) Enter one or more folder paths to exclude from the cleanup policy. Use this option to include all packages within the defined repositories except for the packages whose path matches the exclude patterns.
| |
Include Package Name Pattern | Enter a pattern for a package name or an explicit package name for the archive policy, then click Add or select Include All Packages. Only one pattern or explicit name is allowed.
| |
Exclude Package Name | Enter explicit package names to exclude from the policy and click Add. Only explicit names are accepted and not patterns. | |
Include Package Version Pattern | Enter a pattern for a package version or an explicit package version for the policy, or select Include All Versions.
Available from V 7.127 (Cloud) and V 7.125.7 (Self-managed) | |
Exclude Package Version Patterns | Enter explicit package version to exclude from the policy. Only explicit versions are accepted and not patterns. Available from V 7.127 (Cloud) and V 7.125.7 (Self-managed) | |
Policy Conditions |  | |
Time & Property Based Conditions | Select one or more of the following conditions:
Behavioral logic when multiple conditions are selected If you select both the Packages Older Than and Packages Not Downloaded Since conditions, the policy deletes only those packages that meet both conditions. Packages that have never been downloaded are deleted only if their creation date is older than the Packages Older Than date. | |
Version-based Conditions | Define the number of latest versions to keep. The cleanup policy will delete all versions that exceed this number, with the latest version always excluded from deletion.
| |
Exclude based on property | Enable the checkbox and enter the property name and value applied to the lead artifact of a package. Packages with this property will be excluded from archiving. For information, refer to Smart Archiving Supported Packages. | |
Additional Settings | ||
Cron Expression | A cron expression is a string comprised of five or six fields separated by spaces. Each field represents a different unit of time, which collectively define the schedule for policy execution. The standard format is as follows:
Example Cron Expression To illustrate how to construct a cron expression, consider the example below: Expression:
This expression schedules the policy to run every day at 2:00 AM. Guidelines for Scheduling
Leaving the Cron Expression Empty: If you leave the cron expression empty, you can only Run Smart Archiving Policy Manually manually. This means that there will be no automatic scheduling and the policy will not run unless you initiate it. |
|
Max Run Duration | This setting limits the maximum duration the policy can run when enabled. The maximum allowed duration is 5 hours.
| |
Skip Trash Can | When enabled, this setting will cause packages to be permanently deleted from Artifactory instance without an option to restore them immediately after the archive policy is executed, bypassing the Trash Can repository. To restore, refer to Restore Archived Packages.
|

-
Click Save to save the policy.
The newly created smart archiving policy appears in the Policies list and executes on the scheduled date and time.
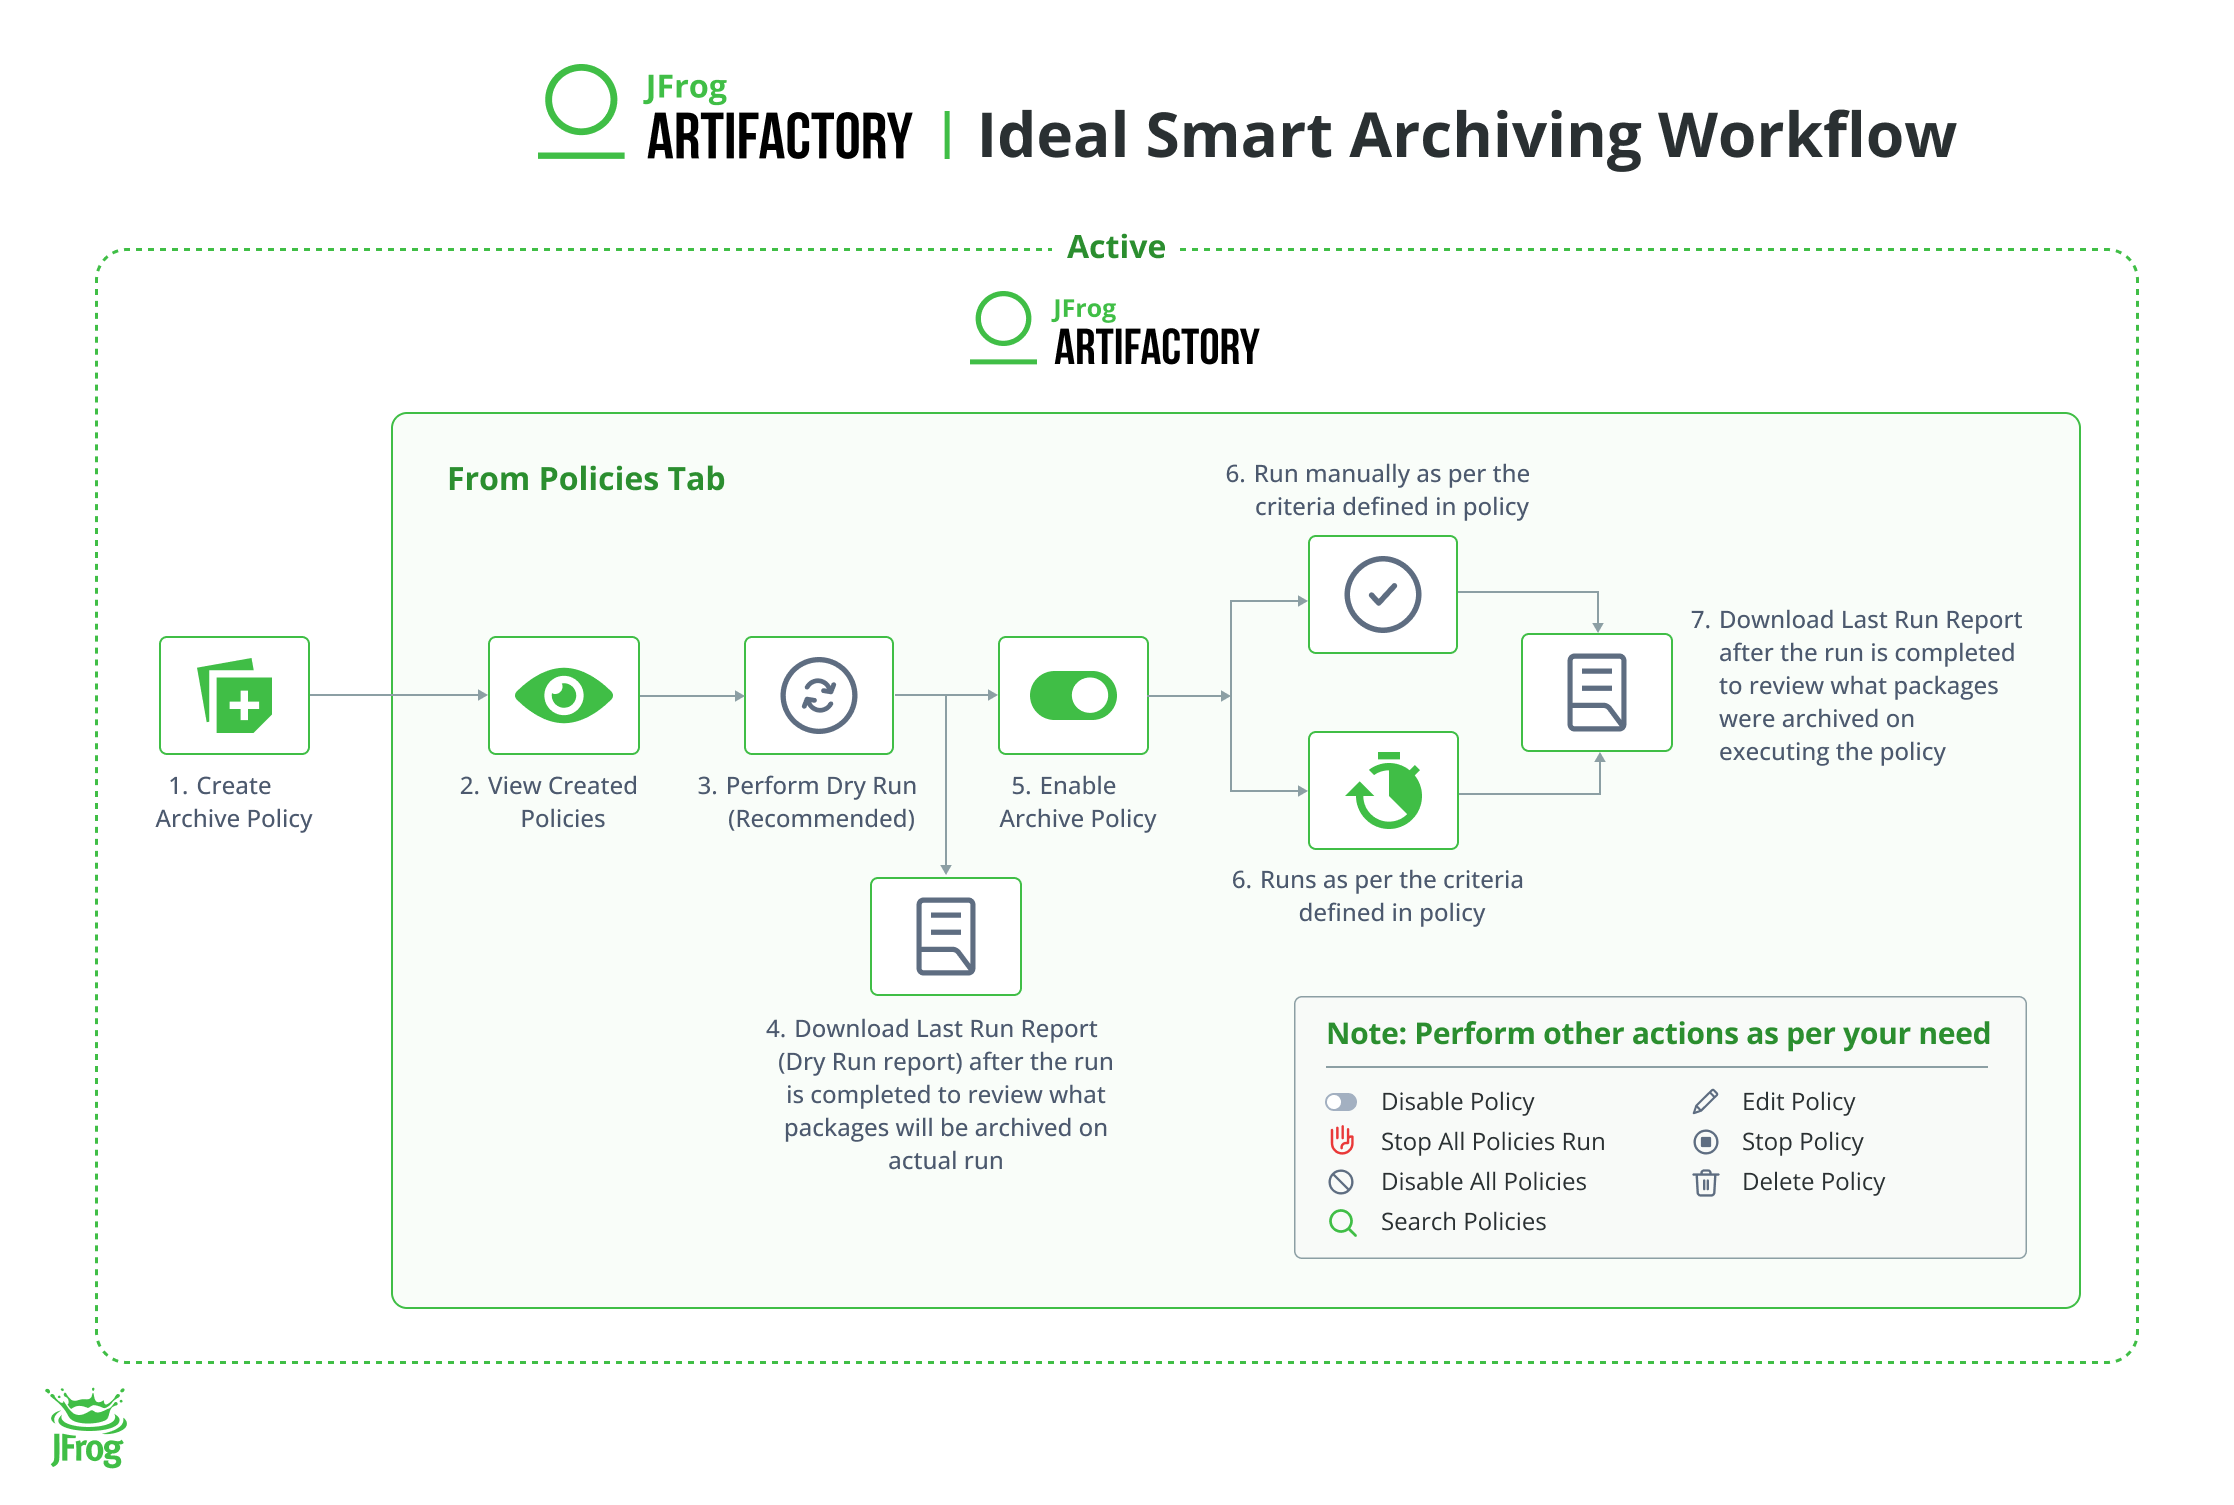
- Perform Dry Run on Smart Archiving Policy: This feature allows you to see which items would be archived without actually archiving them. We recommend performing a dry run and reviewing the results before enabling a policy.
- Enable/Disable Smart Archiving Policy: The policy must be enabled to run automatically according to the schedule or Run Smart Archiving Policy Manually manually.
What Happens After the Smart Archiving Policy is Created?
This topic outlines what happens after a smart archiving policy is created.
After the Smart Archiving policy has been defined and created:
-
Enabled smart archiving policies execute on the scheduled date and time.
The archiving policy can also be manually executed. To learn more, refer to Run Smart Archiving Policy Manually.
Note
We recommend not to run more than 10 policies at the same time.
The Archive policy does not execute when an ongoing mandatory task is in progress (for example, Garbage Collection). If you want to manually Run Smart Archiving Policy Manually or Perform Dry Run on Smart Archiving Policy, try at a later time.
- The system archives the packages, along with the associated metadata, and moves them to the Archive Artifactory Instance.
- When an item is archived, the system dynamically creates dedicated archiving repositories in the Archive Artifactory Instance.
- As the archive process progresses, View All Smart Archiving Runs from the Active Artifactory Instance.
Manage Smart Archiving - Policies
This section outlines the actions you can perform on the smart archiving Policies from the Active Artifactory Instance. It includes enable/disable, search, manual run, dry run, edit, stop, delete, view and delete policies.
The following table lists all the possible actions on the policies and their equivalent links to REST API.
| Task | Description | For UI, see... | For API, see... |
|---|---|---|---|
| View All Policies | This section outlines how to view all smart archiving policies. It guides you in reviewing key details such as the policy status, associated projects with the policy, timestamps for the last and next scheduled runs, last run status, actions performed on each policy, and options for customizing table columns. | View All Smart Archiving Policies | Get All Smart Archiving Policies API |
| Perform a Dry Run | This section outlines how to perform a dry run on a smart archiving policy. A dry run lets you preview which packages will be archived based on your defined policy criteria, without performing the actual archiving. This helps you understand the potential outcome before executing the policy. After the dry run, a CSV report is generated, listing all packages that would be archived along with relevant details. Review this list to decide whether to proceed with the policy or adjust the settings. | Perform Dry Run on Smart Archiving Policy | Run Smart Archiving Policy API |
| Download the Last Run Report | This section outlines how to download the last run report. The report is in CSV format and lists all archived packages with relevant information. You can review the list to learn about the archived packages. | Download Smart Archiving Policy Last Run Report | Download Smart Archiving Policy Run Report API |
| Enable/Disable Policy | This topic outlines how to enable/disable a smart archiving policy. By default, newly created archive policies are disabled. You must activate a policy before it can execute automatically according to the schedule or be triggered manually. | Enable/Disable Smart Archiving Policy | Enable/Disable Smart Archiving Policy API |
| Run Now | This topic outlines how to run a smart archiving policy manually. In addition to the periodic automated execution of the smart archiving policy that occurs if you enable the policy and set its Cron Expression, you can also manually run the archive policy at any time. | Run Smart Archiving Policy Manually | Run Smart Archiving Policy API |
| Search Policies | This topic outlines how to search smart archiving policy to locate the desired policy easily. | Search Smart Archiving Policy | Get Single Smart Archiving Policy by Key API |
| Disable All Policies | This topic outlines how to disable all smart archiving policies. As a Platform Admin, you can disable all policies globally, making them inactive. Once this is done, you can activate policies individually as needed. | Disable All Smart Archiving Policies | Disable All Smart Archiving Policies API |
| Edit Policy | This topic outlines how to edit a smart archiving policy. After a smart archiving policy has been created, you can change the settings or archive criteria. | Edit Smart Archiving Policy | Update Smart Archiving Policy API |
| Stop Policy | This topic outlines how to stop a running smart archiving policy. For some reason, you may want to stop the smart archiving policy that is currently running before it finishes completion. | Stop Running Smart Archiving Policy | Stop Running Smart Archiving Policy API |
| Delete Policy | This topic outlines how to delete a smart archiving policy. If you decide that the smart archiving policy is no longer needed, you can delete it. | Delete Smart Archiving Policy | Delete Smart Archiving Policy API |
| Stop All Runs | This topic outlines how to stop all smart archiving policy runs. You can perform this action from the policies tab and runs tab. As a Platform Admin, you can stop all currently running policies. Once a policy run is stopped, it cannot resume from its last point. You must restart the policy from the beginning to rerun it. | Stop All Smart Archiving Policy Runs | Stop All Running Smart Archiving Policies API |
Authorization
Activity | Platform Admin | Project Admin Note: Applicable within the scope of your project context | Application User |
|---|---|---|---|
|
|
| |
|
|
| |
|
|
| |
|
|
| |
|
|
| |
|
|
| |
|
|
| |
|
|
| |
Note: This option is shown from the Global Context only. |
|
| |
|
|
| |
Note: This option is shown from the Global Context only. |
|
|
View All Smart Archiving Policies
This section outlines how to view all smart archiving policies. It guides you in reviewing key details such as the policy status, associated projects with the policy, timestamps for the last and next scheduled runs, last run status, actions performed on each policy, and options for customizing table columns.
To view all smart archiving policies:
- From the Administration module, select Artifactory > Retention Policies.
- In the Retention Policies page, click Archive.
- Under the Policies tab, you can view all the policies.
Archive Policy Table Fields
The following table describes the columns of the archive policy table fields.
Field | Description |
|---|---|
Policy Name | Indicates the name of the policy |
Project | Indicates the name of the project Note: Unassigned Repos: Only repositories not assigned to a project will be affected. |
Last Run Status | Indicates the status of each policy execution, which can be one of the following: Last Run Status
|
Next Run | Indicates the next scheduled run |
Enabled | Indicates whether the policy is enabled or disabled
|
More Actions - Icon Status
From the more icon you can perform various actions on the policies. The status of the icon is as follows:
Icon | Status | Description |
|---|---|---|
| Active | The more actions have been active. Following are the actions you can perform on a policy:
|
| Hover | Hovered the mouse pointer over more icon |
| Disabled | The more actions have been disabled |
| New | Indicates the policy is newly created. |


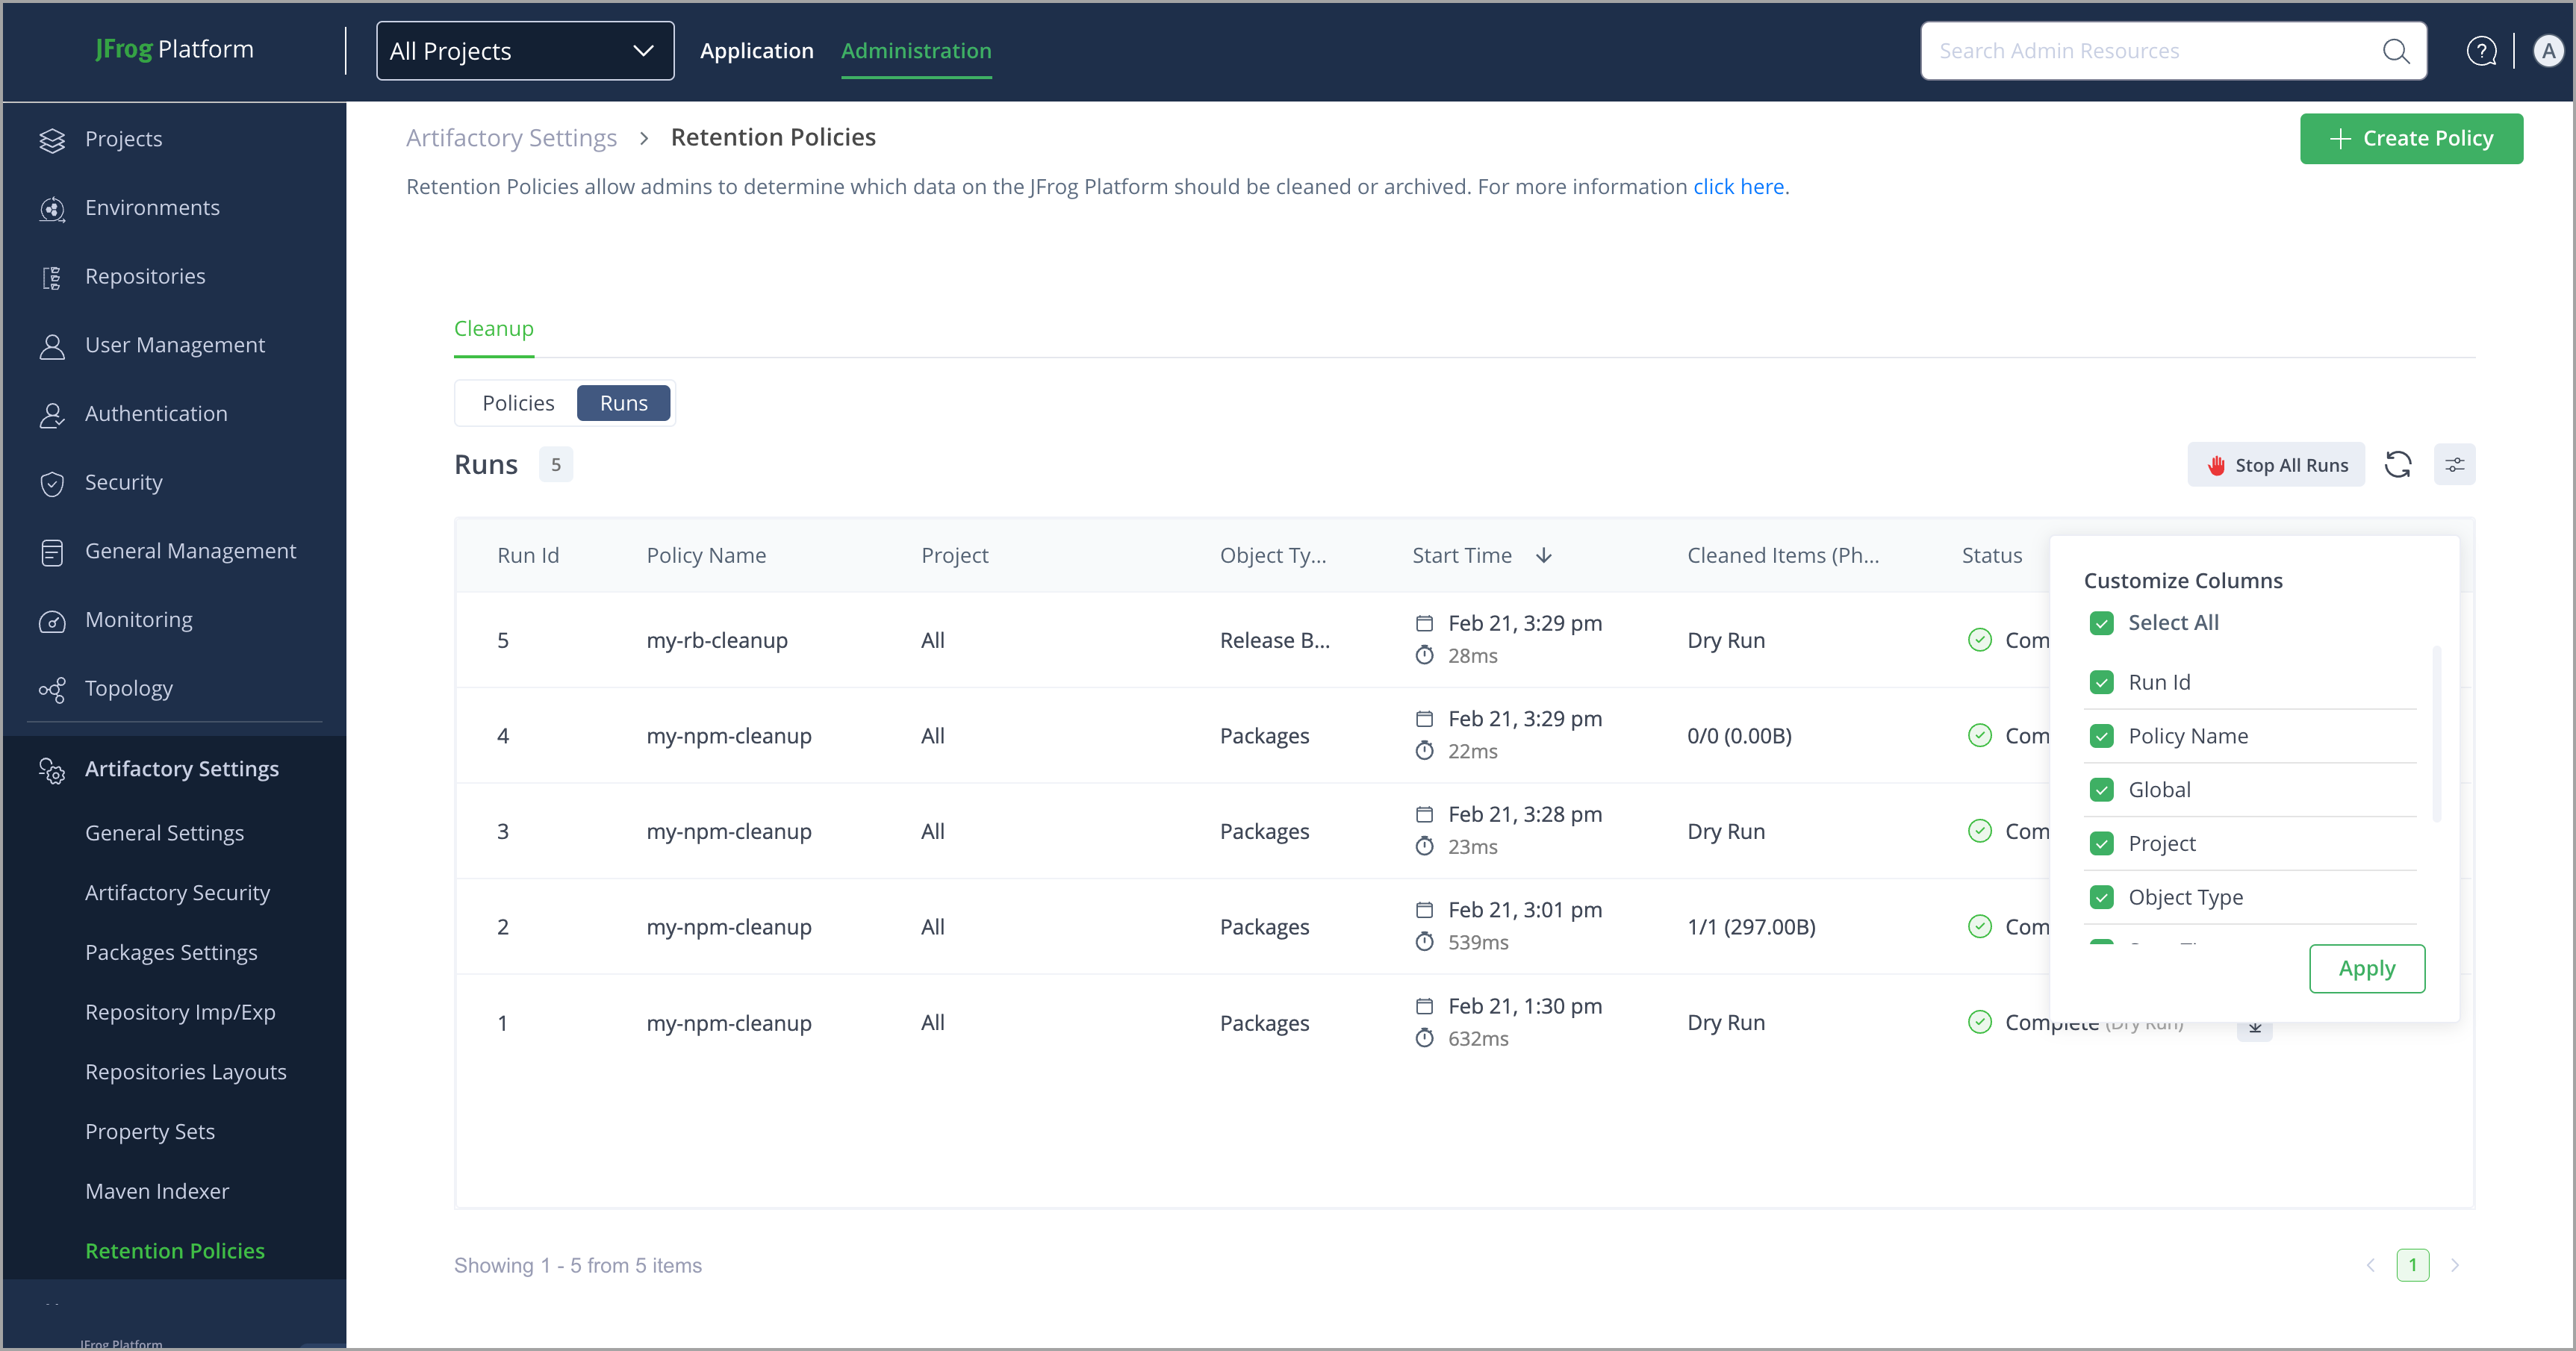
Customize Table Columns
Arrange the table columns according to how you want to view them.
To display and arrange the columns:
-
From the Table header, click the Customize Columns at the end.
-
Select which columns to display in the Customize Columns pop-up and drag and drop to reorder them.
-
Click Apply.
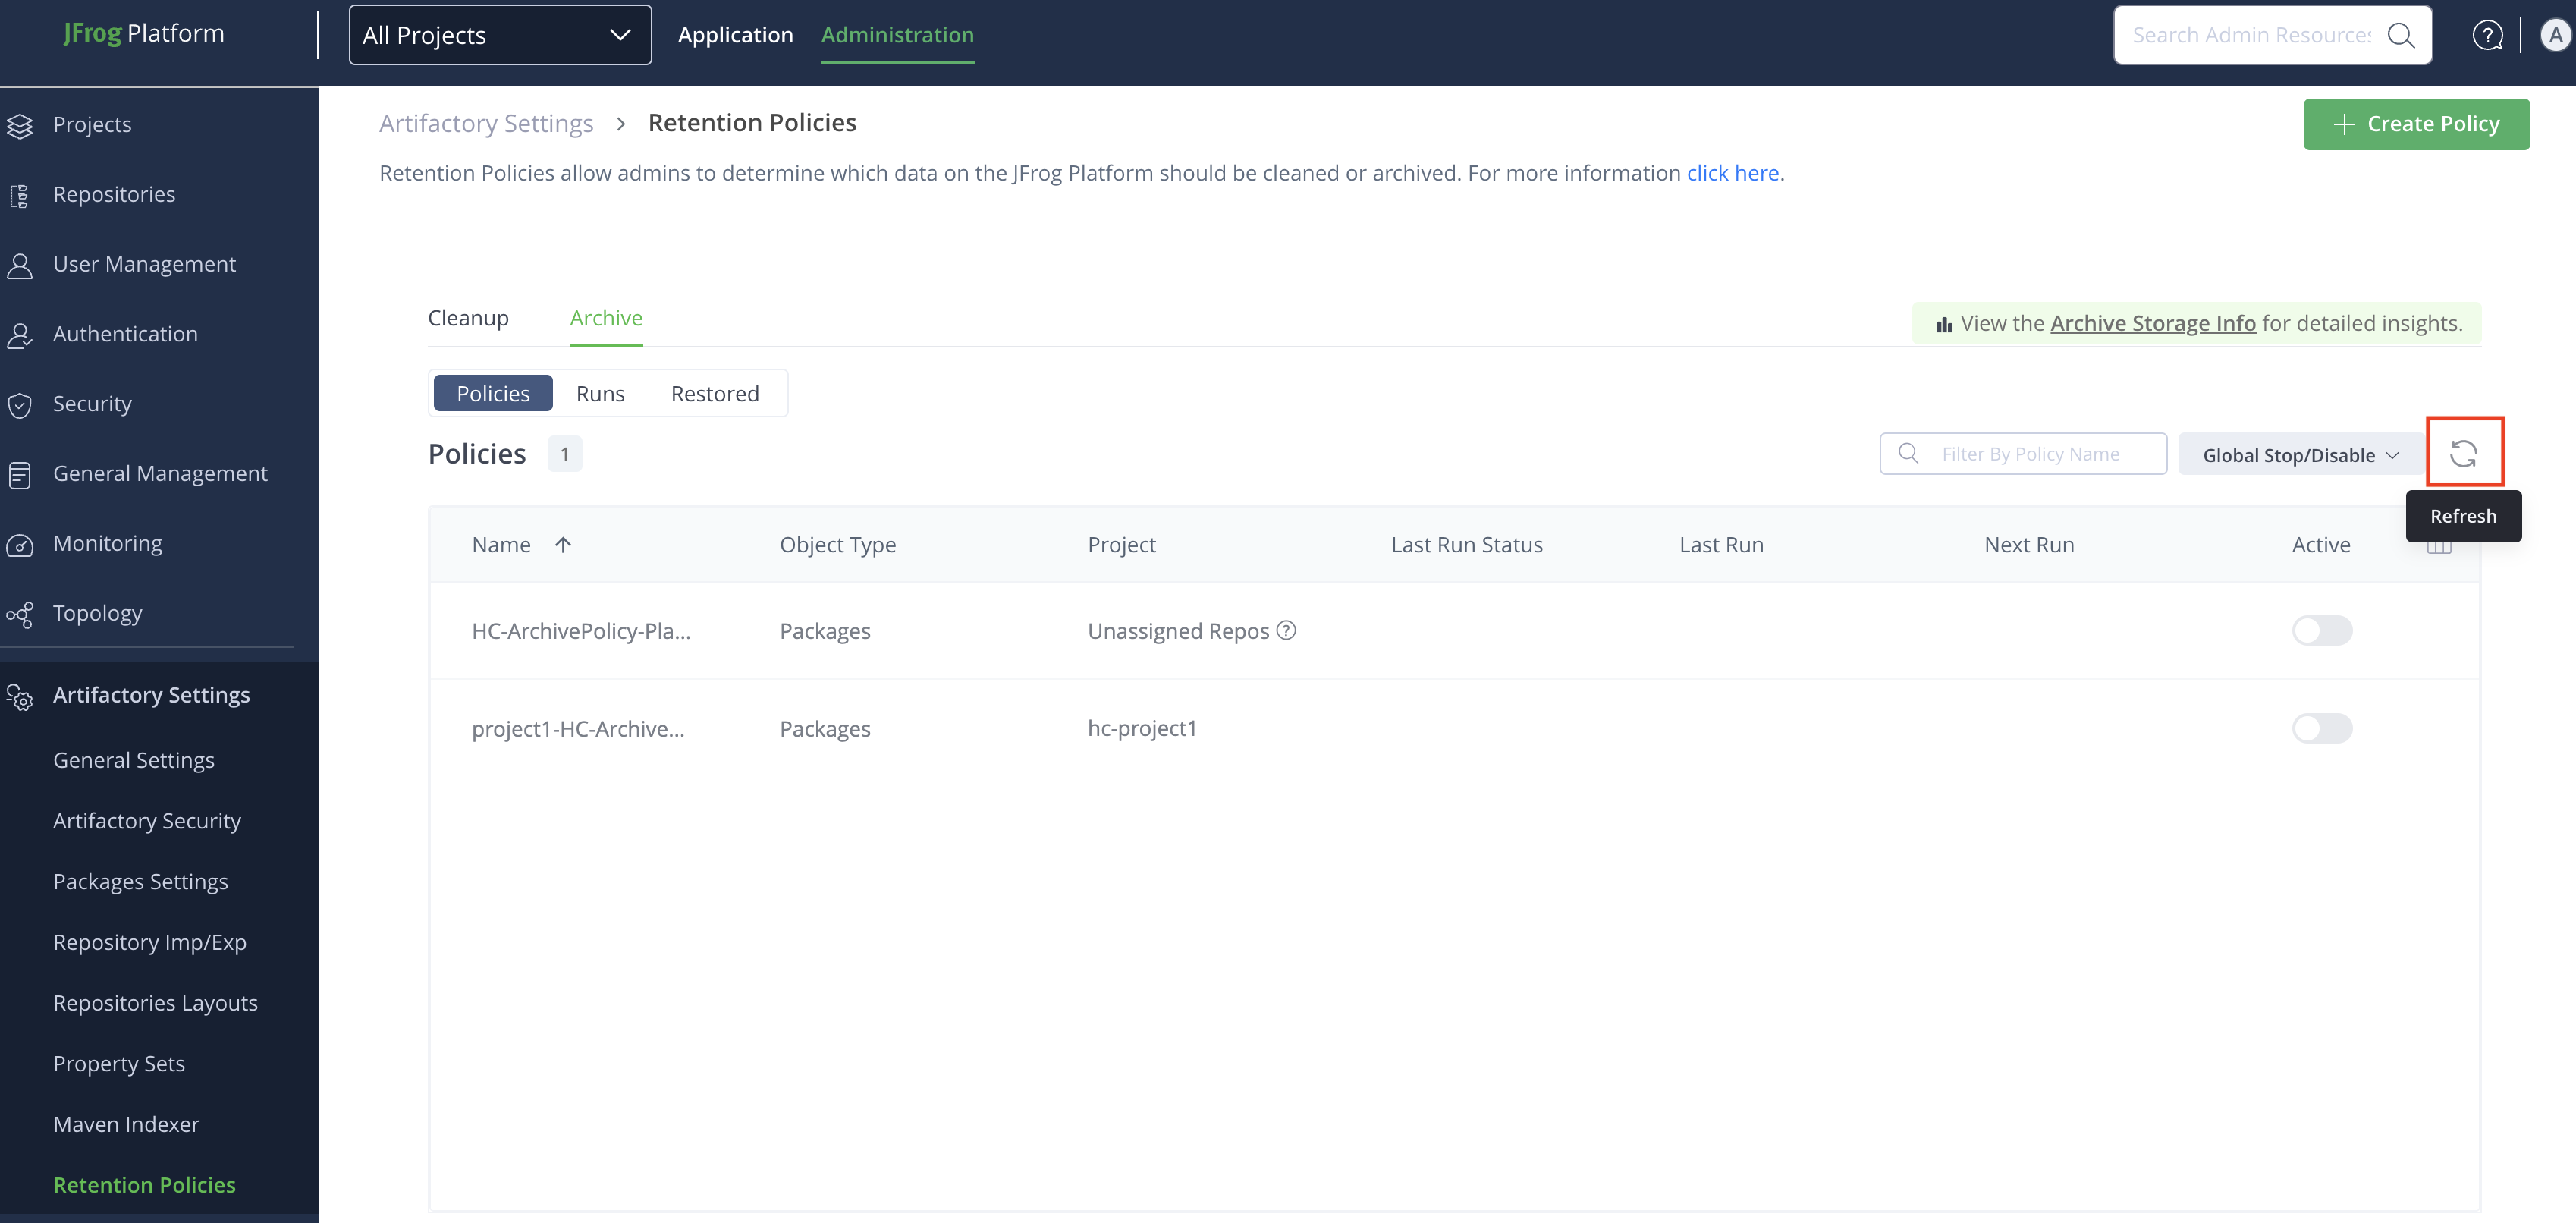
Refresh Policies
To refresh policies, click the Refresh icon from the top right above the table header.
Search Smart Archiving Policy
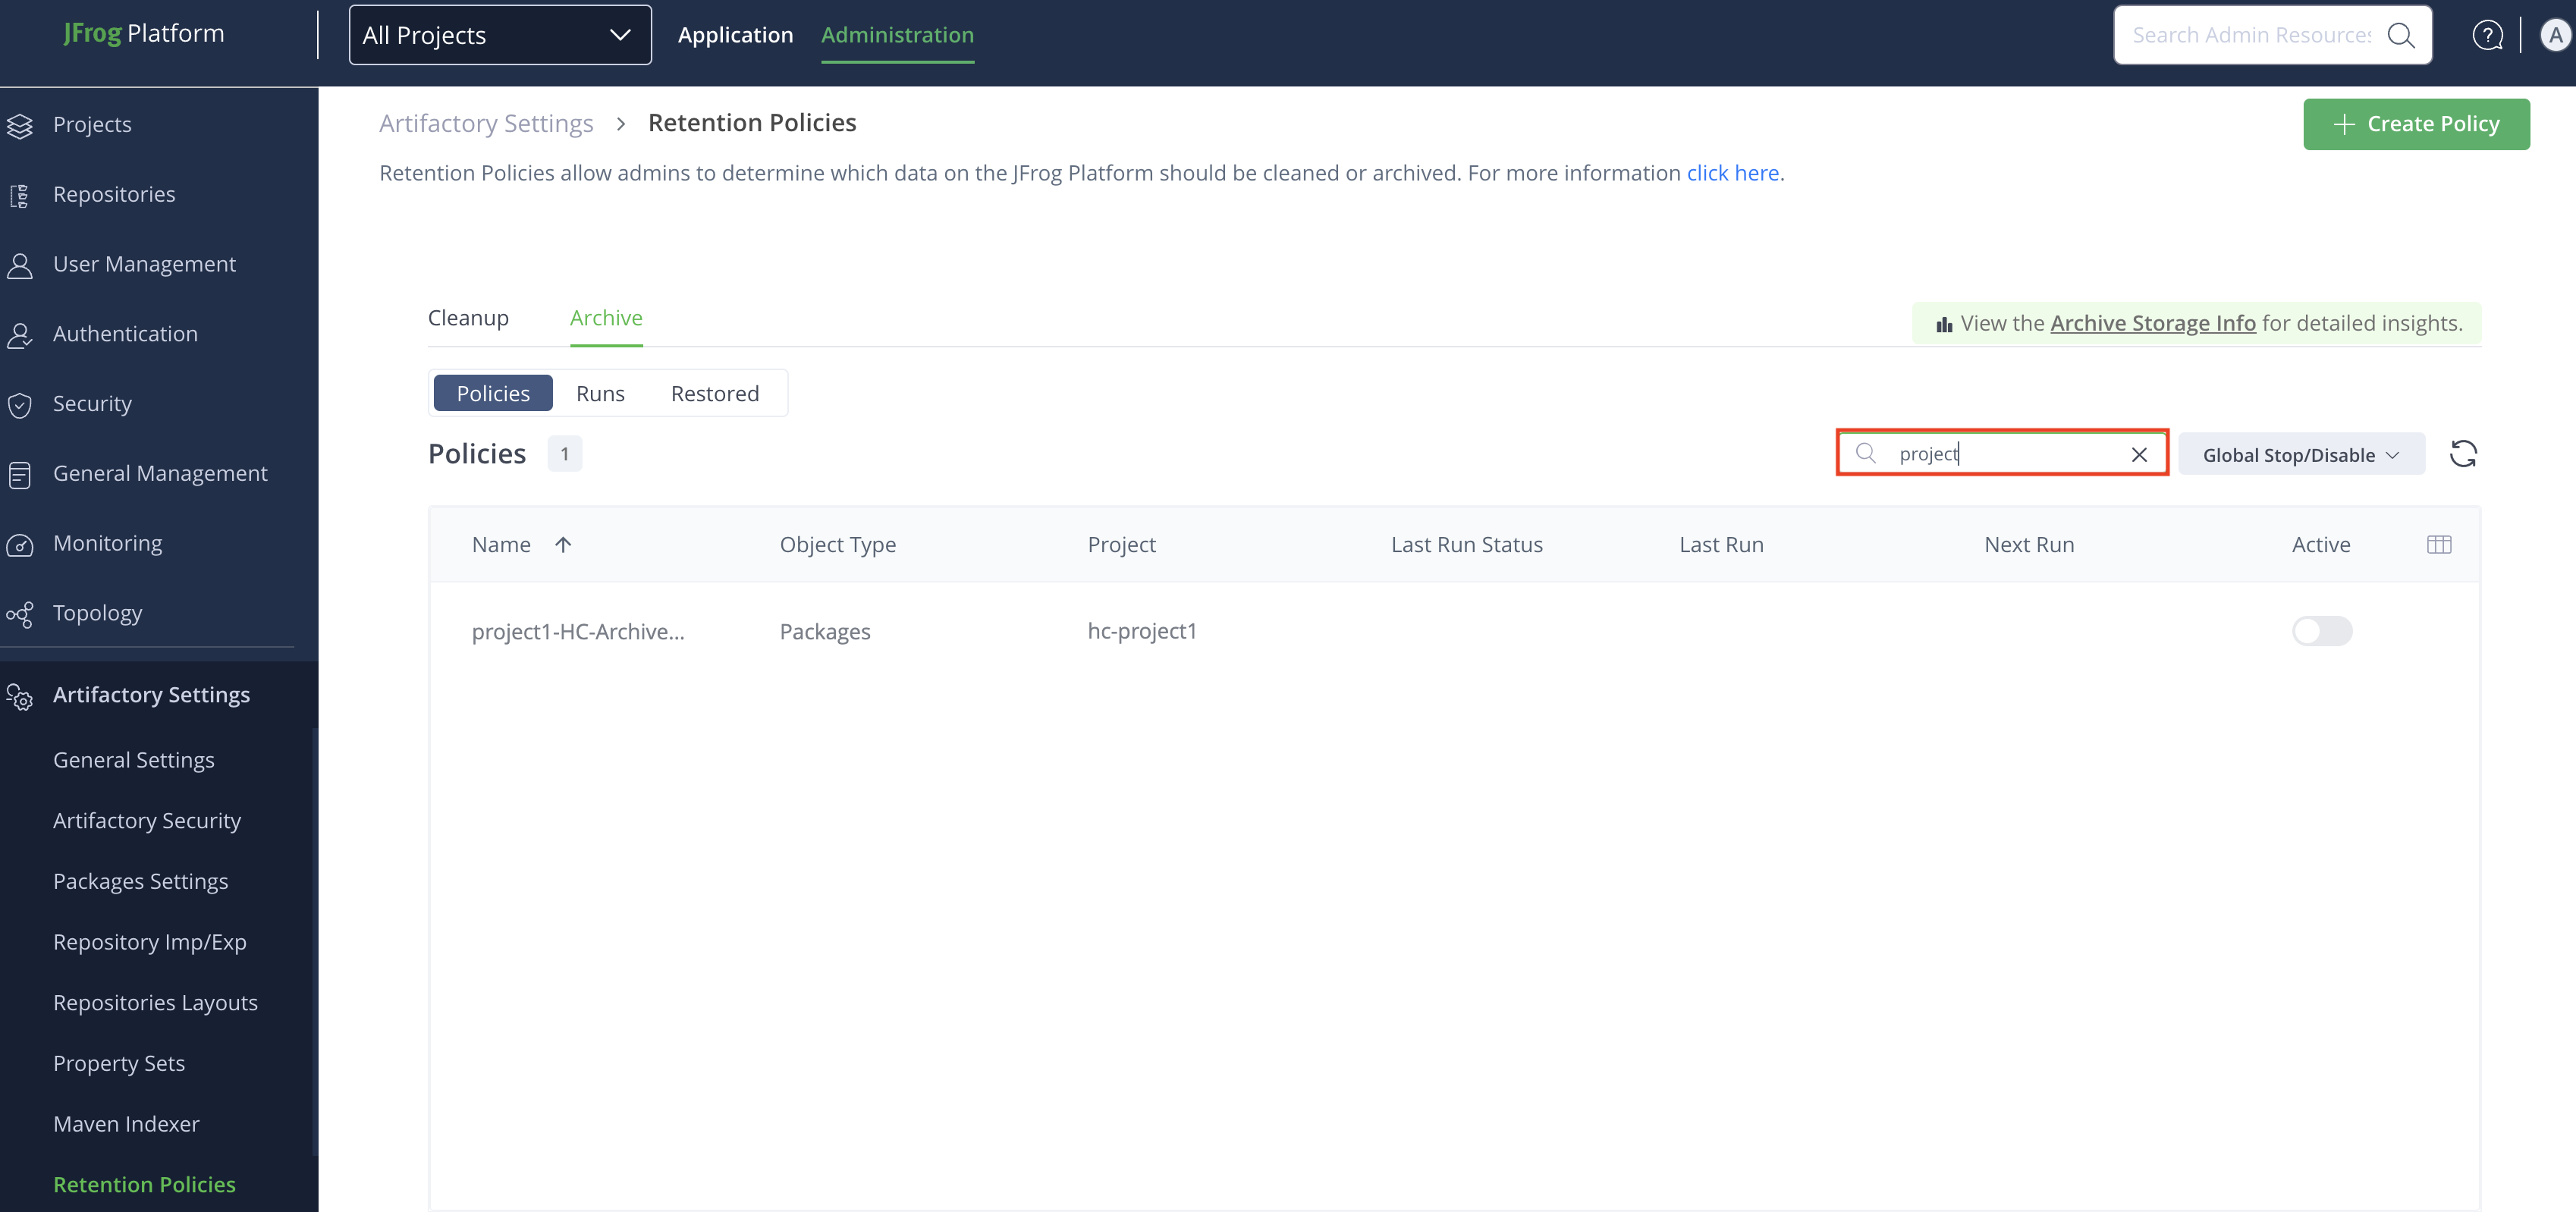
This topic outlines how to search for a smart archiving policy to locate the desired policy easily.
To search the smart archiving policy:
-
From the Administration module, select Artifactory > Retention Policies.
-
In the Retention Policies page, click Archive.
-
Click the Policies tab, enter the policy name in the Search field, and then press enter on the keyboard.
Perform Dry Run on a Smart Archiving Policy
This section outlines how to perform a dry run on a smart archiving policy. A dry run lets you preview which packages will be archived based on your defined policy criteria, without performing the actual archiving. This helps you understand the potential outcome before executing the policy. After the dry run, a CSV report is generated, listing all packages that would be archived along with relevant details. Review this list to decide whether to proceed with the policy or adjust the settings.
Note
- We recommend performing a dry run and reviewing the results before activating a policy to prevent unintended archive.
- Dry run results reflect the specific point in time when the dry run is performed. The results of an actual policy execution may differ, as it occurs at a later scheduled time.
To perform a dry run on a smart archiving policy:
-
From the Administration module, select Artifactory > Retention Policies.
-
In the Retention Policies page, click Archive.
-
From the Policies tab, under Policies, locate the policy you want to run, click ••• icon and then click Perform a Dry Run.
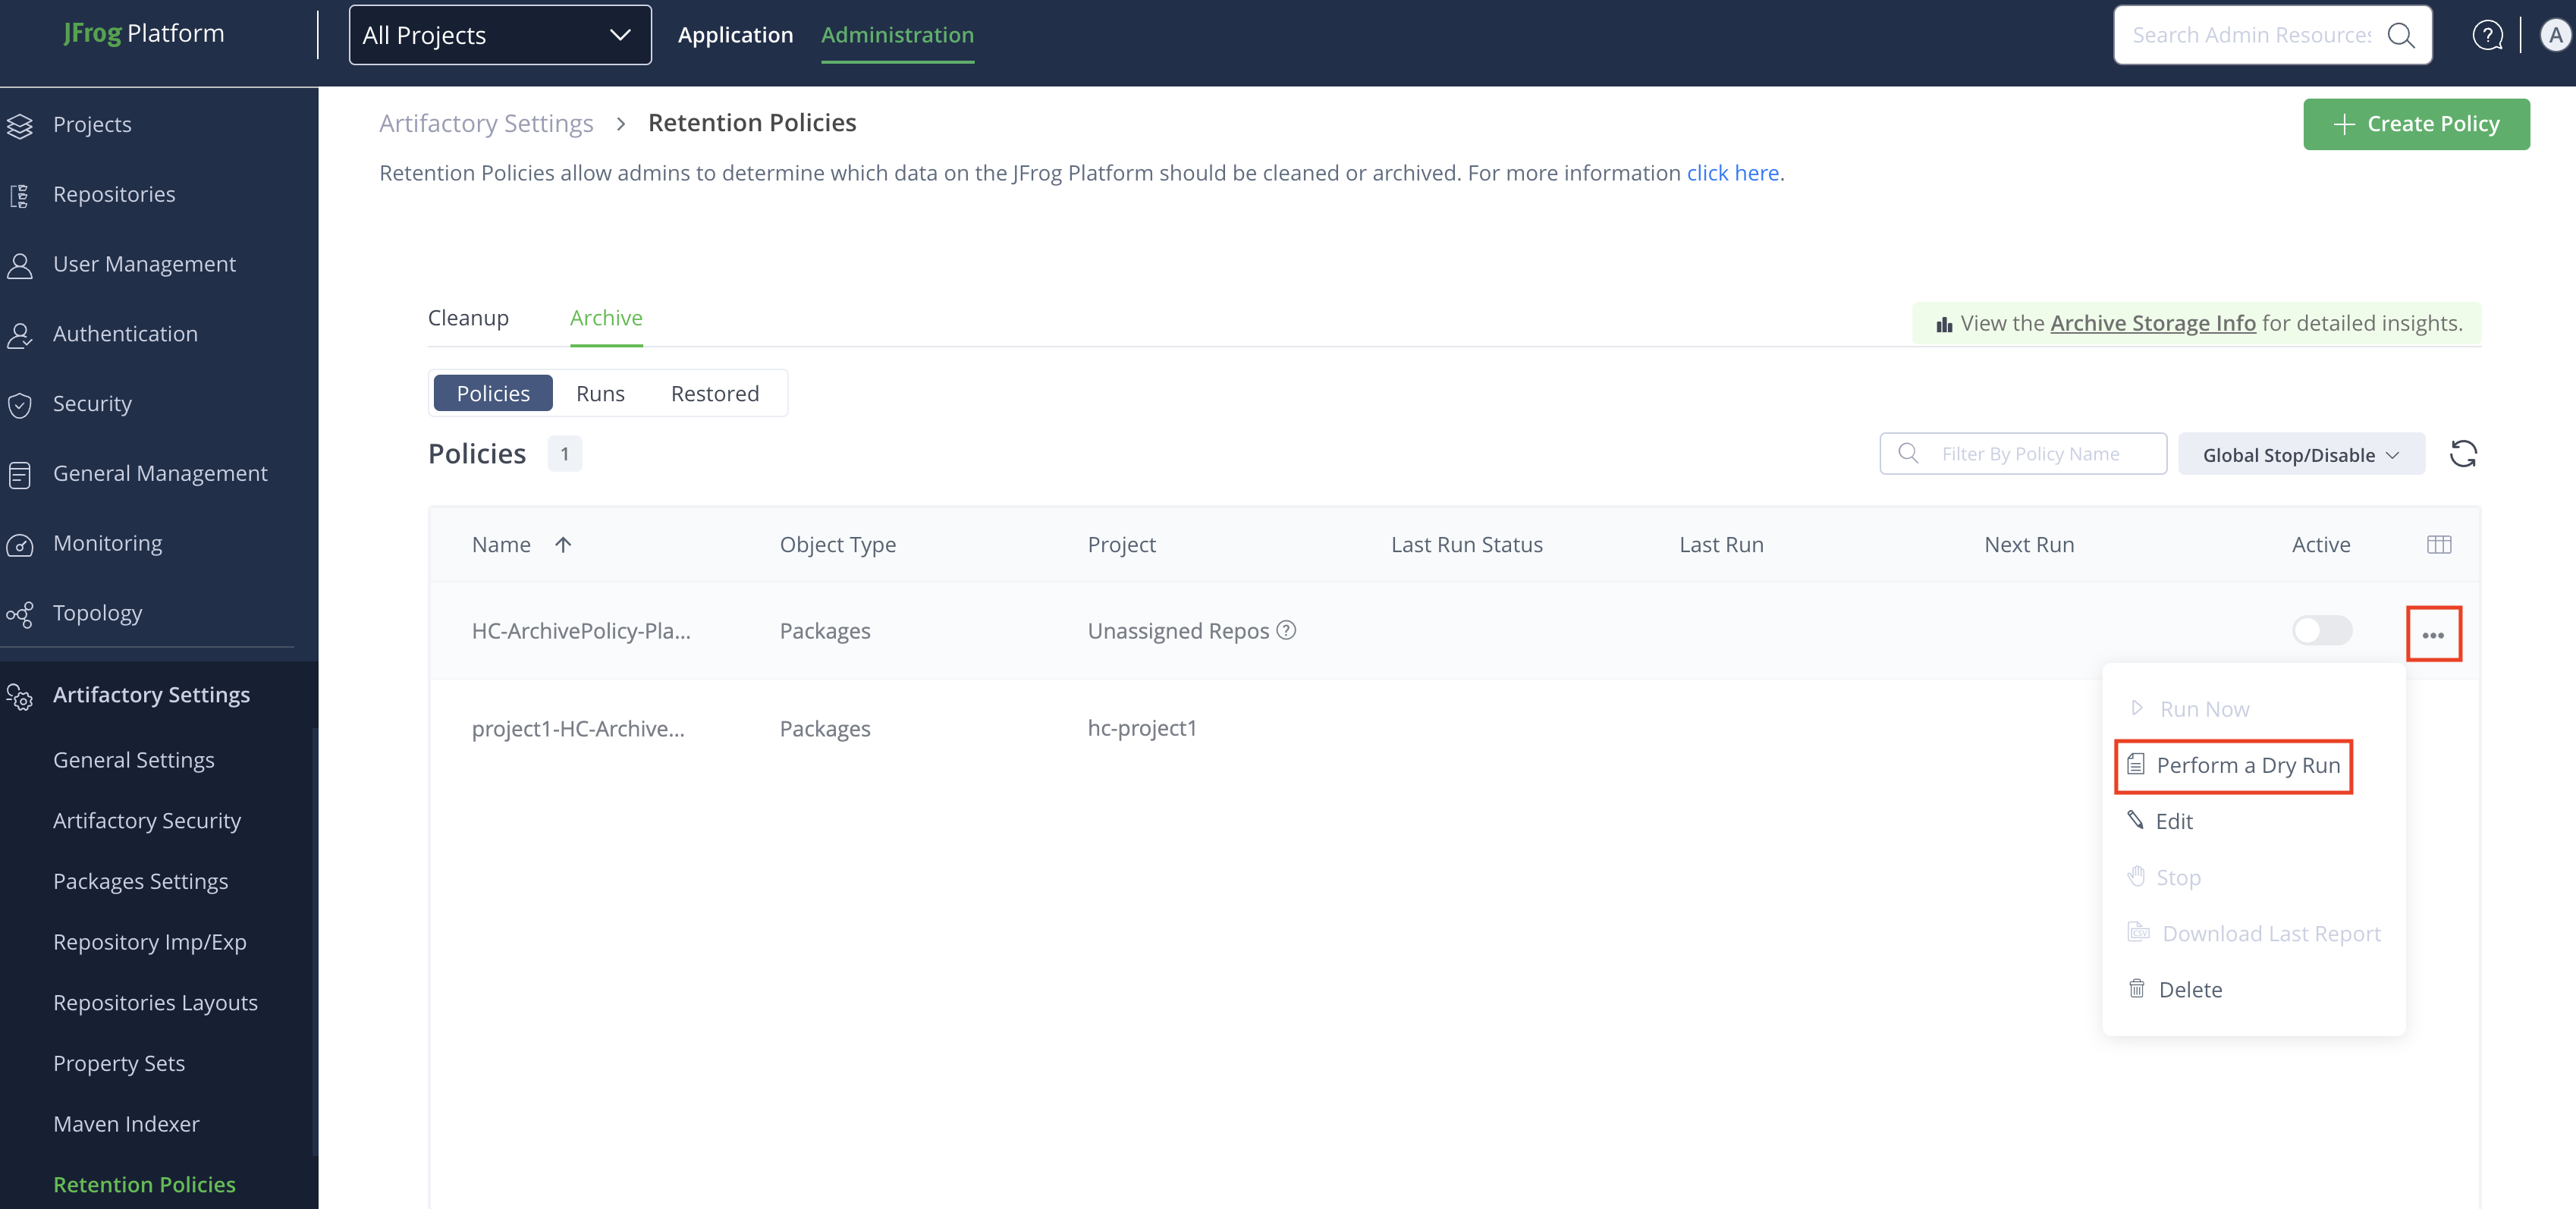
-
After the dry run is completed:
- Download the report from Download Smart Archiving Policy Last Run Report or Download and Review Smart Archiving Run Report.
- Review its status report, as explained in Smart Archiving Run Report Overview.
Enable/Disable Smart Archiving Policy
This topic outlines how to enable/disable a smart archiving policy. By default, newly created archive policies are disabled. You must activate a policy before it can execute automatically according to the schedule or be triggered manually.
Note
We recommend that you first perform a dry run and review its results before you enable a policy. This helps prevent unintended deletion. For more information on performing a dry run, refer to Perform Dry Run on Smart Archiving Policy.
The following actions can be performed on a disabled policy:
To enable or disable the smart archiving policy:
-
From the Administration module, select Artifactory > Retention Policies.
-
In the Retention Policies page, click Archive.
-
From the Policies tab, under Policies, locate the policy you want to enable/disable, and then toggle the slider
 under the Active column.
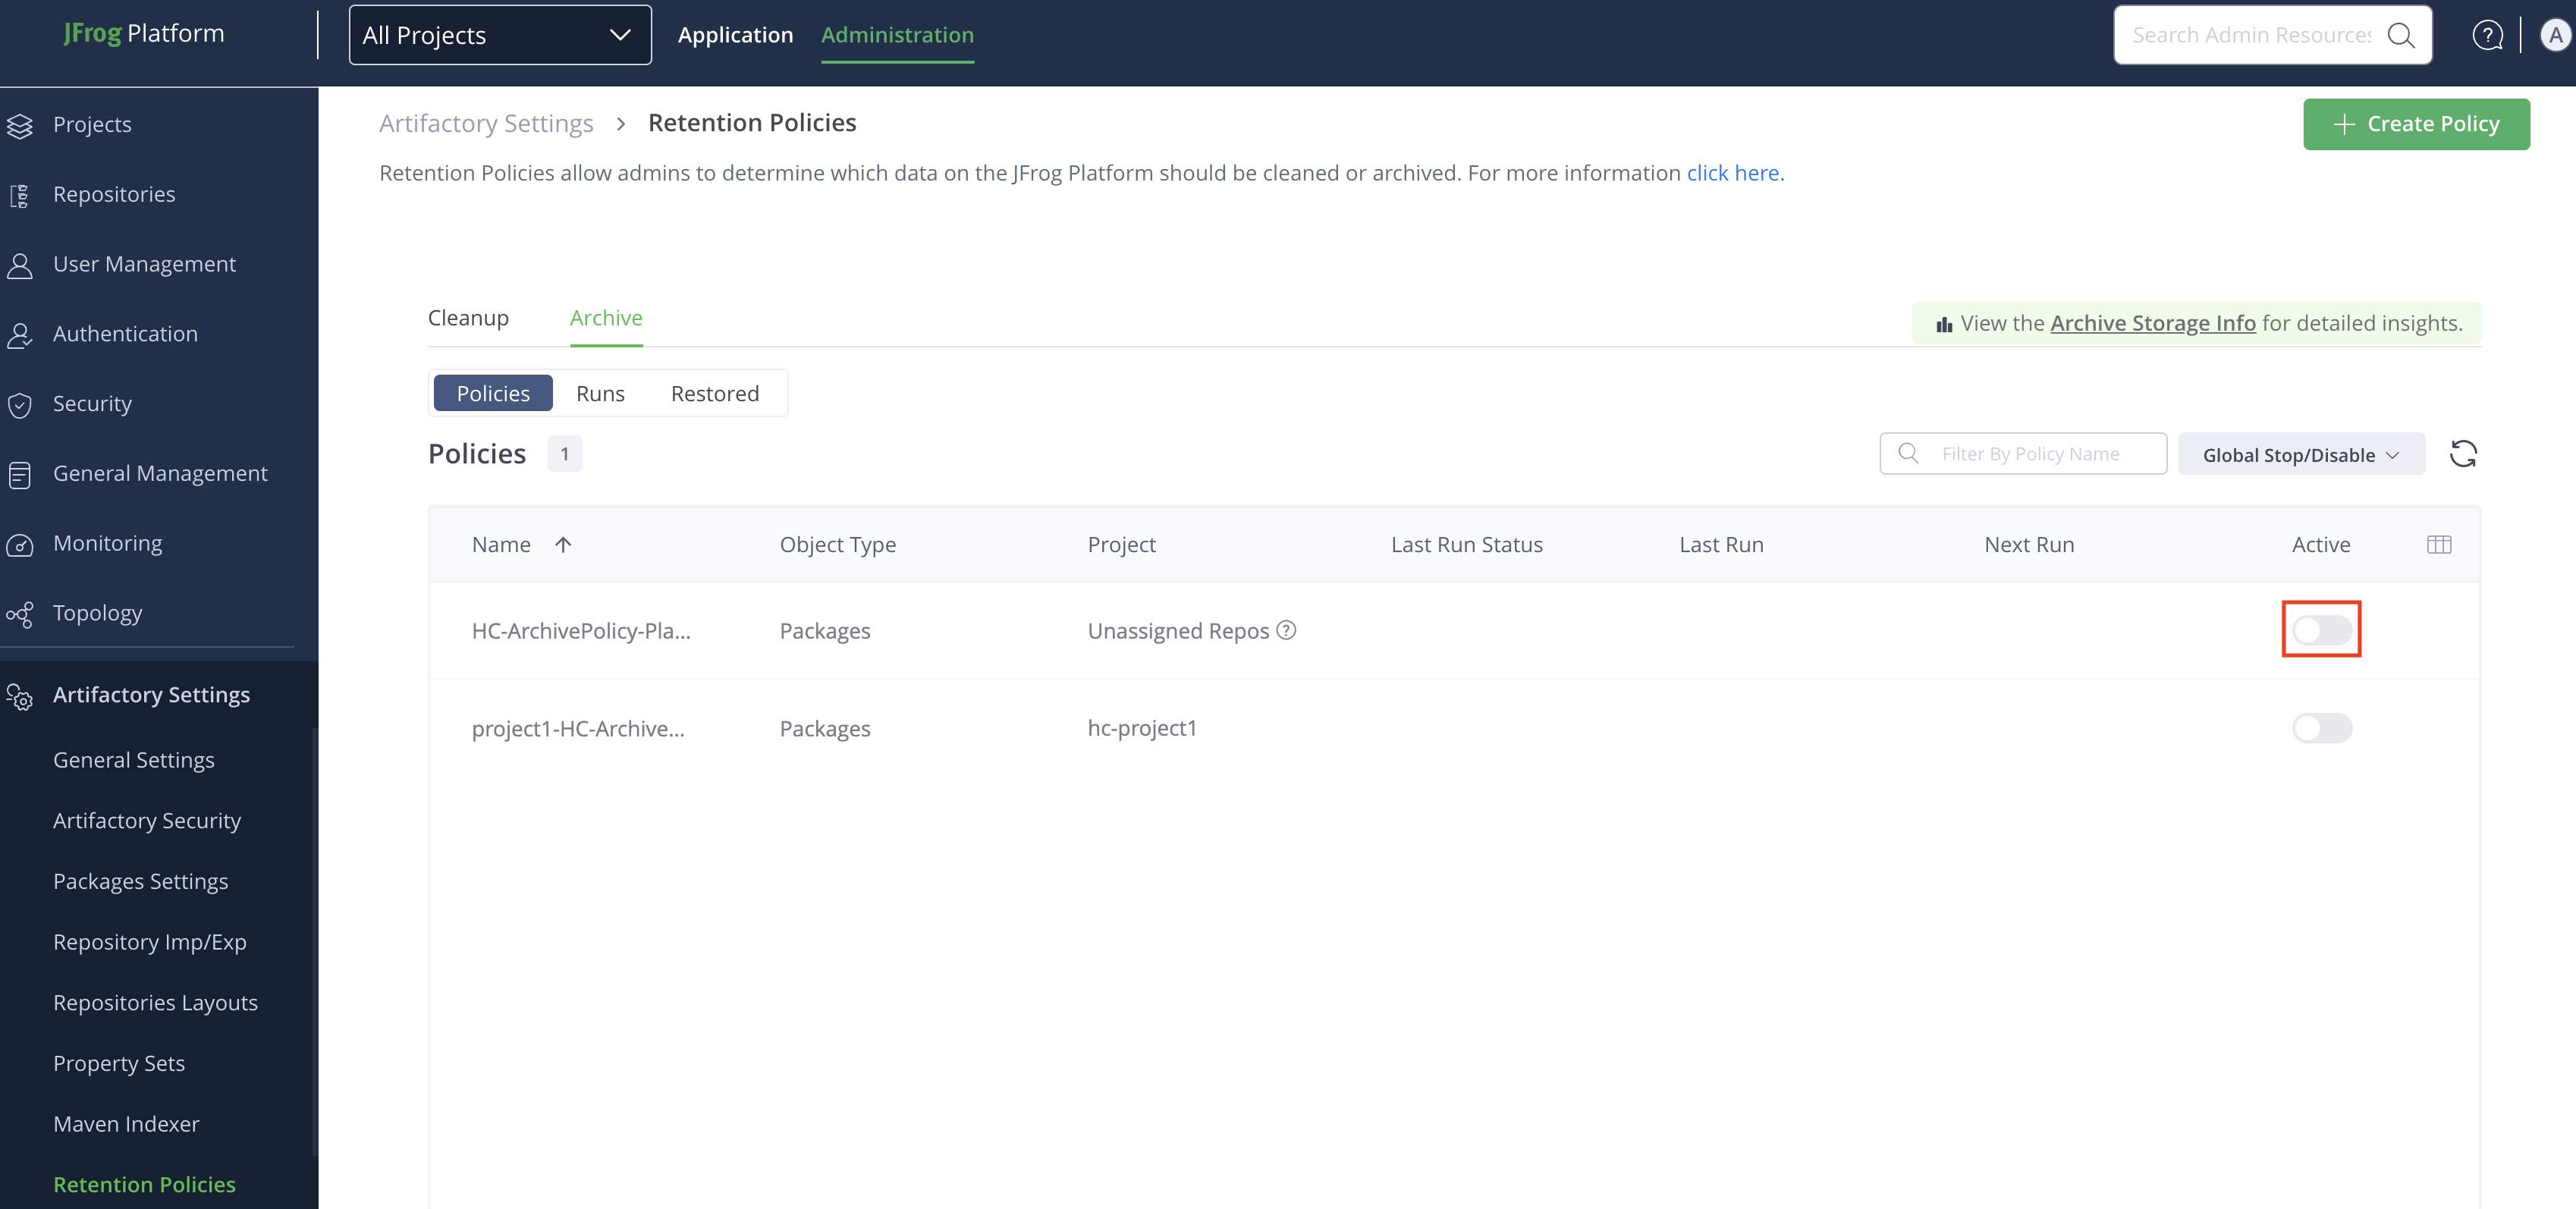
Once enabled, the policy will run automatically based on the schedule you set during creation. You can also run it manually, as detailed in the Run Smart Archiving Policy Manually.
Disable All Smart Archiving Policies
As a Platform Admin, you can disable all smart archiving policies globally, making them inactive. Once this is done, you can activate policies individually as needed.
Note
The option to disable all policies is not available to Project Admins. The Disable All Policies option can be viewed in the global context only.
To disable all the smart archiving policies:
-
From the Administration module, select Artifactory > Retention Policies.
-
In the Retention Policies page, click Archive.
-
From the Policies tab, click Global Stop/Disable dropdown list, and then click Disable All Policies.
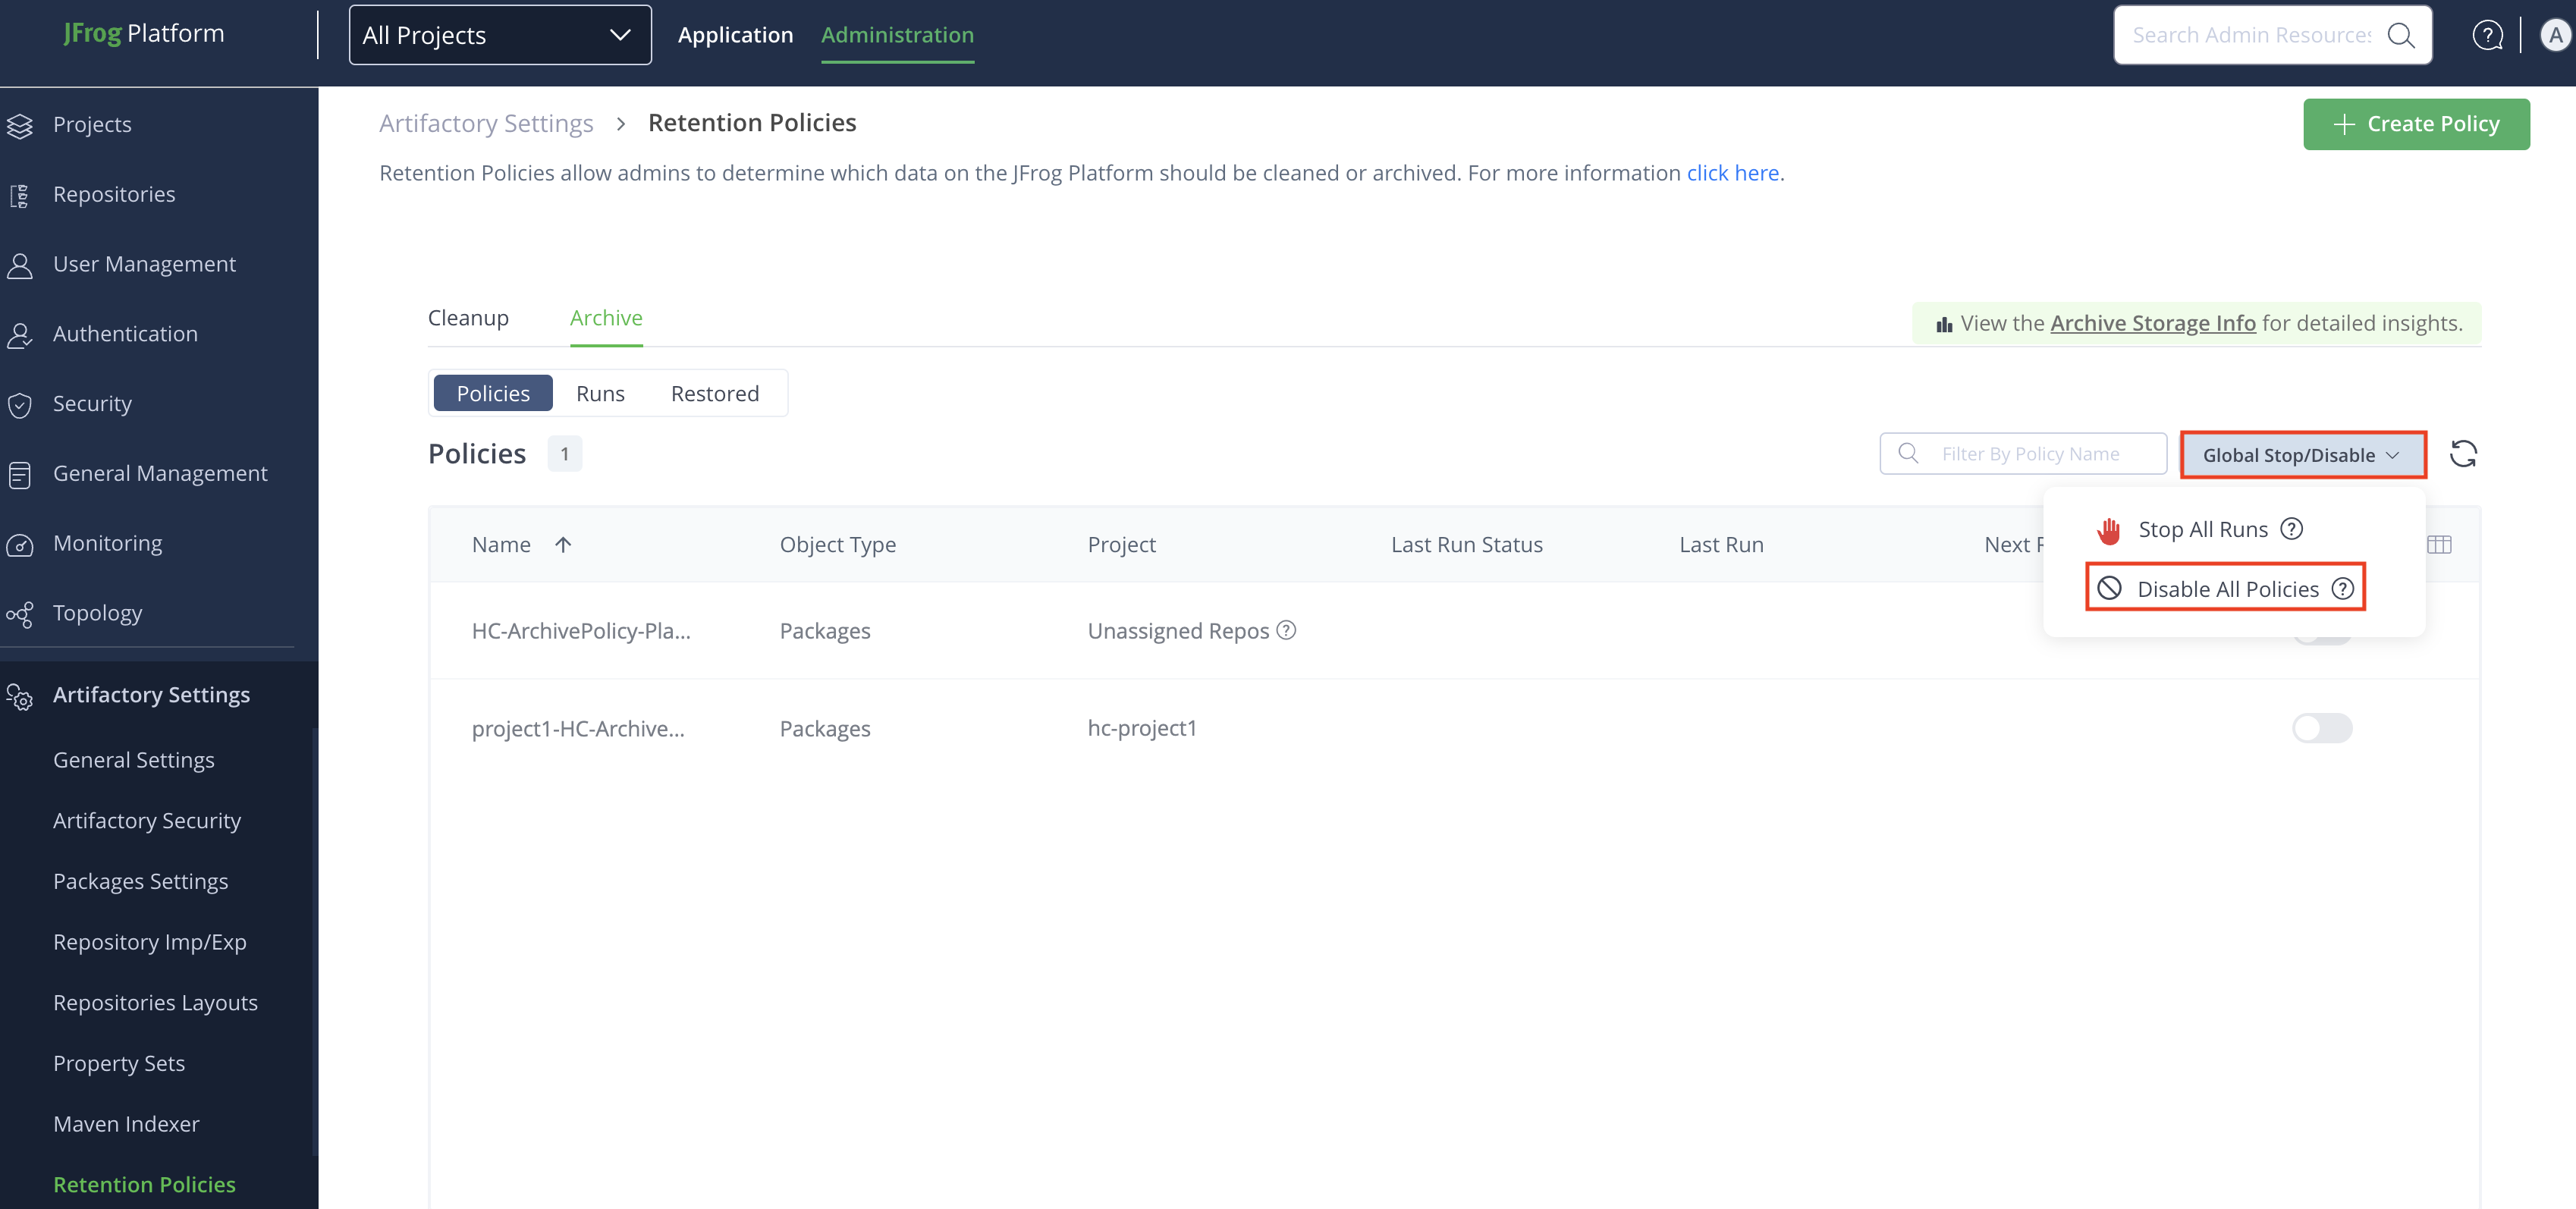
-
Check the Active column in the policies list to verify that all policies are now disabled.
Run Smart Archiving Policy Manually
In addition to the periodic automated execution of the smart archiving policy that occurs if you enable the policy and set its Cron Expression, you can also manually run the archive policy at any time.
Note
To manually run a smart archiving policy, the policy must first be activated. To learn more, refer to Enable/Disable Smart Archiving Policy.
To run the smart archiving policy manually:
-
From the Administration module, select Artifactory > Retention Policies.
-
In the Retention Policies page, click Archive.
-
From the Policies tab, under Policies, locate the policy you want to run, click ••• icon and then click Run Now.
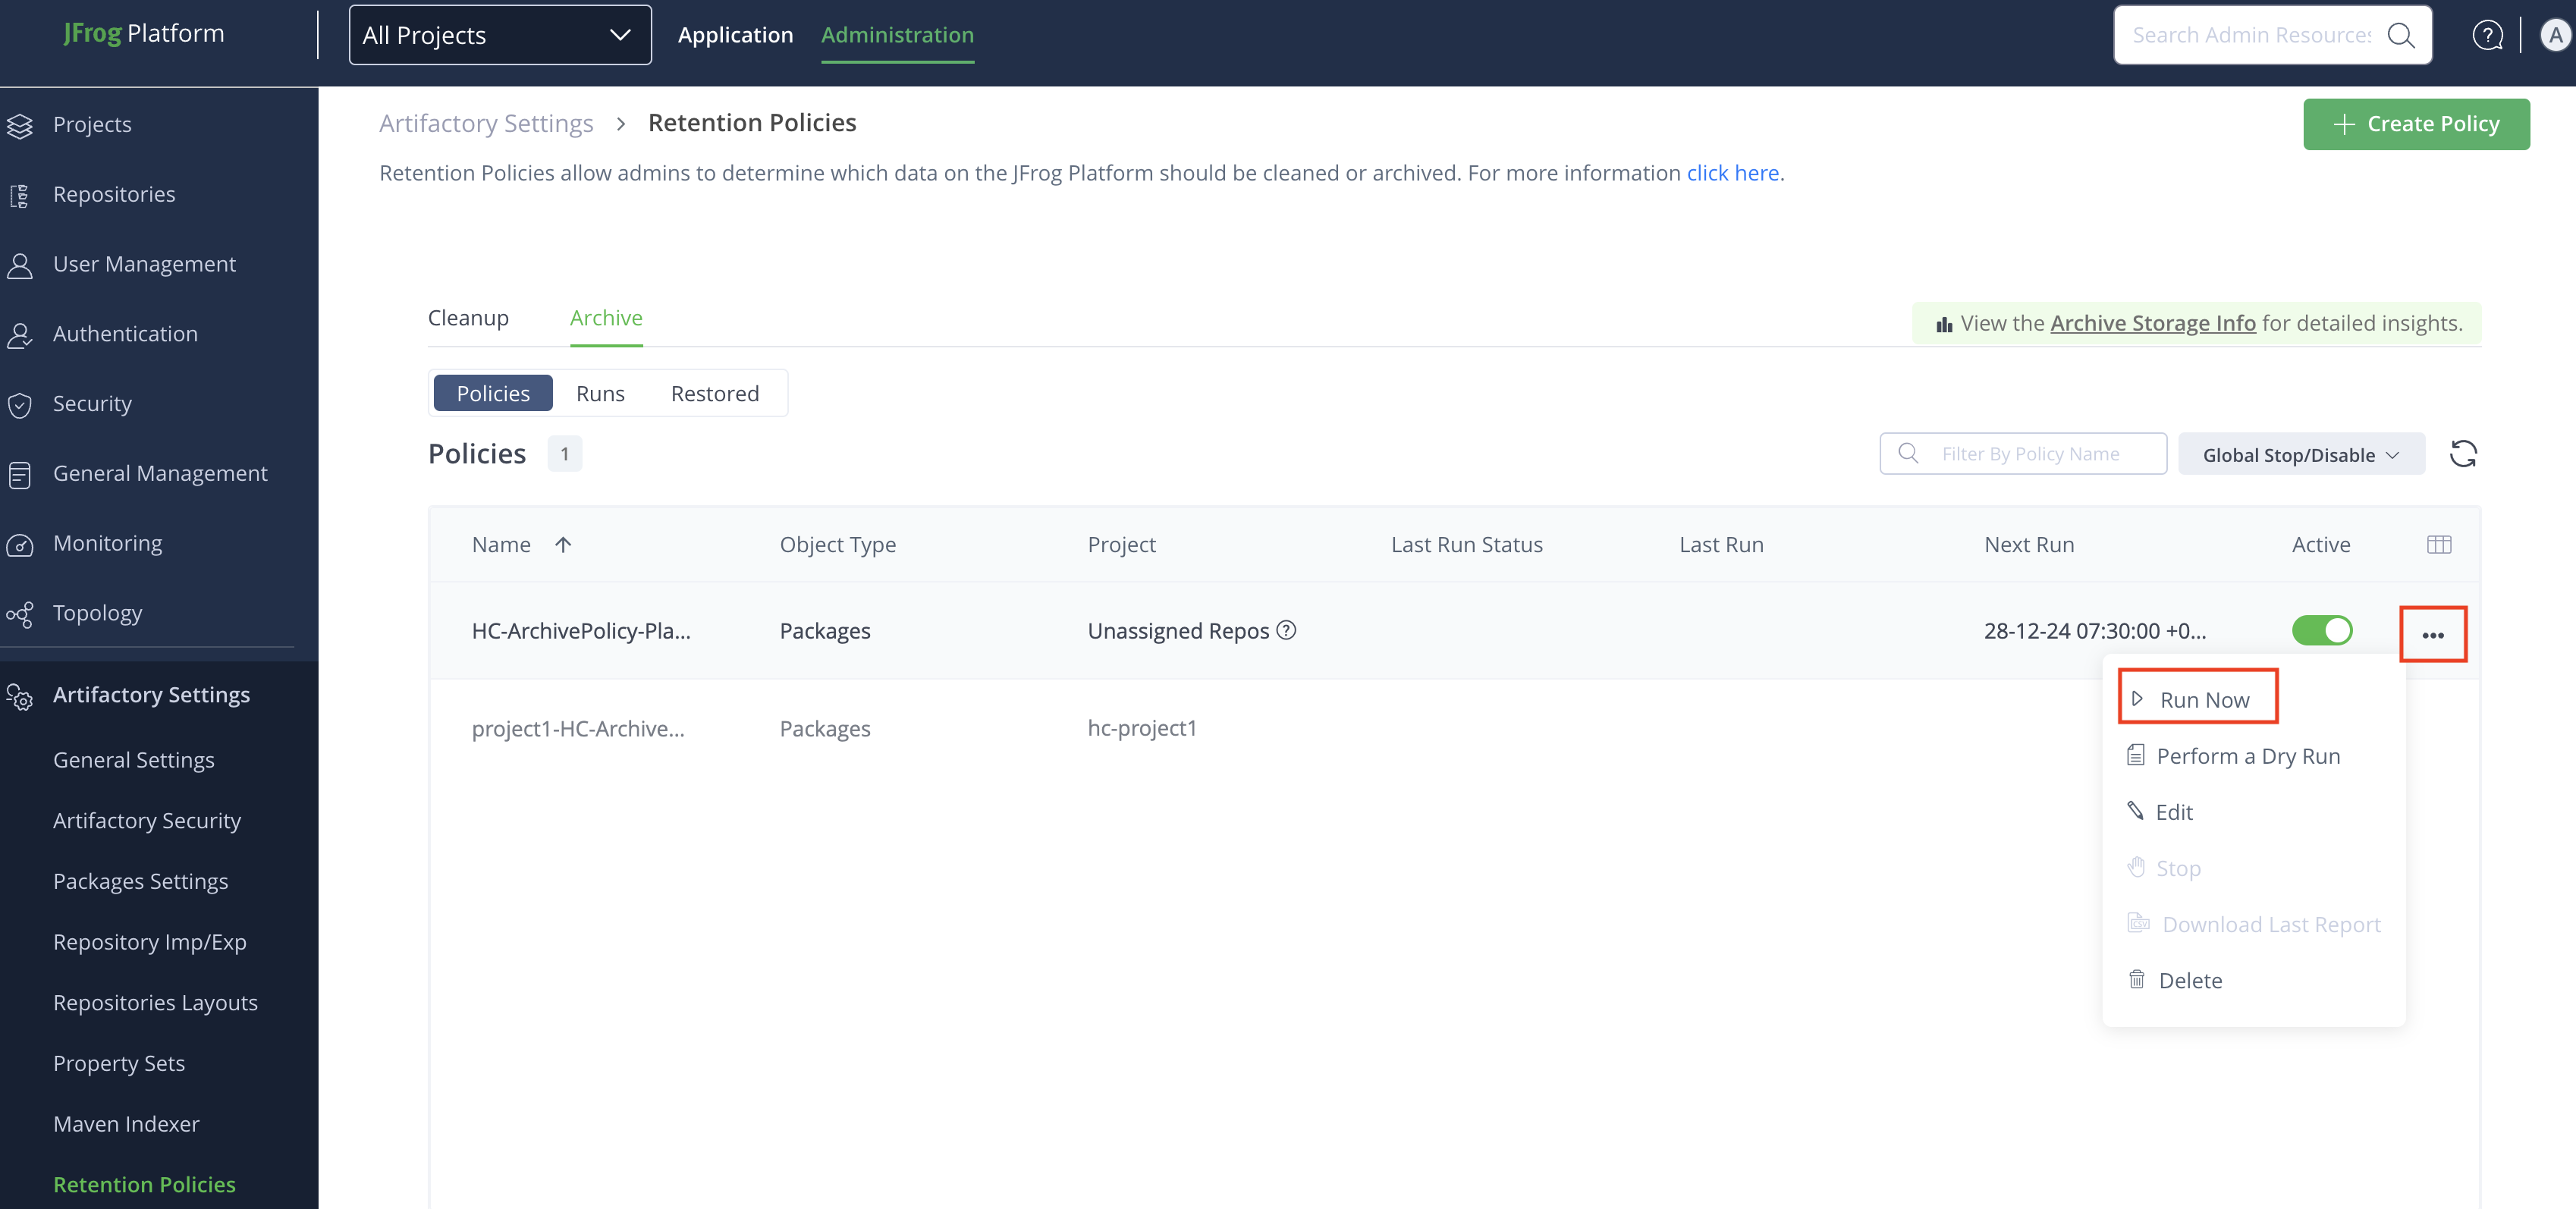
-
After the run is completed:
- Download the report from Download Smart Archiving Policy Last Run Report or Download and Review Smart Archiving Run Report.
- Review its status report, as explained in Smart Archiving Run Report Overview.
Download Smart Archiving Policy Last Run Report
This section outlines how to download the last run report. The report is in CSV format and lists all archived packages with relevant information. You can review the list to learn about the archived packages.
To download the report:
-
From the Administration module, select Artifactory > Retention Policies.
-
In the Retention Policies page, click Archive.
-
From the Policies tab, under Policies, locate the policy for which you want to download the report, click ••• icon, and then click Download Last Report.

A zip file is downloaded including one .csv files.
-
After the run is completed:
- Download the report from Download Smart Archiving Policy Last Run Report or Download and Review Smart Archiving Run Report.
- Review its status report, as explained in Smart Archiving Run Report Overview.
Stop Running Smart Archiving Policy
You have the option to stop the smart archiving policy that is currently running before it finishes completion.
Note
Once a policy has been stopped, it cannot resume from the point where it stopped. The only way to run the policy again is to restart it from the beginning.
To stop the running smart archiving policy:
-
From the Administration module, select Artifactory > Retention Policies.
-
In the Retention Policies page, click Archive.
-
From the Policies tab, under Policies, locate the policy you want to stop, click ••• icon and then click Stop.
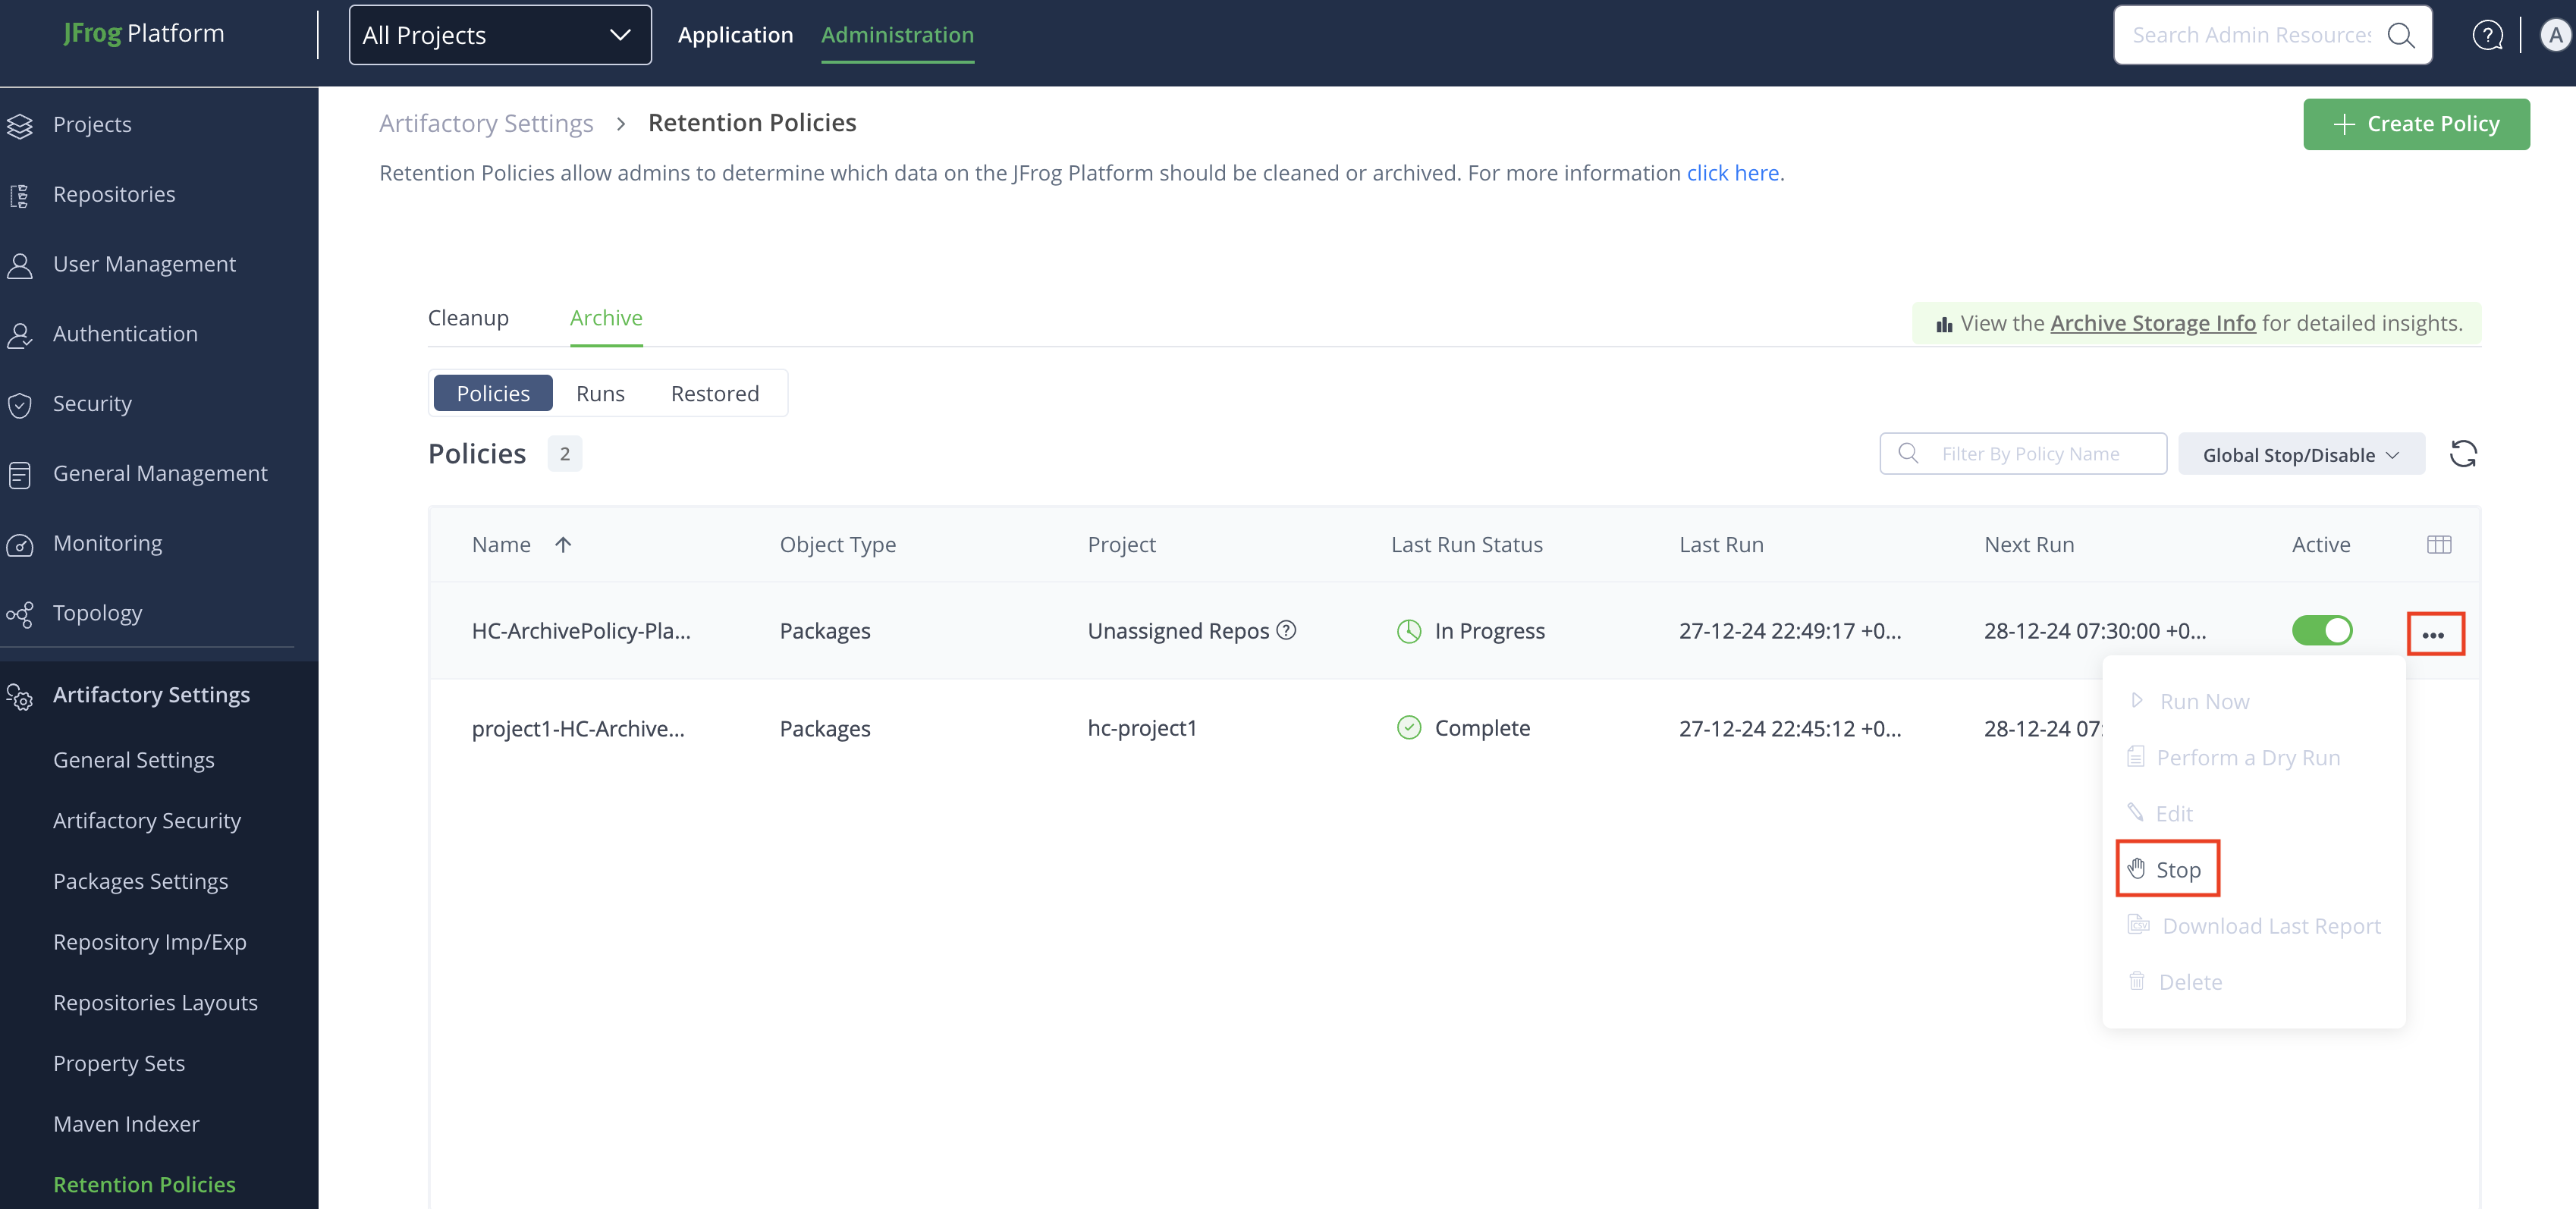
-
In the Status column of Runs tab, the status changes to Stopped for that run.
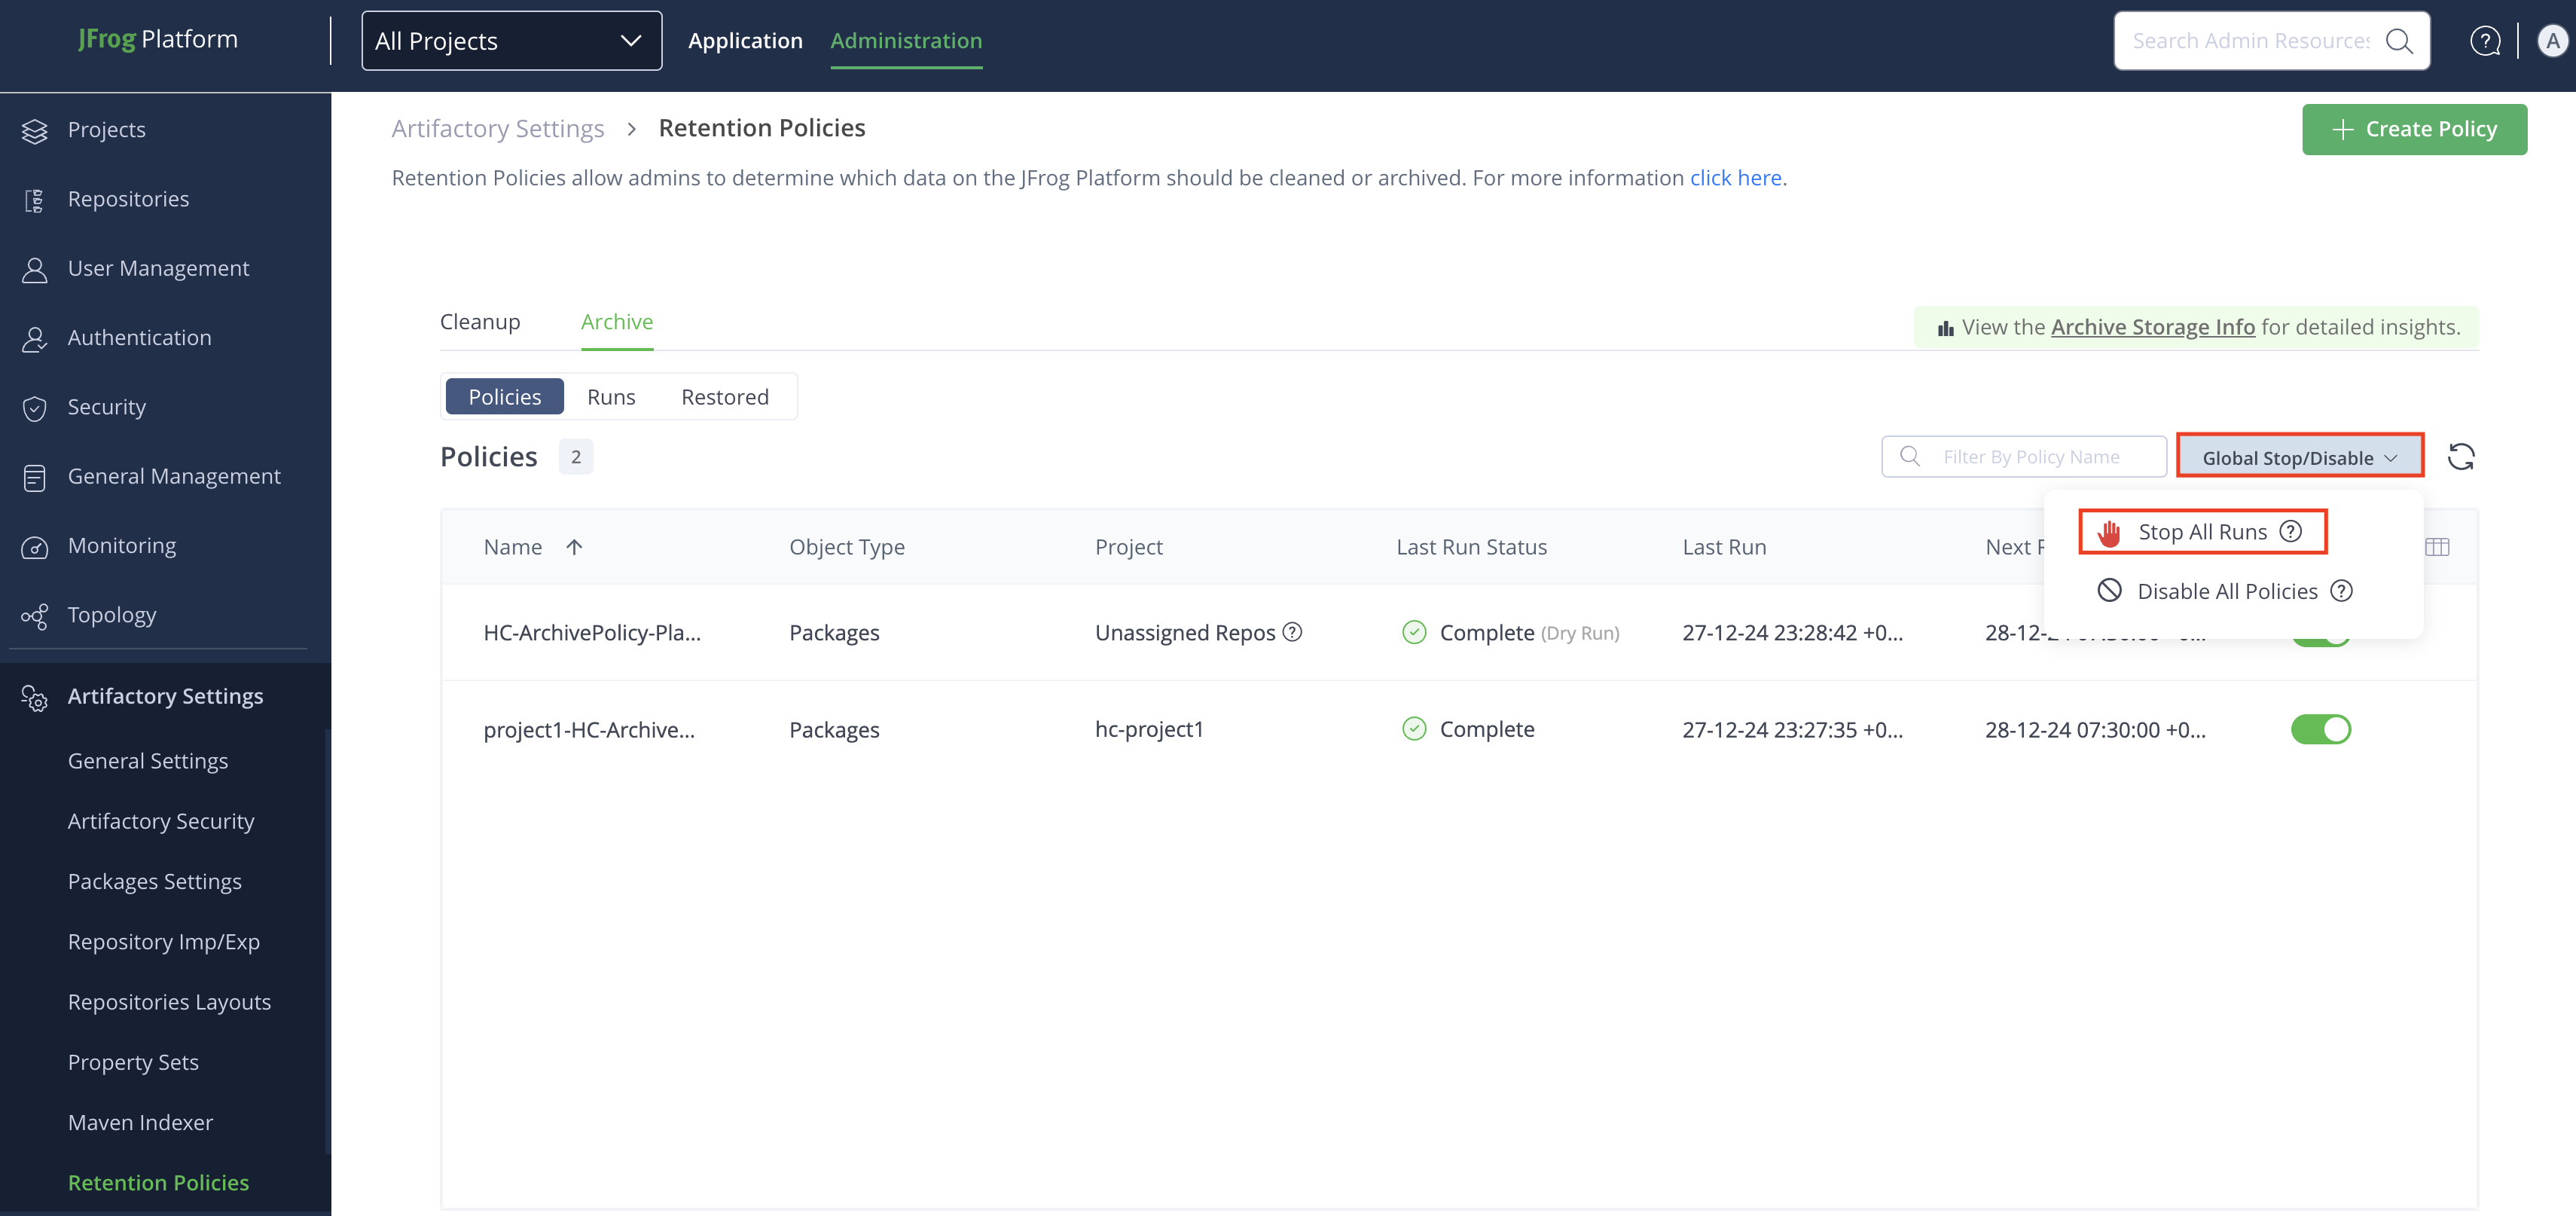
Stop All Smart Archiving Policy Runs
You can stop all smart archiving policy runs from either the Policies tab or the Runs tab. As a Platform Admin, you can stop all currently running policies. Once a policy run is stopped, it cannot resume from its last point. You must restart the policy from the beginning to rerun it.
Note
The option to stop all running policies is not available to Project Admins. The Stop All Runs option can be viewed in the global context only.
To stop all the smart archiving policy runs:
-
From the Administration module, select Artifactory > Retention Policies.
-
In the Retention Policies page, click Archive.
-
From the Policies tab, click Global Stop/Disable, and then click Stop All Runs.
To verify that all runs have stopped, under the Policies tab, check the Last Run Status column to ensure that all runs have stopped.
Edit Smart Archiving Policy
After a smart archiving policy has been created, you can change the settings or archive criteria.
Note
You cannot update a running policy. If you want to update a policy that is running, you need to either wait for the run to complete or Stop Running Smart Archiving Policy.
To edit the smart archiving policy:
-
From the Administration module, select Artifactory > Retention Policies.
-
In the Retention Policies page, click Archive.
-
From the Policies tab, under Policies, locate the policy you want to edit, click ••• icon and then click Edit.
Edit
<Policy Name>Archive Policy page appears.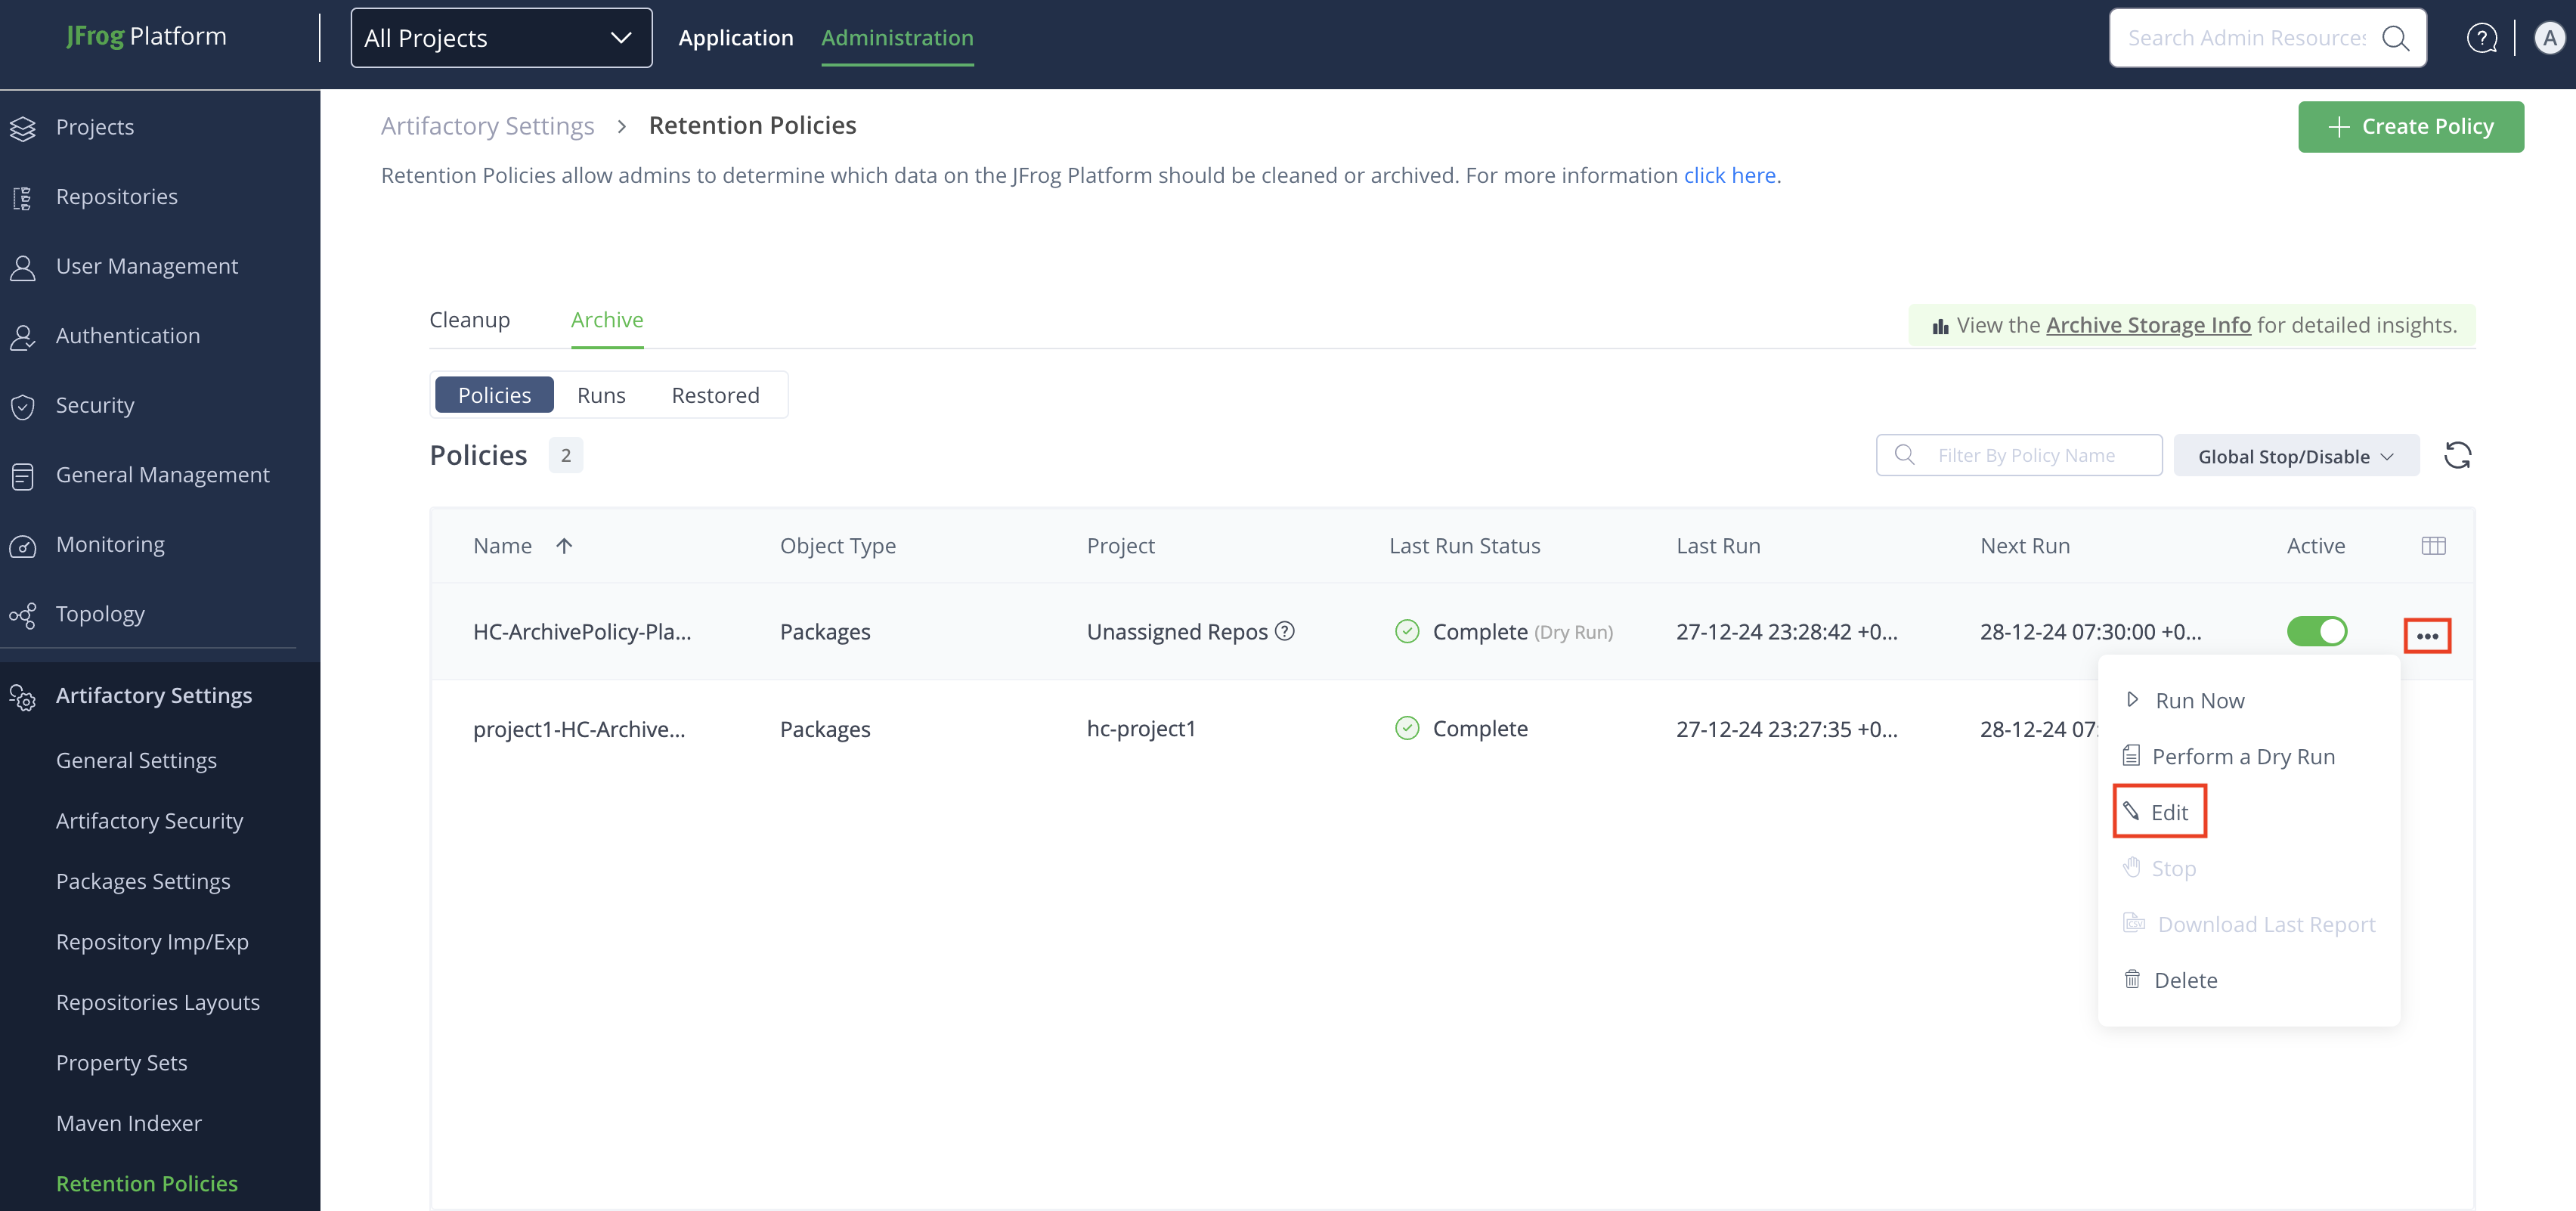
-
In the
<Policy Name>Archive Policy page, update the settings as needed, and then click Save.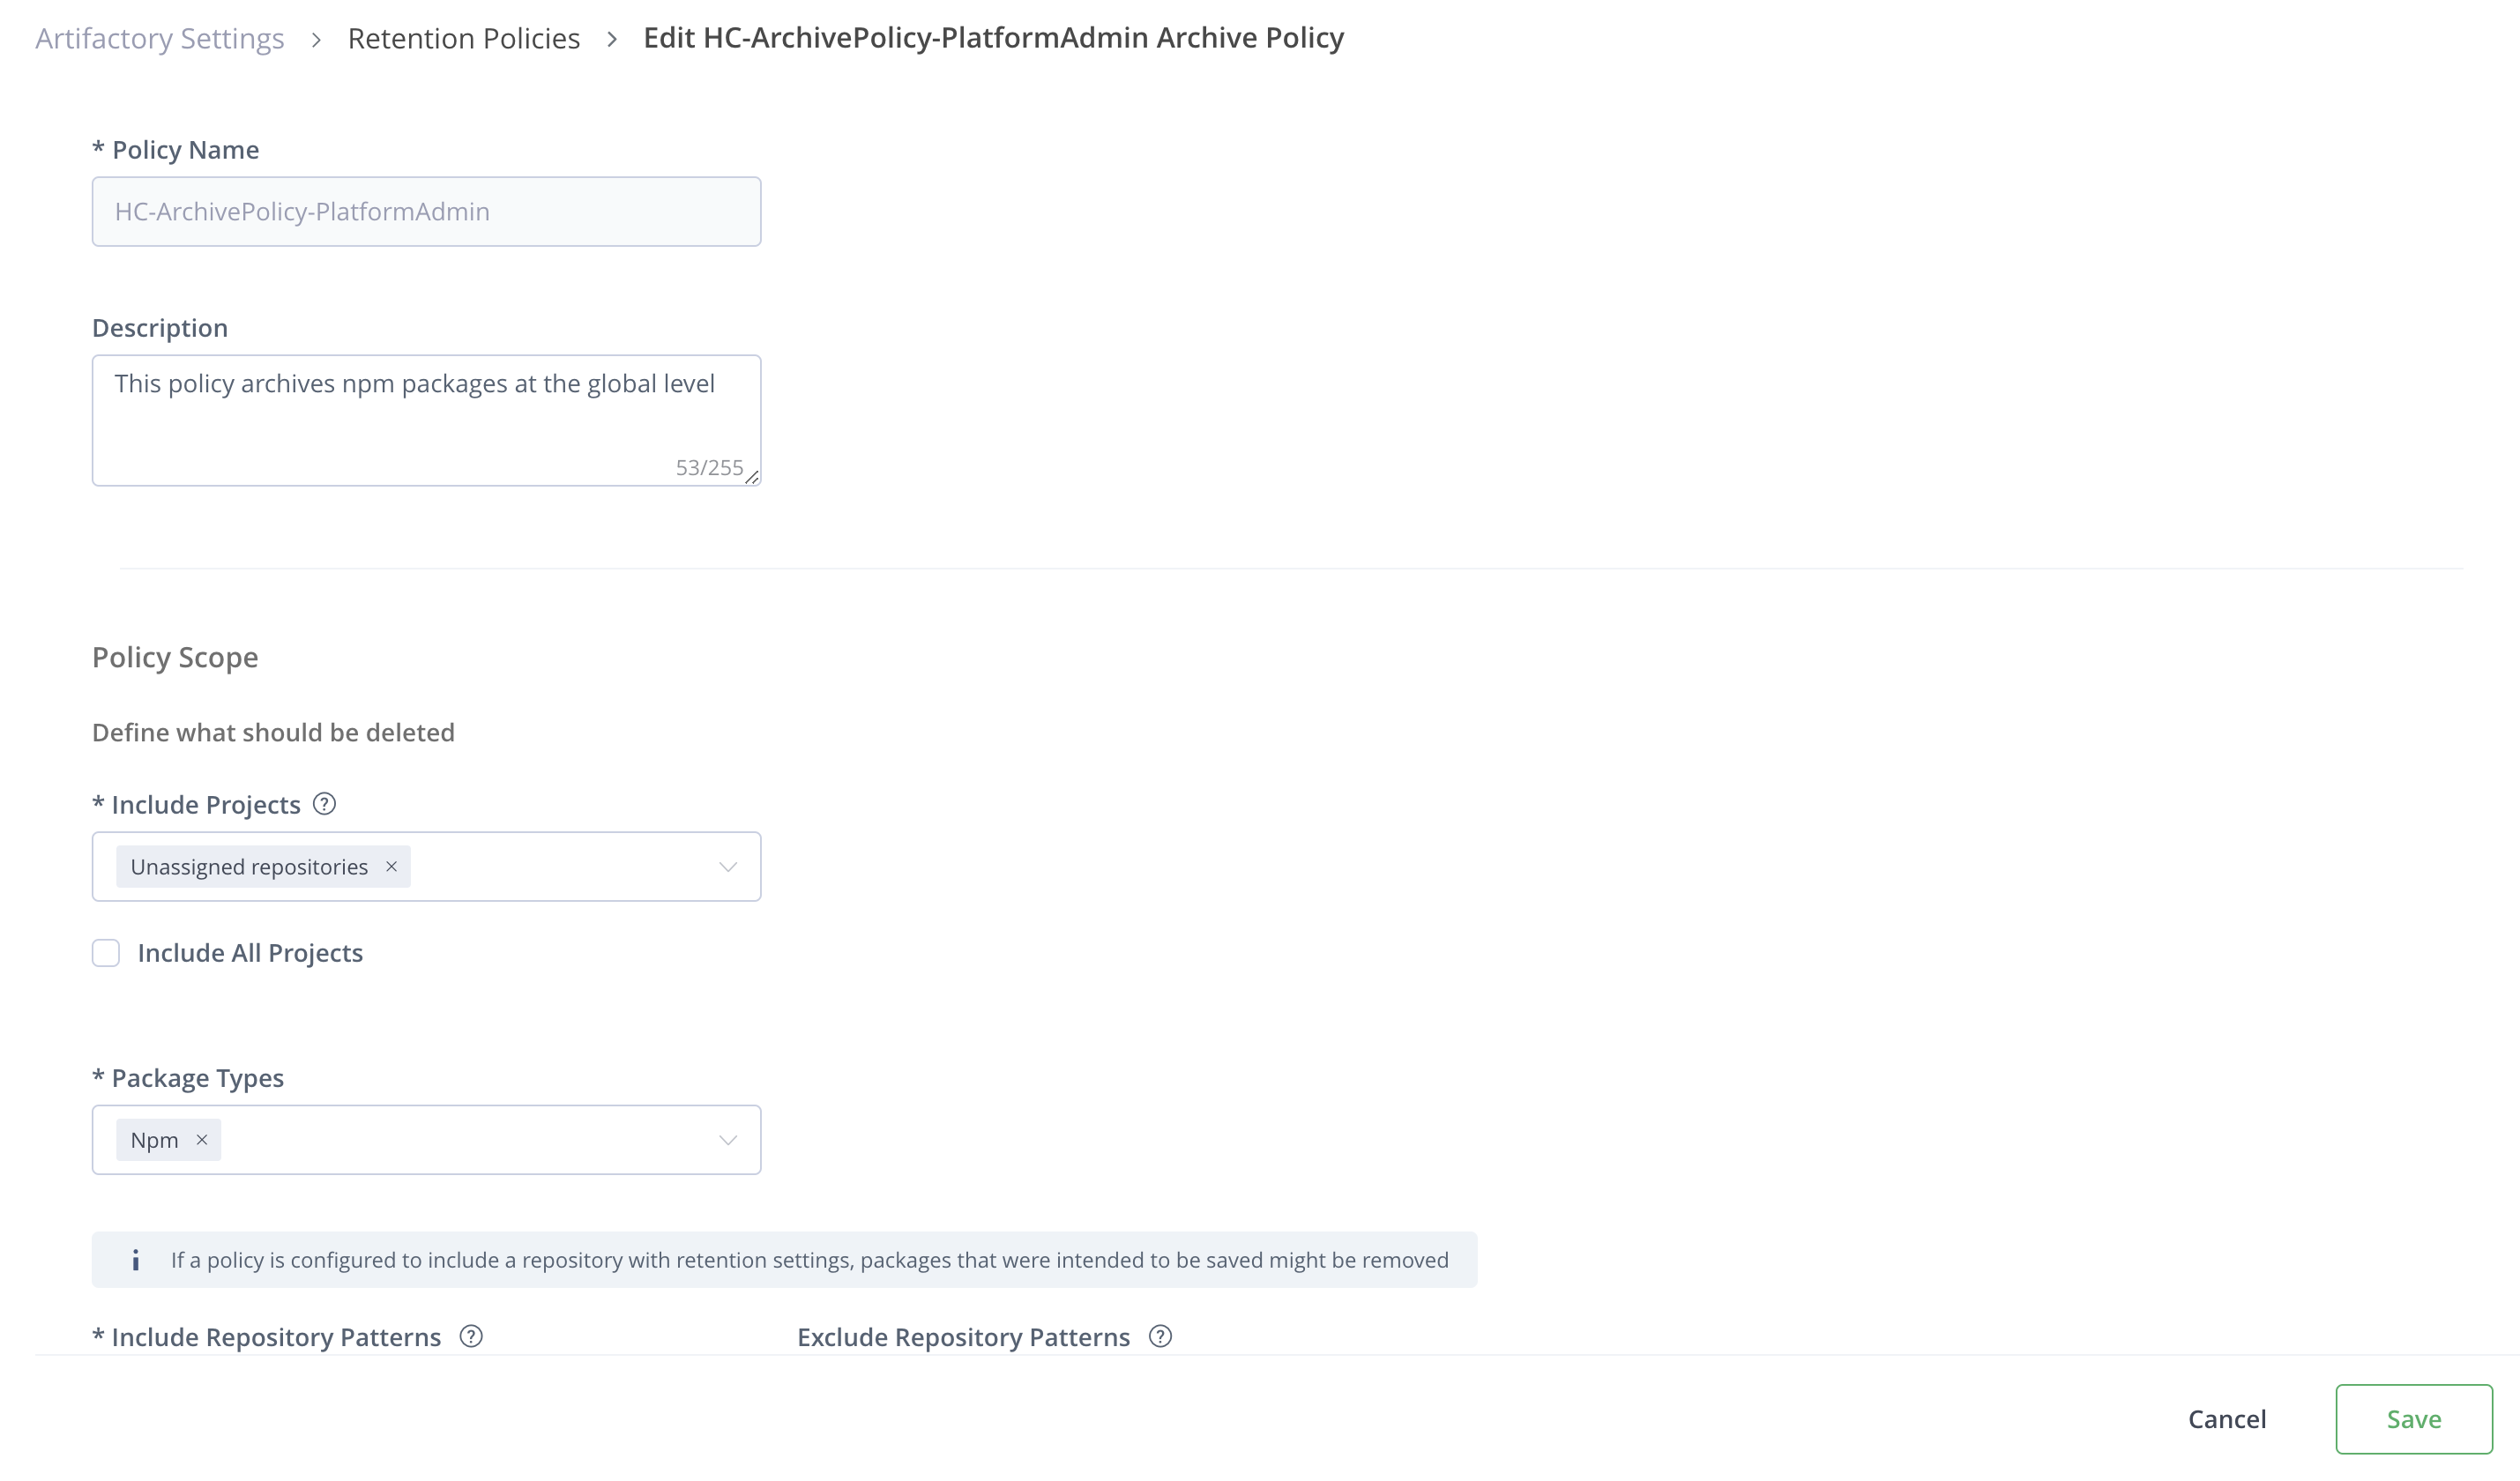
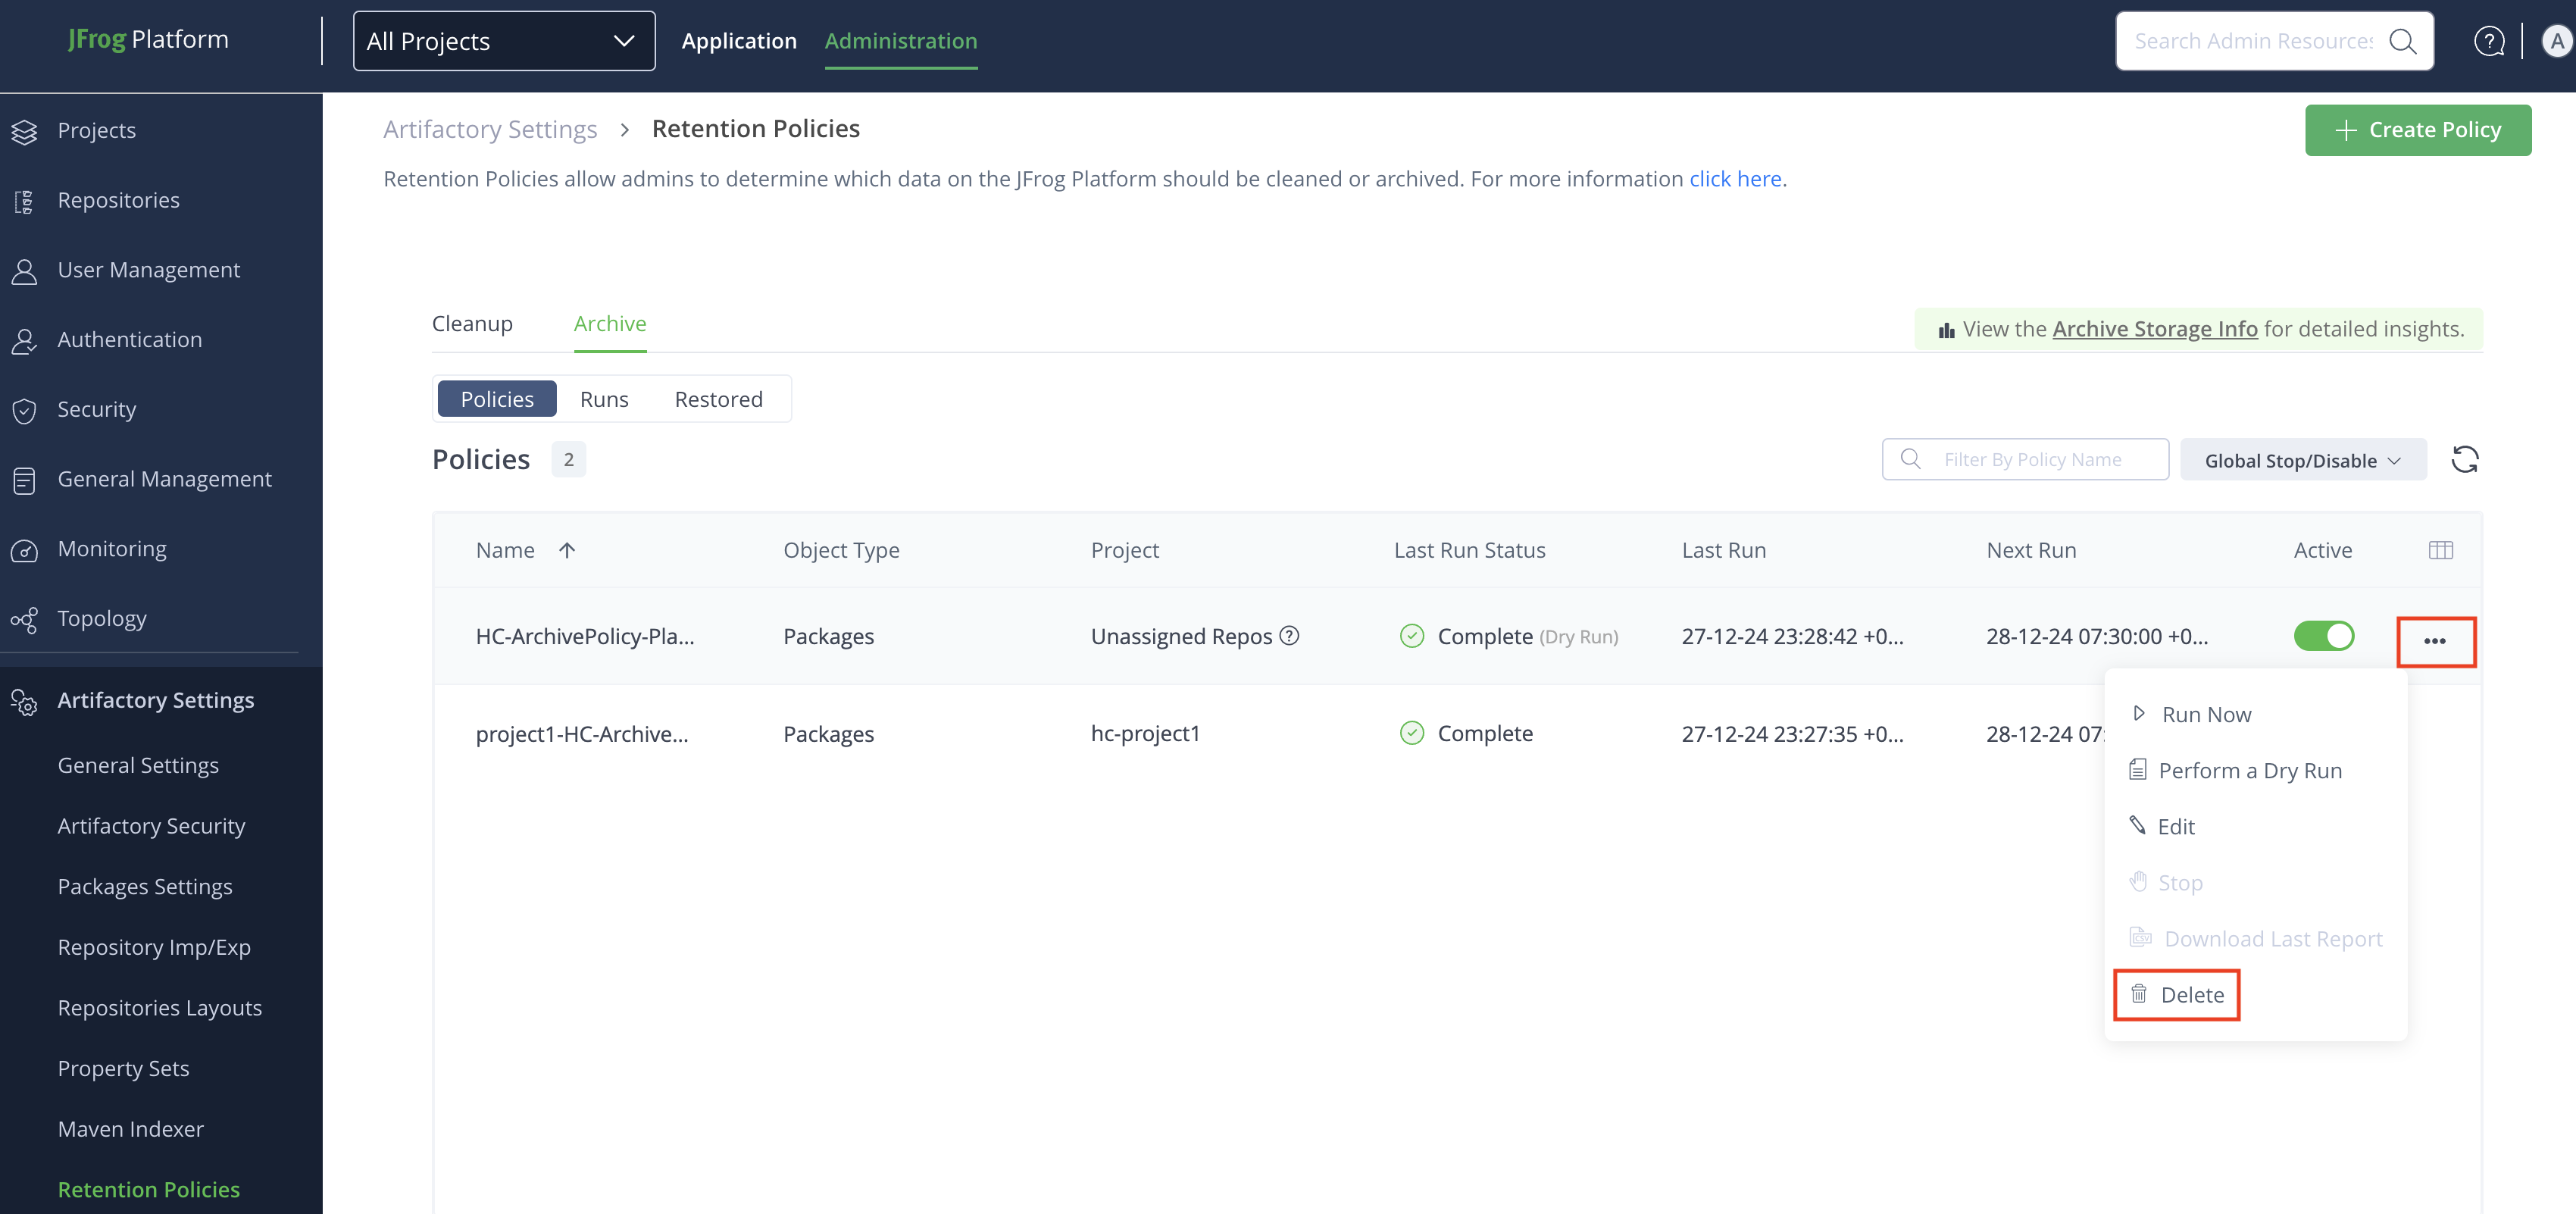
Delete Smart Archiving Policy
If you decide that the smart archiving policy is no longer needed, you can delete it.
Note
You cannot delete a running policy. If you want to delete a running policy, you need to either wait for the run to complete or Stop Running Smart Archiving Policy.
To delete the smart archiving policy:
-
From the Administration module, select Artifactory > Retention Policies.
-
In the Retention Policies page, click Archive.
-
From the Policies tab, under Policies, locate the policy you want to delete, click ••• icon and then click Delete.
The policy is deleted and removed from the Policies list.
Manage Smart Archiving - Runs
This section outlines the actions you can perform on the smart archiving Runs from the Active Artifactory Instance. It includes view, stop all runs and downloading run reports.
Task | Description | For UI, see... | For API, see... |
|---|---|---|---|
View All Archive Runs | This section outlines how to view the status of both past and ongoing smart archiving runs. It provides guidance on how to review specific details, including the items that have been archived, the associated timestamps, the status of each archive operation, customizing table columns, and applying filters to view the desired information. | View All Smart Archiving Runs | |
Stop All Archive Policy Runs | This topic outlines how to stop all smart archiving policy runs. You can stop all currently running policies. Once a policy run is stopped, it cannot resume from its last point. You must restart the policy from the beginning to rerun it. | Stop All Smart Archiving Policy Runs | |
Download and Review Archive Run Report | This section outlines how to download a smart archiving run report. The report is in CSV format and lists all archived packages with relevant information. You can review the list to learn about the archived packages. | Download and Review Smart Archiving Run ReportSmart Archiving Run Report Overview |
Authorization
Activity | Platform Admin | Project Admin Note: Applicable within the scope of your project context | Application User |
|---|---|---|---|
| View All Smart Archiving Runs |
|
|
|
| Stop All Smart Archiving Policy Runs |
|
|
|
| Download and Review Smart Archiving Run Report |
|
|
|
View All Smart Archiving Runs
This section outlines how to view the status of both past and ongoing smart archiving runs. It provides guidance on how to review specific details, including the items that have been archived, the associated timestamps, the status of each archive operation, customizing table columns, and applying filters to view the desired information.
To view the smart archiving policy runs:
-
From the Administration module, select Artifactory > Retention Policies.
-
In the Retention Policies page, click Archive.
-
From the Runs tab, under Runs, locate the Run Id you want to learn about it.
In this list, you can review a comprehensive history of executed archive policies, including the start time, number and physical size of archived items, and run status. The list is sorted chronologically, with the most recent run at the top. For more information on run statuses, see the table below.
-
To view a report on a specific policy run, locate the run, and then click Report icon.
A zip file will be downloaded containing one .csv files. If the report is for a dry run, it will show the items that would be archived in a real run. If it’s for an actual archive run, it will detail what was archived.
Note
- Reports are created and stored in a dedicated repository called
jfrog-policy-reports-local. We recommend not deleting this repository to maintain a history of policy executions and their results. Deleting it will result in the loss of this history.- If no packages are archived (for a real run) or archived (for a dry run), a report will not be generated.
- The number of previous runs included in the history is defined by the artifactory.policy.cleanup.nodes_cleaned.expiration.days system property.
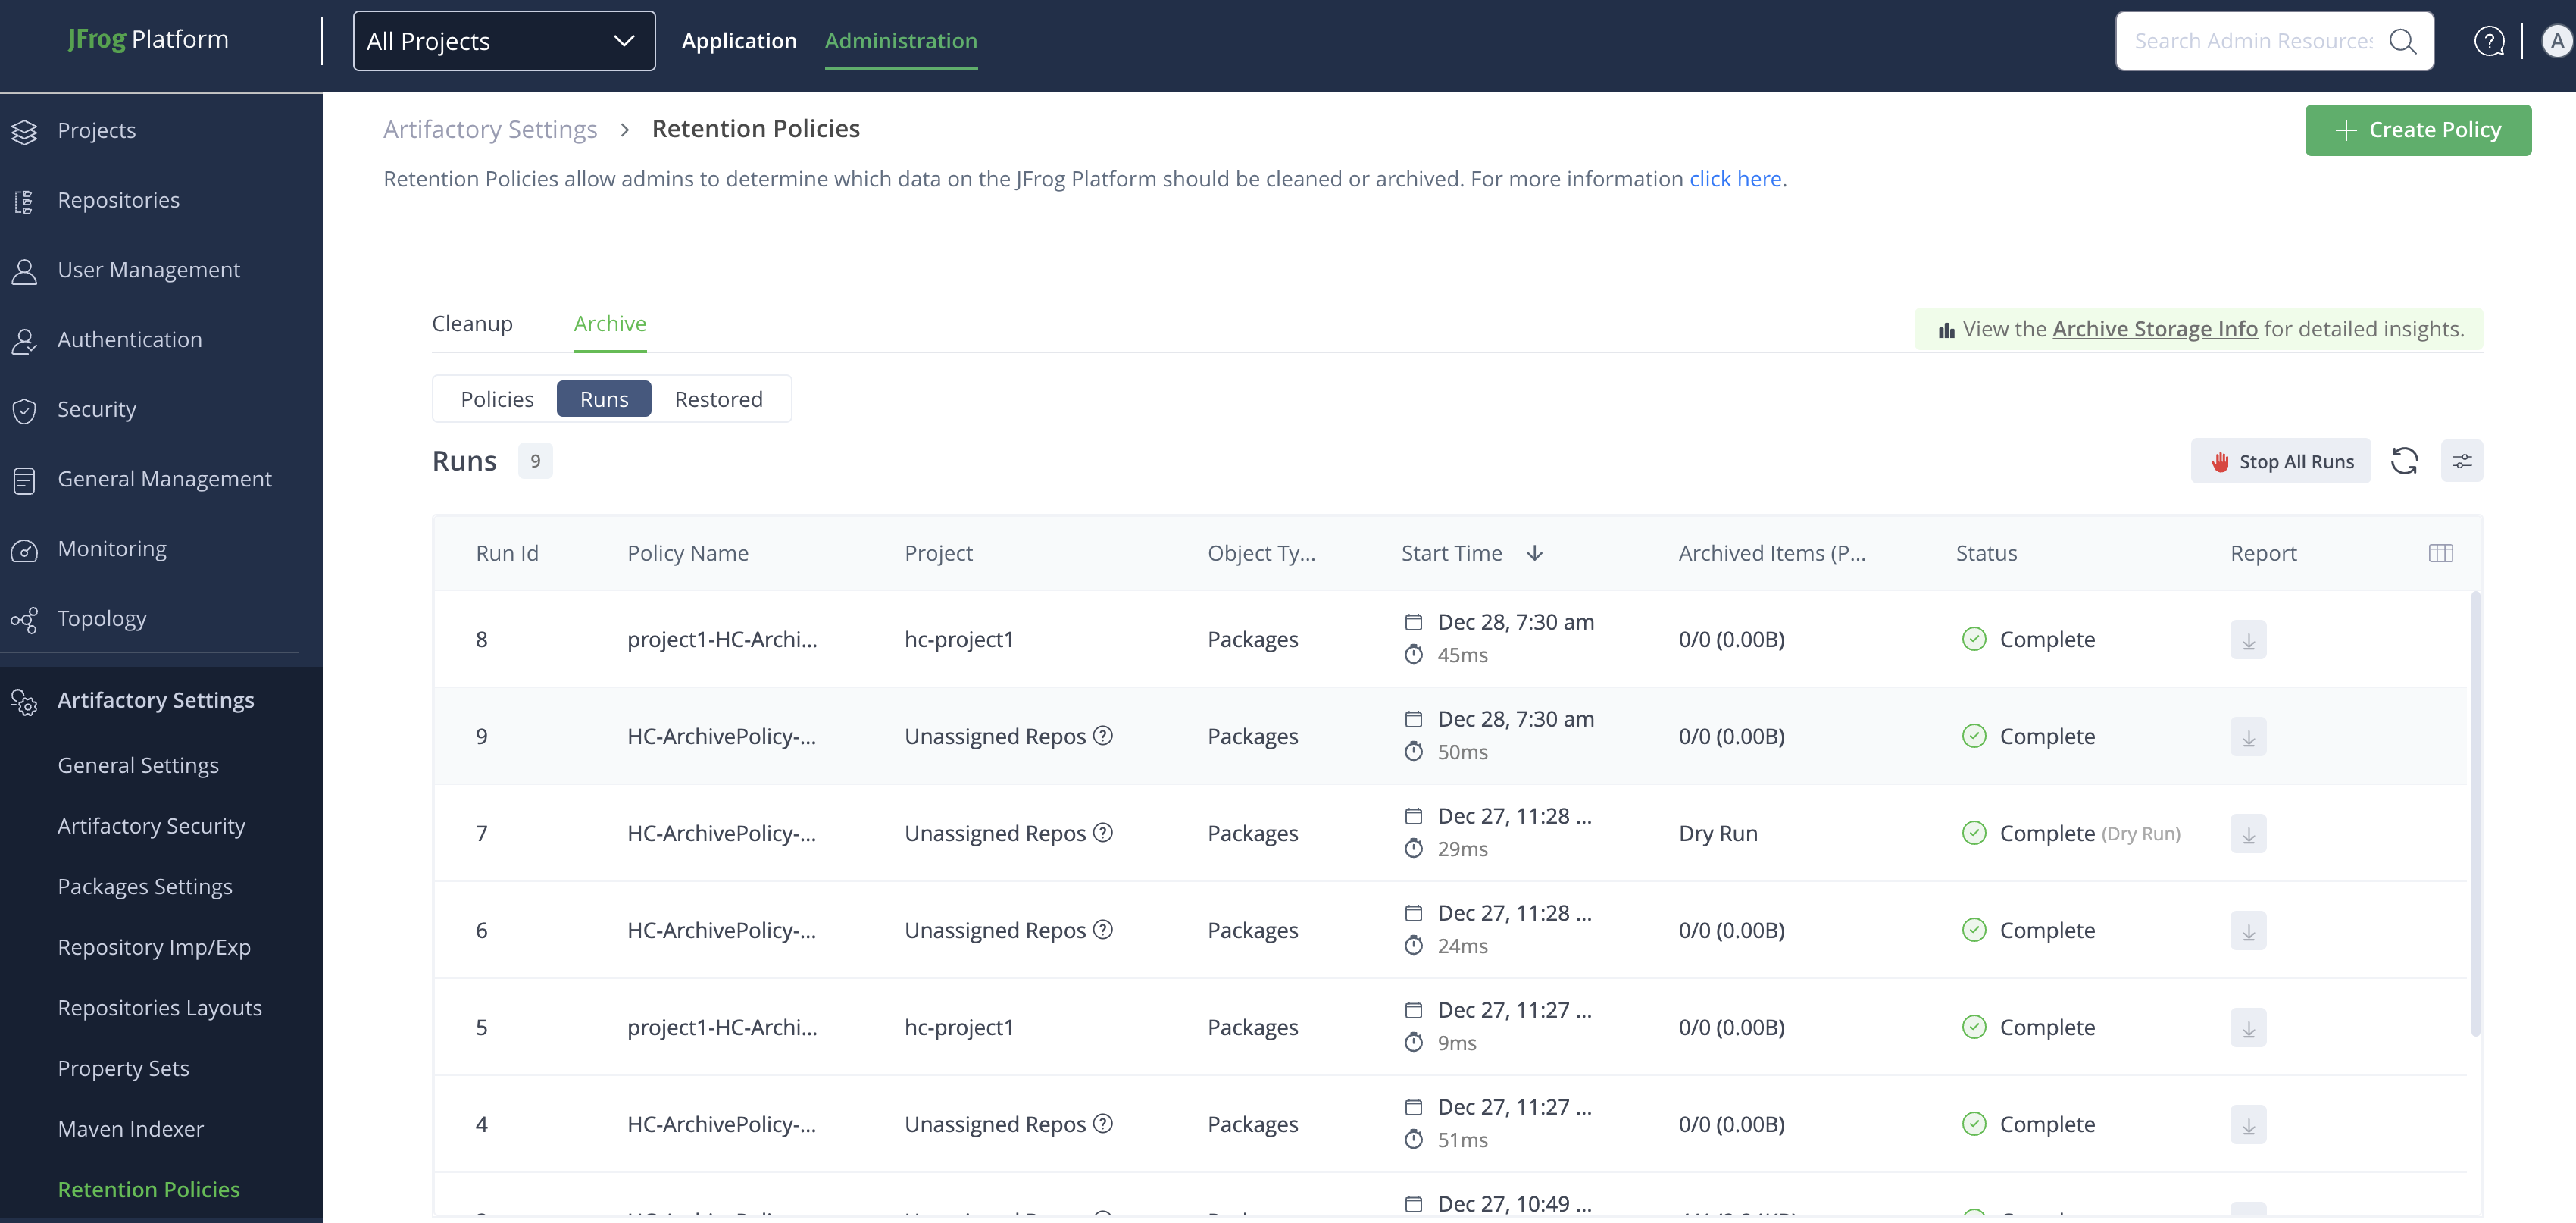
Archive Runs Table Fields
The following table describes the columns of the archive runs table fields.
Field | Description |
|---|---|
Run ID | Indicates the number of the run id |
Global | Indicates the policy is applicable at the global level Note: Global Policy may affect multiple projects. It can be managed by a Platform Admin on the Global Scope only. |
Project | Indicates the name of the project |
Policy Name | Indicates the name of the policy |
Start Time | Indicates the date and time when the archive operation started running |
Archived Items (Physical Size) | The number of total archived items, and the total items (The archived size) |
Status | Indicates the status of each policy execution, which can be one of the following: Last Run Status
|
Report | Indicates the report download state as follows:
|
Customize Table Columns
Arrange the table columns according to how you want to view them.
To display and arrange the columns:
-
From the Table header, click Customize Columns icon at the end.
-
Select which columns to display in the Customize Columns pop-up and drag and drop to reorder them.
-
Click Apply.
Apply Filters to Sort Run Results
You can apply the filter to the run results to easily access your desired view.
To apply filters:
-
Click the Filter icon from the top right above the table header.
-
Apply the following fields as you want to sort:
| Name | Description |
|---|---|
| Policy Name | Enter the name of the policy and choose the policy from the list |
| Project | Enter the name of the project and choose the project from the list |
| Start Time | Select from the dropdown list or customize as per the timelines using the calendar |
| Status | Select the run status from the available list. To learn about statuses, refer to Archive Runs Table Fields and Status field. |
| Other | Select the available options as applicable |
-
To remove applied filters, click Clear all.
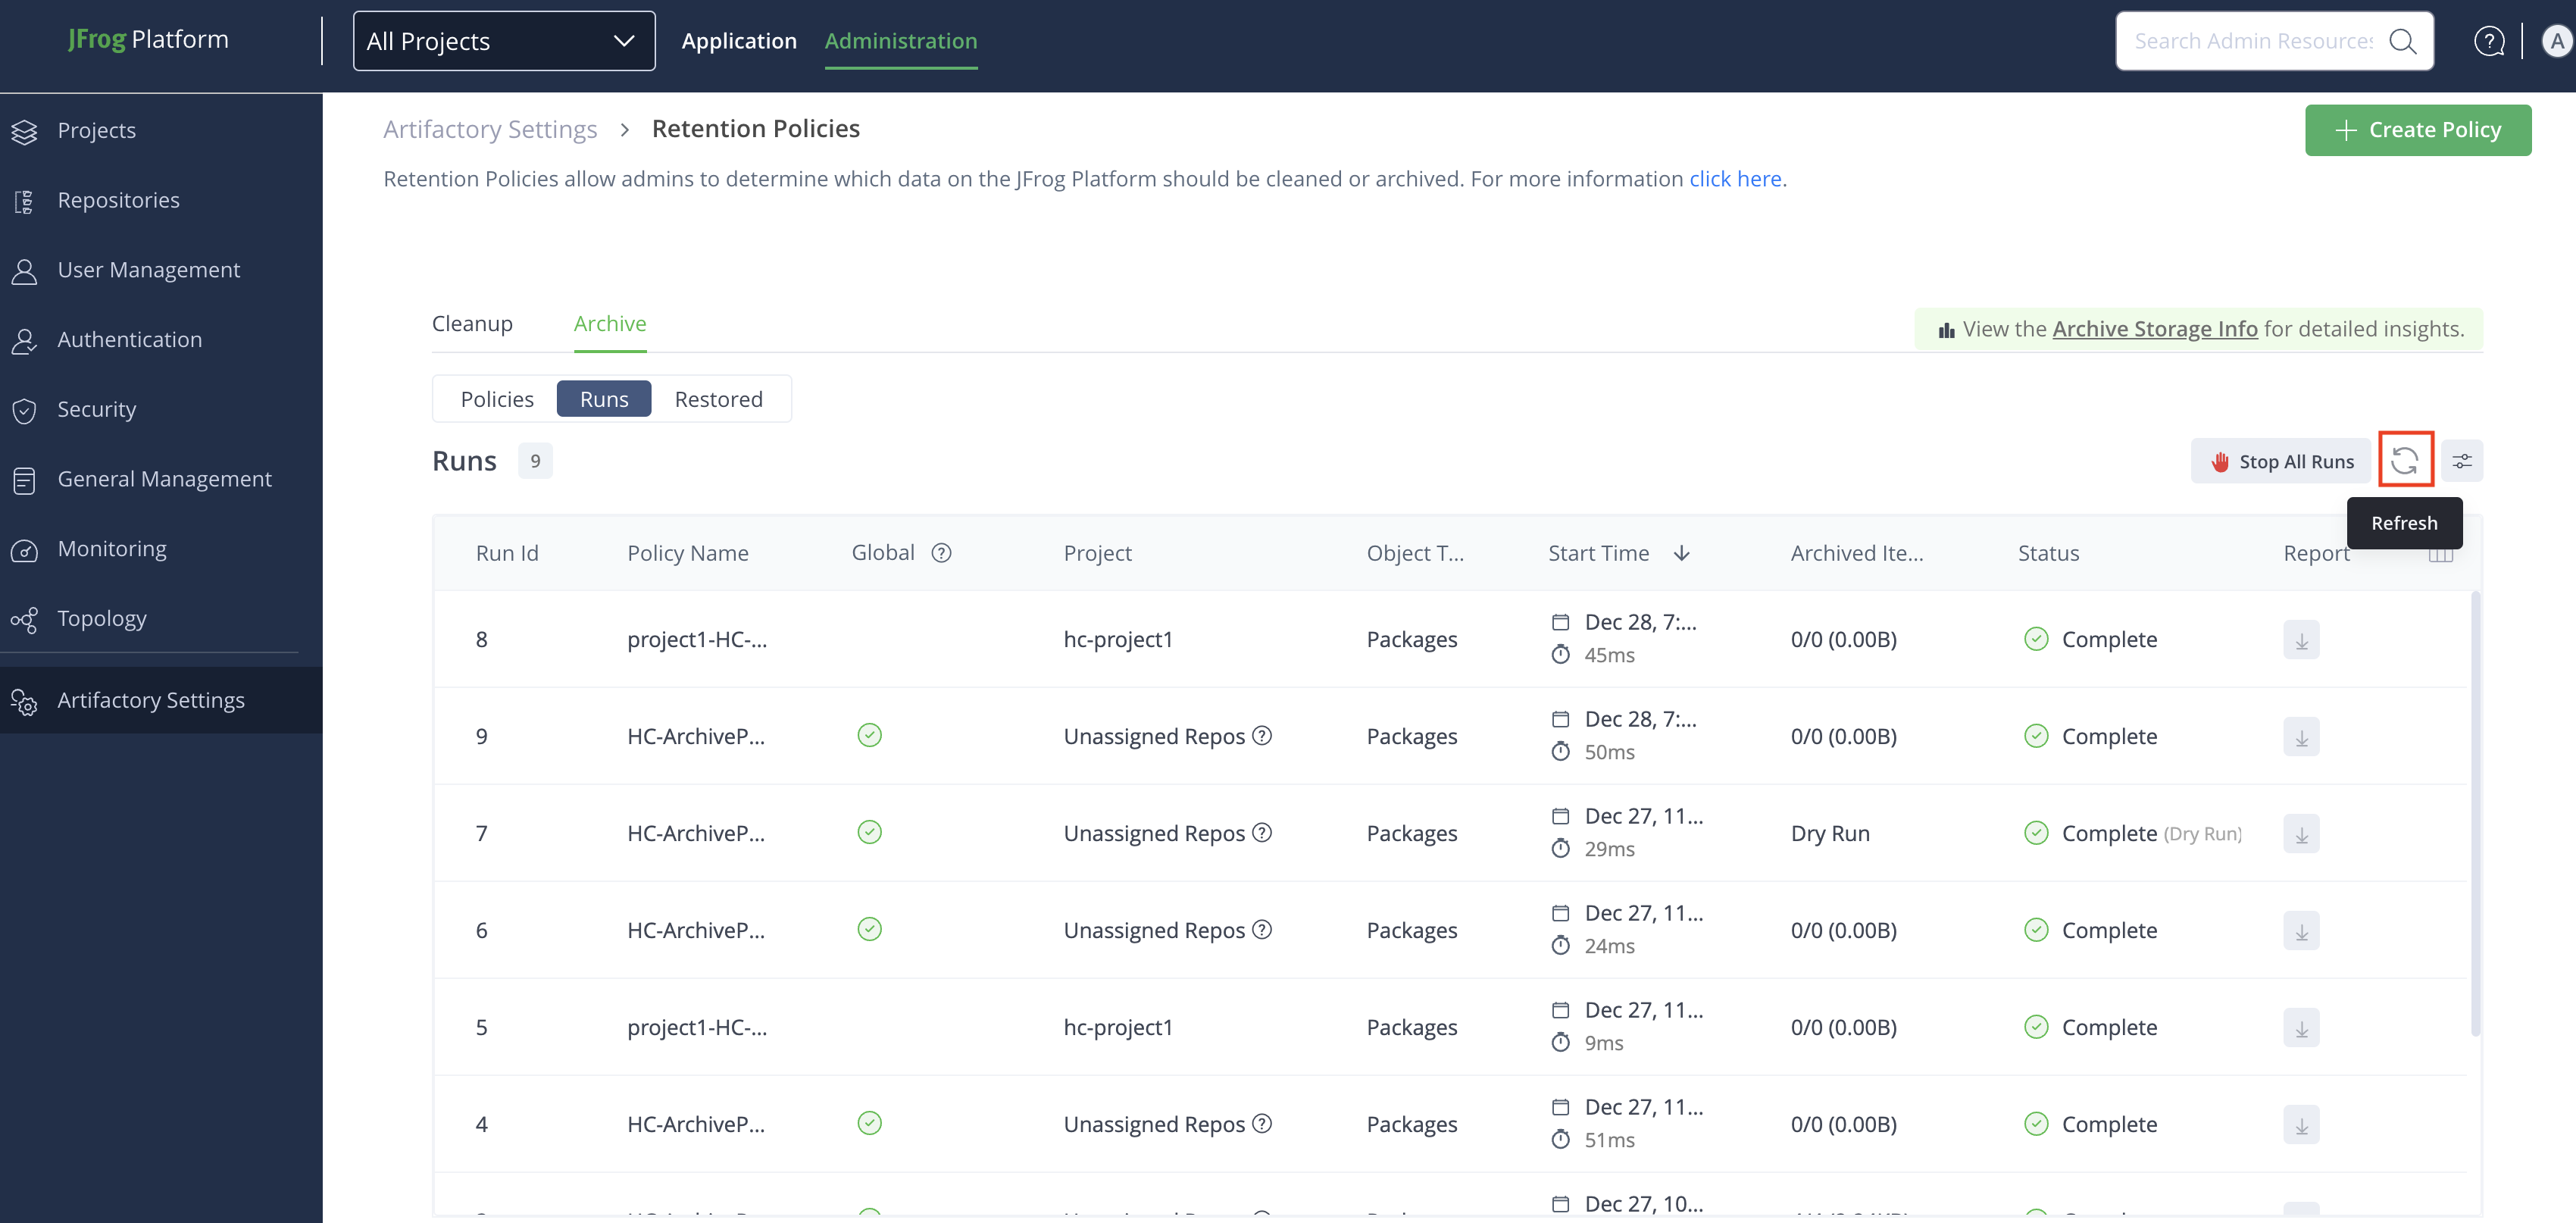
Refresh Archive Runs
If you don't see the latest created runs in the list, you can refresh the runs to view them.
To refresh runs, click Refresh icon from the top right above the table header.
Stop All Smart Archiving Policy Runs
This topic outlines how to stop all smart archiving policy runs. You can perform this action from the policies tab and runs tab. As a Platform Admin, you can stop all currently running policies. Once a policy run is stopped, it cannot resume from its last point. You must restart the policy from the beginning to rerun it.
Note
The option to stop all running policies is not available to Project Admins. The Stop All Runs option can be viewed in the global context only.
To stop all the smart archiving policy runs:
-
From the Administration module, select Artifactory > Retention Policies.
-
In the Retention Policies page, click Archive.
-
From the Policies tab, click Global Stop/Disable, and then click Stop All Runs.
To verify that all runs have stopped, under the Policies tab, check the Last Run Status column to ensure that all runs have stopped.
Download and Review Smart Archiving Run Report
This section outlines how to download a smart archiving run report. The report is in CSV format and lists all archived packages with relevant information. You can review the list to learn about the archived packages.
Note
The report is generated for both actual runs and dry runs.
To download the smart archiving run report:
-
From the Administration module, select Artifactory > Retention Policies.
-
On the Retention Policies page, click Archive.
-
From the Runs tab, under Runs, locate the run for which you want to download the report, and then click the Download icon.
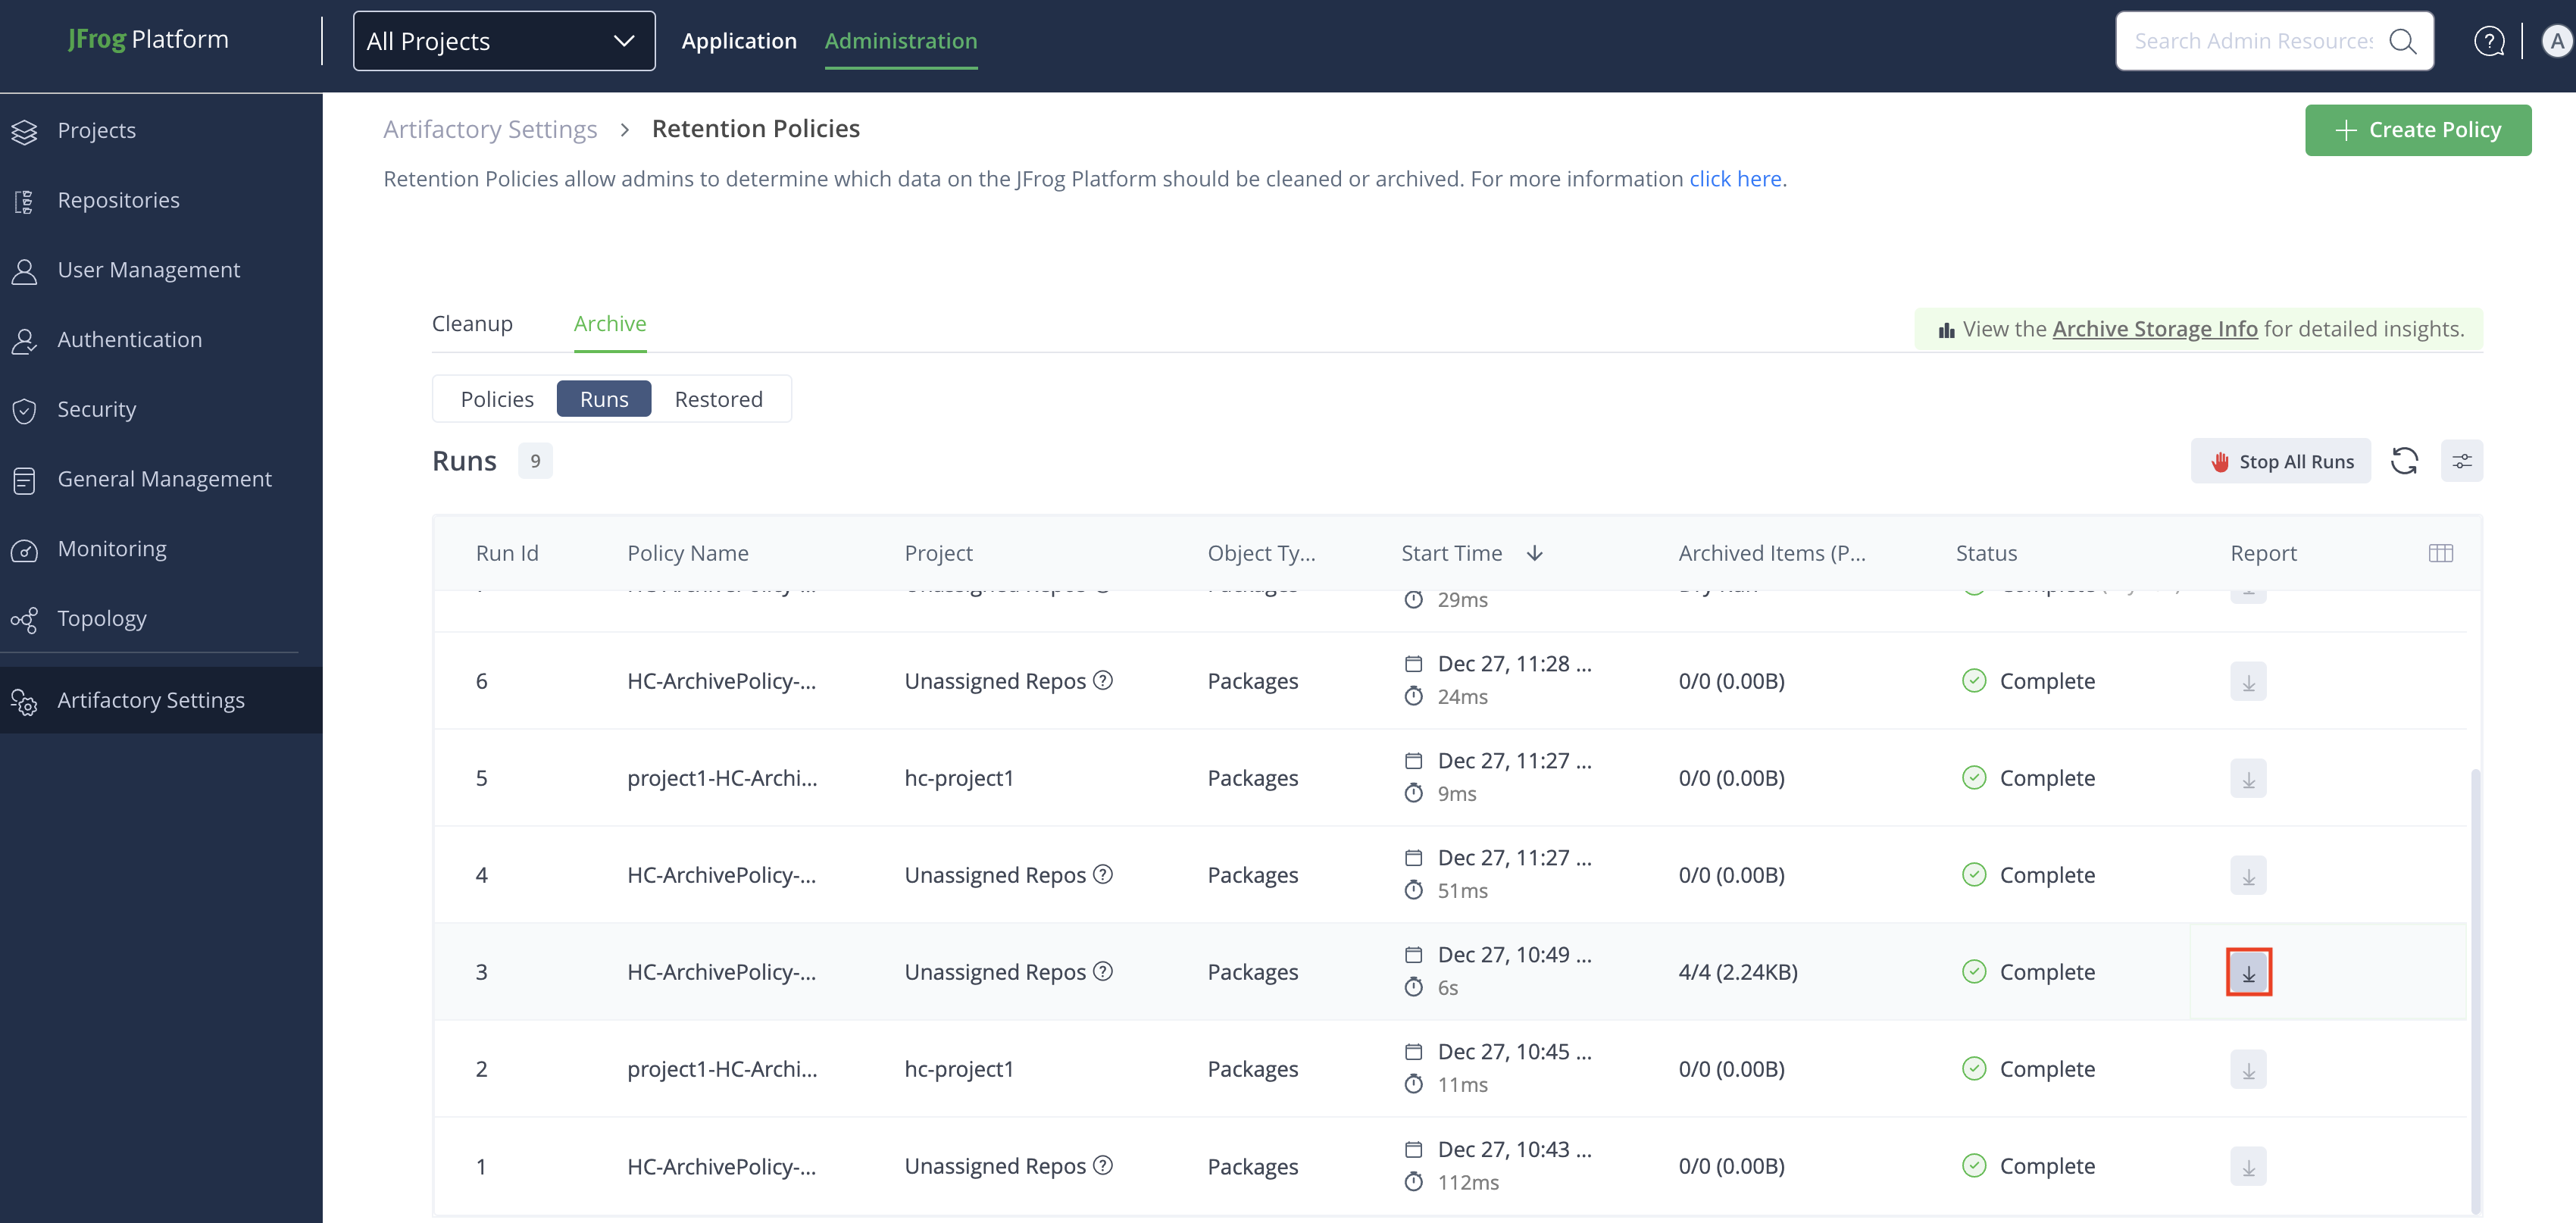
A zip file is downloaded that includes a .csv file.
-
Review the downloaded report. For more information, see Smart Archiving Run Report Overview.
Smart Archiving Run Report Overview
The downloaded CSV report provides a detailed summary of the archive process, including information on the policy used, the status of the run, and the packages processed.
The following are available in the archive report:
Field | Description |
|---|---|
Run General Details | The general details of the archive run. |
archive run for | The policy name and current status of the archive run. |
isDryRun | Indicates whether the run was a dry run or an actual run:
|
Run Start Time | The timestamp when the archive process started. |
Duration | The total time taken for the archive process. |
Run Summary | The summary of the archive run. |
Archive packages count | The total number of packages successfully archived. |
Total packages count | The total number of packages processed during the archive. |
Packages virtual size | The virtual size of all archived packages. |
Packages physical size | The actual physical size of all archived packages. |
Policy Configuration For This Run | Indicates the configuration details of the policy. |
Policy Key | The name of the archive policy used for this run. |
Description | A description of the archive policy. |
Cron Expression | The cron expression used to schedule the archive runs. |
Max Run Duration | The maximum duration allowed for the policy to run. |
Skip Trash Can | Indicates if the trash can was skipped during the archive:
|
Created By | The user who created the policy. |
Creation Time | The timestamp when the policy was created. |
Last Modified By | The user who last edited the policy. |
Last Modification Time | The timestamp when the policy was last edited. |
Projects | The project name associated with the policy. |
Included in Projects | The projects to which the policy is assigned. |
Package Types | Indicates which projects the Global policy applies to. It includes: All: This option indicates that the policy is shared with all projects. This is selected when the Include All Projects checkbox is checked in the policy settings. N/A: This option indicates that the policy is not applicable to any specific projects. |
Included in Repositories | The repositories included in the policy. |
Excluded from Repositories | The repositories not affected by the policy. |
Include Package Name Pattern | The name pattern applied to select packages for archiving. |
Exclude Package Name | The name pattern applied to exclude packages from archiving. |
Age Condition (older than) | The age-based condition for selecting packages (e.g., older than a specified time). |
Usage Condition (not downloaded since) | The condition for selecting packages based on usage (e.g., not downloaded since a certain date). |
Version (keep last N) | The number of latest versions to retain; older versions are archived. |
Run Detailed Summary | Indicates the detailed archive run summary:
|
Search and Restore Archived Packages
This section outlines the actions you can perform on the global search bar from the Active Artifactory Instance. It includes searching and restoring archived packages.
Task | Description | For UI, see... | For API, see... |
|---|---|---|---|
Search Archived Packages | This topic outlines how to search archived packages. Perform a dedicated search for archived packages in the Active Artifactory Instance. The search results indicate the original repository of each package found. | Search Archived Packages | |
Restore Archived Packages | Restore is a non-destructive process, ensuring that none of the restored packages are deleted from the Archive Artifactory Instance.
| Restore Archived Packages |
Authorization
Activity | Platform Admin | Project Admin Note: Available from Version 7.123 | Application User |
|---|---|---|---|
|
|
| |
| Restore Archived Packages |
|
|
|
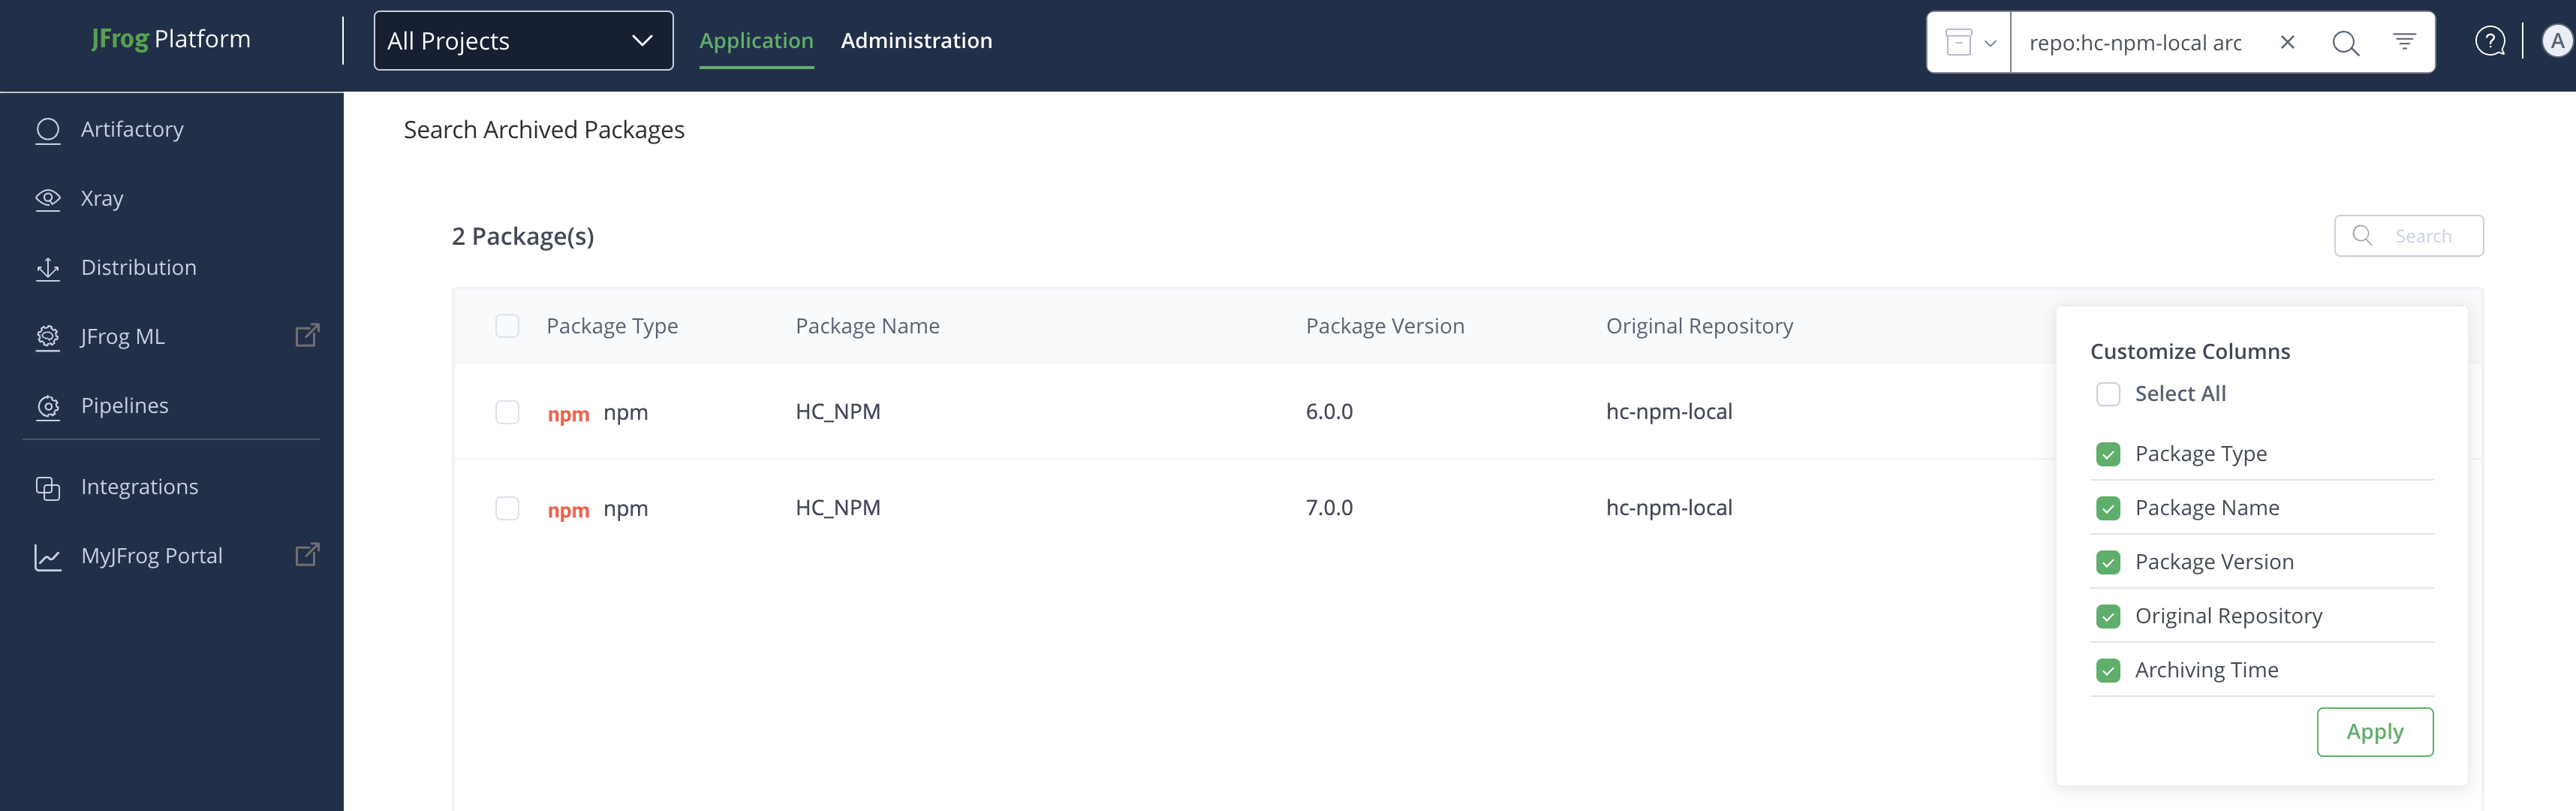
Search Archived Packages
This topic outlines how to search archived packages. Perform a dedicated search for archived packages in the Active Artifactory Instance. The search results indicate the original repository of each package found.
Authorizations
Context | Platform Admin | Project Admin Note: Applicable within the scope of your project context | Application User |
|---|---|---|---|
Global Context |
|
|
|
Project Context |
|
|
|
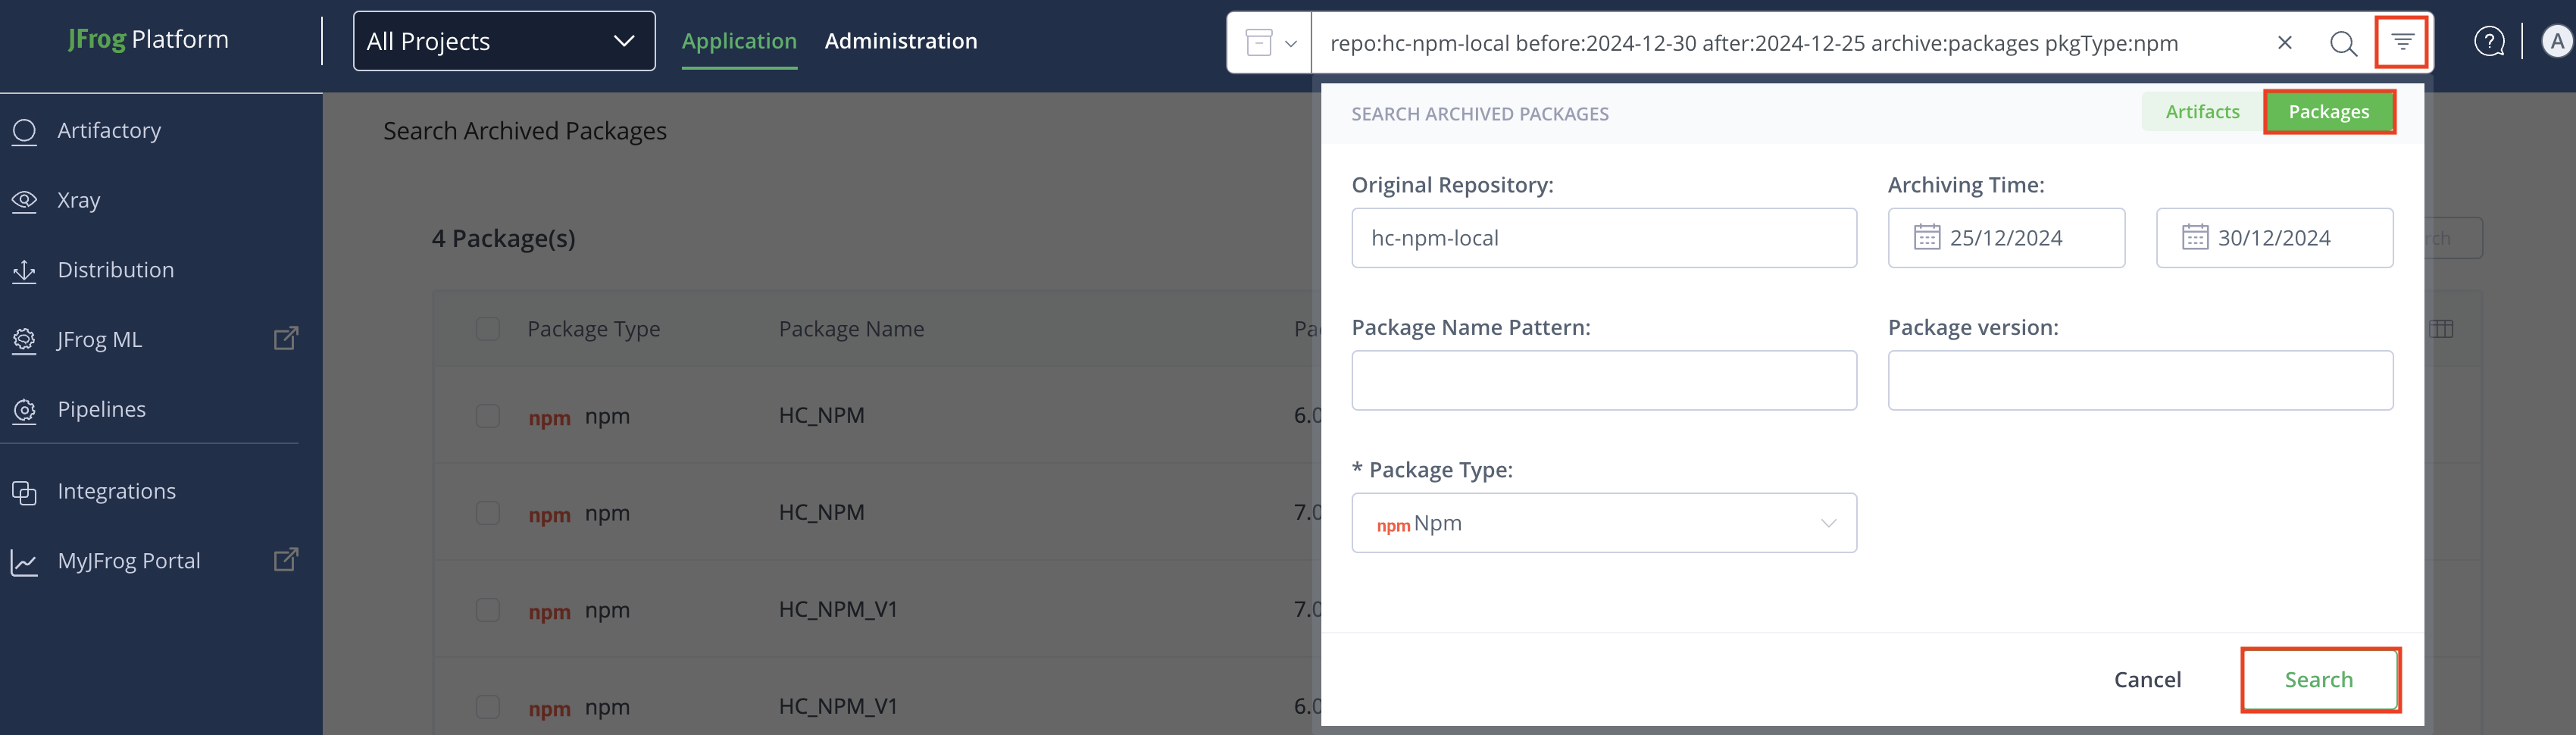
To search the archived packages:
-
From the Administration module, select Artifactory > Retention Policies.
-
Click Archive from the Search dropdown list.
-
Do one of the following:
-
Enter thepkgType: as
<your desired package>, and then click Search icon.
-
Advanced Search
-
Click Filter icon at the right end of the Search field.
The search dropdown window appears.
In the search dropdown window, ensure that Packages is selected in the upper-right section of the window.
-
Enter search criteria for archived packages, as described in the following table.
-
-
| Field | Description |
|---|---|
| Original Repository | Search for packages based on the original repository name. Wildcard characters are supported. |
| Archiving Time | Search for all packages archived within the specified time period. |
| Package Name Pattern | Search for packages based on the name pattern. Wildcard characters are supported. |
| Package version | If you want to search for a specific package version, enter the version number here. Wildcard characters are supported. |
| Package Type | Select the package type that you want to search for. |
-
After entering the search criteria, click Search to display results.
Customize Table Columns
Arrange the table columns according to how you want to view them.
To display and arrange the columns:
-
From the Table header, click Customize Columns icon at the end.
-
Select which columns to display in the Customize Columns pop-up.
-
Click Apply.
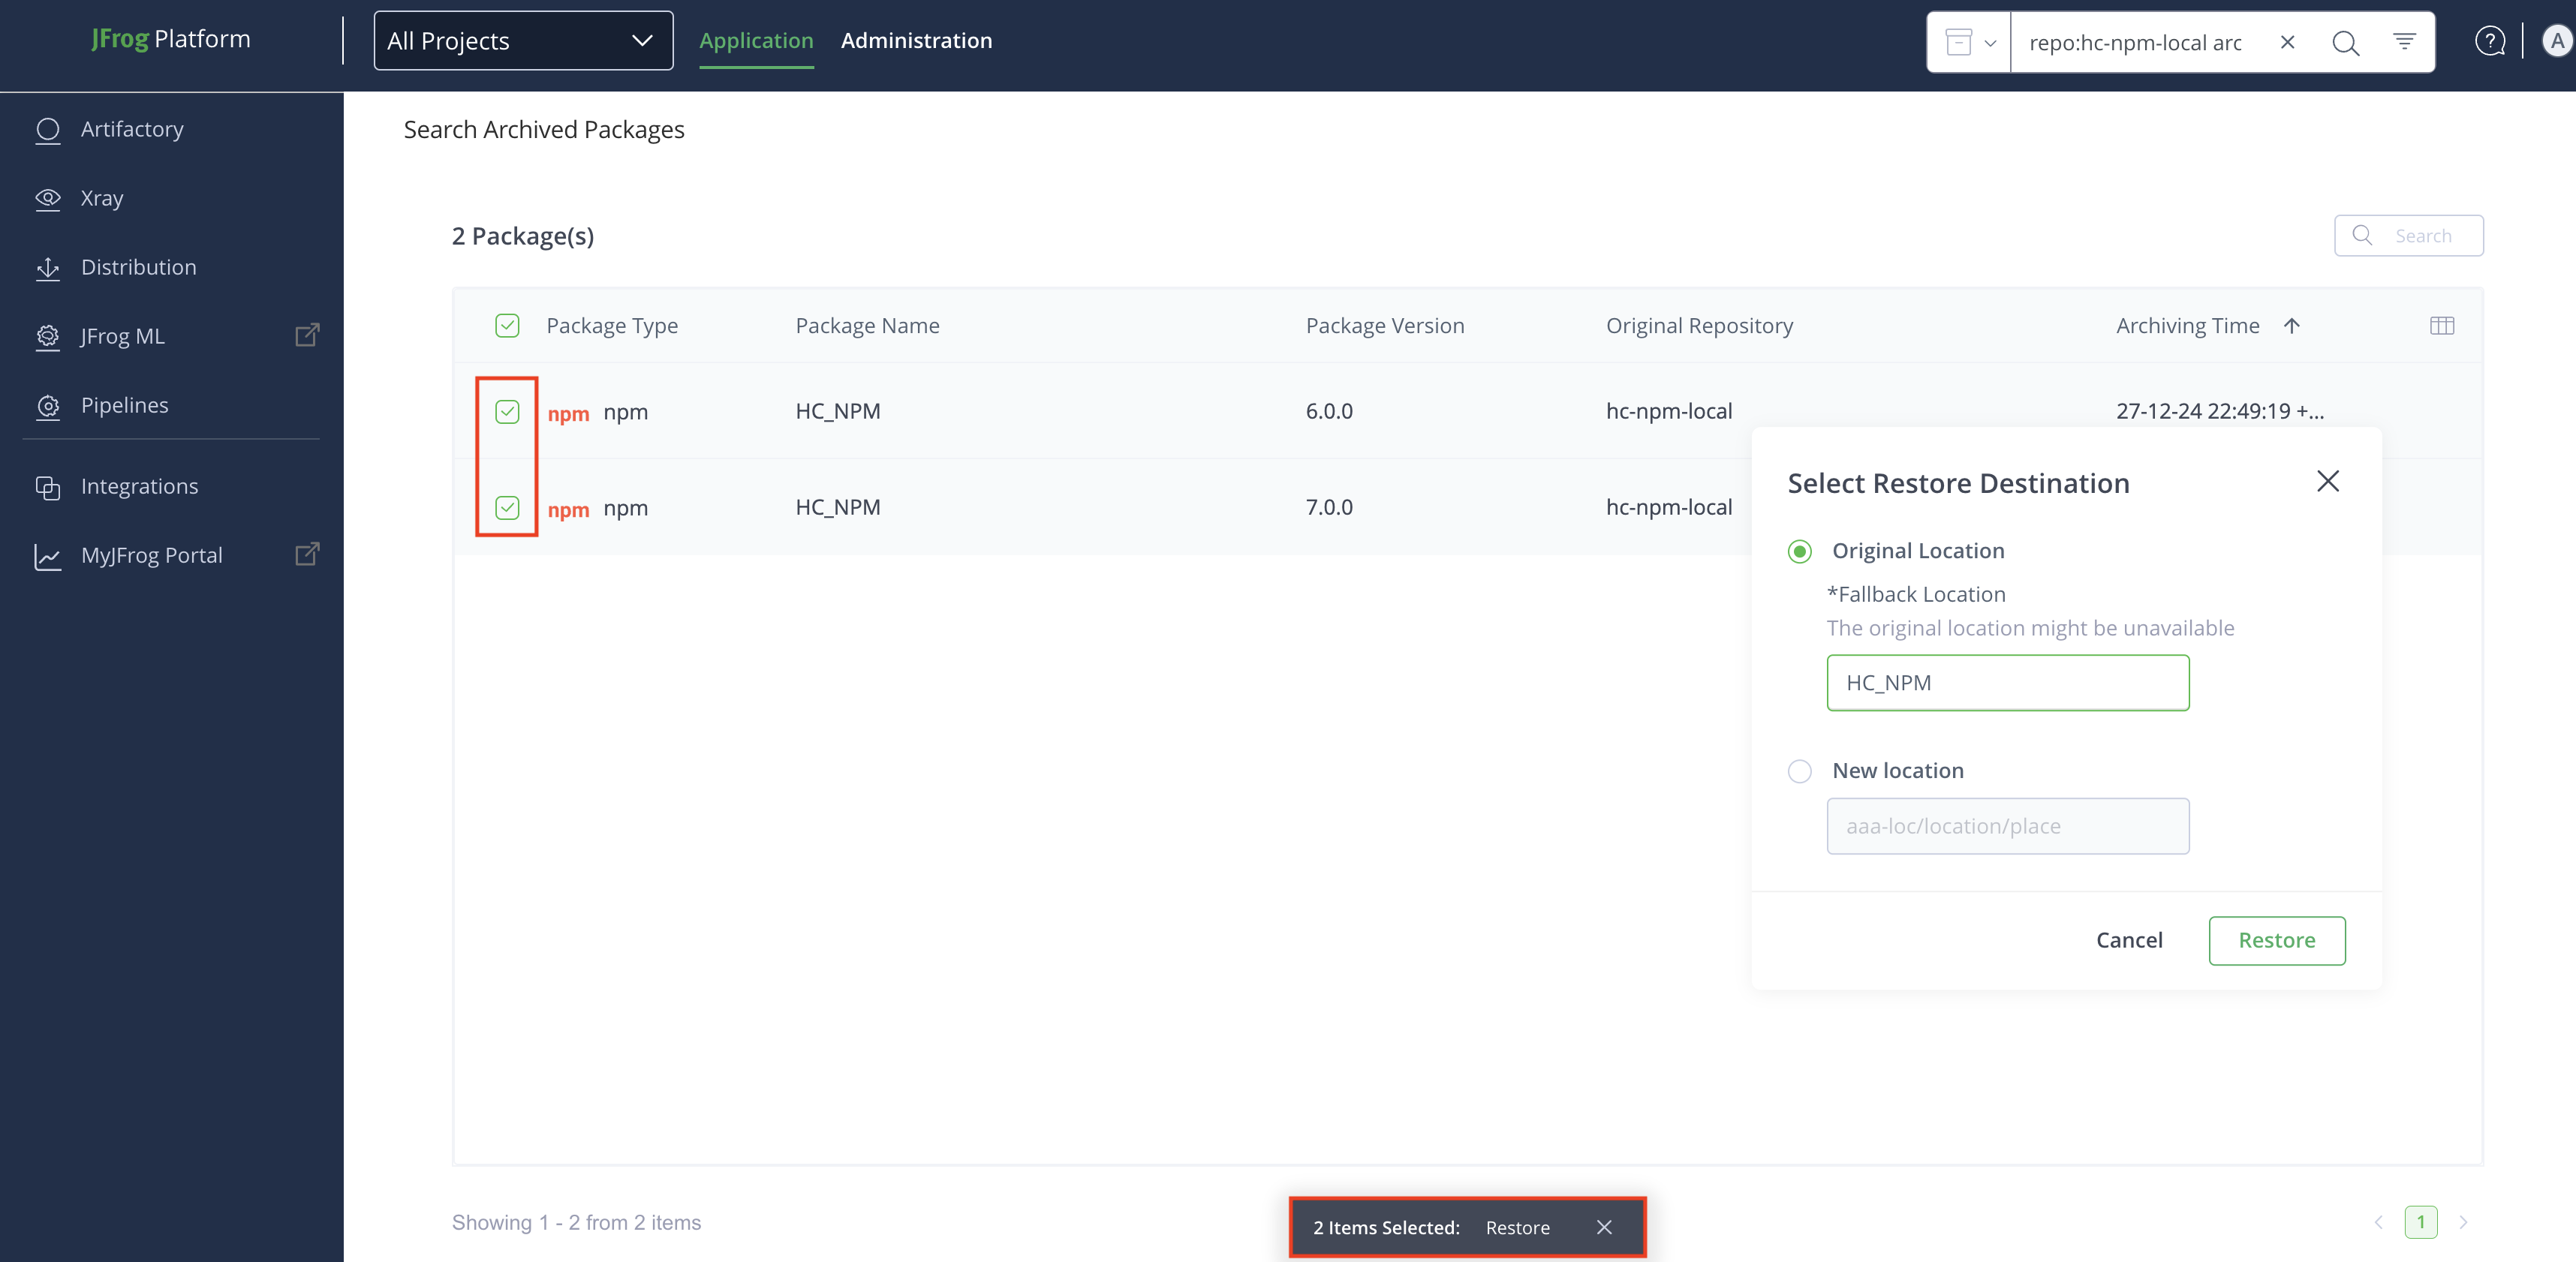
Restore Archived Packages
Restore is a non-destructive process, ensuring that none of the restored packages are deleted from the Archive Artifactory Instance.
Note
Restore is a non-destructive process, ensuring that none of the restored packages are deleted from the Archive Artifactory Instance.
To restore the archived packages, follow these steps:
- Search Archived Packages
-
From the list of Search Archived Packages results, do one of the following:
The following table describes the criteria for Original Location and New Location.
Field | Description |
|---|---|
Original Location | Restore to the original repository where the items were located before archiving. |
Fallback Location | If the Original Location is selected, it is mandatory to provide a Fallback Location. If the Original Location no longer exists, the Fallback Location is used as the location for restoring packages.
|
New Location | Restore to a new location
|
-
Single Package Restoration
-
Locate the package you want to restore, and then click Restore icon.
-
Select Original Location or New Location, enter the repository name, and then click Restore.
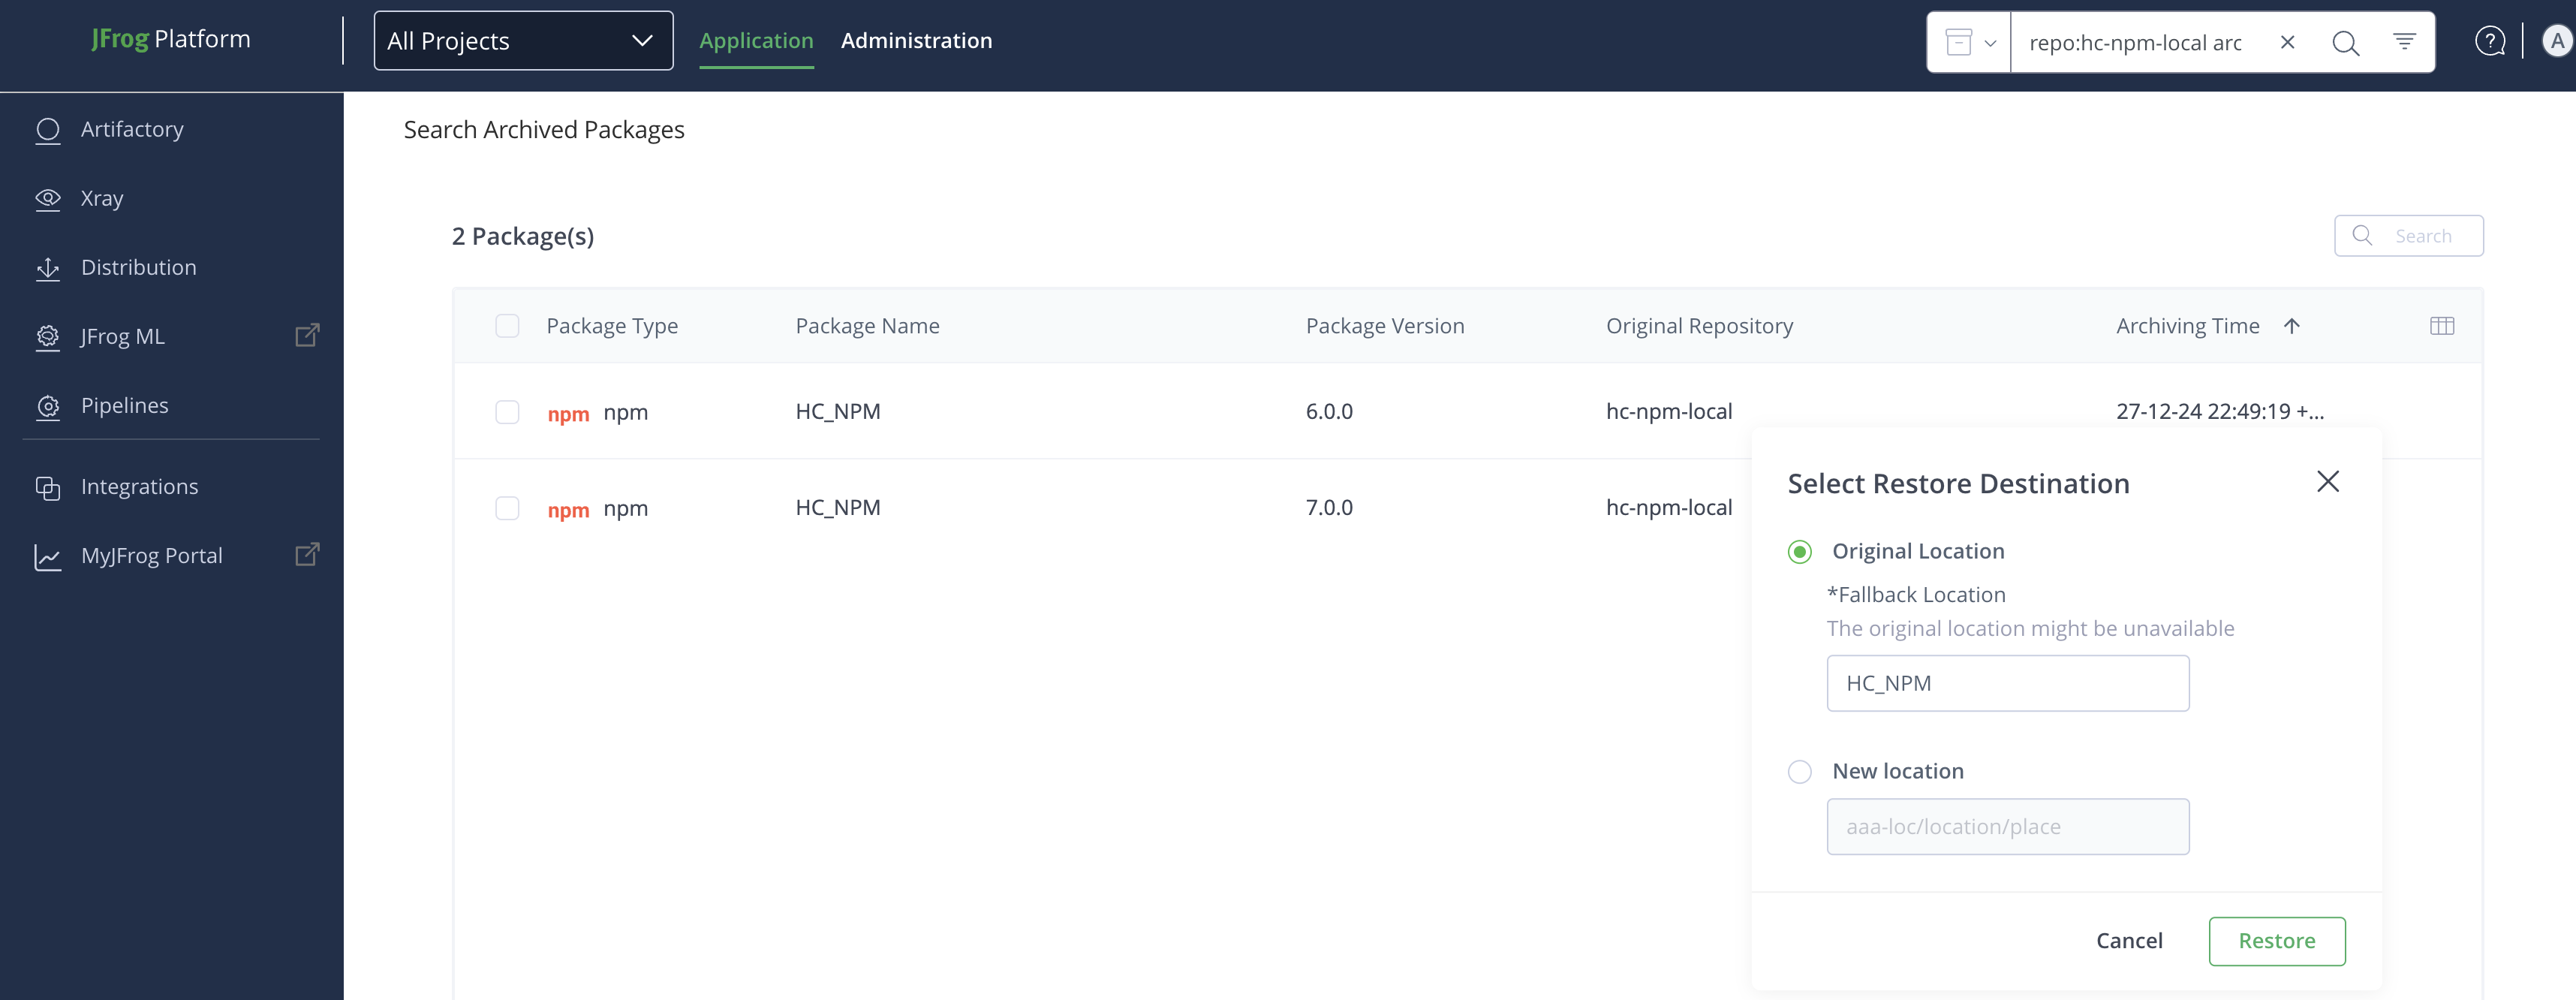
-
-
Multiple Package Restoration
-
Select the checkbox in line with the packages you want to restore, and then click Restore.
-
Select Original Location or New Location, enter the repository name, and then click Restore.
-
Note
- The restoration process duration depends on the number and size of the packages, ranging from a few minutes to several hours.
- If an error occurs during the restoration, the process will fail, and the error details will be logged.
- The default maximum number of artifacts that can be restored in a single run is 10,000.
Note
If the number of artifacts (across selected packages) exceeds 10,000 limit, the restore process terminates (Restoration does not happen). The reason for termination will be logged. Carry out the restore operation again and make sure that the number of artifacts are less than the defined limit.
Manage Restore Runs
This section outlines the actions you can perform on the Restore Runs from the Active Artifactory Instance. It includes view, stop all runs and downloading run reports.
Task | Description | For UI, see... | For API, see... |
|---|---|---|---|
View All Restore Runs | This topic outlines how to view the status of both past and ongoing restore runs. It provides guidance on how to review specific details, including the items that have been restored, the associated timestamps, the status of each restoration operation, customizing table columns, and applying filters to view the desired information. | View All Restore Runs | NA |
Download and Review Restore Run Report | This topic outlines how to download a restore run report. The report is in CSV format and lists all archived packages with relevant information. You can review the list to learn about the restored packages. | Download and Review Restore Run ReportRestore Run Report Overview | NA |
Authorization
Activity | Platform Admin | Project Admin Note: Applicable within the scope of your project context | Application User |
|---|---|---|---|
| View All Restore Runs |
|
|
|
| Download and Review Restore Run Report |
|
|
|
View All Restore Runs
This topic outlines how to view the status of both past and ongoing restore runs. It provides guidance on how to review specific details, including the items that have been restored, the associated timestamps, the status of each restoration operation, customizing table columns, and applying filters to view the desired information.
To view restore runs:
-
From the Administration module, select Artifactory > Retention Policies.
-
In the Retention Policies page, click Archive.
-
Click Restored tab.
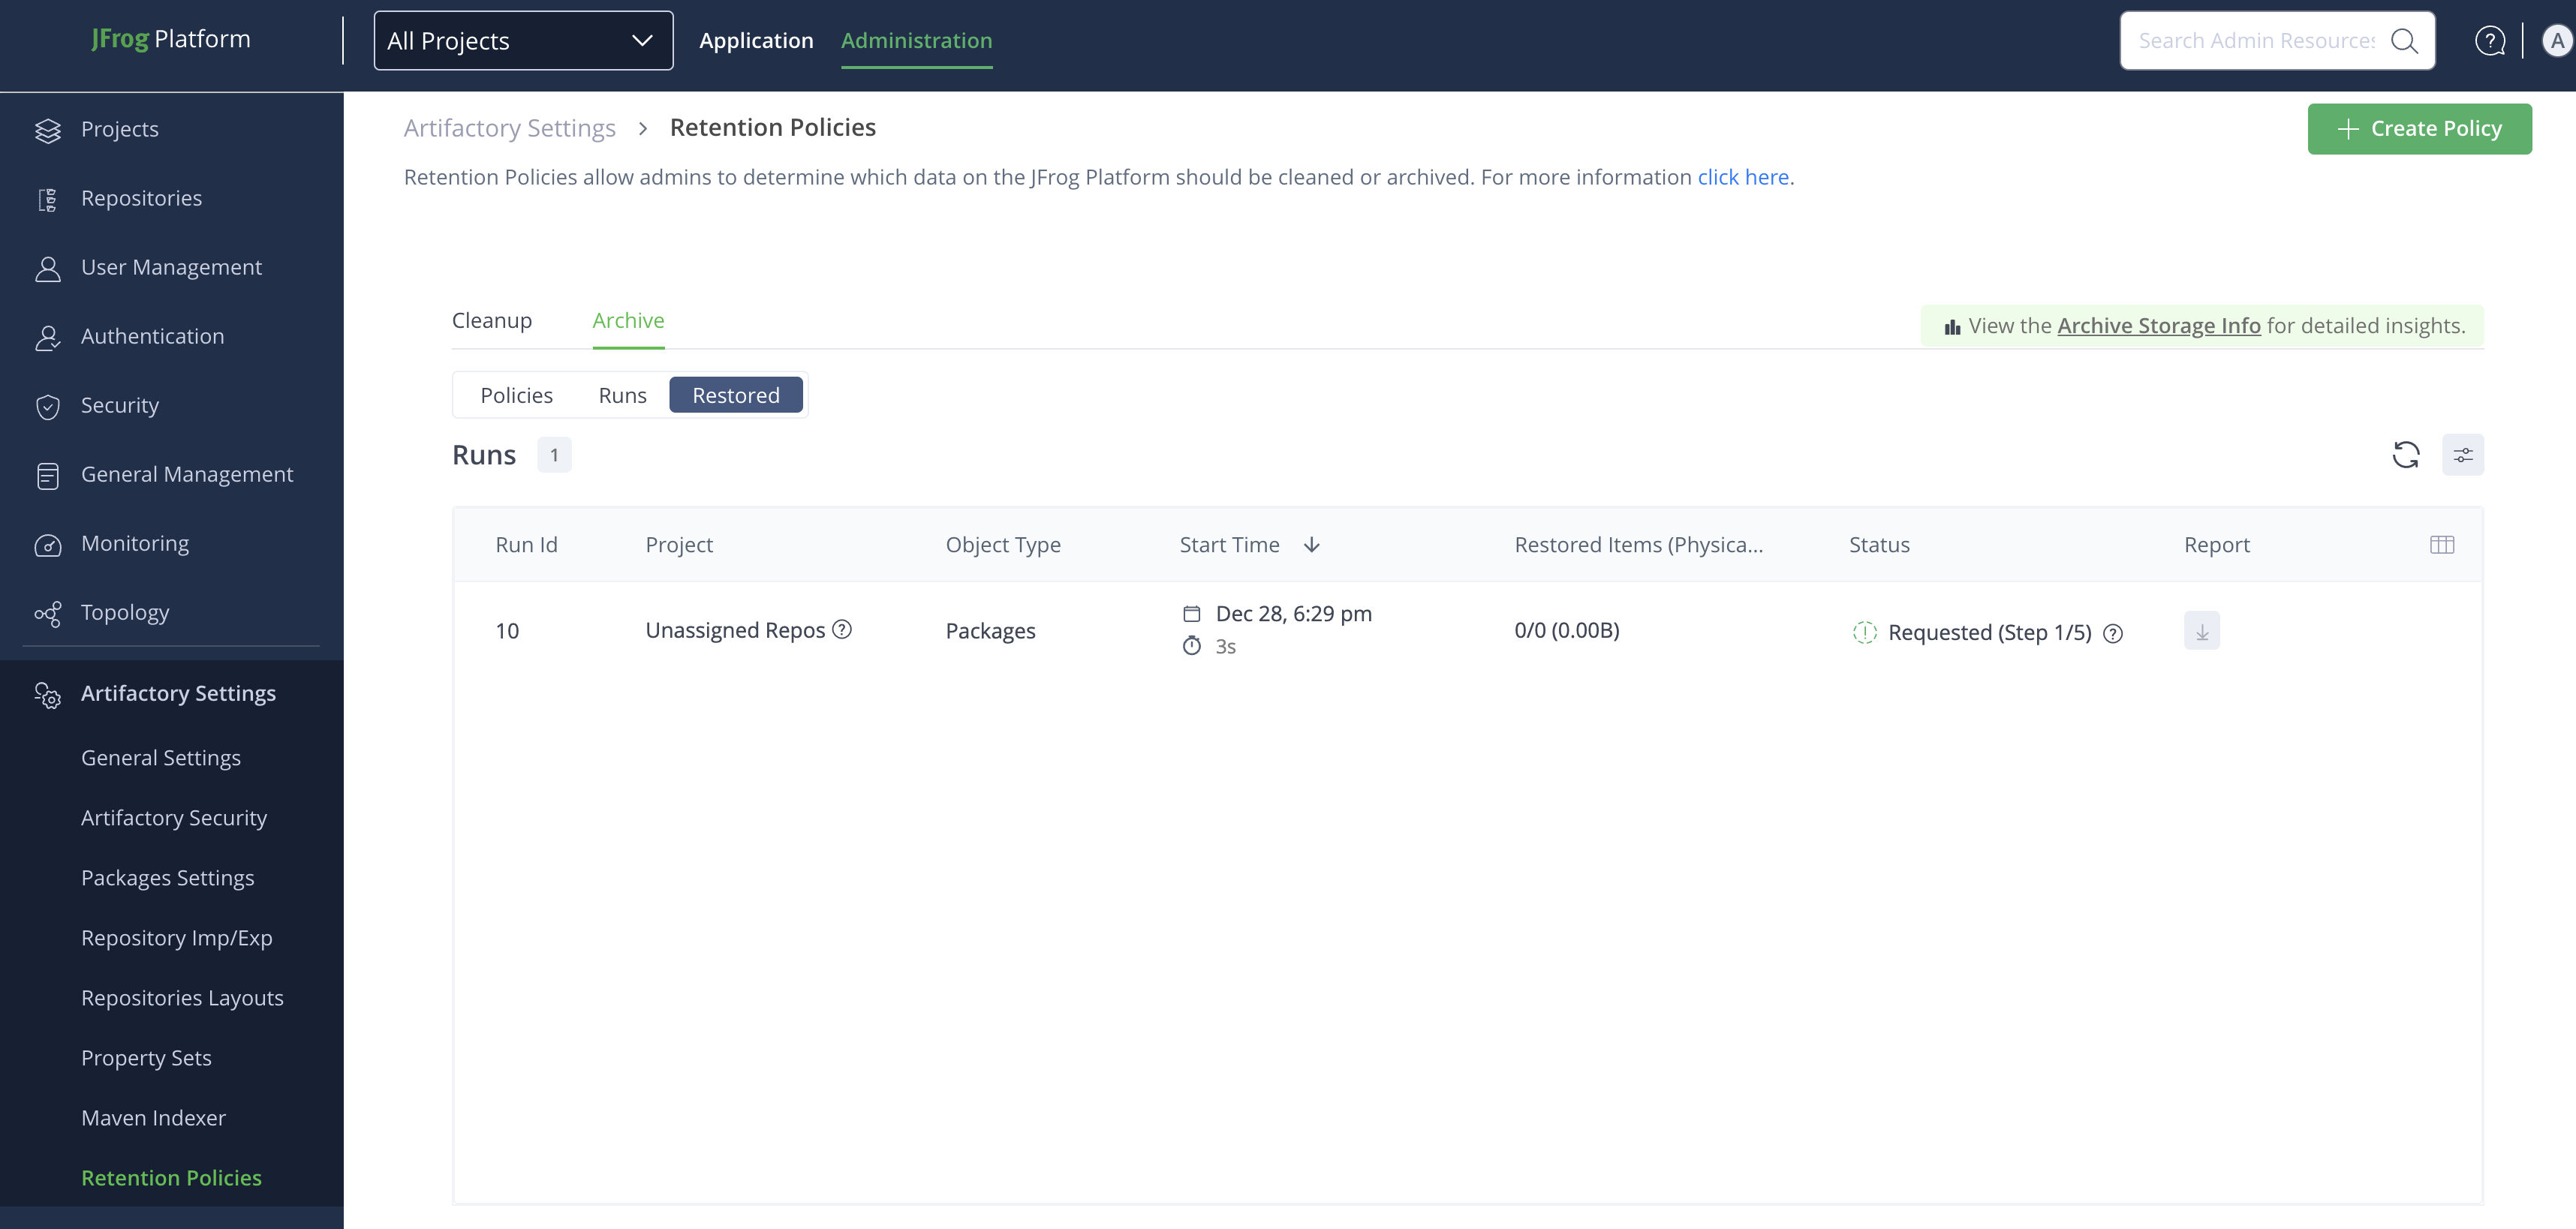
The restored runs list is displayed.
Restore Table Fields
The following table describes the columns of the restore table fields.
Field | Description |
|---|---|
Run ID | Indicates the number of the run id |
Project | Indicates the name of the project |
Start Time | Indicates the date and time when the restore operation started running |
Restored Items (Physical Size) | The number of total restored items, and the total items (The restored size) |
Status | Indicates the status of each restore execution, which can be one of the following: Restore Run Status
|
Report | Indicates the report download state as follows: Possible Download States
|
Customize Table Columns
Arrange the table columns according to how you want to view them.
To display and arrange the columns:
-
From the Table header, click Customize Columns icon at the end.
-
Select which columns to display in the Customize Columns pop-up.
-
Click Apply.

Apply Filters to Sort Run Results
You can apply the filter to the run results to easily access your desired view.
To apply filters:
-
Click the Filter icon from the top right above the table header.
-
Apply the following fields as you want to sort:
| Name | Description |
|---|---|
| Run ID | Enter run id |
| Start Time | Select from the dropdown list or customize as per the timelines using the calendar |
| Status | Select the run status from the available list. To learn more about statuses, refer to Restore Table Fields, Status field. |
-
To remove applied filters, click Clear all.

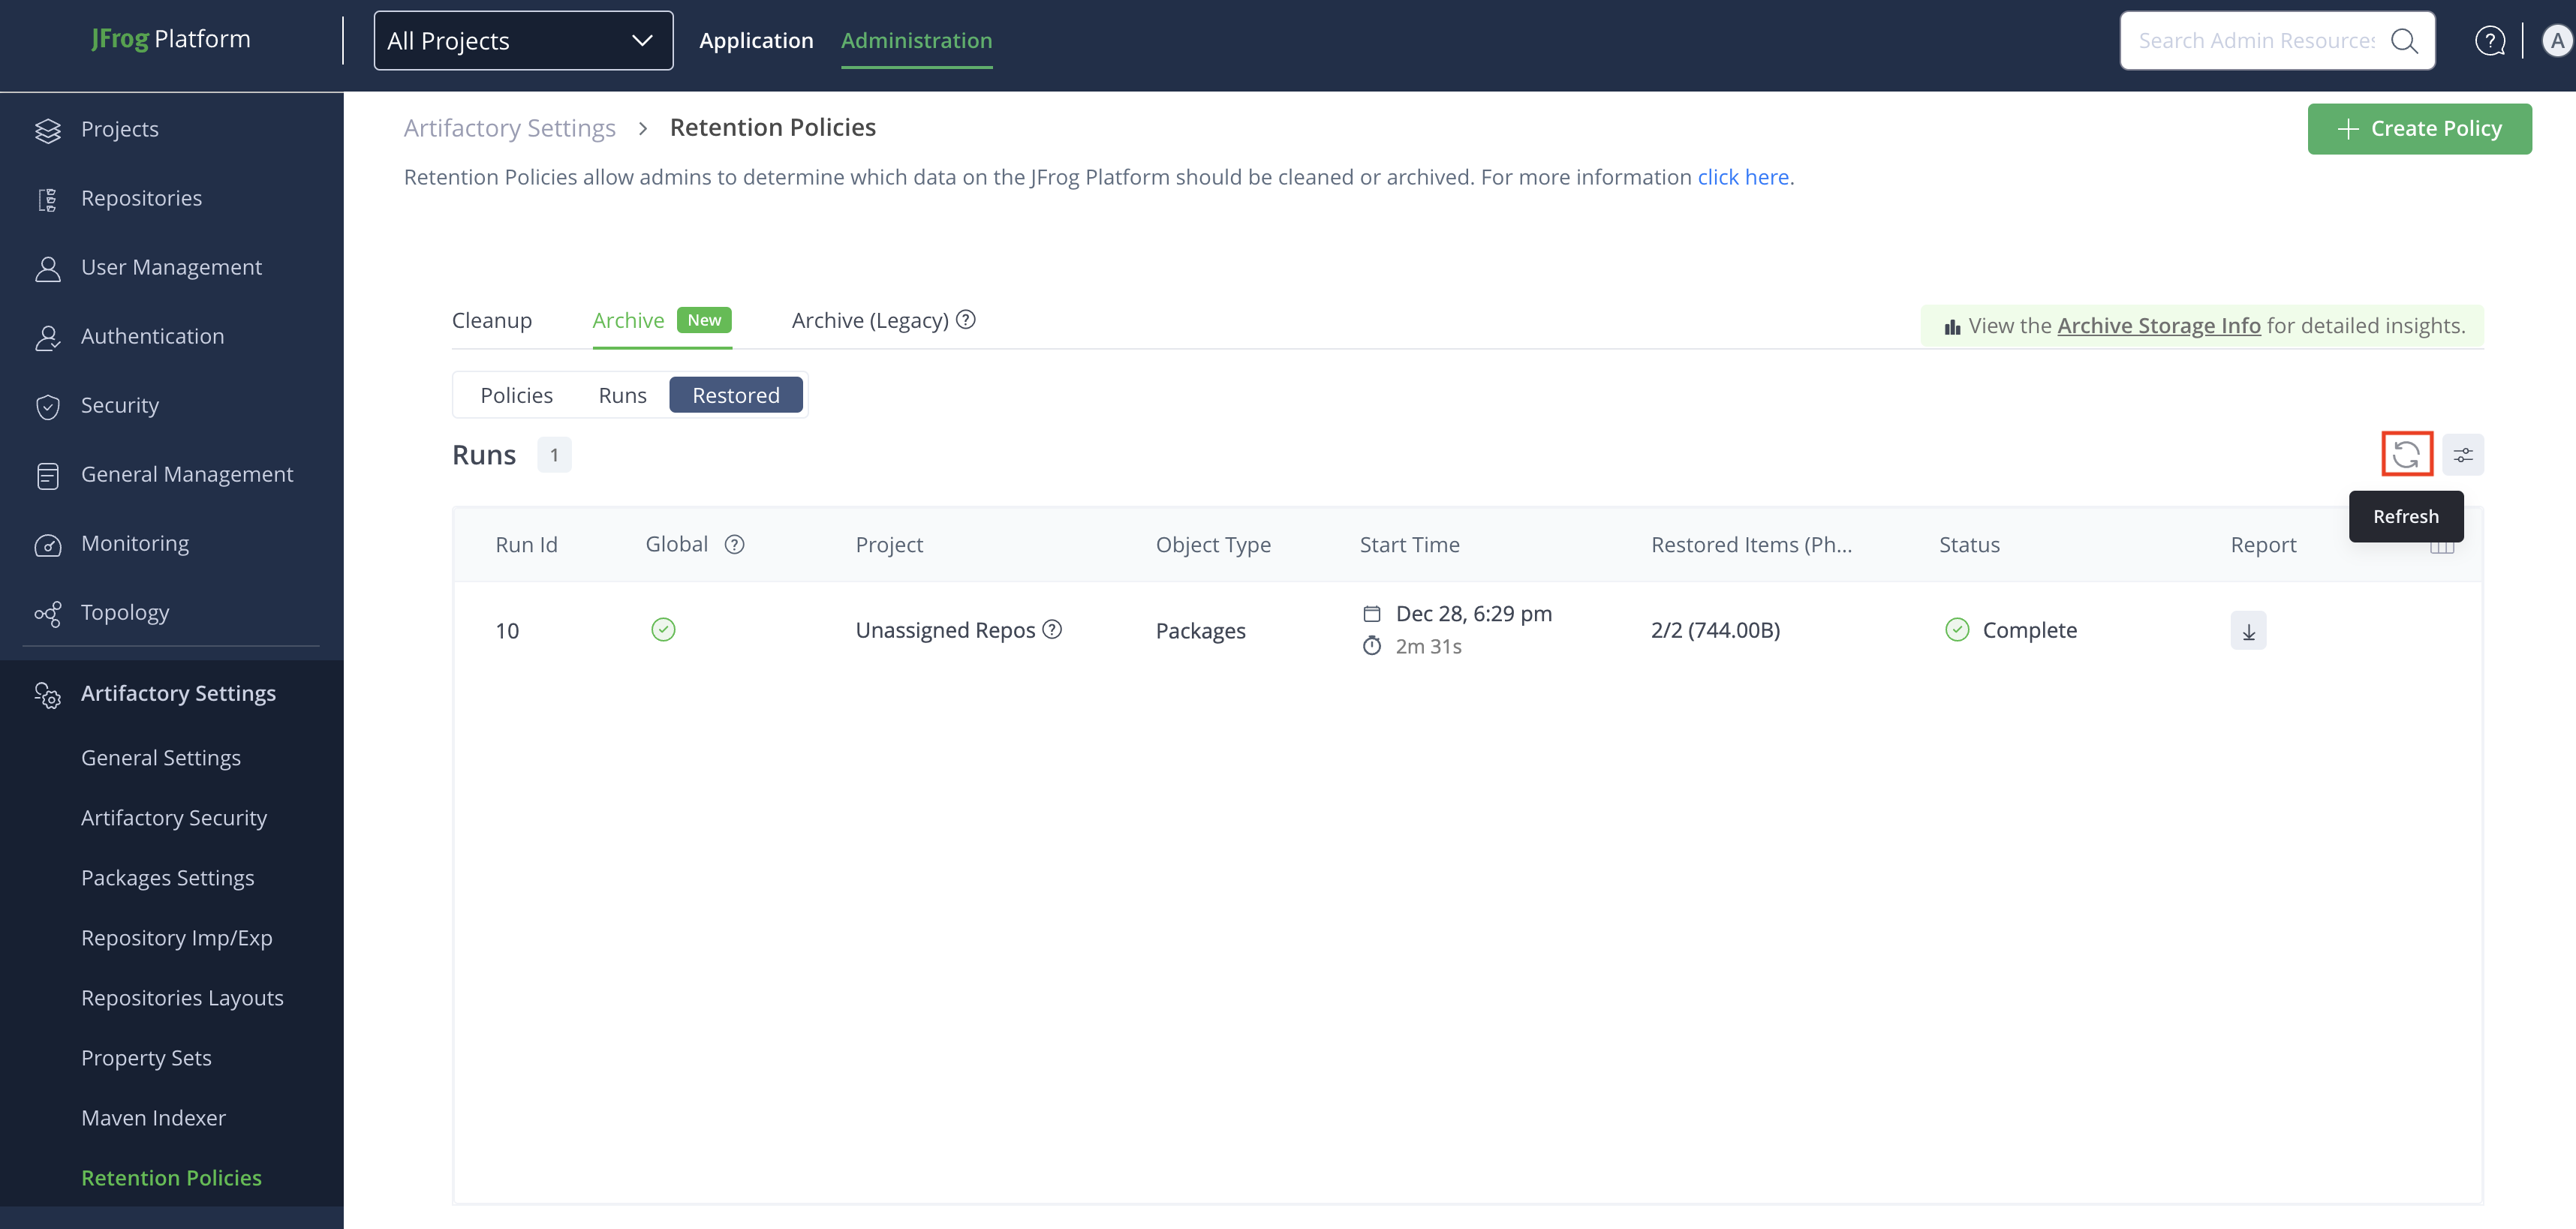
Refresh Restore Runs
If you don't see the latest created runs in the list, you can refresh the runs to view them.
To refresh runs, click Refresh icon from the top right above the table header.
Download and Review Restore Run Report
This topic outlines how to download a restore run report. The report is in CSV format and lists all archived packages with relevant information. You can review the list to learn about the restored packages.
To download the report:
-
From the Administration module, select Artifactory > Retention Policies.
-
In the Retention Policies page, click Archive.
-
From the Restored tab, under Restored, locate the run for which you want to download the report, and then click Download Icon.
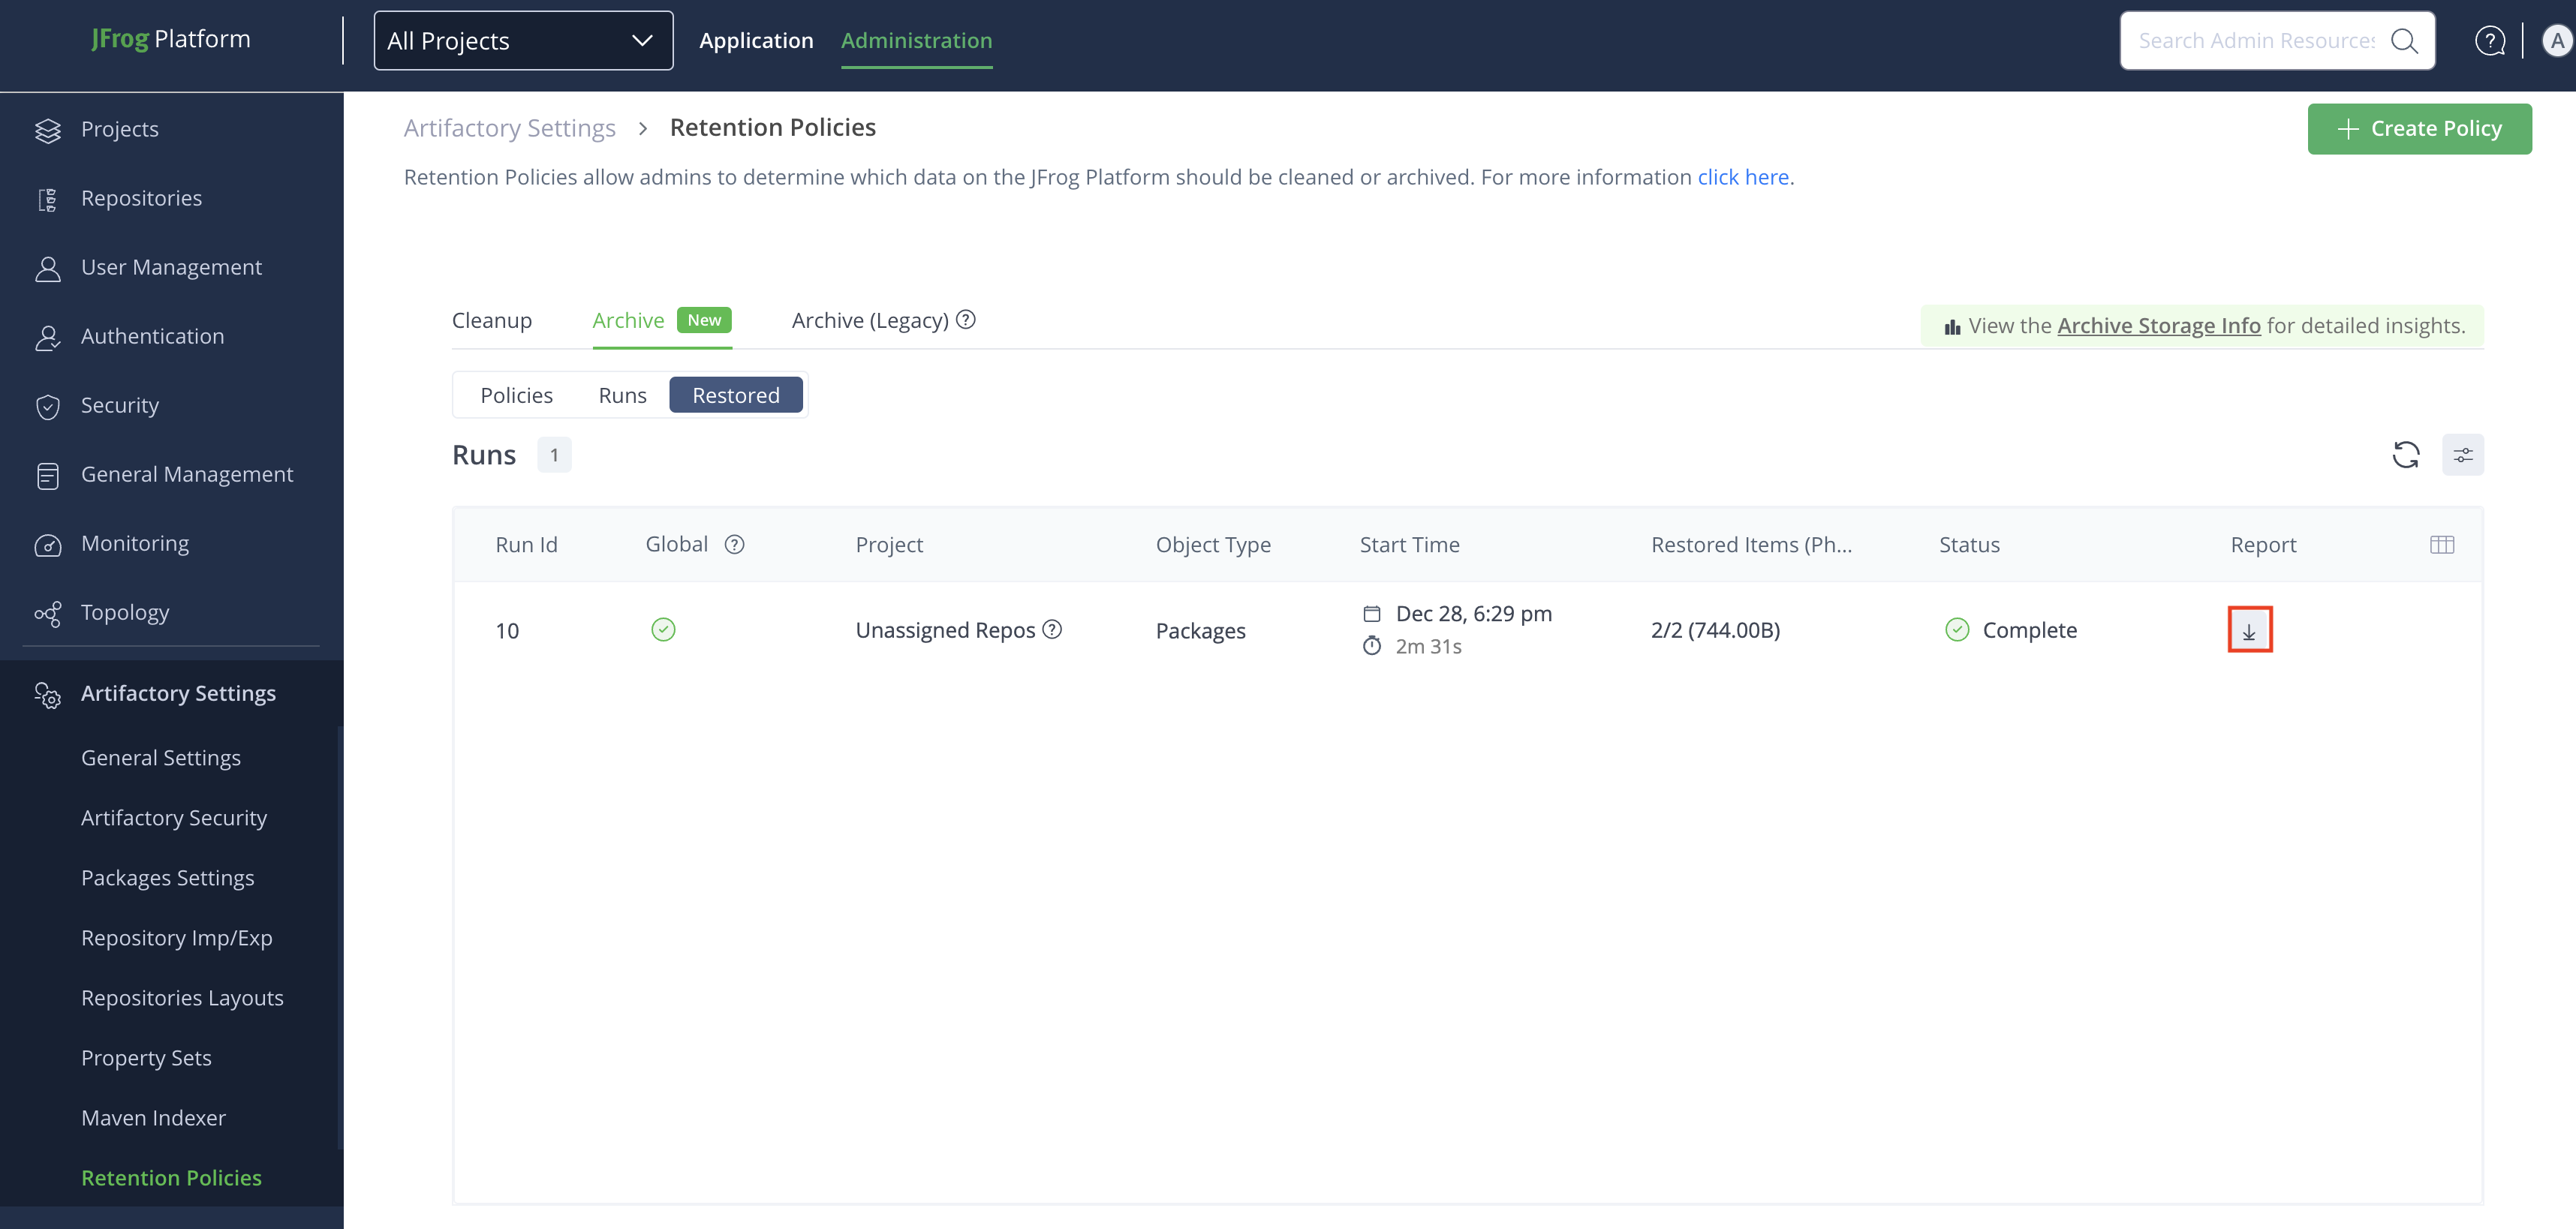
A zip file is downloaded including one or more .csv files.
Possible Download icon statuses are as follows:
| Icon | State | Description |
|---|---|---|
 | Enabled | Indicates the report is available for download |
 | Hover | On hovering the mouse pointer |
 | Selected | Indicates the download icon is clicked |
 | Disabled | Indicates the report is not available |
Restore Run Report Overview
The downloaded CSV Restore Run Report provides a detailed summary of a package restoration process. It includes key information about the restoration status, runtime details, and the packages processed.
Field | Description |
|---|---|
Run General Details | The general details of the restore run |
Restore run | The current status of the restore operation |
Run Start Time | The timestamp when the restore process started |
Duration | The total time taken for the restore process to complete |
Run Summary | The summary of the restore run |
Restored packages count | The total number of packages successfully restored |
Total packages count | The total number of packages processed during the restore |
Packages virtual size | The virtual size of all restored packages |
Packages physical size | The actual physical size of all restored packages |
Restoration Query For This Run | Indicates the query executed for this restore |
Origin Projects | The source project names from which the packages were restored |
Package Type | The types of packages selected for restoration |
Fallback Destination Path | The original destination path used for restoring the packages |
New Destination Path | The new destination path where the packages were restored |
Restore to Original | Indicates whether the restoration was to the original repository from which the package was archived |
Run Detailed Summary | Indicates the detailed restore run summary
|
Monitor Smart Archiving and Restore
This section outlines monitoring archive storage, archive and restore runs.
| Task | Description | For UI, see... | For API, see... |
|---|---|---|---|
| Monitor Smart Archiving Storage Info | This topic outlines how to view Archive Storage Info and provides guidance on detailed insights into optimization after successful archival. | Monitor Smart Archiving Storage Info | NA |
| Monitor Smart Archiving and Restore via UI and Logs | This topic outlines how to monitor archive and restore runs from the UI and their logs. | Monitor Smart Archiving and Restore - via UI and Logs | NA |
Authorization
Activity | Platform Admin | Project Admin Note: Applicable within the scope of your project context | Application User |
|---|---|---|---|
| Monitor Smart Archiving Storage Info |
Note: This option is shown from the Global Context only. |
|
|
|
|
|
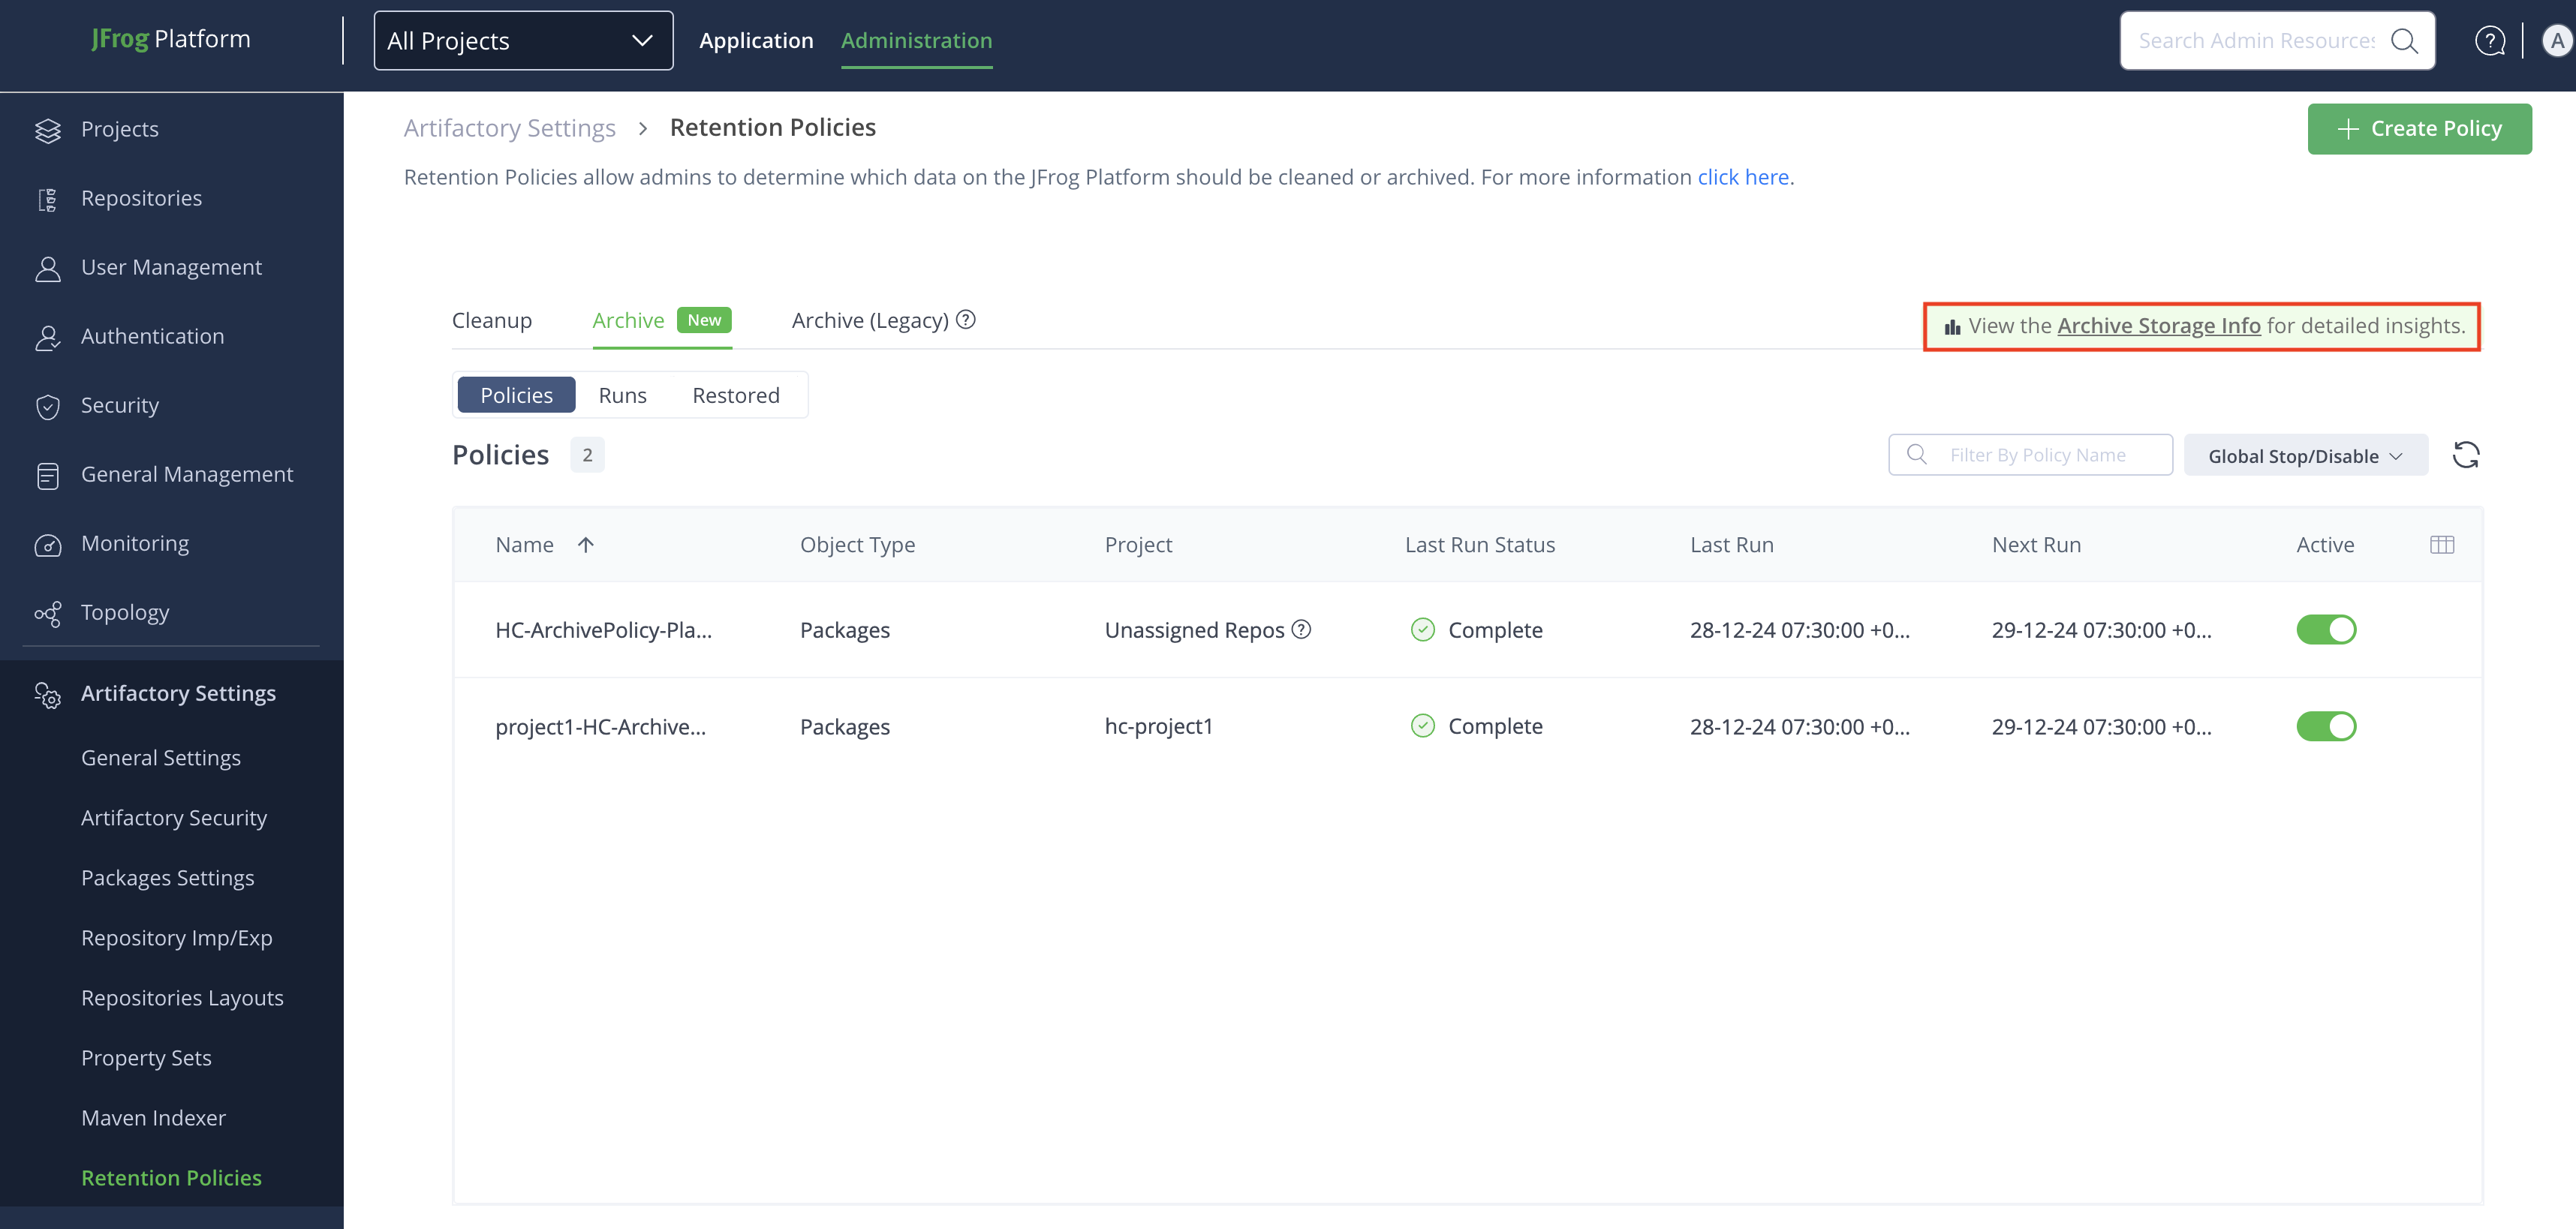
Monitor Smart Archiving Storage Info
This topic outlines how to view Archive Storage Info and provides guidance on detailed insights into optimization after successful archival.
To view the Archive Storage info:
- From the Administration module, select Artifactory > Retention Policies.
Note
The Archive Storage Info can be viewed in the global context only.
-
In the Retention Policies page, click Archive.
-
Click any of the following tabs, and then click Archive Storage Info link from the top right of the page.
- Policies
- Runs
- Restored
-
The Archive Storage info provides the following details:
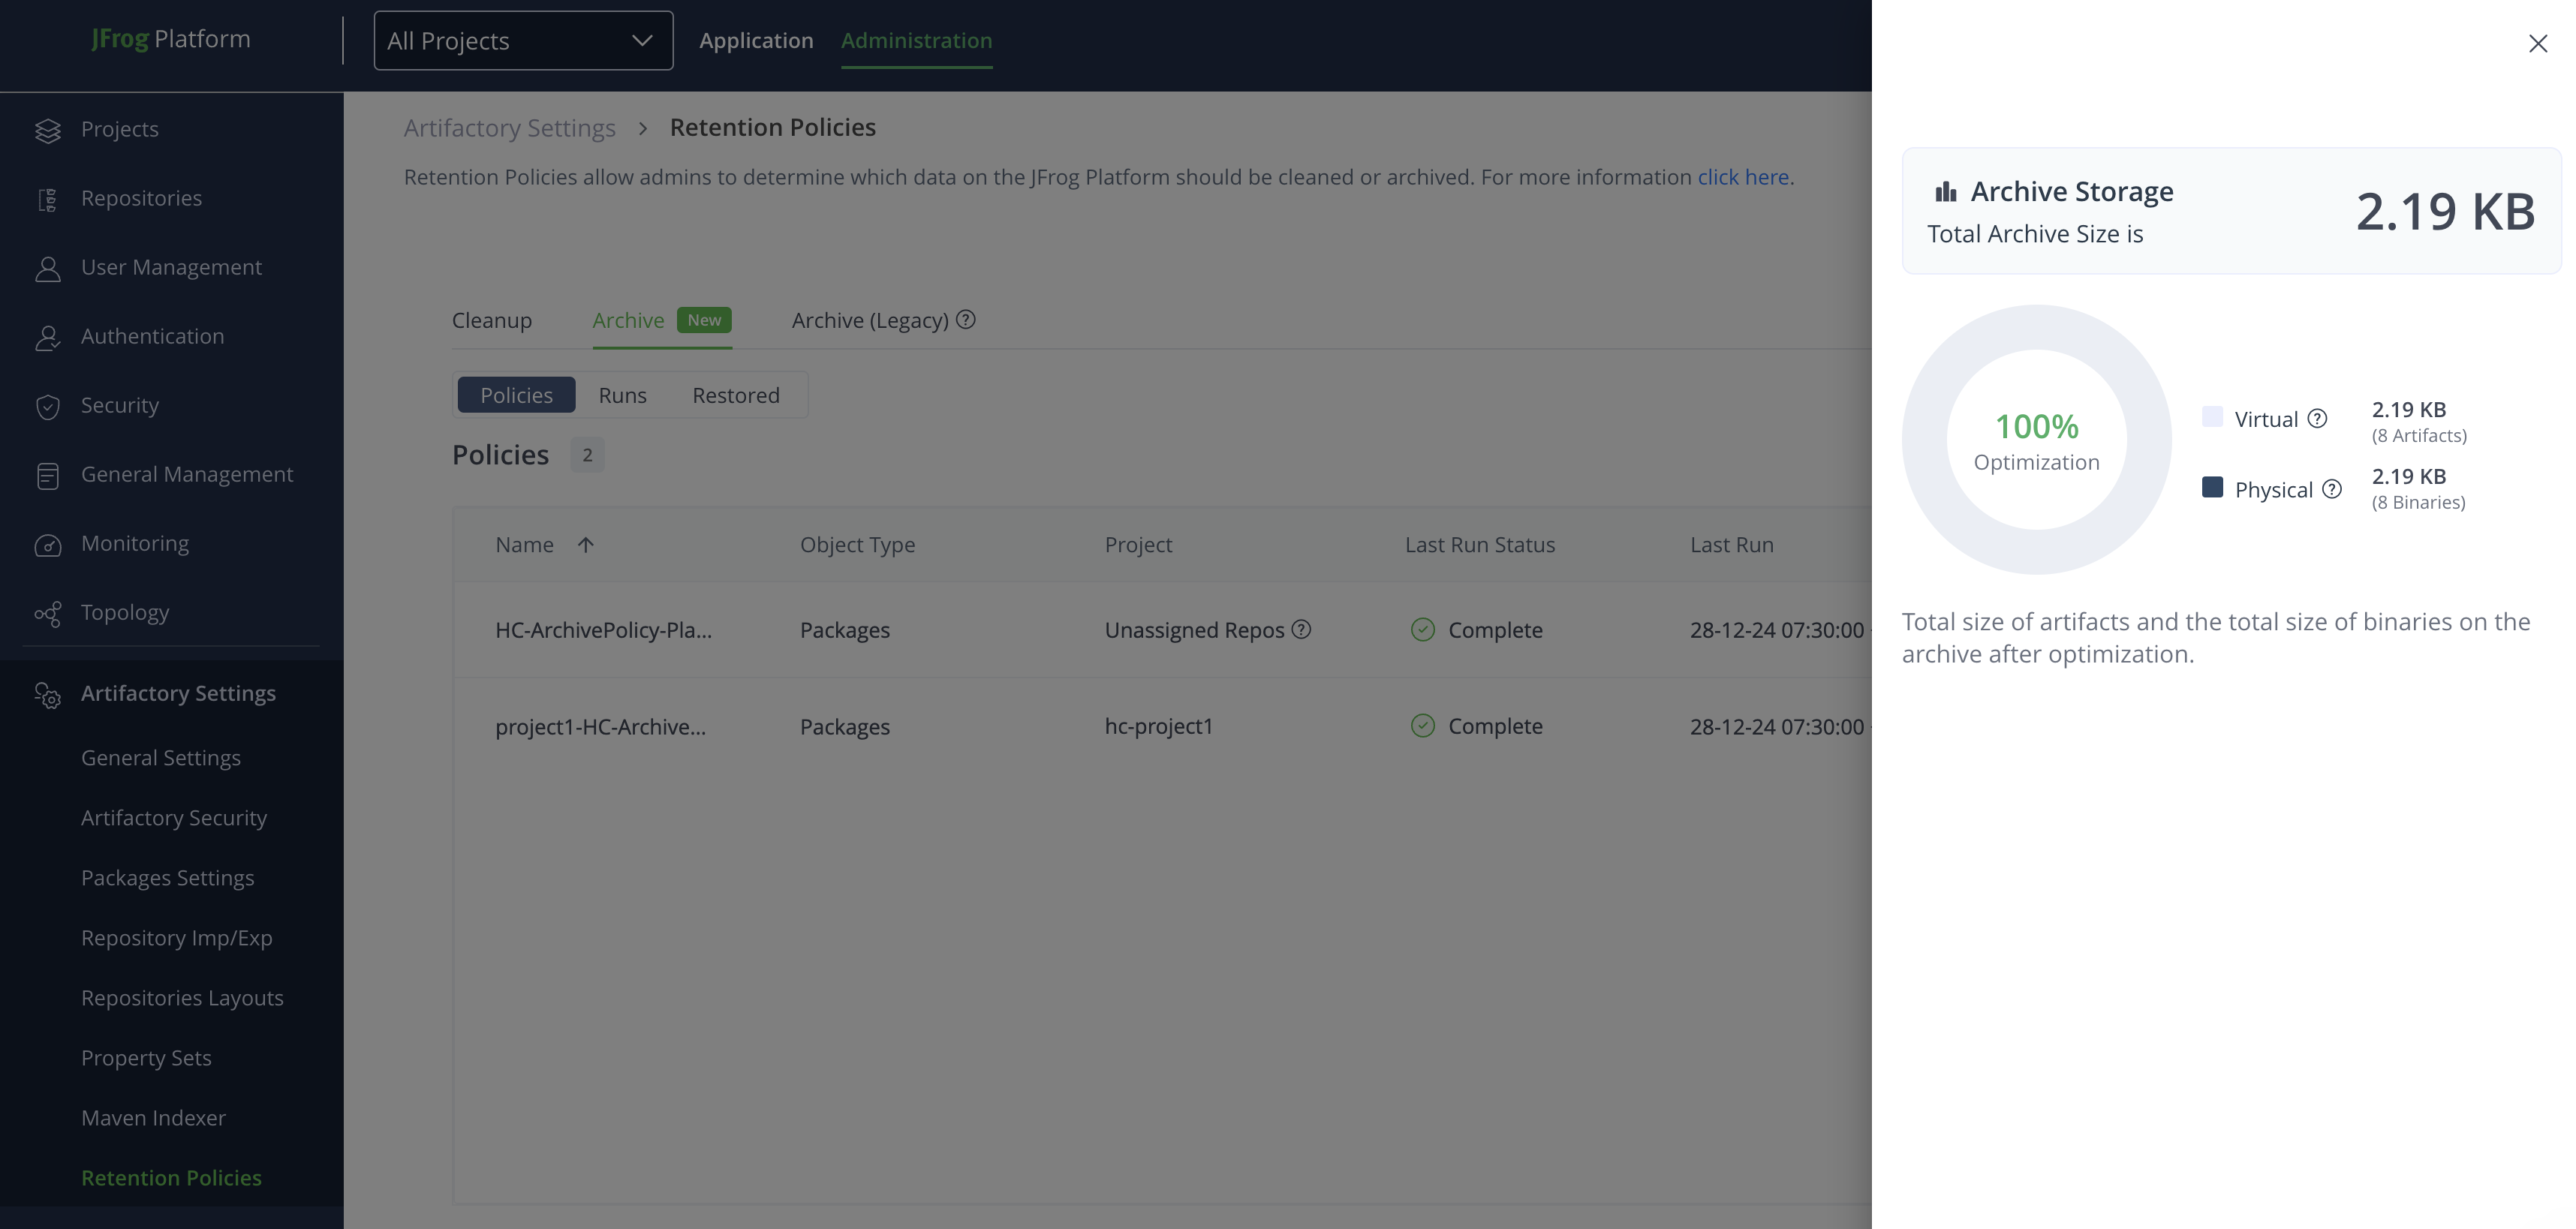
Field | Description |
|---|---|
Archive Storage | Total archive size For example, 750 GB |
Optimization | Percentage of optimization (space saved) after archiving binaries and artifacts For example:
Optimization = ((Initial Storage - Archive)/Initial Storage)) X 100 = 25% Example: Optimization = ((1000 - 750)/1000)) X 100 = 25% The archiving process saved 25% of the original storage space. |
Virtual | Total size on disk of artifacts without optimization. For example, 200 artifacts, 1000 GB |
Physical | Total size on disk of binaries with optimization. For example, 50 binaries, 750 GB |
Monitor Smart Archiving and Restore - via UI and Logs
This topic outlines how to monitor archive and restore runs from the UI and their logs.
To monitor archive and restore, in the Active Artifactory Instance:
-
From the platform UI
After initiating an archive or restore operation, you can monitor its progress and view the status of archive and restore operations from the respective runs
-
From Artifactory Logs
Note
Applies to Platform Admin only.
-
From the Projects dropdown list, click All Projects.
-
From the Administrator module, select Monitoring > Artifactory Logs.
The Artifactory Logs page appears.
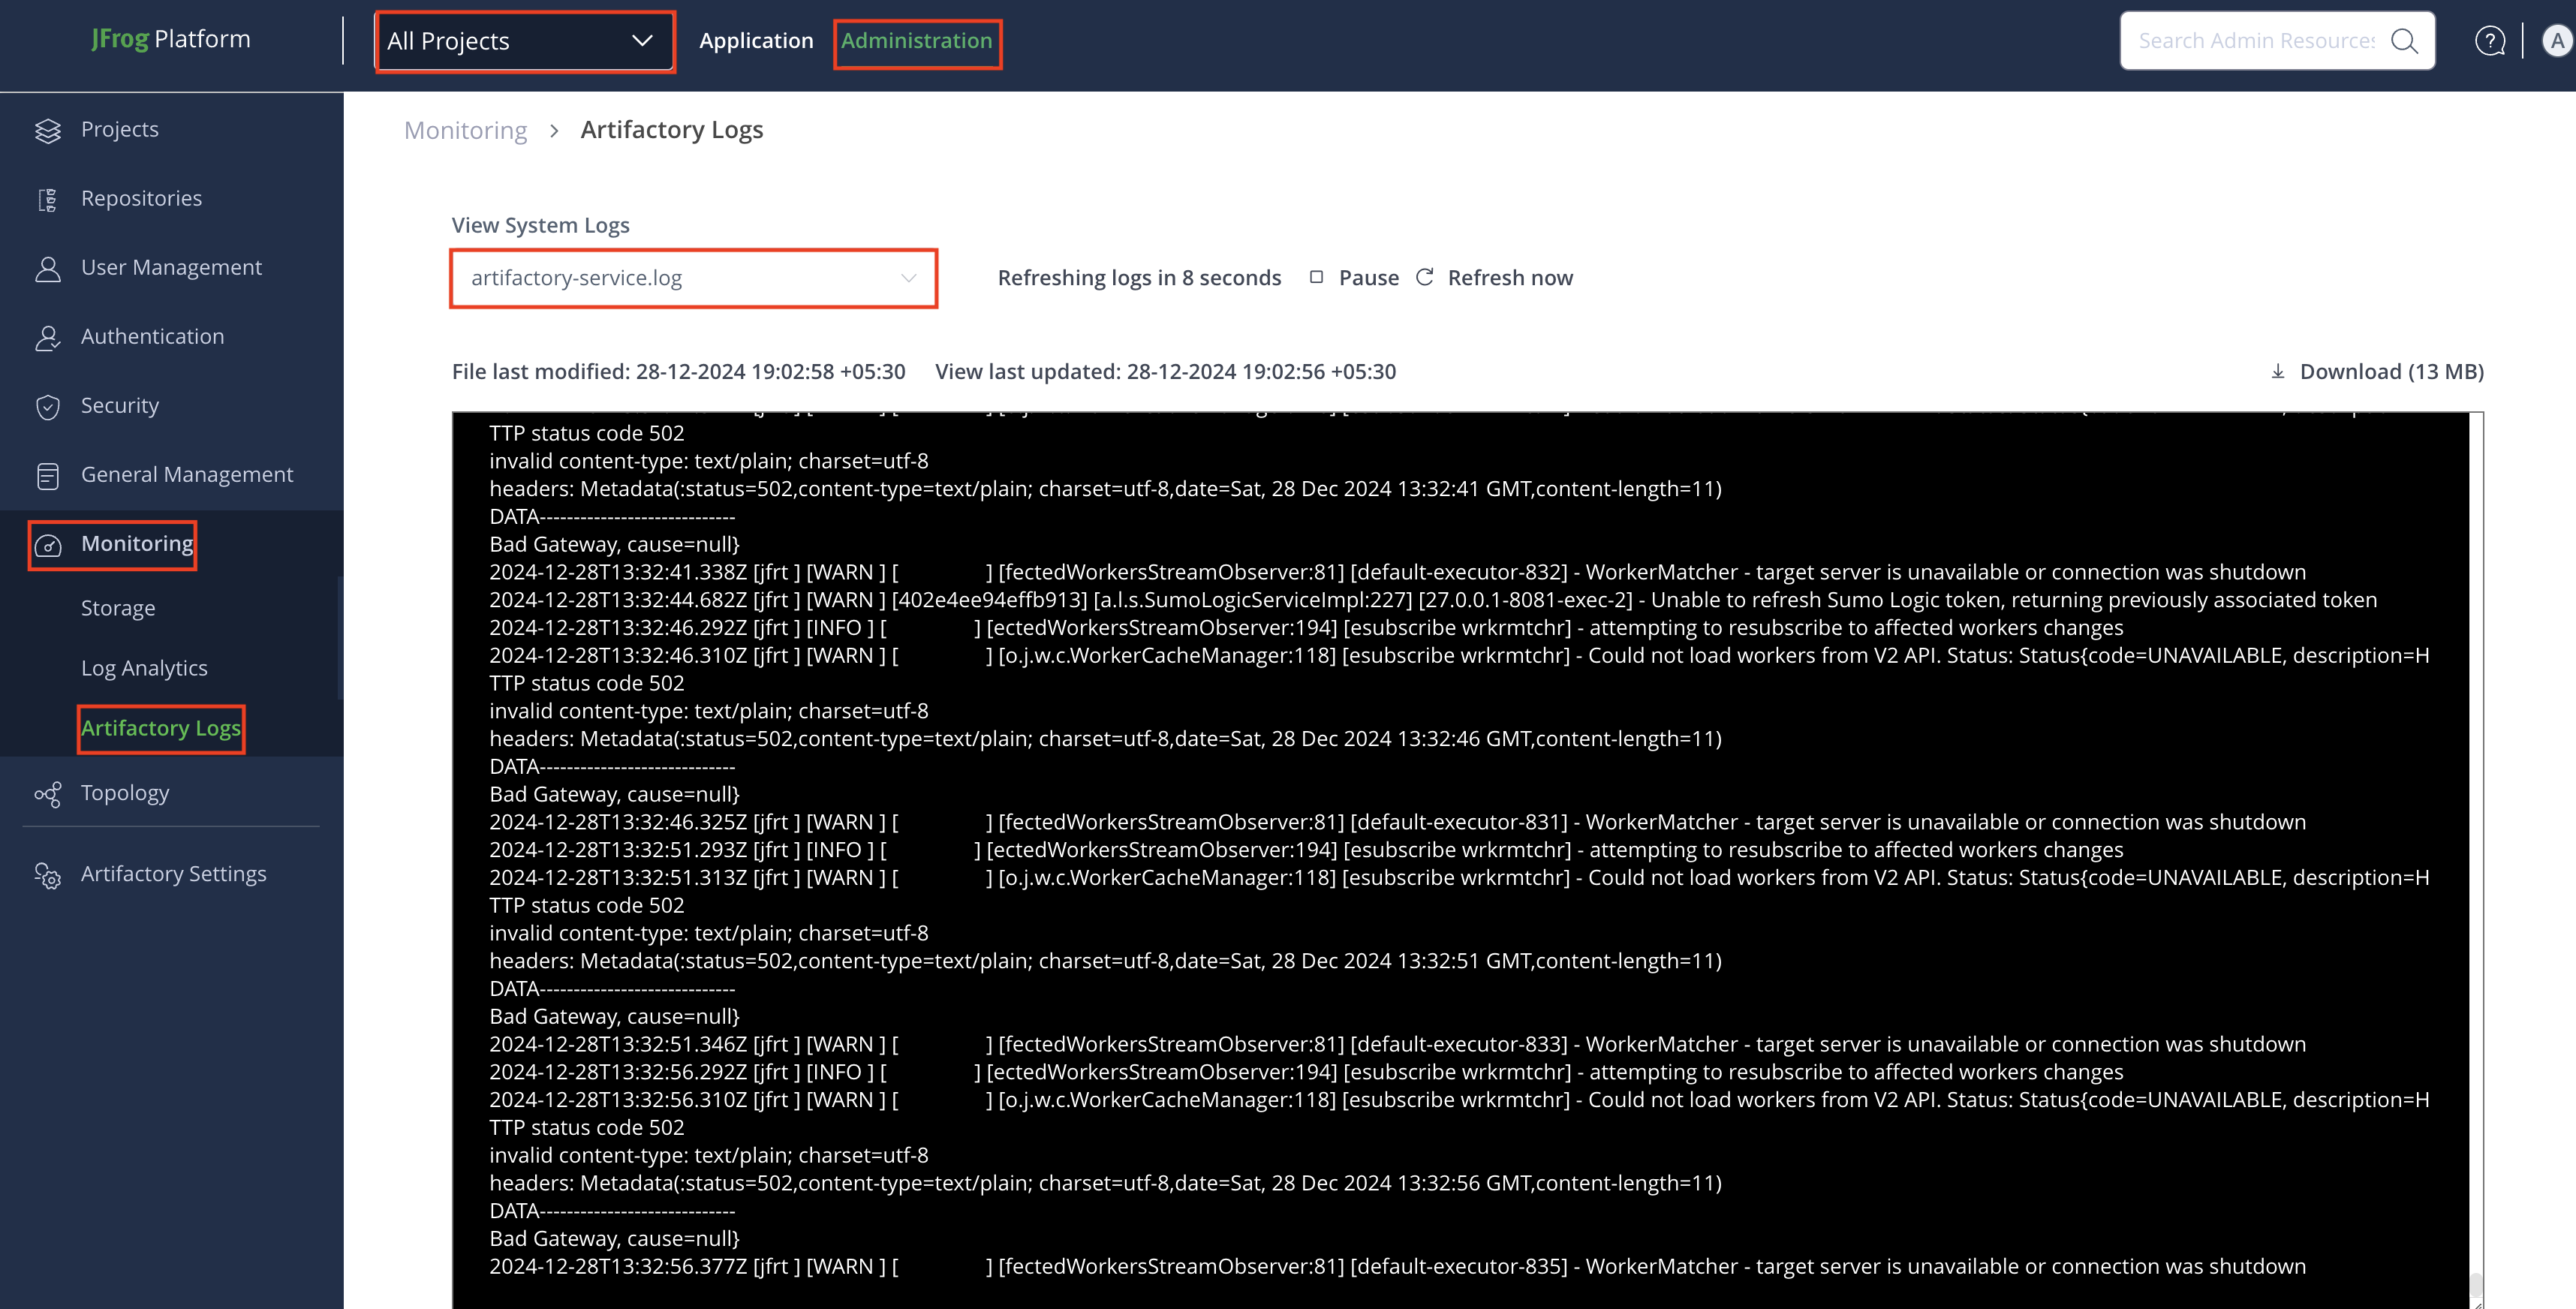
-
From the View System Logs dropdown list, select artifactory-service.log.
-
View the logs.