Manage Licenses
This page provides a full overview of your subscription and license allocation, allowing you to view and download licenses and product keys.
Subscription Summary
At the top, you will find a quick overview of your current JFrog subscription. This includes:
- Subscription Type: Identifies the specific plan you are on (for example, Enterprise+, EnterpriseX, and so on).
- Purchased Licenses: Shows the total number of licenses you have acquired.
- Expiration Date: Indicates when your current license period ends.
- Subscription Status: Displays the current state of your subscription (for example, Expired and Active).
License Buckets View (when applicable)
If your subscription has multiple licenses, they will be grouped into buckets for easy management. In this case, you will see a License Buckets view.
For each bucket, you can see:
- Bucket Type: Which JFrog deployment type the licenses apply to (for example, Artifactory, Xray, Distribution Edge).
- Licenses: The number of licenses assigned to this bucket.
- Owner Email: The contact responsible for the licenses in this bucket.
- Projects: Specifies the number of projects that are allocated per bucket group.
In the table row, click the more (...) icon and select Get signed URL. This opens the Get Signed Url dialog.
- Get signed URL (copy or download)
- Copy the Bucket Unlock key
In the table row, click the more (...) icon and select Export Bucket. This downloads the license keys in CSV format.
Licenses Table View (when buckets are not used)
If your subscription does not use license buckets, you will see a License Table view instead.
For each line, you can see:
- Type: Which JFrog deployment type the licenses apply to (for example, Artifactory, Xray, Distribution Edge).
- Quantity: Specifies the number of licenses assigned.
- Email: The contact responsible for the license.
Actions available from the License Table
- Export to CSV: Download license key for the selected license type.
License Management
Licenses are managed in the Administration module under General Management > License Buckets.
You can upload individual licenses to JPD using the Licenses page.
Dynamic License Expiration
JFrog Platform licenses can be dynamically renewed when you renew your SH subscription, without the need to manually apply a new license file. When a new license is provided, the JFConnect microservice should automatically fetch and apply the updated expiration date.
Dynamic License Expiration represents a shift from the old manual, file-based license update process to an automated, entitlement-based system for connected environments, allowing for seamless management of license expiry dates. However, air-gapped setups would still require manual updating.
Background
Previously, JFrog licenses operated on a perpetual model, meaning that license expiration had limited impact on server function. After Artifactory 7.41, JFrog introduced termed licenses, which expire when your contract ends, to be replaced by a new license. After a license has expired and before it is renewed, the JFrog Platform becomes read-only.
How Dynamic Licensing Works
The JFConnect microservice connects to the JFrog Entitlements Server to populate the appropriate entitlements. When a license is renewed, we produce and send you the new license via email.
At the same time, JFrog updates your entitlements in the entitlement server microservice (jes.jfrog.io) with the new expiration date. If your system is connected to the network, the dates will be updated without replacing the license.
Note
The license file itself is static, and will hold the original expiration date. The dynamic update only affects the JPD entitlements stored in the JPD database.
However, for air-gapped environments where JFConnect cannot connect to the JFrog entitlements server, It is necessary to load new entitlements manually: for more information, see JFConnect Apply Entitlements to an Air-Gapped JPD. This method loads the new entitlements rather than a full license file to update the expiry.
Frequently Asked Questions
When do I need to install a new license?
You need to manually install a new license in any of the following scenarios:
- When updating your subscription (e.g., changing the account type from EnterpriseX to Enterprise +)
- If your Artifactory product version is lower than 7.77.11
- In any other case where JFConnect is not able to load entitlements.
When will my new license expiration be automatically updated?
The expiry date on your license will be updated directly when all these conditions are met:
- You renewed your subscription and received an email confirmation with the new license files.
- Your JFConnect microservice is connected to the JFrog Entitlements Server.
- Your Artifactory product version is higher than 7.77.11.
Manage License Buckets
The JFrog Platform uses license buckets to manage large number of Artifactory services. License buckets are available for Enterprise + license and requires JFrog Mission Control.
Once you have your license buckets, you can add them and match them against their services.
Using license buckets and JFrog CLI, you can easily automate, and therefore greatly simplify, managing licenses for a large number of Artifactory services.
Obtain a License Bucket
Once your license bucket is created, you will receive an email with a link to the dedicated web page.
Contacting your JFrog representative to create a bucket
For additional information on how you can get your license buckets, contact JFrog sales:
- Enterprise Buckets:
[email protected]- Enterprise+ and Artifactory Edge buckets:
[email protected]
This page will display your personalized bucket license information needed when adding your bucket, including the Bucket Identifier, Signed URL and Key.
Add a License Bucket
Follow these guidelines when you add a license bucket.
- Matching the URL and Key: For more than one license bucket, make sure the URL and Key that you enter correspond to the same Bucket Identifier.
- Bucket name and identifier are two different things: Don’t confuse the bucket name with the bucket Identifier. The bucket name is an arbitrary logical name you assign to the bucket. The identifier is a unique identifier assigned to the bucket by JFrog.
-
Go to General Management > License Buckets.
-
Click Add New Bucket. The License Buckets dialog opens.
-
Enter a Name for your bucket, and do one of the following:
-
Select File Upload. Drag-and-drop an Offline Bucket File into the dialog, or click Select File and browse to the Offline Bucket File.
-
Select Signed URL and paste the URL of the License Bucket.
-
-
Enter the Key you received from your JFrog representative, and click Add Bucket.
Once the license bucket has been loaded to the JPD, you can attach licenses from it using JFrog CLI.
View License Bucket Information
A bucket report provides a variety of information on usage of licenses in the bucket.
To view a bucket report, hover over a bucket and select View Report from the Actions dropdown list.
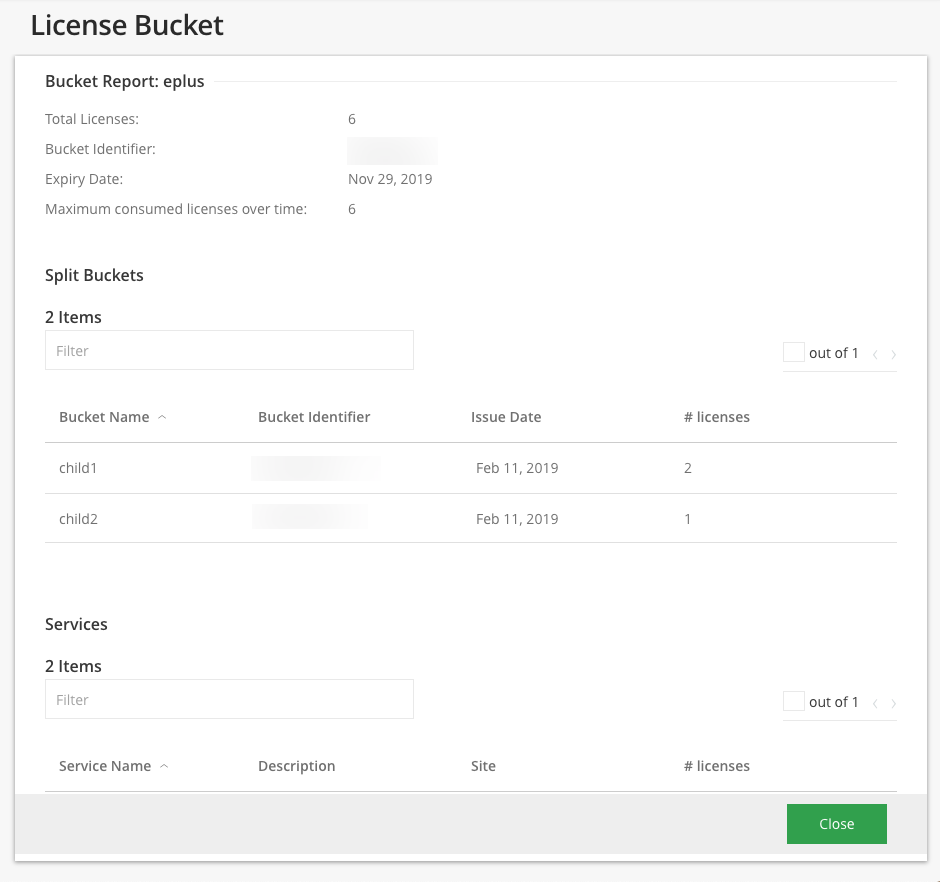
| Bucket Report Section | Description |
|---|---|
| Total Licenses | The total number of licenses in this bucket. |
| Bucket Identifier | The identifier of this license bucket. |
| Expiry Date | The expiry date for this license bucket. |
| Max. consumed licenses over time | The maximum number of licenses that were ever in use concurrently during the validity period of this bucket. |
| Split Buckets | The additional buckets split from this original bucket. |
| Services | The services attached to this license bucket. |
Tip
Do you have enough or too many licenses in your bucket?
Max. Consumed Licenses shows you that highest number licenses you ever used during the validity period of this bucket. This is something to consider when you renew your JFrog Artifactory licenses.
- If you have not used all the licenses in this bucket concurrently, you may be able to manage with fewer licenses.
- If you have reached the total number of licenses in this bucket, you may not be meeting the demand for Artifactory services in your organization and should consider purchasing more Artifactory licenses.
Split a License Bucket
A license bucket can be split into any number of separate buckets that can be applied to multiple environments as needed.
This is useful for isolated environments that have disconnected networks, and each require a dedicated service. For example, separate environments for Development, Staging and Production. In this case you would split the bucket into additional sub-buckets that can be assigned to each service that's within each one of the environments in your organization.
To split a bucket, hover over a bucket and select Split from the Actions dropdown list.
Add the new bucket name and the number of licenses to assign to it.
Once the new bucket is created, it will be added below the original bucket with the same name, appended by a dash and an ordered number.
For example:
- original bucket ID:
905539862 - new bucket ID:
905539862-1
The newly created licenses bucket should be downloaded and uploaded to the JPD environment it is intended for.
To download the split license bucket, hover over the bucket and select Download Bucket or Copy Key from the Actions dropdown list.

Attach Licenses from a License Bucket to a JPD
To attach a license from a license bucket to a JPD, select Attach License from the Actions dropdown list.

Remove a License Bucket
Go to General Management > License Buckets.
To remove a license bucket, hover over a specific bucket and select Delete from the Actions dropdown list.
Removing the bucket will not remove the licenses from the services
Once the license bucket is removed, the services that were attached to it should be assigned to a new bucket.
Update Licenses in a License Bucket
To attach a license bucket, hover over the bucket and select Attach License from the Actions dropdown list.
Split License Buckets
A split bucket is intended to be applied to services in a separate environment. When applying licenses, split licenses should not be used.
The Attach License page displays the available and used licenses within the selected license bucket, and the online services.
You can attach as many licenses to a JPD cluster as needed.
Tip
Attaching additional licenses to your JPD cluster will allow you to dynamically scale it up on demand.
To set the number of licenses you would like to attach to each service, select the green check icon and click Attach licenses. You can set the licenses to all services in bulk by selecting the uppermost green checkbox.
The # Licenses to Attach column initially displays the minimum number of licenses the specific service requires. You can increase this number according to the number of available licenses in your bucket. However, you cannot attach less licenses than this default number.
Automate License Buckets Using JFrog CLI
JFrog CLI is a compact and smart client that provides a simple interface to JFrog Mission Control (through its REST API). It can be used by your automation environment for fully automated license management for all your Artifactory services through Mission Control. For details on downloading and installing JFrog CLI, see JFrog CLI.
While each Artifactory license can only activate one Artifactory service at a time, you are free to move any license around to different Artifactory services as long as the license remains valid. For example, you can temporarily attach a license from a bucket to an Artifactory service used for a specific development project. Once the project is complete and the Artifactory service is no longer needed, you can detach the license and return it to the bucket managed by Mission Control.
Deploy and Release Licenses in a License Bucket with JFrog CLI
You can deploy or release licenses with the JFrog CLI.
The Deploying a license command deploys a license from the bucket specified and attaches it to the specified Artifactory service.
The Releasing a license command removes the specified license from the specified Artifactory service and returns it to the specified bucket in JFrog Mission Control.
A license always belongs to the same bucket.
When you release a license, it is always returned to the same bucket it was attached from.
For details on using the JFrog CLI, please refer to the JFrog CLI Documentation.
License Management for an Individual Artifactory or Artifactory Edge
To apply licenses to a single JPD instance use the following steps.
-
Add a new bucket.
-
Select Edit service for an existing Artifactory or Edge service.
-
In the credentials section, enter username/password and select Test Connectivity. If the connectivity test succeeds, the dropdown for bucket selection is enabled.
-
Choose the new bucket from the list and select Save.
The JPD determines the number of licenses the selected Artifactory/Edge instance requires and deploys that many licenses. If the existing licenses have better expiry than the selected bucket, then no action is taken.
Artifactory / Artifactory Edge licenses
For Artifactory and Artifactory Edge services, buckets of both types are available for selection. This allows you to switch an Artifactory to Artifactory Edge or vice versa.
Updated about 2 months ago