Security Configuration
There are several system-wide settings to control access to different resources.
In the Administration module, select Security | General.
Allow Anonymous Access
JFrog Platform’s permission-based system allows you to control users' access to different features and artifacts. To provide access to users who are not logged in, JFrog also provides the option of enabling Anonymous Access.
Enable/disable Anonymous Access with the Allow Anonymous Access setting under Security > General in the Administration module. You can modify the set of permissions assigned to the "Anonymous User" as for any other user.
Warning
Important Information on Anonymous Users
For security reasons, JFrog does not recommend allowing anonymous access. When you allow non-logged-in users access to your system, you could, potentially, be giving unauthorized access to users to any existing local, remote or virtual repositories, and, to future repositories.
In addition, enabling anonymous access may expose any sensitive data that may be saved in these repositories to non-logged-in users.
The best practice for using anonymous access is to create a new permission target, select the repositories to which the anonymous user will have access, and set the read action only to these selected repositories.
JFrog has hardened anonymous access at the project level for security reasons.
Project administrators can add users and groups to a project. From Artifactory 7.66, JFrog disabled the ability to add the anonymous user to a new project since it is not recommended to enable such access. If you still wish to enable anonymous access for projects, you can modify the Access YAML access.config.latest.yml file and change the security: allow-anonymous-in-projects setting to true. For more information, see Access YAML configuration files, changing Access YAML configuration, and supported access configurations.
Note
Starting from Artifactory 7.84.3, the anonymous user is removed from the Anything and Any Remote permissions by default. To grant permissions to anonymous users, the best practice is to create a new permission target containing the anonymous user, and to assign it with read-only access to the relevant repositories.
Hide Existence of Unauthorized Resources
When a user tries to access a resource for which they are not authorized, the default behavior is to indicate that the resource exists but is protected. For example, an anonymous request will result in a request for authentication (401), and a request by an unauthorized authenticated user will simply be denied (403).
Select Hide Existence of Unauthorized Resources to return a 404 (instead of 403) - Not Found response.
Alternatively, update the Global Configuration Descriptor to set this parameter globally (for all virtual repositories) or for specific repository:
<security>
    <hideUnauthorizedResources>false</hideUnauthorizedResources>
</security>
<virtualRepositories>
        <virtualRepository>
          <hideUnauthorizedResources>false</hideUnauthorizedResources>
   </virtualRepository>
</virtualRepositories>
Password Encryption Policy
Artifactory provides a unique solution to support encrypted passwords through the Password Encryption Policy setting as follows.
| Password Encryption Policy Setting | Description |
|---|---|
| Supported | Artifactory can receive requests with an encrypted password, but will also accept requests with a non-encrypted password (default) |
| Unsupported | Artifactory will reject requests with an encrypted password |
| Required | Artifactory requires an encrypted password for every authenticated request |
For more details on why Artifactory allows you to enforce password encryption, see Centrally Secure Passwords.
Passwords Encryption
Different configuration files may include password information stored in plain text.
To keep passwords secure, you may choose to encrypt them as described in Key Encryption.
Disable Basic Authentication Method
When using all external authentication methods, for example, SAML or LDAP, basic authentication will be disabled by default starting from Artifactory version 7.104.0. This means that Basic authentication is disabled for both UI and REST API, and that all forms of automations, scripts, and plugins using basic authentication are also disabled.
We recommend to leave basic authentication disabled, in order to avoid double authentication with a less secure password-based method. However, if you need to continue using it, you can re-enable it using the following method:
- Go to Security > General and find the Basic Authentication section
- Deselect the Disable Basic Authentication for JFrog Platform Internal Users checkbox
Before Disabling Basic Authentication
Before disabling, do the following to ensure the external users have the necessary permissions and prevent a system lockout:
Warning
If an external system admin is not configured before basic authentication is disabled, the system will be left without administrators. If this occurs and the system is locked out, contact JFrog Support for assistance.
- Configure an external authentication method
- Create a user group for the external users, and provide the users with Admin permissions
- (Optional) Set one or more users with basic authentication permissions as a failsafe, so that the system will not be locked out
- Disable the basic authentication method
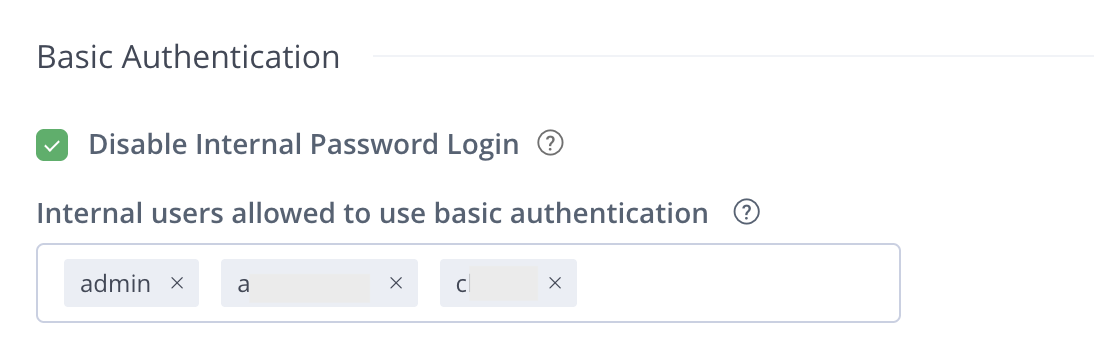
Set Individual Basic Authentication Permissions
When disabling basic authentication, you can assign permissions to specific users in your environment to continue using basic authentication:
-
In the Administration tab, go to Security > General, and find the Basic Authentication section.
-
In the Internal users allowed to use basic authentication field, enter the users you would like to assign basic authentication permissions to from the drop-down menu
-
Click Save.
Re-enable Basic Authentication
If you have disabled basic authentication without enabling an external authentication method and were blocked from using the platform, you can take these steps:
-
For Cloud users, contact JFrog Support for assistance
-
For Self-Hosted users, use the following workaround:
To re-enable basic authentication:
-
Go to the YAML file
/opt/jfrog/artifactory/var/etc/access/access.config.latest.ymland find this section:security: authentication: basic-authentication-enabled: false -
Copy the file with the new name
access.config.import.yml:cp access.config.latest.yml access.config.import.yml -
Edit this new
access.config.import.ymlfile and set thebasic-authentication-enabledparameter to true:security: authentication: basic-authentication-enabled: true -
Restart Artifactory.
-
Hide Basic Authentication
Select Hide Basic Authentication in Login page to hide basic authentication from the login page if you disabled basic authentication.
The basic authentication UI is not available in the login page. You can still access the basic authentication UI by clicking on the link beneath the configured login providers.
Enable Token Generation via API
Select Enable Token Generation via API to allow users logged in through basic authentication to generate tokens with the API. This is useful when you have basic users set up for automation.
Multi-factor Authentication
Multi-factor authentication (MFA) enables a higher level of security when accessing JFrog applications. When enabled, in addition to their user credentials, users will have to authenticate with a one-time password (OTP) generated by an additional authentication factor - the Google Authenticator application. This ensures that in the case where a users' credentials have been compromised, the multi-factor authentication method will prevent malicious users from gaining access to JFrog applications.
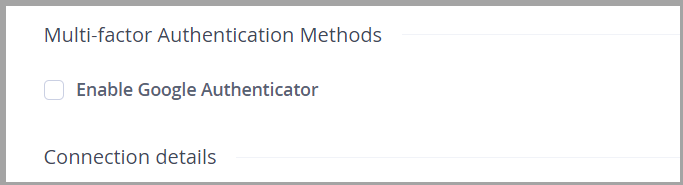
Enable Multi-factor Authentication
Perform the following steps to enable multi-factor authentication for users in the JFrog Platform.
-
Navigate to Administration Module | User Management | Settings.
-
Scroll to Multi-factor Authentication.
-
Select Enable Google Authenticator.
-
Follow the steps of Logging in using Multi-factor Authentication after it is enabled.
Note
Multi-factor authentication is applied to all users of the JFrog Platform application.
Reset Enrollment
In the case that a user's ability to log in using multi-factor authentication is compromised, an Administrator should reset the user's enrollment status by performing the following steps.
-
Navigate to Administration Module | User Management | Users.
-
Select the specific user and in the Edit screen, select Reset MFA Enrollment.
The user will have to follow the enrollment steps again to authenticate.
If an Administrator loses the capability of signing in using the multi-factor authentication method, the Administrator should bootstrap a new Administrator or an existing Administrator with new credentials to reset the multi-factor authentication for the bootstrapped Administrator. For more information see, Recreate the Default Admin User.
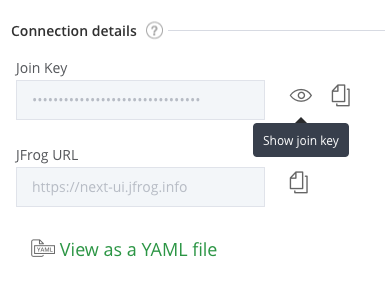
View the Join Key
The JFrog join key feature establishes trust between the JFrog services based on the AES-128 bit symmetric encryption. This feature is an alternative to the basic authentication trust method.
To view the JPD join key, click the Show join key icon.
Password Expiration Policy
An admin user can enforce a password expiration policy to force all users to change their passwords at regular intervals. When the password expiration policy is enforced, users who are not within the specified time interval will have their accounts locked until they change their password.
Artifactory Future Breaking Change
In an upcoming release of Artifactory, JFrog will expire the "Unexpire Password for a Single User" endpoint from RT REST APIs and the UI that goes with it (once API v1 is fully deprecated). This means this API will not available in Artifactory REST API V2.
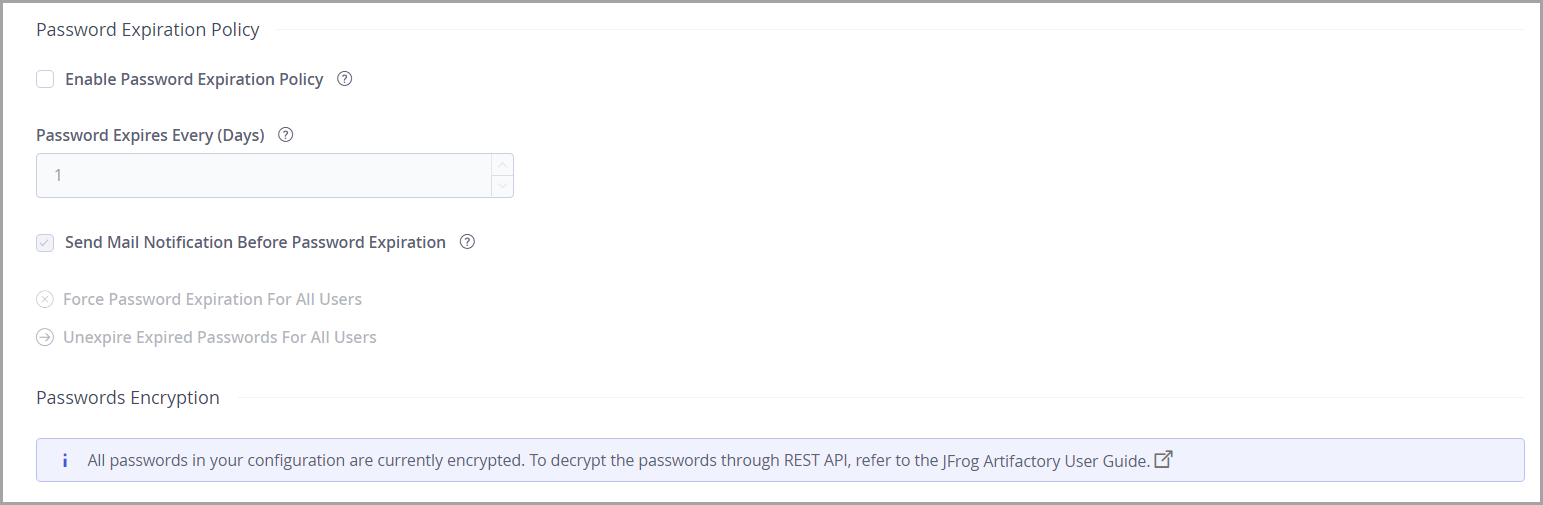
| Password Expiration Policy Setting | Description |
|---|---|
| Enable Password Expiration Policy | When selected, password expiration policy is enabled. |
| Password Expires Every (Days) | Specifies how frequently all users must change their password. |
| Send Mail Notification Before Password Expiration | When selected, users receive an email notification a few days before their password expires. |
| Force Password Expiration For All Users | Forces all passwords to expire. All users will have to change their password at next login. |
| Unexpire Expired Password for All Users | Removes the password expiry status for all users |
User Lock and Login Suspension
User account locking and temporary login suspension are two independent mechanisms employed to prevent identity theft via brute force attack.
Temporary Login Suspension
Temporary login suspension means that when a login attempt fails due to incorrect authentication credentials being used, the system will temporarily suspend (with a 403 HTTP status code) that user's account for a brief period of time during which additional login attempts will be ignored. If login attempts fail repeatedly, the suspension period is increased each time until it reaches a maximum of 60 seconds.
From Artifactory version 7.90, it is possible to modify or disable the temporary login suspension within the UI.
It is possible to configure login suspension using the Access YAML Configuration using the security.user-lock-policy.max-login-delay-incorrect-attempts setting and the security.user-lock-policy.Max-login-delay-millis setting.
Note
During an upgrade to Artifactory 7.90 or higher a one time converter will run. If you configured the
artifactory.max.incorrect.login.attemptsorartifactory.security.maxLoginBlockDelaysettings in the Artifactory System Properties, they will be migrated to the Access service and the properties can be removed from the Artifactory System Properties .
Warning
On a high availability cluster, the suspension mechanism is applied for each node separately. For example, when using the
max.incorrect.login.attemptsis100on a high availability cluster with 3 nodes, the first, second and third node will each accept 99 incorrect login attempts before there is a temporary login suspension.
User Account Locking
In addition to temporary login suspension, you can lock a user's account after a specified number of failed login attempts. This is enabled by selecting the Lock User After Exceeding Max Failed Login Attempts check box, and adding a value to the Max Failed Login Attempts field. Users who get locked out of their account because they have exceeded the maximum number of failed login attempts allowed (as specified in Max Failed Login Attempts) must have administrator access to unlock their account.
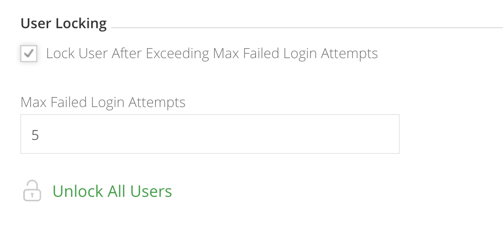
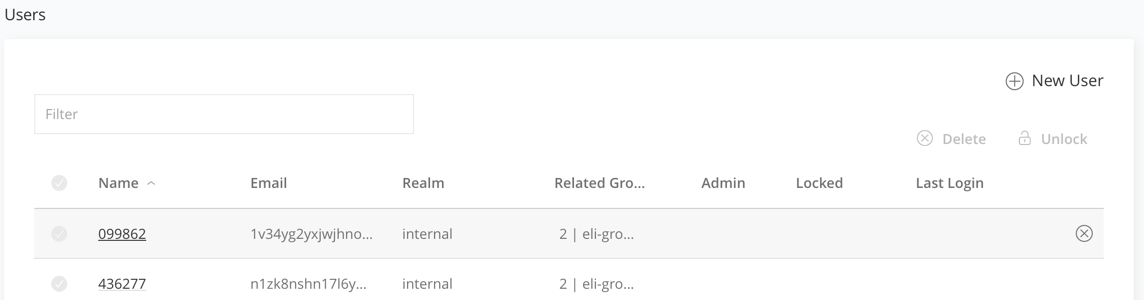
Unlocking User Accounts
An administrator can unlock all locked-out users by clicking Unlock All Users in the User Management | Settings page where user locking is configured. An administrator can also unlock a specific user or a group of users in User Management | Users.
Through the REST API, an administrator can unlock a single user, a group of users, or all locked-out users at once.
Manage API Keys
Select Administration Module | Artifactory Settings| Artifactory Security.
To revoke all API keys in the system, click Remove API Keys for All Users.
Warning
Once you revoke an API key, any REST API calls using that API key will no longer work. The user will have to create new API key and update any scripts that use it.
Token Expiration
Users accessing the JFrog Platform use access tokens that have a predetermined expiration date.
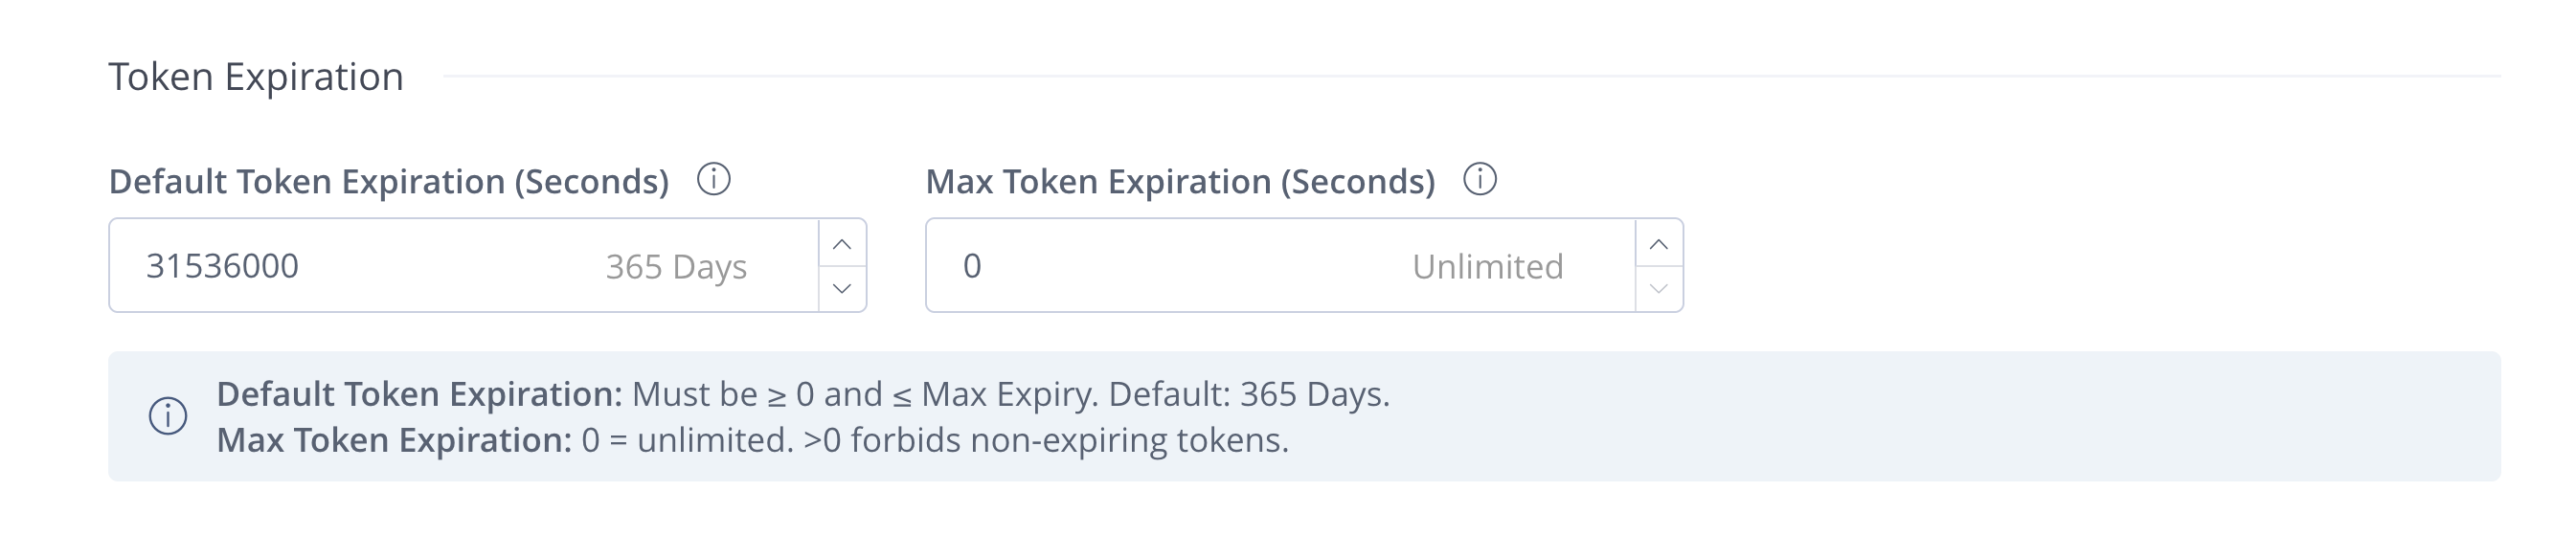
You can change your token expiration settings in the following fields:
| Field Name | Description | Default |
|---|---|---|
| Default Token Expiration (Seconds) | The value that will appear by default when trying to create new identity tokens. This value must be ≥ 0 and smaller than the Max Token Expiration limit. | 31,536,000 seconds (365 days) |
| Max Token Expiration (Seconds) | Available from Artifactory version 7.135.0: The maximum expiration limit when generating new access tokens by project admins. Note: Setting this value to 0 removes the limit, allowing non-expiring tokens. It is recommended to set a maximum: setting this value to any number > 0 forbids the use of non-expiring tokens in your environment, enhancing your security. | 0 (unlimited) |
Note
If token entities are federated, enable email notifications only on one of the JPDs to avoid getting duplicate emails for the same entity.
To ensure that your access to the platform is maintained, you can set token expiration notifications that send an automatic email notification before your tokens expire (the notification will be sent according to the notice period).
- To enable notifications, select the Enable Email Notifications for Token Expiration checkbox.
- In the Notice Period Before Tokens Expire field, you can specify how many days before a token expires you will receive an email notification.
- Once a day, the system checks for tokens that expire within a 24-hour time window after the notice period. You can customize this setting by entering a time in the Time of Daily Token Expiration Check field (the Platform will convert the time automatically to UTC).
- Starting from Artifactory version 7.116.3, you can set the Notification Frequency Field to send notifications either once or daily during the notice period.
Hide SSO Providers
When you have a large number of SSO providers in your JPD, you might want to avoid displaying the providers. A large number of SSO providers might make it difficult for users to find their provider and clutter the UI. If you have many sub-organizations that use the same JPD, you might also want to hide the providers of a sub-organization from other sub-organizations.
Select Hide SSO Providers to hide the SSO providers that are available in your JPD in the login screen. If you select the option, the users have to type in the name of the SSO provider to log in to the JFrog Platform UI. This option is available only if you select Hide Basic Authentication in Login Page.