Security Keys Management
Subscription Information
This feature is supported with the Enterprise+ license.
The Keys Management function in the JFrog Platform enables you to create and control the keys used to encrypt or digitally sign your artifacts - in one central location. This makes it easier for you to manage signing keys throughout your organization.
Using the Keys Managed function, you can configure the following Artifactory security settings:
- Signing Keys: Use this tab to manage GPG, RSA, and ECDSA signing key pairs for signing and verifying package metadata.
- Java Keystore: Manage the key store that holds the signing keys used to automatically sign JAR files downloaded from a virtual repository.
- Public Keys: Store and manage the public keys used to verify your Release Bundle integrity.
- SSH Keys: Configure SSH keys to authenticate requests sent to the JFrog Platform from a Git LFS client or from the JFrog CLI.
To access the Keys Management function, in the JFrog Platform UI, go to the Administration module and then go to Security > Keys Management. This displays the Keys Management window.
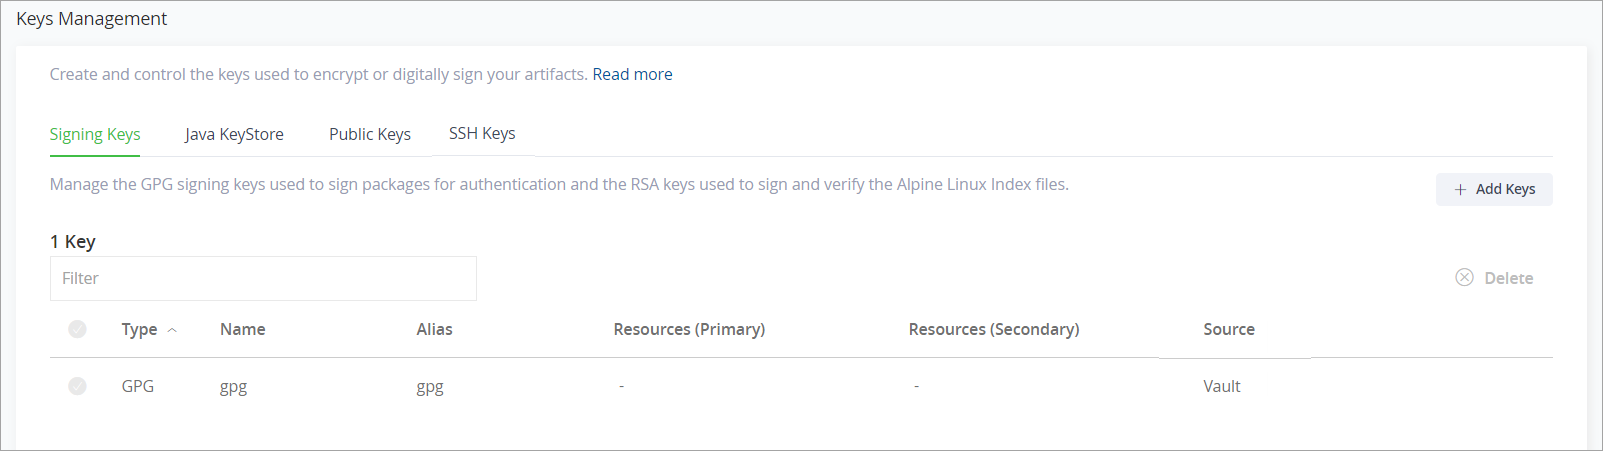
The centralized dashboard for creating and managing all signing keys displays the number of configured keys, the type, name, alias, primary resource, and secondary resource.
The Source column provides an indication of whether the key is an uploaded key or a Vault key:
- If there are multiple Vault connectors configured in your system, the Source will indicate which configured Vault connector is being used.
- If no connector is configured, the key's source will appear as "No connector is configured".
Next, follow the steps for creating and controlling the keys.
- Managing Signing Keys
- Managing WebStart and Jar Signing for the Java keystore
- Managing Public Keys
- Managing SSH Keys
Manage Signing Keys
Artifactory supports four signing key types for signing and verifying package metadata. You can manage all signing key pairs from the Signing Keys tab in Keys Management.
Note
Artifactory signs repository metadata (not packages) for RPM, Debian, Opkg, and Alpine.
- Add Signing Keys
- Store Signing Keys in HashiCorp Vault
- Set Up a New Signing Key in Vault
- Change an Uploaded Key to a Vault Key
Supported Keys and Use Cases
The following table lists each signing key type, what it signs, and the package types or platform features that use it.
Signing Key | Use Cases |
|---|---|
GPG | Repository metadata signing for Debian, Opkg, and YUM/RPM repositories. Artifactory signs repository metadata, not individual packages. Terraform provider registry — GPG-based signing to verify providers served from your Terraform/OpenTofu repository. Release Bundles v2 — sign Release Bundle versions when creating or promoting bundles. Keys can propagate to Distribution for distribution to Edge nodes. JFrog Distribution — sign Release Bundle v1 delivery to Edge nodes. |
RSA | Alpine Linux — sign and verify Hex — sign and encrypt content for secure communication between Artifactory and the Mix client. |
ECDSA | npm — sign and verify npm package metadata to support |
Add Signing Keys
Add a signing key pair to Artifactory to use it for package metadata signing and supported Release Bundle signing workflows.
Prerequisite: A supported signing key pair generated on your local machine.
To add a signing key:
-
In the Administration module, go to Security > Keys Management. The Keys Management page opens.
-
Click the Signing Keys tab, then click Add Keys.
-
Select the key type: GPG Keys, RSA Keys, or ECDSA Keys. The Add Key dialog opens.
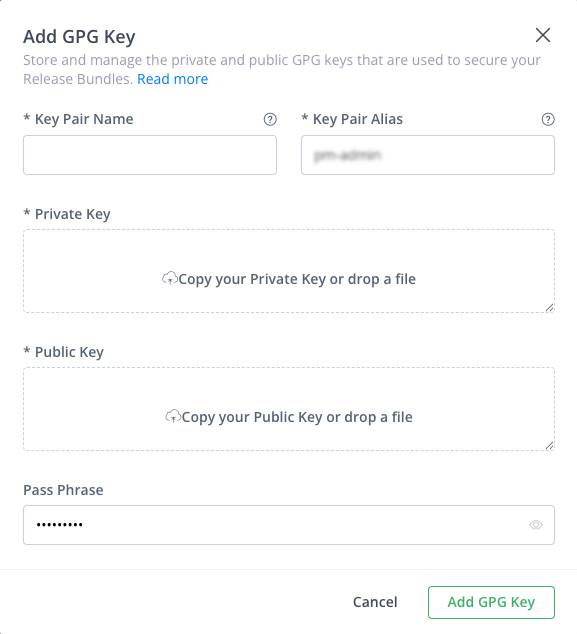
-
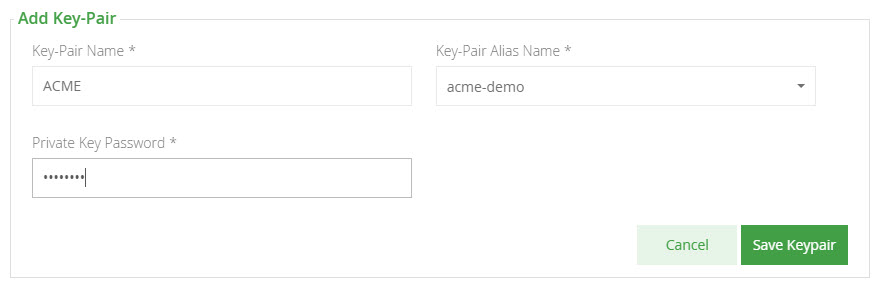
Enter the following information for the key pair:
- Key Pair Name: The name of the key pair.
- Key Pair Alias: A short nickname for the key pair.
- Private Key: Upload the private key.
- Public Key: Upload the public key.
- Pass Phrase: Optionally, enter a passphrase to protect the key pair.
-
Click Add Key.
Store Signing Keys in HashiCorp Vault
In addition to uploading keys, you can store signing key pairs in HashiCorp Vault as secrets and retrieve them in Artifactory. When Vault is enabled, keys stored in Vault appear with a Vault value in the Source column of the Signing Keys table.
Note
Vault key storage is confirmed for RSA and GPG key pairs.
For more information, see Vault.
When Vault is enabled, you can either add new signing keys and store them in Vault, or change the uploaded keys with Vault ones.
Set Up a New Signing Key in Vault
Use this procedure to add an RSA or GPG signing key whose key material is stored in HashiCorp Vault instead of uploaded to Artifactory.
To add a new signing key from Vault:
- Click Add Keys and select GPG Keys or RSA Keys.
- Select the Vault connector to use for the key.
- Enter the details for the key.
- Click Test to test the configuration.
- If the test is successful, save the new key.
Change an Uploaded Key to a Vault Key
Use this procedure when an uploaded RSA or GPG signing key must use HashiCorp Vault storage.
Warning
Once you change an uploaded key to a Vault key, the uploaded key is permanently deleted. This action can't be undone.
To change an uploaded key to a Vault key:
- In the Signing Keys list, click Change to vault next to the uploaded key you want to migrate.
- Select the Vault connector to use for the key.
- Enter the details for the key.
- Click Test to test the configuration.
- If the test is successful, save the changes.
REST API
You can manage signing key pairs using the Artifactory REST API. For more information, see Create Key Pair.
Manage WebStart and Jar Signing
Java Web Start is a technology developed by Sun Microsystems (now Oracle) to allow you to download and run Java applications directly from your browser with one-click activation.
Java Web Start requires that any JAR downloaded is signed by the software vendor. To support this requirement, Artifactory lets you manage a set of signing keys that are used to automatically sign JAR files downloaded from a virtual repository.
For more information, see the Oracle documentation for Java Web Start.
Signing keys are managed in the Administration module under Artifactory | Security | Keys Management.
Note
Artifactory signs repository metadata (not packages) for RPM, Debian, Opkg, and Alpine.
Generate JAR Signing Keys
To sign JAR files, you first need to create a keystore, and generate and add key pairs to it. These can be created with Oracle's keytool utility, that comes built into your Java Runtime Environment (JRE), by executing the following command:
keytool -keystore <keystore filename> -keypass <key_password> -storepass <store_password> -alias <store_alias> \
-genkeypair -dname "cn=<cName>, ou=<orgUnit>, o=<orgName>, S=<stateName>, c=<country>" -validity <days>
For more information, refer to the Oracle keytool - Key and Certificate Management Tool documentation.
Set Your Keystore and JAR Signing Keys
Before you can add a keystore, you must set the password needed to make any later changes to the keystore. You will need this password to remove or update the keystore.
Set the password and click Create. This will unlock the rest of the keystore management fields.
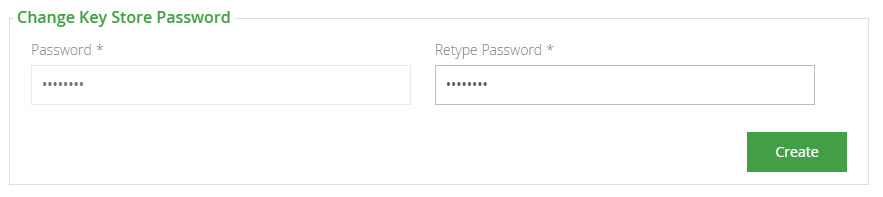
Once your keystore password is set and you have created a keystore and a set of signing keys, you can add them to Artifactory.
First upload your keystore file under Add Key-Store and enter the keystore password. Click Unlock.
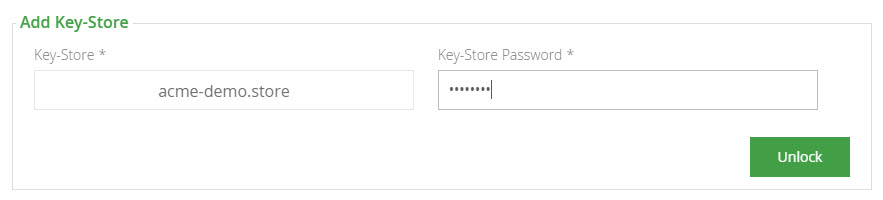
Once your keystore is set in Artifactory you may add key pairs under Add Key-Pair.
Remove a JAR Signing Key Pair
To remove a key pair, simply select the key pair and click "Remove".

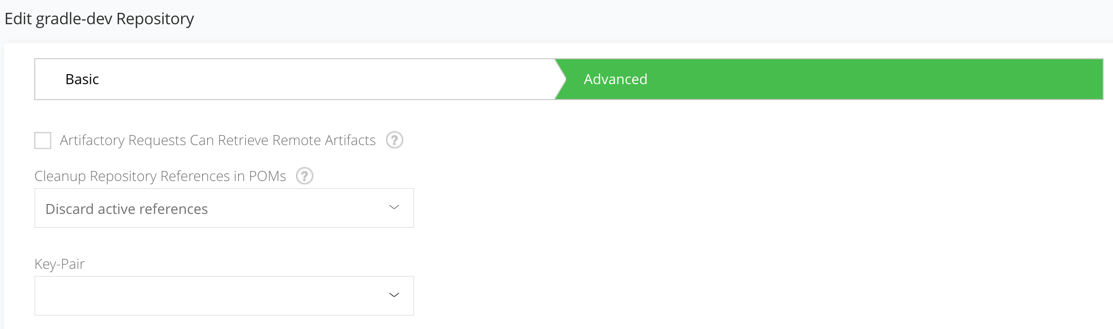
Configure Virtual Repositories to Sign JARs
Once Artifactory has a keystore and key pairs, you can configure a virtual repository with the key pair you wish to use for JAR signing. This is done in the Advanced settings of the virtual repository configuration screen.
Manage Public Keys
Subscription Information
This feature is supported with the Enterprise+ license.
To create trust between Distribution, source Artifactory instances, and Artifactory Edge nodes in the JFrog Platform, you will need to deploy the relevant public GPG key to each service.
Create your signing key using the following sections:
- Distribution service: Set Signing Key for Distribution REST API
- Source Artifactory and Artifactory Edge node: Set GPG Public Key REST API
For more information, see Managing Signing Keys.
Note
If Vault is configured, follow the steps in Vault.
You can upload your public GPG key to the source Artifactory instance and Artifactory Edge instances in the Administration module. Go to Administration > Security > Keys Management. and select the Public Keys tab.
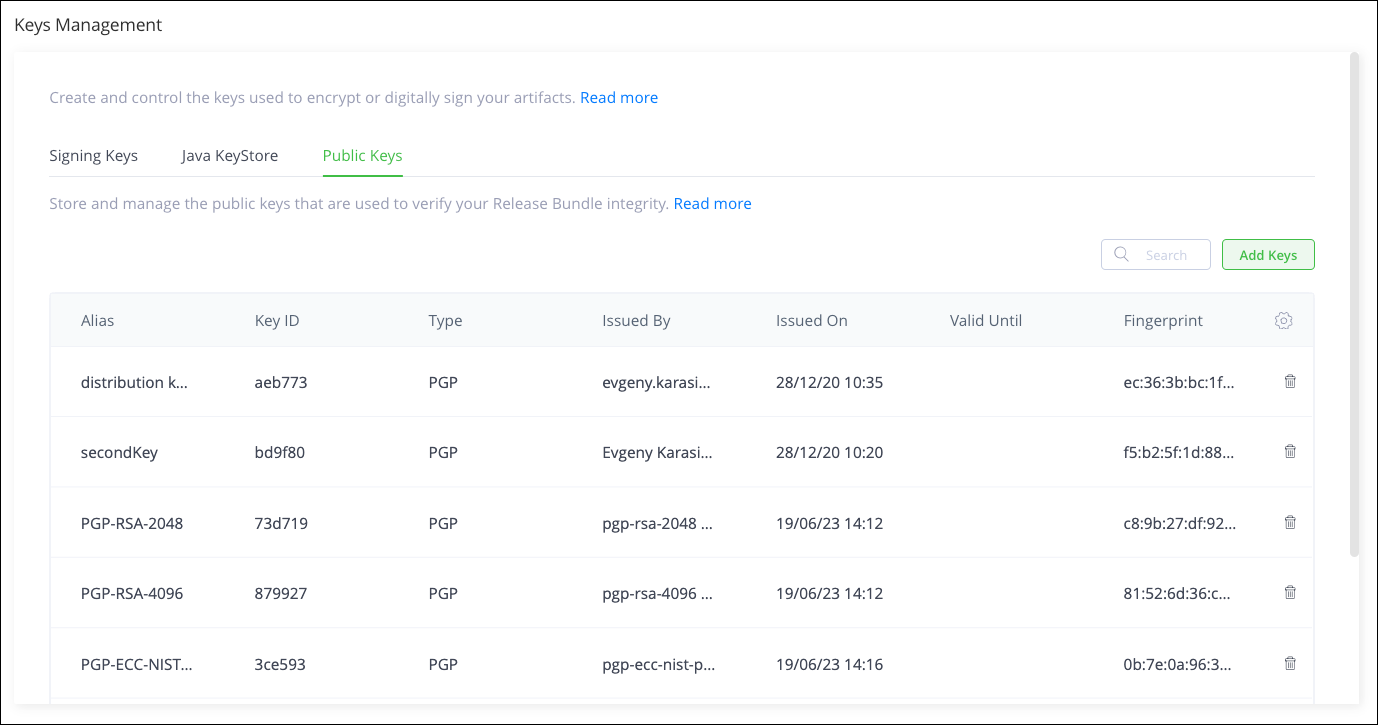
Add a Public Key
-
Click Add Keys.
This opens the Add Public Key window.

-
Enter the Key Alias and then copy your public key or drop a file into the Certificate Key field.
-
Click Add Public Key.
Manage SSH Keys
JFrog Artifactory supports SSH authentication for Git LFS and the JFrog CLI using RSA public and private keys. This allows these tools to exchange sensitive information with the Artifactory server that is authenticated via SSH. You will need to configure SSH keys to authenticate requests sent to the JFrog Platform from Git LFS client or from the JFrog CLI.
There are two main facets of SSH authentication:
Server authenticates itself to the client
The server must be authenticated before you send it any confidential data. For example, you should not authenticate a user to the server with the user's password before the server has been authenticated. The server is authenticated in the following manner:
When the SSH connection is established, the server sends its public key to the client, and the client matches the key to a list of known public keys stored in a known_hosts file (before the first ever connection to the server, you must obtain the server's public key by some other means and add it to the known_hosts file manually). This verifies that the server is indeed the owner of the stored public key, since only that server will have the corresponding private key. It also verifies that the server is known (and not an imposter) since its public key is stored in the known_hosts file.
User authenticates itself to the server
This process mirrors the process of the server being authenticated to the client. The user must first provide their public key to the server, which stores the key in the user's account authorization list. Then, when the user tries to log in, the server sends the user back their public key, and the user must show that they hold the corresponding private key.
Limitation
SSH is not supported on the Artifactory SaaS cloud service.
To configure SSH authentication, you will need to execute the following main steps:
Configure SSH Server Authentication
-
In this step, you will configure Artifactory's SSH authentication parameters. First, you need to generate an SSH key pair for Artifactory. For example, on a Linux-based system, you could execute the following command.
ssh-keygen -t rsa -C "[email protected]" -
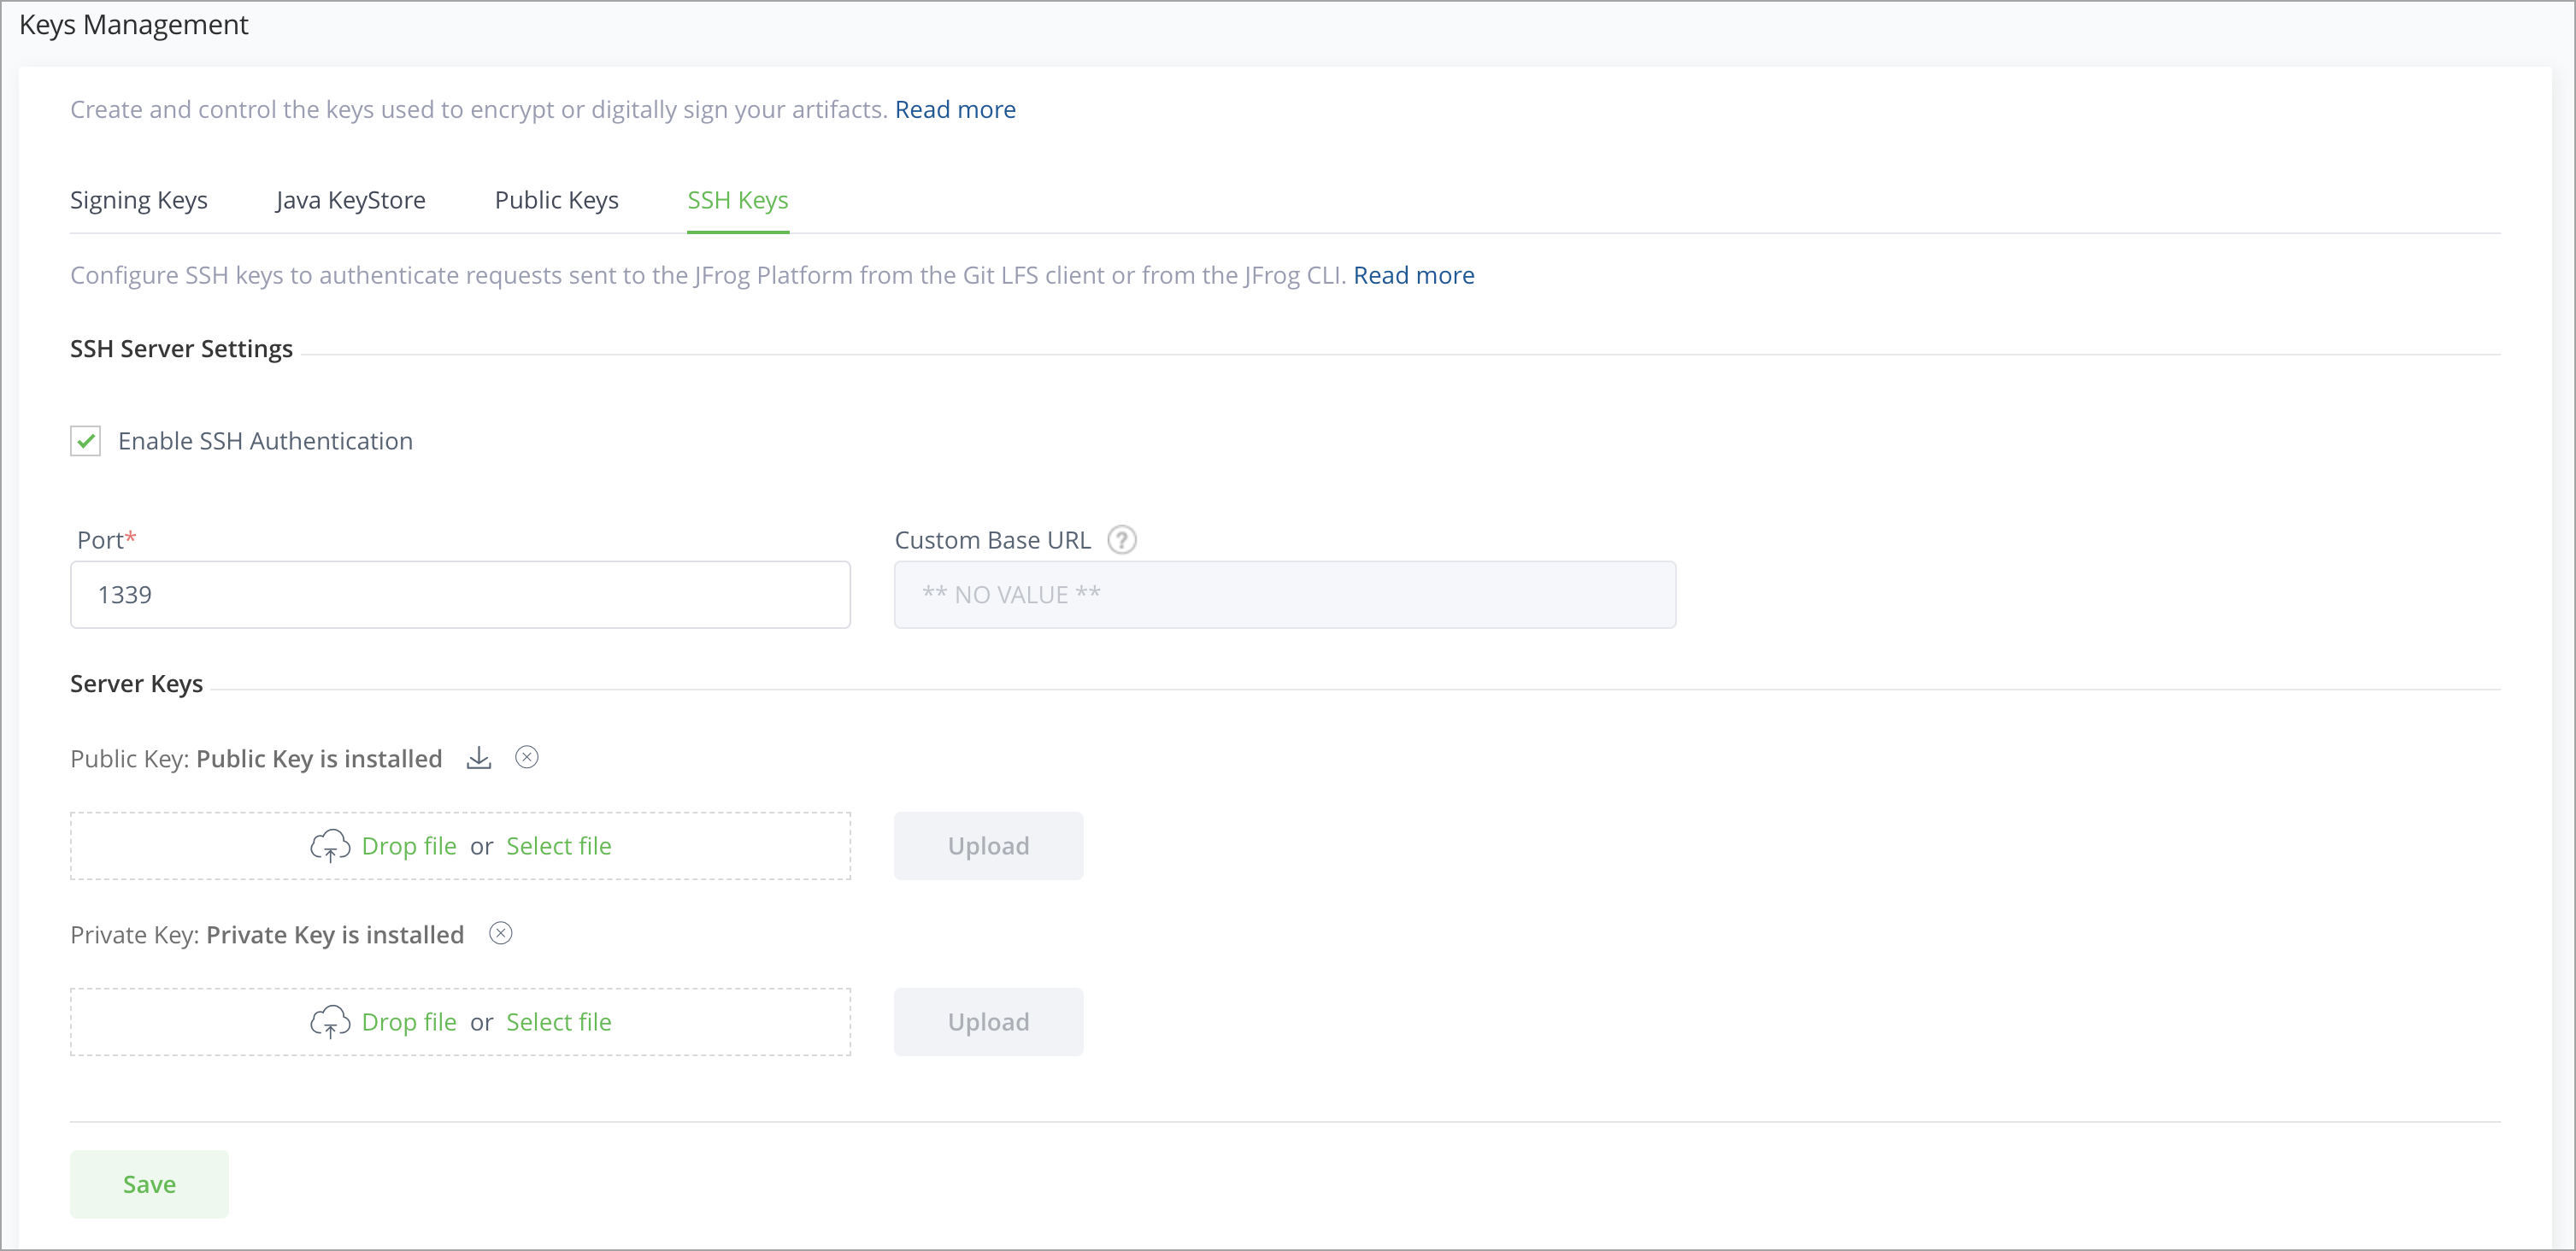
Next, to configure Artifactory for SSH authentication, go to the Administration module, select Artifactory | Security | Keys Management and click the SSH Keys tab.
-
Fill in the details for the Server Settings and the Server Keys.
| Server Setting | Description |
|---|---|
| Enable SSH Authentication | When checked, SSH authentication is enabled. |
| Port | The port that should be used for an SSH connection. |
| Custom URL Base | The Custom Base URL that should be used for SSH connections. Note that this is the same Custom URL Base configured in the Administration module under Configuration | General. |
| Public key/ Private key | The key pair used for authentication. |
Configure User Authentication with your Public Key
In this step, you will configure Artifactory with your public key so that you may be authenticated when sending requests to Artifactory from the Git LFS client or from the Artifactory CLI.
First, you need to generate a key pair. For example, on a Linux-based system, you could execute the following command:
ssh-keygen -t rsa -C "[email protected]"Your public and private keys should be created under the ~/.ssh folder.
Don't forget to update your public key
Update your public key under the SSH section of your User Profile.
Configure the GIT LFS or CLI Client
To configure your Git LFS client, see Authenticating with SSH.
Control Your SSH Server Security
Controlling your SSH Server Security depends on your JFrog deployment:
- In a Cloud deployment, contact JFrog support, to make the required changes to your SSH Server Security.
- In a self-hosted deployment, you can control your SSH Server Security. Requires Platform Administrator permissions.
You can now control ciphers, MACs, signatures, and key exchange algorithms that are accepted by the Artifactory SSH server.
These values are left empty/null by default, and can have values delimited by comma (,) similarly to the correlating properties, and will be applied only if the corresponding artifactory.ssh.*.algorithms is not set.
Include Pattern System Properties for SSH Configuration
From Artifactory 7.18.6, the following constant values have been added as Include Only algorithms:
artifactory.ssh.cipher.algorithms=artifactory.ssh.key.exchange.algorithms=artifactory.ssh.mac.algorithms=artifactory.ssh.signature.algorithms=
Exclude Pattern System Properties for SSH Configuration
The Exclude patterns are:
artifactory.key.exchange.black.list=...artifactory.cipher.black.list=...
From Artifactory 7.18.6, the additional system properties were added to the exclude patterns.
artifactory.ssh.mac.black.list=...artifactory.ssh.signature.black.list=...
Supported Values By Algorithm Type for SSH Configuration
Note
Deprecated values are not loaded by default.
Algorithm Type | Values (loaded by default) | Deprecated (not loaded unless configured by name) |
|---|---|---|
Cipher Algorithms |
|
|
Key Exchange Algorithms |
|
|
Message Authentication Codes (MAC) Algorithms |
|
|
Signature Algorithms |
|
|