SCIM
JFrog provides Enterprise X and Enterprise+ customers with the ability to manage user access to the Platform through the System for Cross-domain Identity Management ( SCIM 2.0) protocol, which is designed to make managing user identities easier.
The SCIM protocol complements SSO (such as SAML or OAuth), which allows receiving updates regarding users and groups. To this end, the JFrog Platform implements the parts of SCIM 2.0 required for managing users and groups and the association between them. We have used Okta and Azure Active Directory (AD) to verify this capability.
Click here to learn more about managing users and groups with SCIM in the JFrog Platform.
SCIM Requirements
To implement the JFrog SCIM protocol, you need the following prerequisites.
- JFrog Platform 7.17.0 (and above)
- An identity service (e.g., Okta, Azure AD) with provisioning mode enabled
User Names
User names are the unique identifiers for users in Access. User names are case-insensitive.
Associating API Keys
If you want to associate API Keys with users added through SCIM, in the SAML SSO configuration in Access, verify that the option "Allow Created Users Access To Profile Page" is selected (for more information, see SAML SSO Configuration).
Implemented SCIM Endpoints
The JFrog Platform implements a subset of SCIM 2.0 endpoints that are required to support the scenarios for managing users and groups, and the association between them:
- Get user
- Find user
- Create user
- Update user (Currently, you cannot rename a user)
- Disable user
- Delete user
- Get group by filter
- Get group by name
- Create group
- Update group (Currently, you cannot rename a group)
- Patch group (Currently, you cannot rename a group)
- Delete group
For more information, see SCIM REST APIs.
Generate a Scoped Token for SCIM
WebUI Changes implemented in Artifactory 7.38.x and above
Security is now called Authentication Providers. All the relevant text and images on this page have been updated to reflect this change.
To implement SCIM with any identity service, you will need to generate an admin access token in the JFrog Platform, and then use that token in the identity service setup. The actions granted to this token are system:identities:r,w,d; whereby the following rules apply:
- Read, write, delete on users and groups only
- It is not possible to regenerate another token
To generate a scoped token via REST API:
Use the Create Token REST API to create a token with the necessary scope. For example:
curl -H "Authorization: Bearer <admin_token>" -X POST -d 'scope=system:identities:r,w,d' -d 'expires_in=4000' -d 'username=scim_admin' "<jfrog_platform_url>/access/api/v1/tokens"To generate a scoped token via the JFrog Platform WebUI:
-
In the JFrog Platform, navigate to Administration | Authentication | SCIM.
This displays the SCIM Configurations window.
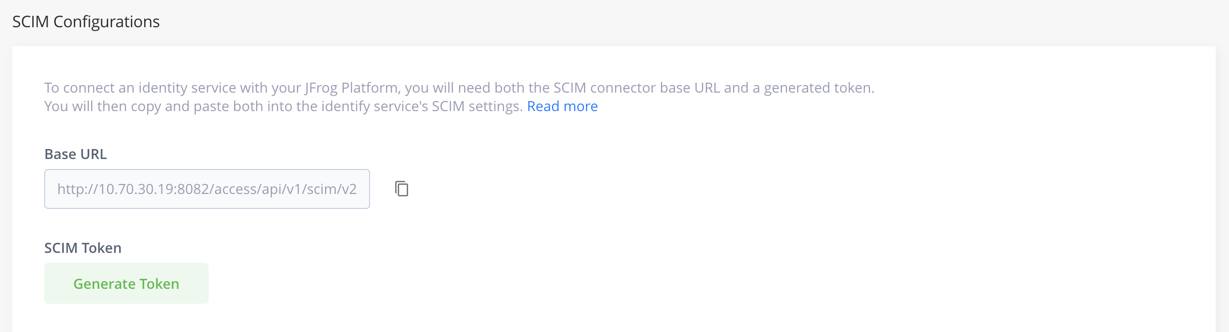
To connect an identity service with your JFrog Platform, you will need both the SCIM connector base URL and a generated token.
-
Click the copy button next to the URL and paste it into the identify service's SCIM settings.
-
Under Expiration time, select the time you would like your token to expire at from the drop-down menu: the default time is 1 year, which can be set or changed through the Access Configuration YAML file. You can select from set times, or select custom to define an expiry time.
-
Click the Generate Token button, and then click the Copy Token button, and paste the token into the identify service's SCIM settings.
Security Note
The token can be revoked at any time via the same page. As with any other security token, it is recommended to revoke the token and recreate it occasionally for security reasons. The identity service configuration should be adjusted accordingly.
- Go to the identity service you will be using with SCIM and follow the steps for that tool. We have used Okta and Azure Active Directory (AD) to verify this capability:
- Go to the identity service (for example, Okta, Azure AD, etc.), and select the relevant provisioning.
- Set the provisioning details according to the tool that you use.
Provisioning with Okta
-
Go to the Provisioning tab.
-
Set the options Create Users, Update User Attributes, and Deactivate Users to the To App settings.
-
Go to the Integration page.
-
Set the SCIM connector base URL to:
https://<Artifactory_URL>/access/api/v1/scim/v2 -
In the Unique identifier field for users, enter the userName.
-
In the Supported provisioning actions field, select all of the following options:
- Import New Users and Profile Updates
- Push New Users
- Push Profile Updates
- Push Group.
-
From the Authentication Mode dropdown, select HTTP Header and then paste the scoped token for SCIM that you created in the JFrog Platform (see Generate a Scoped Token for SCIM).
For more information, refer to the Okta tutorial how to configure the SCIM application.
Provisioning with Azure AD
Follow these guidelines by specifying :
- Tenant URL:
https://<Artifactory_URL>/access/api/v1/scim/v2. - Secret: Enter the scoped token from your JFrog Platform.
Note
The current JFrog Artifactory template app should not be used with Azure AD.
Updated about 2 months ago