Docker Repositories
Connect your Docker client to JFrog Artifactory using docker login or manual credentials so you can push and pull images from private Docker repositories.
Docker is a platform that lets you develop, ship, and run applications in environments called containers. Containers allow you to run applications consistently with all dependencies across different environments. Integrating Docker with JFrog Artifactory provides a secure, private, and powerful registry for your Docker images, giving you fine-grained control over your development and distribution pipeline. For more information, see the Docker documentation.
Note
Both Artifactory and Docker use the term "repository", but each uses it in a different way:
- Docker repository: A hosted collection of tagged images that creates the file system for a container.
- Docker registry: A host that stores Docker repositories.
- Artifactory repository: A hosted collection of Docker repositories, effectively a Docker registry that you can access transparently with the Docker client. An Artifactory repository for Docker images is also called a "Docker repository" in Artifactory documentation.
Artifactory does not limit the number of repositories you can create, so you can manage any number of Docker registries in Artifactory.
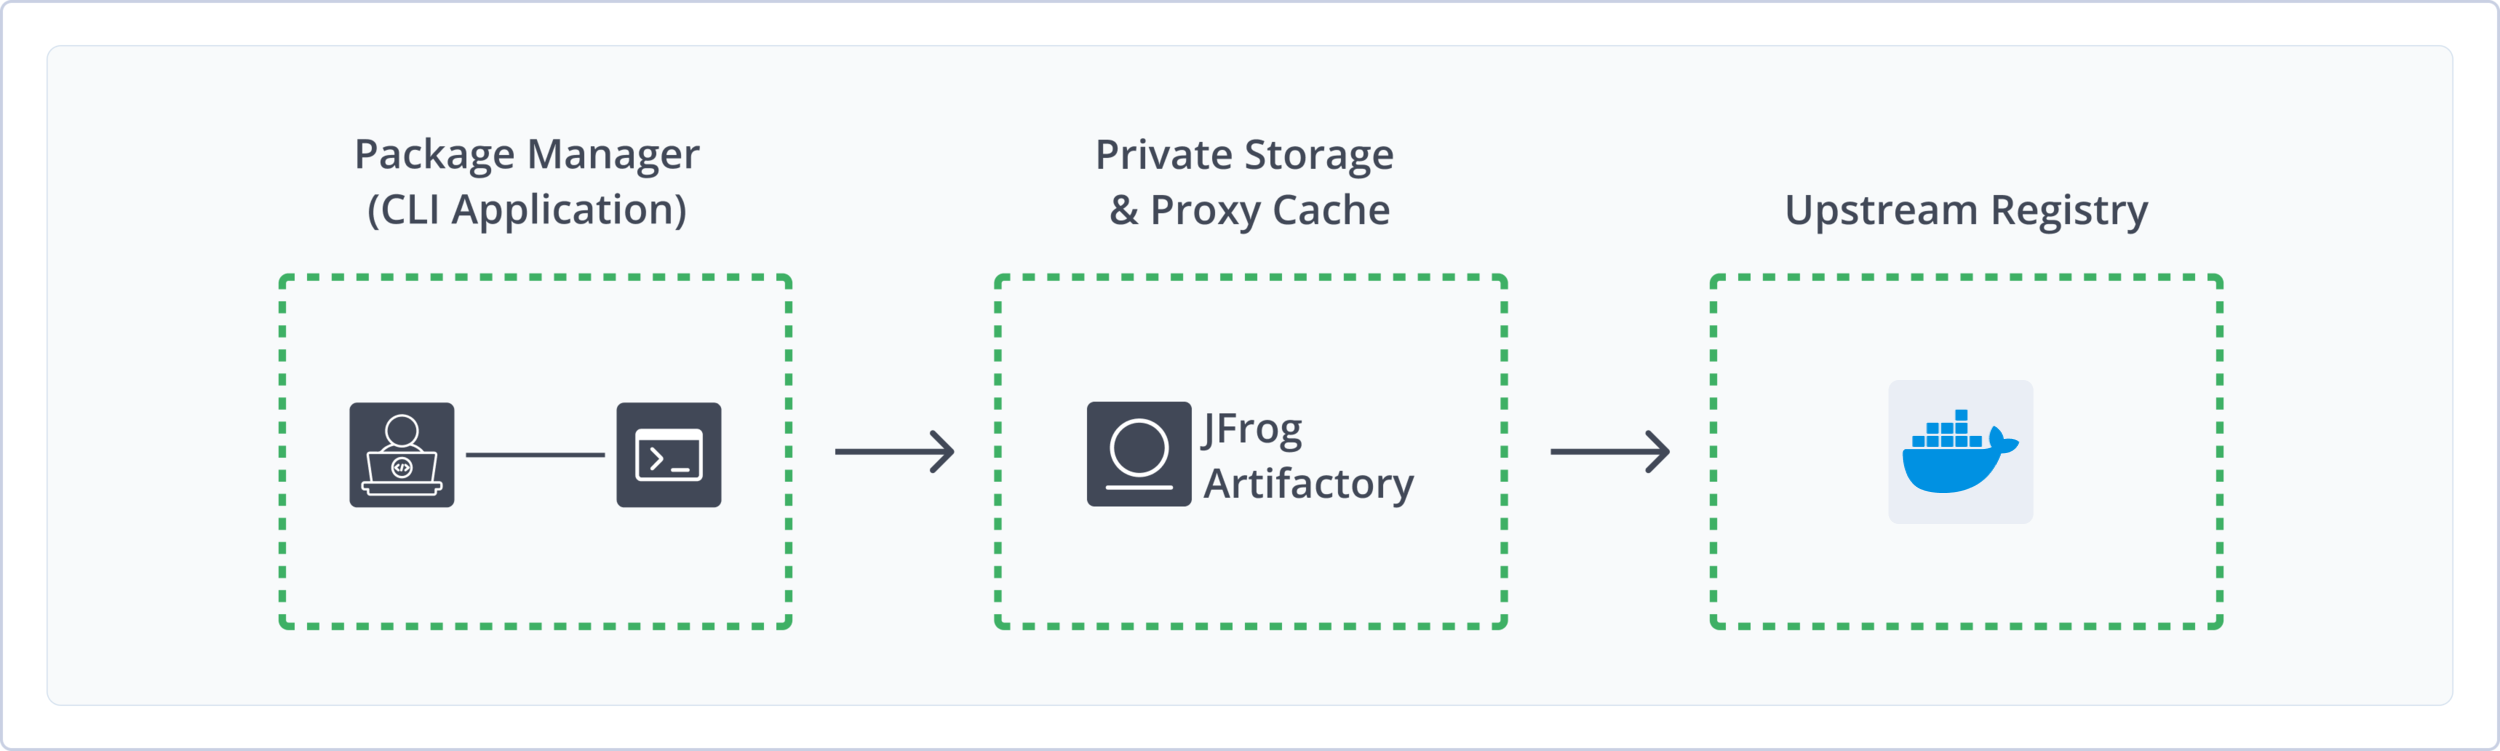
Using Artifactory as your Docker registry provides the following benefits:
- Secure and Private Registries: Host your Docker images in a secure environment with granular access control.
- Support for Docker Registry API: Artifactory supports the relevant Docker Registry API calls so that you can use the Docker client natively to access images through Artifactory.
- Unlimited Docker Hub Access: Artifactory provides SaaS users with unlimited, high-performance, unauthenticated access to Docker Hub. To avoid usage-based rate limits and to pull images from private repositories, authentication is recommended.
- OCI Support: Artifactory is OCI-compliant and supports OCI clients, enabling you to deploy and resolve OCI images in Docker registries.
- Local, Remote, and Virtual Repositories: Manage internal images, proxy public images from Docker Hub, and aggregate multiple registries under a single URL.
- CI/CD Integration: Seamlessly integrate with your continuous integration and delivery pipelines for automated builds, testing, and deployment.
- High Availability and Redundancy: Ensure reliable access to your Docker images with Artifactory's support for high-availability configurations.
Get Started with Docker
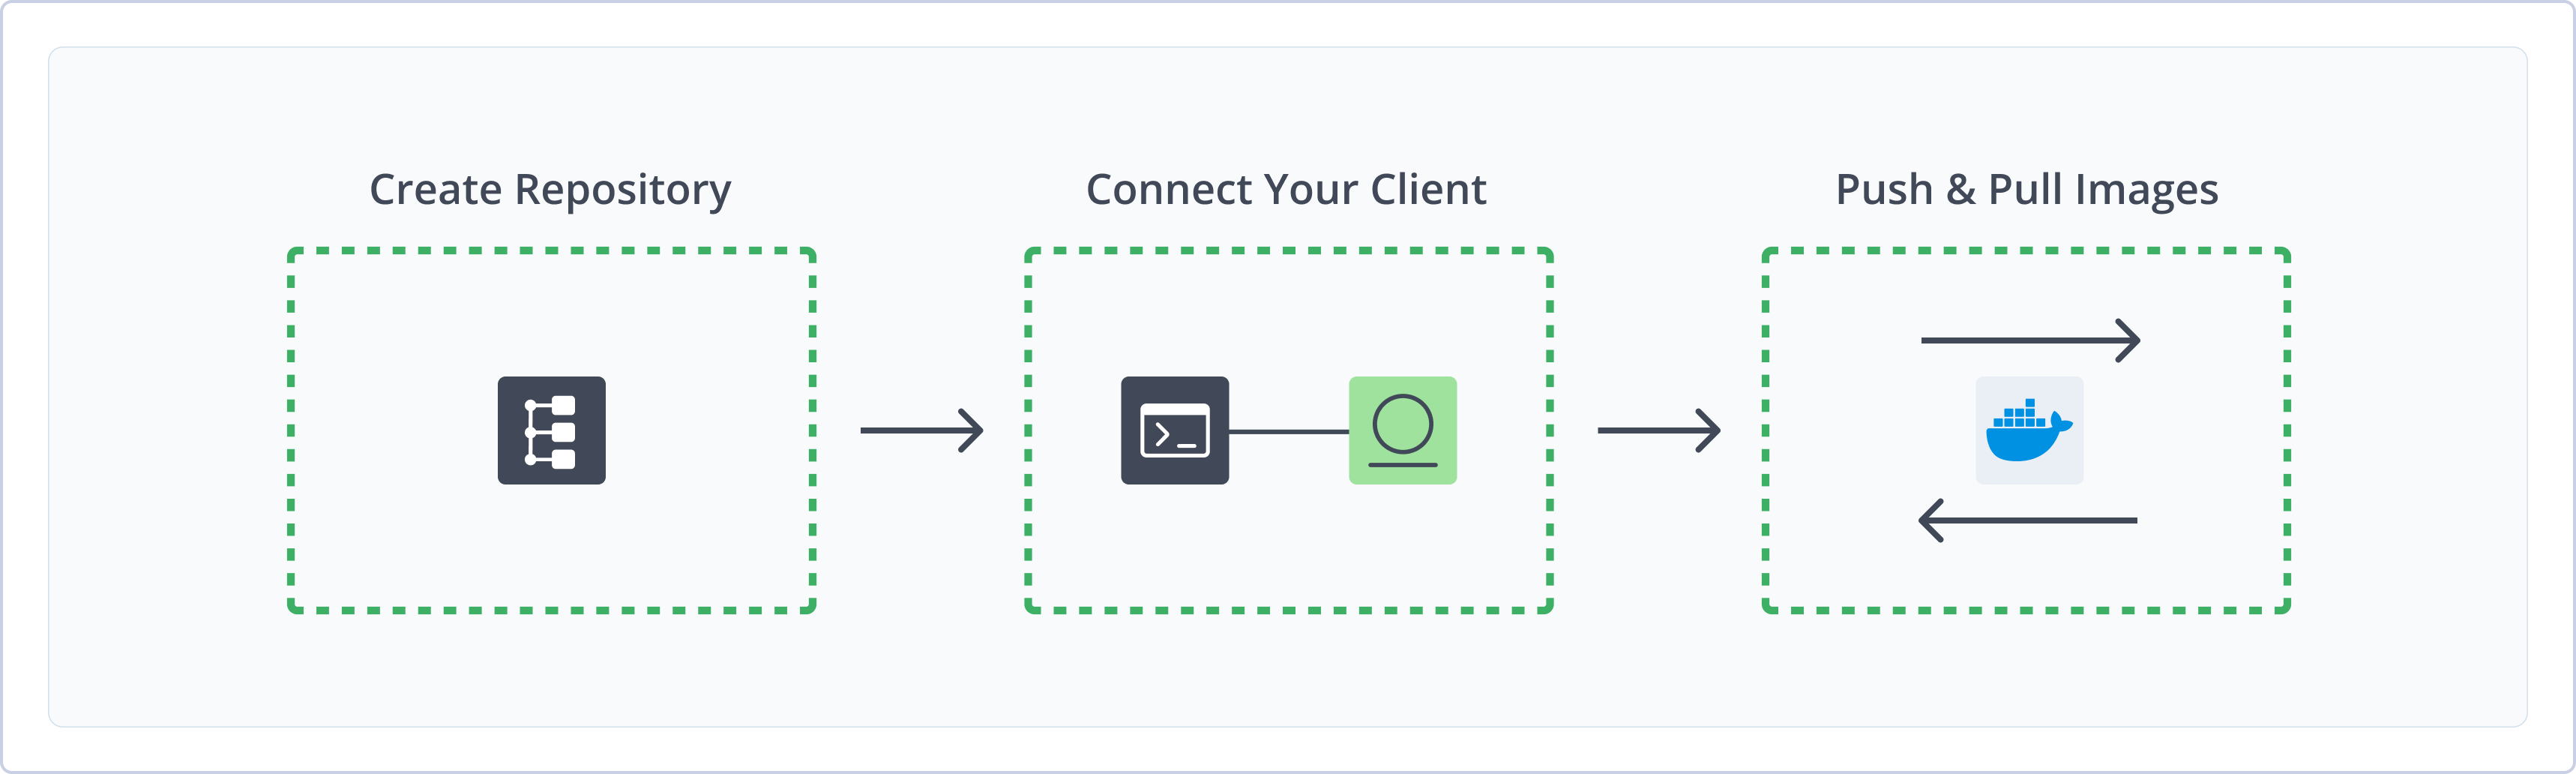
To get started working with Docker, complete the following main steps:
- Create a Docker Repository
- Connect your Docker Client to Artifactory
-
Publish and install OCI images using a supported client:
Create a Docker Repository
This topic describes how to create a Docker Repository. This is required before pushing and pulling Docker images. There are three primary types of repositories:
- Local repositories: Store and share first- and second-party packages with your organization
- Remote repositories: Download from any remote location, including external package registries or other Artifactory instances
- Virtual repositories: Aggregate remote and local repositories, enabling your organization to scale by providing a single URL to access multiple repositories and package types
For more information about JFrog repositories, see Repository Management.
Prerequisite: You need Admin or Project Admin permissions to create a Docker repository. If you don't have Admin permissions, the option will not be available.
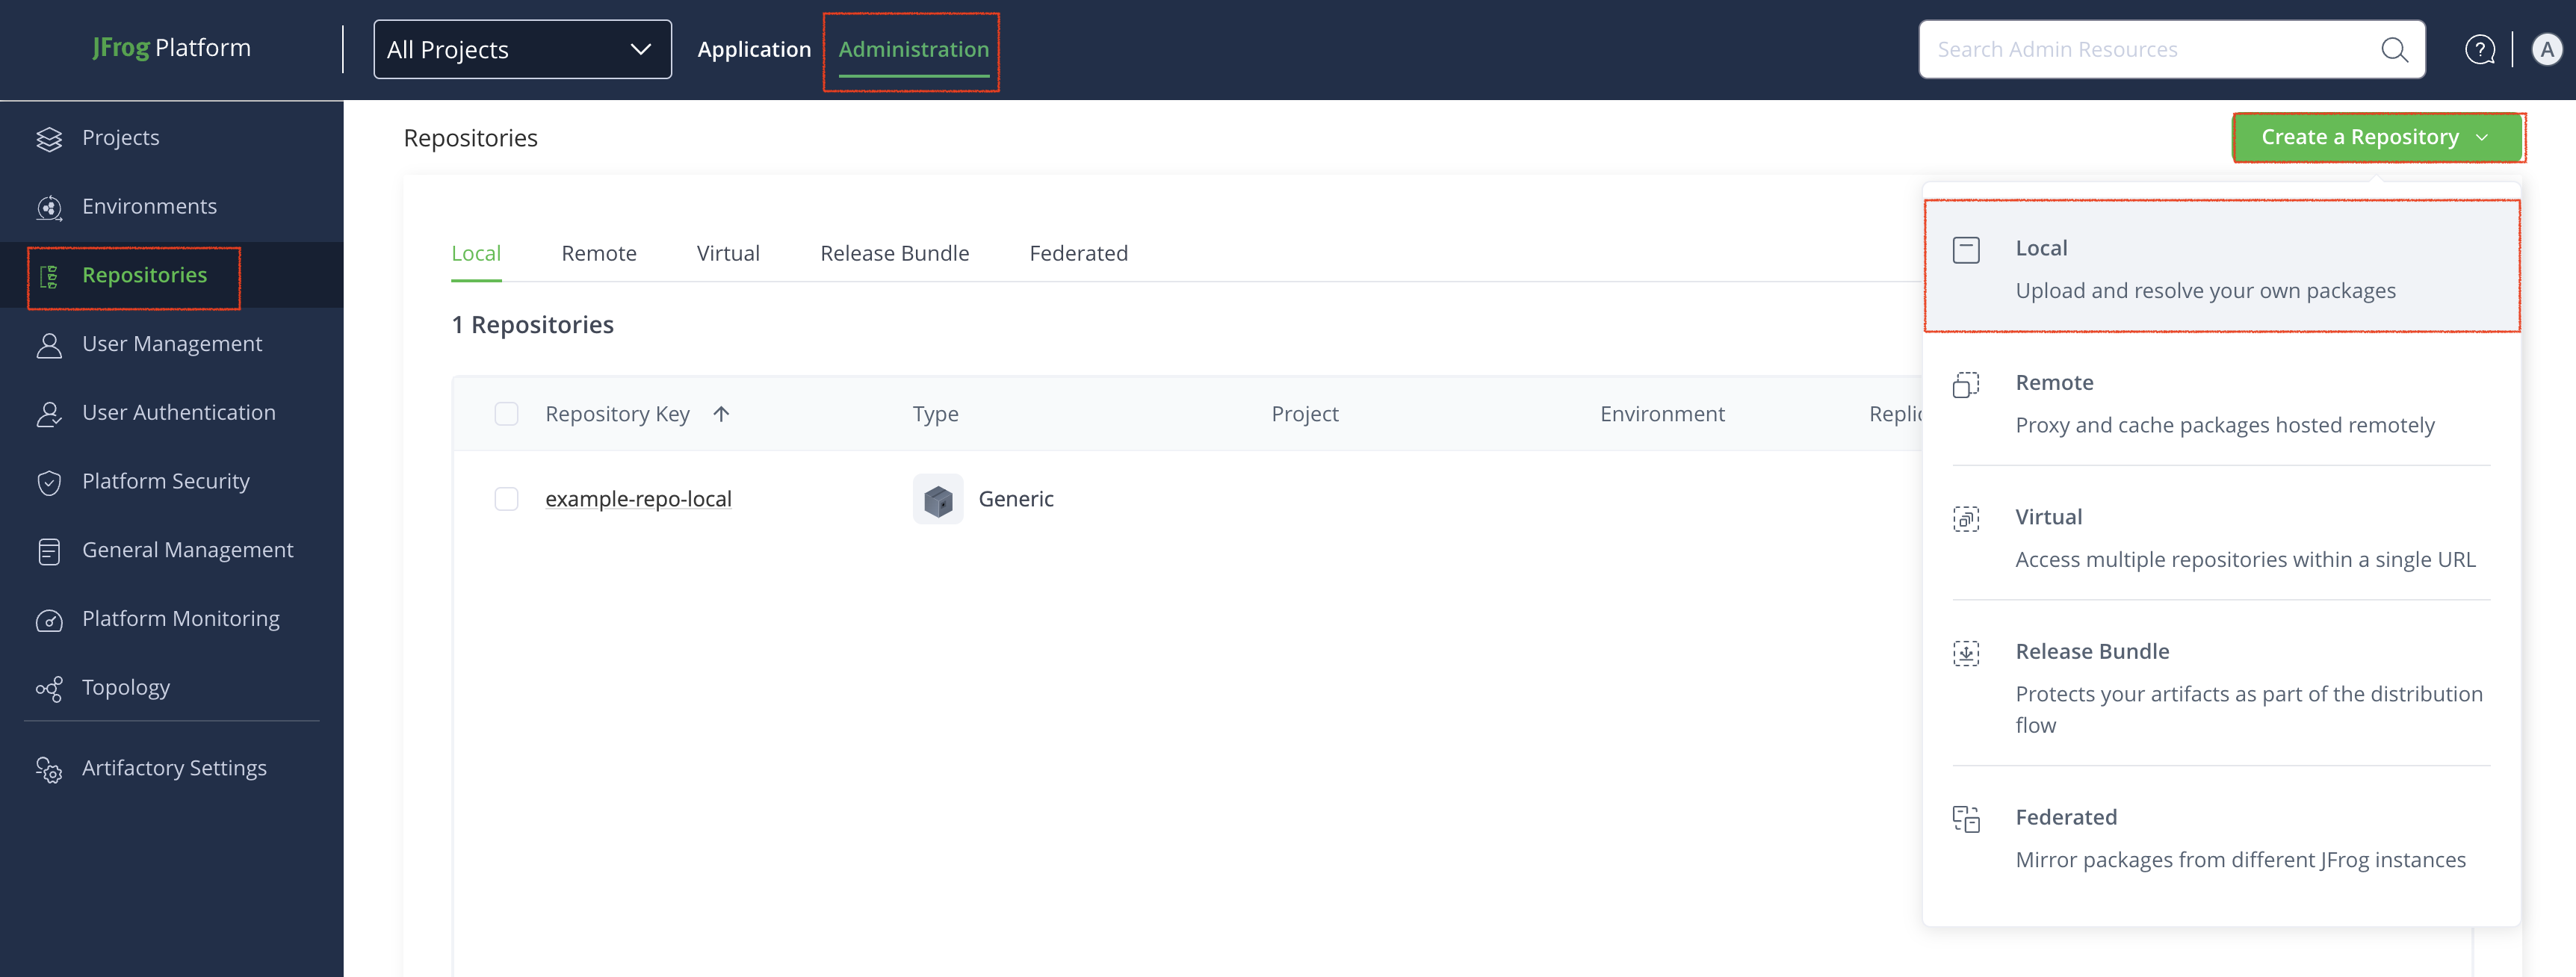
To create a Docker repository:
-
In the Administration tab, click Repositories > Create a Repository.
-
Select the type of repository you want to create: Local, Remote, or Virtual.
-
Select the Docker package type.
-
Configure the required fields for the repository:
Note
Do not use underscores in the repository name. Due to subdomain/DNS/hostname limitations, Docker cannot communicate with registries that have underscores in the name.
For example, do not use the name
docker_dev_local. Instead, usedocker-dev-localordocker.dev.local.-
For local repositories:
- In the Repository Key field, type a meaningful name for the repository. For example,
docker-dev-local. - In the Docker Settings section, set the API version to V2.
- Set the Max Unique Tags and Docker Tag Retention values. For more information, see Tag Retention Logic.
For more information on local repositories and all its possible settings, see Local Repositories.
- In the Repository Key field, type a meaningful name for the repository. For example,
-
For remote repositories, additionally verify the Repository URL and update it if needed.
Artifactory provides Cloud users with unlimited, high-performance, unauthenticated access to Docker Hub at
https://registry-1.docker.io/. To avoid rate limits and to pull images from private repositories, authenticate your Docker Hub connection by entering your credentials in the User Name and Password/Access Token fields. Self-Hosted deployments of Artifactory are subject to rate limits.For more information on Remote Repositories and all its possible settings, see Remote Repositories.
-
For virtual repositories, additionally select one or more local or remote Docker repositories to include in the virtual repository. Optionally, set a default deployment repository. For more information on virtual repositories and all its possible settings, see Virtual Repositories.
To learn how to configure virtual Docker repositories to pull images based on modification time, see Resolve Latest Docker Image.
-
-
Click Create Repository.
The repository is created and the Repositories window is displayed.
Related Topics
Connect your Docker Client to Artifactory
This section provides details on configuring Docker to work with Artifactory.
Prerequisite: Before connecting your Docker client to Artifactory, you must have an existing Docker repository in Artifactory. For more information, see Create a Docker Repository.
Note
Depending on your hosting framework, the URL for your Docker repository may vary. For examples of different URL formats by hosting framework and method, see Docker Repository URL Formats.
To connect your Docker client to Artifactory:
Follow the instructions for one of the supported clients:
Docker CLI
The following topics describe how to configure and use the Docker CLI with Artifactory:
- Connect Docker CLI to Artifactory
- Push Docker Images with Docker CLI
- Pull Docker Images with Docker CLI
Connect Docker CLI to Artifactory
You can configure the Docker CLI to work with Artifactory using two methods.
To connect Docker CLI to Artifactory:
Logged-In and Anonymous Users: You can work with Docker and Artifactory as either a logged-in user or as an anonymous user without logging in. To work with Artifactory using Anonymous Access, configure that access under Administration > Security > General. For more information, see Allow Anonymous Access.
Connect Docker to Artifactory using docker login
docker loginTo connect Docker to Artifactory using docker login:
-
Run the following command:
docker login <JFrogPlatformURL>Where:
<JFrogPlatformURL>: The URL of your JPD, without the protocol schema
For example:
docker login company.jfrog.io
Note
You can also use JFrog Set Me Up to copy the snippet populated with your token and environment. For more information, see Use Artifactory Set Me Up for Configuring Package Manager Clients.
Connect Docker to Artifactory by Manually Setting Credentials
You can manually set your Docker credentials to authenticate in automated workflows, or if you are using Docker V1. For more information, see Use Docker V1.
You can copy your authentication snippet from Set Me Up, or you can retrieve credentials directly from Artifactory by running this command:
curl -u<USERNAME>:<PASSWORD> "https://<JFrogPlatformURL>/artifactory/api/docker/<REPO_NAME>/<V1|V2>/auth"Where:
<USERNAME>: Your Artifactory username<PASSWORD>: Your Artifactory password<JFrogPlatformURL>: The URL of your JPD<REPO_NAME>: The name of the target repository<V1|V2>: The version of Docker you are using, eitherV1orV2.
To manually set Docker credentials:
-
Add the following snippet to your
~/.docker/config.jsonfile:{ "auths": { "https://<JFrogPlatformURL>" : { "auth": "<TOKEN>", "email": "<EMAIL>" } } }Where:
<JFrogPlatformURL>: The URL of your JFrog Platform<TOKEN>: Your Base64-encoded Artifactory username and password<EMAIL>: The email address associated with your Artifactory account
For example:
{
	"auths": {
		"https://company.jfrog.io" : {
			"auth": "YWRtaW46QVA1N05OaHZTMnM5Qk02RkR5RjNBVmF4TVFl",
			"email": "[email protected]"
		}
	}
}
Note
You can also use JFrog Set Me Up to copy the snippet populated with your token and environment. For more information, see Use Artifactory Set Me Up for Configuring Package Manager Clients.
Next steps:
Push Docker Images with Docker CLI
You can use Docker commands to push multiple kinds of images to Artifactory:
Starting from Artifactory 7.21.2, you can also push multi-architecture images with Docker BuildX. For more information, see Push Multi-Architecture Docker Images with BuildX.
Push Single-Architecture Images with Docker CLI
-
Tag your image by running the following command:
docker tag <IMAGE_ID> [JFrogPlatformURL]/<REPO_NAME>/<IMAGE>:<TAG>Where:
<IMAGE_ID>: The existing image ID[JFrogPlatformURL]: The URL of your JPD, without the protocol schema<REPO_NAME>: The name of the target repository<IMAGE>: The image name<TAG>: The tags you want to apply to the image
For example:
docker tag a1b2c3d4e5f6 company.jfrog.io/docker-local/froggy-app:v1.0.0 -
Run the following command to push the image to Artifactory:
docker push [JFrogPlatformURL]/<REPO_NAME>/<IMAGE>:<TAG>Where:
[JFrogPlatformURL]: The URL of your JPD, without the protocol schema<REPO_NAME>: The name of the target repository<IMAGE>: The image name<TAG>: The tags you want to apply to the image
For example:
docker push company.jfrog.io/docker-local/froggy-app:v1.0.0
Note
You can also use JFrog Set me up to copy the snippet populated with your token and environment. For more information, see Use Artifactory Set Me Up for Configuring Package Manager Clients.
Push Multi-Architecture Images with Docker CLI
You can push multi-architecture Docker images, using a manifest list file, or fat manifest, which references image manifests for platform-specific versions of an image.
Starting from Artifactory 7.21.2, you can also push multi-architecture images with Docker BuildX. For more information, see Push Multi-Architecture Docker Images with BuildX.
-
For each architecture you want to include in the final multiple-architecture image, build the image by running this command:
docker build -t [JFrogPlatformURL]/<REPO_NAME>/<IMAGE>:<TAG> --build-arg ARCH=<ARCHITECTURE> <DOCKER_FILE>Where:
[JFrogPlatformURL]: The URL of your JPD, without the protocol schema<REPO_NAME>: The name of the repository where the image is located<IMAGE>: The image name<TAG>: The tags you want to apply to the image<ARCHITECTURE>: The architecture you want to build for<DOCKER_FILE>: The path to the Docker file
For example:
docker build -t company.jfrog.io/docker-local/froggy-app:v1.0.0 --build-arg ARCH=amd64 . -
For each image you built, push it to Artifactory by running this command:
docker push [JFrogPlatformURL]/<REPO_NAME>/<IMAGE>:<TAG>Where:
[JFrogPlatformURL]: The URL of your JPD, without the protocol schema<REPO_NAME>: The name of the target repository<IMAGE>: The image name<TAG>: The tags you want to apply to the image
For example:
docker push company.jfrog.io/docker-local/froggy-app:v1.0.0 -
Run the following command to create a local manifest file, referencing all the platform-specific images you just built:
docker manifest create \
  [JFrogPlatformURL]/<REPO_NAME>/<MULTI_IMAGE>:<TAG> \
  --amend [JFrogPlatformURL]/<REPO_NAME>/<PLATFORM_IMAGE1>:<TAG> \
  --amend [JFrogPlatformURL]/<REPO_NAME>/<PLATFORM_IMAGE2>:<TAG>
Where:
[JFrogPlatformURL]: The URL of your JPD, without the protocol schema<REPO_NAME>: The name of the target repository<MULTI_IMAGE>: The name of the multiple architecture image you want to build<TAG>: The tags you want to apply to the image<PLATFORM_IMAGE>: The name of the platform-specific image you built
Note
Add a new
--amendfor each image you want to include in the multi-architecture image.
For example:
docker manifest create \
  company.jfrog.io/docker-local/multiarch-image:latest \
  --amend company.jfrog.io/docker-local/froggy-app:v1.0.0 \
--amend company.jfrog.io/docker-local/swamp-app:v2.2.1-
Run the following command:
docker manifest push [JFrogPlatformURL]/<REPO_NAME>/<MULTI_IMAGE>:<TAG>Where:
[JFrogPlatformURL]: The URL of your JPD, without the protocol schema<REPO_NAME>: The name of the target repository<MULTI_IMAGE>: The multi-architecture image name<TAG>: The tags you want to apply to the image
For example:
docker manifest push company.jfrog.io/docker-local/multiarch-image:latest
Multi-Architecture Tagging
Starting from Artifactory version 7.21.2, when you push a platform-specific Docker image, the server automatically adds a second descriptive tag that includes the operating system.
For example, when you push
my-app:1.0-amd64, Artifactory publishesmy-app:1.0-linux-amd64.
Push Multi-Architecture Docker Images with BuildX
Docker Buildx is a plugin for the Docker CLI that extends the core docker build command with advanced features powered by Moby BuildKit. You can use BuildX to easily build and push multi-architecture images with a single command.
To build and push multi-architecture images with BuildX:
-
Run this command to open a new builder instance that you can use to build images for multiple architectures:
docker buildx create --use -
Build and publish multiple images by running the following command:
docker buildx build --platform <ARCHITECTURES> -t [JFrogPlatformURL]/<REPO_NAME>/<IMAGE>:<TAG> . --pushWhere:
<ARCHITECTURES>: A comma-separated list of the operating system and CPU combinations you want to build[JFrogPlatformURL]: The URL of your JPD, without the protocol schema<REPO_NAME>: The repository where the image is located<IMAGE>: The image name<TAG>: The tags identifying the version of the image you want to pull
For example:
docker buildx build --platform linux/amd64,linux/arm64,linux/arm/v7,linux/s390x,linux/ppc64le -t company.jfrog.io/docker-local/froggy-app:v1.0.0 . --push
Pull Docker Images with Docker CLI
Run the following command:
docker pull [JFrogPlatformURL]/<REPO_NAME>/<IMAGE>:<TAG>Where:
[JFrogPlatformURL]: The URL of your JPD, without the protocol schema<REPO_NAME>: The repository where the image is located<IMAGE>: The image name<TAG>: The tags identifying the version of the image you want to pull
For example:
docker pull company.jfrog.io/docker-local/froggy-app:v1.0.0Note
You can also use JFrog Set me up to copy the snippet populated with your token and environment. For more information, see Use Artifactory Set Me Up for Configuring Package Manager Clients.
Podman
The following topics describe how to configure and use Podman with Artifactory:
Connect Podman to Artifactory
Podman, or the Pod Manager, is a tool for managing, developing, and running OCI images on Linux systems. It is daemonless, which makes it more accessible and less vulnerable to security breaches than other clients. You can configure Podman to work with Artifactory using two methods:
Logged in vs. Anonymous User: You can work with Podman and Artifactory as either a logged-in user, or as an anonymous user without logging in. To work with Artifactory using Anonymous Access, configure that access under Admin > Security > General. For details, refer to Allow Anonymous Access.
Connect Podman to Artifactory Using podman login
podman login-
Run the following command:
podman login [JFrogPlatformURL]Where:
[JFrogPlatformURL]: The URL of your JPD, without the protocol schema
For example:
podman login company.jfrog.io -
Enter your Artifactory credentials.
Note
You can also use JFrog Set me up to copy the snippet populated with your token and environment. For more information, see Use Artifactory Set Me Up for Configuring Package Manager Clients.
Connect Podman to Artifactory Manually
By default, Podman looks for authentication information in ${XDG_RUNTIME_DIR}/containers/auth.json. If no valid credentials are found in the file, Podman falls back to the ~/.docker/config.json file. You can also specify a different authentication file path by using the --authfile flag with your Podman commands.
To manually connect Podman to Artifactory:
Add the following snippet to the ${XDG_RUNTIME_DIR}/containers/auth.json or ~/.docker/config.json file:
{
	"auths": {
		"[JFrogPlatformURL]" : {
			"auth": "<AUTH_TOKEN>",
			"email": "<EMAIL>"
		}
	}
}
Where:
[JFrogPlatformURL]: The URL of your JPD, without the protocol schema<AUTH_TOKEN>: Your Base64-encoded credentials<EMAIL>: The email address you use to access your JFrog account
For example:
{
	"auths": {
		"company.jfrog.io" : {
			"auth": "ZGVtb191c2VyOnNhbXBsZV9hdXRoX3Rva2VuXzEyMzQ1QUJDREVGRg==",
			"email": "[email protected]"
		}
	}
}Note
You can also use JFrog Set me up to copy the snippet populated with your token and environment. For more information, see Use Artifactory Set Me Up for Configuring Package Manager Clients.
Next steps:
Push Docker Images with Podman
To tag and push Docker images with Podman:
-
Tag your image by running the following command:
podman tag <IMAGE_ID> [JFrogPlatformURL]/<REPO_NAME>/<IMAGE>:<TAG>Where:
<IMAGE_ID>: The existing image ID[JFrogPlatformURL]: The URL of your JPD, without the protocol schema<REPO_NAME>: The name of the repository where the image is located<IMAGE>: The image name<TAG>: The tags you want to apply to the image
For example:
podman tag a1b2c3d4e5f6 company.jfrog.io/docker-local/froggy-app:v1.0.0 -
Run the following command to push the image to Artifactory:
podman push [JFrogPlatformURL]/<REPO_NAME>/<IMAGE>:<TAG>Where:
[JFrogPlatformURL]: The URL of your JPD, without the protocol schema<REPO_NAME>: The name of the target repository<IMAGE>: The image name<TAG>: The tags you want to apply to the image
Tip
Optionally, you can add the
-f=ociflag to set the image format to OCI.
For example:
podman push [JFrogPlatformURL]/docker-local/froggy-app:v1.0.0 -f=ociPull Docker Images with Podman
Run the following command:
podman pull [JFrogPlatformURL]/<REPO_NAME>/<IMAGE>:<TAG>Where:
[JFrogPlatformURL]: The URL of your JPD, without the protocol schema<REPO_NAME>: The repository where the image is located<IMAGE>: The image name<TAG>: The tags identifying the version of the image you want to pull
For example:
podman pull company.jfrog.io/docker-local/froggy-app:v1.0.0Note
You can also use JFrog Set me up to copy the snippet populated with your token and environment. For more information, see Use Artifactory Set Me Up for Configuring Package Manager Clients.
Docker Limitations in Artifactory
The following are the limitations of Docker in Artifactory:
-
Key Length Limits: Key length limitations exist for Docker OCI and Helm OCI repositories to ensure proper operation and accessibility of repositories using the Docker subdomain method on cloud platforms:
- Hard Limit: The maximum allowable length for repository keys is 63 characters. This limit is enforced strictly and cannot be exceeded.
- Soft Limit: The soft limit is calculated as 63 - (length of server name + 1). This means the effective length for the repository key may be shorter, depending on the combined length of the server name. For example, if the server name is 'myserver', which is 8 characters, then the Soft Limit is 63 - (8+1), which is 54.
You will receive a warning when creating a repository or after creating a repository via API. You can create the repository, but no DNS record will be created, making the repository inaccessible unless you manage DNS records internally.
If you are migrating from a self-hosted environment to the cloud platform, existing repositories with keys equal to or exceeding 63 characters may cause access issues.
-
Docker client limitations:
- You cannot use a context path when providing the registry path, for example
localhost:8082/artifactoryis invalid - Docker will only send basic HTTP authentication when working against an HTTPS host or when using the insecure registry flag
Artifactory offers solutions to these limitations with reverse proxies for self-hosted deployments, and out-of-the-box support for Docker repositories in cloud deployments of Artifactory as of version 5.8.
- You cannot use a context path when providing the registry path, for example