Chef Repositories
The JFrog Artifactory integration with Chef Cookbook allows you to manage Chef collections in Artifactory. Cookbook is an open-source platform that enables you to automate IT processes such as provisioning, application deployment, orchestration, and more. For more information, see Chef documentation.
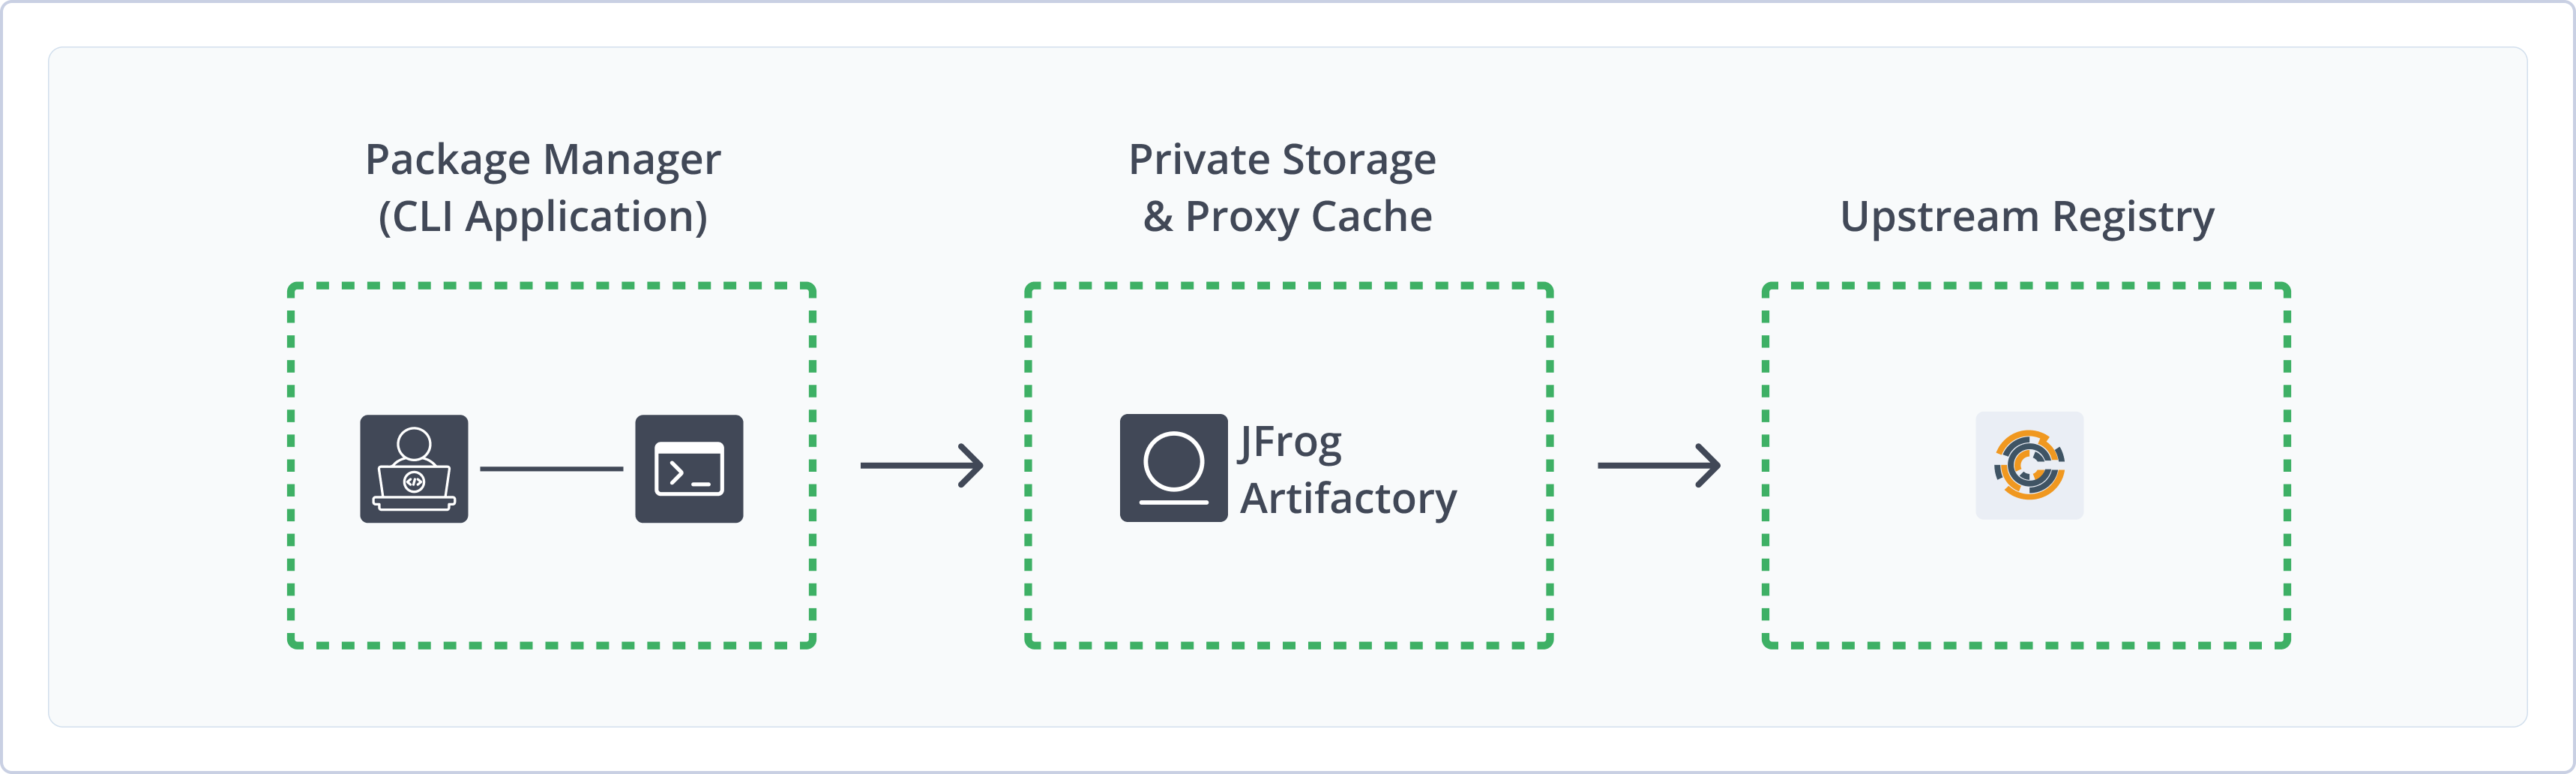
Artifactory support for Chef Cookbook provides:
- Robust Metadata Capabilities: Calculate metadata for cookbooks hosted in Artifactory's local repositories.
- Unified Repository Management: Consolidate all your Chef repositories in Artifactory as a single source of truth. Set up secure local repositories, access cached versions of remote registries like Chef supermarket, and create a single point of access for all sources with virtual repositories.
- Support for Knife and Berkshelf: Natively use Chef Workstation CLI tools to deploy, remove, and manage packages in Artifactory.
- Fine-Grained Access Control: Manage user and group permissions for your Chef repositories, giving access based on projects or development teams.
Note
Chef uses the concept of a Chef repository to store their own data objects on a workstation. This is different from the use of "repository" in Artifactory.
Chef provides an official "supermarket" for cookbook packages, so Chef repositories in Artifactory are actually Chef supermarkets in Chef terminology. This page refers to Chef Cookbook repositories and Chef supermarkets interchangeably.
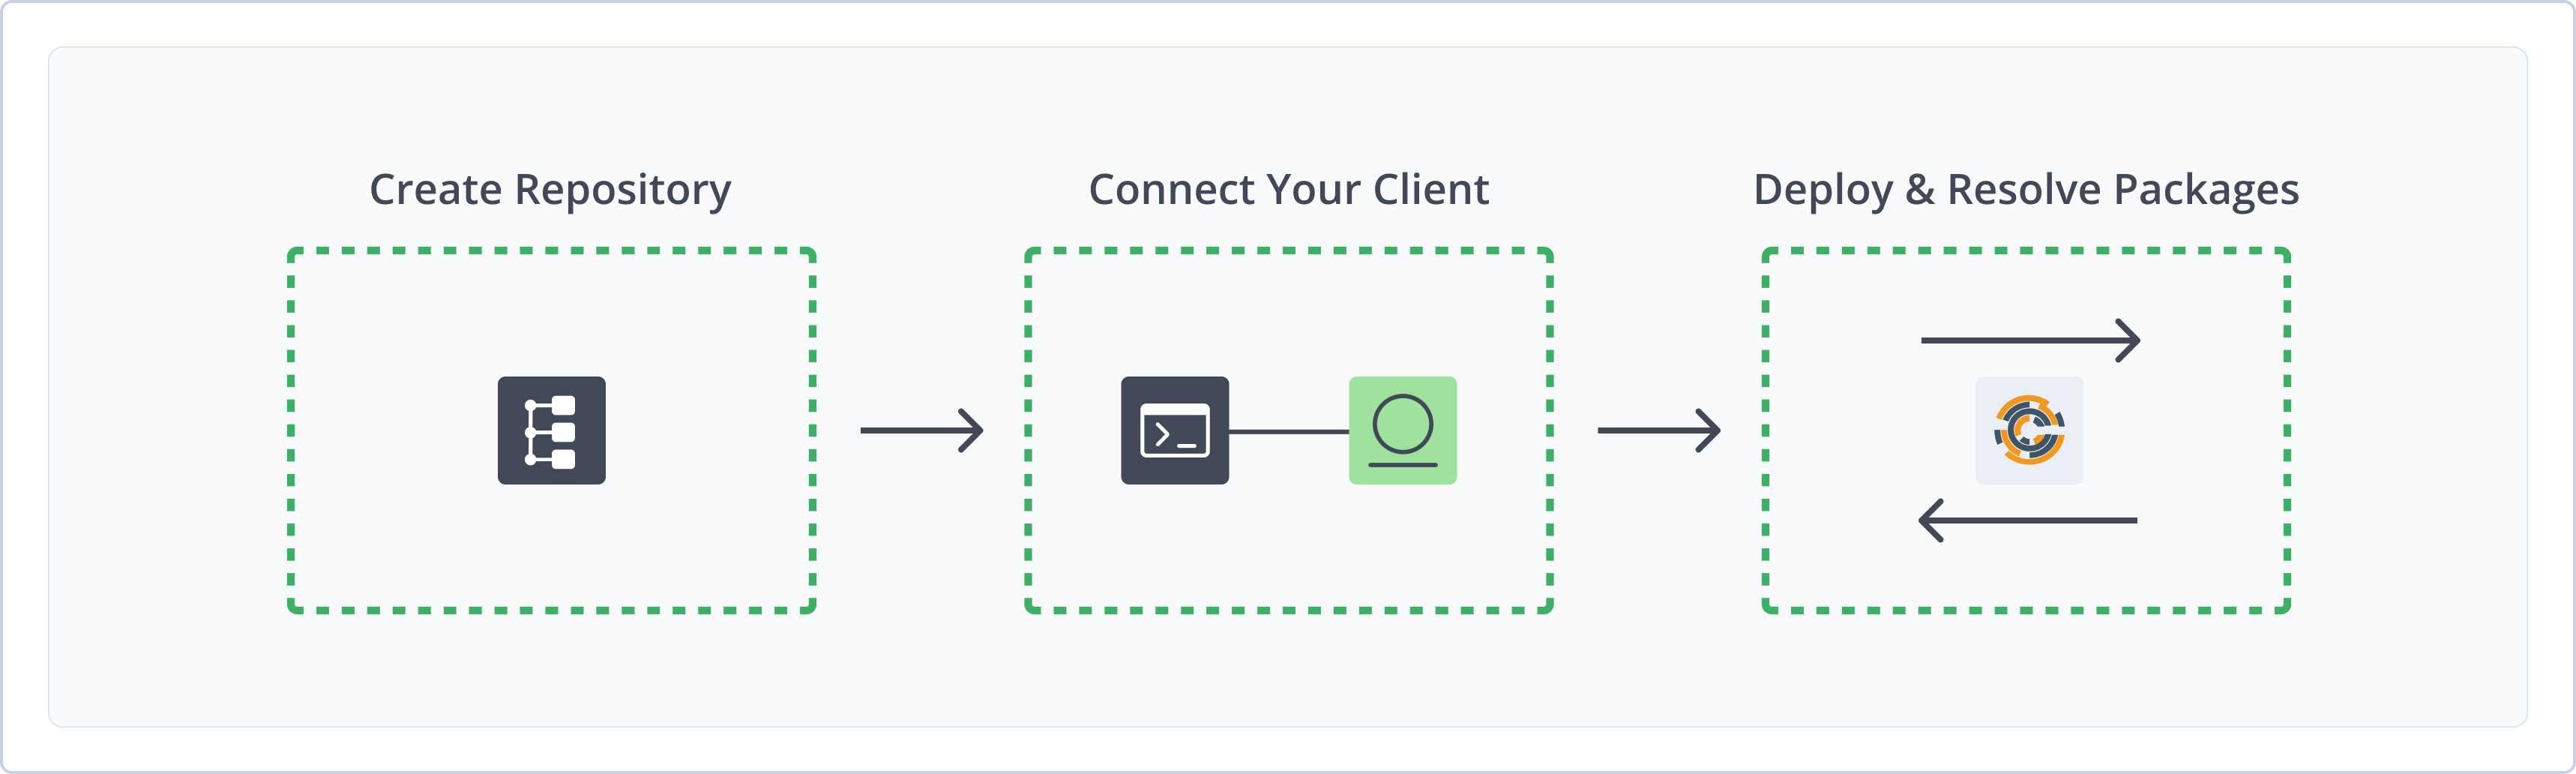
Get Started with Chef
To get started working with Chef, complete the following main steps:
- Create a Chef Repository
- Connect Chef client to Artifactory:
- Deploy and Resolve cookbooks
Create a Chef Repository
This topic describes how to create a Chef Repository. This is required before publishing and installing Chef packages. There are three primary types of repositories:
- Local repositories: Store and share first- and second-party packages with your organization
- Remote repositories: Download from remote locations, including external package registries or other Artifactory instances
- Virtual repositories: Aggregate remote and local repositories, enabling your organization to scale by providing a single URL that provides access to multiple repositories and types
For more information on JFrog repositories, see Repository Management.
Prerequisite: You need Admin or Project Admin permissions to create a Chef repository. If you don't have Admin permissions, the option will not be available.
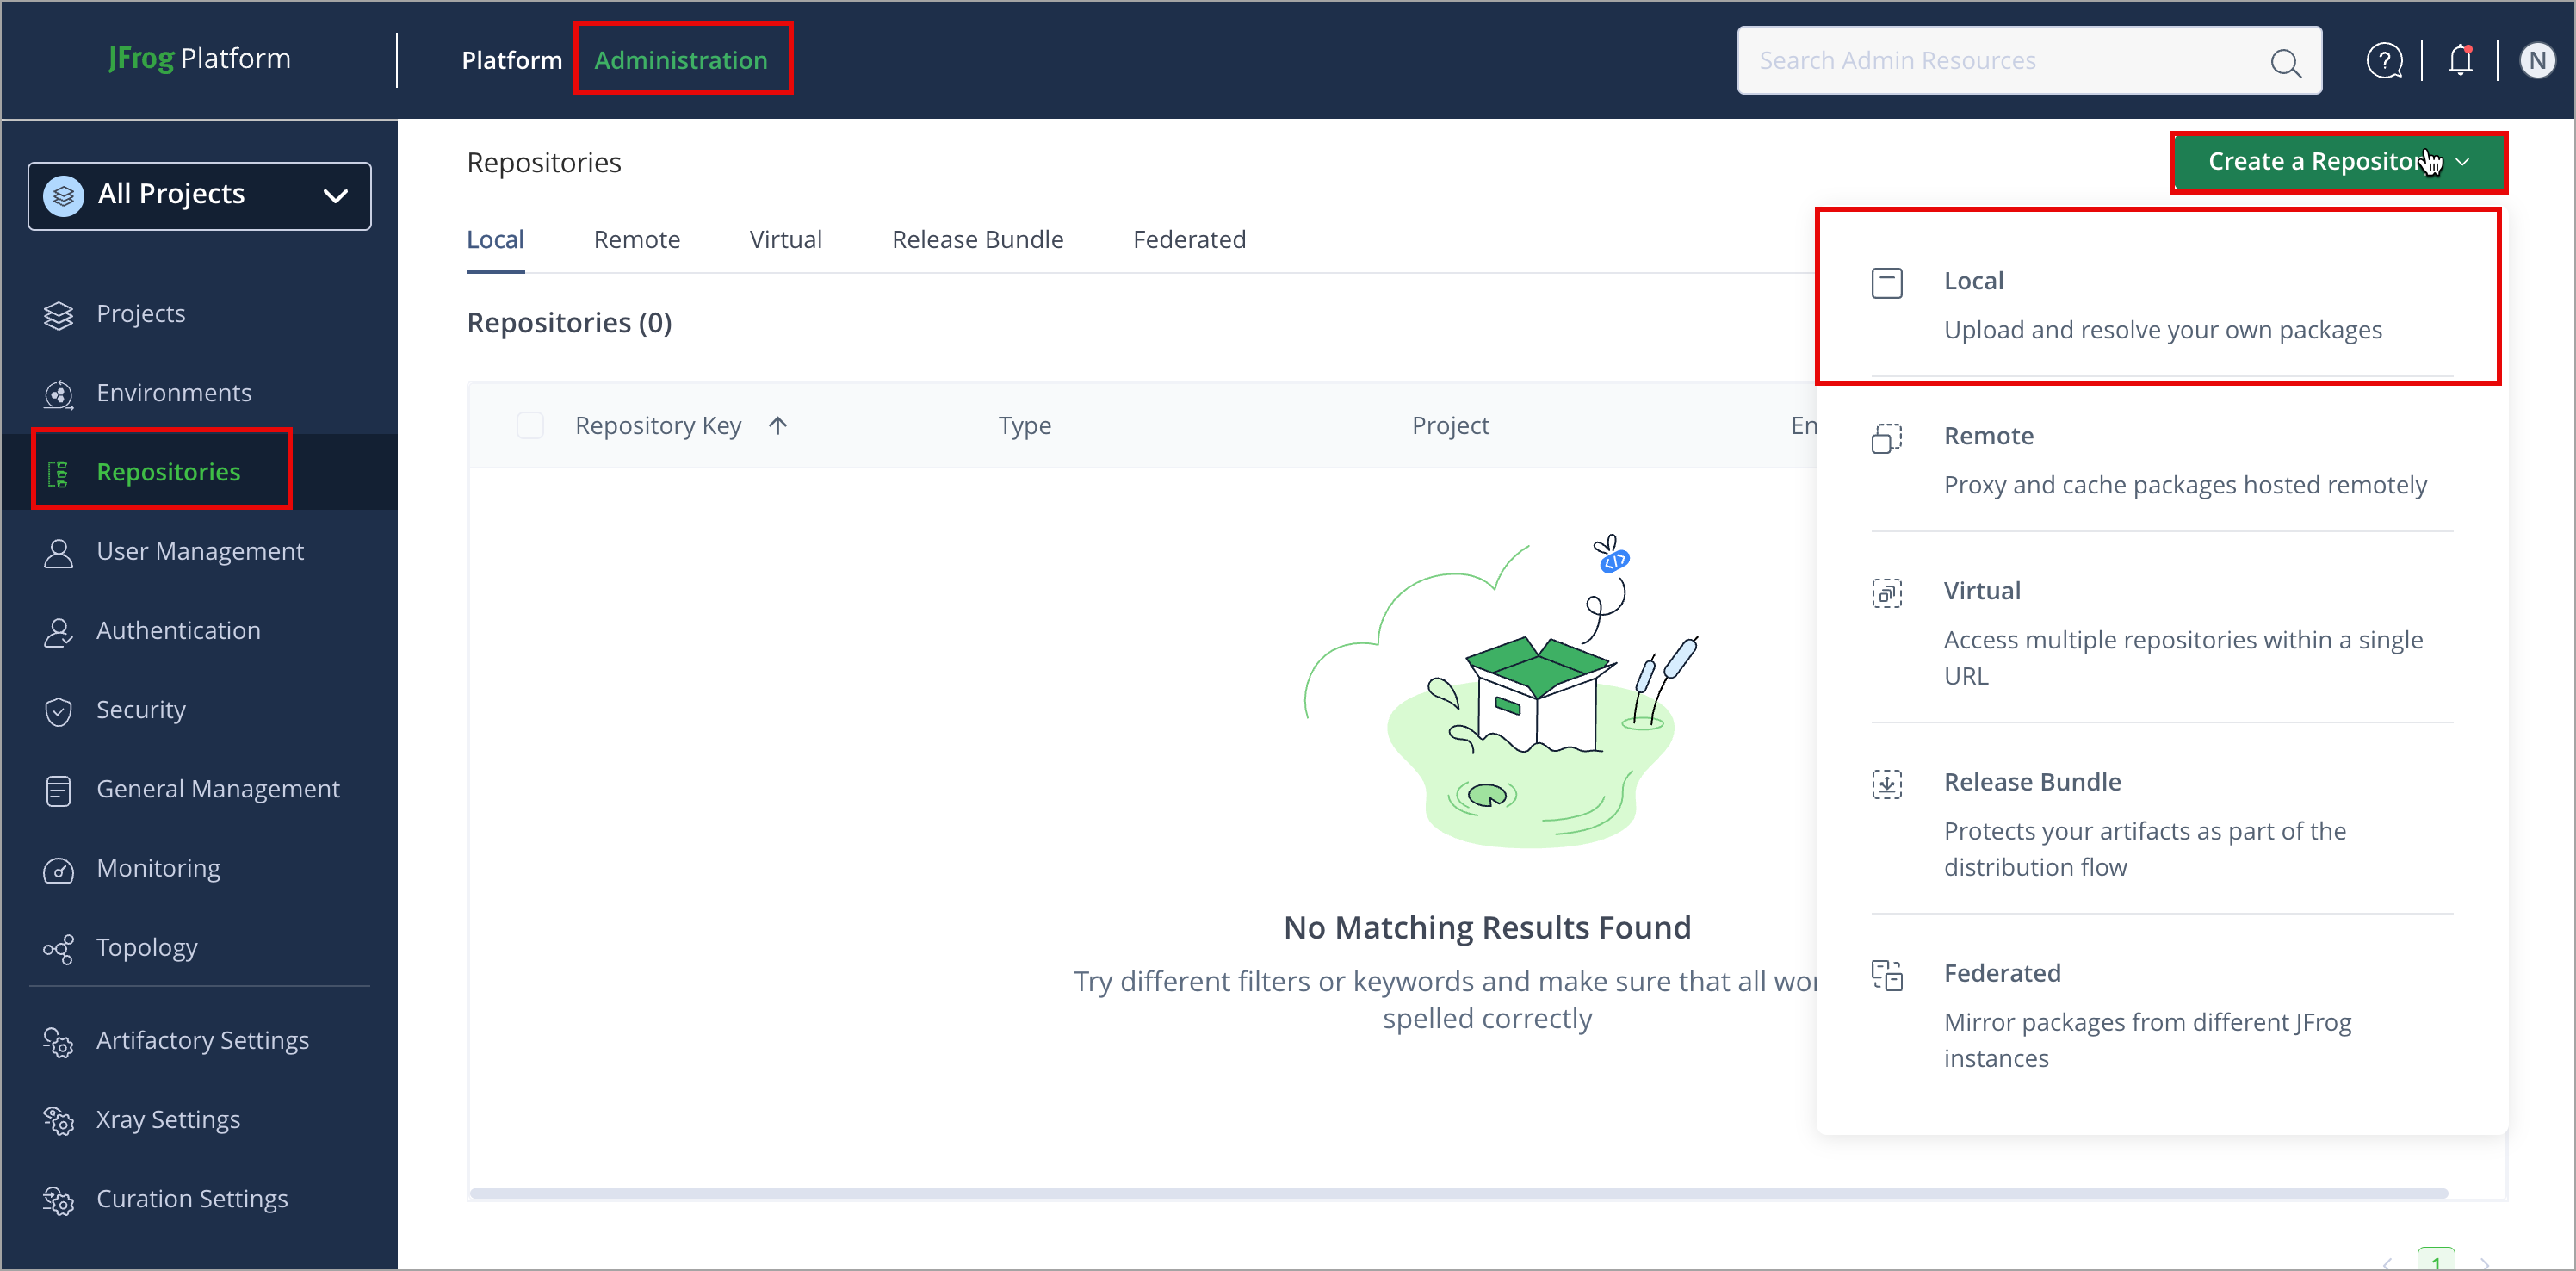
To create a Chef supermarket repository:
-
In the Administration tab, click Repositories > Create a Repository
-
Select the repository type you want to create: local, remote, or virtual.
-
Select the Chefpackage type.
-
Configure the required fields for the repository:
- For local repositories, in the Repository Key field, type a meaningful name for the repository. For example,
chef-local. For more information on local repositories and their settings, see Local Repositories. - For remote repositories, verify the Repository URL and update as needed. For example,
https://supermarket.chef.io. For more information on remote repositories and their settings, see Remote Repositories. - For virtual repositories, select one or more local or remote repositories to include in the virtual repository. For more information on virtual repositories and their settings, see Virtual Repositories.
- For local repositories, in the Repository Key field, type a meaningful name for the repository. For example,
-
Click Create Repository. The repository is created, and the Repositories window is displayed.
Connect Knife to Artifactory
The Knife command line is installed with Chef Workstation. After your Chef supermarket exists in Artifactory, configure Knife to use that supermarket as its default site so knife supermarket commands target Artifactory.
Prerequisites:
-
An existing Chef repository in Artifactory. For more information, see Create a Chef Repository.
-
Chef Workstation installed on your machine.
Note
When you access a Chef supermarket through Artifactory, prefix the repository URL with
api/chefin the path. This applies to all Knife commands. For example:
https://<JFrogPlatformURL>/artifactory/api/chef/<repository_key>
To connect Knife to Artifactory:
-
If your Artifactory instance requires authentication, install the
knife-artplugin:chef gem install knife-artFor more information about authenticating with Chef, see Work with Artifactory and Chef without Anonymous Access.
-
Open your
~/.chef/config.rbor~/.chef/knife.rbfile.Note
The
config.rbfile, which replaces theknife.rbfile, doesn't exist by default. You can create it with theknife configurecommand. You can override the location of this file with the--configparameter when you run a Knife command.If there is no
config.rbfile, Knife looks for aknife.rbfile as a fallback. -
Set the default Chef supermarket to your Artifactory Chef repository, including the
api/chefpath and repository key. Use one of the following formats:-
For anonymous access:
knife[:supermarket_site] = 'https://<JFrogPlatformURL>/artifactory/api/chef/<REPO_NAME>'Where:
<JFrogPlatformURL>: The URL of your JFrog Platform<REPO_NAME>: The name of your Chef repository in Artifactory
For example:
knife[:supermarket_site] = 'https://company.jfrog.io/artifactory/api/chef/chef-local' -
For authenticated access:
knife[:supermarket_site] = 'https://<USERNAME>:<TOKEN>@<JFrogPlatformURL>/artifactory/api/chef/<REPO_NAME>'Where:
<USERNAME>: Your Artifactory username<TOKEN>: Your Artifactory identity token<JFrogPlatformURL>: The URL of your JFrog Platform<REPO_NAME>: The name of your Chef repository in Artifactory
For example:
knife[:supermarket_site] = 'https://jeffry:[email protected]/artifactory/api/chef/chef-local'
-
Note
You can also use JFrog Set Me Up to copy the snippet populated with your token and environment. For more information, see Use Artifactory Set Me Up for Configuring Package Manager Clients.
Deploy Chef Packages
Deploying Chef packages makes them available to other users.
The following options are available for publishing Chef packages:
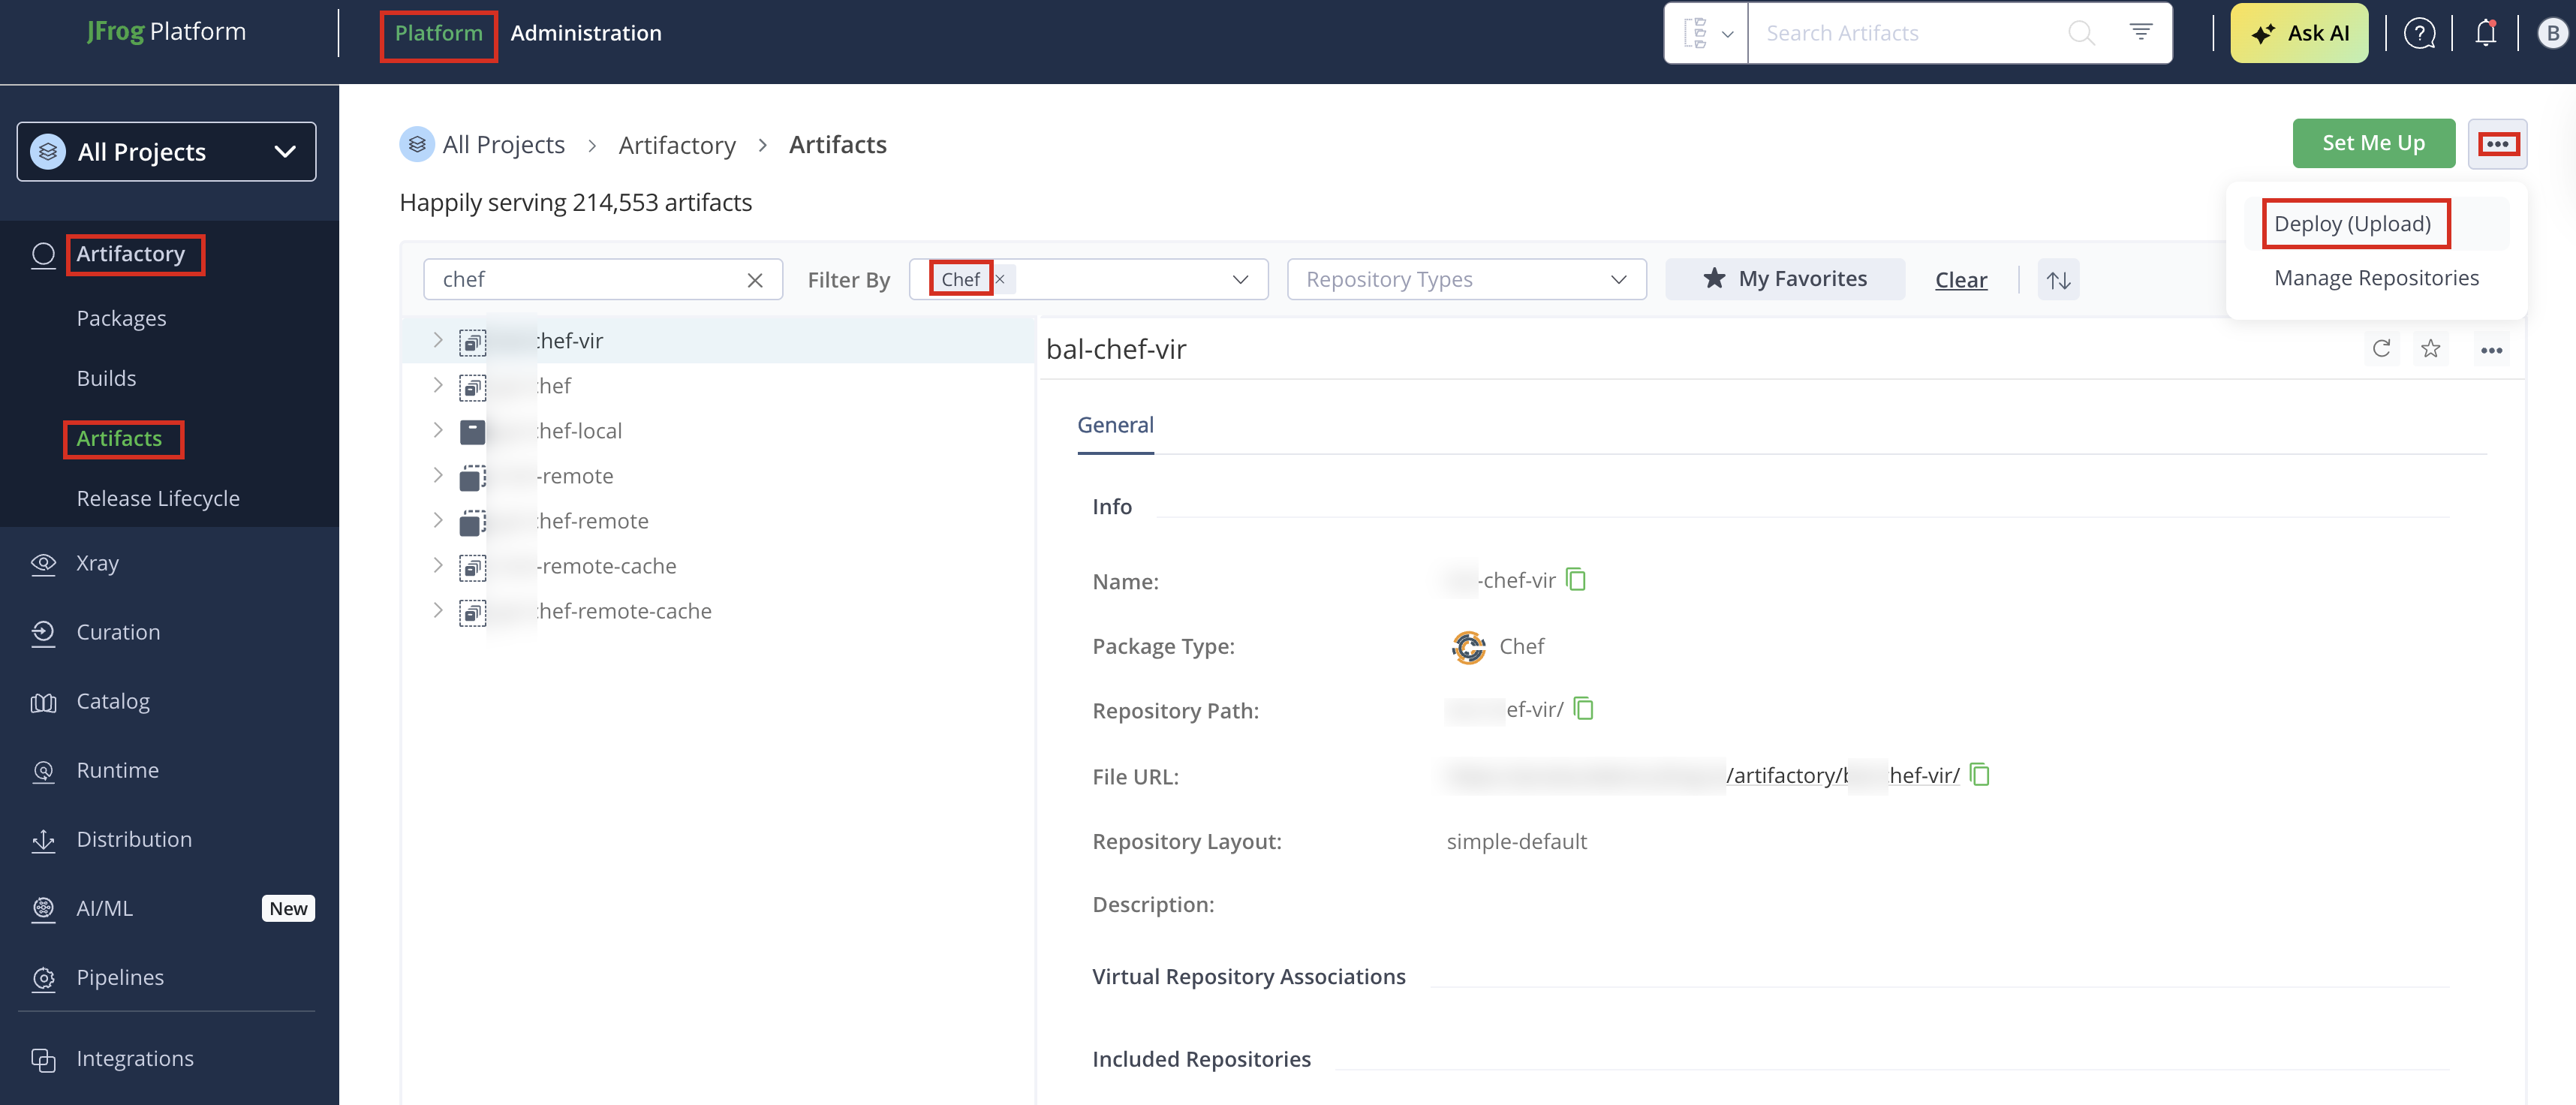
Deploy Chef Package Using the UI
-
In the Platform module, click Artifactory > Artifacts, then click the ellipsis and select Deploy (Upload). Deploy options are displayed.
-
Select your Chef repository as the Target Repository, and upload the file you want to deploy.
-
Verify the deploy options, then click Deploy. The package is deployed.
Deploy a Chef Package Using Knife
To deploy a cookbook using Knife:
- Run the following command:
Where:
knife artifactory share <cookbook-name> <CATEGORY><cookbook-name>: The name of your cookbook.[CATEGORY]: Optionally, the category your cookbook belongs to. It helps organize cookbooks in Artifactory (for example, “Web Servers”, “Databases”, or “Monitoring”). For example:
knife artifactory share nginx "Web Servers"
Resolve Chef Packages
To install the cookbook using Knife:
- Run the following command:
Where:
knife artifactory install <cookbook-name> <VERSION><cookbook-name>: The name of your cookbook<VERSION>: Optionally, the version number of the cookbook you want to download For example:
# Install the latest version of the 'nginx' cookbook from Artifactory
knife artifactory install nginx

# OR install a specific version of the 'nginx' cookbook (for example, version 2.3.0)
knife artifactory install nginx 2.3.0
Additional Chef Actions
The following additional actions are available with Chef repositories:
Work with Artifactory and Chef without Anonymous Access
By default, Artifactory allows anonymous access for Chef repositories. This is defined under Security > General Configuration. For more information, see Allow Anonymous Access.
If you want to be able to trace how users interact with your repositories, you need to uncheck the Allow Anonymous Access setting. This means that users will be required to enter their username and password.
The Knife command line tool does not support basic authentication. It only supports authentication with RSA keys. To enable basic authentication, install the knife-art plugin.
Install knife-art plugin
chef gem install knife-artIf properly installed you should see the following specific Artifactory commands:
Knife Artifactory plugin commands
** ARTIFACTORY COMMANDS **
knife artifactory download COOKBOOK [VERSION] (options)
knife artifactory install COOKBOOK [VERSION] (options)
knife artifactory list (options)
knife artifactory search QUERY (options)
knife artifactory share COOKBOOK [CATEGORY] (options)
knife artifactory show COOKBOOK [VERSION] (options)
knife artifactory unshare COOKBOOK VERSION
These commands are a wrapper around the standard Knife supermarket commands, that enable basic authentication. To add these credentials, pre-pend them to the URL of the Chef supermarket configured in your config.rb or knife.rb file:
Setting the default Chef supermarket for Knife with credentials
knife[:supermarket_site] = 'https://<USERNAME>:<TOKEN>@<JFrogPlatformURL>/artifactory/api/chef/<REPO_NAME>'Use an encrypted password
Use an encrypted password instead of clear-text; see Centrally Secure Passwords.
Use the Berkshelf Command Line
Note
Berkshelf is effectively deprecated and is only being maintained to ship as-is. For more information, see the Berkshelf repository on GitHub.
Berkshelf is a dependency manager for Chef cookbooks and is included with Chef Workstation. You can point Berkshelf at a Chef supermarket in Artifactory so berks resolves and downloads cookbooks from your repositories instead of only from the public Supermarket.
From Berkshelf version 6.1.0 onward, Berkshelf supports authenticated access to Artifactory using an identity token. Earlier versions only supported anonymous access. For more information about authentication, see Work with Artifactory and Chef without Anonymous Access.
To use Berkshelf with Artifactory:
-
In your
~/.chef/config.rbfile, set your Artifactory identity token to the following:artifactory_api_key "<TOKEN>"Note
The
config.rbfile, which replaces theknife.rbfile, doesn't exist by default. You can create it with theknife configurecommand. For more information, including possible file locations, see knife documentation. You can override the location of this file with the--configparameter when you run a Knife command.If there is no
config.rbfile, Knife looks for aknife.rbfile as a fallback. -
In your Berksfile's cookbook, set the default supermarket
sourceto your Artifactory URL, including theapi/chefpath and the repository key. For example:source artifactory: 'https://<JFrogPlatformURL>/artifactory/api/chef/<REPO_NAME>' -
From your cookbook directory, run
berksto resolve and download dependencies from Artifactory.The following example shows sample
berksoutput.vagrant@default-ubuntu-1404:~/chef-zero/mycookbook$ berks Resolving cookbook dependencies... Fetching 'mycookbook' from source at . Fetching cookbook index from http://localhost:8081/artifactory/api/chef/chef-virtual... Installing apt (5.0.0) from http://localhost:8081/artifactory/api/chef/chef-virtual ([opscode] http://localhost:8081/artifactory/api/chef/chef-virtual/api/v1) Installing chef-apt-docker (1.0.0) from http://localhost:8081/artifactory/api/chef/chef-virtual ([opscode] http://localhost:8081/artifactory/api/chef/chef-virtual/api/v1) Installing chef-yum-docker (1.0.1) from http://localhost:8081/artifactory/api/chef/chef-virtual ([opscode] http://localhost:8081/artifactory/api/chef/chef-virtual/api/v1) Installing compat_resource (12.16.2) from http://localhost:8081/artifactory/api/chef/chef-virtual ([opscode] http://localhost:8081/artifactory/api/chef/chef-virtual/api/v1) Using mycookbook (0.1.0) from source at . Installing yum (4.1.0) from http://localhost:8081/artifactory/api/chef/chef-virtual ([opscode] http://localhost:8081/artifactory/api/chef/chef-virtual/api/v1)