Go Modules
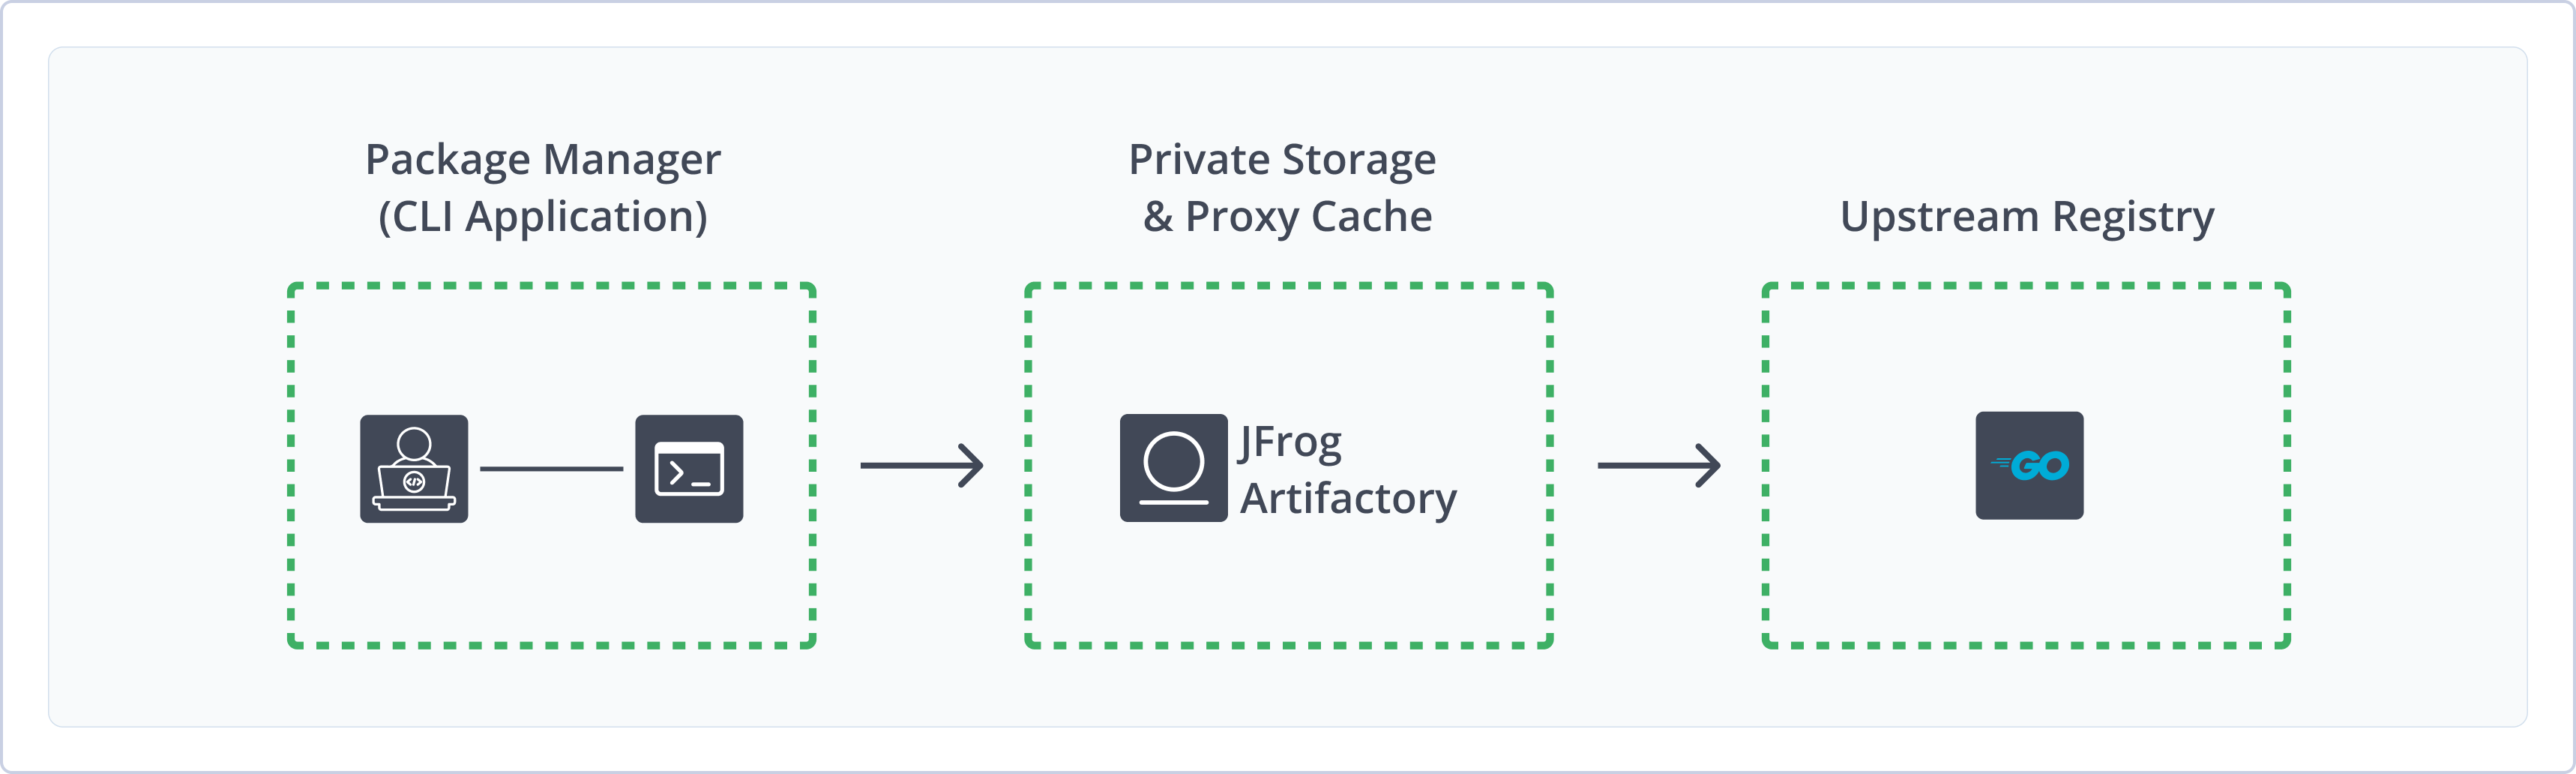
JFrog Artifactory offers support for Go modules, providing:
- Secure, private repositories with fine-grained access control over Go modules according to projects or development teams.
- Remote Go repositories, which provide proxy and caching functionality for remote Go resources.
- Enterprise features such as high availability, repository replication for multi-site development and different options for massive scalability storage.
- A full solution with JFrog CLI, allowing you to resolve and publish your Go projects.
For more information on the benefits of integrating Go with Artifactory, see the integration benefits.
Get Started with Go
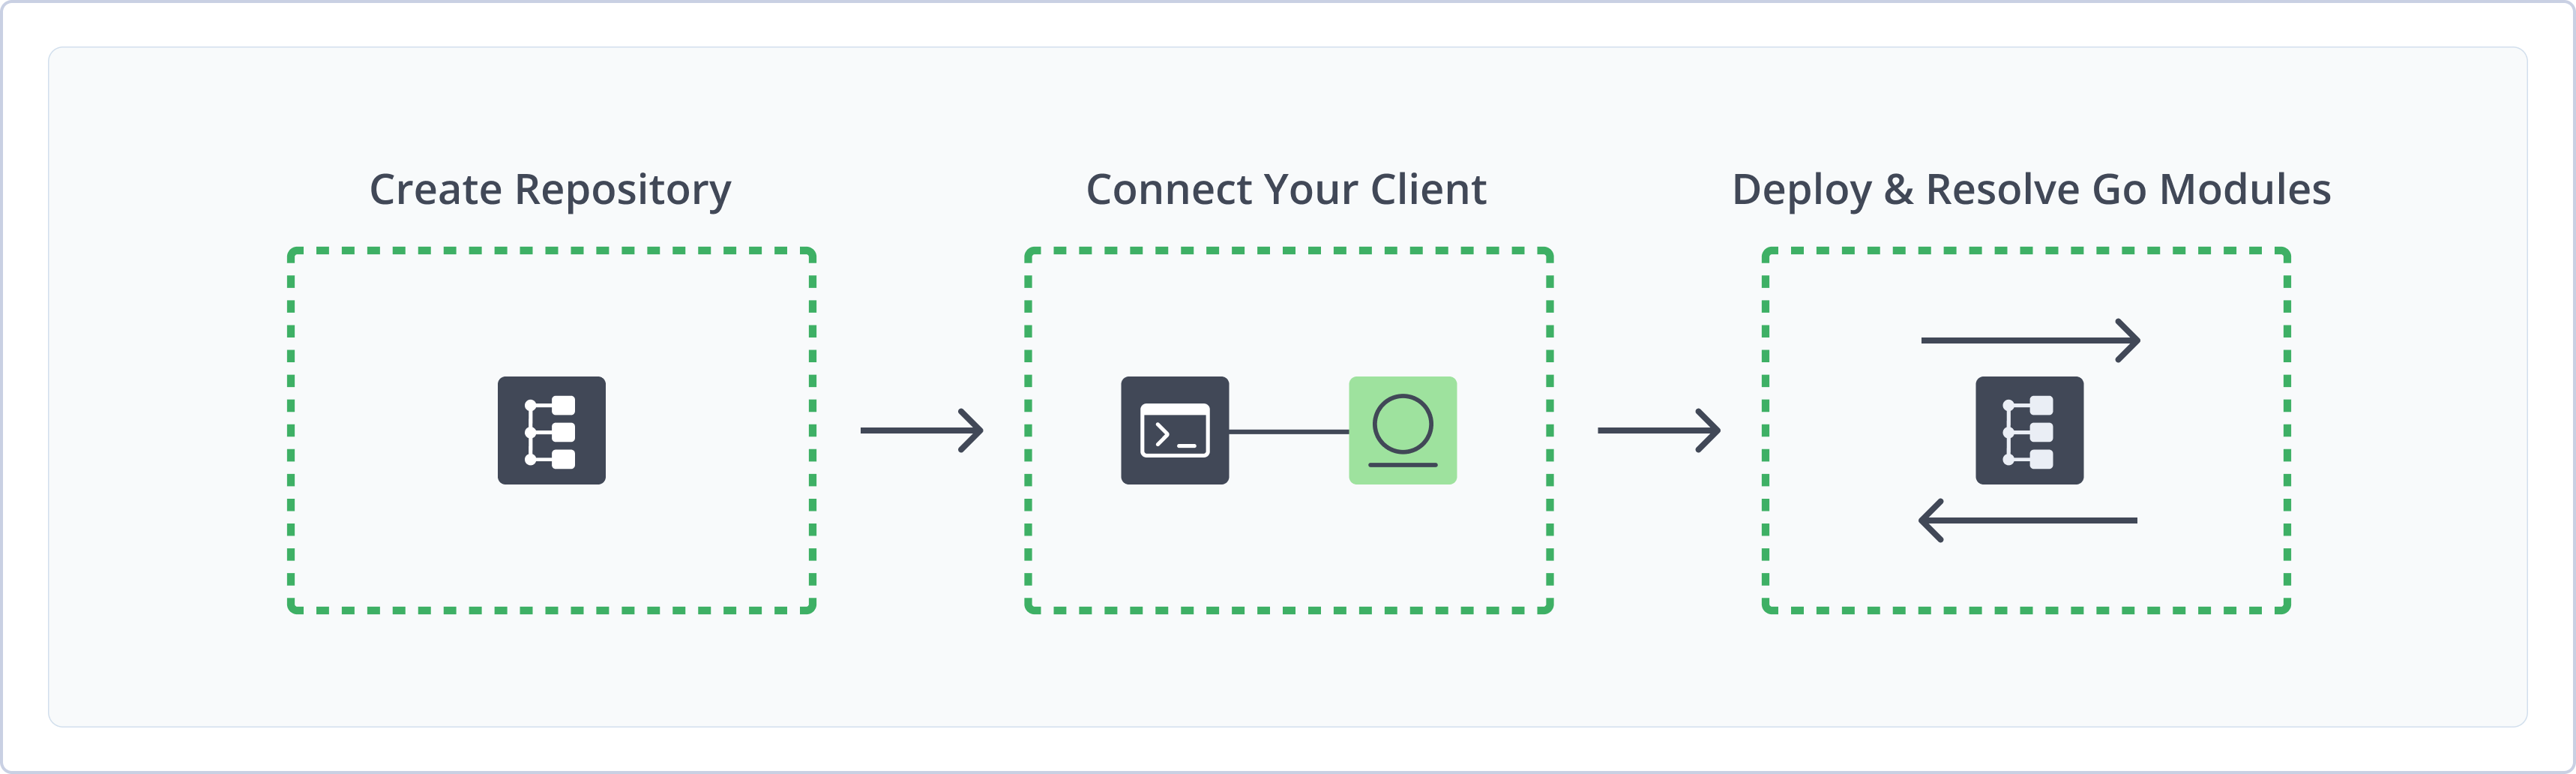
To get started working with Go, complete the following main steps:
- Create a Go Repository in Artifactory
- Connect your Go Client to Artifactory
- Deploy Go Modules to Artifactory
- Resolve Go Modules from Artifactory
Create a Go Repository in Artifactory
This topic describes how to create a Go repository in Artifactory. This is required before deploying and resolving Go modules. There are three primary types of repositories:
- Local repositories: Where you store and share 1st and 2nd party Go modules with your organization
- Remote repositories: Enable you to download from any remote location, including external package registries or other Artifactory instances
- Virtual repositories: Enable aggregating remote and local repositories, enabling your organization to scale by providing a single URL that provides access to multiple repositories and types
For more information on JFrog repositories, see Repository Management.
Prerequisite: You need Admin or Project Admin permissions to create a Go repository. If you don't have Admin permissions, the option will not be available.
To create a Go repository:
-
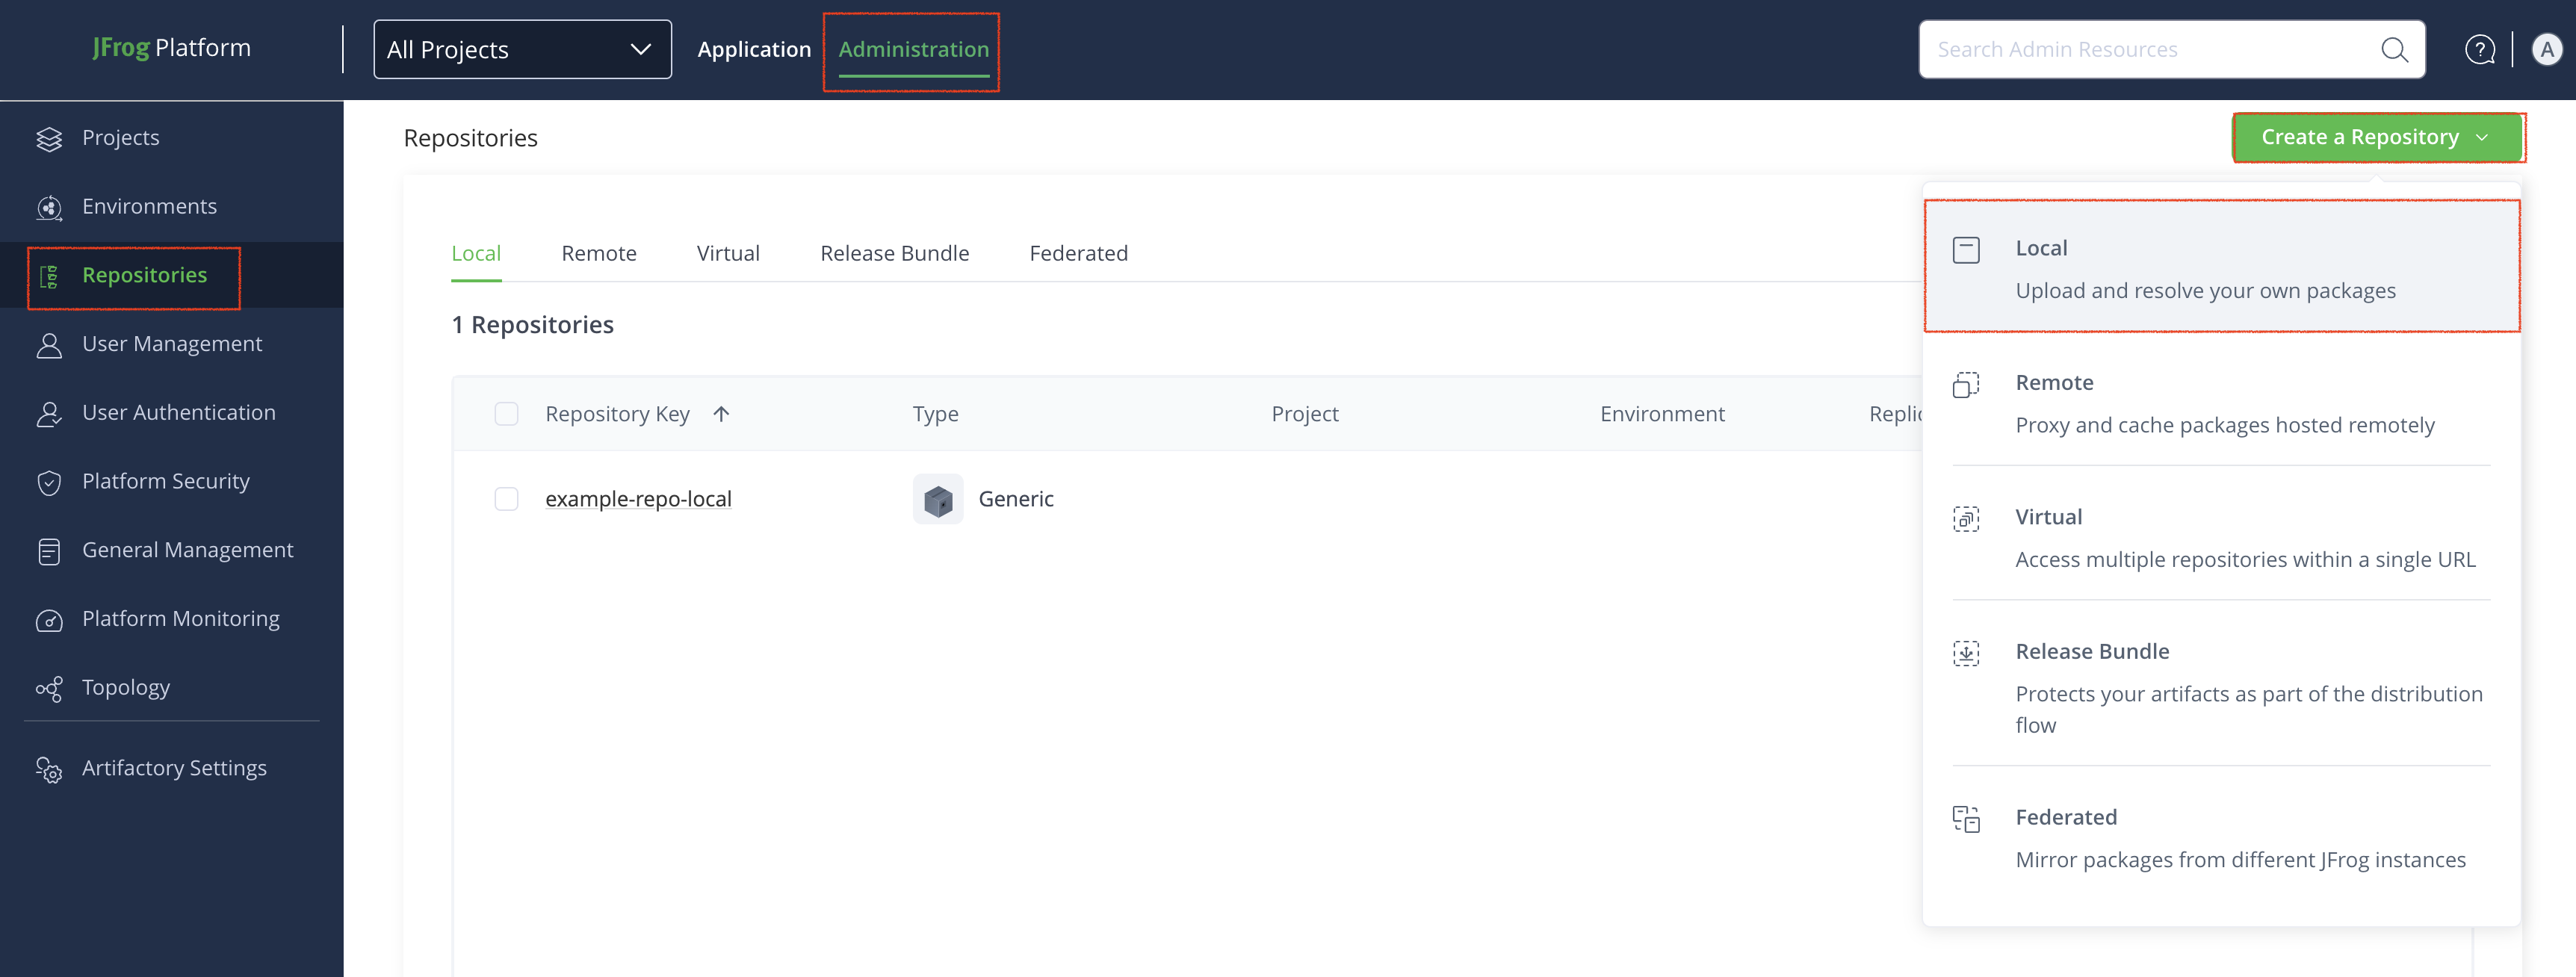
In the Administration tab, click Repositories | Create a Repository
-
Select the repository type you want to create (local, remote, or virtual). The Select Package Type window opens.
-
Select Go.
-
In the New Repository window, configure the required fields (described in the following list).
-
For Local Repositories, In the Repository Key field, type a meaningful name for the repository. For example,
go-local-repo-1. For more information on local repositories and their possible settings, see Local Repositories. -
For Remote Repositories, additionally verify the Repository URL and update it if needed. For more information related specifically to setting up remote Go repositories in Artifactory, see Set Up Remote Go Repositories.
For more general information on remote repositories and the relevant settings, see Remote Repositories.
-
For Virtual Repositories, additionally, select one or more local or remote repository types to include in the virtual repository. For more information on virtual repositories and the relevant settings, see Virtual Repositories.
-
-
When you are finished configuring the repository, click Create Repository. The repository is created and the Repositories window is displayed.
Connect your Go Client to Artifactory
This topic provides details on configuring your Go client to work with Artifactory. There are two methods for configuring your Go client with Artifactory:
- Configure your native Go client with Artifactory
- Configure your Go client with Artifactory using the JFrog CLI
Pre-requisites:
- Before connecting your Go client to Artifactory, you must have an existing Go repository in Artifactory. For more information , see Create a Go Repository in Artifactory.
- To deploy Go packages into an Artifactory repository, you first need to install and configure JFrog CLI. For more information on JFrog CLI and installation instructions, see JFrog CLI.
Supported Go Clients
Artifactory requires Go client version 1.11.0 and above.
To install the Go client, please refer to the Go Programming Language documentation.
Logged in vs. Anonymous User: You can work with Artifactory as either a logged in user or as an anonymous user. To work with Artifactory using Anonymous Access. you need to configure that access under Admin | Security | General. For details, refer to Allow Anonymous Access.
Configure your Go Client with Artifactory
To configure your native Go client to work with Artifactory:
- If you want to use an identity token instead of your Artifactory password for configuring your Go client with Artifactory, follow the instructions in Generate Scoped Tokens.
Note
JFrog recommends using an identity token for configuring your Go client, as it has certain advantages over a user password. However, it is not strictly required.
-
Set your default Artifactory Go repository by running the following command in the command line:
export GOPROXY="https://<USERNAME>:<TOKEN>@<MY_JFROG_DOMAIN>/artifactory/api/go/<GO_REPO_NAME>"In the command above, replace the following placeholders as follows:
<USERNAME>: Replace with your username.<TOKEN>: Replace with your identity token or Artifactory password.<MY_JFROG_DOMAIN>: Replace with the name of your Artifactory domain.<GO_REPO_NAME>: The name of your Go repository in Artifactory.
Configure your Go Client with Artifactory Using the JFrog CLI
To configure your Go client to work with Artifactory using the JFrog CLI:
- If you want to use an identity token instead of your Artifactory password for configuring your Go client with Artifactory, follow the instructions in Generate Scoped Tokens.
Note
JFrog recommends using an identity token for configuring your Go client, as it has certain advantages over a user password. However, it is not strictly required.
-
Configure the Artifactory server details by running the following command in the JFrog CLI:
jf c add rt-server --artifactory-url https://<MY_JFROG_DOMAIN>/artifactory --user <USERNAME> --password <TOKEN> --interactive=falseIn the command above, replace the following placeholders as follows:
<USERNAME>: Replace with your username.<MY_JFROG_DOMAIN>: Replace with the name of your Artifactory domain.<TOKEN>: Replace with your identity token or Artifactory password.
-
Configure the project with the Artifactory resolution repository.
jf go-config --server-id-resolve rt-server --repo-resolve <GO_REPO_NAME>Where
<GO_REPO_NAME>is the name of your Go repository in Artifactory.
Note
You can also use JFrog Set me up to copy the snippet populated with your token and environment. For more information, see Use Artifactory Set Me Up for Configuring Package Manager Clients.
Next Steps:
Deploy Go Modules to Artifactory
The Go client works through a Git repository which hosts the Go module source code, and does not provide a way to directly deploy modules to Artifactory. To deploy your Go module to Artifactory, use the JFrog CLI.
Default Deployment Repository
If you are deploying Go modules to a Virtual Repository, make sure to set one of the local Go repositories that it aggregates as the Default Deployment Repository.
To deploy a Go module to an Artifactory repository, you need to run the following JFrog CLI command from your project’s root directory:
jf gp <GO_REPO_NAME> <VERSION> --server-id rt-serverIn the CLI command above, replace the placeholders as follows:
<GO_REPO_NAME>: The name of your Go repository in Artifactory.<VERSION>: The version of the Go module that you are deploying to Artifactory.
Resolve Go Modules from Artifactory
There are two methods for resolving Go modules from Artifactory:
- Using the Go client
- Using JFrog CLI
Resolving Go modules only via local or virtual repositories
Artifactory only supports resolution of Go modules from local or virtual Go repositories. To resolve Go modules from remote Go repositories, you need to aggregate them in a virtual Go repository.
Resolve Go Modules Using the Go Client
To resolve Go modules from your Go repository in Artifactory using the Go client, run the following command from your project’s root directory:
go buildResolve Go Modules Using the JFrog CLI
To resolve Go modules using the JFrog CLI, run the following command under your project’s root directory:
jfrog rt go buildAdditional Go Actions
The following additional actions are available with Go repositories in Artifactory:
- Set Up Remote Go Repositories, including information on how to set up Go repositories to proxy private registries.
- Advanced Configuration for Virtual Go Repositories
- Resolving GitLab Subgroups
Set Up Remote Go Repositories
Important
To resolve dependencies from a remote Go repository, you must nest the remote repository under a virtual Go repository.
A remote Go repository in Artifactory serves as a caching proxy for golang.org, GitHub.com or a Go repository in a different Artifactory instance.
Artifacts (such as zip files) requested from a remote Go registry are cached on demand. You can remove downloaded artifacts from the remote repository cache, however you can not manually deploy artifacts to a remote repository.
Set Up Go Repositories to Proxy Private Registries
Starting from Artifactory version 7.77, It is possible to use remote Go repositories to proxy your private registries hosted on platforms such as:
- GitHub (Cloud)
- GitHub Enterprise (Self-Hosted)
- Bitbucket Cloud (Cloud)
- Bitbucket Server (Self-Hosted)
- GitLab (Cloud & Self-Hosted)
Important
Before using a Go repository to proxy a private registry, ensure your repository follows the Go Modules Reference, and especially the Module release and versioning workflow.
Set Up Go Proxy Mirror Repositories
When configuring Artifactory to proxy a private registry, it is highly recommended to always create a proxy mirror directing to http://proxy.golang.org/ to resolve your public modules. This will reduce your unnecessary usage on your other remotes pointing to your private repositories hosted on other git providers and avoid potential rate-limiting issues.
To create a proxy mirror repository:
Note
When using a remote repository that implements Go API Specification, use Artifactory as the Git provider. For example, to set up a remote registry opposite
proxy.golang.org, use Artifactory as the Git provider.
- Create a new remote repository and set Go as its Package Type.
- Set the Repository Key value, and enter http://proxy.golang.org/ in the URL field.
- In the Go Settings section, set the Git Provider as Artifactory.
- In the Advanced tab, select the Priority Resolution checkbox.
- Click Save & Finish.
- Nest the repository you just created and your remote repository proxying a private registry under the same virtual repository. That way, whenever you resolve an artifact through the virtual repository, Artifactory will attempt to resolve your cached artifacts first and avoid requesting the external registry.
Proxy GitHub with Go
Go Proxy Best Practice: Add Mirror Repository
JFrog highly recommends that you create a remote repository pointing to the default Go mirror (proxy.golang.org) and enter Artifactory as the Git provider. This way, Artifactory will be able to resolve cached public modules without querying the external registry, reducing the chance of rate limiting. For more information, see Set Up Go Proxy Mirror Repositories.
To create a Remote Repository which serves as a caching proxy for github.com, follow the steps below:
-
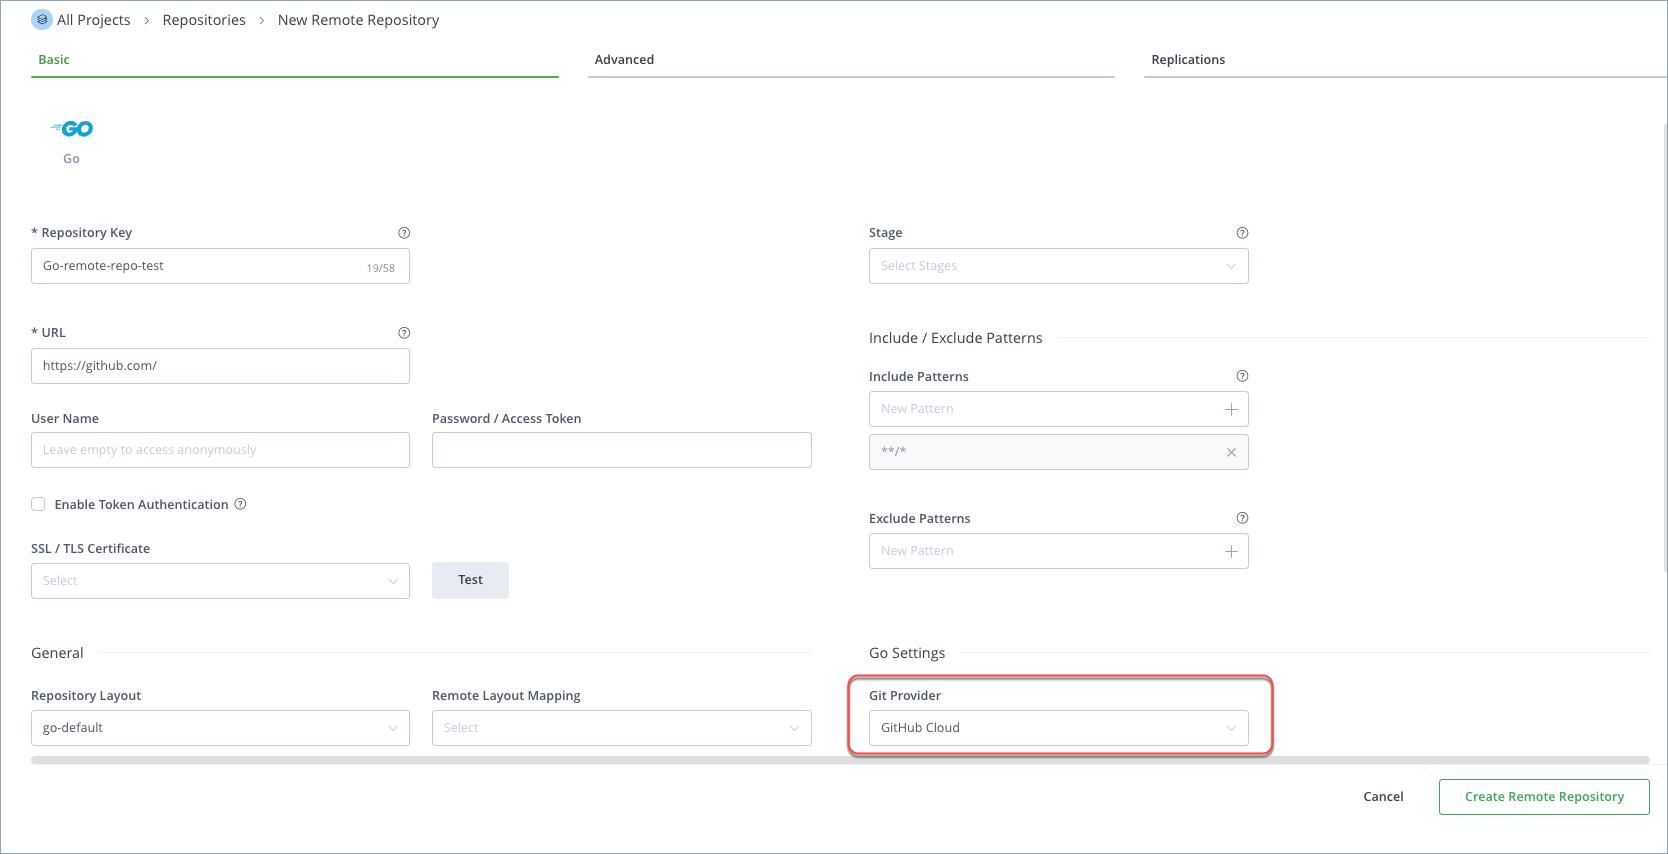
Create a new remote repository and set Go to be its Package Type.
-
Set the Repository Key value, and enter
https://github.com/in the URL field as displayed below.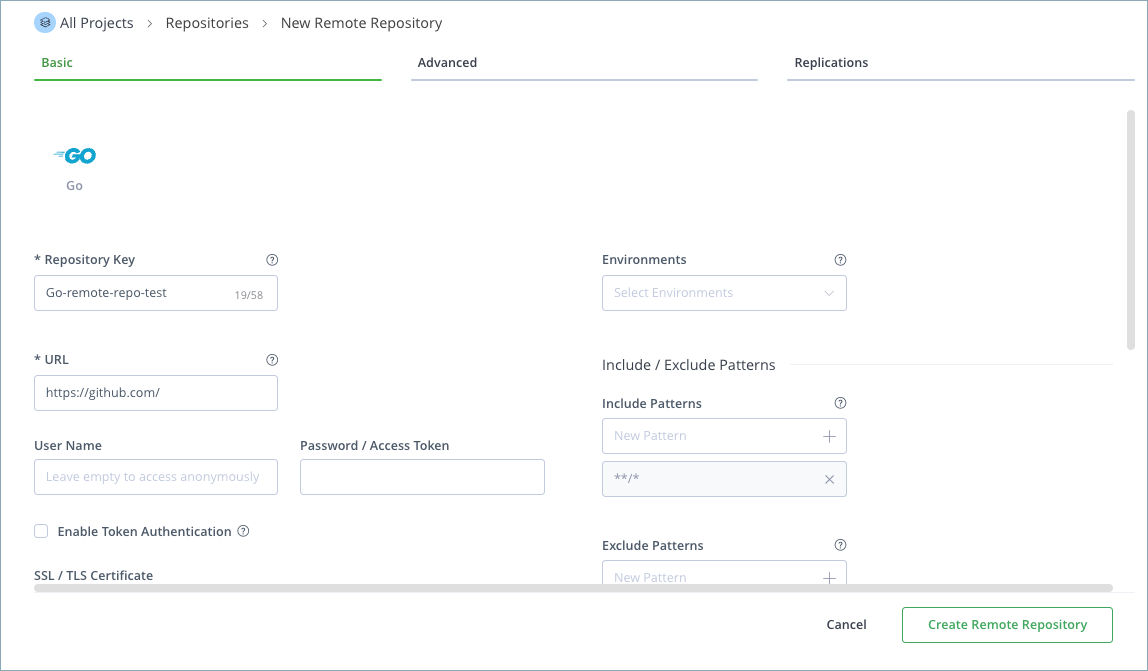
-
In the Basic tab, enter the username and password of your GitHub account. This is required due to a rate limit imposed by GitHub when access is anonymous.
From November 2020, GitHub no longer accepts account passwords when authenticating via the REST API
As per the latest GitHub update, basic authentication is no longer supported via REST API. Your password must be replaced with a GitHub private access token.
-
Scroll down to Go Settings and select GitHub Cloud for the Git Provider, as shown below.
-
In the Advanced tab, check Lenient Host Authentication.
-
Click Save & Finish.
Generate a Personal Access Token in GitHub Enterprise
This topic describes how to generate a personal access token in GitHub Enterprise that is needed for authentication when using a Go remote repository to proxy your private GitHub Enterprise registry.
To generate a personal access token in GitHub Enterprise:
-
Log in to your GitHub Enterprise account.
-
Click your profile photo in the upper-right corner and select User settings from the menu.
-
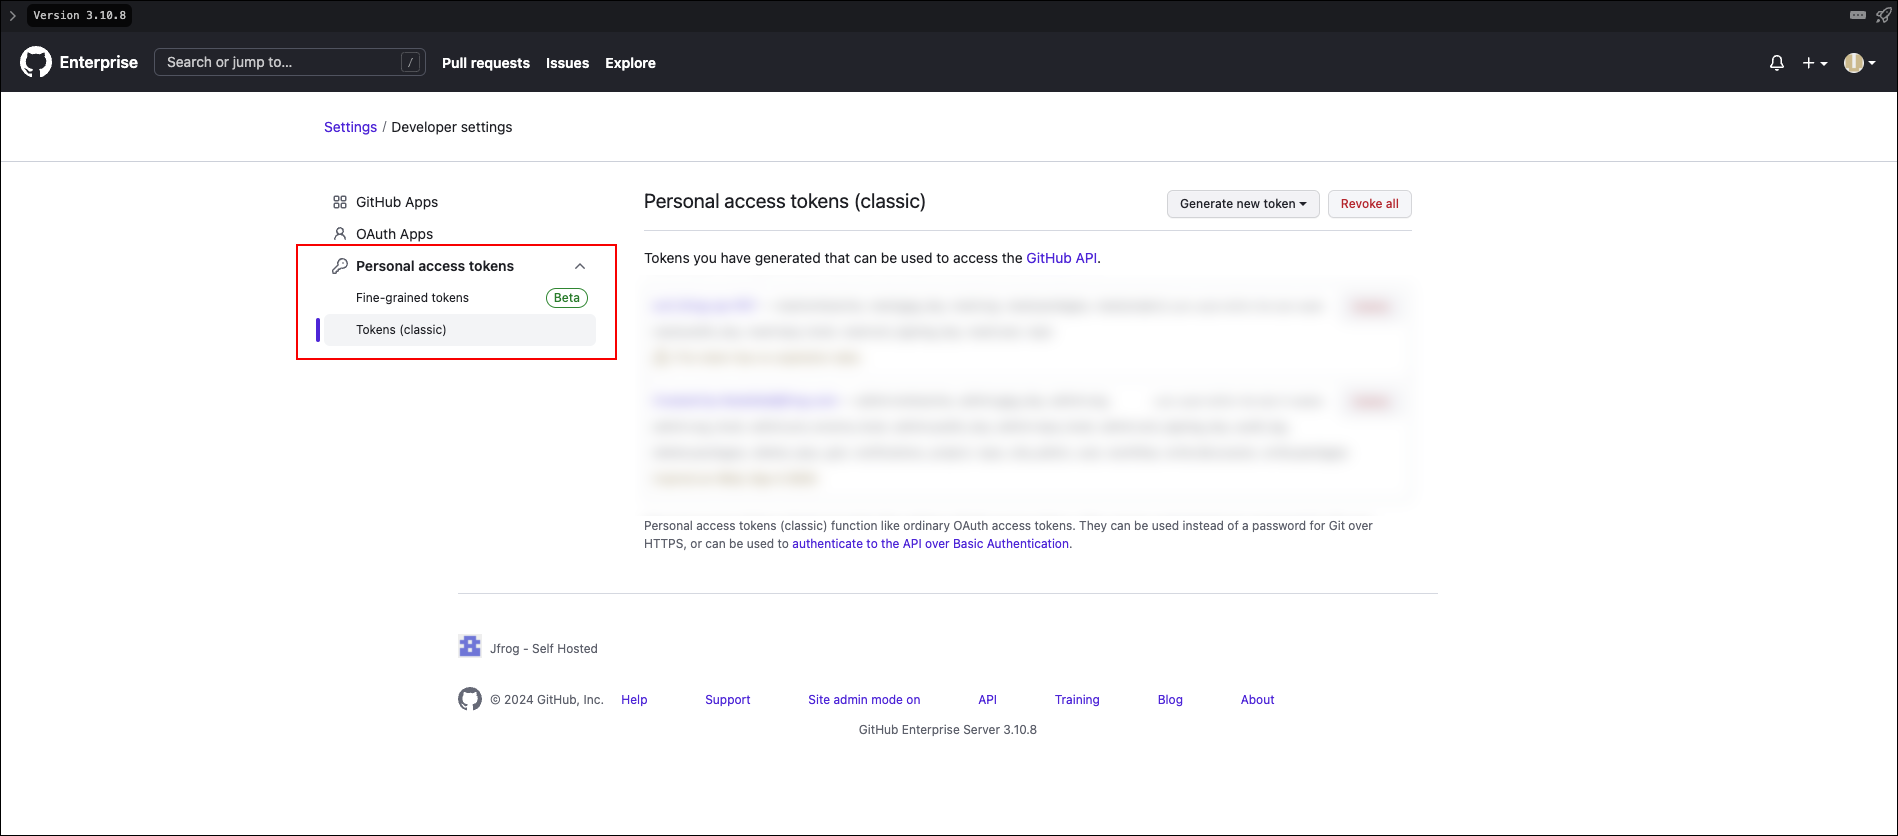
From the sidebar menu on the left, click Developer settings.
-
Select Personal access tokens > Tokens (classic).
-
Click Generate new token.
-
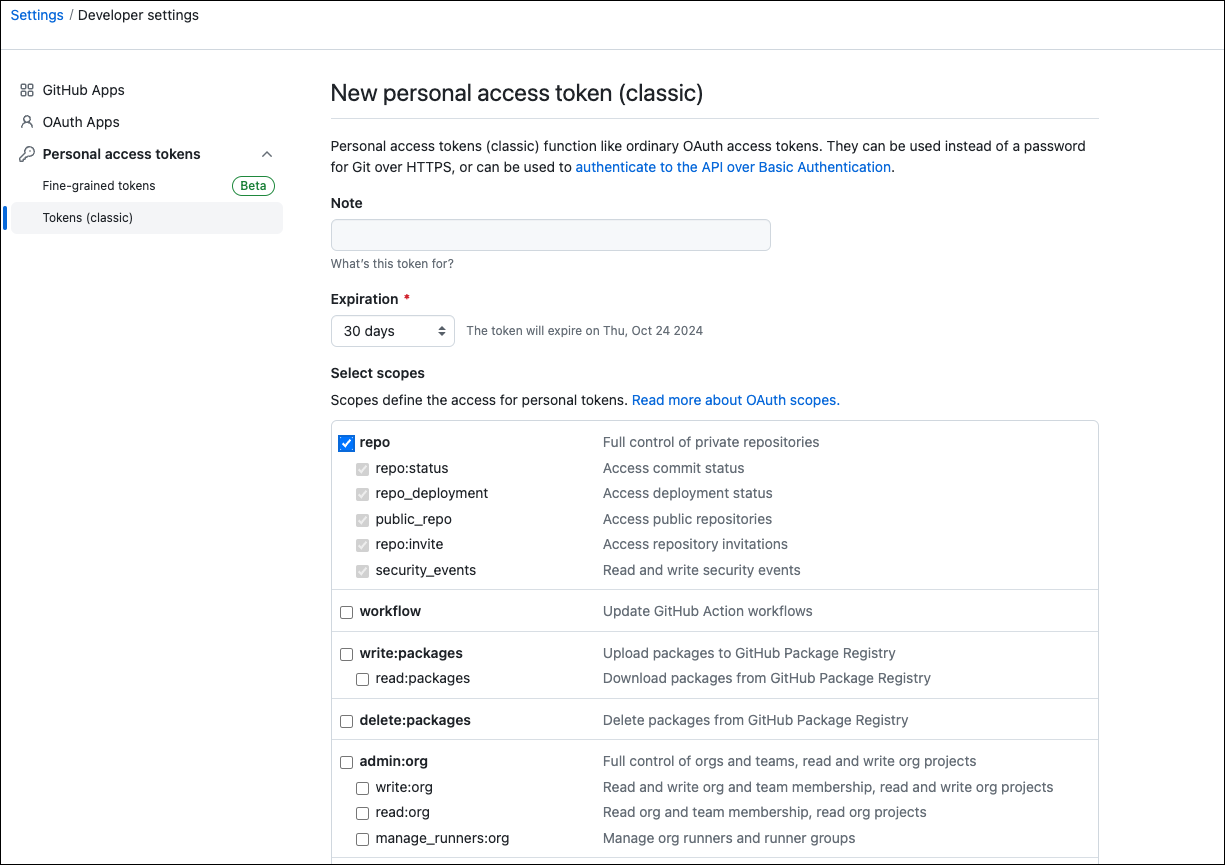
Optional: In the Note field, add a description.
-
In the Expiration field, configure when the personal access token will expire [recommended].
-
In the Select scopes field, select the repo checkbox to assign this set of permissions to the personal access token.
-
Optional: Select additional permissions, if required by your environment.
-
Click Generate Token.
Proxy GitHub Enterprise with Go
Go Proxy Best Practice: Add Mirror Repository
JFrog highly recommends that you create a remote repository pointing to the default Go mirror (proxy.golang.org) and enter Artifactory as the Git provider. This way, Artifactory will be able to resolve cached public modules without querying the external registry, reducing the chance of rate limiting. For more information, see Set Up Go Proxy Mirror Repositories.
To create a remote repository that serves as a caching proxy for GitHub Enterprise, follow these steps:
-
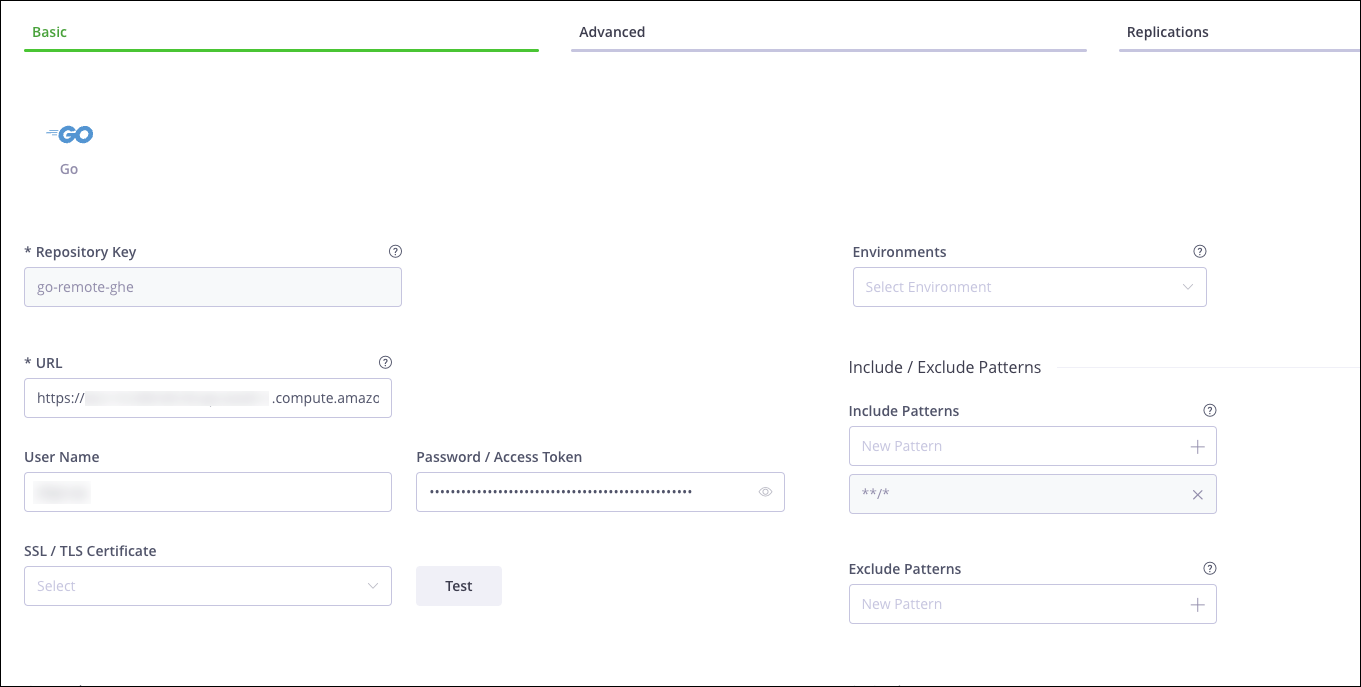
Create a new remote repository and set Go as the Package Type.
-
Set the Repository Key value, and enter your local GitHub Enterprise URL in the URL field.
-
Enter the username and personal access token that provides authentication to GitHub Enterprise. For more information about creating a personal access token, see Generate a Personal Access Token in GitHub Enterprise.
-
Scroll down to Go Settings and select a Git Provider:
- For On-Prem, select GitHub Server.
- For Cloud, select GitHub Cloud.
-
Click Save & Finish.
Proxy GitLab with Go
Go Proxy Best Practice: Add Mirror Repository
JFrog highly recommends that you create a remote repository pointing to the default Go mirror (proxy.golang.org) and enter Artifactory as the Git provider. This way, Artifactory will be able to resolve cached public modules without querying the external registry, reducing the chance of rate limiting. For more information, see Set Up Go Proxy Mirror Repositories.
To create a remote repository that serves as a caching proxy for GitLab, follow these steps:
-
In Artifactory, click the Administration tab and select Repositories in the Navigation bar.
-
Click the Create Repository button and select Remote from the dropdown menu. The Select Package Type screen appears.
-
Select Go for the package type. The New Remote Repository screen for the Go package type appears, as shown below.
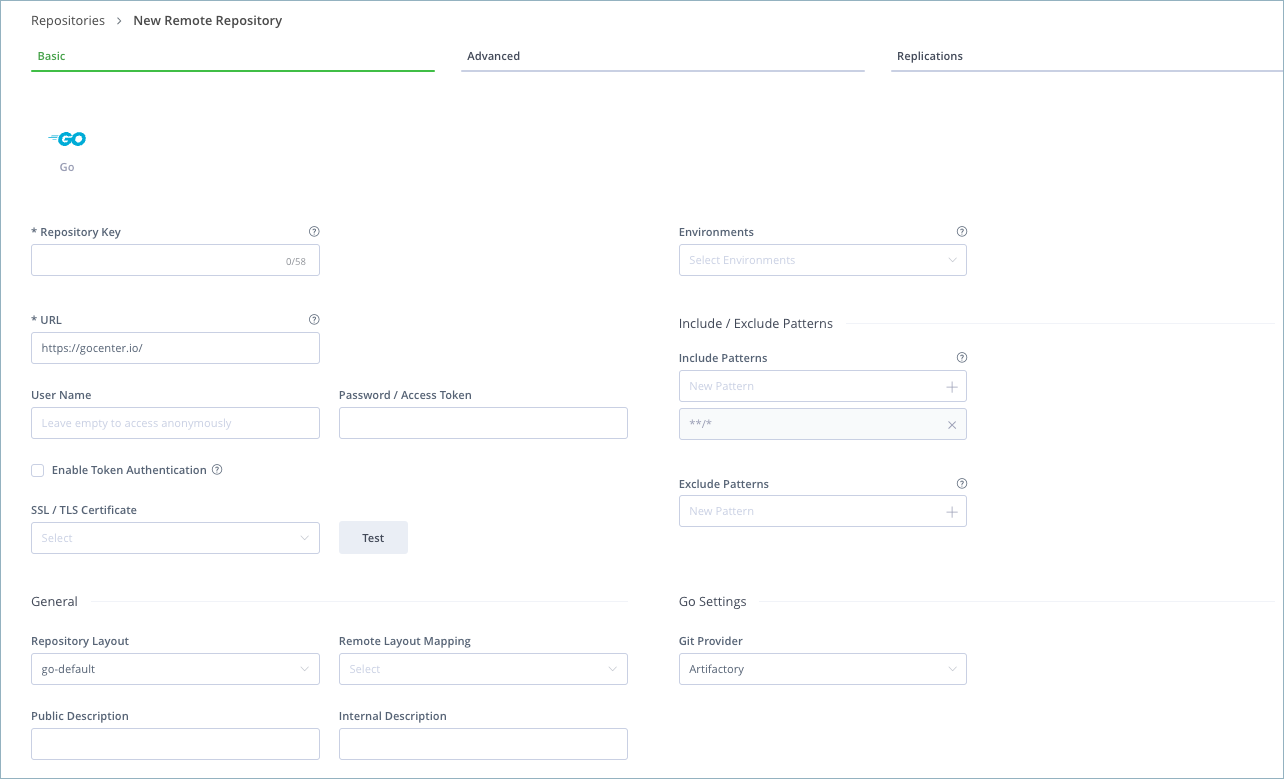
-
Set the Repository Key value, and enter the link to your GitLab environment in the URL field:
- For GitLab Self-managed, enter your environment link
- For GitLab SaaS, enter
https://gitlab.com/
-
Under Go Settings, set the Git Provider as GitLab. The Resolve Subgroups check box appears, as shown below.
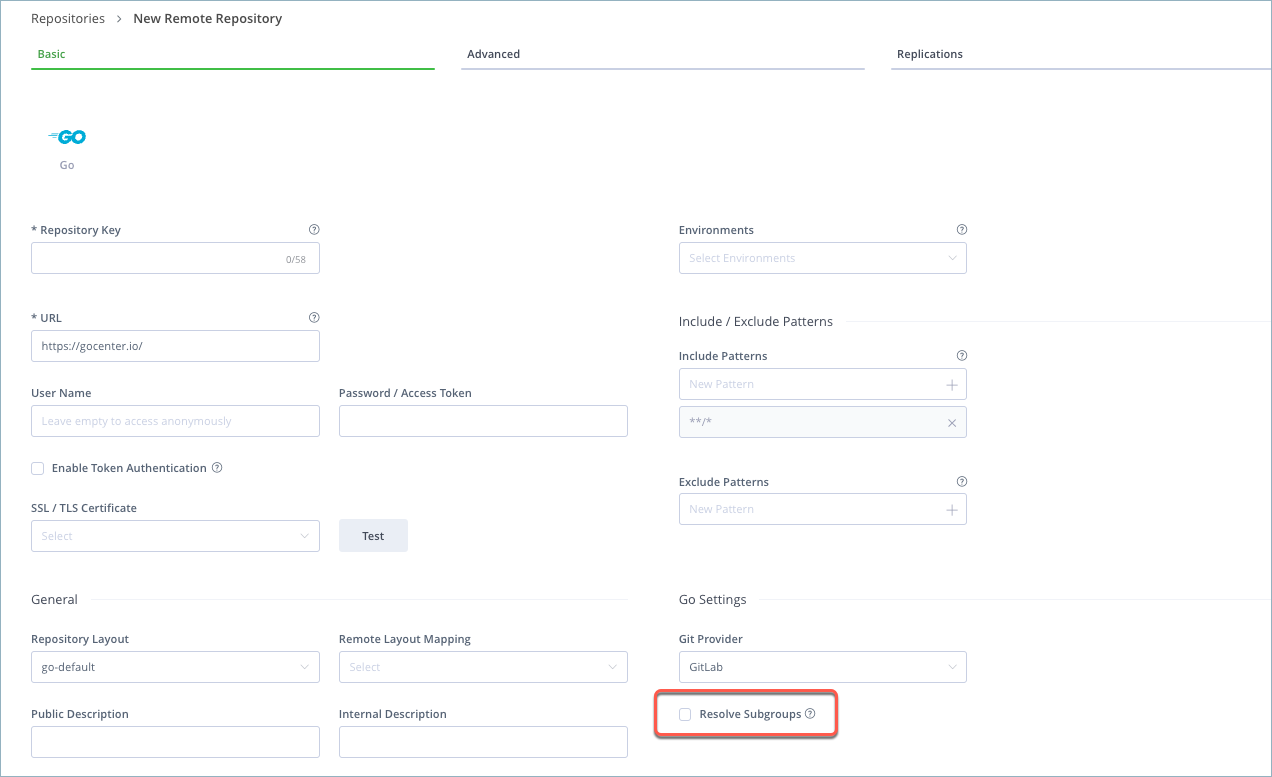
-
Optional: Select the Resolve Subgroups checkbox if you want Artifactory to automatically resolve sub-groups and sub-modules from gitlab.com. For more information, see Resolving GitLab Subgroups.
-
Enter your GitLab username and password. To generate a GitLab password:
-
Go to your GitLab account, click your avatar in the top right corner, and select Settings.
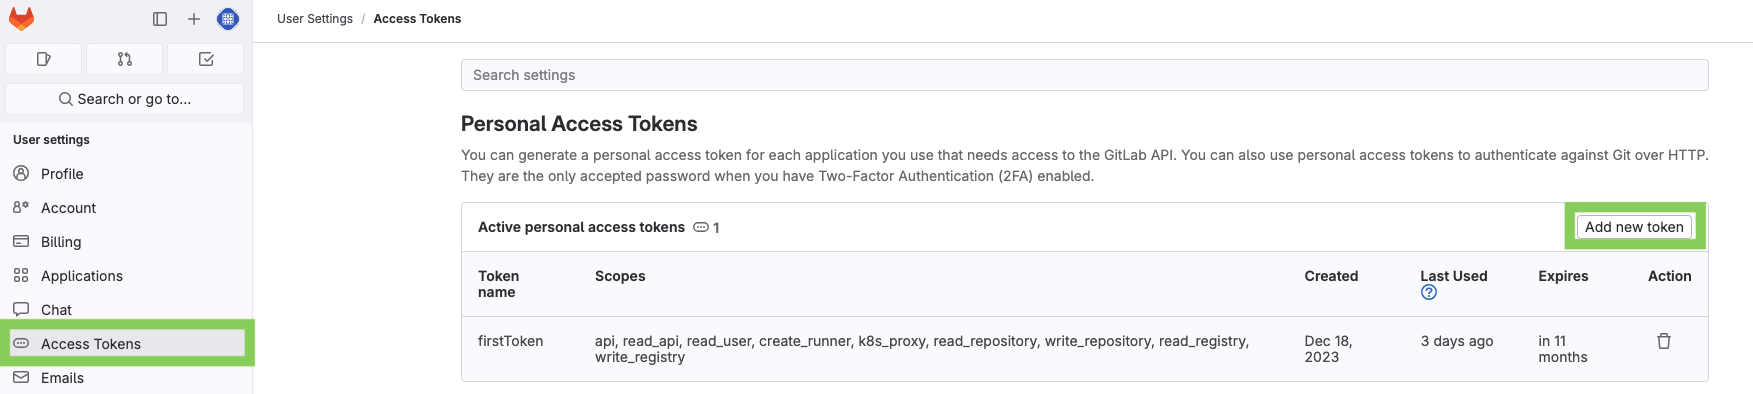
-
Go to Access Tokens, and click Add new token.
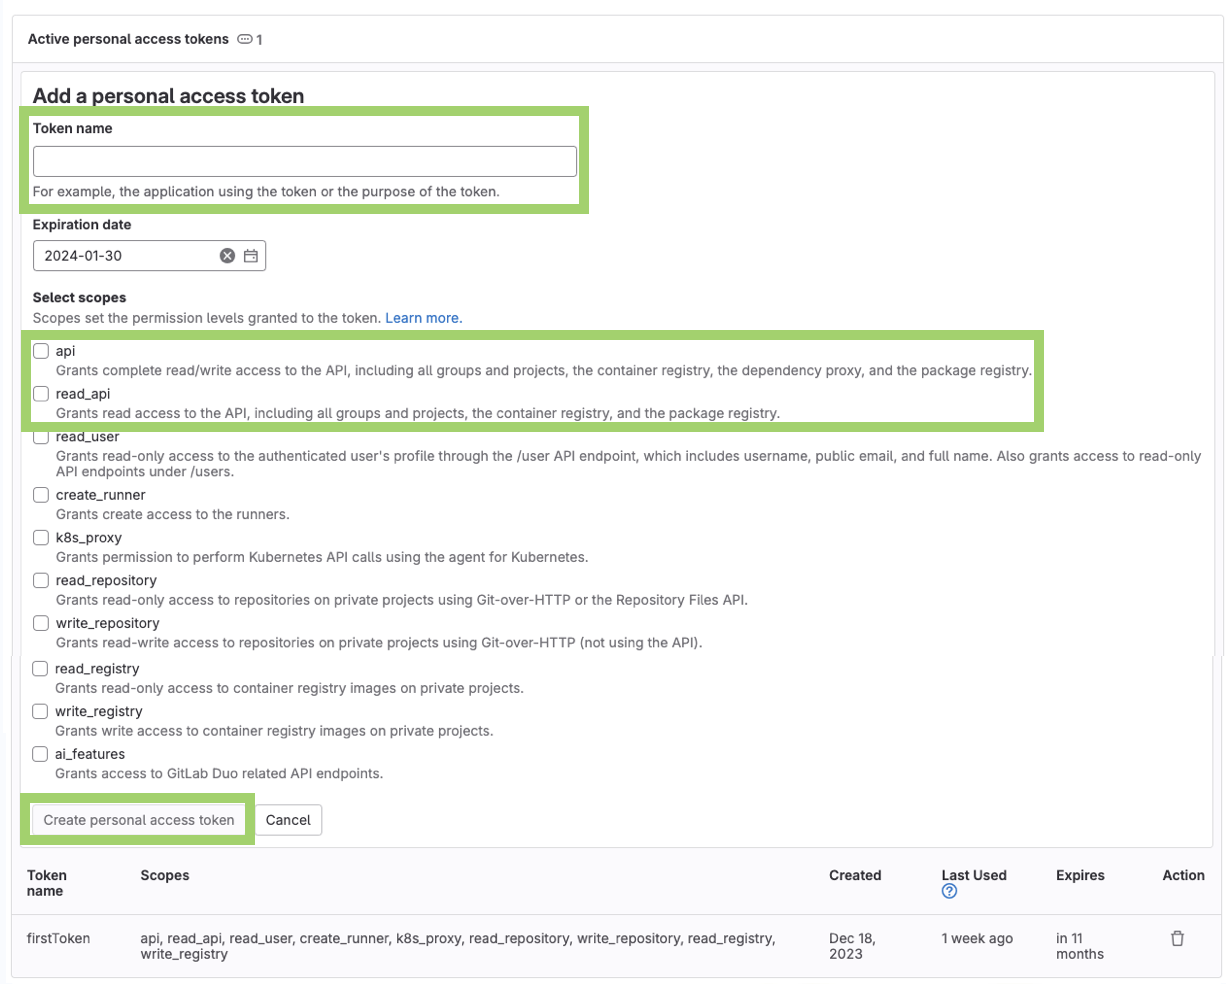
-
Enter a name and select permissions for your token: select the api and read_api permissions, and add other permissions according to your environment. When you are done, click Create personal access token.
-
Copy the token you created, and paste it into the Password field in Artifactory.
-
-
Click Save & Finish.
-
Create a new virtual repository and under Repositories, select the remote repository you have created.
-
Under Include/ Exclude Patterns, add the include pattern for GitLab, and click the + sign to add the pattern.
- For GitLab Self-managed, enter your environment URL in this structure:
**/<YOUR_URL>/** - For GitLab SaaS, enter
**/gitlab.com/**.
You can use the virtual repository to resolve artifacts from your GitLab private registry.
- For GitLab Self-managed, enter your environment URL in this structure:
Proxy Bitbucket Cloud with Go
Go Proxy Best Practice: Add Mirror Repository
JFrog highly recommends that you create a remote repository pointing to the default Go mirror (proxy.golang.org) and enter Artifactory as the Git provider. This way, Artifactory will be able to resolve cached public modules without querying the external registry, reducing the chance of rate limiting. For more information, see Set Up Go Proxy Mirror Repositories.
To create a remote repository that serves as a caching proxy for Bitbucket Cloud, follow these steps:
-
Create a new remote repository and set Go as the Package Type.
-
Set the Repository Key value, and enter
https://bitbucket.org/in the URL field. -
Scroll down to Go Settings and select Bitbucket Cloud for the Git Provider.
-
In the Advanced tab, enter your Bitbucket username and password. To generate a Bitbucket password:
-
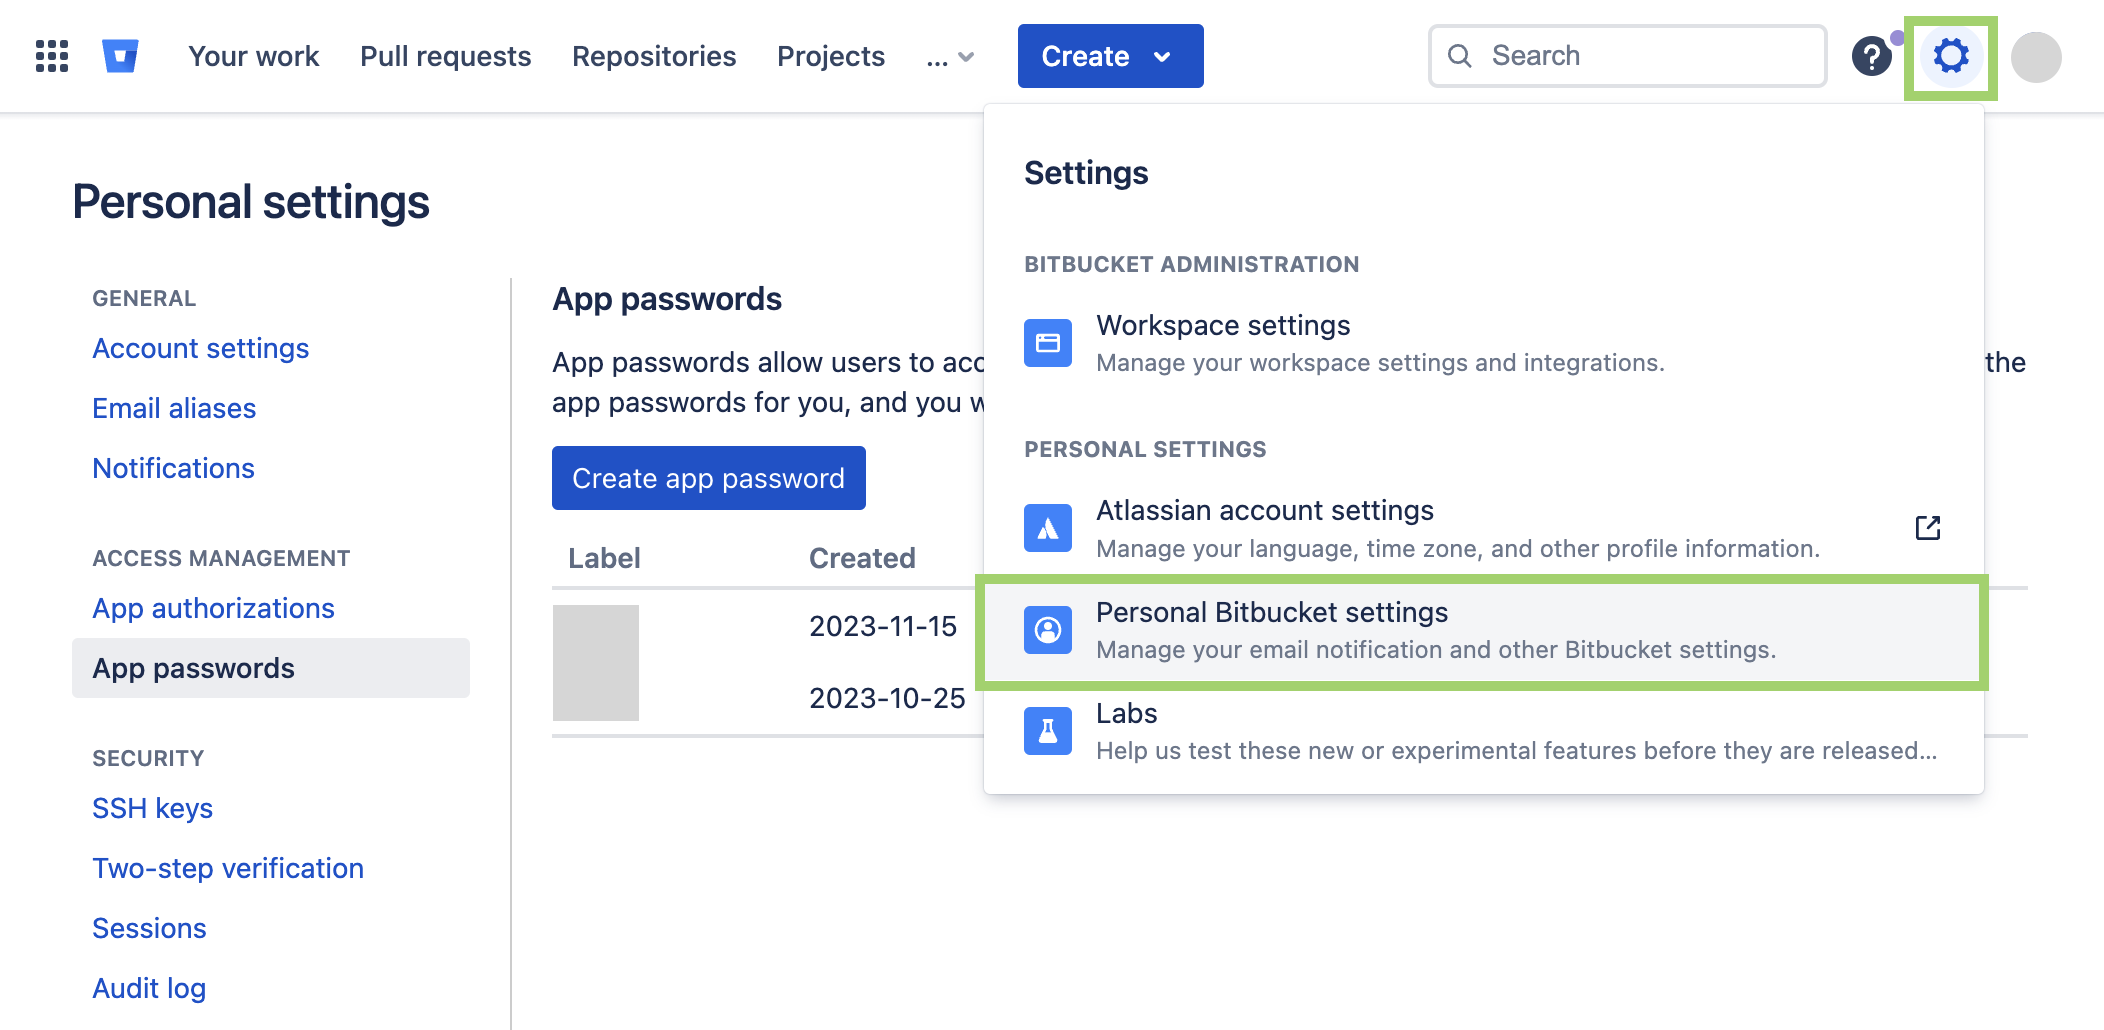
Go to your Bitbucket account, click the gear icon in the top right corner, and select Personal Bitbucket settings.
-
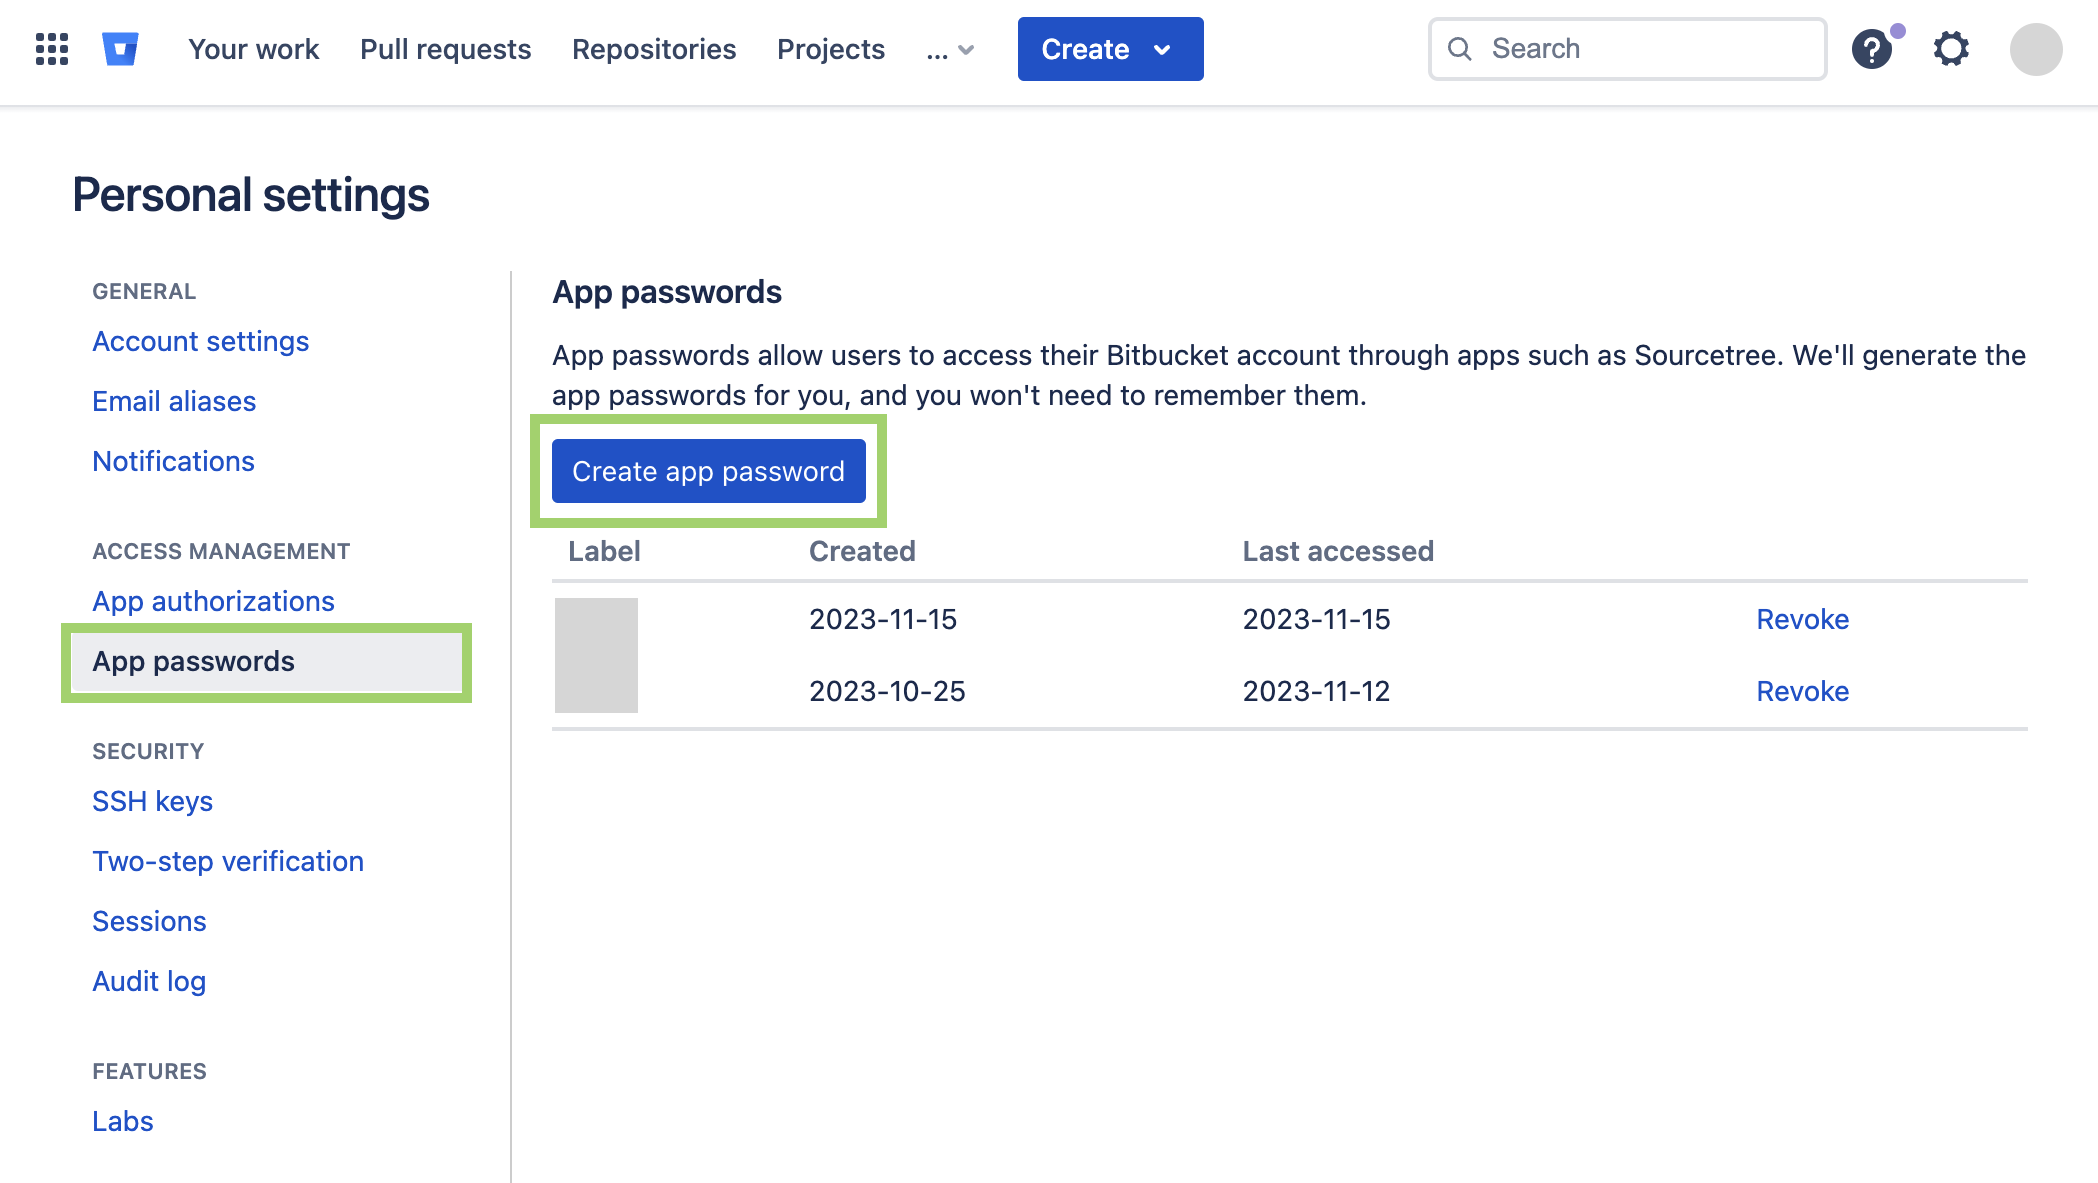
Go to App passwords, and click Create app password.
-
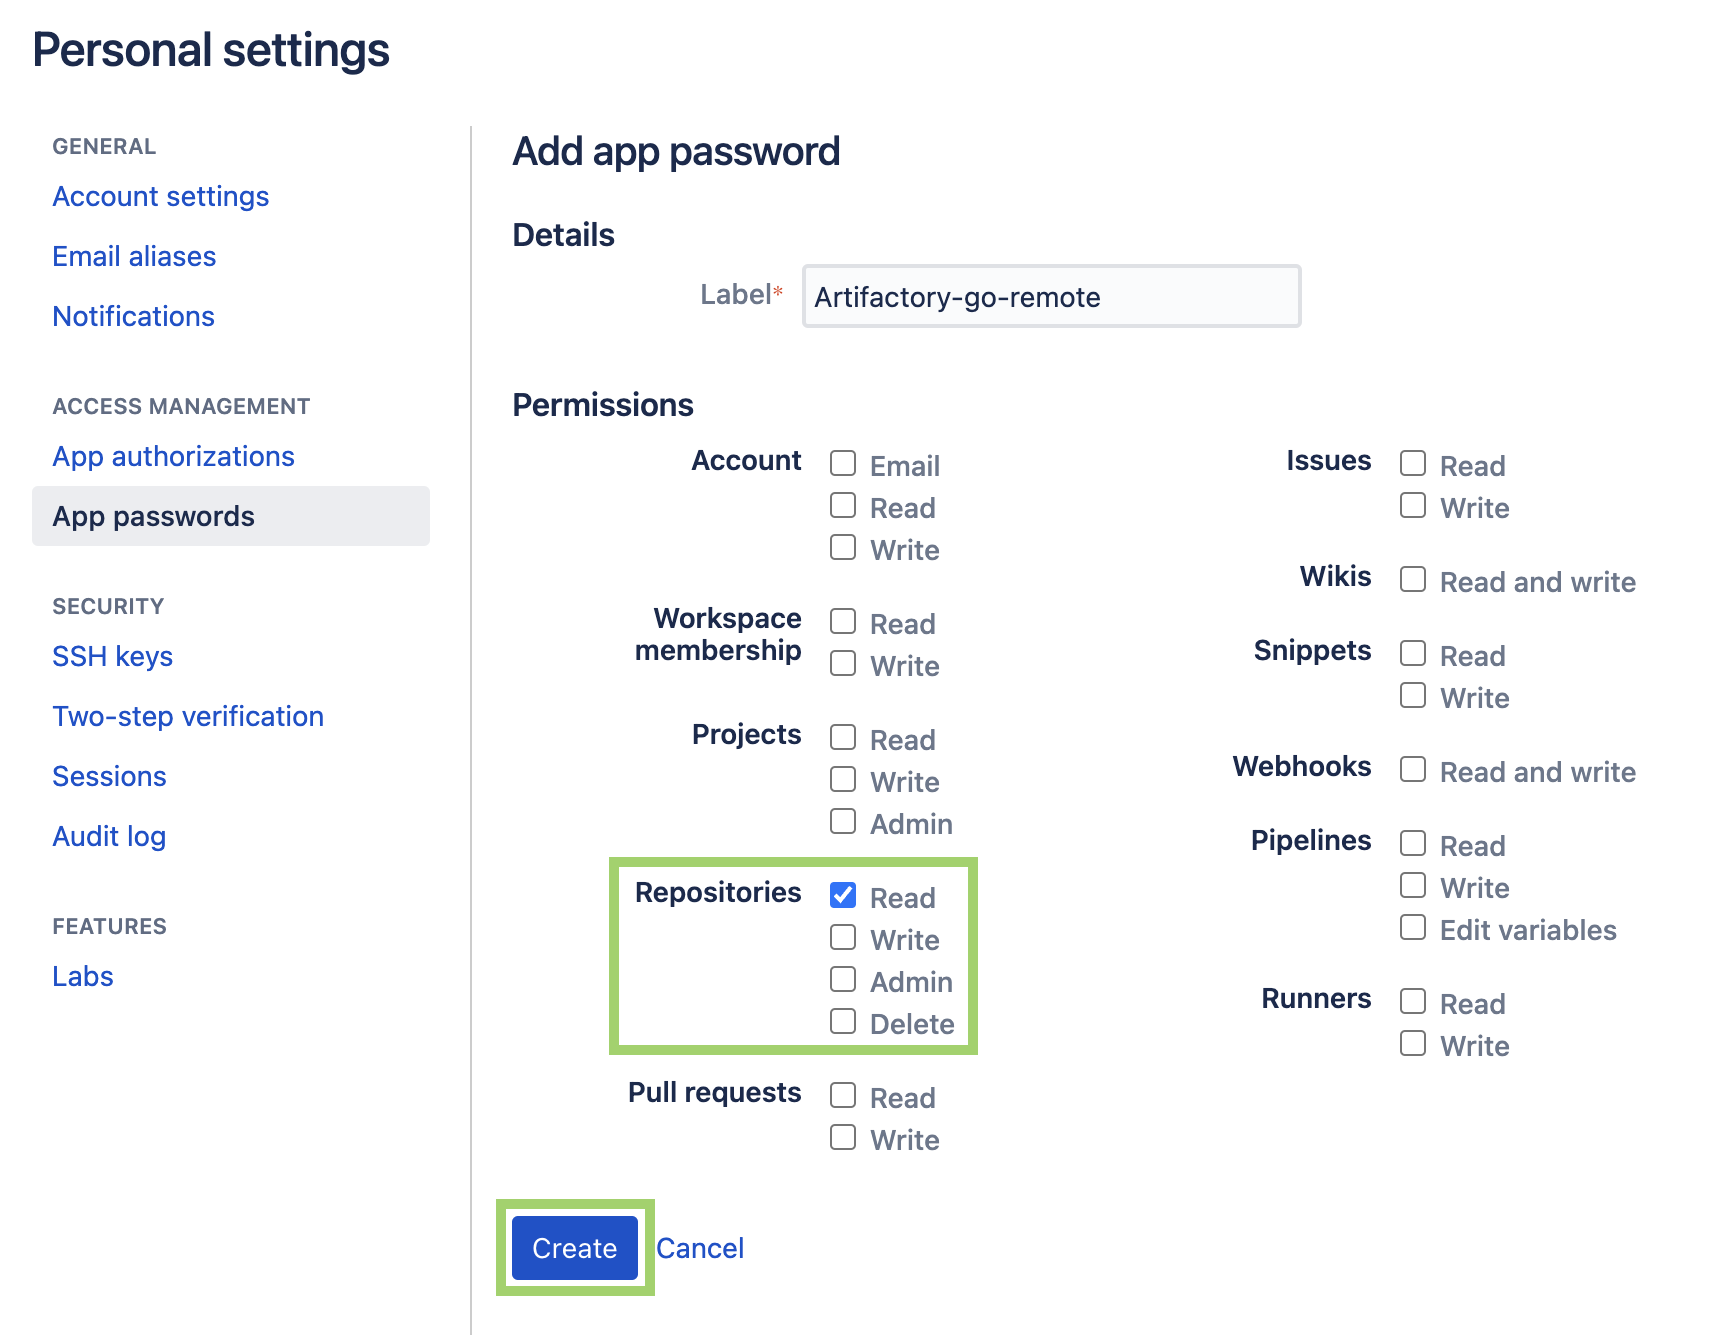
Select permissions for your password: select Read permission for Repositories, and if you need to, add other permissions according to your environment. When you are done, click Create.
-
Copy the password you created, and paste it into the Password field in the JFrog platform.
-
-
Click Save & Finish.
-
Create a new virtual repository and under Repositories, select the remote repository you have created. You can use the virtual repository to resolve artifacts from your Bitbucket Cloud private registry.
Proxy Bitbucket Server with Go
Go Proxy Best Practice: Add Mirror Repository
JFrog highly recommends that you create a remote repository pointing to the default Go mirror (proxy.golang.org) and enter Artifactory as the Git provider. This way, Artifactory will be able to resolve cached public modules without querying the external registry, reducing the chance of rate limiting. For more information, see Set Up Go Proxy Mirror Repositories.
To create a remote repository that serves as a caching proxy for Bitbucket Server, follow these steps:
-
Create a new remote repository and set Go as the Package Type.
-
Set the Repository Key value, and enter your Bitbucket URL in the URL field: for example,
https://git.acme.org/. -
Scroll down to Go Settings and select Bitbucket Server for the Git Provider.
-
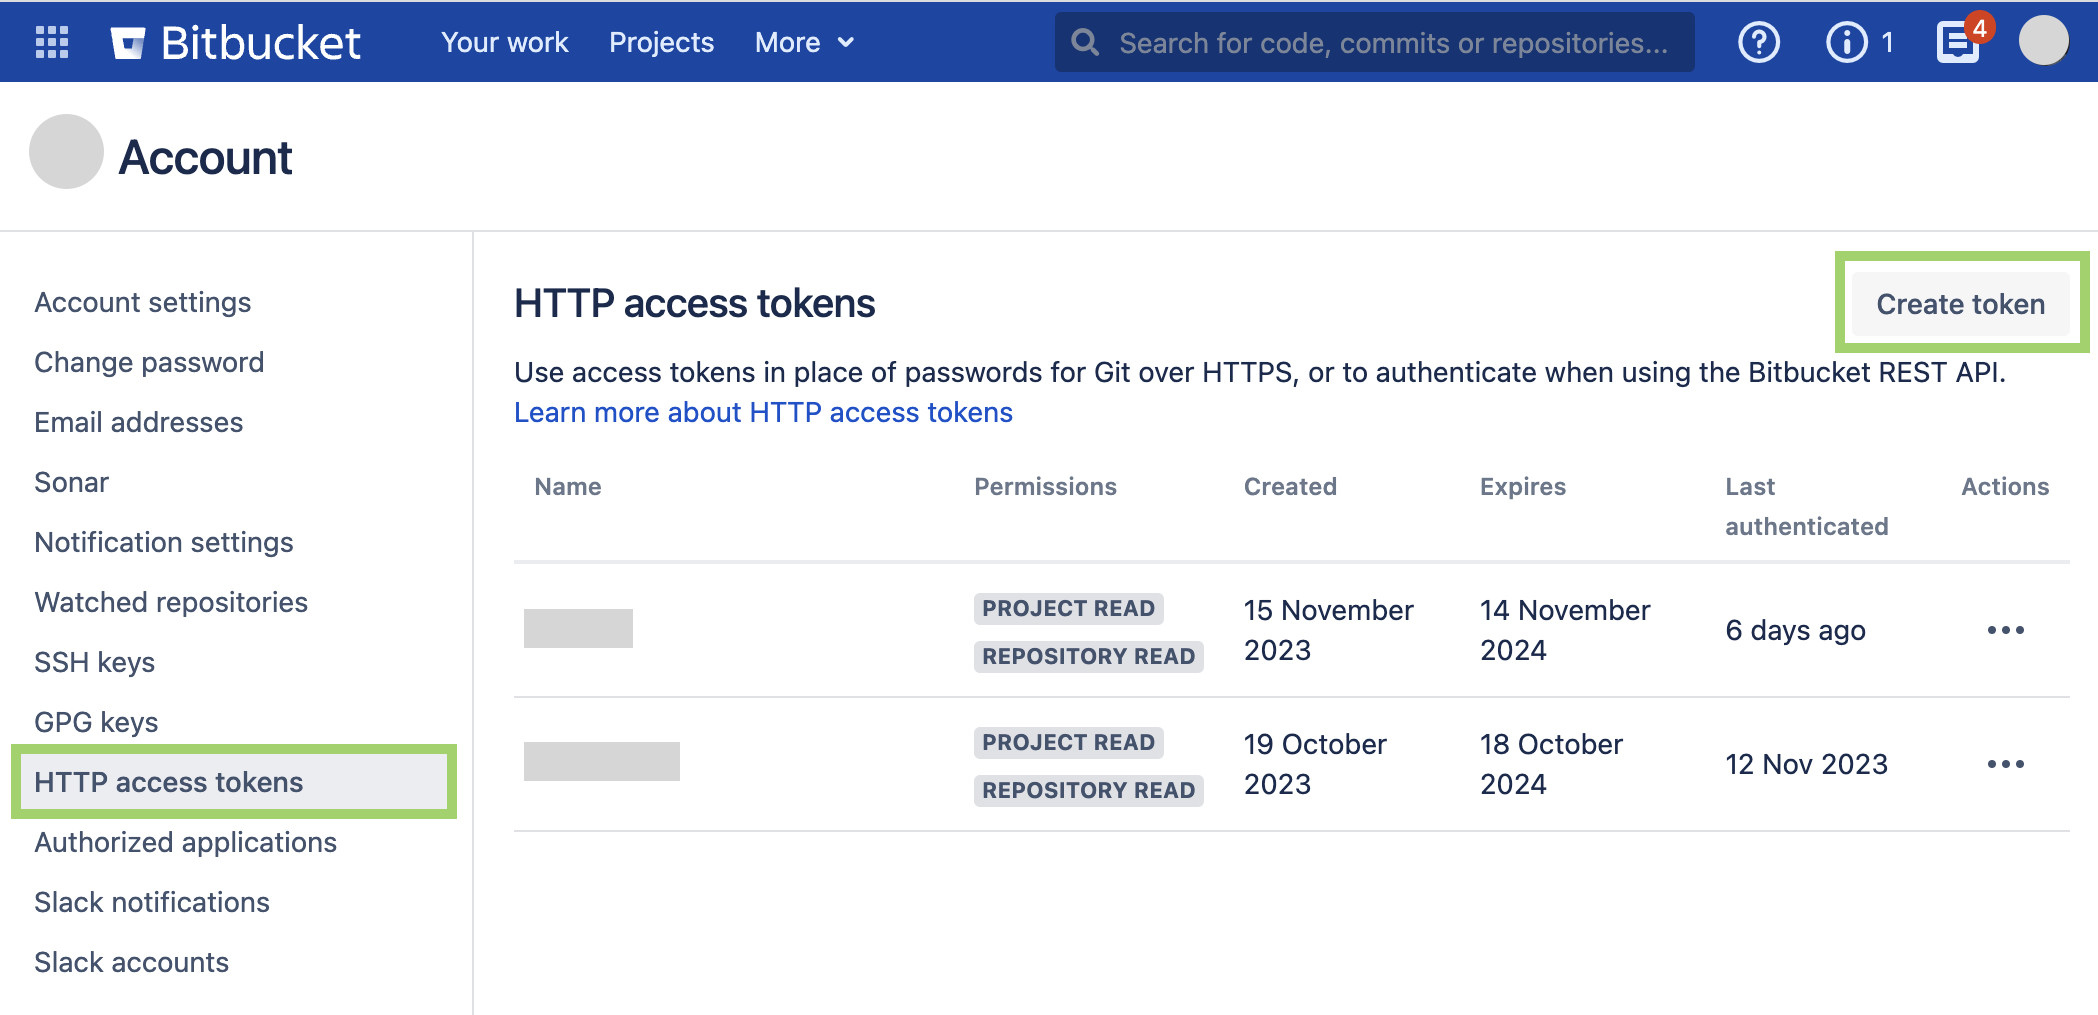
In the Advanced tab, enter the username Bitbucket account under Username, and your token under Password. To create a token:
-
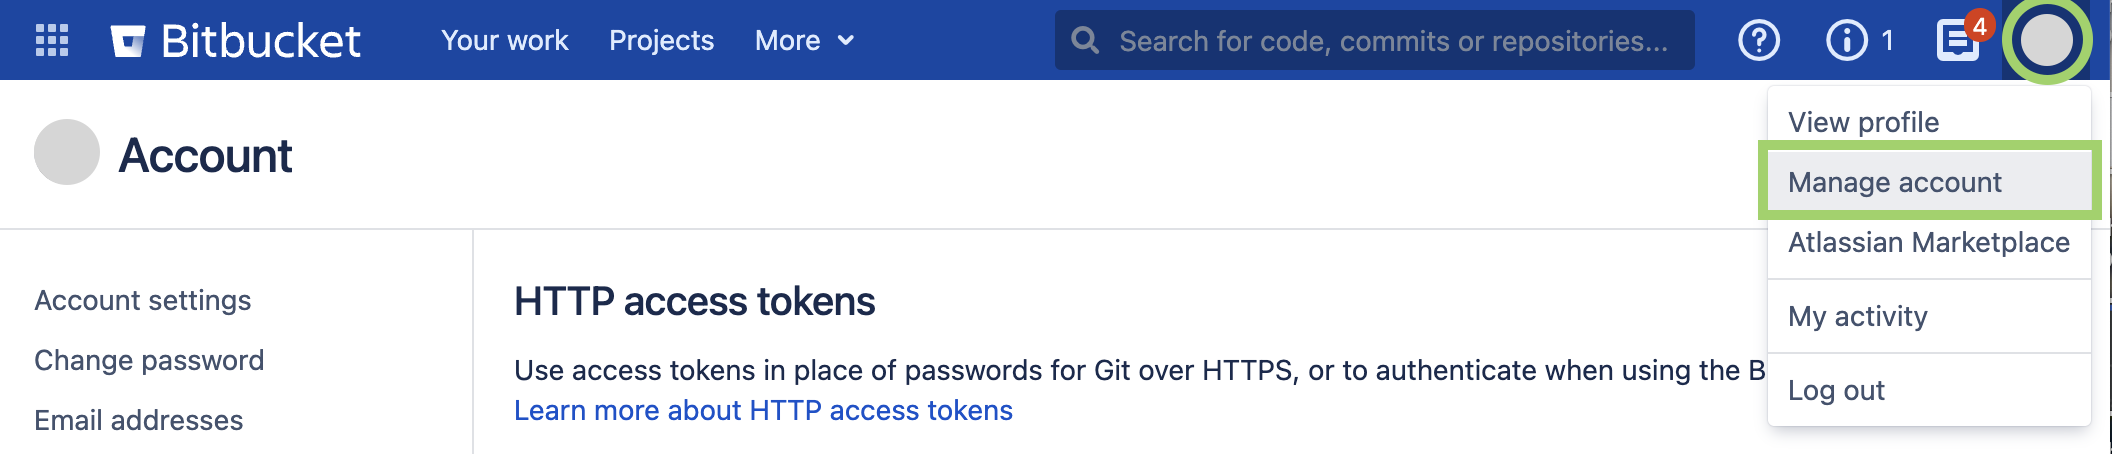
Go to your Bitbucket account, click your avatar in the top right corner, and select Manage account.
-
Go to HTTP Access tokens, and click Create token.
-
Give a label and select permissions for your password: select Read permission for Repositories, and if you need to, add other permissions according to your environment. When you are done, click Create.
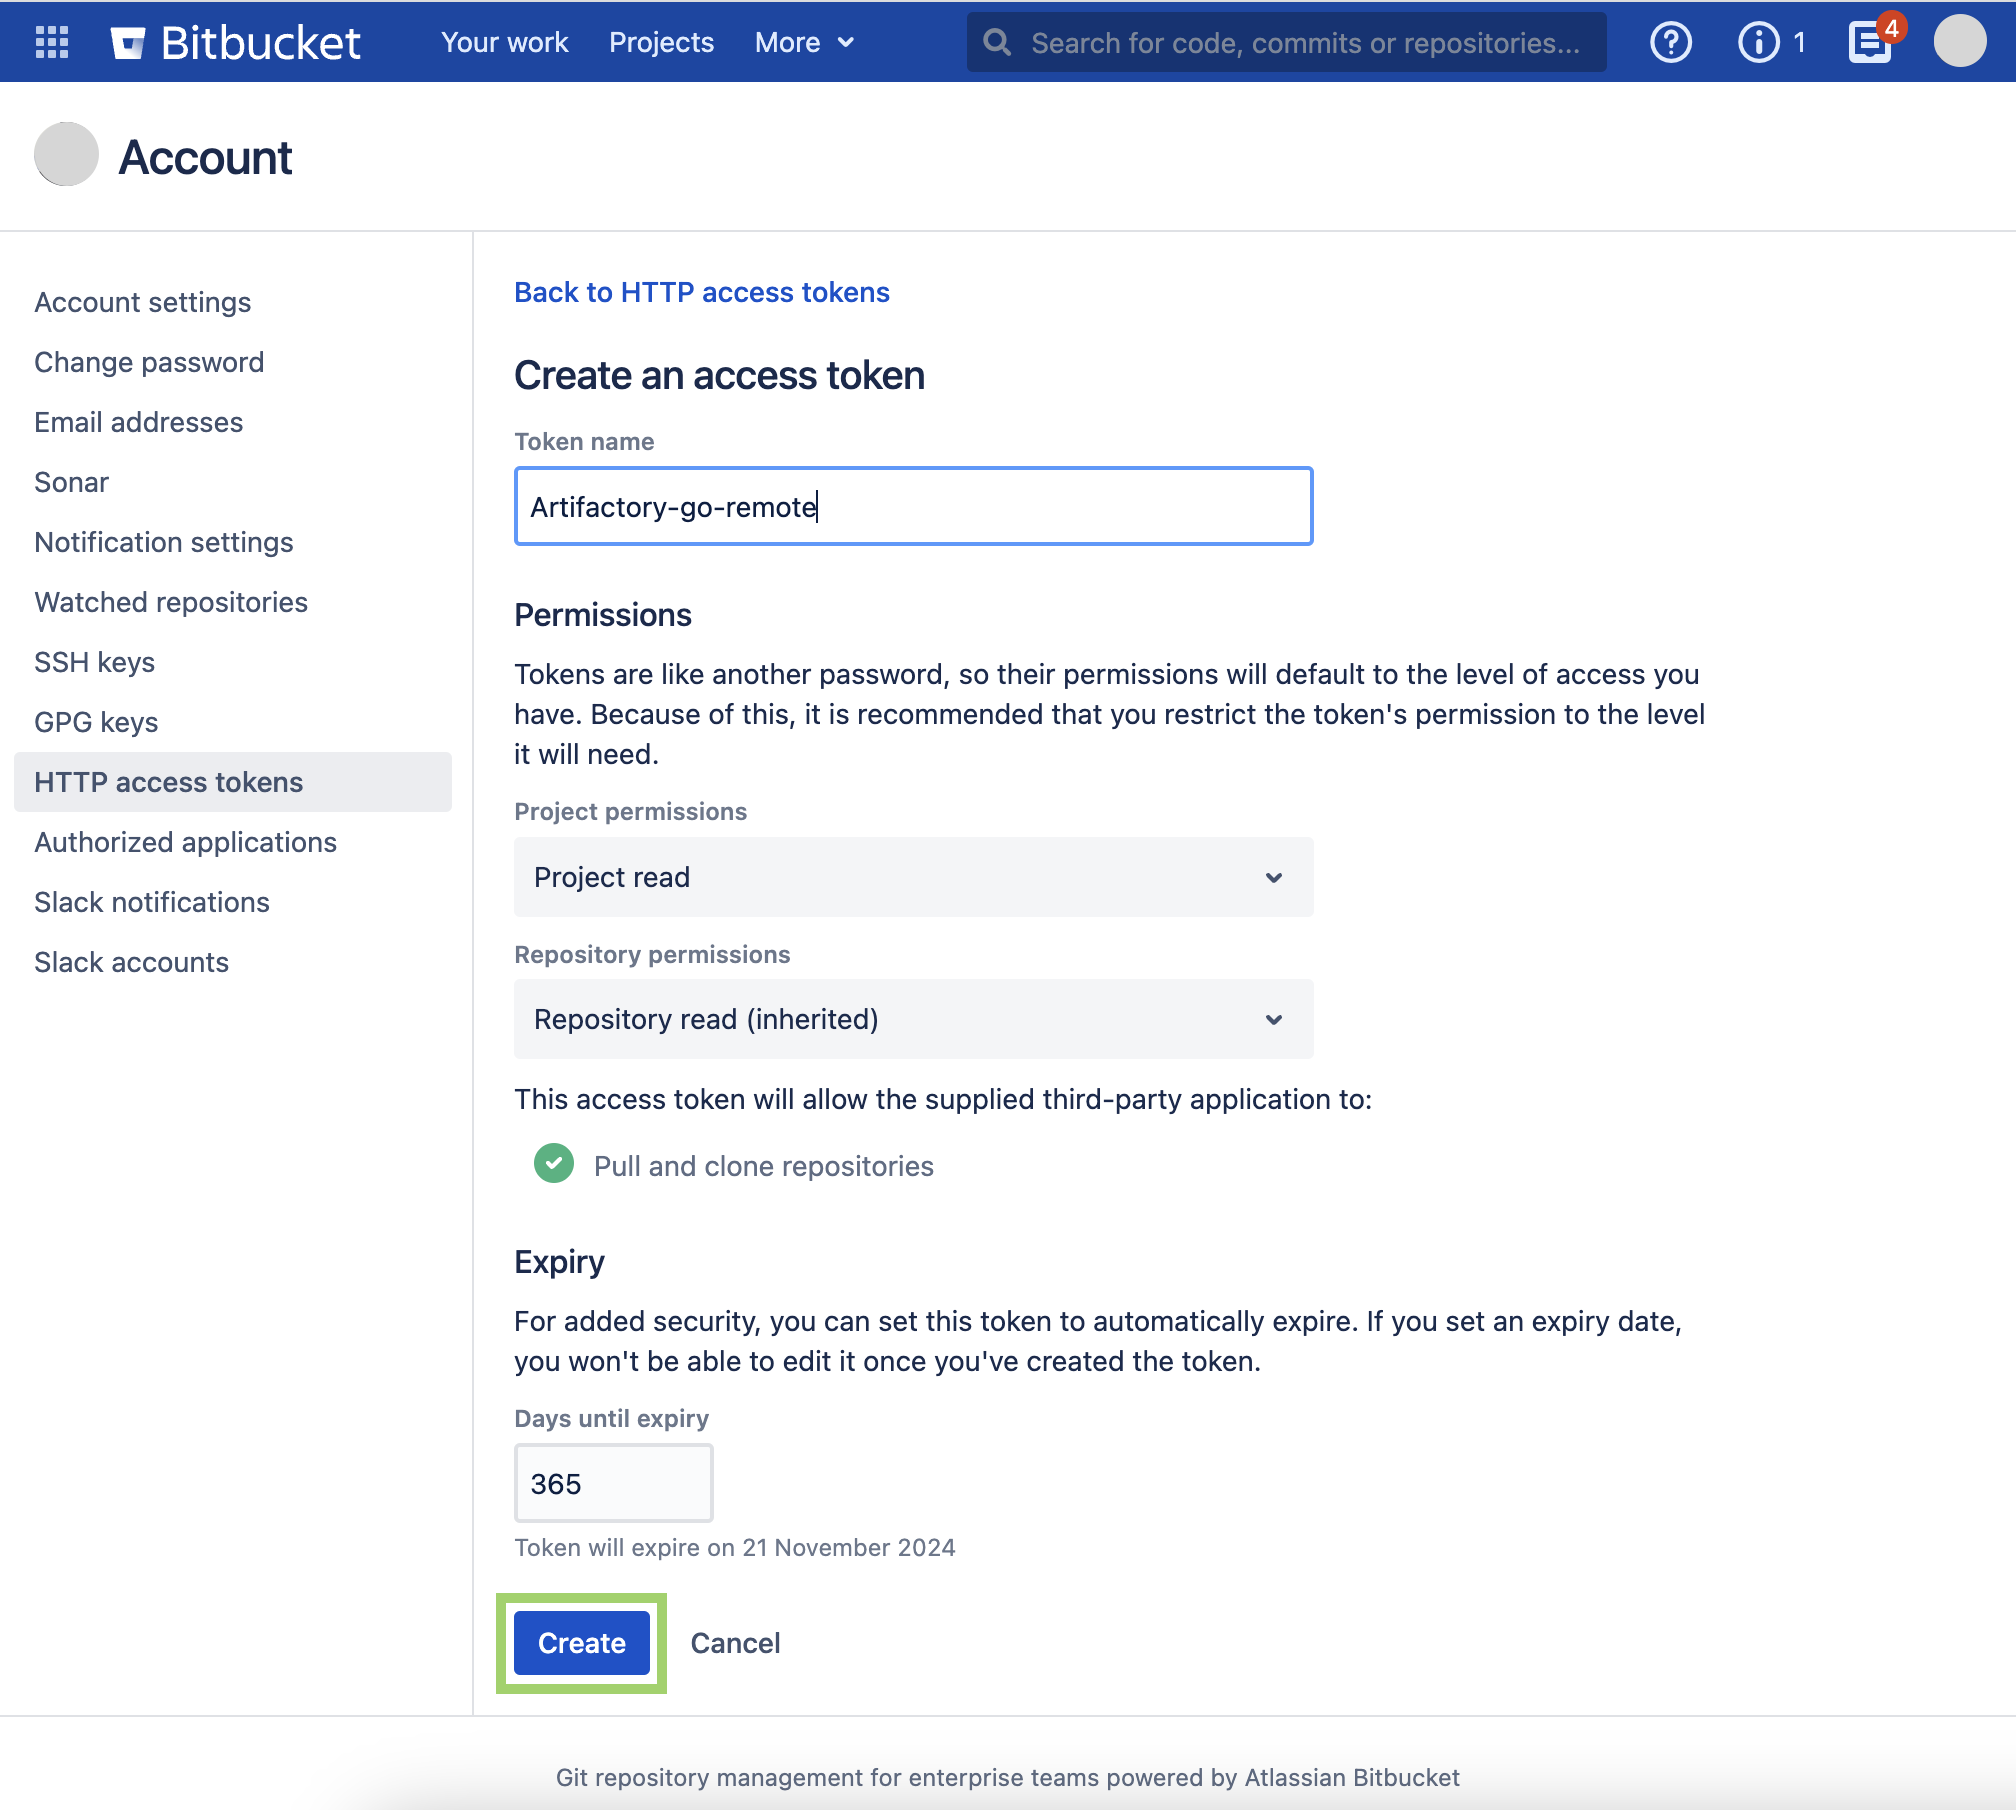
-
Copy the token you created, and paste it into the Password field in the JFrog platform.
-
-
Click Save & Finish.
-
Create a new virtual repository and under Repositories, select the remote repository you have created. You can use the virtual repository to resolve artifacts from your Bitbucket Server private registry.
Work with GOSUMDB
Go Client 1.13 introduced support for checksum verifications of modules against a central server (sum.golang.org). Artifactory can proxy and cache requests to sum.golang.org for clients that use Artifactory as a Go proxy. This feature works without any additional configurations for remote sites pointing to GitHub or another Artifactory server.
You can override the default central server used by Artifactory to provide the checksums by adding the property artifactory.go.sumdb.url.override= https://... to your Artifactory's system properties.
You can disable this feature by adding the property artifactory.go.sumdb.enabled=false.
Private GitHub repositories and some remote sites do not provide checksums. The Go client in those cases will complain about missing the checksum. You can control this feature on the client side with the GOPRIVATE and GONOSUMDB environment variables. See the Go 1.13 Modules environment variables for full details.
Advanced Configuration for Virtual Go Repositories
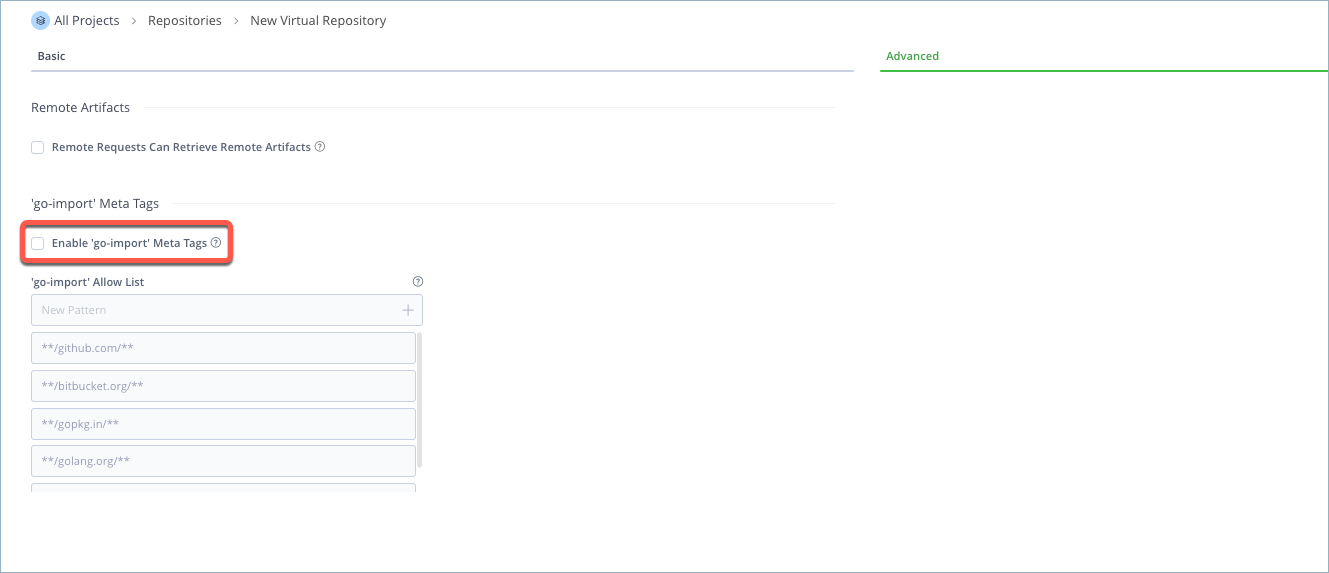
Some Remote Import Paths may use go-import meta tags on the remote repository response body to declare the location of a remote VCS root to follow. By default, this behavior is enabled in virtual Go repositories, and Artifactory will follow these tags to download remote modules. To disable this behavior, select the Advanced tab and then uncheck the Enable 'go-import' Meta Tags checkbox, as shown below.
Field | Description |
|---|---|
Enable 'go-import' Meta Tags | When checked (default), Artifactory will automatically follow remote VCS roots in |
'go-import' Allow List | An Allow List of Ant-style path patterns that determine which remote VCS roots Artifactory will follow to download remote modules from when presented with For example, if you wish to limit remote |
Resolving GitLab Subgroups
GitLab has a feature called subgroups. When selecting GitLab as the Git provider for a Go remote repository, a checkbox appears called Resolve Subgroups (for configuration instructions, see Proxy GitLab with Go). When selected, Artifactory will determine sub-groups and sub-modules from URL paths and resolve any dependencies. If not selected, Artifactory will resolve Go modules by treating the /name/ as a submodule. By default, this checkbox is not selected.
The option to resolve subgroups was added to the Go remote repository configuration because GitLab implemented a change in the API path that is not part of the .git protocol. Artifactory can identify if the path is in fact a sub-group or a sub-module and resolve the correct dependency version.
Best Practices
Go remote repositories only work via a virtual repository. Therefore, a dedicated remote repository should be defined to the specific subgroup URL. You can decide on the remote resolution order, either go to a regular repository first and then a subgroup, or the other way around by ordering the list of remote repositories in the virtual repository.
Limitations of Go in Artifactory
- Go remote repositories can only be accessed directly through a virtual repository. To resolve an artifact from a remote repository, you must create a virtual repository, connect it to the remote repository, and use it to resolve the artifact.