Create Release Bundles (v1)
Important
This section describes how to create Release Bundles v1. For information about creating Release Bundles v2, which were introduced in Artifactory 7.63.2 as part of Release Lifecycle Management, see Create Release Bundles (v2).
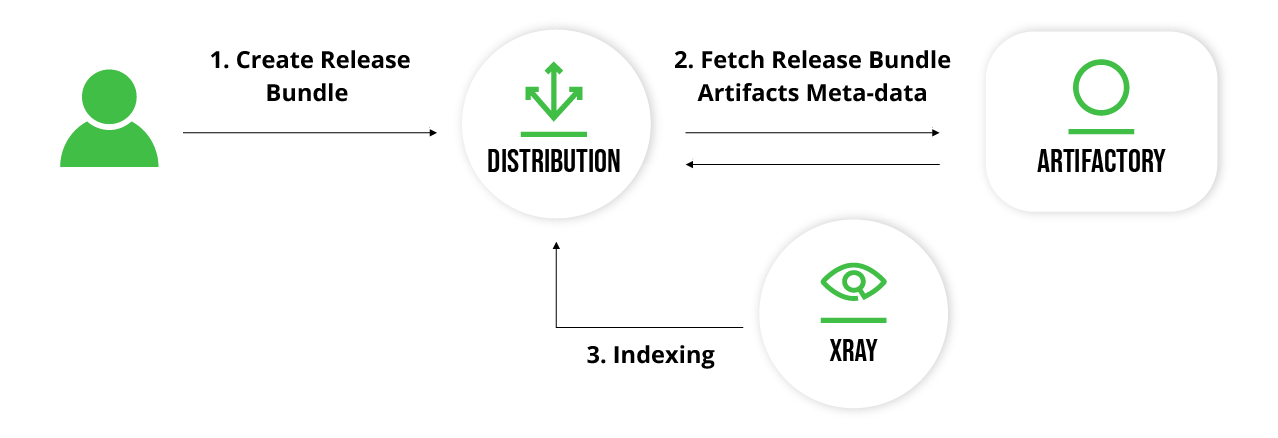
JFrog Distribution enables creating and distributing Release Bundles from the Artifactory service. Each Release Bundle may only contain artifacts from a single Artifactory service.
To create a Release Bundle, Distribution runs queries against the JPD in order to retrieve the required artifact references and their properties. Fetching the artifacts is performed according to the security privileges of the user who made the request.
To prevent tampering with the Release Bundle, it is signed by JFrog Distribution using a GPG key. The same GPG key is then used by the Artifactory Edge to validate the Release Bundle before it is accepted.
Note
A Release Bundle version can include up to 3,000 artifacts. This number is not limited by the product, but exceeding it is not recommended.
Methods for Creating Release Bundles
There are two methods for creating Release Bundles v1:
- Using the REST API
- Using the JFrog Platform UI
In either case, you define the artifacts to be included in the Release Bundle through a set of queries you can define.
In the final stages of creating a Release Bundle v1 in the JFrog UI, you can opt to save the Release Bundle in the following modes:
- Draft version: You can create a draft version that can be edited by clicking Create.
- Signed version (Unmodifiable): You can skip the draft phase by clicking Create & Sign to sign and finalize the process without a draft phase.
- To search for a specific Release Bundle by name or by the latest version, use the filter search.
- The total count for both Distributable and Received Release Bundles is also displayed in the UI.
Prerequisites
Creating a Release Bundle requires the Release Bundle 'Write' permissions.
Note
When creating a Release Bundle, matrix properties already defined for the artifacts are added to the Release Bundle. Additional custom properties can be added during the initial Release Bundle version created using the Create Release Bundle REST API. These properties are transferred over to the Edge Node as part of the distribution process.
Create a New Release Bundle through the Platform UI
Important
This section describes how to create Release Bundles v1. For information about creating Release Bundles v2, which were introduced in Artifactory 7.63.2 as part of Release Lifecycle Management, see Create Release Bundles (v2).
You can use the platform UI to create a Release Bundle containing the artifacts to be distributed. This includes general details about the Release Bundle, the AQL queries that define its contents, and optional release notes containing additional information about the Release Bundle.
To create a Release Bundle v1 using the platform UI:
-
From the Application module, select Distribution > Distributable, and then click New Release Bundle.
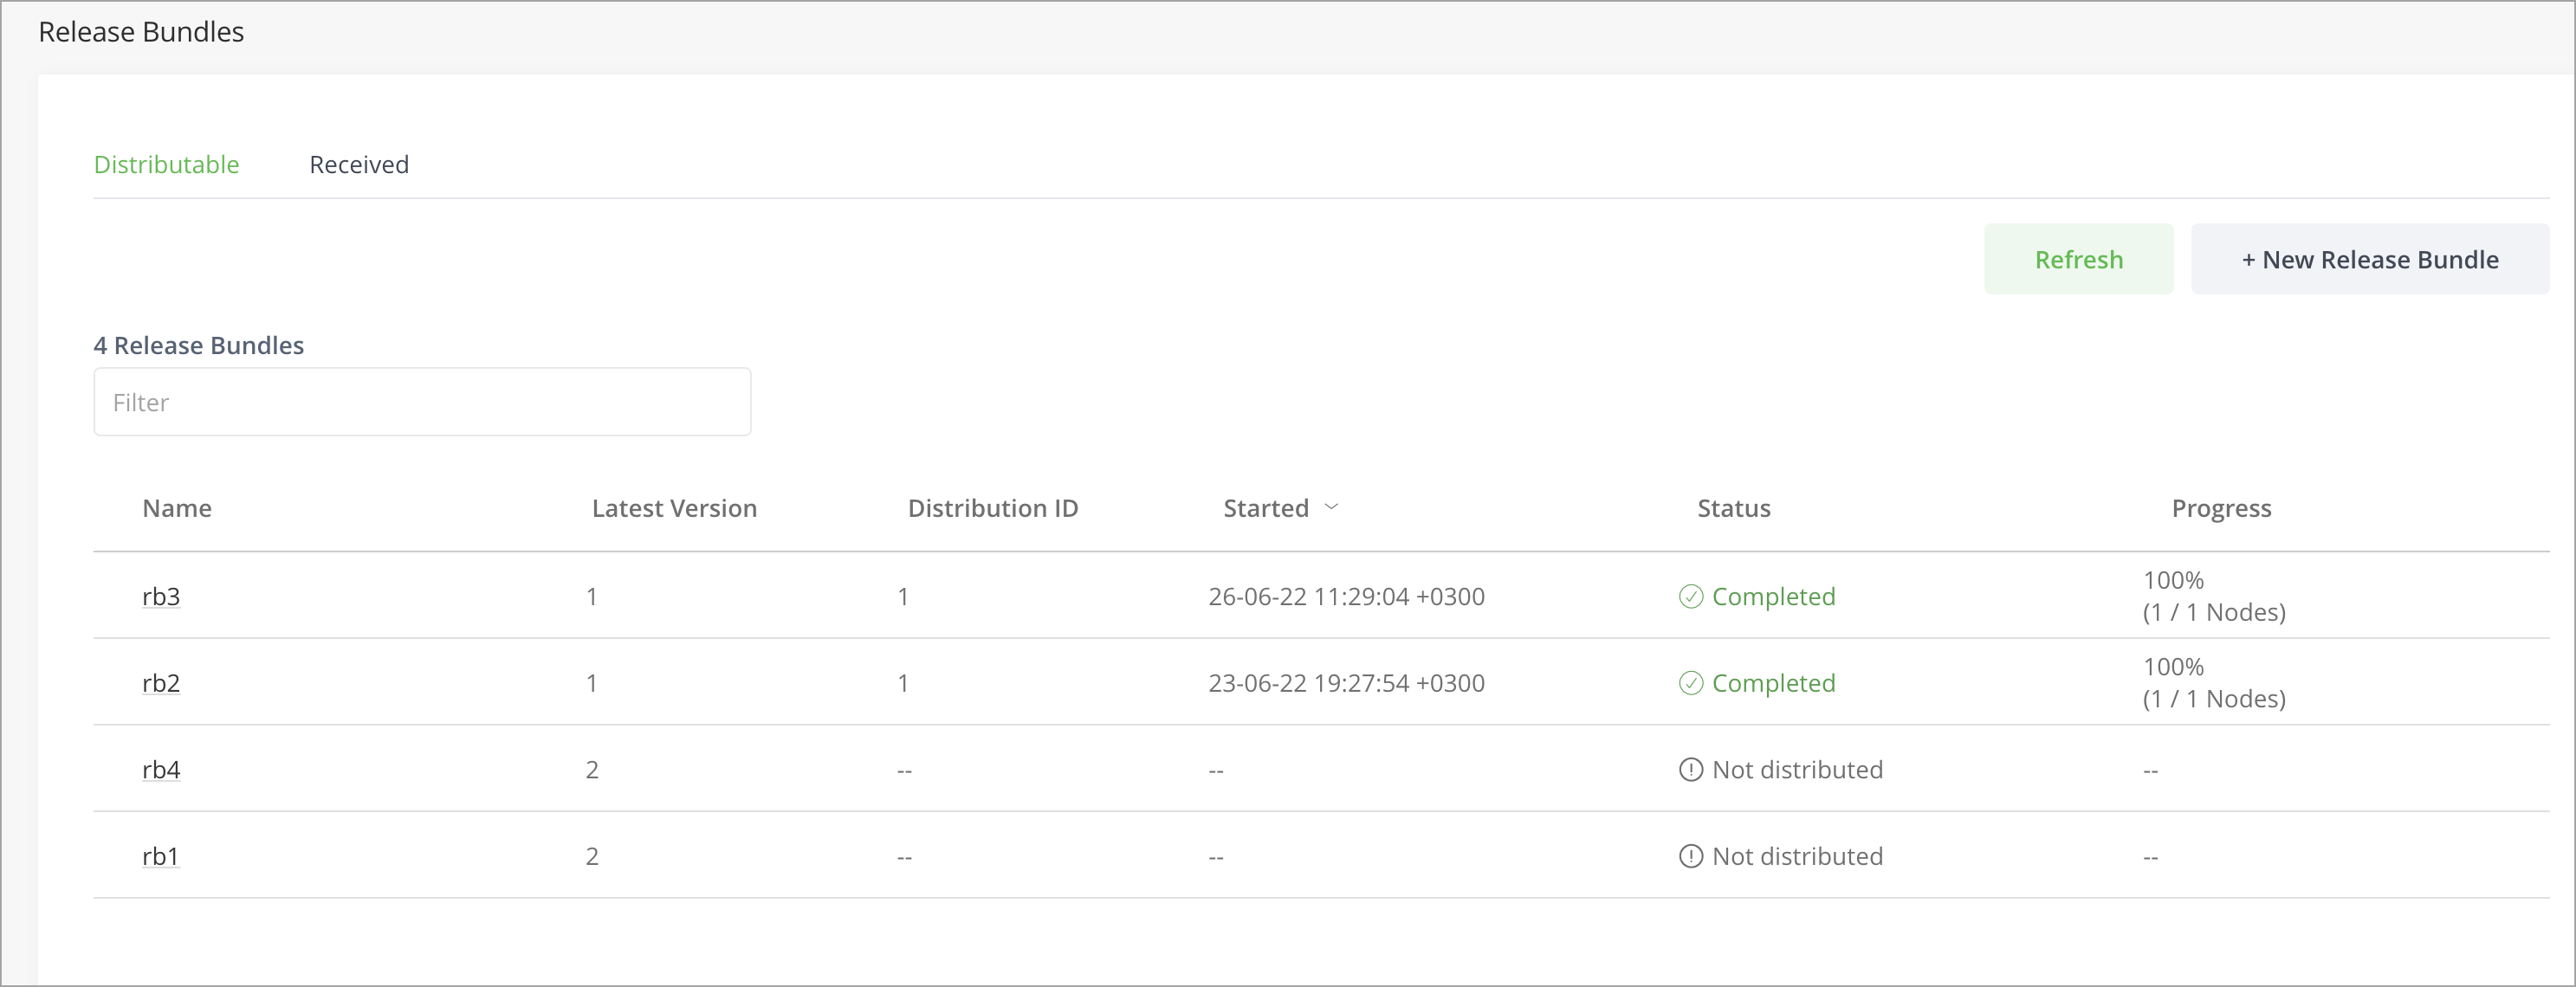
This displays the New Release Bundle window.
-
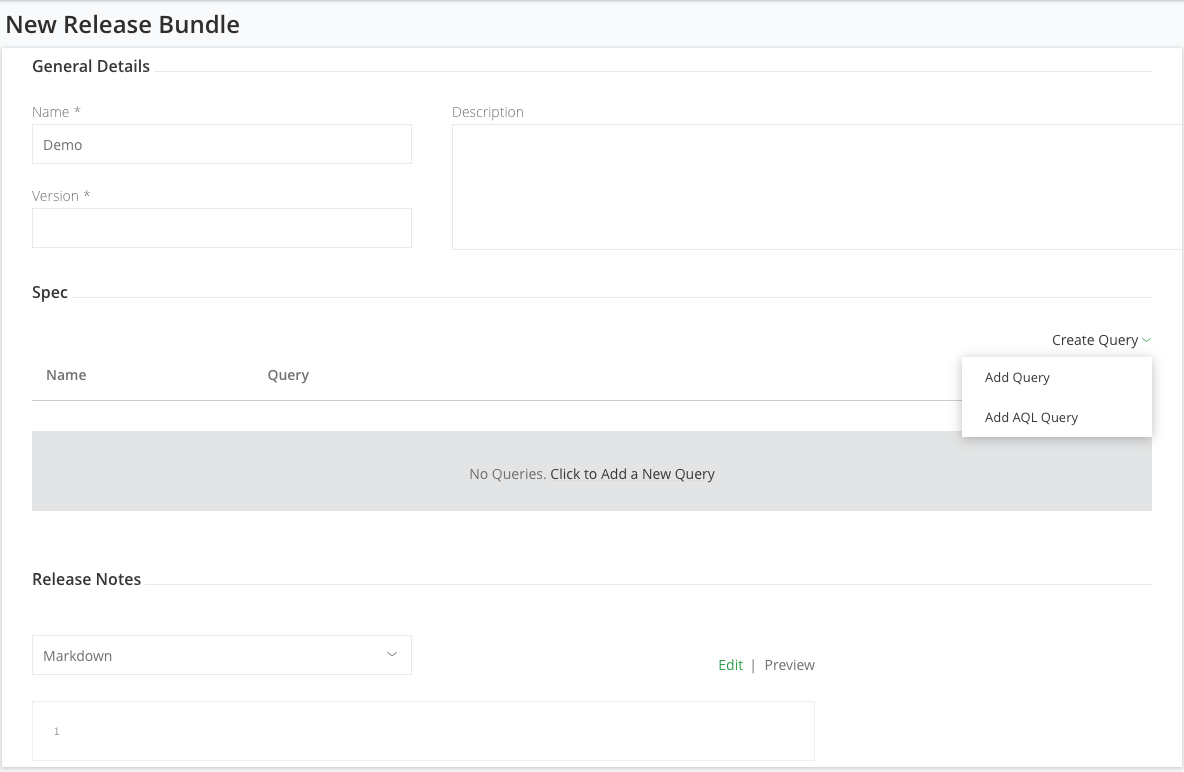
Enter the Release Bundle details according to the general details below, and then click Create Query (see Adding a Query for details).
The Release Bundle page is divided into three panels: General Details, Spec , and Release Notes.
General Details
| Field | Description |
|---|---|
| Name | The Release Bundle name. The Release Bundle name must start with an alphanumeric character followed by an alphanumeric or one of the following characters: - _ : . The maximum length is 255 characters. |
| Version | The Release Bundle version. The maximum length is 255 characters. |
| Description | The Release Bundle description. |
Spec
This section specifies the Artifactory service from which the Release Bundle will be assembled (remember, a Release Bundle can only be assembled from a single Artifactory service) and the different queries that will be used to assemble the artifacts. For more details on how to define the queries, see Adding a Query.
| Field | Description |
|---|---|
| Name | The query name. |
| Query | The query details. |
Release Notes
This section specifies release notes for the Release Bundle.
| Field | Description |
|---|---|
| Type | The release notes format. Supported types include Markdown, Asciidoc and Plain Text.
|
| Edit | Preview | Use these links to edit the release notes in your selected format and then preview how they will look once rendered. |
Adding a Query
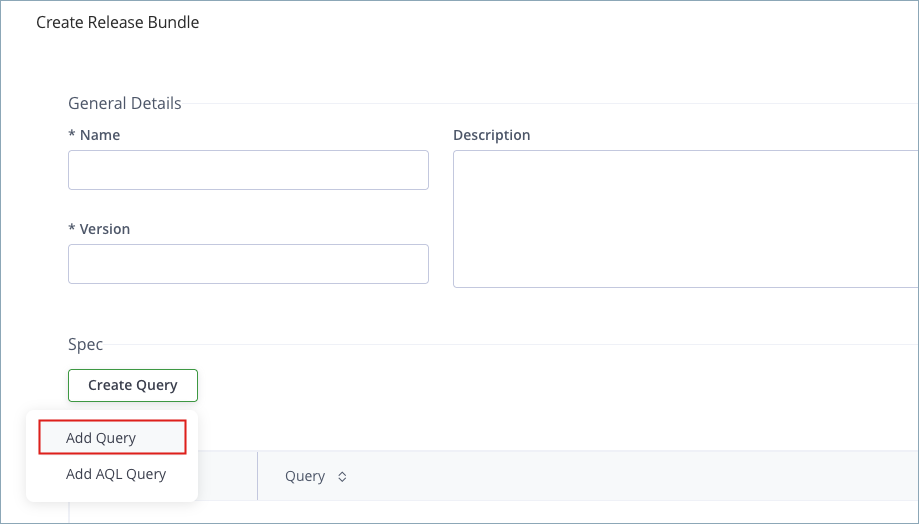
There are two ways to build a query:
To select the way you want to build your query, hover over Create Query and select either Add Query or Add AQL Query.
Use the Query Builder
The query builder lets you build your query by filling in a simple form. The parameters you enter are eventually translated into an AQL query which you can view by setting the Show AQL checkbox at the end of the form.
-
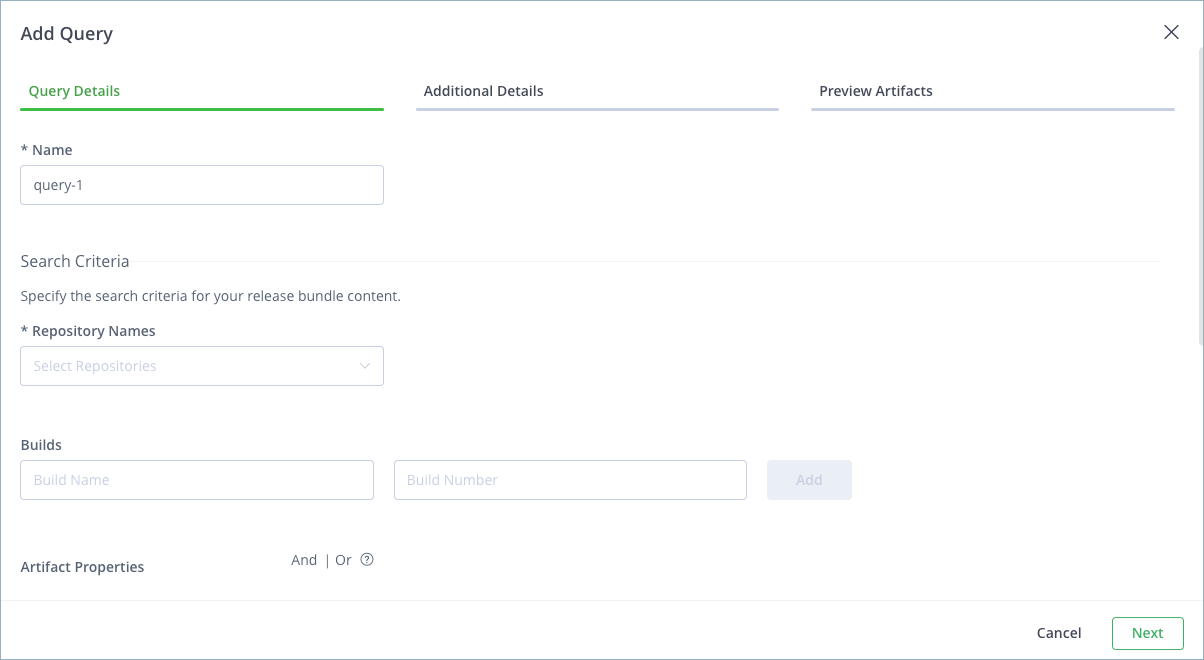
To use the query builder, hover over the Create Query button and select Add Query. This will launch a multi-step wizard.
-
In the Query Details step, start by giving your query a name. You can then specify different search criteria including:
- Repository names
- Build names and numbers
- Properties with specific values
- Include and Exclude patterns
-
To specify multiple values for each of these parameters, click the '+' button to the right of the parameter.
-
Using the And | Or options, you can add multiple properties in a single click of a button.
Use AQL
-
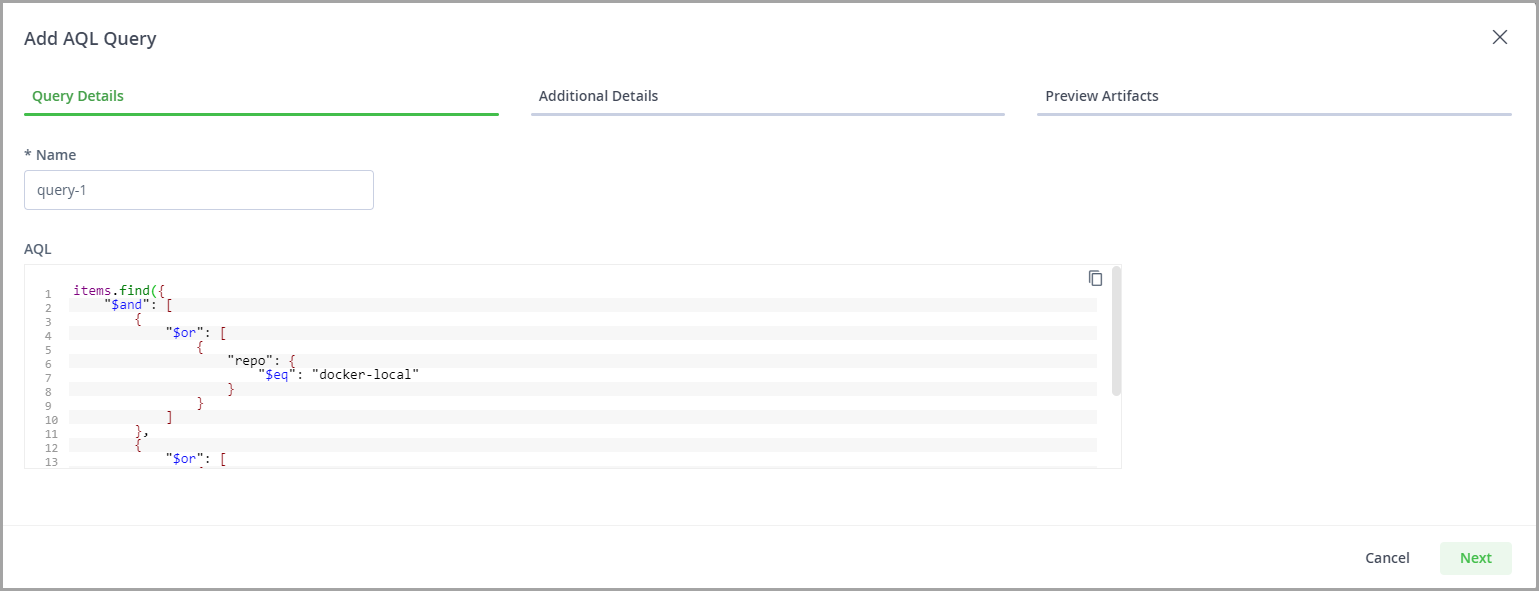
To add an AQL query, under Create Query, select Add AQL Query.
This will launch a multi-step wizard.
-
In the Query Details step, name your query and provide the AQL expression that will be used for assembling the artifacts, for example:
-
Click Next.
Note
As of Distribution 2.44.0, AQL queries are limited by default to a maximum length of 6000 characters. Self-managed users can modify or disable the limit by changing the value of the
aql-input-size-limitproperty. For more information, see Distribution Application Config YAML File.
Preview Artifacts
After specifying your query details (whether using an AQL query or the query builder), you can view the artifacts that will be included in your Release Bundle under the Preview Artifacts tab.
Note
If the source or target Artifactory service specified for the Release Bundle does not have a correct and valid license, Distribution will display an error that it cannot create the Release Bundle.
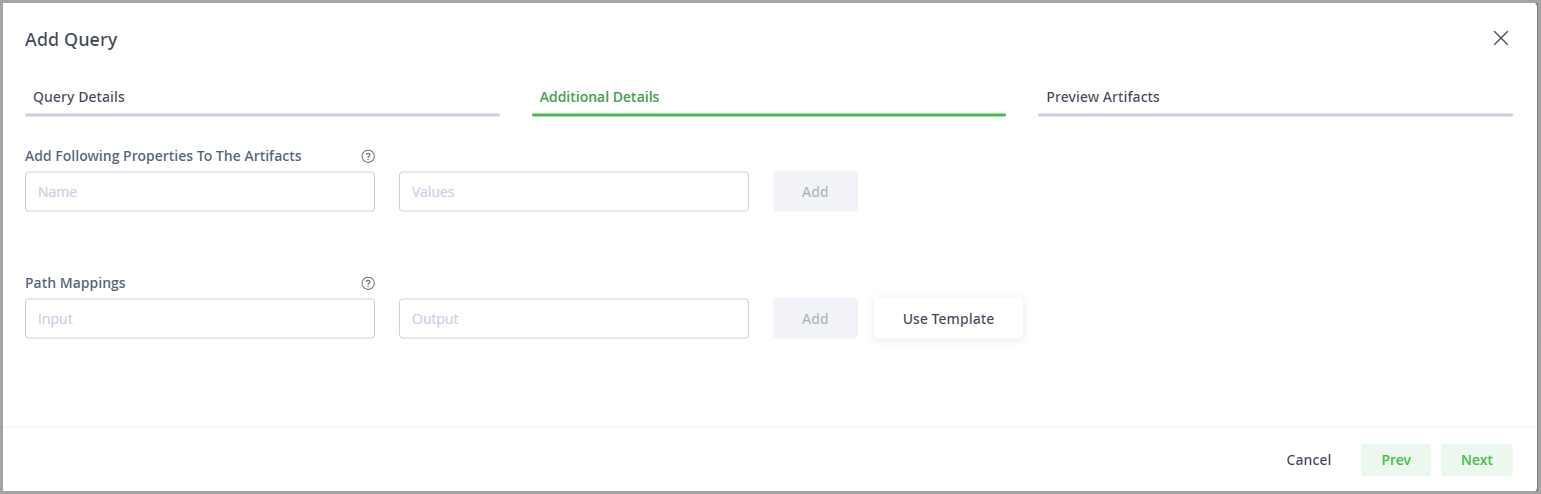
Additional Details Tab
The Additional Details tab lets you specify two more parameters for your Release Bundle:
| Parameter | Description |
|---|---|
| Additional Properties | Specify a list of properties that will be attached to all artifacts in your Release Bundle during the distribution process, in addition to those that they already have. |
| Path Mappings | Specify a list of mappings to govern where artifacts will be placed in your target Artifactory service according to their location in your source Artifactory service. You may use any of the Path Mapping Templates provided, or set up custom mappings of your own. |
Path Mapping Templates
As a convenience, JFrog Distribution provides a set of commonly used templates you can use to set up your path mappings. Simply select one of the templates listed under Use Template, and then modify the placeholders to correspond with your setup.
The templates provided are:
| Template | Description |
|---|---|
| Change Repository | All files in a specific repository on the source Artifactory service are mapped to a different repository on the target. |
| Change Folder | All files are moved to a specific folder in the target. |
| Rename Folder | All files in a specific folder on the source Artifactory service are mapped to a different folder on the target. |
Click Save and then click Create. This will create a draft Release Bundle that can be edited, signed, and then finally distributed.
Alternatively, you can skip the draft phase by clicking Create & Sign to sign and finalize the process without a draft phase (continue to Signing a Release Bundle).
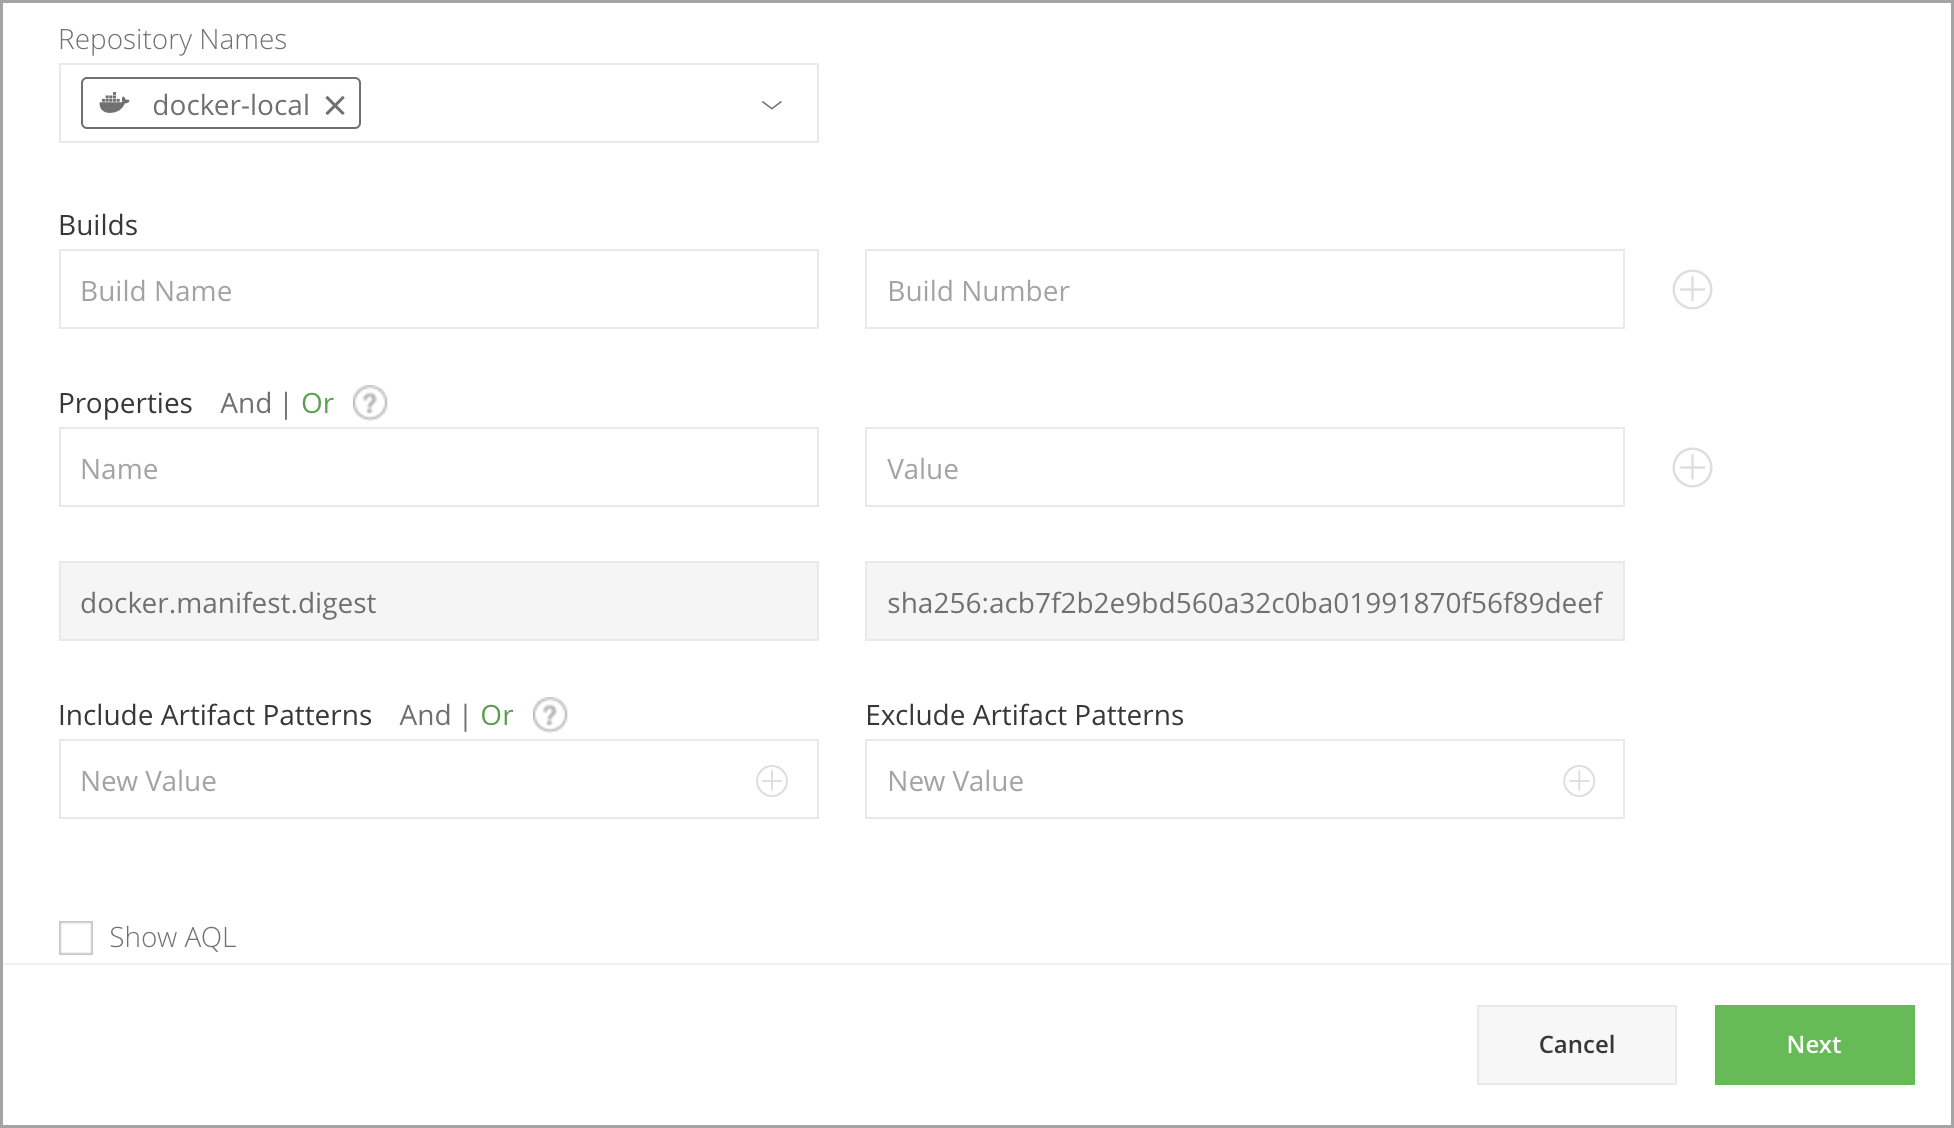
Including Docker Images in a Release Bundle
To include Docker image in the Release Bundle, it is sufficient to specify query criteria that will match the manifest.json of the desired docker image. Distribution will include all the Docker layers of the Docker image associated with that manifest.json file.
For example, we have a Docker image of a PostgreSQL version 11.1 in a Docker repository called docker-local.
The content of the repository has the following hierarchy:
The manifest.json file includes the following property:
docker.manifest.digest = sha256:acb7f2b2e9bd560a32c0ba01991870f56f89deeff5f3224bc50aac2a98b7f73e
All the other files under docker-local/postgres/11.1 are the layers composing this specific image.
Docker digest
The “digest” parameter is designed as an opaque parameter to support verification of a successful transfer. For example, an HTTP URI parameter might be as follows:
sha256:6c3c624b58dbbcd3c0dd82b4c53f04194d1247c6eebdaab7c610cf7d66709b3b
Given this parameter, the registry will verify that the provided content does match this digest.
To include all the artifacts in the image (manifest and layers) it is sufficient to specify a query criteria that will match the manifest.json of the desired Docker image:
AQL example
items.find({
    "$and": [
        {
            "$or": [
                {
                    "repo": {
                        "$eq": "docker-local"
                    }
                }
            ]
        },
        {
            "$or": [
                {
                    "@docker.manifest.digest": "sha256:acb7f2b2e9bd560a32c0ba01991870f56f89deeff5f3224bc50aac2a98b7f73e"
                }
            ]
        }
    ]
})
Include a List of Manifests in a Release Bundle
To include a multi-architecture Docker image in a Release Bundle, specify query criteria that will match the list.manifest.json file of the desired image. This file (also known as a fat manifest file), and all referenced images and manifest files, will be included in the Release Bundle v1.
Signing a Release Bundle
Important
This section is relevant for Release Bundles v1 only.
Signing a Release Bundle finalizes the process of creating a Release Bundle. This sets the Release Bundle status to Signed and the Release Bundle can no longer be edited.
Note
Signing a Release Bundle will trigger the Artifactory to clone the contents of the signed Release Bundle into an isolated Release Bundle Repository.
-
You can sign a Release Bundle from the Edit Release Bundle page or from the New Release Bundle page.
-
From Distribution release 2.14.1, if you are using multiple GPG signing keys in Distribution, you can now select which signing key to use in the Platform UI (previously available only from the REST API). If no key is selected, the default/primary key will be used to sign the Release Bundle.
-
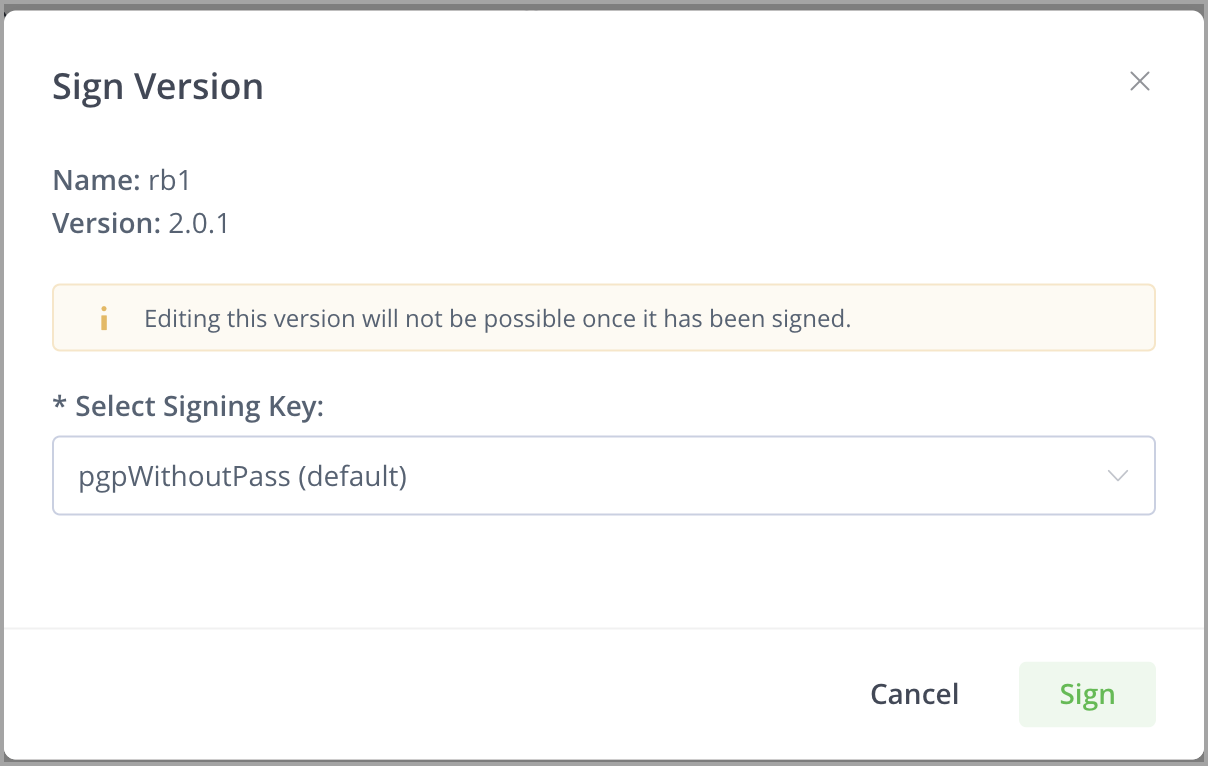
Click Sign Version.
-
In the Sign Version window, you will see the name of the Release Bundle and its version. From the Select Signing Key dropdown, select the signing key.
-
If the signing key was created with a passphrase, JFrog Distribution will prompt you to enter the passphrase.
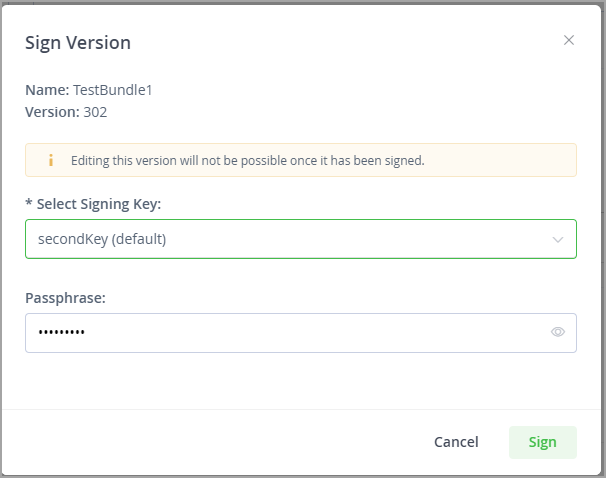
Important
Once you sign a version, you will not be able to edit it.
- Click Sign to sign your version.
- Next, continue to distributing your Release Bundle when ready.
Updated about 1 month ago