NuGet Repositories
The JFrog Artifactory integration with NuGet allows you to manage NuGet packages in Artifactory. NuGet is the package manager for Microsoft .NET. For more information, see NuGet website.
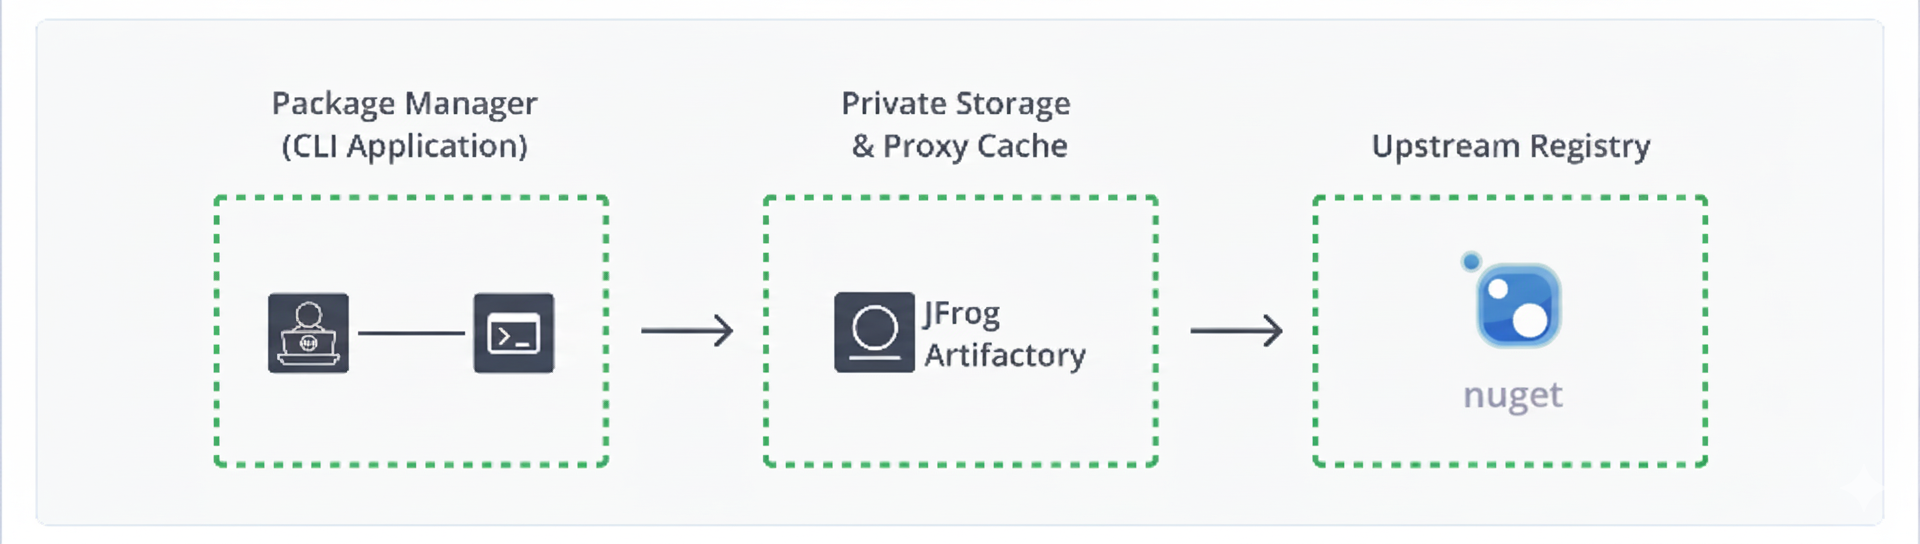
Artifactory fully supports NuGet repositories, including:
-
The ability to provision NuGet packages from Artifactory to NuGet clients from all repository types
-
Metadata calculation for NuGet packages hosted in Artifactory's local repositories
-
The ability to define proxies and caches to access Remote NuGet repositories
-
Multiple NuGet repository aggregation through virtual repositories
-
APIs to deploy or remove packages that are compatible with NuGet Package Manager Visual Studio extension and the NuGet Command Line Tool
-
Debugging NuGet packages directly using Artifactory as Your Symbol Server documentation.
-
Support for NuGet API v3 Registries.
Note
The PackageBaseAddress API is supported in normalized NuGet repositories (where Enforce Layout is enabled). It is not supported in non-normalized NuGet Repositories..
-
Support for NuGet SemVer 2.0 Package.
Metadata Updates
NuGet Metadata is automatically calculated when adding, moving, copying, or removing NuGet packages.
The calculation is only invoked once the action has been completed. It is also asynchronous and its performance depends on the overall system load, so it may take some time to complete, depending on the number of packages in the repository.
To invoke metadata calculation for a NuGet repository, select Reindex Packages.
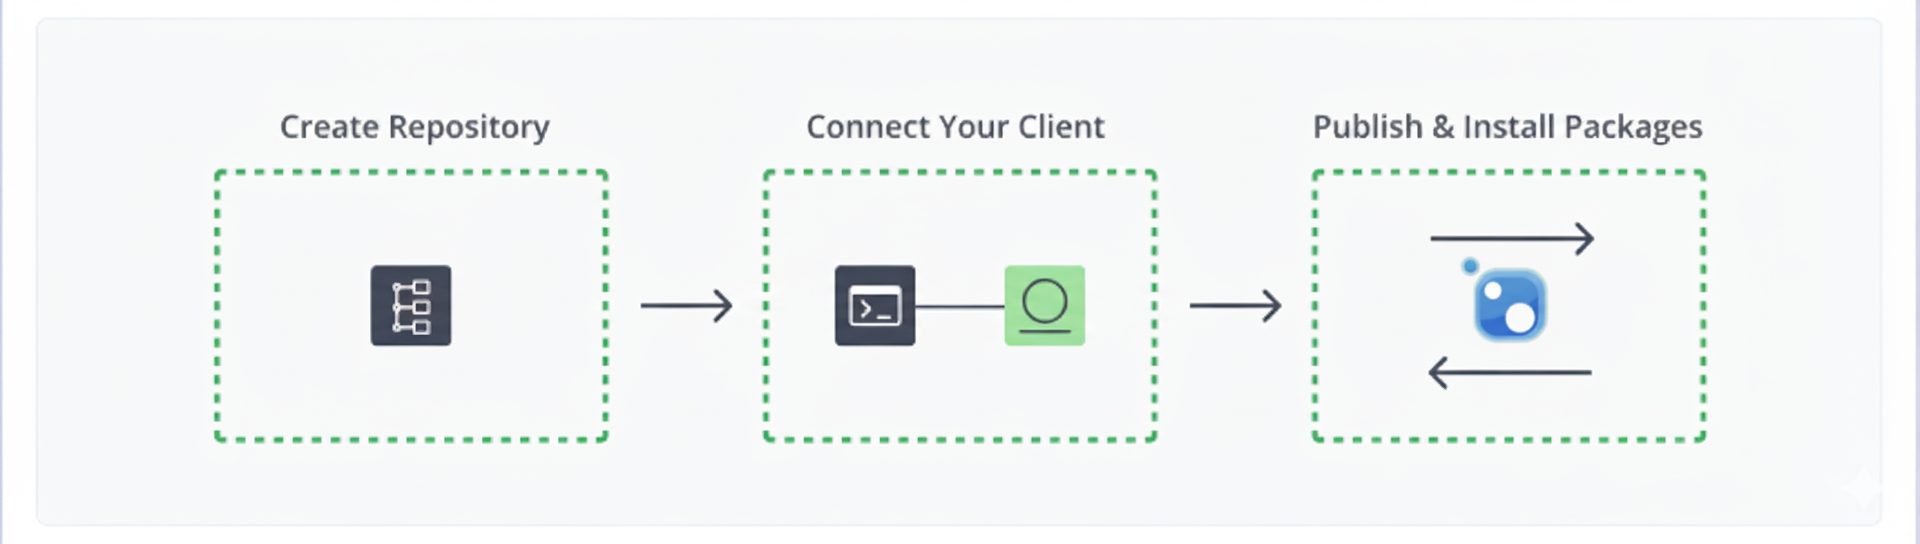
Get Started with NuGet
To get started working with NuGet, complete the following main steps:
- Create a NuGet Repository
- Connect Your NuGet Client to Artifactory
- Push and Install NuGet packages
Create a NuGet Repository
This topic describes how to create a NuGet Repository. This is required before publishing and installing NuGet packages. There are three primary types of repositories:
- Local repositories: Where you store and share 1st and 2nd party packages with your organization
- Remote repositories: Enable you to download from any remote location, including external package registries or other Artifactory instances
- Virtual repositories: Enable aggregating remote and local repositories, enabling your organization to scale by providing a single URL that allows access to multiple repositories and types
For more information on JFrog repositories, see Repository Management.
Prerequisite: You need Admin or Project Admin permissions to create a NuGet repository. If you don't have Admin permissions, the option will not be available.
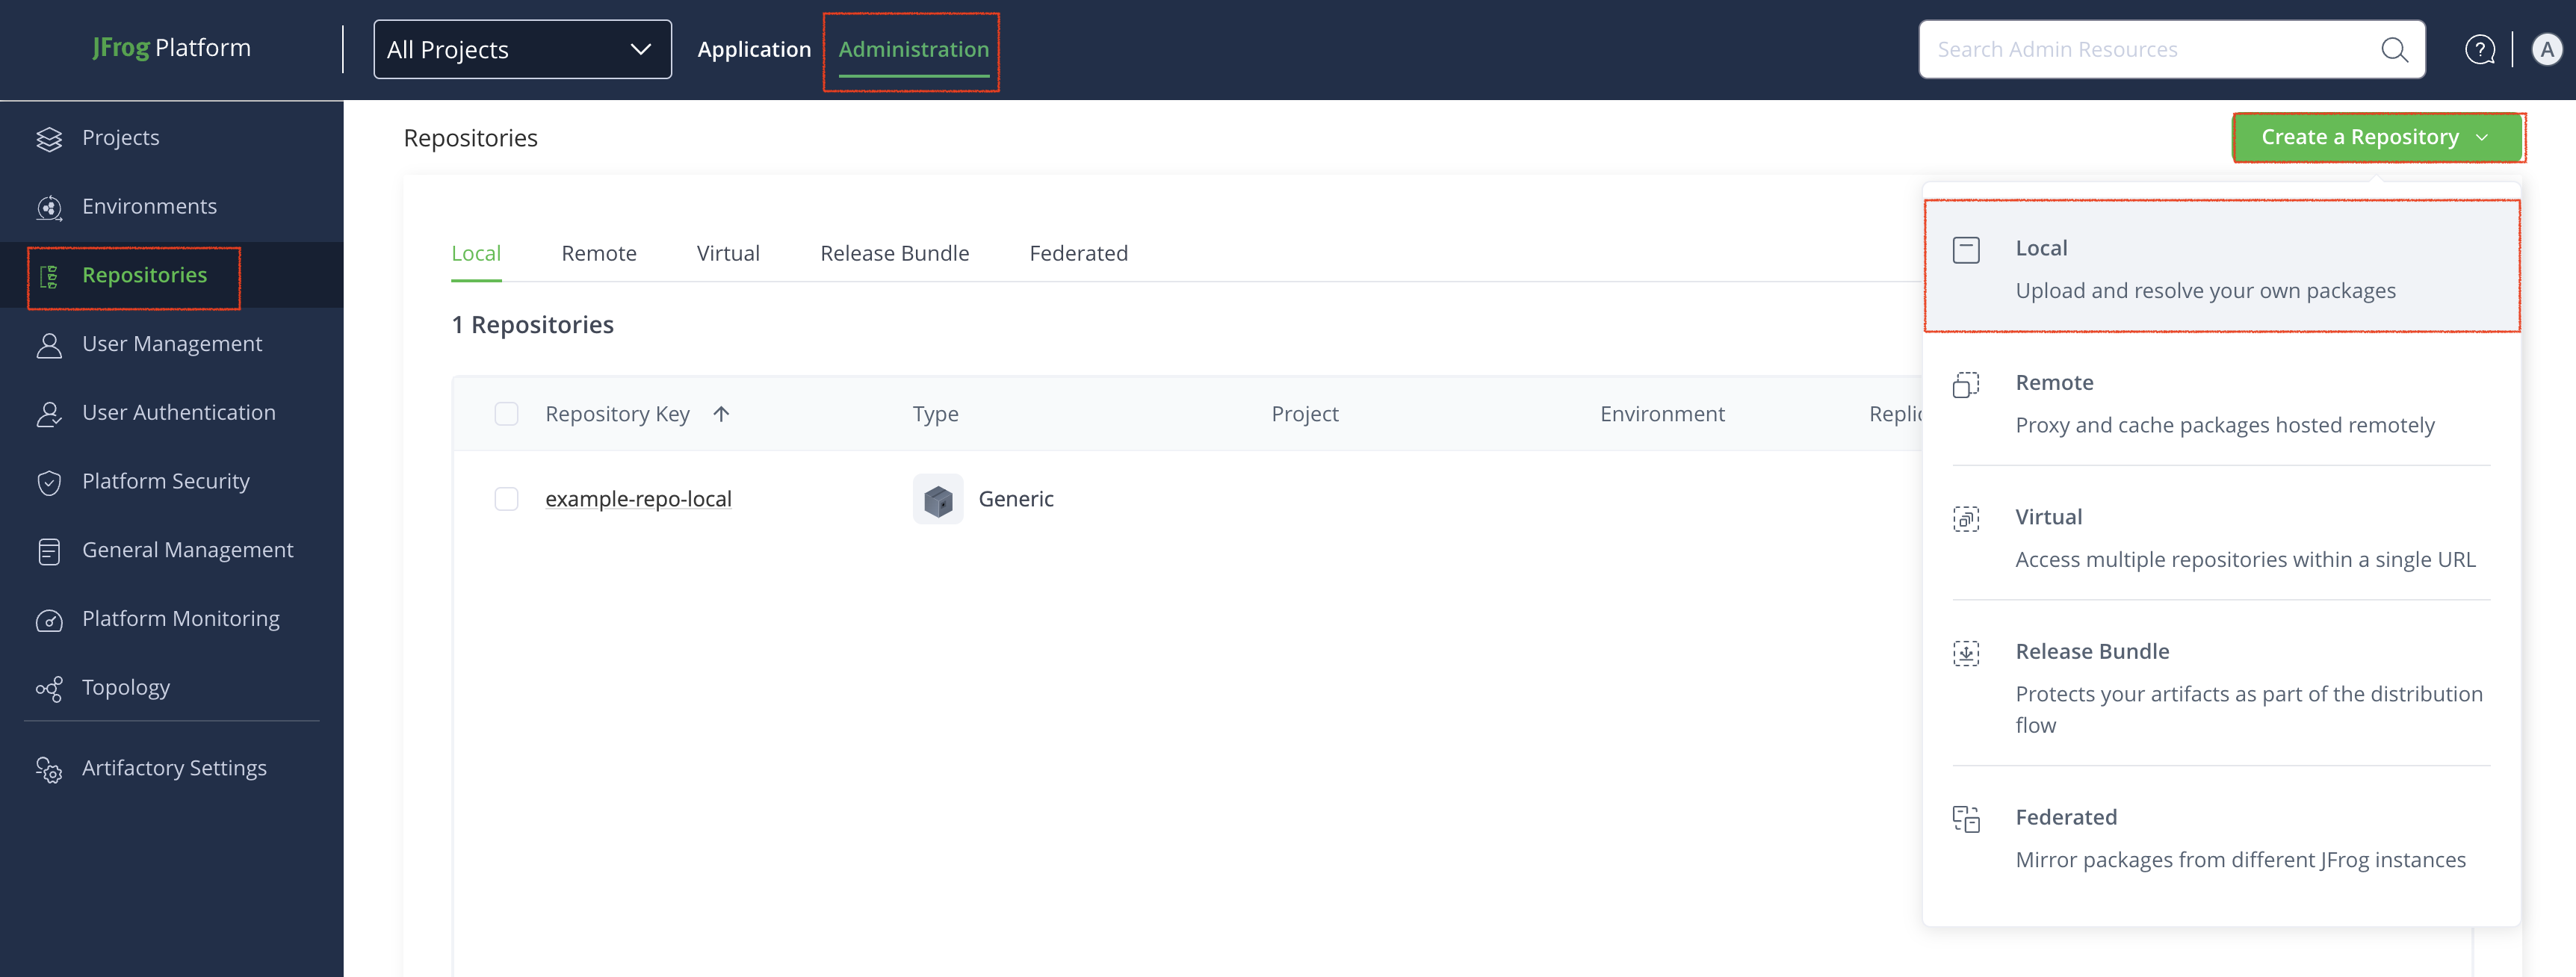
To create a NuGet repository:
-
In the Administration tab, click Repositories.
-
Click Create a Repository and then select the repository type you want to create (local, remote, or virtual).
-
In the Select Package Type window, click NuGet.
-
Configure the repository, as described below:
- Local repository: Enter a meaningful name for the repository (for example,
nuget-local-repository-1) and configure other basic and advanced settings, as required. For more information, see Local Repositories. - Remote repository: In addition to providing a name, verify the URL of the remote registry, and configure other basic and advanced settings, as required. For more information, see Remote Repositories.
- Virtual repository: In addition to providing a name, select one or more local or remote repositories to include in the virtual repository. For more information, see Virtual Repositories.
- Local repository: Enter a meaningful name for the repository (for example,
-
Click Create Repository.
Connect Your NuGet Client to Artifactory
This topic provides details on configuring NuGet to work with Artifactory.
Prerequisite: Before connecting your NuGet client to Artifactory, you must have an existing NuGet repository in Artifactory. For more information, see Create a NuGet Repository.
Supported NuGet clients:
- PowerShell: Version 1.0.5 and above
- Chocolatey: Version 1.2.0 and above
- NuGet CLI: Version 3.4.4 and above
- .NET
NuGet Client
The following topics describe how to connect to NuGet as well as how to install and push packages:
Connect the NuGet Client to Artifactory
NuGet CLI configuration
When using Artifactory as a NuGet repository you can either work with the NuGet CLI directly or with Visual Studio.To configure the NuGet CLI to work with Artifactory, you need to add this repository to the list of sources. To add this repository, use the following command:
nuget sources Add -Name <REPOSITORY_NAME> -Source https://company.jfrog.io/artifactory/api/nuget/v3/<PACKAGE_NAME>/index.json -username <username> -password <password>Example
nuget sources Add -Name Artifactory -Source https://company.jfrog.io/artifactory/api/nuget/v3/john-nuget-local/index.json -username john -password cmVmdGtuOjAxOjE3OTE4ODI0OTQ6d0lrRU9OUGVqU2dQaFNlNElCNmt4QWo4UDVjThen, to authenticate against Artifactory with the NuGet API key, run the following command:
nuget setapikey <USER-NAME>:<API-KEY> -Source ArtifactoryExample
nuget setapikey john:cmVmdGtuOjAxOjE3OTE4ODI0OTQ6d0lrRU9OUGVqU2dQaFNlNElCNmt4QWo4UDVj -Source ArtifactoryNuGet CLI Configuration (API v2)
If this repository is configured as a NuGet API v2 repository manually add the following line to the NuGet.config file:The NuGet.config file can be found at %appdata%\NuGet\NuGet.config (Windows) or ~/.config/NuGet/NuGet.config (Mac/Linux)
nuget sources Add -Name ArtifactoryV2 -Source https://company.jfrog.io/artifactory/api/nuget/<REPOSITORY_NAME> -username <username> -password <password>Example
nuget sources Add -Name ArtifactoryV2 -Source https://company.jfrog.io/artifactory/api/nuget/john-nuget-virtual -username john -password cmVmdGtuOjAxOjE3OTE4ODI0OTQ6d0lrRU9OUGVqU2dQaFNlNElCNmt4QWo4UDVjThen, to authenticate against Artifactory with the NuGet API key, run the following command:
nuget setapikey <USER-NAME>:<API-KEY> -Source ArtifactoryV2Example
nuget setapikey john:cmVmdGtuOjAxOjE3OTE4ODI0OTQ6d0lrRU9OUGVqU2dQaFNlNElCNmt4QWo4UDVj -Source ArtifactoryV2Visual Studio Configuration
To configure the NuGet Visual Studio Extension to use Artifactory, you need to add this repository as another Package Source under NuGet Package Manager.
- Go to the "Package Manager Settings" in your Visual Studio (Tools > NuGet Package Manager > Package Manager Settings > Package Sources) and add another Package Source.
- Name: Add a name for the package source (e.g. Artifactory NuGet repository)
- Paste the snippet below in the URL field
https://company.jfrog.io/artifactory/api/nuget/v3/<REPOSITORY-NAME>Example
https://company.jfrog.io/artifactory/api/nuget/v3/john-nuget-virtualTo configure the NuGet CLI to work with Artifactory, you need to add this repository to the list of sources. To add this repository, use the following command:
nuget sources Add -Name Artifactory -Source https://company.jfrog.io/artifactory/api/nuget/v3/<REPOSITORY-NAME>/symbols -username <username> -password <password>Example
nuget sources Add -Name Artifactory -Source https://company.jfrog.io/artifactory/api/nuget/v3/john-nuget-local/symbols -username john -password cmVmdGtuOjAxOjE3OTE4ODI0OTQ6d0lrRU9OUGVqU2dQaFNlNElCNmt4QWo4UDVjNuGet CLI Symbol configuration
Add the following line to the NuGet.config file: The NuGet.config file can be found at %appdata%\NuGet\NuGet.config (Windows) or ~/.config/NuGet/NuGet.config (Mac/Linux)
<add key="ArtifactorySymbols" value="https://company.jfrog.io/artifactory/api/nuget/v3/john-nuget-local/symbols" protocolVersion="3" />Then, to authenticate against Artifactory with the NuGet API key, run the following command:
nuget setapikey <USER-NAME>:<API-KEY> -Source ArtifactorySymbolsExample
nuget setapikey john:cmVmdGtuOjAxOjE3OTE4ODI0OTQ6d0lrRU9OUGVqU2dQaFNlNElCNmt4QWo4UDVj -Source ArtifactorySymbolsVisual Studio Configuration (Symbol Server)
To configure the NuGet Visual Studio Extension to use Artifactory as a Symbol Server, you need to change the location of the symbol (.pdb) file. Under Tools | Options | Debugging | Symbols add a new symbol server pointing to the symbols url:
https://company.jfrog.io/artifactory/api/nuget/v3/<REPOSITORY-NAME>

Example:

https://company.jfrog.io/artifactory/api/nuget/v3/john-nuget-local
Install NuGet Packages
Important!
Make sure to replace the
<PACKAGE_NAME>placeholder in the snippet to reflect the specific package name you would like to install
nuget install <PACKAGE_NAME>Example
nuget install mypackage.1.0.0.nupkgTo make sure your client resolves from this repository, verify it is the first in the list of sources in your NuGet.config file, or run the following command:
nuget install <PACKAGE_NAME> -Source ArtifactoryExample
nuget install mypackage.1.0.0 -Source ArtifactoryNuGetV3Push NuGet Packages
Note
Applicable for Local and virtual repositories. Not applicable for Remote repositories.
Deploying to this repository can be done by running the following command:
nuget push <PACKAGE_NAME> -Source ArtifactoryExample
nuget push mypackage.1.0.0 -Source ArtifactoryNuGetV3To support more manageable layouts and additional features such as cleanup, NuGet repositories support custom layouts. When pushing a package, you need to ensure that its layout matches the target repository's layout:
nuget push <PACKAGE_NAME> -Source https://company.jfrog.io/artifactory/api/nuget/pkgsdemo-NuGet-local/<PATH_TO_FOLDER>Example
nuget push mypackage.1.0.0 -Source https://company.jfrog.io/artifactory/api/nuget/pkgsdemo-NuGet-local/releasesNuGet Symbol Packages
Deploying only Symbol package to this repository can be done by running the following command:
nuget push <SYMBOL_PACKAGE> -Source ArtifactoryExample
nuget push mypackage.1.0.0.snupkg -Source ArtifactoryNuGetV3When deploying NuGet package in the same directory with his Symbol package running the following command will deploy both of the packages:
nuget push <PACKAGE_NAME> -Source ArtifactoryExample
nuget push mypackage.1.0.0 -Source ArtifactoryNuGetV3PowerShell Client
The following topics describe how to connect to PowerShell as well as how to install and publish packages:
- Connect the PowerShell Client to Artifactory
- Install NuGet Modules and Scripts with PowerShell
- Publish NuGet Packages with PowerShell
Connect the PowerShell Client to Artifactory
The PowerShell client can be used to install and publish NuGet packages.
To connect the PowerShell NuGet client to Artifactory:
You must perform the following steps:
- Create credentials for authentication
- Add this repository as a source for use with Modules and/or Scripts Configure credentials
-
In the command line, use the following command to generate credentials:
$credential = New-Object PSCredential('<USER>',$(ConvertTo-SecureString
'<TOKEN>' -AsPlainText -Force))
For example:
$credential = New-Object PSCredential('johnfrog',$(ConvertTo-SecureString 'RANDOM_TOKENlROXloME5ubjlY' -AsPlainText -Force)) -
Add Source (Modules / Scripts)
Use the following command to add a repository:
Register modules
To register this repository to your modules SourceLocation, use the following command:
Register-PSRepository -Name artifactory -SourceLocation
"https://<YOUR_JFROG_DOMAIN>/artifactory/api/nuget/<REPOSITORY_NAME>" -PublishLocation
"https://<YOUR_JFROG_DOMAIN>/artifactory/api/nuget/<REPOSITORY_NAME>" -InstallationPolicy Trusted -Credential $credential
Register scripts
To register this repository to your scripts ScriptSourceLocation, use the following command:
Register-PSRepository -Name artifactory -ScriptSourceLocation
"https://<YOUR_JFROG_DOMAIN>/artifactory/api/nuget/<REPOSITORY_NAME>" -ScriptPublishLocation
"https://<YOUR_JFROG_DOMAIN>/artifactory/api/nuget/<REPOSITORY_NAME>" -InstallationPolicy Trusted -Credential $credential
Install NuGet Modules and Scripts with PowerShell
Use the commands below to install NuGet modules (packages) and scripts:
Install NuGet Modules
To install a PowerShell module, run the following command:
Important
Make sure to replace the
<PACKAGE_NAME>placeholder in the snippet to reflect the PowerShell module you would like to install
Install-Module -Name <PACKAGE_NAME> -Repository adam-nuget-local-normalized -Credential $credentialInstall NuGet Scripts
To install a PowerShell script, run the following command:
Important
Make sure to replace the
<PACKAGE_NAME>placeholder in the snippet to reflect the PowerShell module you would like to install
Install-Script -Name <PACKAGE_NAME> -Repository adam-nuget-local-normalized -Credential $credentialPublish NuGet Packages with PowerShell
Deploying to this repository can be done by running the following command:
Publish modules
Publish-Module -Path <PATH_TO_FILE> -Repository <REPOSITORY_NAME> -NuGetApiKey <USER>:<API-KEY> -VerboseExample
Publish-Module -Path /home/your-username/project -Repository john-nuget-local -NuGetApiKey sk_test_DI0OTQ6d0lrRU9OUGVqU2d -VerbosePublish scripts
Publish-Script -Path <PATH_TO_FILE> -Repository <REPOSITORY_NAME> -NuGetApiKey <USER>:<API-KEY> -VerboseExample
Publish-Script -Path /home/your-username/project -Repository john-nuget-local -NuGetApiKey sk_test_DI0OTQ6d0lrRU9OUGVqU2d -VerboseChocolatey Client
The following topics describe how to connect to Chocolatey as well as how to install and pushpackages:
- Connect the Chocolatey Client to Artifactory
- Install NuGet with Chocolatey
- Push Chocolatey NuGet Packages
Connect the Chocolatey Client to Artifactory
You can configure the Chocolatey client to work with Artifactory in the following ways:
Note
Chocolatey registry only supports NuGet API V2
- Choco - NuGet API V2 - (recommended)
- Choco - NuGet API V3
Choco - NuGet API V2
Add Artifactory to your choco client sources by running the following command:
choco source add -n artifactory -s="https://company.jfrog.io/artifactory/api/nuget/john-nuget-local" --priority 1 --bypass-proxy --allow-self-serviceThen, to authenticate against Artifactory with the NuGet API key, run the following command:
choco apikey -s "https://company.jfrog.io/artifactory/api/nuget/john-nuget-local" -k john:cmVmdGtuOjAxOjE3OTE4ODI0OTQ6d0lrRU9OUGVqU2dQaFNlNElCNmt4QWo4UDVjChoco - NuGet API V3
Add Artifactory to your choco client sources by running the following command:
Note: …nuget/v3/…/index.json is explicitly set in the Artifactory URL
choco source add -n artifactory -s="https://company.jfrog.io/artifactory/api/nuget/v3/john-nuget-local/index.json" --priority 1 --bypass-proxy --allow-self-serviceThen, to authenticate against Artifactory with the NuGet API key, run the following command:
choco apikey -s "https://company.jfrog.io/artifactory/api/nuget/v3/john-nuget-local/index.json" -k john:cmVmdGtuOjAxOjE3OTE4ODI0OTQ6d0lrRU9OUGVqU2dQaFNlNElCNmt4QWo4UDVjInstall NuGet with Chocolatey
To install a Chocolatey module, run the following command:
choco install <PACKAGE_NAME>Example
choco install nuget-choco-localTo make sure your client resolves from this repository, verify it is the first in the list of sources in your NuGet.config file, or run the following command:
choco install <PACKAGE_NAME> -Source ArtifactoryExample
choco install nuget-choco-local -Source ArtifactoryPush Chocolatey NuGet Packages
To push a package to Artifactory, run the following command:
choco push <PACKAGE_NAME> -s artifactoryExample
choco push john-nuget-choco-local -s artifactory.NET NuGet Client
The following topics describe how to connect to .NET NuGet as well as how to install and restore packages:
Connect the .NET NuGet Client to Artifactory
You can configure the .NET client to work with Artifactory in the following ways:
- dotnet - NuGet API V3
- dotnet - NuGet API V2
dotnet NuGet API V3
Add Artifactory to your .NET client sources by running the following command:
Note: …nuget/v3/…/index.json is explicitly set in the Artifactory URL
dotnet nuget add source https://company.jfrog.io/artifactory/api/nuget/v3/john-nuget-local/index.json --name artifactory --username john --password cmVmdGtuOjAxOjE3OTE4ODI0OTQ6d0lrRU9OUGVqU2dQaFNlNElCNmt4QWo4UDVjdotnet NuGet API V2
Add Artifactory to your .NET client sources by running the following command:
dotnet nuget add source https://company.jfrog.io/artifactory/api/nuget/john-nuget-local --name artifactory --username john --password cmVmdGtuOjAxOjE3OTE4ODI0OTQ6d0lrRU9OUGVqU2dQaFNlNElCNmt4QWo4UDVjPush .NET NuGet Packages
To push a package to Artifactory, run the following command:
dotnet nuget push <PACKAGE_NAME> --api-key --source artifactorychoco push <PACKAGE_NAME> -s artifactoryExample
dotnet nuget push demo-app.1.2.3.nupkg --api-key sk_test_51HxxxxxxREDACTED --source artifactorychoco push john-nuget-choco-local -s artifactoryRestore .NET NuGet Packages
To Restores the dependencies navigate to your project and run the following command:
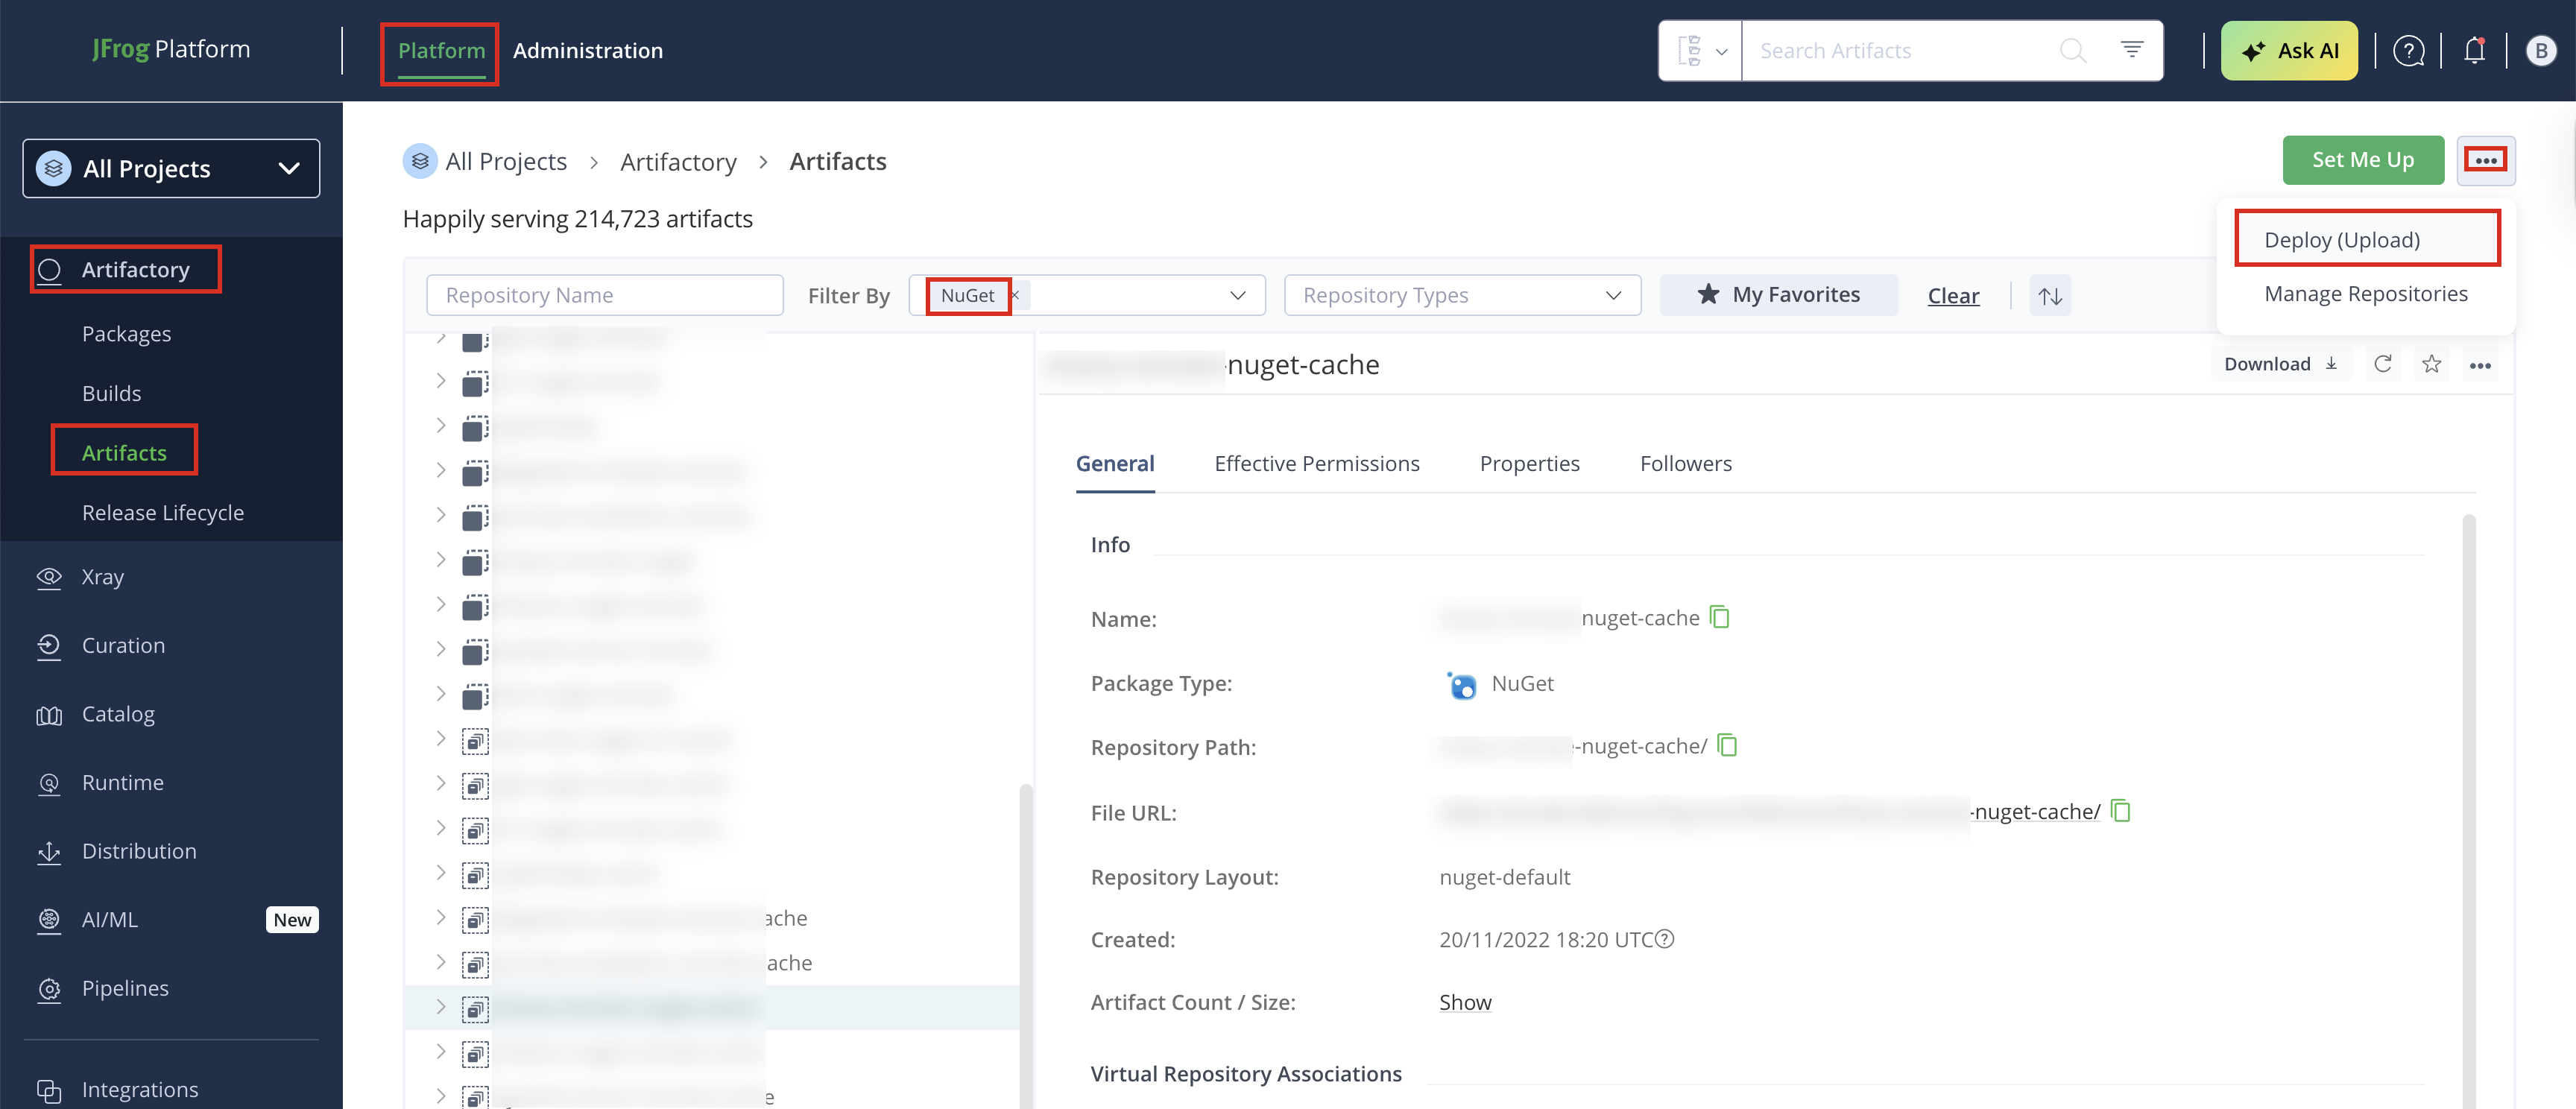
dotnet restorechoco push <PACKAGE_NAME> -s artifactoryDeploy NuGet Package Using the UI
-
In the Platform tab, click Artifactory | Artifacts, then click ellipsis |Deploy(Upload). Deploy options are displayed.
-
Select your RubyGems repository as the Target Repository, and upload the file you want to deploy.
-
Verify the deploy options, then click Deploy. The package is deployed.
Advanced Topics – NuGet Packages
The following additional actions are available with NuGet repositories:
- Anonymous Access to NuGet Repositories
- Artifactory as Your Symbol Server
- Access NuGet Repositories from Visual Studio
- Configure NuGet CLI/ Visual Studio to Work with NuGet v3 API
- NuGet API v3 Registry Support
- NuGet SemVer 2.0 Package Support
- Use the NuGet Command Line
- View NuGet Build Information
- NuGet Enforce Layout
Anonymous Access to NuGet Repositories
By default, Artifactory allows anonymous access to NuGet repositories. This is defined under Administration | Security | General Configuration. For details, please refer to Allow Anonymous Access.
Allow Anonymous Access to NuGet Repositories
Artifactory supports NuGet repositories with Allow Anonymous Access enabled.
When Allow Anonymous Access is enabled, Artifactory will not query the NuGet client for authentication parameters by default, so you need to indicate to Artifactory to request authentication parameters differently.
You can override the default behavior by setting the Force Authentication checkbox in the New or Edit Repository dialog.
When set, Artifactory will first request authentication parameters from the NuGet client before trying to access this repository.
Work in NuGet Without Anonymous Access
To track how users interact with your repositories, we recommend that you uncheck the Allow Anonymous Access setting described above. This means that users will be required to enter their username and password when using their NuGet clients.
You can configure your NuGet client to require a username and password using the following command:
nuget sources update -Name Artifactory -UserName admin -Password passwordYou can verify that your setting has taken effect by checking that the following segment appears in your %APPDATA%\NuGet\NuGet.Config file:
<packageSourceCredentials>
    <Artifactory>
        <add key="Username" value="admin" />
        <add key="Password" value="...encrypted password..." />
    </Artifactory>
</packageSourceCredentials>Note
NuGet.Configfile can also be placed in your project directory, for further information please refer to NuGet Configuration File
Artifactory as Your Symbol Server
Symbol files (which are .pdb files) provide a footprint of the functions that are contained in executable files and dynamic-link libraries (DLLs) and can present a roadmap of the function calls that lead to the point of failure.
A Symbol Server stores the .PDB files and binaries for all your public builds. These are used to enable you to debug any crash or problem that is reported for one of your stored builds. Both Visual Studio and WinDBG know how to access Symbol Servers, and if the binary you are debugging is from a public build, the debugger will get the matching PDB file automatically.
From Artifactory 7.36, you can benefit from the following advanced Symbol Server features:
- Publishing while indexing your Symbol packages to Artifactory from your NuGet Client v3 together with your NuGet packages or as separate Symbol packages
- Resolving Symbol files (.pdb) from virtual and local repositories in the JFrog Platform
- Resolving Symbol files from remote proxies. For example,
http://symbols.nuget.org/download/symbols. - Debugging the Symbol files hosted on Artifactory using the Visual Studio debugger tool.
Note that prior to Artifactory 7.36, Symbol Server support was limited to setting Artifactory as a remote Proxy for Symbol files that were hosted as Generic packages in Artifactory
Support PDB Formats
- Microsoft PDB V7 (Microsoft C/C++ MSF 7.00)
- Portable PDB v1.0
Publish NuGet Symbol Packages to Artifactory
The JFrog Platform supports publishing and automatically indexing your Symbol packages for consumption by the debugger.
Prerequisite:
- Create your NuGet Symbol packages (.snupkg). For more information, see Create Symbol Packages.
Set up a Local Symbol Server Repository
Local repositories enable you to deploy NuGet Symbol (.snupkg) packages. Artifactory calculates the metadata for all the Symbol packages and indexes them to allow users to download Symbol files through the Visual Studio debugger.
To create a NuGet Symbol local repository:
- Navigate to the Administration module, go to Repositories | Repositories | Local | New Local Repository
- Select NuGet as the Package Type.
Set up a Remote Symbol Server Repository
You can proxy a remote Symbol Server through the JFrog Platform remote repositories. A Remote Repository defined in Artifactory serves as a caching proxy for a registry managed at a remote URL, such as (which is https://symbols.nuget.org/download/symbols ).
Symbol files requested from a remote repository are cached on demand. You can remove downloaded Symbol files from the remote repository cache; however, you can not manually push Symbol packages to the remote NuGet repository.
To define a remote repository to proxy as a remote Symbol Server, follow these steps:
-
From the Administration module, select Repositories | Repositories | Remote.
-
Click New Remote Repository and select NuGet from the Select Package Type dialog.
-
In the Basic tab, set the Repository Key value, and specify the URL to the remote registry in the NuGet Symbol Server URL field. Note that the default is set to
http://symbols.nuget.org/download/symbols.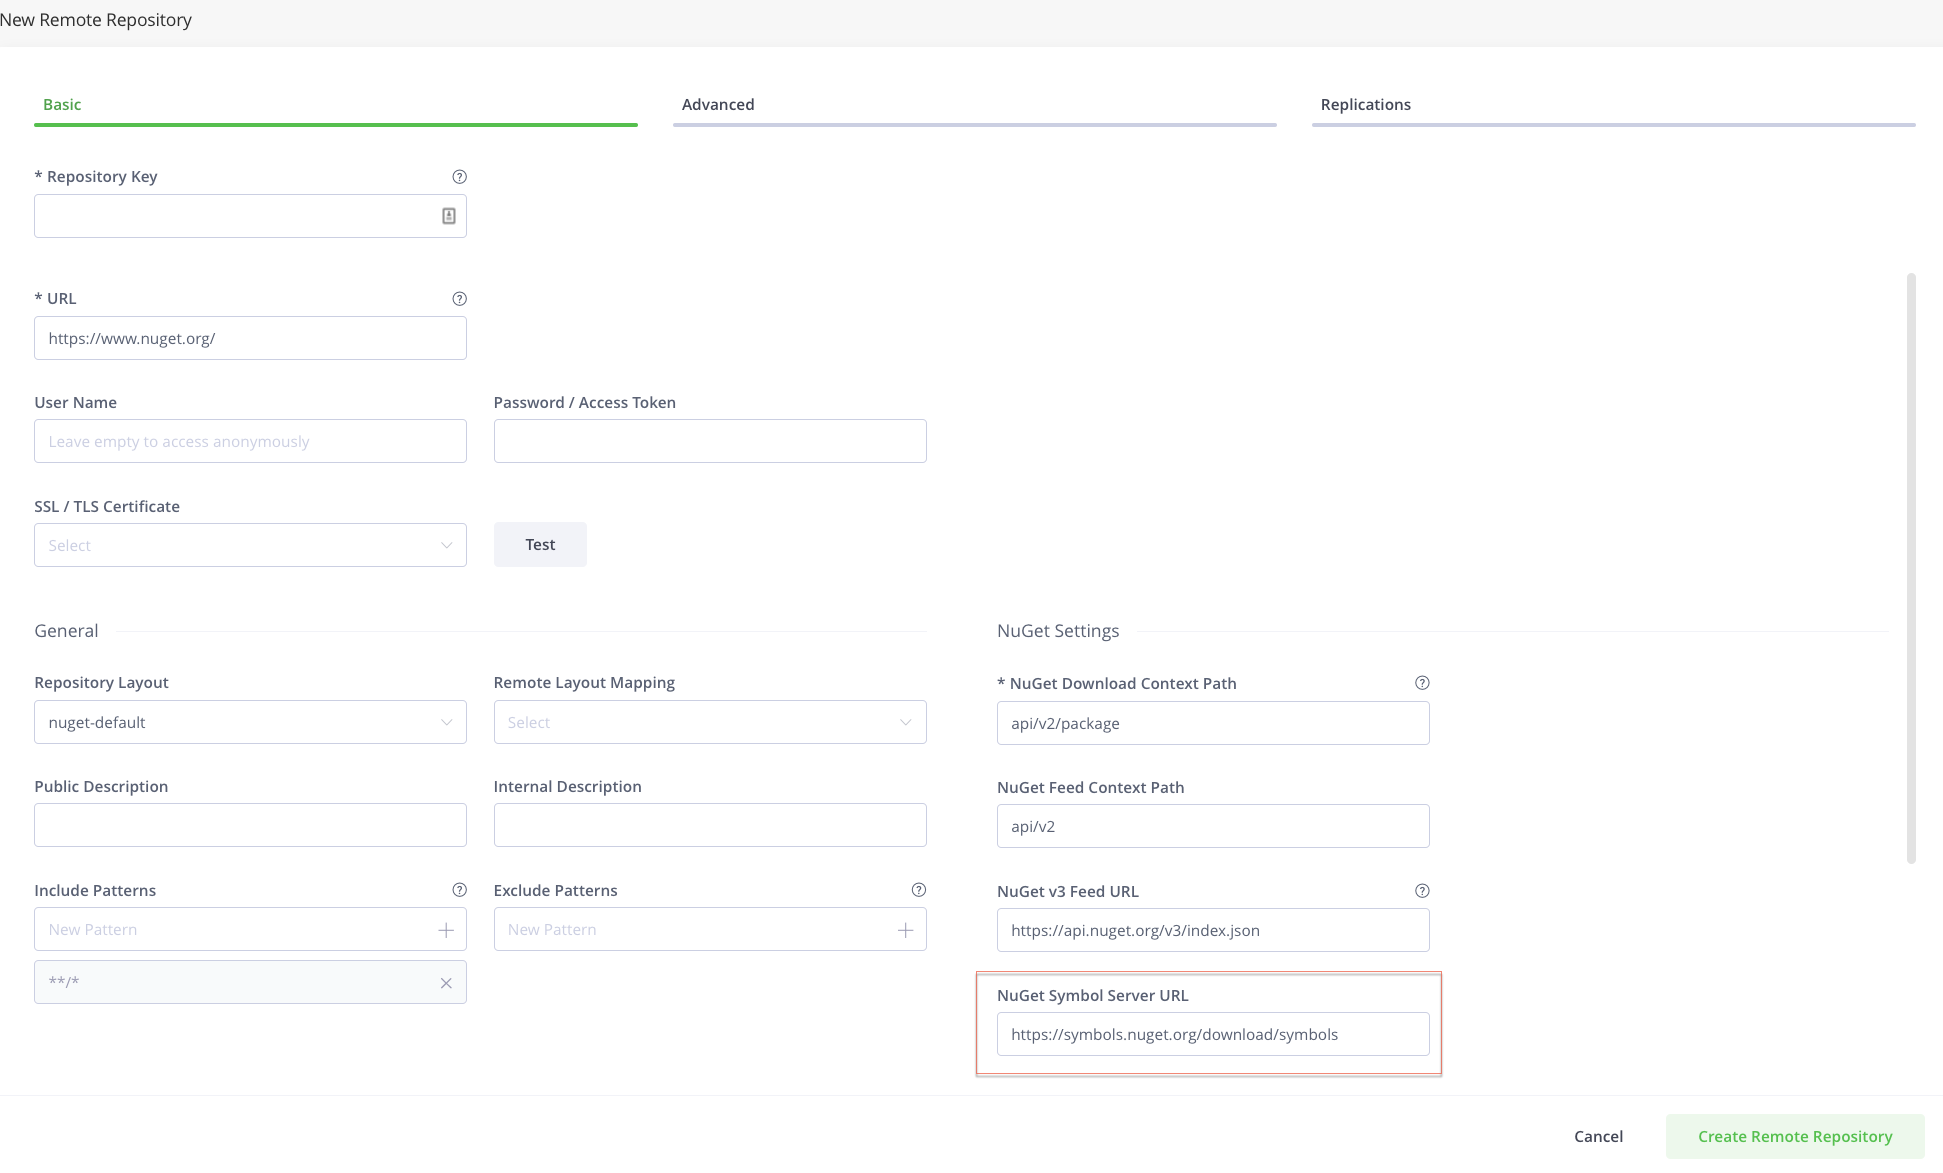
Set up a Virtual Symbol Server Repository
An Artifactory Virtual Repository aggregates packages from both local and remote repositories.
This allows you to access both locally-hosted NuGet Symbol packages and remote-proxied NuGet Symbol files from a single URL that is defined for the virtual repository.
To create a virtual NuGet repository:
- In the Administration module, under Repositories | Repositories | Virtual, click New Virtual Repository and set NuGet to be its Package Type.
- Select the underlying local and remote NuGet Symbol repositories to include under the Repositories section.
Configure the NuGet CLI to Work Opposite Artifactory as the Symbol Server
Important
This section is relevant only for users of older versions of NuGet. If you are using NuGet version 3.5 or later, there is no need to configure a separate symbols source to publish .snupkg packages with the NuGet CLI.
In addition to building and creating NuGet packages (.nupkg), the NuGet client also supports creating associated Symbol packages (.snupkg or .symbols.nupkg), that contain all the relevant symbol files for the NuGet package. The Symbol packages can be pushed to a Symbol Server, where the Symbol files can be indexed and consumed by the Visual Studio Debugger.
The Symbol package structure is similar to the NuGet package, but contains the Symbol files instead of the source files.
To configure the NuGet CLI:
-
In the JFrog Platform, navigate to Application Module | Artifactory | Artifacts.
-
Select the NuGet repository you created,
-
Select Set Me Up.
-
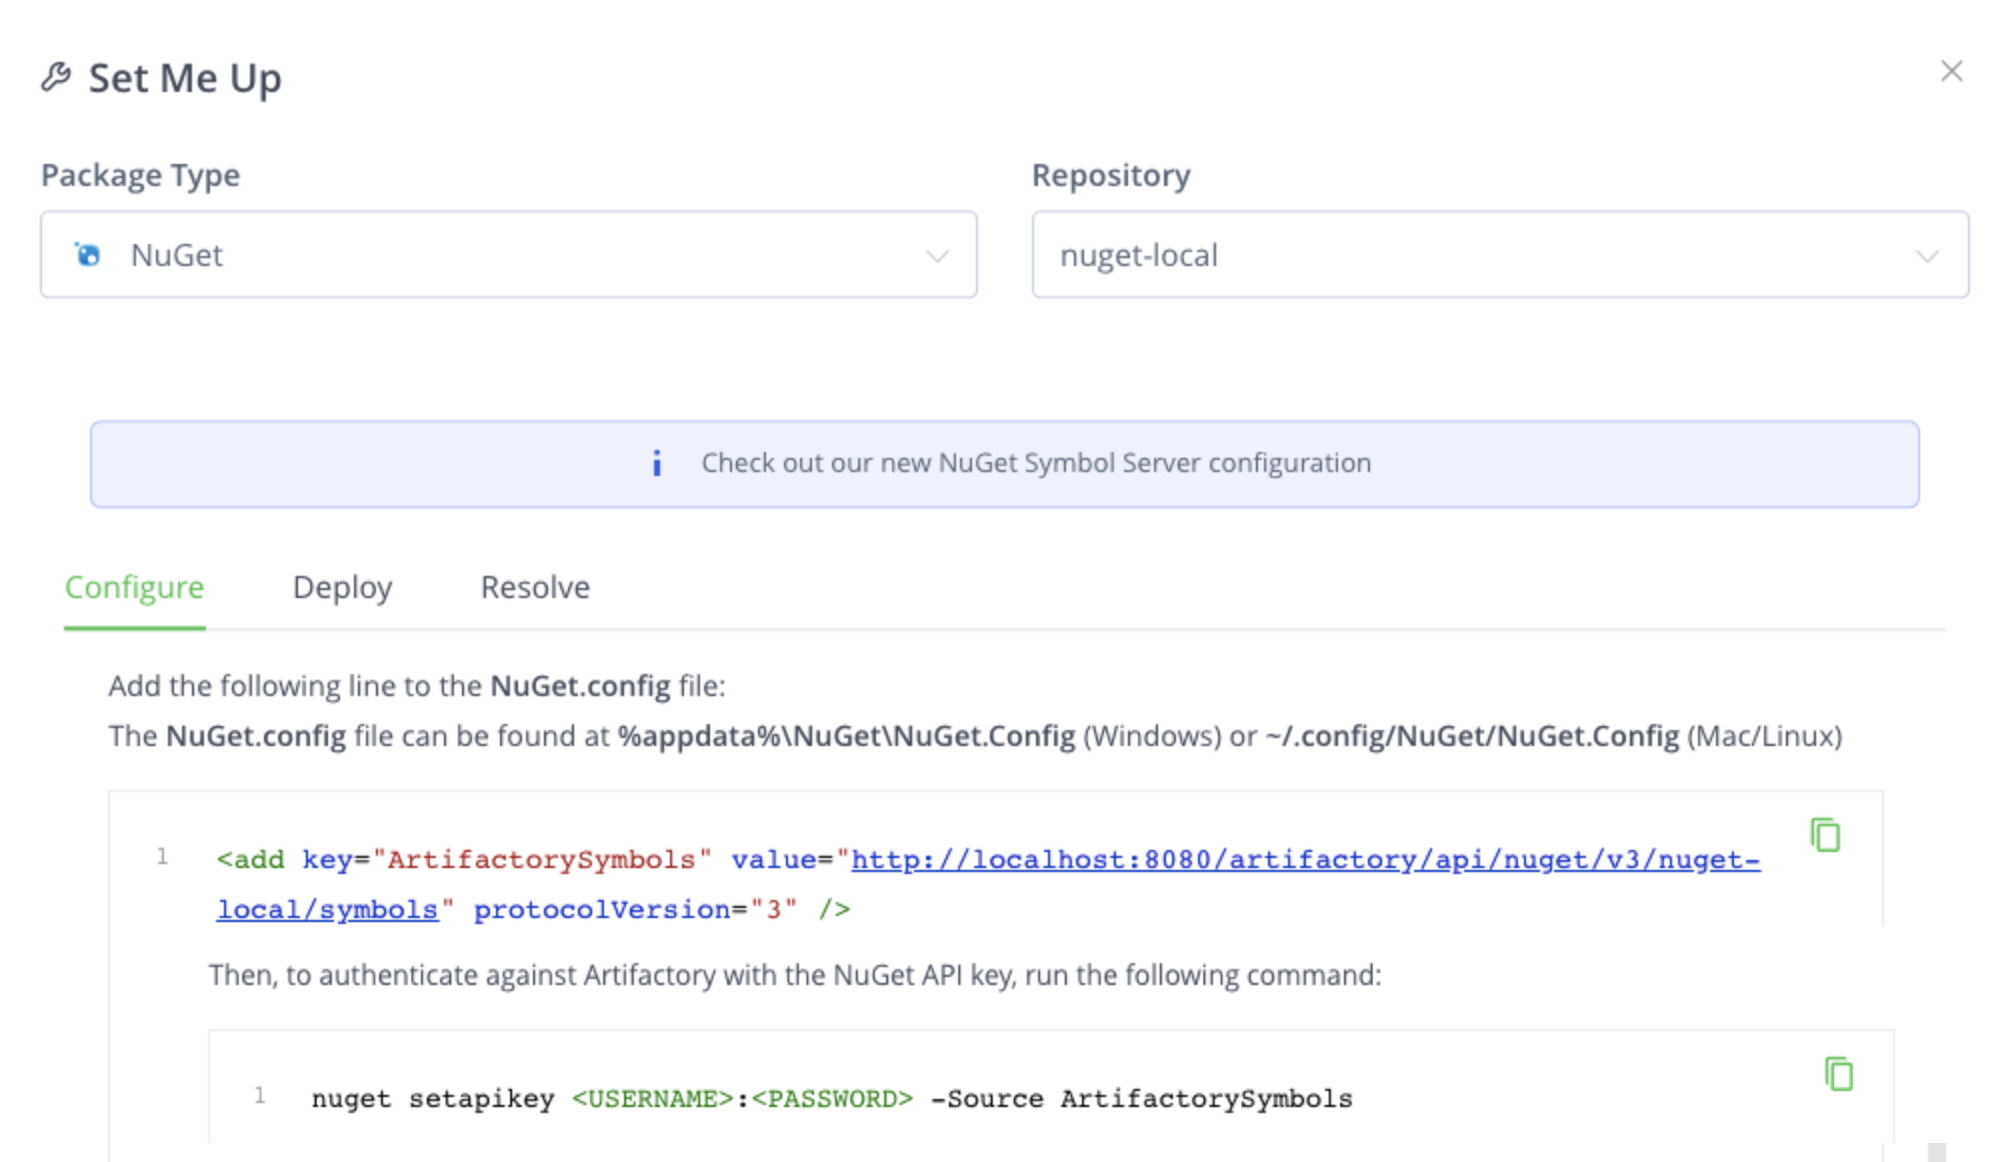
In the Configure tab, set up the NuGet repository to work against the NuGet Client.
-
Add the following line to the NuGet.configfile.
-
In the Deploy tab, choose from one of the following Push options.
-
Push NuGet packages together with their related Symbol packages
When you run the
nuget pushcommand, if there is a Symbol package present in the same directory, then the Symbol package will be automatically pushed to the same location.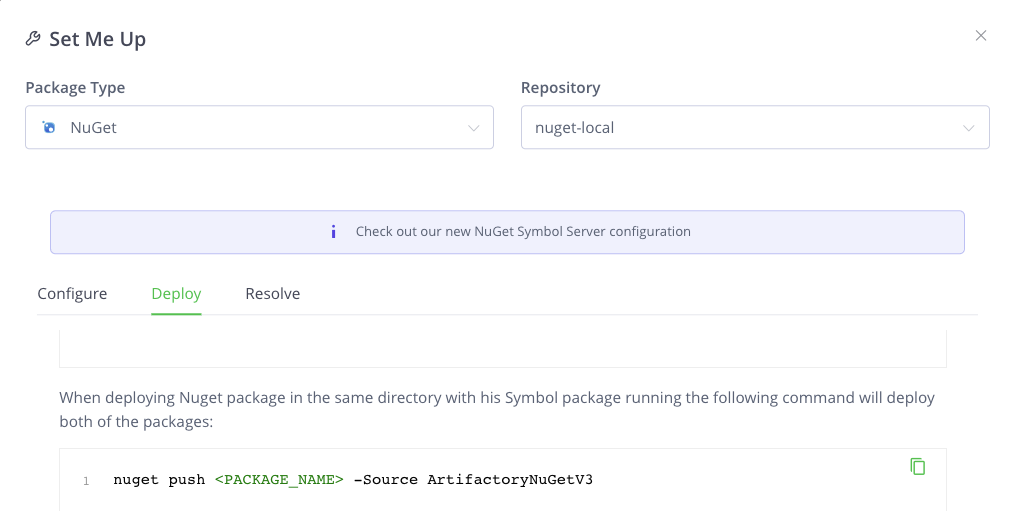
As displayed in the following example.
nuget push mypackage.1.0.0.nupkg -Source ArtifactoryNuGetV3
-
-
Pushing NuGet Symbol packages only When you run the
nuget pushcommand, you can decide to push only Symbol packages by adding an ‘s’ as the prefix to thenupkgstring.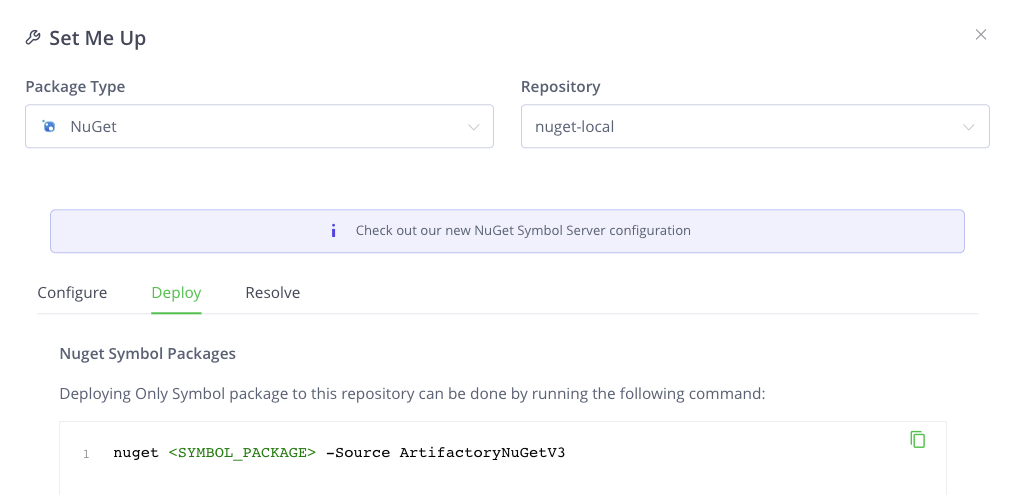
As displayed in the following example.
nuget push mypackage.1.0.0.snupkg -Source ArtifactoryNuGetV3
Debug Symbol Files in Visual Studio
The way in which Visual Studio and other debugging tools match an assembly and PDB file, is by using the assembly hash. This hash is stored in the .dll and .pdb files and must match for the debugging and source stepping to work.
When a .nupkg contains .pdb files, Visual Studio will not reach out to MyGet to download Symbols and sources. When trying to debug using this type of package, Visual Studio will find the .pdb on the disk instead of reaching out to MyGet to download it, and therefore will fail to step into the code because of that.
-
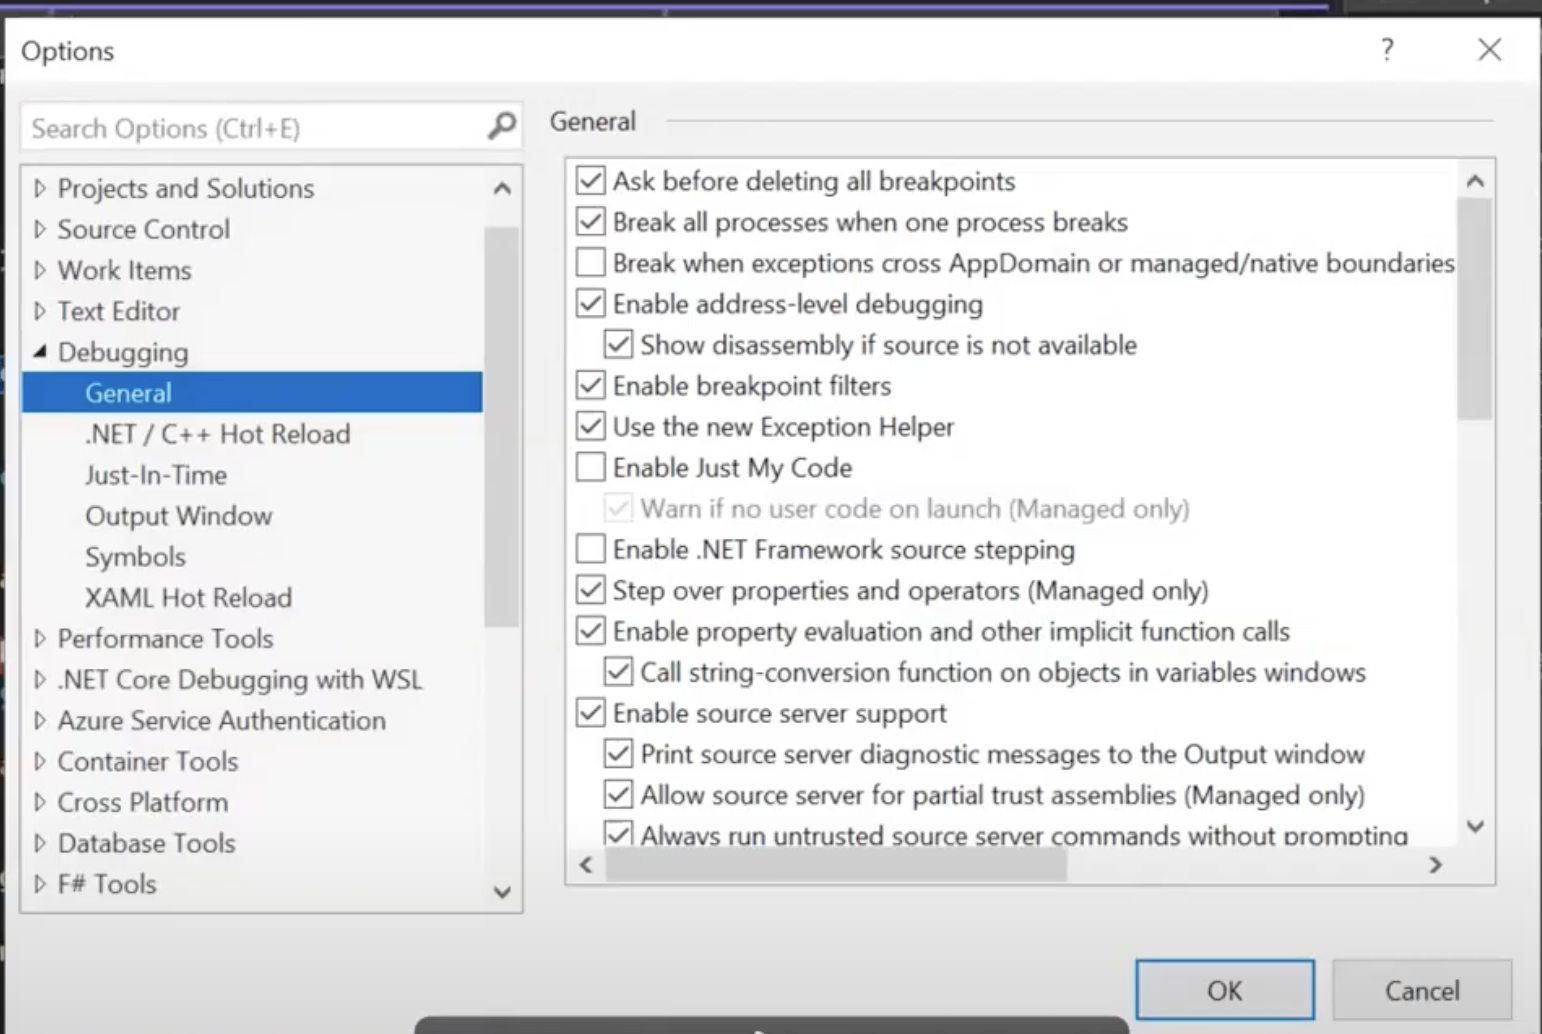
In Visual Studio, under Tools | Options (or Debug | Options) | Debugging | General , clear the Enable Just My Code field.
-
Set Artifactory to be your Symbol Server in Visual Studio by going to Tools | Options | Debugging | Symbols and adding the virtual or local repository URL path.
To debug the Symbol files in Artifactory:
-
Run the Visual Studio Debugger and type in your credentials.
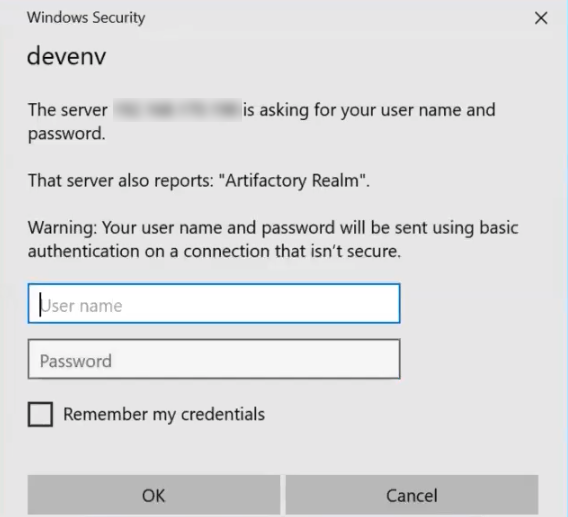
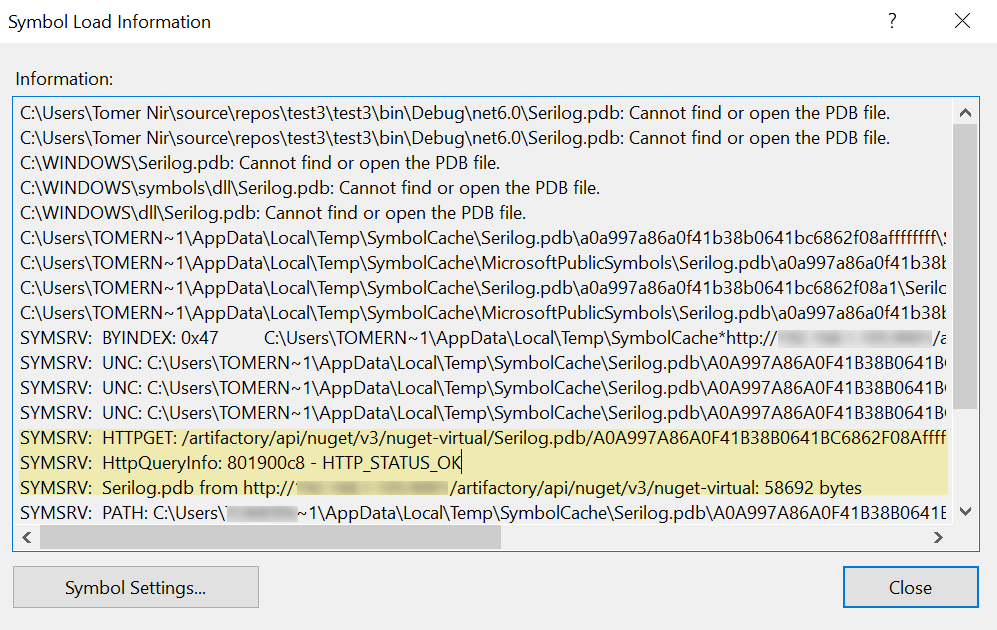
Once logged in, the debugger scans the local cache and then goes to the virtual repository in Artifactory as displayed in the following example.
-
Once the symbol is resolved by Visual Studio, proceed to debug the deployed Symbol file.
Access NuGet Repositories from Visual Studio
NuGet repositories must be prefixed with api/nuget in the path
When configuring Visual Studio to access a NuGet repository through Artfactory, the repository URL must be prefixed with api/nuget in the path.
For example, if you are using Artifactory standalone or as a local service, you would configure Visual Studio using the following URL:
https://localhost:8081/artifactory/api/nuget/<repository key>Or, if you are using Artifactory Cloud the URL would be:
https://<server name>.jfrog.io/artifactory/api/nuget/<repository key>
Artifactory exposes its NuGet resources via the REST API at the following URL: http://localhost:8081/artifactory/api/nuget/<repository key>.
This URL handles all NuGet related requests (search, download, upload, delete) and supports both V1 and V2 requests. To use V3 requests, you need to Configure Visual Studio with NuGet v3 API.
To configure the NuGet Visual Studio Extension to use Artifactory, check the corresponding repositories in the "Options" window: (You can access Options from the Tools menu).

Configure NuGet CLI/ Visual Studio to Work with NuGet v3 API
Manually add the protocolVersion=3 attribute to the NuGet.Config file:
- For Linux installation: The file is located under
~/.config/NuGet/NuGet.Config - For a Windows installation: Locate the file usually under
%appdata%\NuGet\NuGet.Configand add/v3/to the source URL.
<?xml version="1.0" encoding="utf-8"?>
<configuration>
<packageSources>
    <add key="ArtifactoryV3Remote" value="http://artifactory:8081/artifactory/api/nuget/v3/nuget-remote" protocolVersion="3" />
</packageSources>
...
...
</packageSourceCredentials>
</configuration>
NuGet API v3 Registry Support
For .NET and Visual Studio Users: Announcement on Changes to Microsoft’s NuGet V3 API.
From February 2021, the nuget.org team has announced the deprecation of several OData queries resulting in blocking endpoints used by 3rd party clients.
JFrog has evaluated the implication and can conclude that:
- No versions of JFrog Artifactory, that use the NuGet client software, are known to be impacted as this is related to 3rd party clients.
- Artifactory by default uses NuGet V3 endpoints.
- Queries sent by the official NuGet client software will continue to be supported as official NuGet clients do not use those queries and will not suffer from this change.
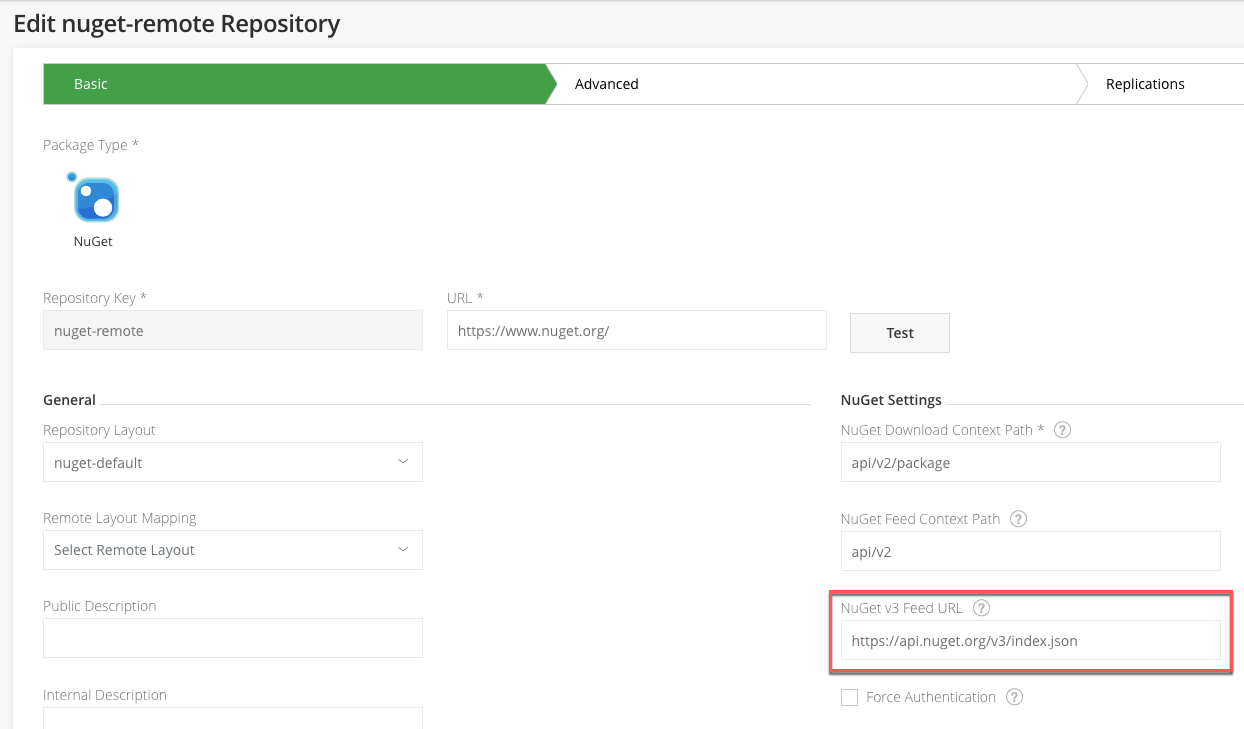
Artifactory now supports NuGet API v3 feeds and allows you to proxy remote NuGet API v3 repositories (e.g. the NuGet gallery) and other remote repositories that are set up with the API v3 feed.
To enable API v3, configure the remote repo v3 feed URL value.
NuGet SemVer 2.0 Package Support
Artifactory now supports SemVer 2.0 rules for NuGet repositories (for both NuGet API v2 and API v3), which means you can now use pre-release numbers with dot notation or add metadata to the version, for example: MyApp.3.0.0-build.60, MyApp.1.0+git.52406.
Artifactory serves the requests for downloading packages in SemVer 2.0 rules. For example, if the latest version for a certain package is in SemVer 2.0 convention, Artifactory will return it to the client. NuGet packages with the SemVer 2.0 convention are served from local, remote, and virtual repositories and for both NuGet API v2, and v3 feeds.
NuGet packages with SemVer2 are not available for old NuGet clients (prior to version 4.3.0). This is a breaking change that was made to align with the official global repository behavior. To retain the old behavior, use the artifactory.nuget.disableSemVer2SearchFilterForLocalRepos flag.
Use the NuGet Command Line
NuGet repositories must be prefixed with api/nuget in the path
When using the NuGet command line to access a repository through Artfactory, the repository URL must be prefixed with
api/nugetin the path. This applies to all NuGet commands includingnuget installandnuget push.For example, if you are using Artifactory standalone or as a local service, you would access your NuGet repositories using the following URL:
https://localhost:8081/artifactory/api/nuget/<repository key>Or, if you are using Artifactory Cloud the URL would be:
https://<server name>.jfrog.io/artifactory/api/nuget/<repository key>
Note
The NuGet install/delete will not work if there is a subfolder in the command (even if the NuGet push has a subfolder in its command).
To use the Nuget Command Line tool:
- Download NuGet.exe
- Place it in a well known location in your file system such as
c:\utils. - Make sure that
NuGet.exeis in your path
For complete information on how to use the NuGet Command Line tool please refer to the NuGet Docs Command Line Reference.
First configure a new source URL pointing to Artifactory:
nuget sources Add -Name Artifactory -Source http://localhost:8081/artifactory/api/nuget/<repository key>To use V3 requests, you need to Configure NuGet CLI with NuGet v3 API.
View NuGet Build Information
You may store exhaustive build information in Artifactory by running your NuGet builds with JFrog CLI.
JFrog CLI collects build-info from your build agents and then publishes it to Artifactory. Once published, the build info can be viewed under Builds.
For more details on NuGet build integration using JFrog CLI, see JFrog CLI.
NuGet Enforce Layout (enabling PackageBaseAddress API)
Use NuGet Enforce Layout to avoid package duplication and bring Artifactory closer in alignment with the nuget.org registry.
Note
NuGet Enforce Layout is available only if your Artifactory version has the NuGet Package Handler activated.
NuGet Enforce Layout has three main uses:
-
It allows access to the PackageBaseAddress service, which speeds up NuGet restore operations.
-
It normalizes the names of the packages that you deploy based on SemVer, according to the NuGet Normalized Version Numbers convention, supported in NuGet versions 3.4 and above.
For example, when deploying a package named Package-1.0.0.0+asdfs.nupkg to a repository with Enforce Layout enabled, the suffix +asdfs is removed from the package name and the package will be deployed as Package-1.0.0.0.nupkg.
-
It prevents the upload of duplicate versions or several package versions that are identical according to the Normalized Version Numbers rules.
For example, when deploying a package named Package-1.0.0.0+asdfs.nupkg and a package named Package-1.0.0.0.nupkg already exists in the repository, Artifactory will normalize the new package name to Package-1.0.0.0.nupkg, consider the two packages to be identical, prevent the upload, and return an error.
For reference, NuGet Packages take the form of the .nupkg file:
{NAME}-{VERSION}-{OPTIONAL-PARAMETERS}.nupkg
Important
The only way to use the NuGet V3 PackageBaseAddress API in Artifactory is by using NuGet Enforce Layout repositories.
Activate NuGet Enforce Layout
Enforcement can be enabled either globally for all NuGet repositories in Artifactory or for specific NuGet repositories. If you enable enforcement globally, the enforcement cannot be later disabled on any NuGet repositories in Artifactory that were created after global enforcement was activated.
Note
Global enforcement takes effect only on NuGet repositories that are created from the time that global enforcement is activated; it is not backward compatible. Repositories with the old NuGet layout will continue to be non-normalized.
Enable Enforcement Globally
To enable global enforcement:
-
In Artifactory, click the Administration tab and go to Artifactory Settings > Packages Settings. The Package Settings screen appears.
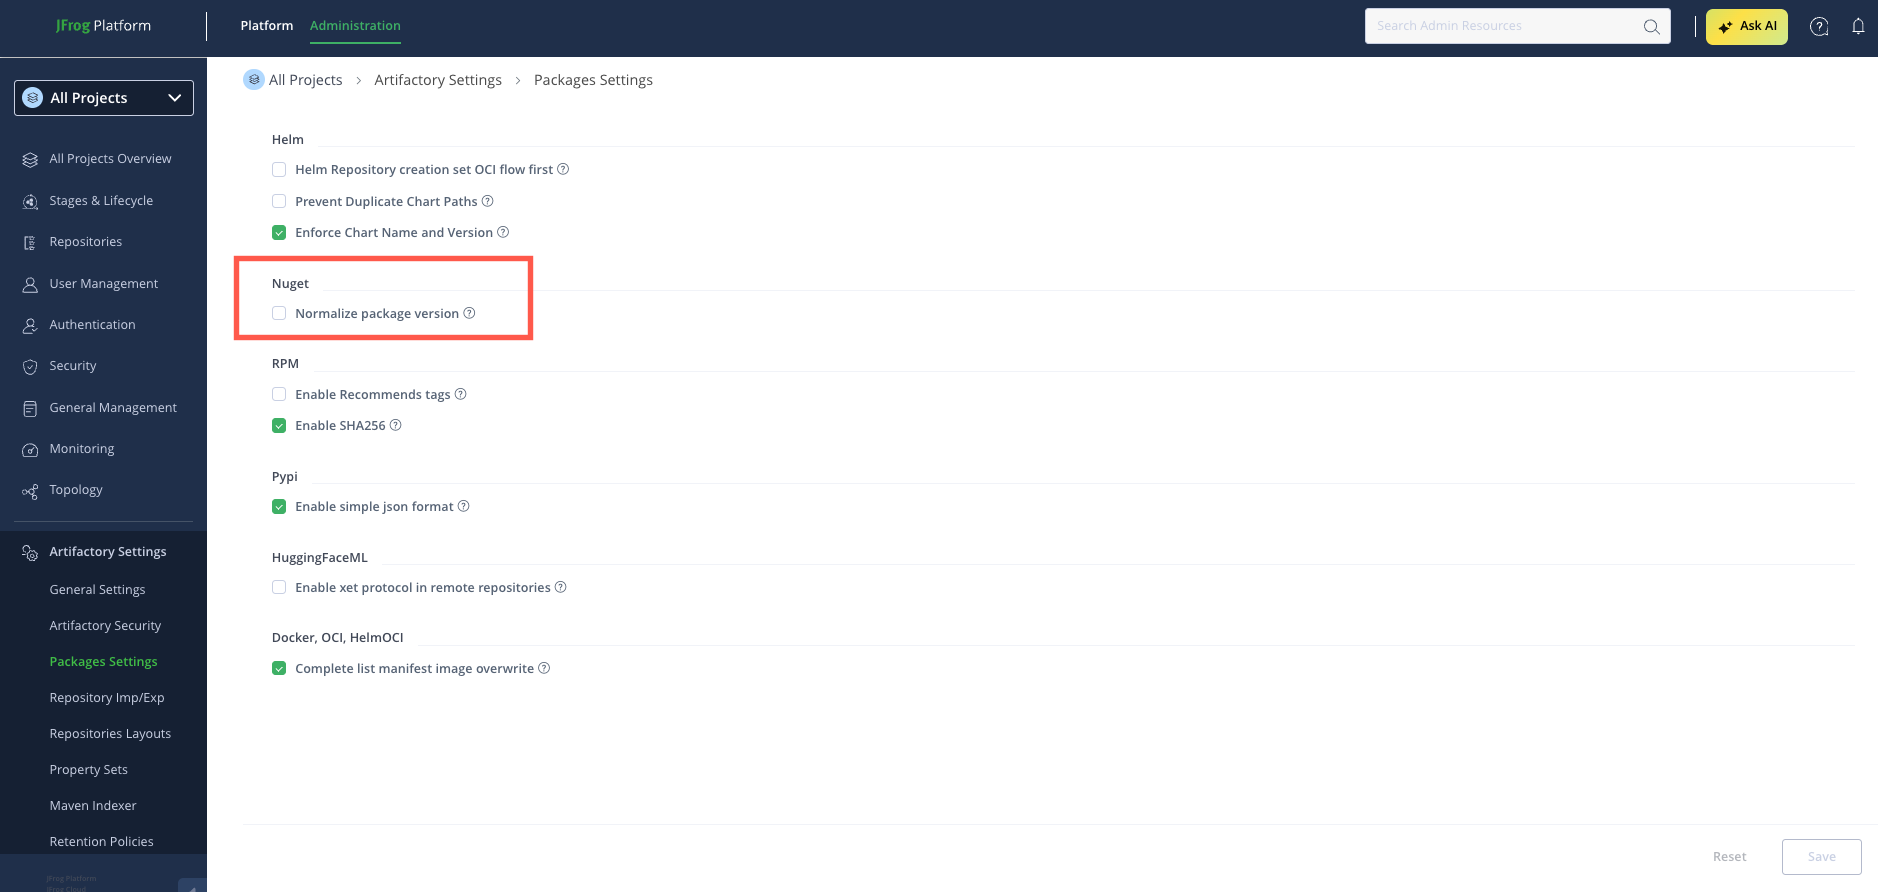
-
In the NuGet section of the Package Settings screen, select the Normalize package version checkbox and click Save.
Enable Enforcement on a Specific Repository
When creating a new NuGet repository, you can selectively activate enforcement on specific repositories by selecting the Enforce Layout option. This allows tailored enforcement that fits the specific needs of different projects or teams.
When enabling layout enforcement on a new repository, it is recommended to indicate this in the repository name. For example, nuget-local-enf.
For more information, see:
- Additional Settings for NuGet Local Repositories
- Additional Settings for NuGet Remote Repositories
- Additional Settings for NuGet Virtual Repositories
Important
- The Enforce Layout setting cannot be changed after repository creation. To enable layout enforcement on a repository that was created without layout enforcement enabled, migrate the repository using the Migration Tool.
- For virtual repositories, you must only include NuGet repositories that already have Enforce Layout activated.
- Click Create Local Repository.
Error Message
Artifactory will return the following error message when trying to perform actions on an artifact whose name does not match the naming conventions:
| Error Code | Description |
|---|---|
| 409 | Response status code does not indicate success: 409 (Conflict). |
Limitations on NuGet Enforce Layout
The strictest operational constraints for NuGet Enforce Layout are usually around federation, replication, and smart remote repositories. Federated peers, replication endpoints, and smart remote targets must all use the same NuGet layout type (normalized or non-normalized).
NuGet Enforce Layout has the following limitations:
- When creating normalized virtual repositories, you must select local and/or remote repositories that have enforce layout selected.
- Moving and copying artifacts between repositories is allowed only between homogenous NuGet repository types. Packages from an un-normalized repository cannot be moved to a normalized repository.
- Packages that do not follow SemVer naming conventions cannot be published/uploaded to a normalized NuGet repository.
- A normalized smart repository can only point to a normalized local or remote target repository.
- When configuring a smart remote repository, the credentials of an admin user should be used because these credentials are used to determine if the target repository is normalized.
- When enabling federation between two repositories, the source and destination NuGet repositories must be the same type (i.e., only normalized NuGet repositories must be synced with each other). Currently, there are no forced restrictions for federation, and therefore users must ensure not to federate between heterogeneous repositories (i.e., normalized repositories must not be synced with un-normalized repositories or vice versa).
- Replication too must follow the same principle described above (i.e., replicate between identical repositories. Normalized → normalized, or un-normalized → un-normalized).
- In cases where users are restoring archived repositories to a different repository (not the original repository that was archived), the same repository configurations as the original archived repositories must be used. Ensure that un-normalized artifacts do not get restored to a normalized repository.
For migration planning, see Limitations and Usage Notes in the Migration Tool documentation.