Kubernetes Helm Chart Repositories
The JFrog Artifactory integration with Helm allows you to manage Helm charts in Artifactory. Helm is a package manager for Kubernetes, enabling you to define, install, and upgrade applications on Kubernetes clusters. Helm charts are the standardized way to package Kubernetes applications, providing templates that allow consistent and efficient deployment of applications across various environments. The Helm Hub serves as a public repository for community-contributed charts.
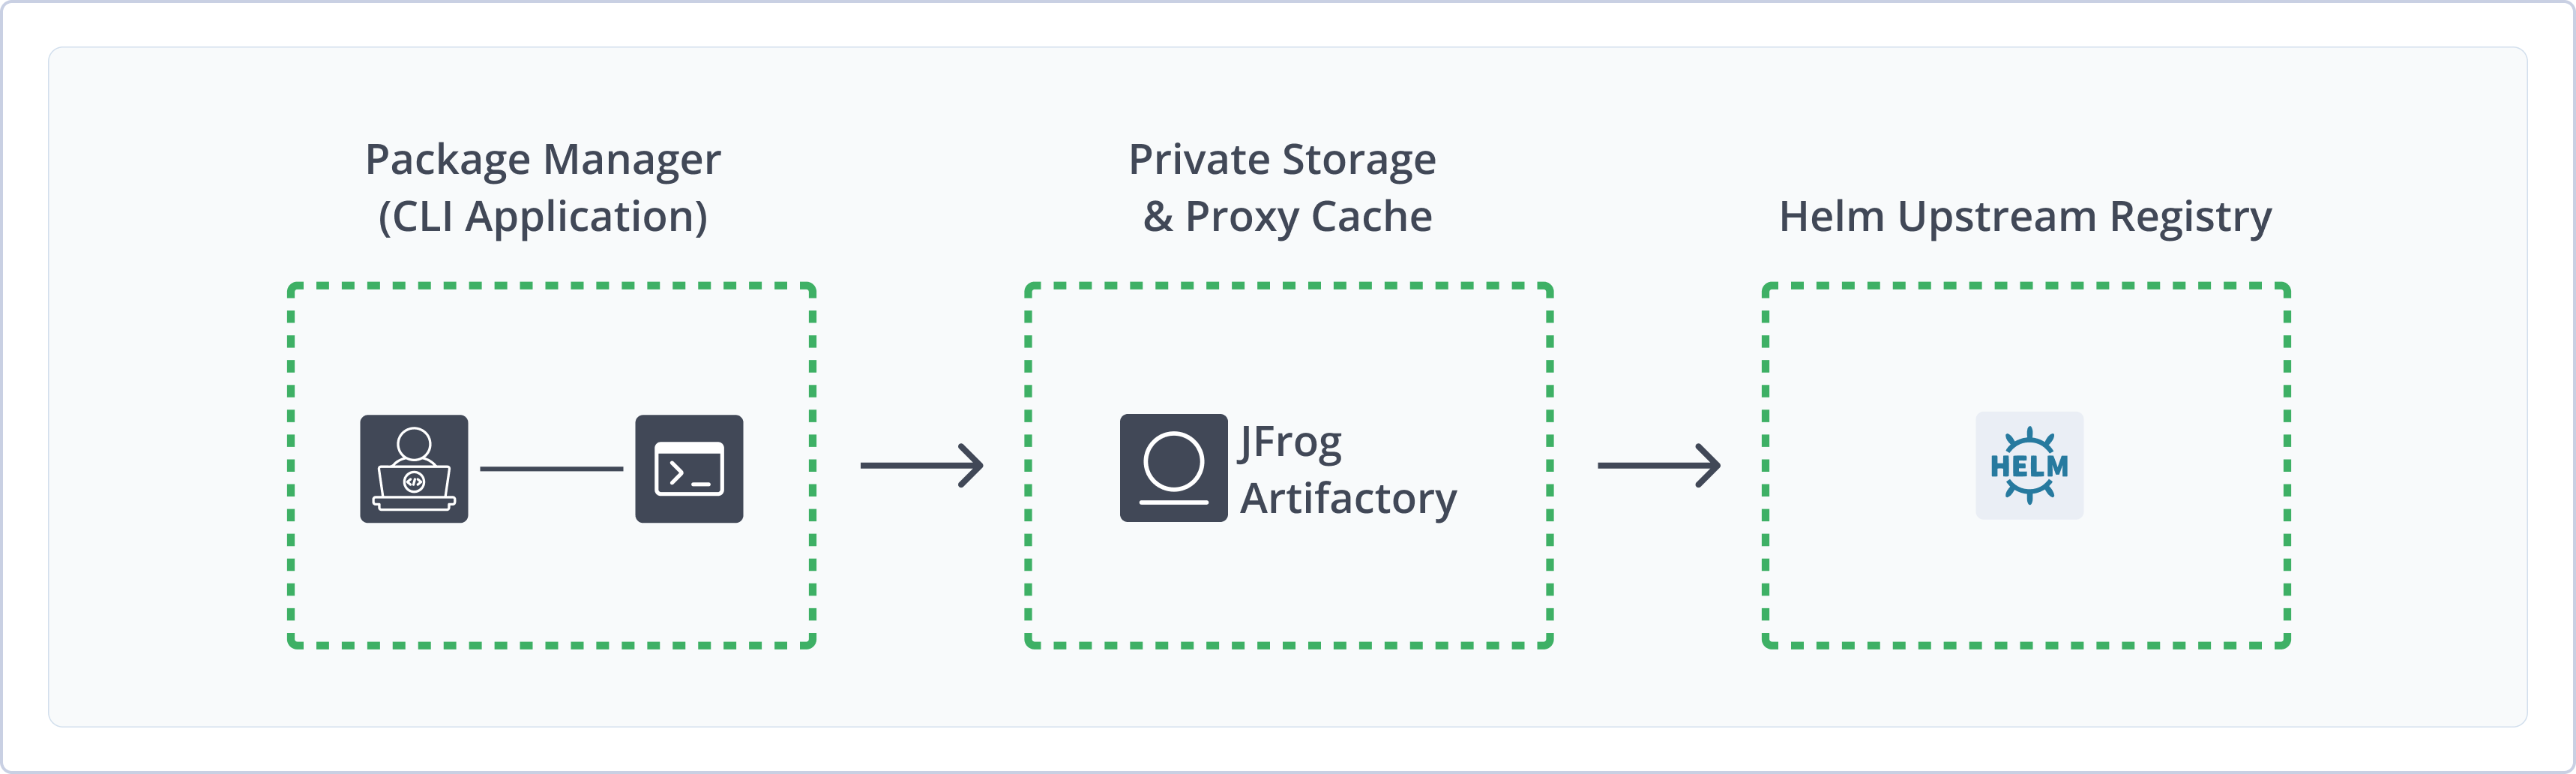
The JFrog Artifactory integration with Helm offers the following ways to work with Helm charts:
- Helm Repositories: To manage and distribute Helm charts
- Helm OCI Repositories: To manage and distribute Helm charts through the Open Container Initiative (OCI) standard
Note
Artifactory has transitioned to using Helm Relative URLs for indexing Helm chart responses by default. This change requires an upgrade for users still operating with Helm client V2, as this feature is only compatible with Helm client version 3 and above.
Artifactory has adopted Helm client version 3 as the default, and all support for Helm client versions below 3.0.0 will be discontinued.
For more information, see Deprecations in Process.
Artifactory provides robust capabilities for managing Helm charts, including:
- Secure, Private Repositories: Host your Helm charts in secure repositories with fine-grained access control tailored for projects or development teams.
- Metadata Calculation: Automatically compute metadata for Helm charts stored in Artifactory's local repositories.
- Remote Repository Access: Utilize remote Helm chart repositories that offer proxy and caching functions for improved efficiency.
- OCI Repository Support: Use Helm OCI repositories to store and share your Helm charts seamlessly.
- Enterprise-Level Features: Benefit from high availability, repository replication designed for multi-site development, and various options for scalable storage solutions.
- Compatibility with Helm 3: Deploy and resolve Helm charts using V3 clients.
Note
For more information on using Helm with Artifactory and managing applications on Kubernetes, see Kubernetes cheatsheet for managing applications.
Helm OCI Repositories
The JFrog Artifactory integration with Helm OCI allows you to manage and distribute Helm charts through the Open Container Initiative (OCI) standard.
As of Helm version 3.8.0, OCI (Open Container Initiative) has become the primary method for managing the scale and distribution of Helm charts. This advancement directly addresses the scaling limitations associated with the traditional index.yaml file, allowing for improved scalability, distribution, and utilization of OCI’s capabilities in delivering charts effectively.
With the release of Artifactory version 7.75.3, repository creation now defaults to Helm OCI in the JFrog Platform WebUI. This enhances the user experience by streamlining the process of setting up repositories for Helm charts. Additionally, Artifactory continues to support legacy versions, ensuring compatibility and flexibility for users who have not yet transitioned to OCI.
For more information, see Helm documentation.
Key Benefits of OCI Adoption in Helm:
- Improved Scalability: Overcomes the limitations of the
index.yamlfile, enabling better performance as the number of charts grows. - Enhanced Distribution: Simplifies the distribution of Helm charts across multiple environments and platforms.
- Using OCI Features: Allows you to take full advantage of OCI's robust features, enhancing the overall workflow for managing Helm charts.
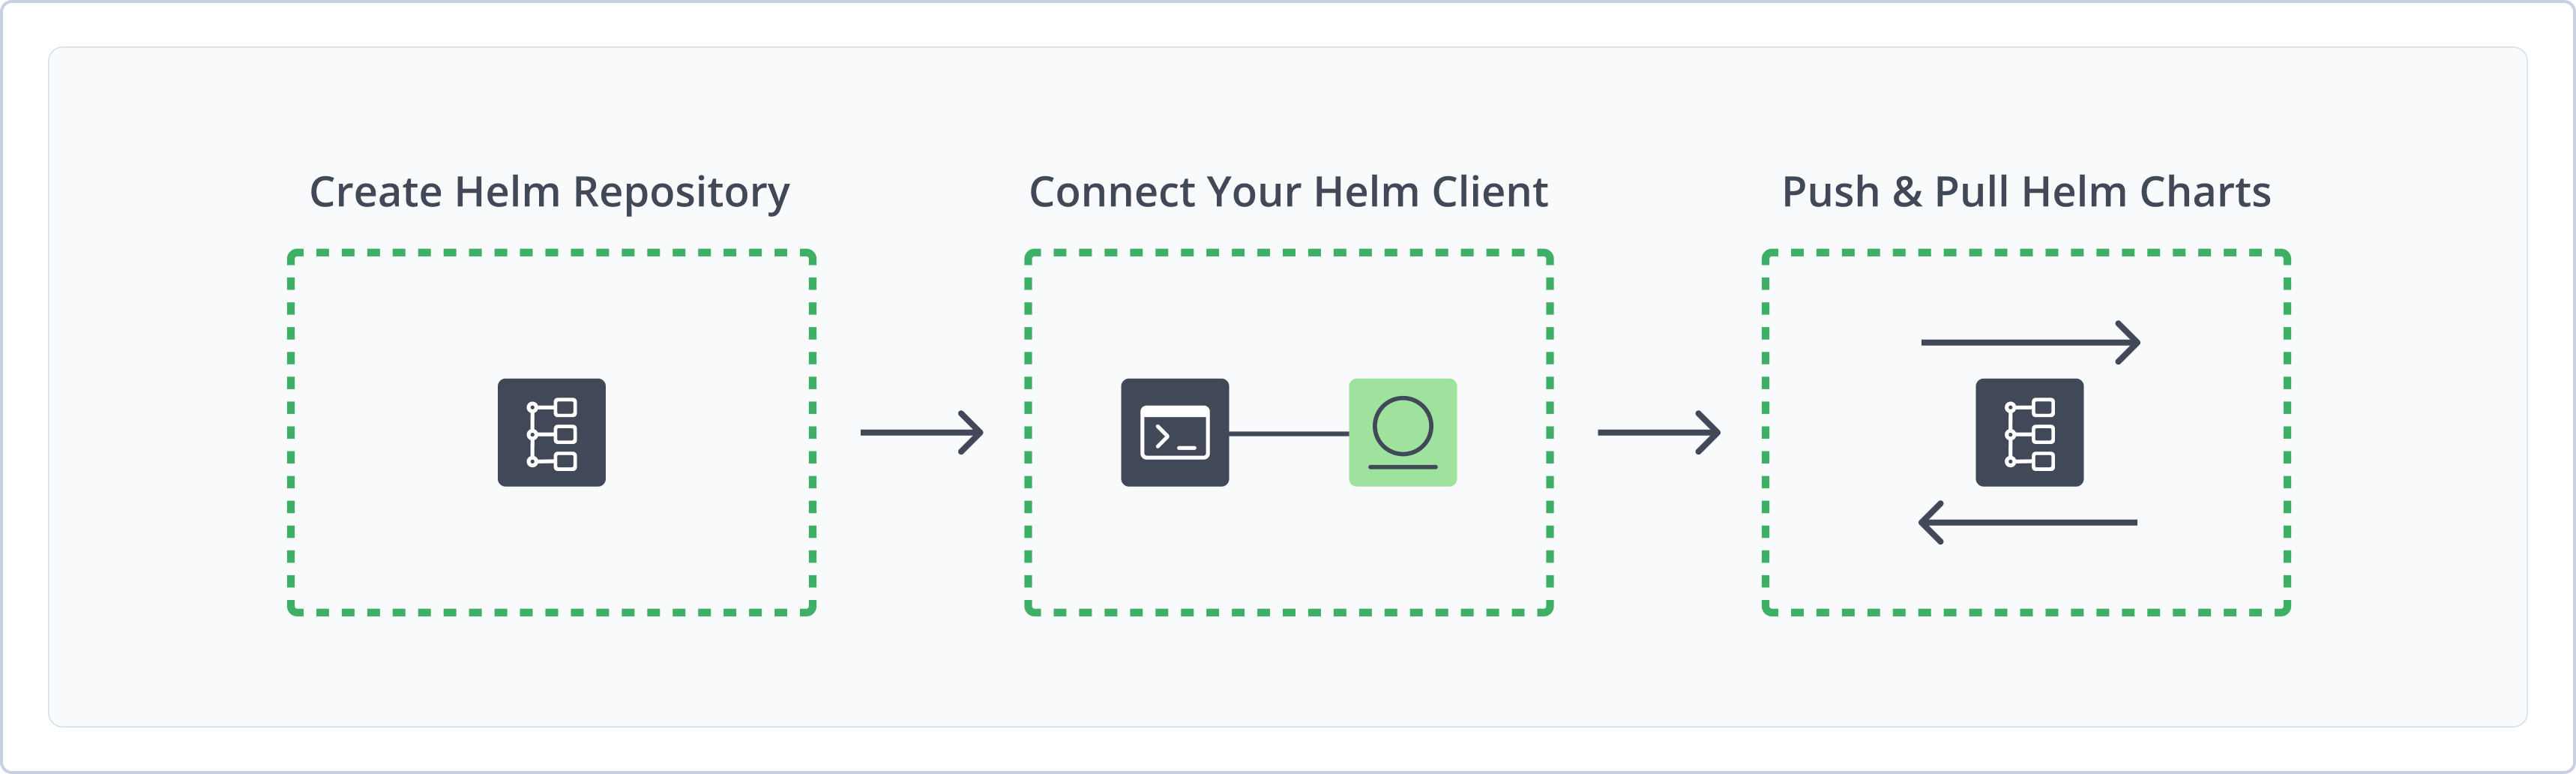
Get Started with Helm OCI
To get started working with Helm OCI, complete the following main steps:
Create a Helm OCI Repository
This topic describes how to create a Helm OCI Repository. This is required before uploading and installing Helm OCI charts. The following repository types are available:
- Local repositories: Where you store and share 1st and 2nd party packages with your organization
- Remote repositories: Enable you to download from any remote location including external package registries or other Artifactory instances
- Virtual repositories: Enable aggregating remote and local repositories enabling your organization to scale by providing a single URL that provides access to multiple repositories and types
For more information on JFrog repositories, see Repository Management.
Prerequisite: You need Admin or Project Admin permissions to create a Helm OCI repository. If you don't have Admin permissions, the option will not be available.
To create a Helm OCI repository:
-
In the Administration tab, click Repositories > Create a Repository.
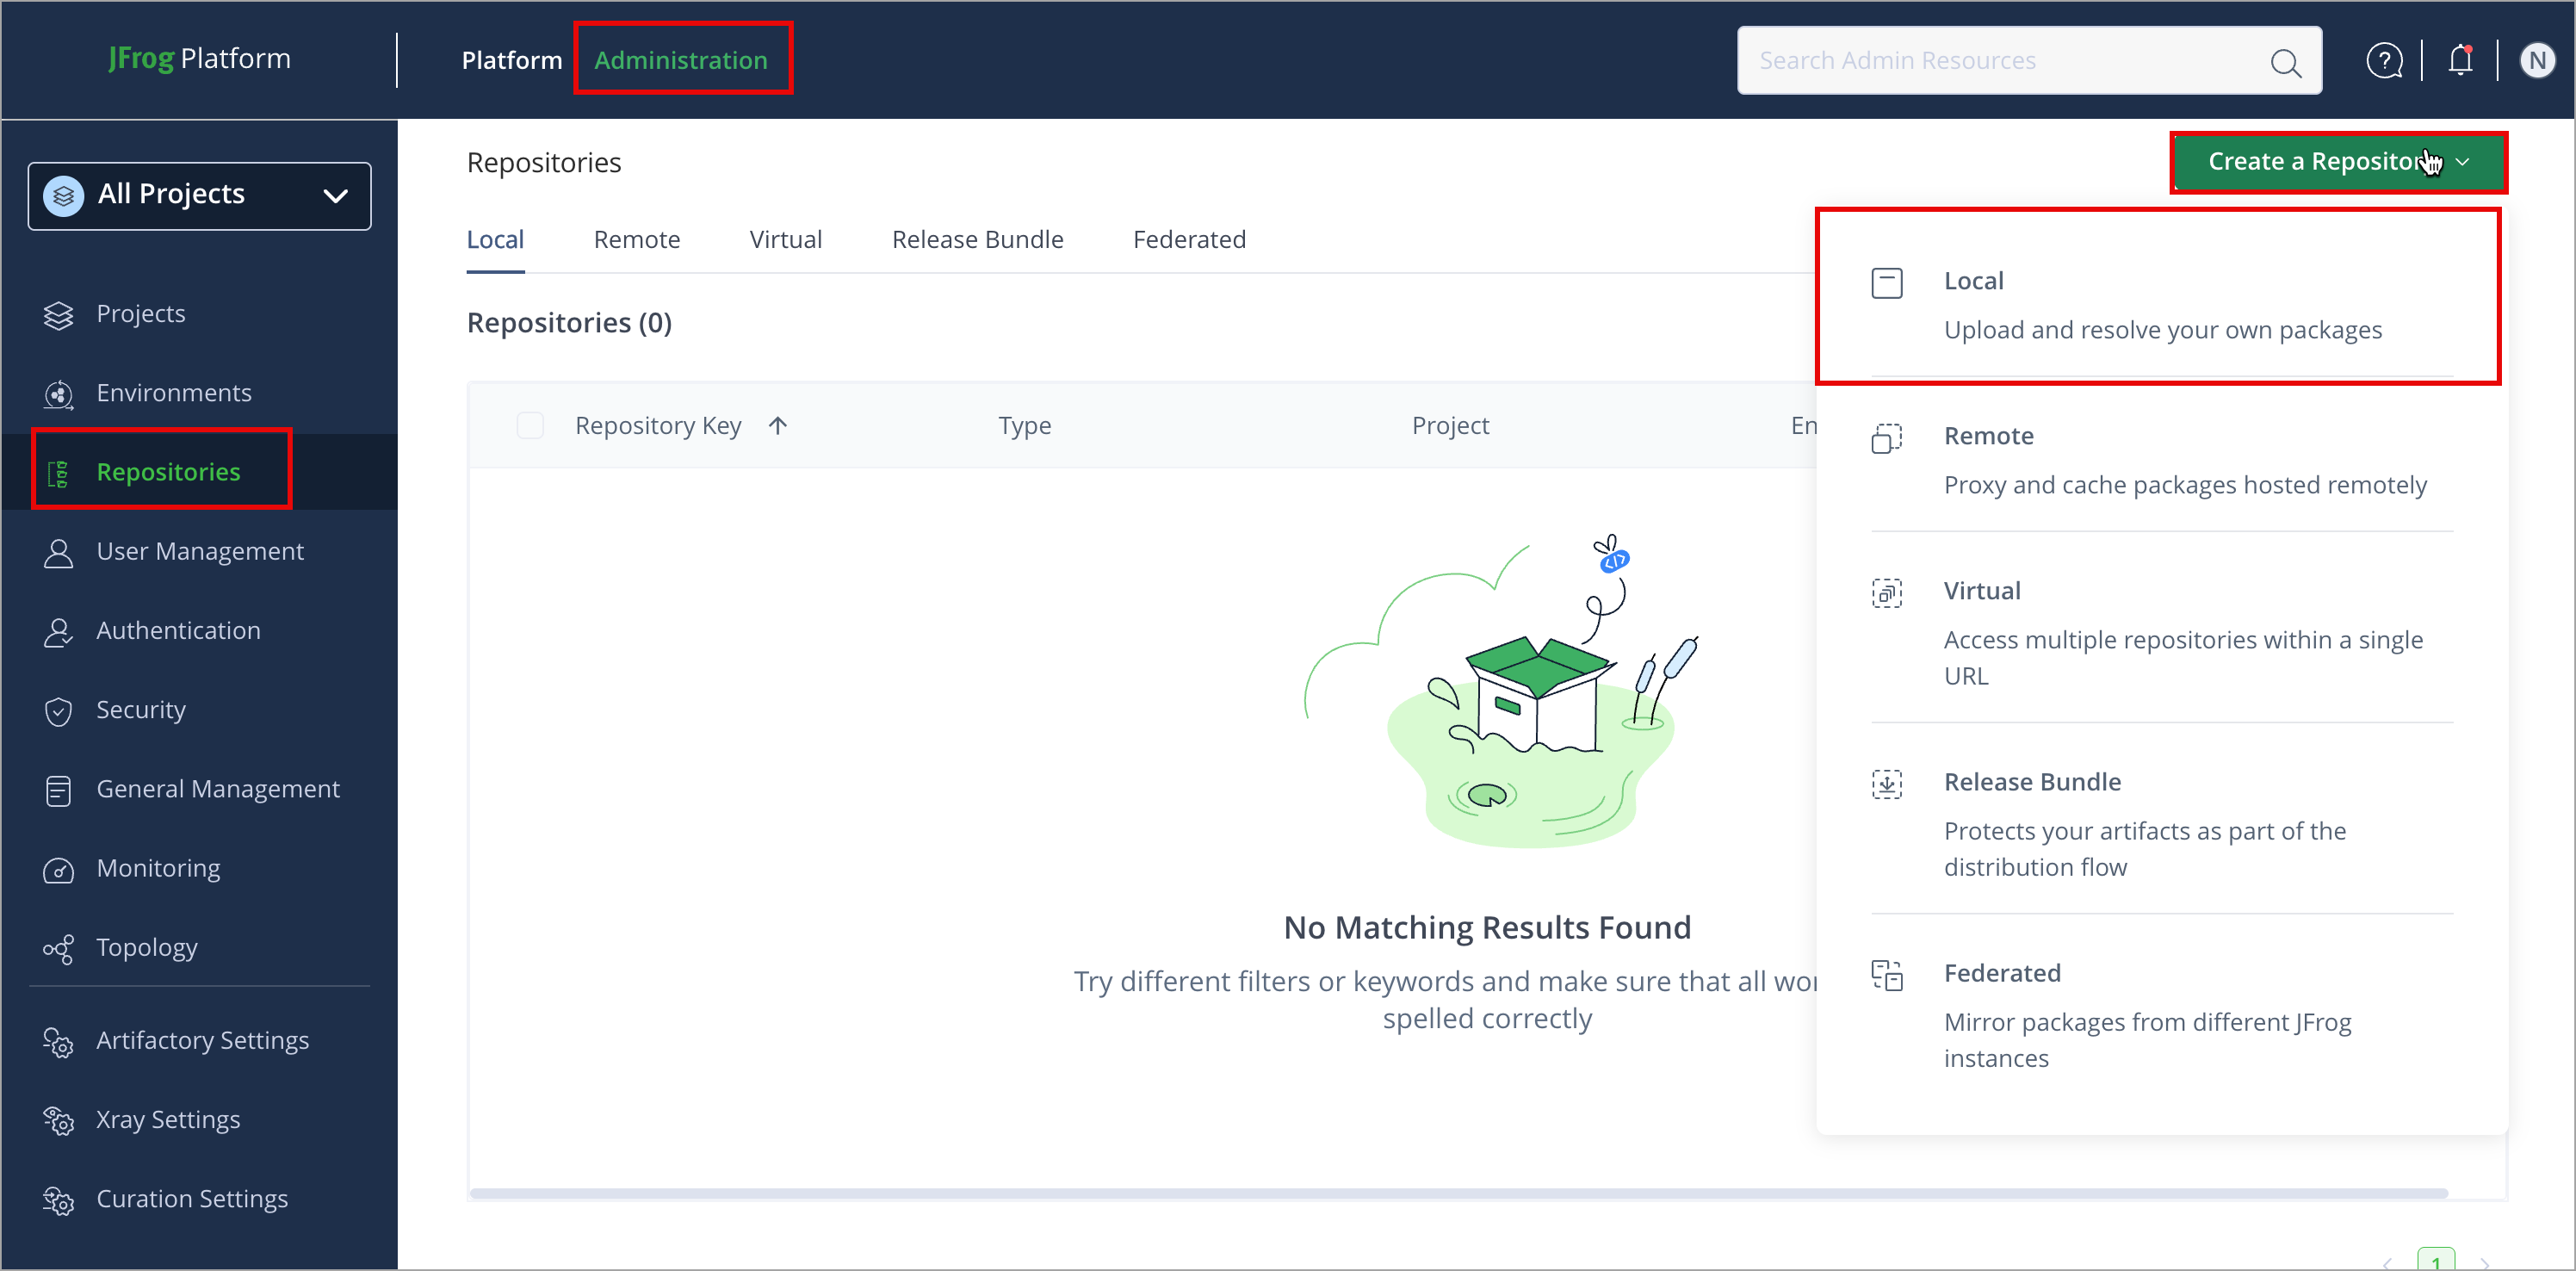
-
Select the repository type you want to create, configure the required fields (described in the following list), then click Create Repository.
-
For Local Repositories, In the Repository Key field, type a meaningful name for the repository. For example,
helmoci-local-repository-1. For more information on local repositories and all their possible settings, see Local Repositories.Starting from Artifactory version 7.75.3, when creating a new Helm repository, a Helm OCI repository will be created by default that is compliant with OCI, and supports OCI REST APIs instead of Helm.
You can change this setting in two ways:
- To use the legacy Helm implementation for one repository, click the Use Legacy Helm button on the repository creation menu.
- To change the default behavior to Helm instead of Helm OCI, navigate to Administration > Artifactory Settings > Packages Settings, and deselect the Helm repository creation set OCI flow first checkbox.
-
For Remote Repositories, additionally, verify the Repository URL and update if needed. For more information on Remote Repositories and all their possible settings, see Remote Repositories.
-
For Virtual Repositories, additionally select one or more local or remote repository types to include in the virtual repository. For more information on virtual repositories and all their possible settings, see Virtual Repositories.
-
-
Click Create Repository. The repository is created, and the Repositories window is displayed.
Connect your Helm OCI Client to Artifactory
This topic provides details on configuring Helm OCI to work with Artifactory. To get up and running quickly to use Helm OCI, see Get Started with Helm OCI.
Note
Use this section only for Helm OCI repositories, not for Helm repositories. Helm OCI repositories do not support non-OCI interactions. For more information, see Helm documentation.
- For Helm OCI repositories, use
helm registry loginandoci://...commands.- For Helm repositories, use
helm repo add https://[JFrogPlatformURL]/artifactory/api/helm/<HELM_REPO_KEY>.If you use the wrong flow for the repository type, commands may fail. For more information about working with Helm repositories, see Helm Repositories.
Prerequisite: Before connecting your Helm client to Artifactory, you must have an existing Helm OCI repository in Artifactory. For more information, see Create a Helm OCI Repository
Supported Helm OCI Clients
- Helm version 3.8.0 or above, or prior versions with OCI Experimental mode enabled
Logged in vs. Anonymous user: You can work with Artifactory as either a logged-in user or an anonymous user. To use Artifactory with anonymous access, configure that access under Admin > Security > General. For more information, see Allow Anonymous Access.
To configure your local machine to install Helm OCI charts, follow these steps:
-
To configure the Helm OCI client with Artifactory, log in using the
helm registry logincommand:helm registry login https://[JFrogPlatformURL]Where:
[JFrogPlatformURL]: Your JPD name<USER_NAME>: Your JPD username<TOKEN>: Your JPD Token
Alternatively, you can provide your username and token in advance using the following command:
helm registry login -u <USER_NAME> -p <TOKEN> https://[JFrogPlatformURL]
Note
- Starting from Artifactory version 7.75.3, to use Helm OCI with a Helm client version before 3.8.0, run this command in your Helm client:
export HELM_EXPERIMENTAL_OCI=1- We recommend using an encrypted password instead of clear-text. For more information, see Centrally Secure Passwords.
- Note: You can also use JFrog Set me up to copy the snippet populated with your token and environment. For more information, see Use Artifactory Set Me Up for Configuring Package Manager Clients.
Note
When using Helm OCI repositories with a reverse proxy or load balancer, understand that the Docker access method configured in Artifactory directly impacts how Helm OCI repositories are accessed. This is true even if you are working exclusively with Helm OCI charts.
For instructions on configuring your reverse proxy for Helm OCI, refer to How-to Guide for Docker/Helm OCI with your Load-Balancer/Reverse Proxy.
Next Steps:
Deploy Helm OCI Charts
Deploying Helm OCI charts makes them available to other users.
The following options are available for deploying Helm OCI charts:
Deploy Helm OCI Charts via the UI
To deploy a Helm OCI chart via Artifactory UI:
-
In the Platform tab, click Artifactory > Artifacts, then click Deploy. Deploy options are displayed.
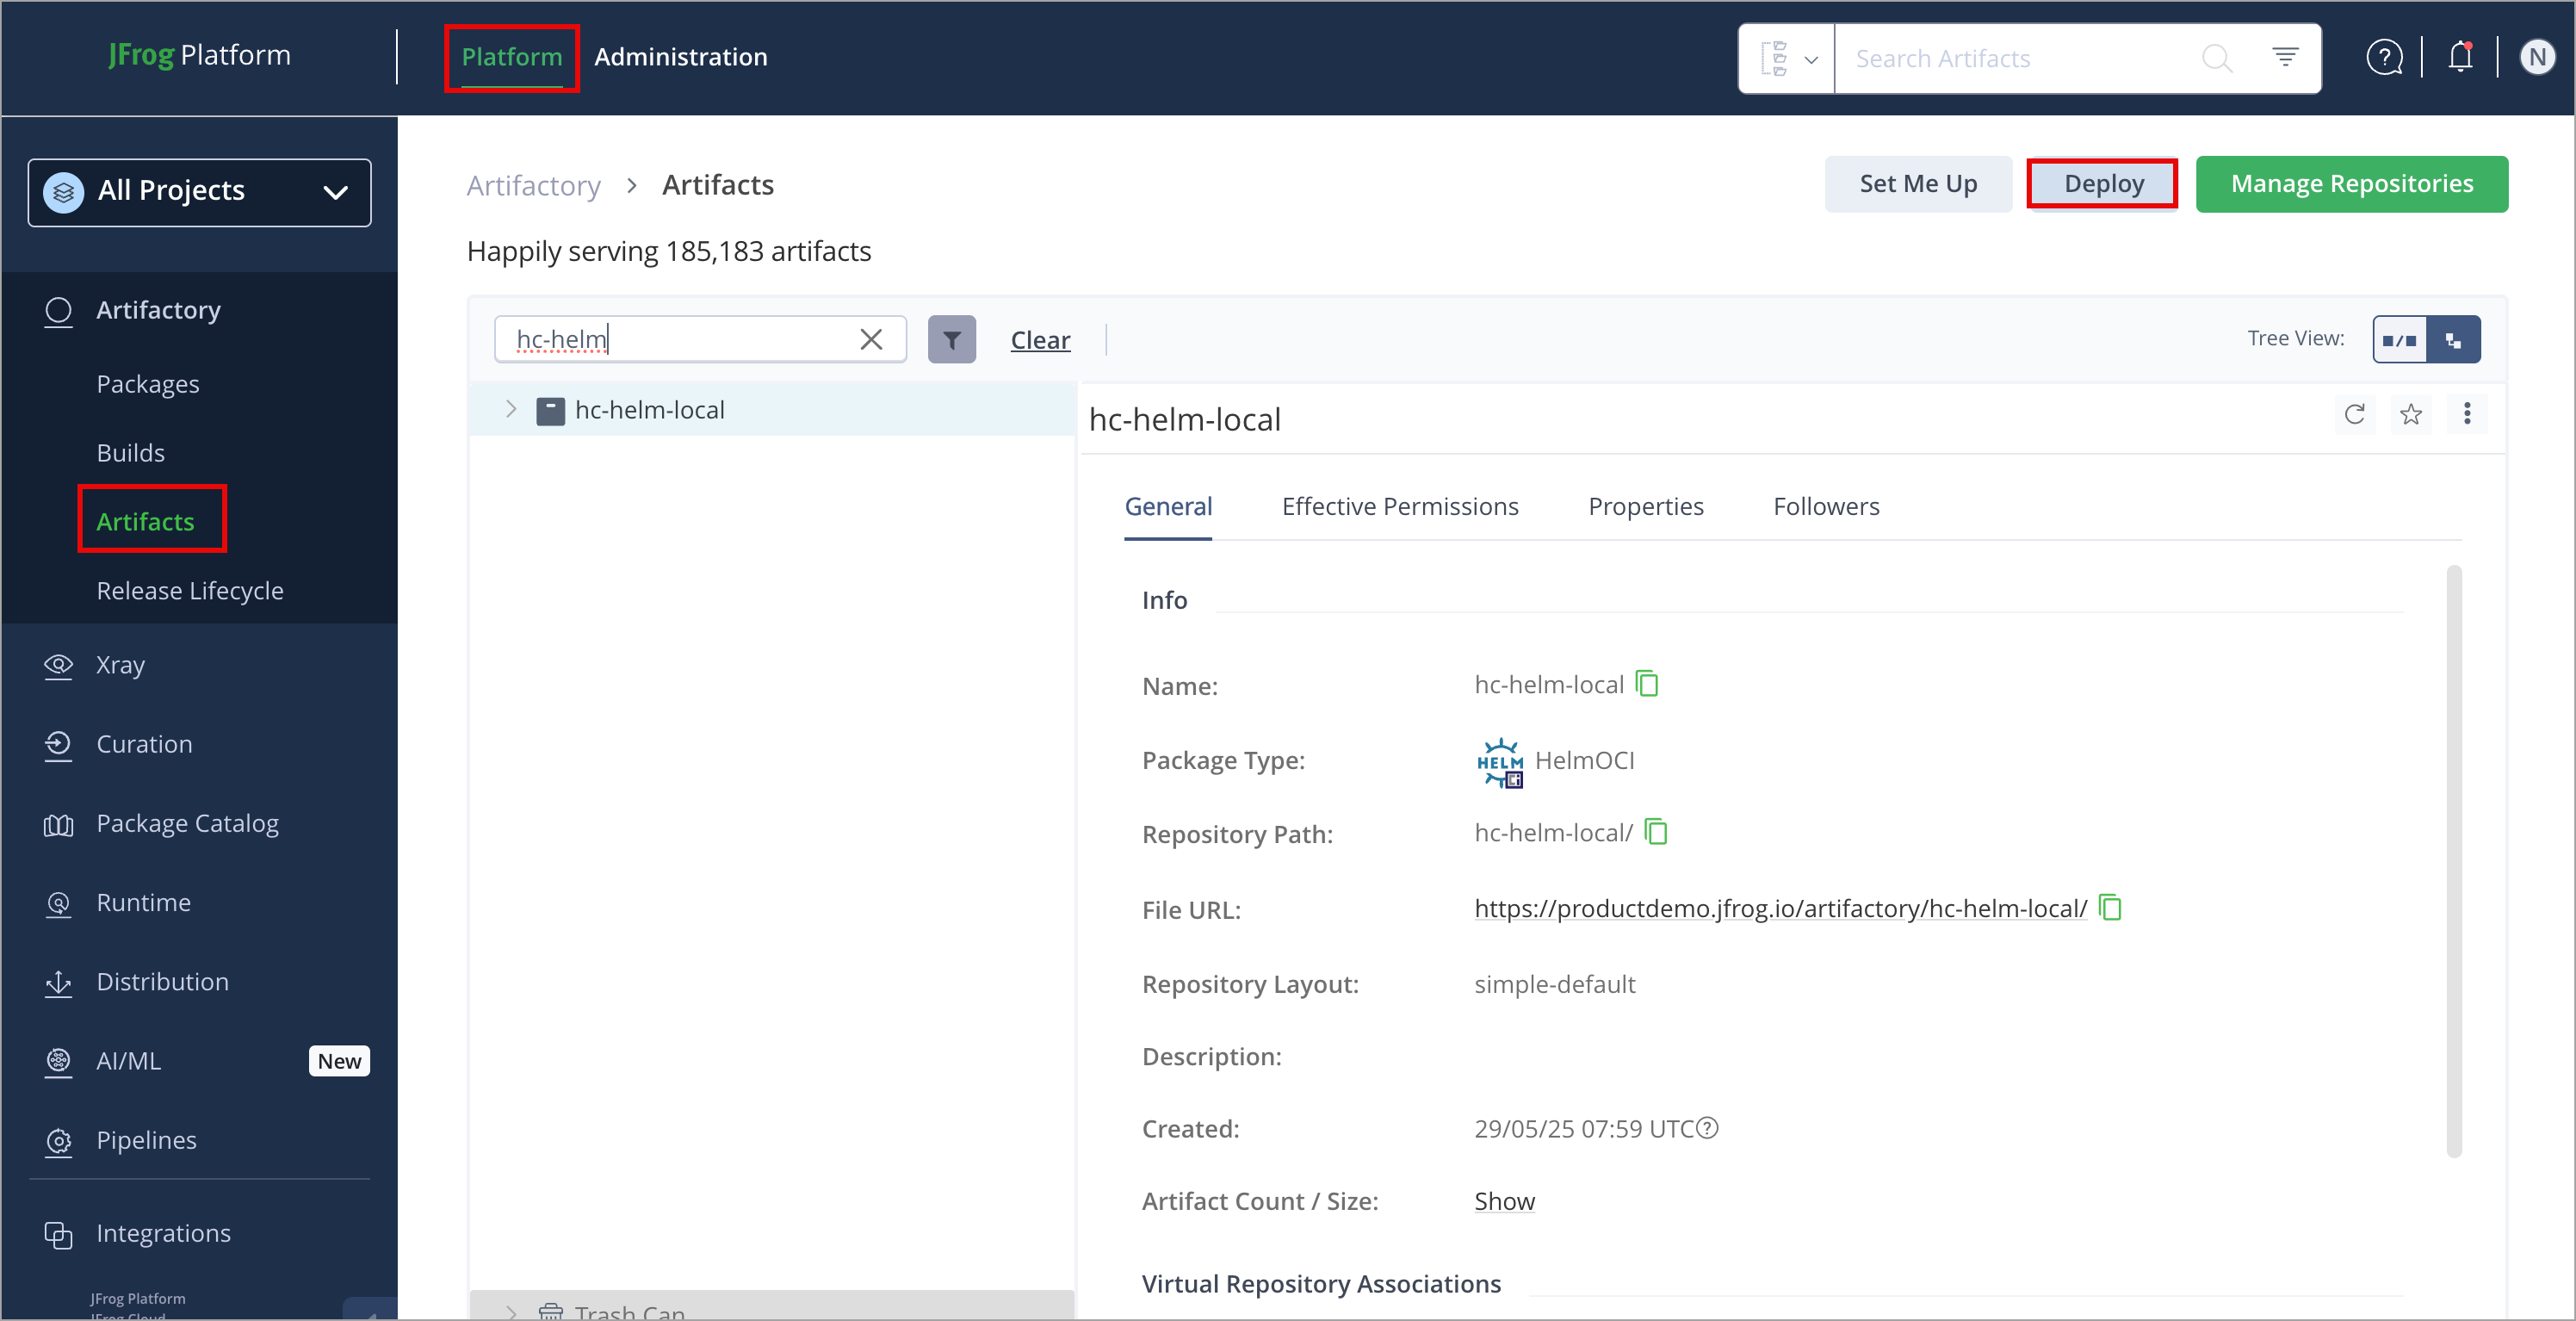
-
Verify the deploy options, then click Deploy.
The chart is deployed. For more information, see Deploy Artifacts.
Push Helm OCI Charts via Client
You can push Helm charts using the following method: you can deploy by checksum or from an archive.
For example, to push a Helm OCI chart to a repository called helmoci-local, you could use the following:
helm push <HELM_CHART_TGZ_FILE> oci://[JFrogPlatformURL]/<REPOSITORY>Where:
[JFrogPlatformURL]: The URL of your JPDREPOSITORY: The name of the target repositoryHELM_CHART_TGZ_FILE: The name of Helm chart file
Note
Add the
oci://prefix to the Artifactory repository URL to force the Helm chart to wrap the artifact as OCI.
For example:
helm push mychart oci://company.jfrog.io/helmoci-localNote
You can also use JFrog Set Me Up to copy the snippet populated with your token and environment. For more information, see Use Artifactory Set Me Up for Configuring Package Manager Clients.
Pull Helm OCI Chart Using Helm Client
The process of pulling a chart from Helm OCI is referred to as installing.
Now, every Helm OCI chart pushed to the root of the helmoci-local repository can be pulled using:
helm pull oci://[JFrogPlatformURL]/<REPOSITORY>/<CHART_NAME>Where:
[JFrogPlatformURL]: The URL of your JPDREPOSITORY: The name of the target repositoryCHART_NAME: The Helm chart file
For example:
helm pull oci://company.jfrog.io/helmoci-local/mychartNote
This command pulls the latest chart version. To pull a specific chart version, add the
--versionflag and specify a version number after the chart name. For example,--version 1.9.3
Additional Helm OCI Actions
The following additional actions are available with Helm OCI repositories:
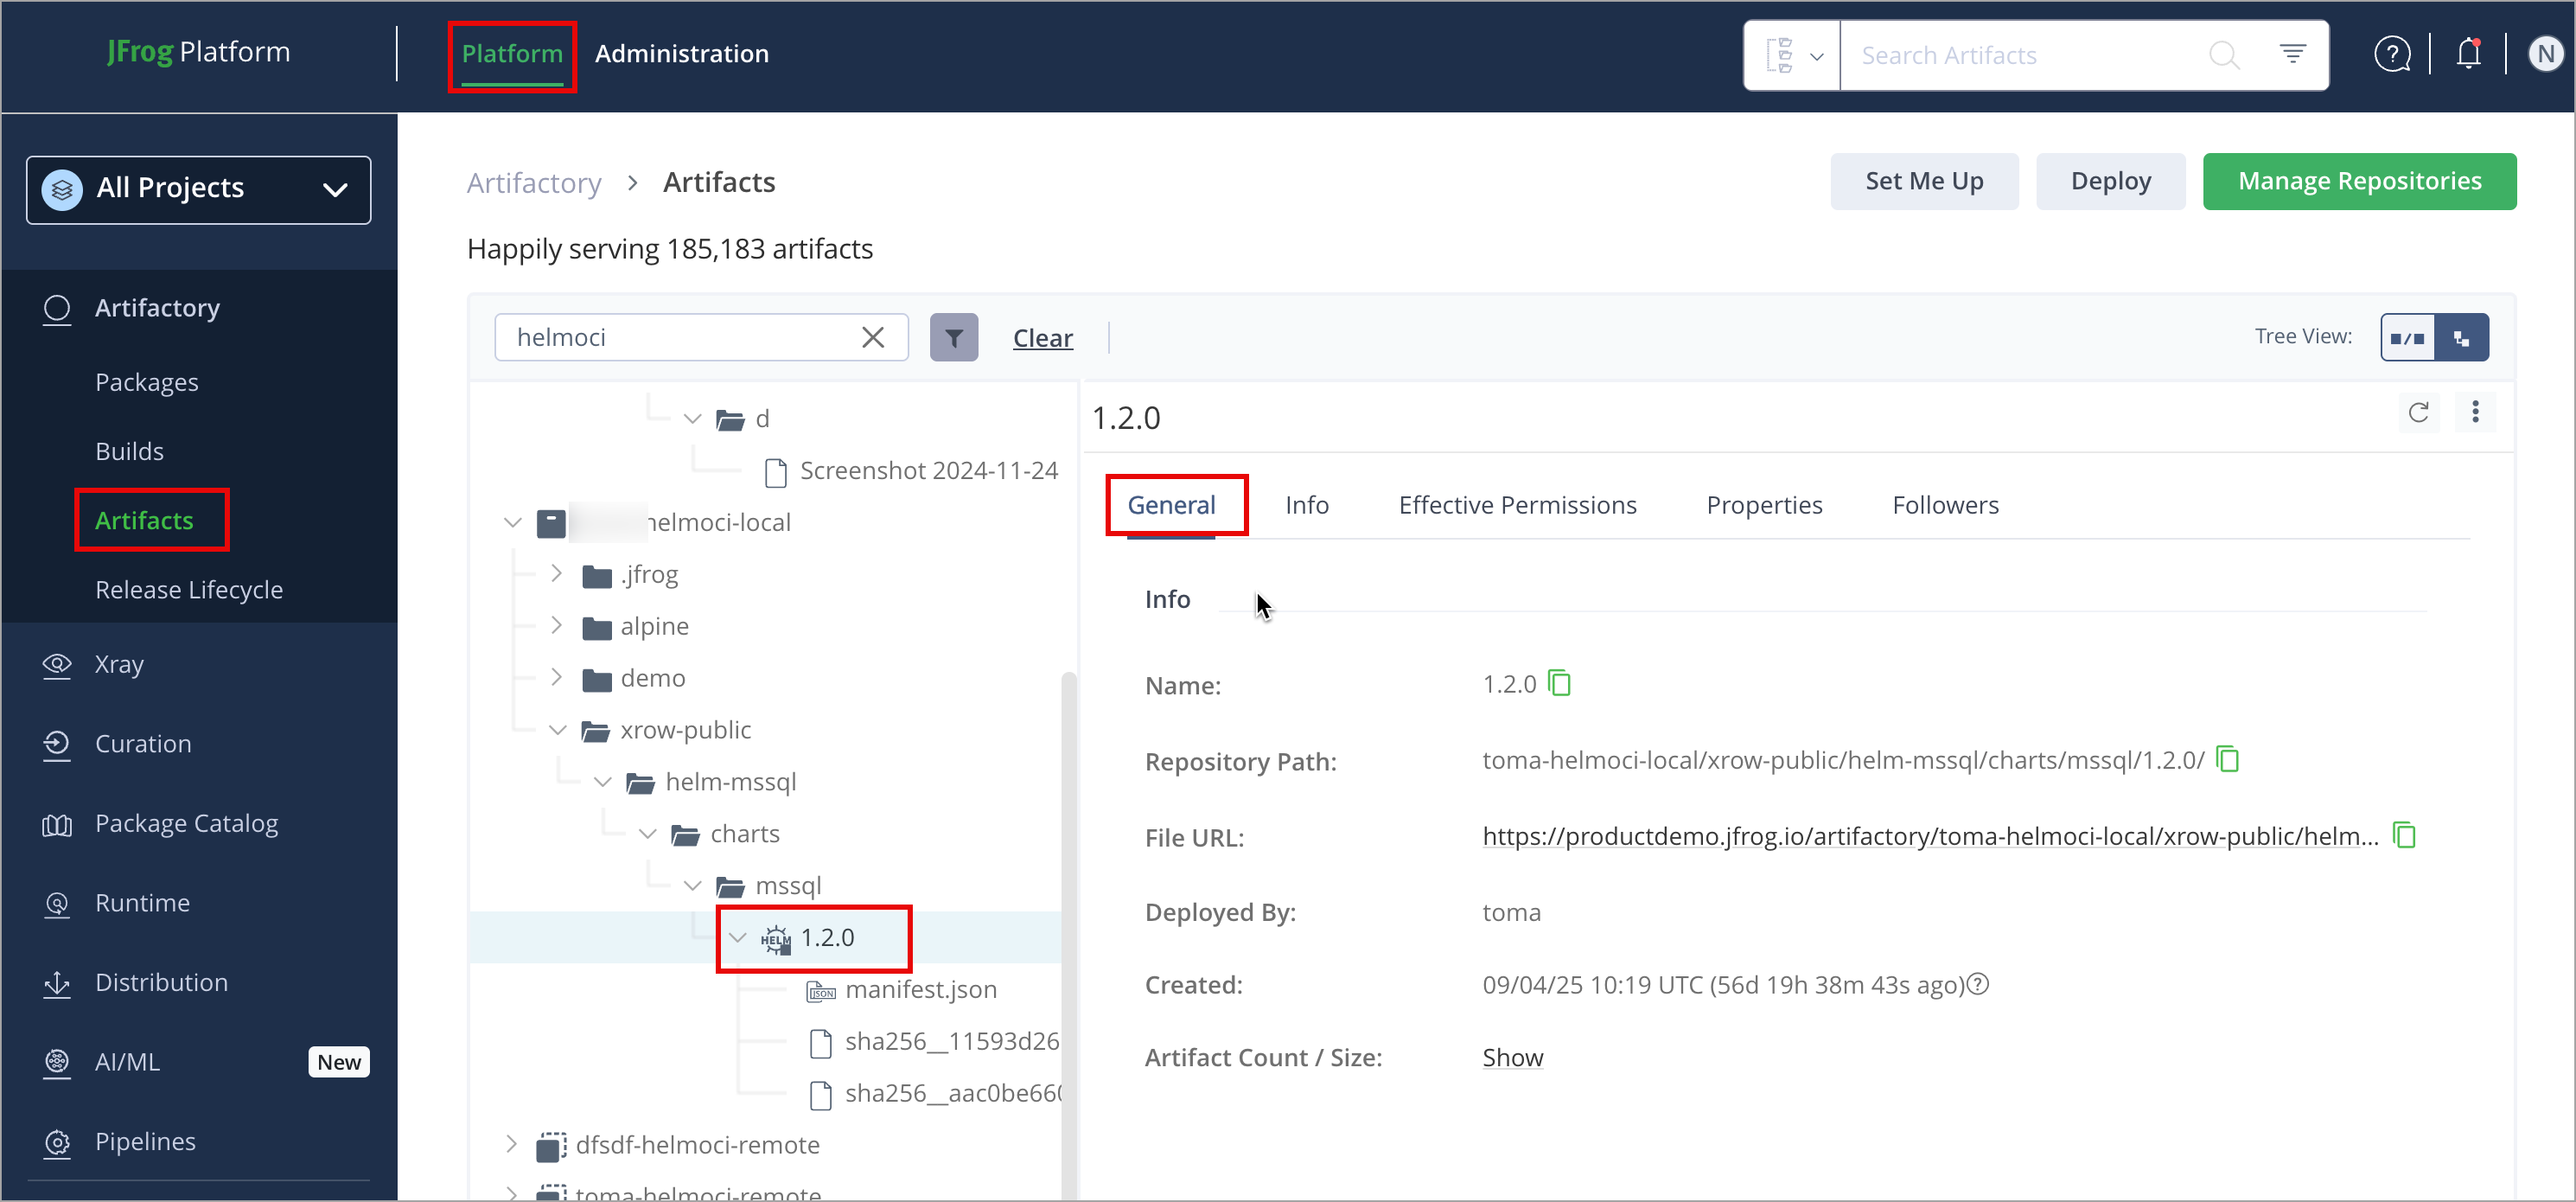
View Individual Helm OCI Chart Information
Artifactory lets you view metadata for selected Helm OCI charts and their contents directly from the UI.
In Platform , click Artifactory > Artifacts, then select the Helm OCI chart you want to inspect.
The metadata is displayed in the General and Info tabs.
Note
Starting from Artifactory version 7.75, in the Packages view, both Helm OCI and Helm will show up side by side, but in the Artifacts view, you’ll be able to filter and view only one or the other.
Starting from Artifactory version 7.90.1, you can use Referrers API to link between images and their related information. For more information, see Use Referrers REST API to Discover OCI References.
Helm OCI Limitations in Artifactory
The following are the limitations of Helm OCI in Artifactory:
- Repository Compatibility: Artifactory does not allow the inclusion of both Helm and Helm OCI repositories within the same virtual repository. You must create separate virtual repositories—one for standard Helm and another for Helm OCI.
- Xray Scanning: Currently, JFrog Xray does not support scanning of Helm charts.
- Index Manifest Management: When moving, copying, or deleting index manifests, these actions do not automatically include their associated images. You must manually select both the index manifests and the corresponding images to perform these operations successfully.
- File Type Flexibility: Although referred to as Helm OCI, this format is compliant with OCI standards and can store various file types, not just Helm charts. This flexibility allows you to upload any file compatible with OCI.
Helm Repositories
For more information about Helm repositories, see Kubernetes Helm Chart Repositories and Helm documentation.
Get Started with Helm
To get started working with Helm, complete the following main steps:
Create a Helm Repository
This topic describes how to create a Helm Repository. This is required before pushing and pulling Helm packages. The following repository types are available:
- Local repositories: Where you store and share 1st and 2nd party packages with your organization
- Remote repositories: Enable you to download from any remote location including external package registries or other Artifactory instances
- Virtual repositories: Enable aggregating remote and local repositories enabling your organization to scale by providing a single URL that provides access to multiple repositories and types
For more information on JFrog repositories, see Repository Management Overview.
Prerequisite: You need Admin or Project Admin permissions to create a Helm repository. If you don't have Admin permissions, the option will not be available.
To create a Helm repository:
-
In the Administration tab, click Repositories > Create a Repository
-
Select the repository type you want to create, configure the required fields (described in the following list), then click Create Repository.
For example, if you limit the Patterns Allow List to
github.com, the external dependencies will be cached in the "helm" remote repository, and only charts fromhttps://github.com/prometheus-community/helm-charts/are allowed to be cached.-
For Local Repositories, In the Repository Key field, type a meaningful name for the repository. For example,
Helm-local-repository-1. For more information on local repositories and all their possible settings, see Local Repositories. -
For Remote Repositories, additionally, verify the Repository URL and update if needed. For more information on Remote Repositories and all their possible settings, see Remote Repositories.
Helm charts often rely on external dependencies listed in the
index.yamlfile. These dependencies can have their dependencies, which means you might not see the complete list of required charts when downloading. This lack of visibility increases the risk of unknowingly downloading malicious components from untrusted sources.
-
Note
For information about working with single-base and multi-base URL repositories, see Create a Helm Repository.
To manage this risk, and maintain the best practice of consuming external charts through Artifactory, you may specify a "safe" Allow List from which dependencies may be downloaded, cached in Artifactory, and configured to rewrite the dependencies so that the Helm client accesses dependencies through a remote repository as follows:
- Select the Enable Dependency Rewrite checkbox in the Helm Chart remote repository advanced section.
- Specify an Allow List pattern of external resources from which dependencies may be downloaded.
The fields under External Dependency Rewrite are connected to automatically rewriting external dependencies for Helm Charts that require them.
Field | Description |
|---|---|
Enable Dependency Rewrite | When selected, external dependencies are rewritten. |
Patterns Allow List | An Allow List of Ant-style path expressions that specify where external dependencies may be downloaded from. By default, this is set to For example, if you limit the Patterns Allow List to |
- For Virtual Repositories, additionally select one or more local or remote repository types to include in the virtual repository. For more information on virtual repositories and all their possible settings, see Virtual Repositories.
Note
When using virtual Helm repositories, Artifactory does not support using YUM or DNF commands that use the
updateinfo.xmlmetadata file.
- Click Create Repository. The repository is created, and the Repositories window is displayed.
Connect your Helm Client to Artifactory
This topic provides details on configuring Helm to work with Artifactory. To get up and running quickly to use Helm, see Get Started with Helm.
Note
Use this section only for Helm repositories, not for Helm OCI repositories.
- For Helm repositories, use
helm repo add https://[JFrogPlatformURL]/artifactory/api/helm/<HELM_REPO_KEY>.- For Helm OCI repositories, use
helm registry loginandoci://...commands.If you use Helm commands against a Helm OCI repository, commands may fail. For more information about working with Helm OCI repositories, see Helm OCI Repositories.
Prerequisite: Before connecting your Helm client to Artifactory, you must have an existing Helm repository in Artifactory. For more information, see Create a Helm Repository
Supported Helm Clients
- Helm version 2.9.0 or above
Logged in vs. Anonymous user: You can work with Artifactory as either a logged-in user or an anonymous user. To use Artifactory with anonymous access, configure that access under Admin > Security > General. For more information, see Allow Anonymous Access.
To configure your local machine to install the Helm charts, follow these steps:
Set your default Artifactory Helm repository with the following command:
helm repo add <HELM_REPO_KEY> https://[JFrogPlatformURL]/artifactory/api/helm/<HELM_REPO_KEY> --username <USERNAME> --password <PASSWORD>
helm repo update
Where:
[JFrogPlatformURL]: Your JPD URL<USERNAME>: Your JPD Username<PASSWORD>: Your JPD Password<HELM_REPO_KEY>: Name of the repository.
For example:
helm repo add helm-local https://company.jfrog.io/artifactory/api/helm/helm-local --username admin --password passwordNote
You can also use JFrog Set Me Up to copy the snippet populated with your token and environment. For more information, see Use Artifactory Set Me Up for Configuring Package Manager Clients.
Note
An encrypted password is recommended instead of clear text. For more information, see Centrally Secure Passwords.
Note
To ensure Artifactory properly caches Helm charts, resolve the charts only through a virtual repository.
If you encounter errors, verify:
- You are using the correct flow for your repository type (Helm vs Helm OCI).
- Your URL/path matches your deployment routing (for example, whether
/artifactoryis required in your base URL).- Your user or token has read access to the target repository or virtual repository.
Next Steps:
Deploy Helm Charts
Deploying Helm charts makes them available to other users.
The following options are available for deploying Helm charts:
Deploy Helm Charts via the UI
To deploy a Helm chart via Artifactory UI:
-
In the Platform tab, click Artifactory > Artifacts, then click Deploy. Deploy options are displayed.
-
Verify the deploy options, then click Deploy.
The package is deployed.
Deploy Helm Charts via API
You can deploy charts via the REST API. When using this method, you can deploy by checksum or from an archive.
For example, to deploy a Helm chart to a repository called helm-local, you could use the following:
curl -u<USERNAME>:<PASSWORD> -T <PATH_TO_FILE> "https://[JFrogPlatformURL]/artifactory/helm-local/<TARGET_FILE_PATH>"Where:
<USERNAME>: Your JPD Username<PASSWORD>: Your JPD Password<TARGET_FILE_PATH>: The path from the repository root to the deploy folder
For example:
curl -uadmin:password -T myPath "https://company.jfrog.io/artifactory/helm-local/mypath"Pull Helm Charts Using Helm Client
The process of downloading a package from Helm is referred to as installing.
Now, every Helm file deployed to the root of the helm-local repository can be installed using:
helm repo update
helm install <RELEASE_NAME> helm-virtual/[chartName]
For example:
helm repo update
helm install my-release helm-virtual/myChart
Additional Helm Actions
The following additional actions are available with Helm repositories:
- Helm Virtual Repository Index Improvements
- Namespace Support for Helm Virtual Repositories
- Relative URL Support for Helm Repositories
- Set Multiple External Dependencies for Helm Using a List of URLs
- Helm Charts Partial Re-Indexing
- Helm Enforce Layout
Helm Virtual Repository Index Improvements
Starting from Artifactory version 7.80.0, we have improved our index calculation mechanism for virtual repositories to minimize potential OOM issues.
Important
If you use a Helm virtual repository with a virtual cache expiration time set to 0, you might experience slower resolution times.
We recommend setting the Metadata Retrieval Cache Period (Sec) in the repository page in the JFrog Platform WebUI to 60 seconds or more. This will help you avoid recreating the index every time there’s a new request and prevent out-of-memory issues. By default, this parameter is set to 6 minutes. This will prevent subsequent indexing requests from being triggered during this time period.
When receiving a download request for an index.yaml file against a Helm virtual repository, Artifactory will perform the following steps:
- Check whether the instance already contains a cached non-expired calculated file that fits the user’s permissions, and return that file if it exists.
- If the file does not already exist, check if there is an ongoing calculation of the merged
index.yamlfile that fits the user’s permissions. If the calculation is in progress, wait 6 minutes or until the calculation is completed, whichever happens first. - If the calculation is completed within 6 minutes, whether the instance contains a cached non-expired calculated file that fits the user’s permissions, and return that file if it exists.
You can use this feature flag to return to the previous behavior:
artifactory.virtual.repo.metadata.merge.lock.timeout.sec.HELM=120Namespace Support for Helm Virtual Repositories
From Artifactory 7.24.1 (SaaS), you can explicitly state a specific aggregated local or remote repository to fetch from a virtual by assigning namespaces to local and remote repositories in Helm virtual repositories according to the following syntax.
By default, this feature is disabled but can be set when creating or updating a virtual Helm repository.
/helm-virtual/<local_repository_name>/chart.tgzRelative URL Support for Helm Repositories
From version 7.59.5, Artifactory supports relative URLs for indexing Helm charts. Relative URLs allow the Helm client to use shorter URLs, which improves the performance of your Helm client and slightly reduces the size of your index.yaml file. This feature is available for Helm clients in version 3 and up.
To use this feature, enable the following feature flag in your system configuration file:
artifactory.helm.relative.urls.enabled=trueThis will only apply to new chart deployments. If you want it to apply to all charts, run a simple reindex to align the index.
Set Multiple External Dependencies for Helm Using a List of URLs
To support downloading files from multiple internal Artifactory URLs, you can create a list of URLs that are trusted by the repository.
By default, this feature is disabled but can be set for each aggregated remote repository separately.
The following example shows how to add the following configuration as an external dependency.
https://example.com/example-community/helm-charts/**As a result, all the external URLs located in the index.yaml file starting with the following pattern.
https://example.com/example-community/helm-charts/Will be replaced with the following syntax:
http://rt-host/artifactory/api/helm/helm-virtual/_external/https/example.com/exaple-community/helm-charts/Helm Charts Partial Re-Indexing
Artifactory supports partial re-indexing of Helm charts. This allows users to manually trigger the re-indexing process to address issues with charts that are missing from (or corrupted in) the index.yaml file. Partial re-indexing reduces processing time and resource usage by enabling more efficient and targeted updates. Partial re-indexing can be triggered on a path containing multiple charts to be re-indexed, as well as on a specific chart archive. For more information, see Helm Charts Partial Re-Indexing REST API.
Note
Helm Charts Partial Re-Indexing is available starting from Artifactory version 7.105.2.
Helm Enforce Layout
Helm Enforce Layout is designed to maintain the integrity and organization of Helm charts within your repositories. It consists of two key functionalities that promote structure and reduce errors during deployments:
- Preventing duplicate chart paths
- Enforcing chart names and versions
Note
Helm Enforce Layout is forward-compatible only, it will not work on repositories created prior to Artifactory 7.104.2. This means that even if you upgrade to Artifactory 7.104.2, any repositories created prior to the upgrade are not compatible with this feature. Enforcement is set only upon repository creation.
Prevent Duplicate Chart Paths
Helm’s index.yaml indexes charts by name. Each version entry exposes a urls list, but the Helm client resolves a single URL. Artifactory builds the same index structure as a native Helm chart repository.
If you deploy the same chart name and version to multiple paths in a single repository, Artifactory retains only the latest entry and overwrites the URL. The earlier file remains in the repository, but Helm clients cannot view it in index.yaml.
Prevent Duplicate Chart Paths blocks this workflow at upload time. This enforcement ensures a single, unambiguous index entry per chart version, which helps you manage Release Bundle v2 distribution, replication, or folder layouts.
Example
When deploying a chart named chart-1.0.0.tgz where there is already chart-1.0.0.tgz in the repository under a different path, Artifactory will reject the upload with a 403 response code and proper message.
This action is prevented due to the Enforce Layout Policy, a package with the same name and version chart-1.0.0 already exists in the repository.Enforce Chart Name and Version
This functionality ensures that the chart name and version specified in the packaged file name match the values in Chart.yaml and adhere to Semantic Versioning (SemVer2) standards adopted by the Helm official specification. Enforcing these rules promotes uniformity, allowing teams to adopt clear naming conventions that foster better collaboration and understanding of changes across different versions.
Example 1:
When deploying a chart with non-SemVer2 version (1.0.0.0 for example), Artifactory will reject the upload with a 403 response and a proper message.
This action is prevented due to the Enforce Layout Policy, the specified package version chart-1.0.0.0 does not comply with the Semantic Versioning format.Example 2:
When deploying a chart under chart-1.0.0.tgz, the chart name and chart version inside the Chart.yaml file must be chart and 1.0.0 respectively, otherwise Artifactory will reject the upload with a 403 response code and a proper message.
This action is prevented due to the Enforce Layout Policy, the package file chart-1.0. does not match the package name/version chart:2.0.0 in the metadata file.Example 3:
When deploying a chart with a malformed name or version, Artifactory will reject the upload with a 403 response code and a proper message.
This action is prevented due to the Enforce Layout Policy, the metadata of the package chart-1.0.0 could not be read or is malformed.Activate Helm Enforce Layout
Enforcement can be enabled either globally for all Helm repositories in Artifactory, or for specific Helm repositories. If you enable enforcement globally, the enforcement cannot be later disabled on any Helm repositories in Artifactory.
Enable Enforcement Globally
To enable global enforcement, in the Administration tab, click Artifactory Settings > Packages Settings.
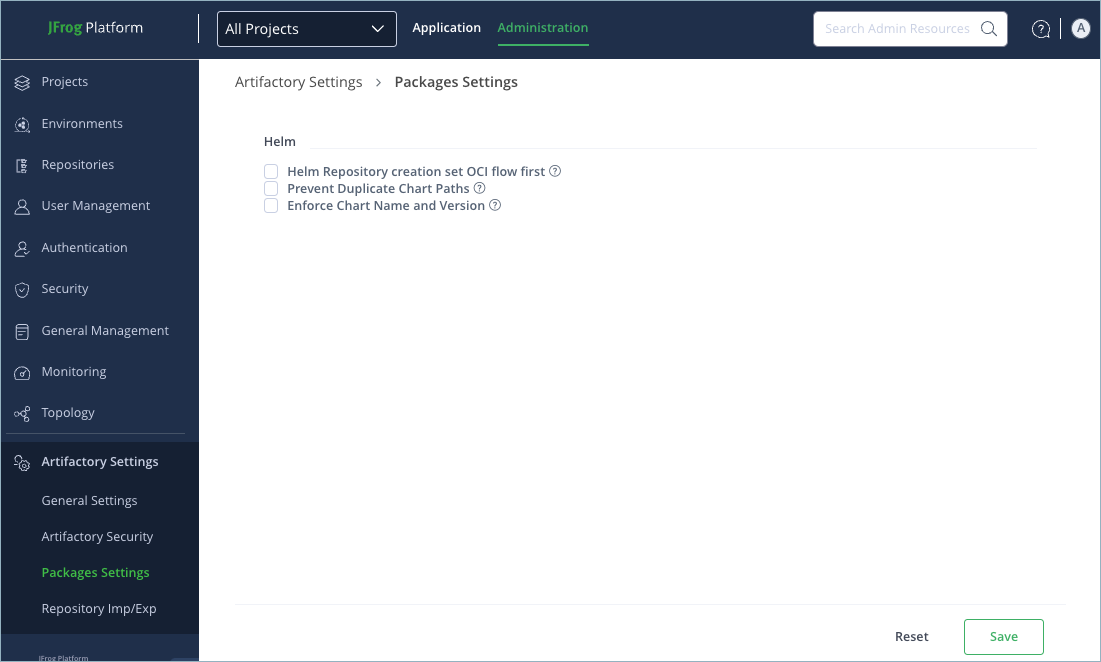
In the Package Settings screen, select the checkboxes by Prevent Duplicate Chart Paths and Enforce Chart Name and Version, then click Save.
Enable Enforcement on Specific Repositories
System Administrators can selectively activate enforcement on specific repositories. This allows tailored enforcement that fits the specific needs of different projects or teams.
To enable enforcement on a specific repository:
-
In the Administration tab, click Repositories > Create a Repository > Local.
-
In the Select Package Type window, select Helm.
-
In the New Local Repository screen, click Use Legacy Helm.
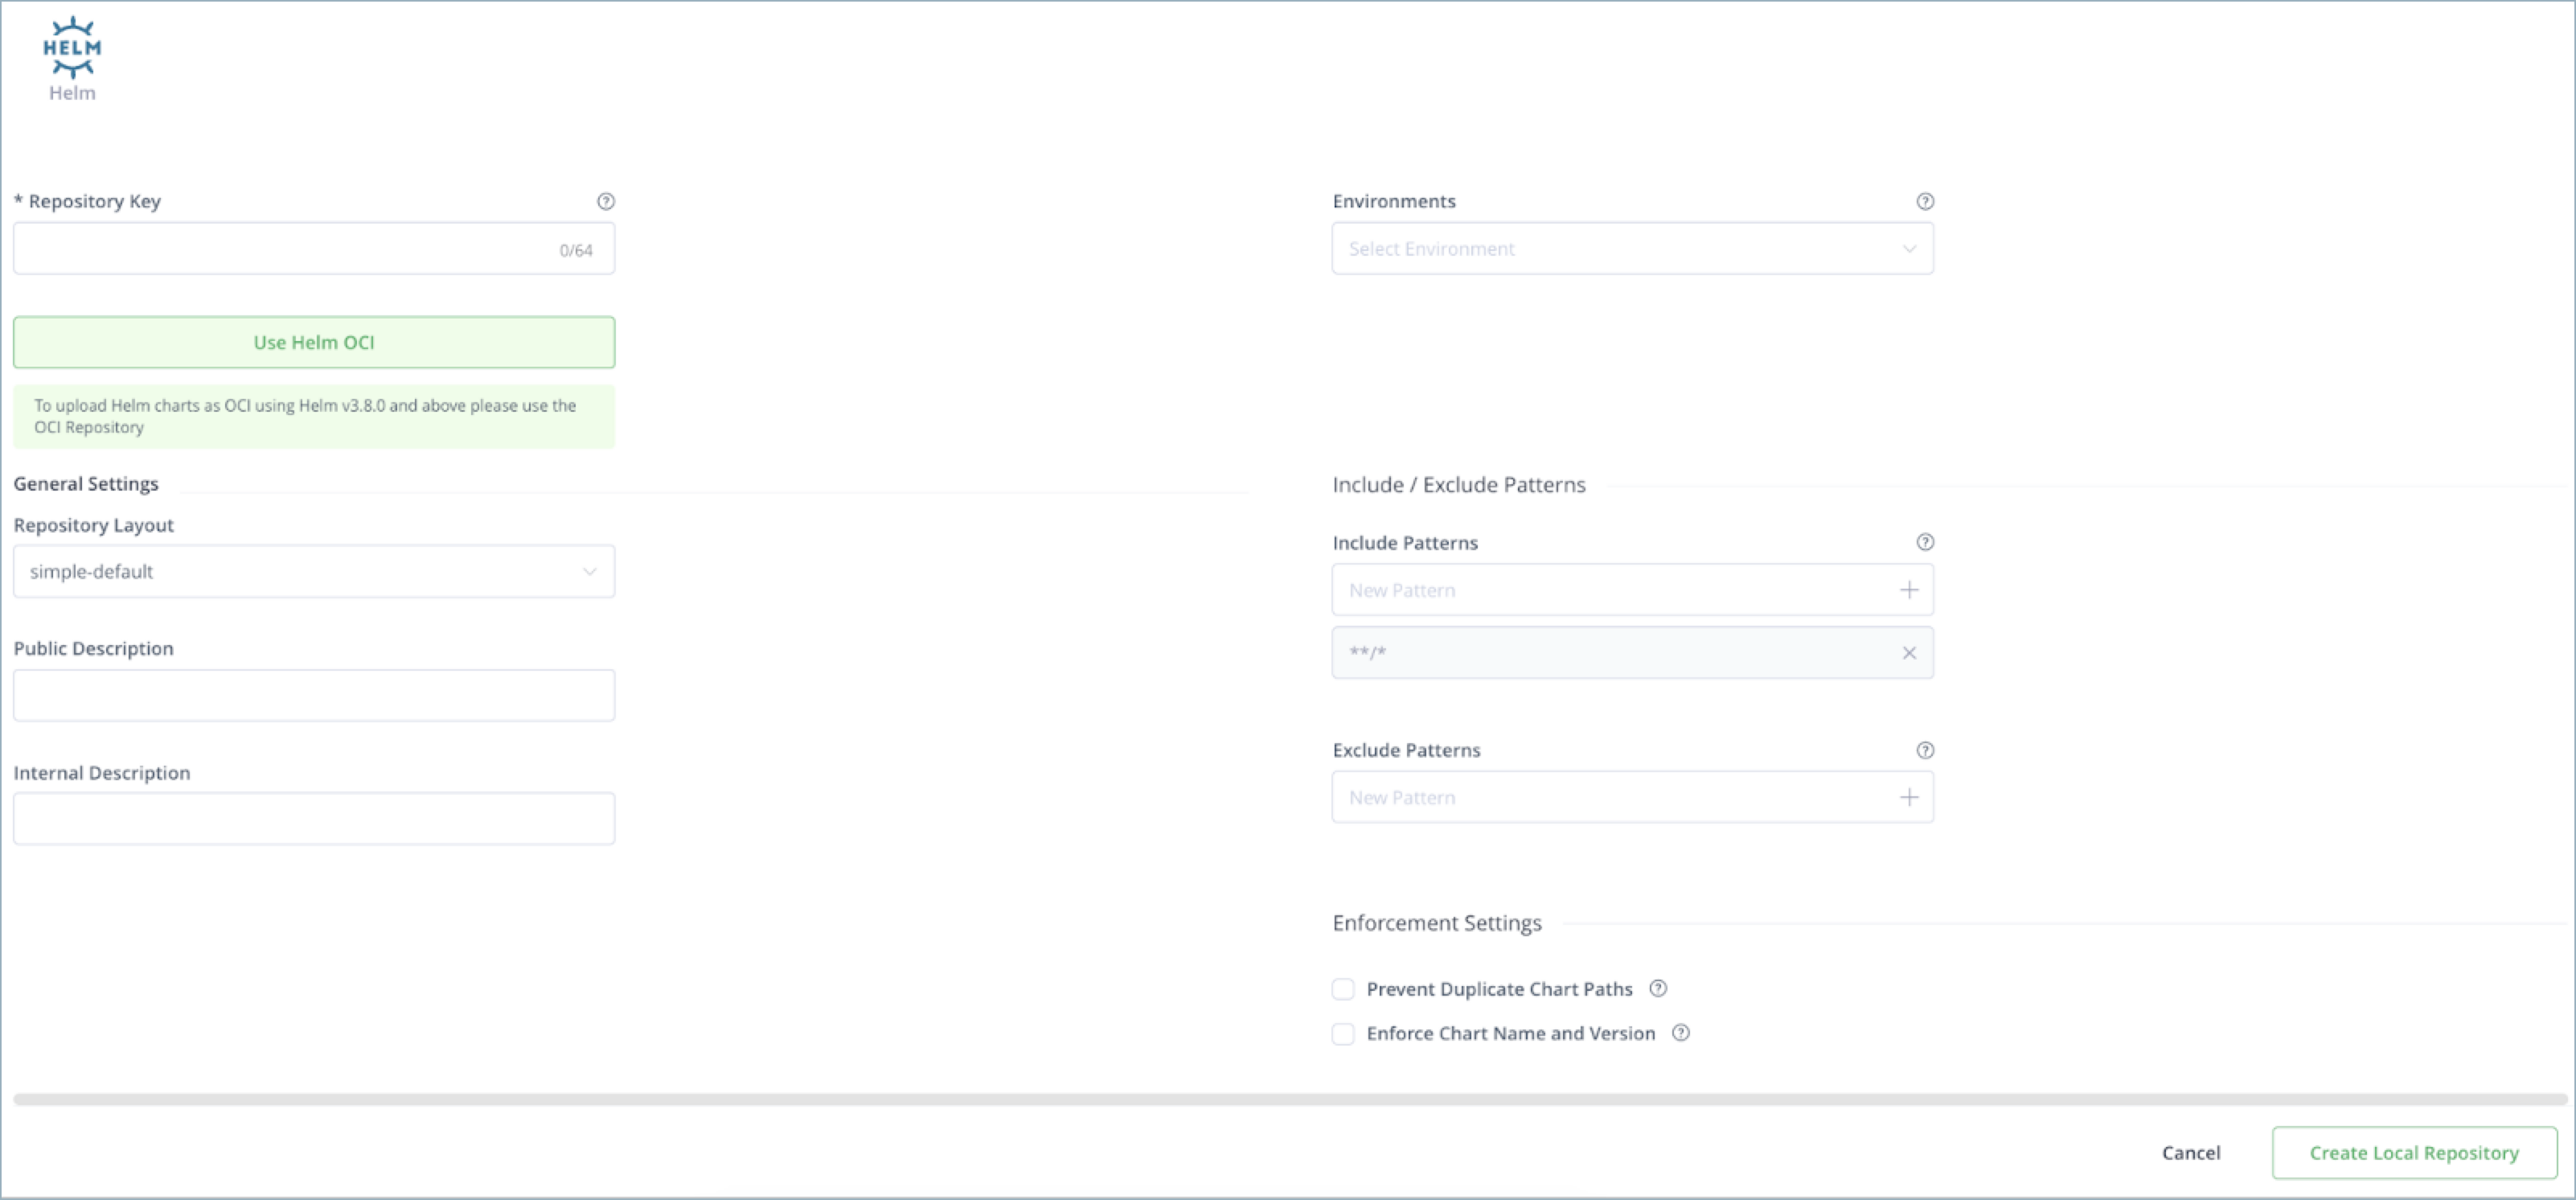
-
Under Enforcement Settings, select the checkboxes by Prevent Duplicate Chart Paths and Enforce Chart Name and Version, then click Create Local Repository.
Note
When two or more local repositories under a virtual repository have the same chart name and version, the resolution will be according to the repositories' resolution order.
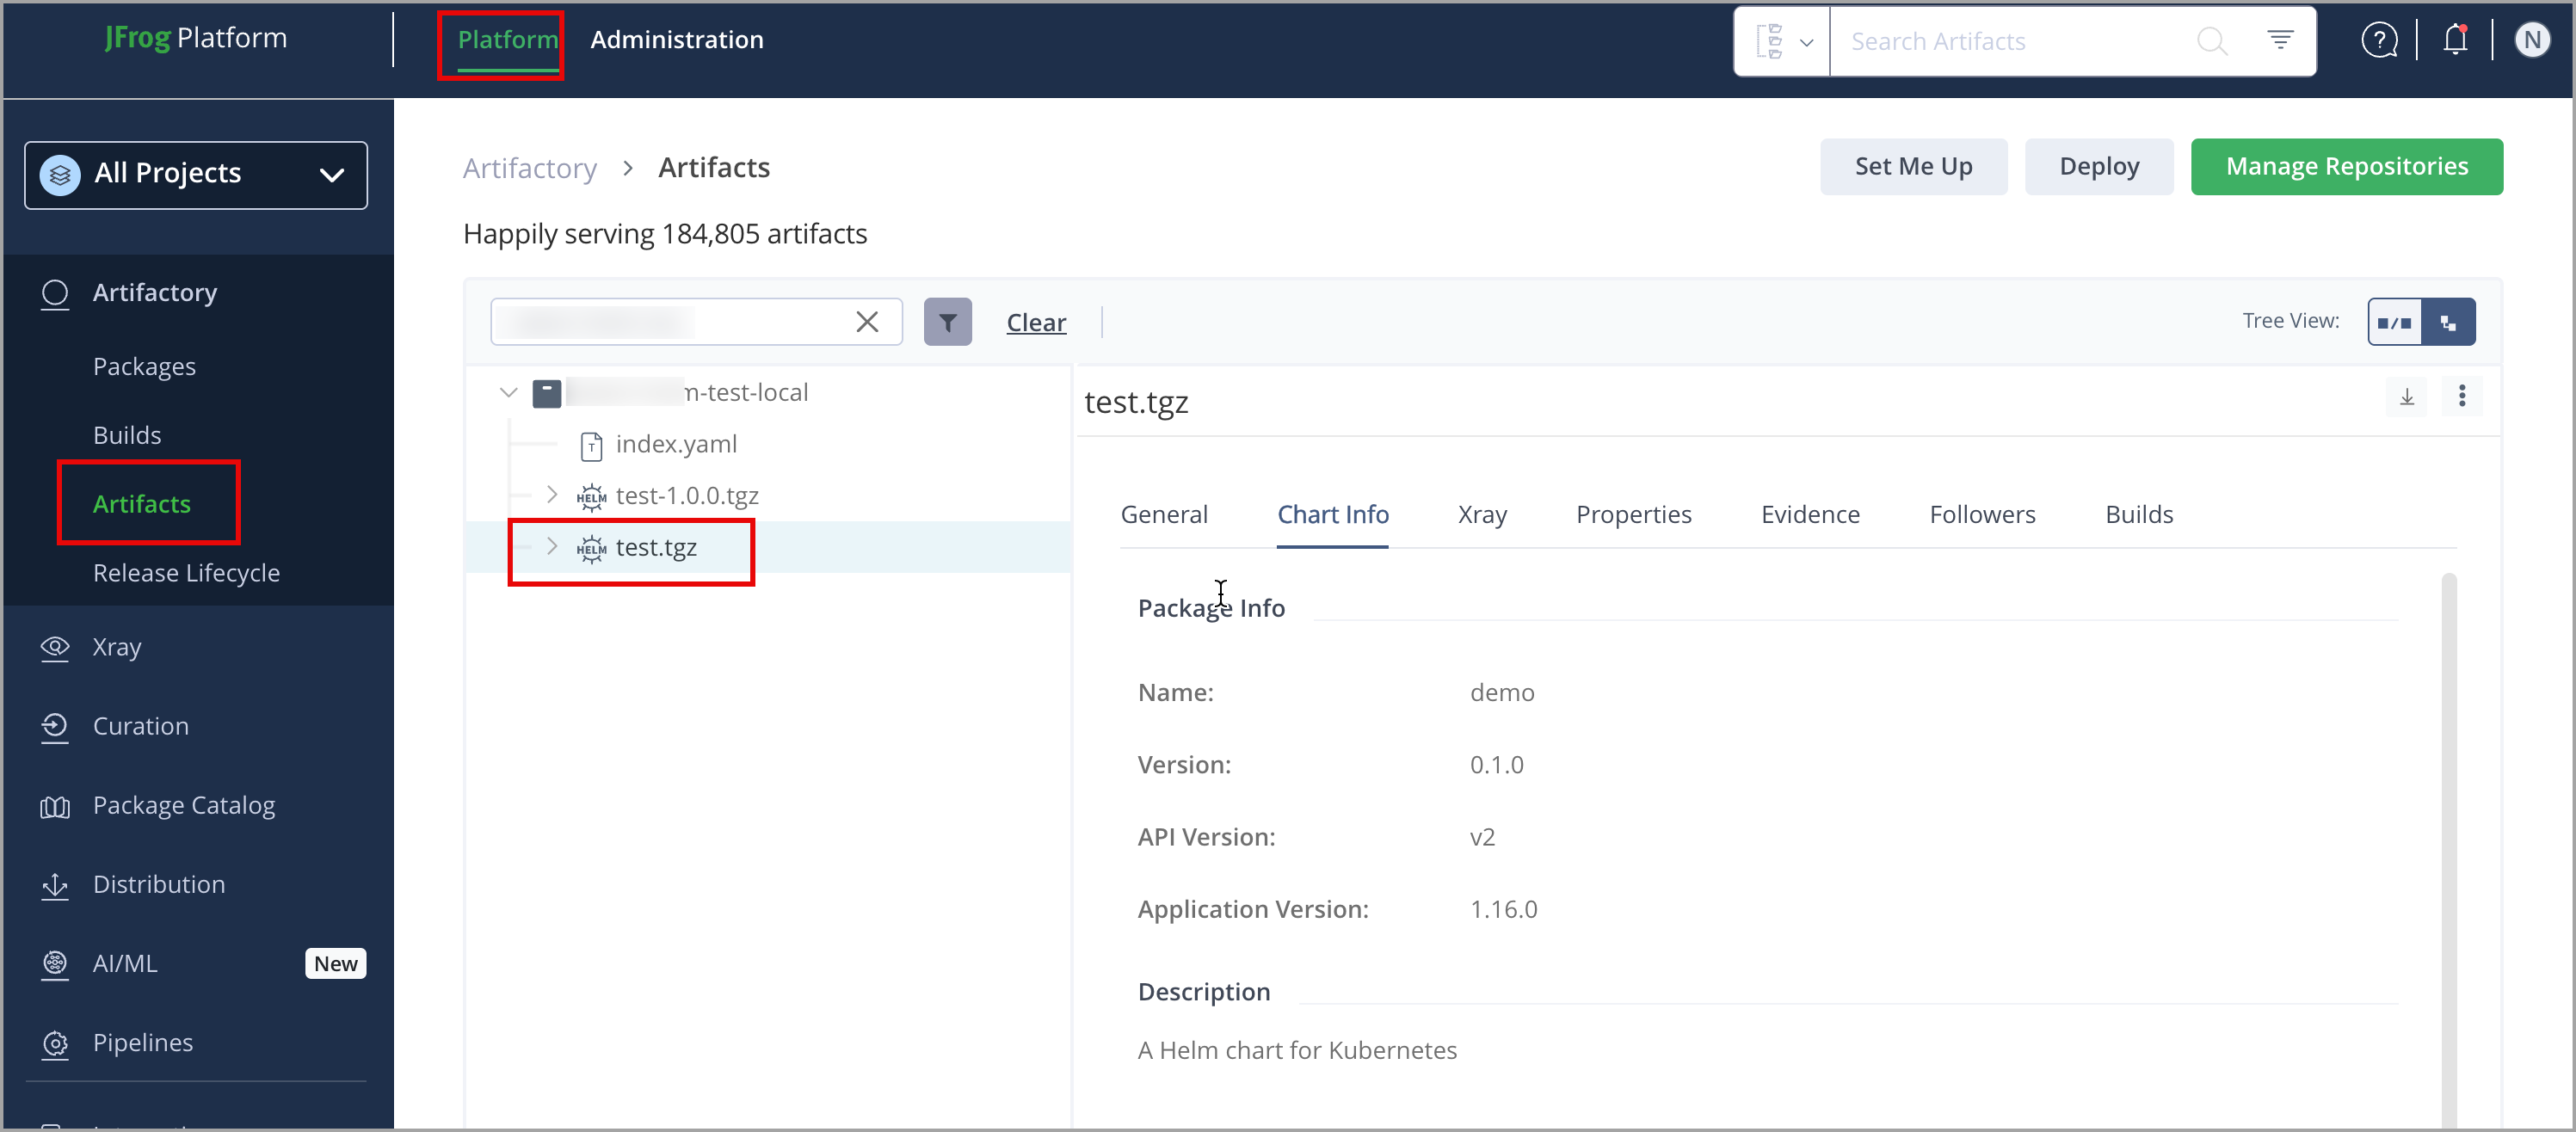
View Individual Helm Chart Information
Artifactory lets you view metadata for selected Helm chart and their contents directly from the UI.
In Platform , click Artifactory > Artifacts, select the tar.gz file you want to inspect, then click Chart Info.
Helm Limitations in Artifactory
The following are the limitations of Helm in Artifactory:
- Helm Enforce Layout > Push Replication/Copy/Move: If the source is not set with enforcement, and the target is set with enforcement, not all charts may be replicated/copied/moved successfully because the target repository might filter charts that are breaching enforcement.