Hybrid Deployment
Subscription Information
This feature is supported with the Enterprise+ license.
JFrog is designed to enable customers to set up the deployment that works best for them. As such, in addition to our Self-hosted and Cloud solutions, JFrog supports a Hybrid deployment that allows customers to create their main solution in type of deployment (i.e., Self-hosted or Cloud), and to then add JFrog Platform Deployments (JPDs) in another constellation.
How Does it Work?
The Hybrid Deployment depends on your primary JFrog Platform. Choose from the configuration that's right for you:
Cloud Customer
Cloud customers can choose to add additional Edge nodes in a Self-hosted environment. This implementation supports the distribution of your Release Bundles from JFrog Distribution on the cloud to multiple Cloud and Self-hosted Edges within the same organization. This means that customers can develop their software using the JFrog Platform on the cloud while gaining the flexibility of consuming the software on the Cloud and Self-hosted. See Hybrid Distribution from the JFrog Platform on the Cloud.
Self-Hosted Customer
Self-hosted customers may sometimes require the option of adding additional Edge nodes in the cloud. This is achieved through a feature called the Distribution Edges Add-on, a commercial offering for Self-hosted customers to leverage JFrog Cloud for software distribution. This add-on enables Self-hosted customers to add cloud Edge nodes managed by JFrog (software-as-a-service) and fully utilize them for content distribution. See Hybrid Distribution from JFrog Platform Self-Hosted.
Hybrid Distribution from the JFrog Platform on the Cloud
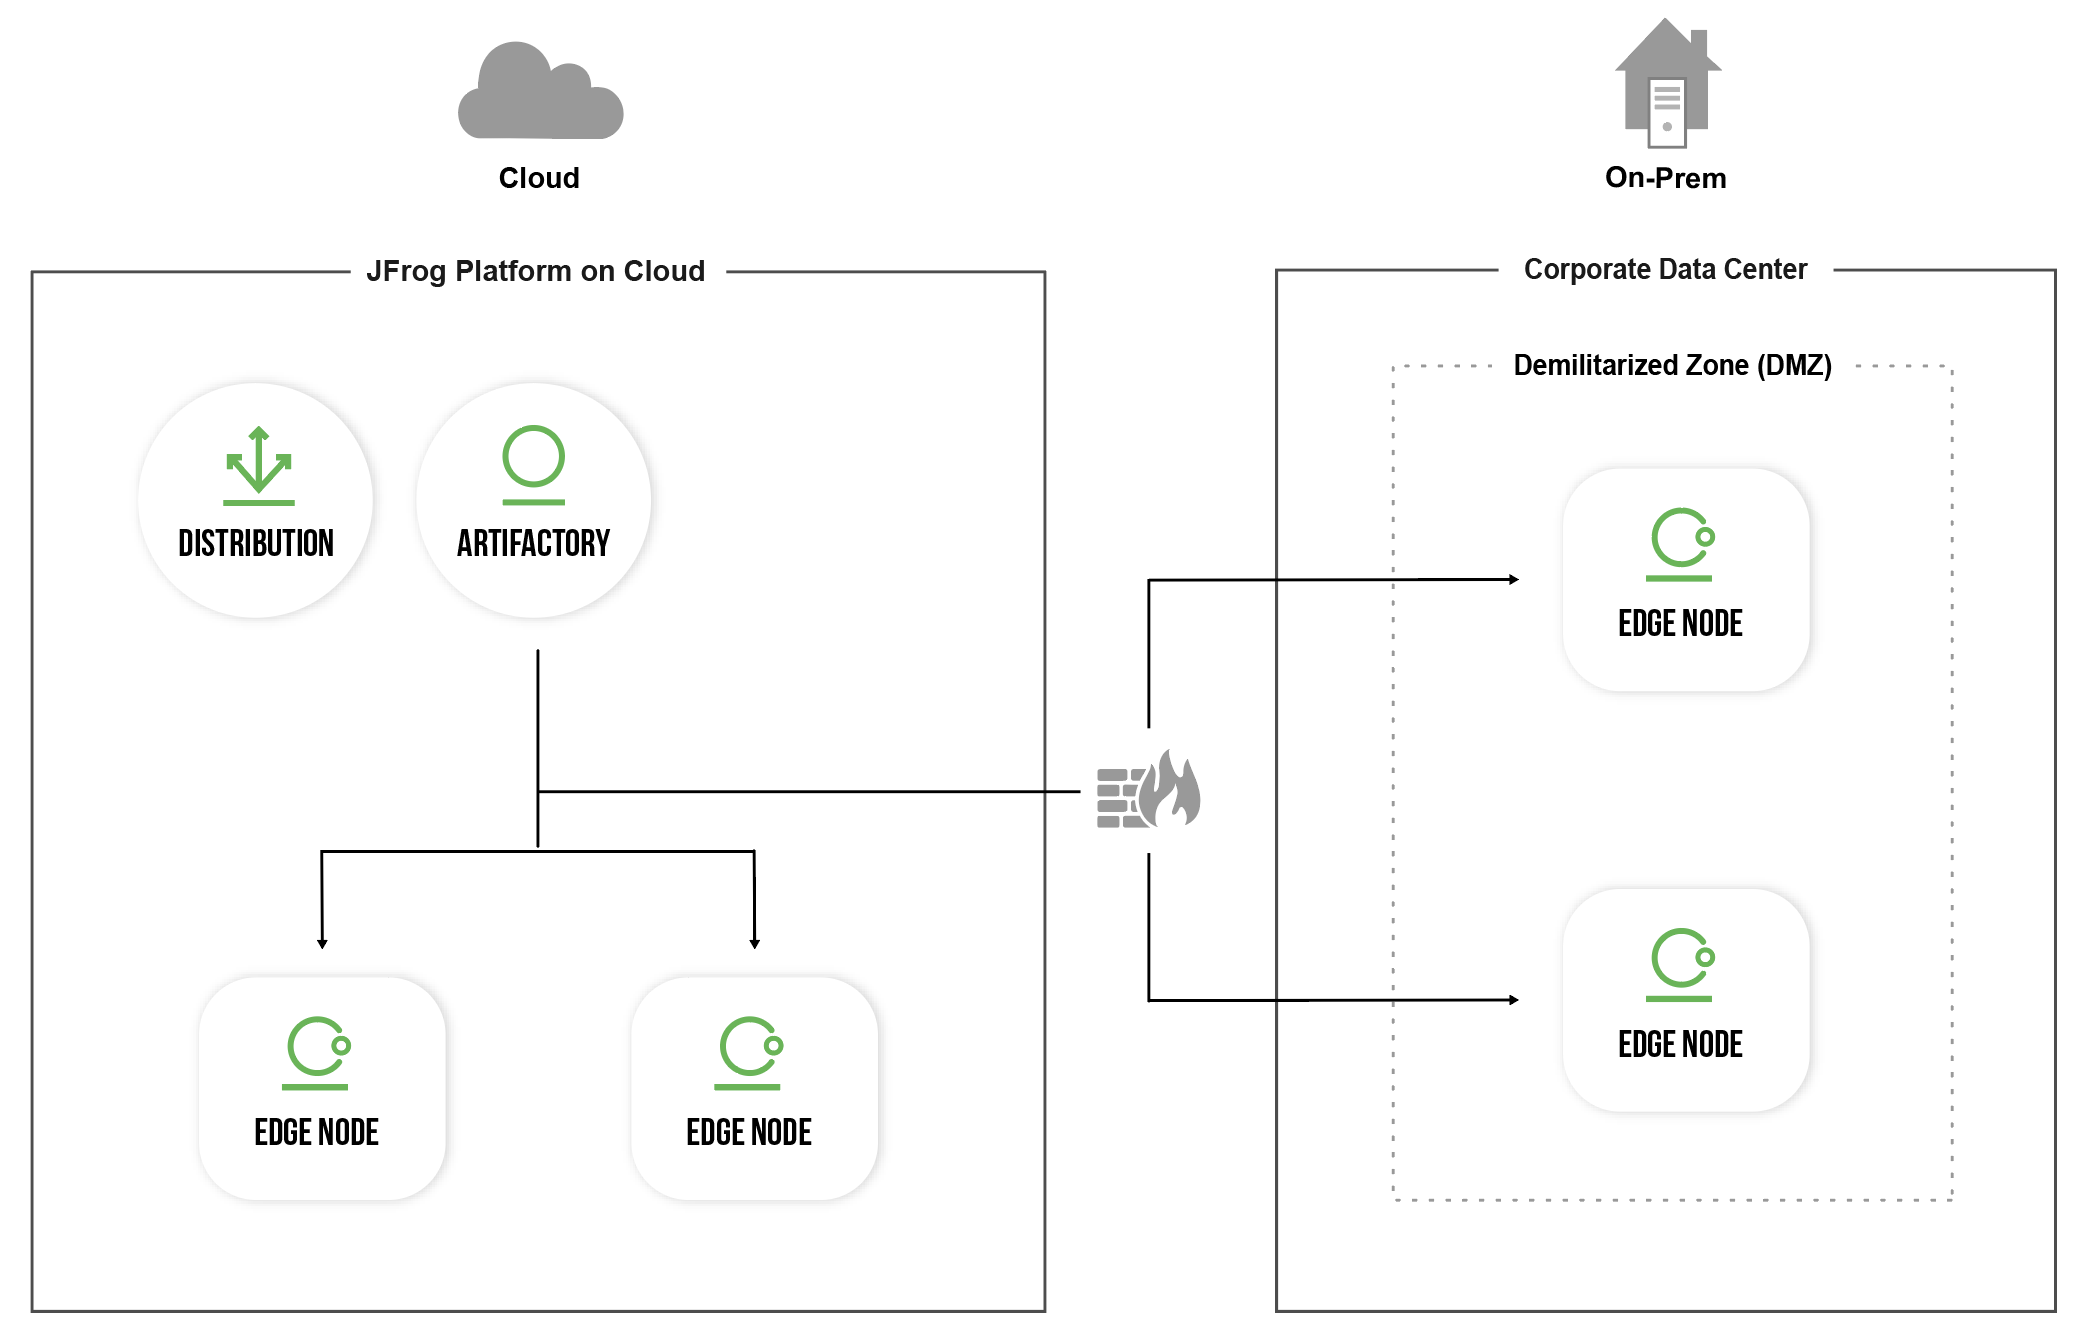
As part of the JFrog Platform on the cloud, Hybrid Distribution supports the distribution of your Release Bundles from JFrog Distribution on the cloud to multiple Cloud and Self-hosted Edge nodes within the same organization. Enterprise customers can develop their software using the JFrog Platform on the cloud while gaining the flexibility of consuming the software on the Cloud and Self-hosted.
Hybrid Distribution supports:
- Balancing your distribution workloads in response to changing workloads, new challenges, and increasing security requirements.
- Distributing sensitive, highly regulated, and mission-critical Release Bundles to locally managed Edge nodes while using the JFrog Platform on the cloud for mainstream public distributions and thereby gaining significant cost savings.
Hybrid Environment Requirements
Self-hosted Edge nodes within the JFrog Platform on the cloud are commonly located within the corporate network and protected by a firewall. Within your corporate network, you can choose to set up the Self-hosted Edge within a DMZ (Demilitarized Zone) or alternatively build a VPN tunnel or use any other secure method.
Enable Ingress Traffic for Hybrid Distribution
The JFrog distribution process requires enabling ingress communication between the JFrog Platform on the cloud and self-hosted Edge nodes. Please ensure that your corporate firewall is configured to accept this type of traffic.
Set Up Hybrid Cloud Distribution
The workflow for adding a self-hosted Edge node to the JFrog SaaS environment includes:
- Setting up and connecting the Edge node to the SaaS environment
- Establishing a secure connection between the source Artifactory and the Edge nodes
Prerequisites
-
Set up your JFrog Platform on the cloud.
-
The Artifactory Edge node requires a valid license. The license for the self-hosted Edge node is allocated using the Bucket License mechanism.
-
Once your license bucket is created, you will receive an email with a link to a dedicated web page.
-
Add the License Bucket in the JFrog Platform on the cloud by navigating to Administration > General Management > License Buckets, and click Add New Bucket. For more information, see Add a License Bucket.
-
Step 1: Set up and Connect the Self-hosted Artifactory Edge Node to the SaaS Artifactory Instance
- Install the Artifactory Edge Node.
- Register your Edge node as a JFrog Platform Deployment (JPD) in Administration > Platform Management > Registered JPDs of your SaaS Artifactory instance. For more information, see Manage Platform Deployments.
- Optional: Attach a license from the license bucket on SaaS Artifactory instance to the Edge node via Administration > Licenses > License Buckets. For more information, see Attach Licenses from a License Bucket to a JPD.
Step 2: Establish a Secure Connection for Distribution Between the Source Artifactory and the Edge Nodes
Use one of the following methods to connect Artifactory and the Edge nodes.
Using a Pairing Token
From Artifactory version 7.29.7, the recommended method for connecting between the source Artifactory and the Artifactory Edge nodes is the pairing token.
-
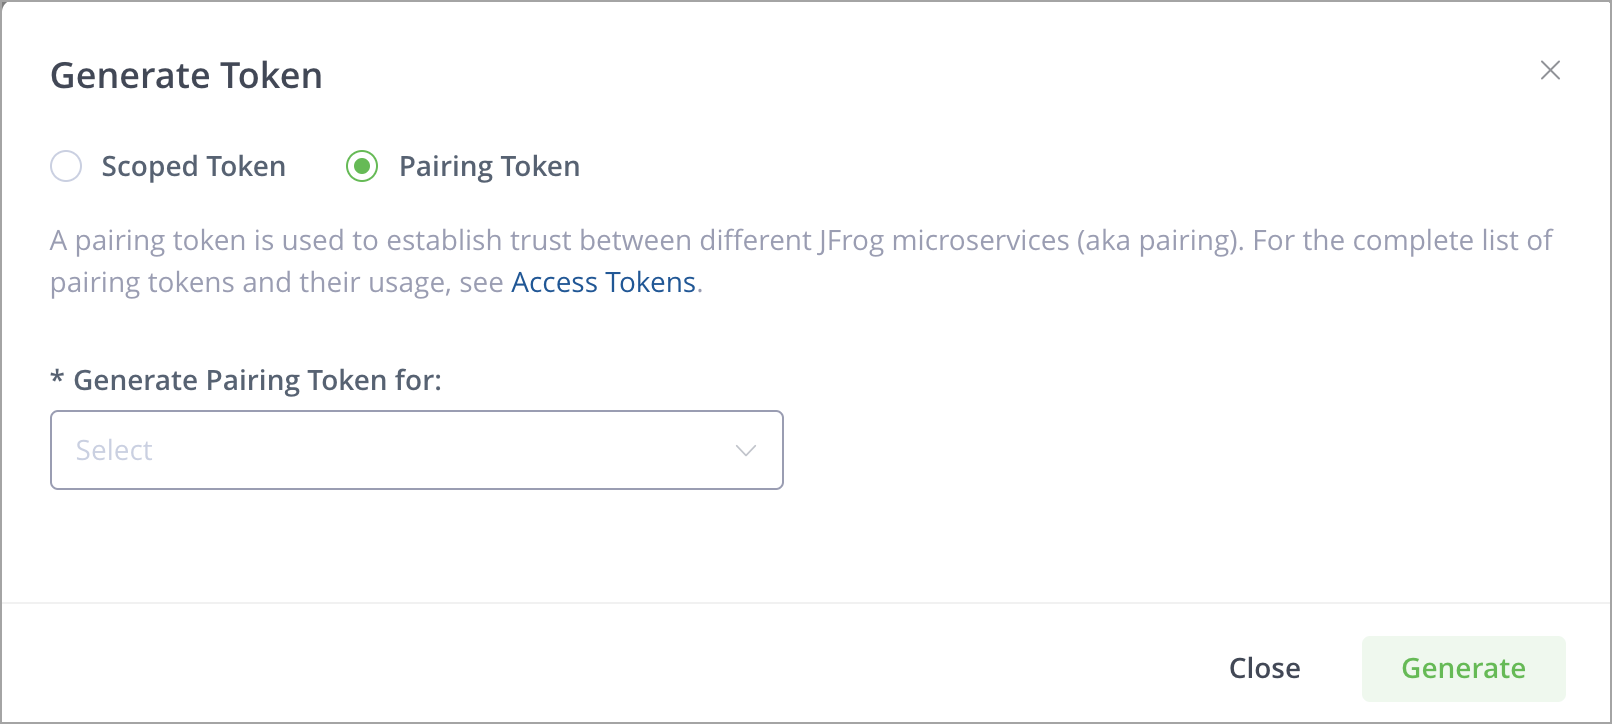
In the Administration module, go to User Management > Access Tokens > Generate Token > Pairing Token.
-
In the Generate Pairing Token for field, select the purpose of the pairing token.
-
Click Generate to generate the token.
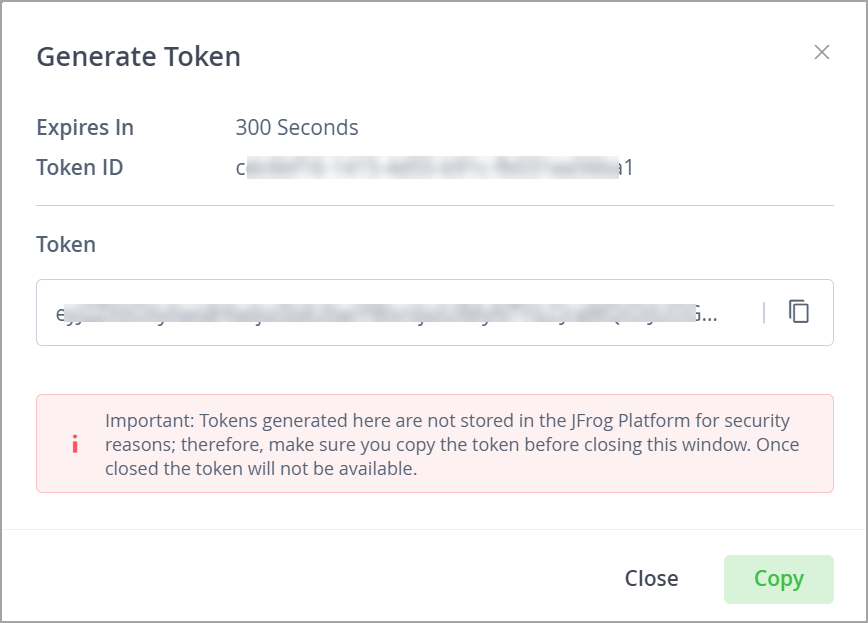
This displays the token window, which includes the token's expiration (in seconds, set by default to 300 seconds = 5 minutes), the token ID, and the actual token, which you can copy by clicking Copy.
Using the Scoped Tokens API (Manual)
Creating a connection using the scoped token API requires generating a token on the Edge node that is scoped for Distribution, and then providing that token to the SaaS Artifactory. To do this you will need to do the following.
-
Generate a scoped token using the Create Token REST API.
For example:
curl -X POST http://localhost:8084/access/api/v1/service_trust/pairing/mission-control -H "Authorization: Bearer $TOKEN" -
Copy the token.
-
Upload the token to the SaaS instance using the REST API.
Establishing a Circle of Trust
Establish trust between servers by establishing a "Circle of Trust" between the SaaS environment and the Self-hosted Artifactory Edge node. To do that you will need to do the following:
-
Make the Edge node trust the Artifactory SaaS instance by doing the following:
- Obtain the
root.crtfrom the Artifactory SaaS instance by running the Get Root Certificate REST API against the SaaS instance. - Set the
root.certreceived in step 1 above as the trusted certificate in each Edge node by copying the service’s root certificate to the new Edge service’s$JFROG_HOME/artifactory/var/etc/access/keys/trustedfolder.
- Obtain the
-
Next, make the Artifactory SaaS instance trust the Edge node by doing the following:
- Obtain the
root.crtfrom the Edge nodes by running the Get Root Certificate REST API against each Edge. - To add the
root.certfrom the Edges, open a support request to copy the root certificate from step 2a to your SaaS instance.
- Obtain the
Note
From release 7.29.7, paired tokens are the default option used for connecting the source and node. If you are unable to upgrade your self-hosted instance, or need to continue using the circle of trust, refer to the explanation above.
Hybrid Distribution from JFrog Platform Self-Hosted
Self-hosted customers who have an existing JFrog Distribution in place may sometimes require the option of adding additional JFrog Artifactory instances in the cloud.
To enable this type of hybrid setup, JFrog now offers the Distribution Edges Add-on, a commercial offering for Self-hosted customers to leverage JFrog SaaS for software distribution. This add-on enables Self-hosted customers to add cloud-based Edge nodes managed by JFrog (software-as-a-service) and fully utilize them for content distribution.
About Edge Nodes
Edge nodes are read-only Artifactory repositories that provide fast, low latency, local consumption points for distributed content for public or authenticated downloads. Edge nodes provide secure, governed distribution, with full role-based access control, configurable download restrictions, and an audit trail.
Edge nodes are used as part of a flexible, hybrid software distribution infrastructure that can be deployed on any environment (self-hosted) or consumed as a managed SaaS instance on public clouds (multi-cloud). SaaS edges allow for multi-tenant distribution and for improved management costs and overhead.
With Edge nodes, self-hosted customers can now consume cloud Edge nodes, and distribute from any source JPD to any Edge, including from self-hosted to SaaS.
Adding Edge nodes requires minimal configuration. The steps required are described below (you will need to make sure the prerequisites below are also in place).
Important
The Distribution Edges Add-on is available only to Enterprise+ subscriptions.
Prerequisites
You will need to make sure the following prerequisites are in place.
Purchase Distribution Edges Add-On
To use the Distribution Edges add-on, you will need to purchase the add-on through your JFrog salesperson. You will receive a confirmation email of your purchase with a link, which will bring you to the webpage where you will create the Edge nodes by selecting your edge locations/details and submitting the form (you will need to enter your email address for validation).
Setting up the JFrog Distribution Edges add-on requires you to have successfully launched at least one Cloud Edge node.
Note
You will need to create at least one edge; however, the minimum purchase for a Distribution Edges setup is for two edges. You will be able to set up the rest of your edges later using MyJFrog Portal.
Set Permissions
You will need to verify that you have the proper permissions in place. See Permissions.
Get Started
To get started, you will need to activate your JFrog Distribution Edges add-on and set up your Edge nodes by following these steps.
Step 1: Register the Edge nodes by Setting Up Pairing Tokens
First, you will need to register each Edge node in JFrog Mission Control. This is done by replacing the join.key-based method with a scoped token of type pairing token using the Access Tokens tab, on the Edge node.
-
On the Edge node, go to the Administration module, and then go to User Management > Access Tokens > Create Token > Pairing Token.
-
In the Generate Pairing Token for field, select Mission Control.
-
Click Generate to generate the token.
This displays the token window, which includes the token's expiration (in seconds, set by default to 300 seconds = 5 minutes), the token ID, and the actual token.
-
Copy the pairing token you generated by clicking Copy, then paste the token in a clipboard.
You will need to access this token in the steps below.
-
Alternatively you can generate a scoped pairing token using the Create Pairing Token REST API.
Note
The result of a pairing is the master token, which is an access token that grants the requesting service all the actions it is required to do on the issuing service, based on the given use case. The master token is usually a strong access token that can be used for several operations and is usually a long-lived token. An admin user can revoke trust by revoking this token.
Step 2: Set the GPG Keys in the Edge Nodes
From version 2.8.1, Distribution supports managing multiple pairs of GPG signing to sign Release Bundles using a set of REST APIs. You will need to get the public GPG key from Distribution via the Distribution REST API Get Public Signing Key for Distribution.
If you have existing GPG keys, simply propagate the keys instead of uploading new ones. See Upload and Propagate GPG Signing Keys for Distribution.
Next Steps
Once you have completed these steps, you will receive an email that your Edge nodes are ready. You will now be able to view the latest status updates and your complete topology in the MyJFrog Portal.
If you have additional Edge nodes that you purchased but have not yet set up, follow the instructions in Manage Your Cloud Topology to set up these Edges.
Updated 4 months ago