OCI Repositories
Open Container Initiative (OCI) images provide a standardized way to package application code and all its dependencies into a single, portable unit. This standardization ensures that an image built once can run consistently across various container runtimes and operating systems. Using Artifactory as a central repository manager for OCI images offers a robust solution for managing your containerized applications throughout their lifecycle. The OCI integration with Artifactory provides a secure, centralized location for storing, managing, and distributing your OCI images, alongside other package types. For more information, see the OCI website.
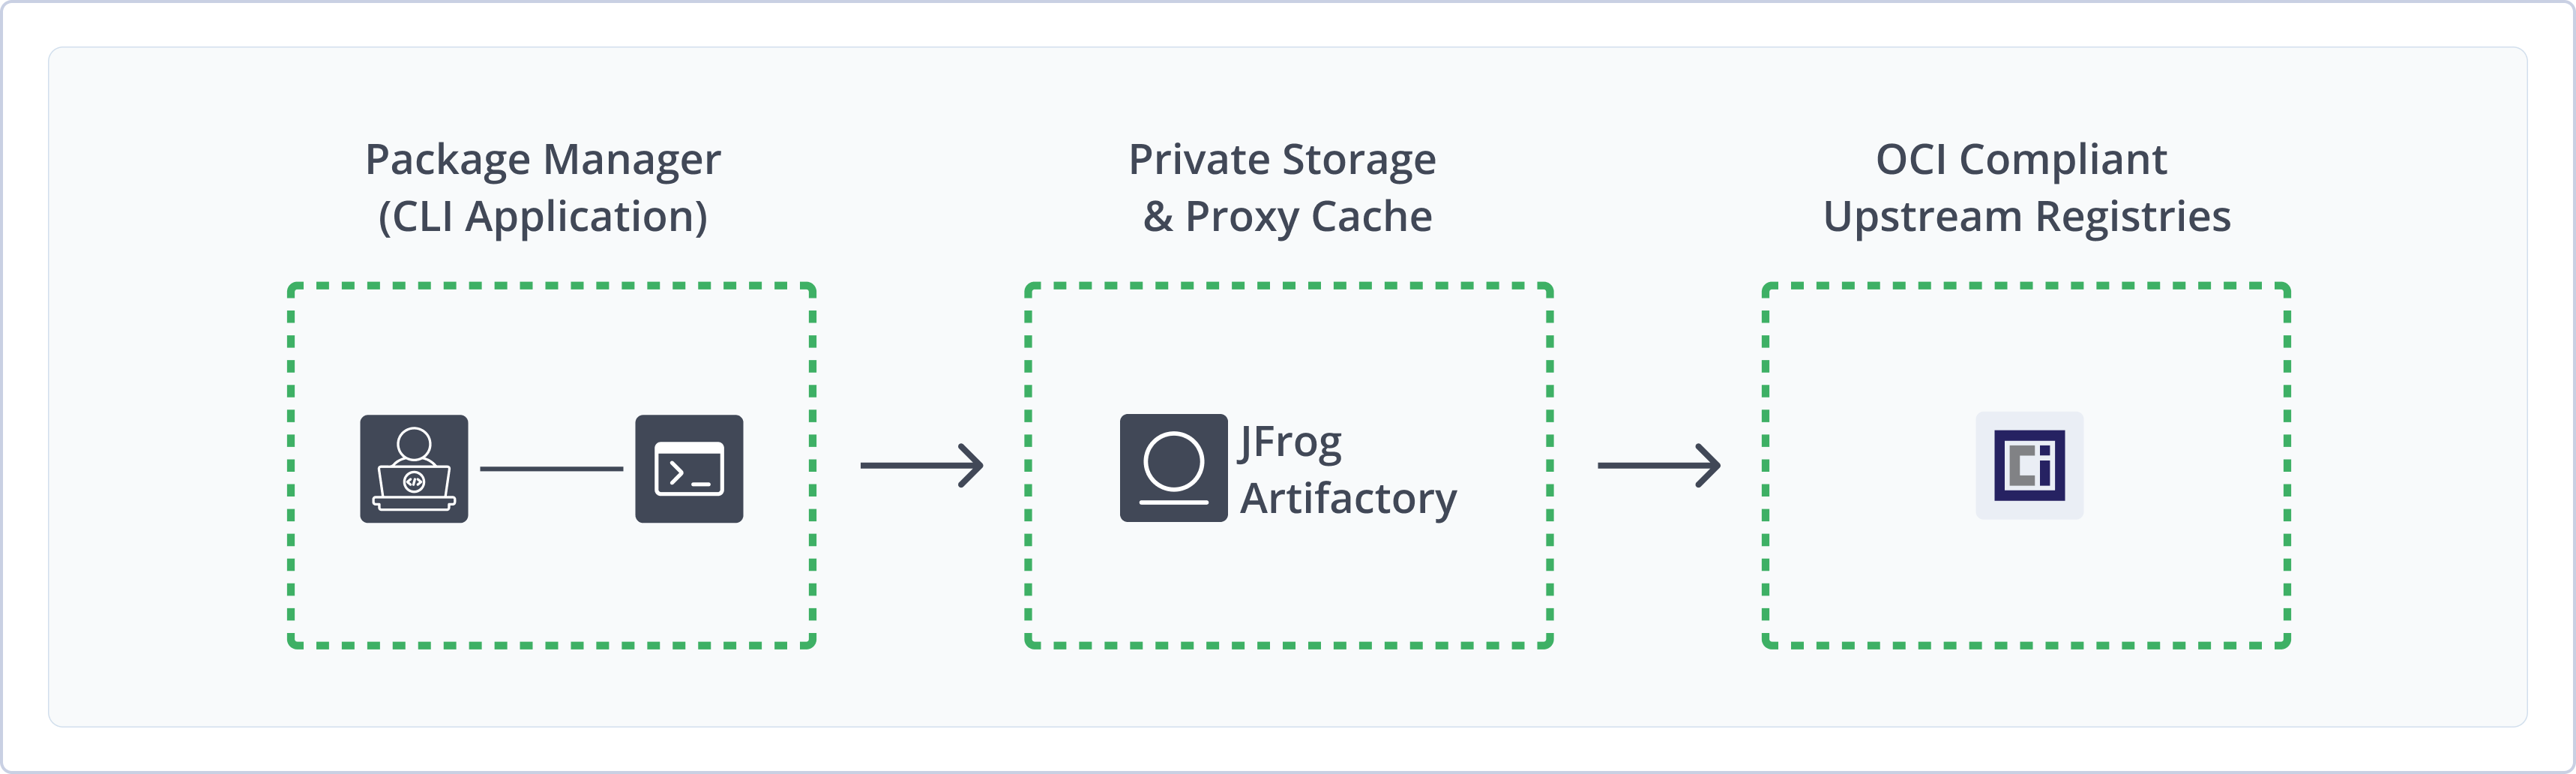
Using Artifactory to manage OCI images provides the following benefits:
- Single Source of Truth: Store all your OCI images alongside other package types in a centralized location with access to local, remote, and virtual repositories.
- Use OCI Natively: Artifactory supports the relevant OCI Distribution specification API calls so that you can transparently use the OCI client to access images through Artifactory.
- Enhanced Security: Artifactory's built-in security features, including access control and vulnerability scanning, provide secure OCI push and pull with local OCI repositories as fully functional, secure, private OCI registries.
- Improved Traceability: Gain full visibility and traceability of your OCI images, from creation to deployment.
- Optimized Performance and Reliable Access: Leverage Artifactory's caching and proxy capabilities with remote repositories to accelerate image pulls and improve build times.
- High Availability and Disaster Recovery: Ensure continuous access to your OCI images with Artifactory's high availability and disaster recovery options.
- Support for diverse OCI clients: Connect and work with various OCI-compliant clients, such as Podman and BuildX.
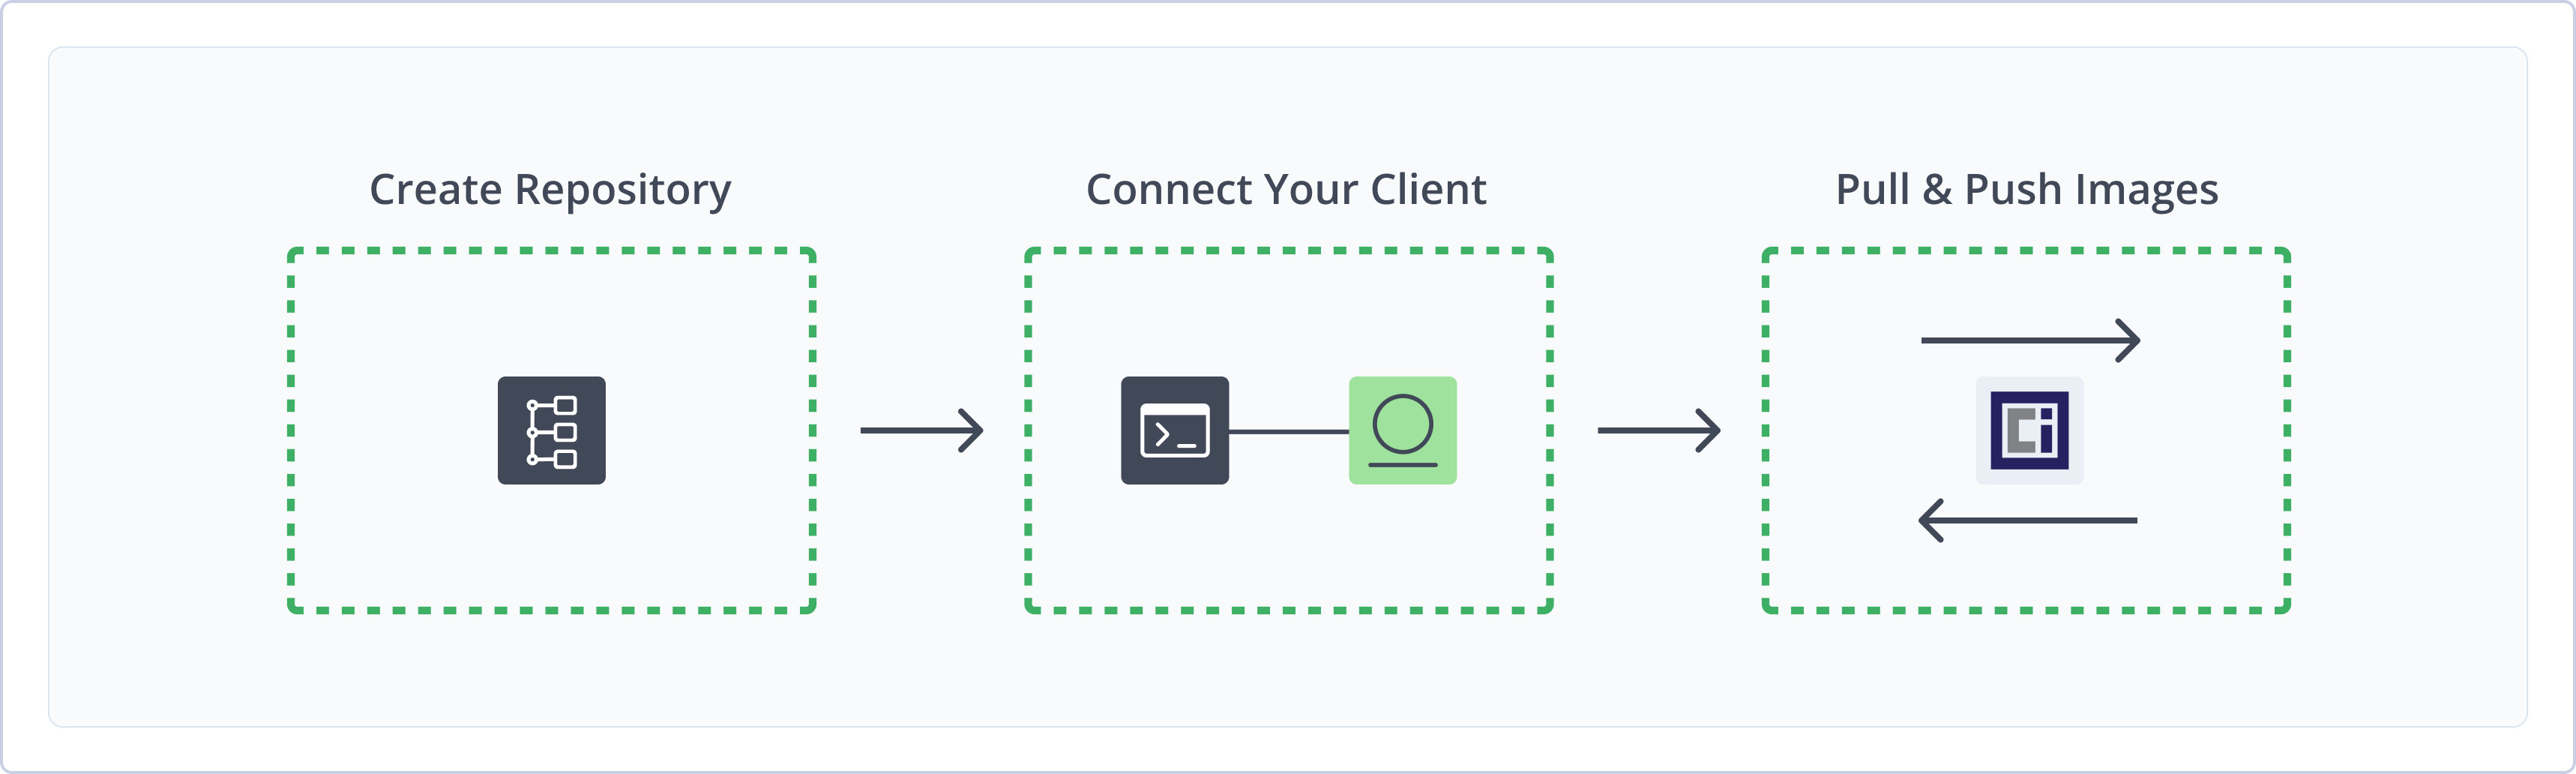
Get Started with OCI
To get started working with OCI, complete the following main steps:
- Create an OCI Repository
- Connect OCI Clients to Artifactory
-
Push and pull OCI images using a supported client:
Create an OCI Repository
This topic describes how to create an OCI repository. This is required before publishing and installing OCI images and other OCI-compliant artifacts. There are three primary types of repositories:
-
Local repositories: Store and share first- and second-party packages with your organization
-
Remote repositories: Download packages from remote OCI-compliant registries or other Artifactory instances
DockerHub Remote Repository Restrictions
Artifactory provides unlimited access to the DockerHub remote repository for unauthenticated Cloud users. Excessive use may incur a rate limit of 100 pulls per six hours. For compliance and security, and to avoid rate limits, authenticate to DockerHub using credentials.
- Virtual repositories: Aggregate remote and local repositories, enabling your organization to scale by providing a single URL that provides access to multiple repositories and types
For more information on JFrog repositories, see Repository Management.
Supported Naming Conventions
Due to OCI client limitations, do not use underscores (
_) or uppercase letters in OCI repository names. The OCI client cannot communicate with a repository namedoci_localorOCI-local, but it can communicate withoci-local.
Prerequisite: You need Admin or Project Admin permissions in Artifactory to create a repository. If you don't have Admin permissions, the option will not be available.
To create an OCI repository:
-
In the Administration tab, click Repositories | Create a Repository.
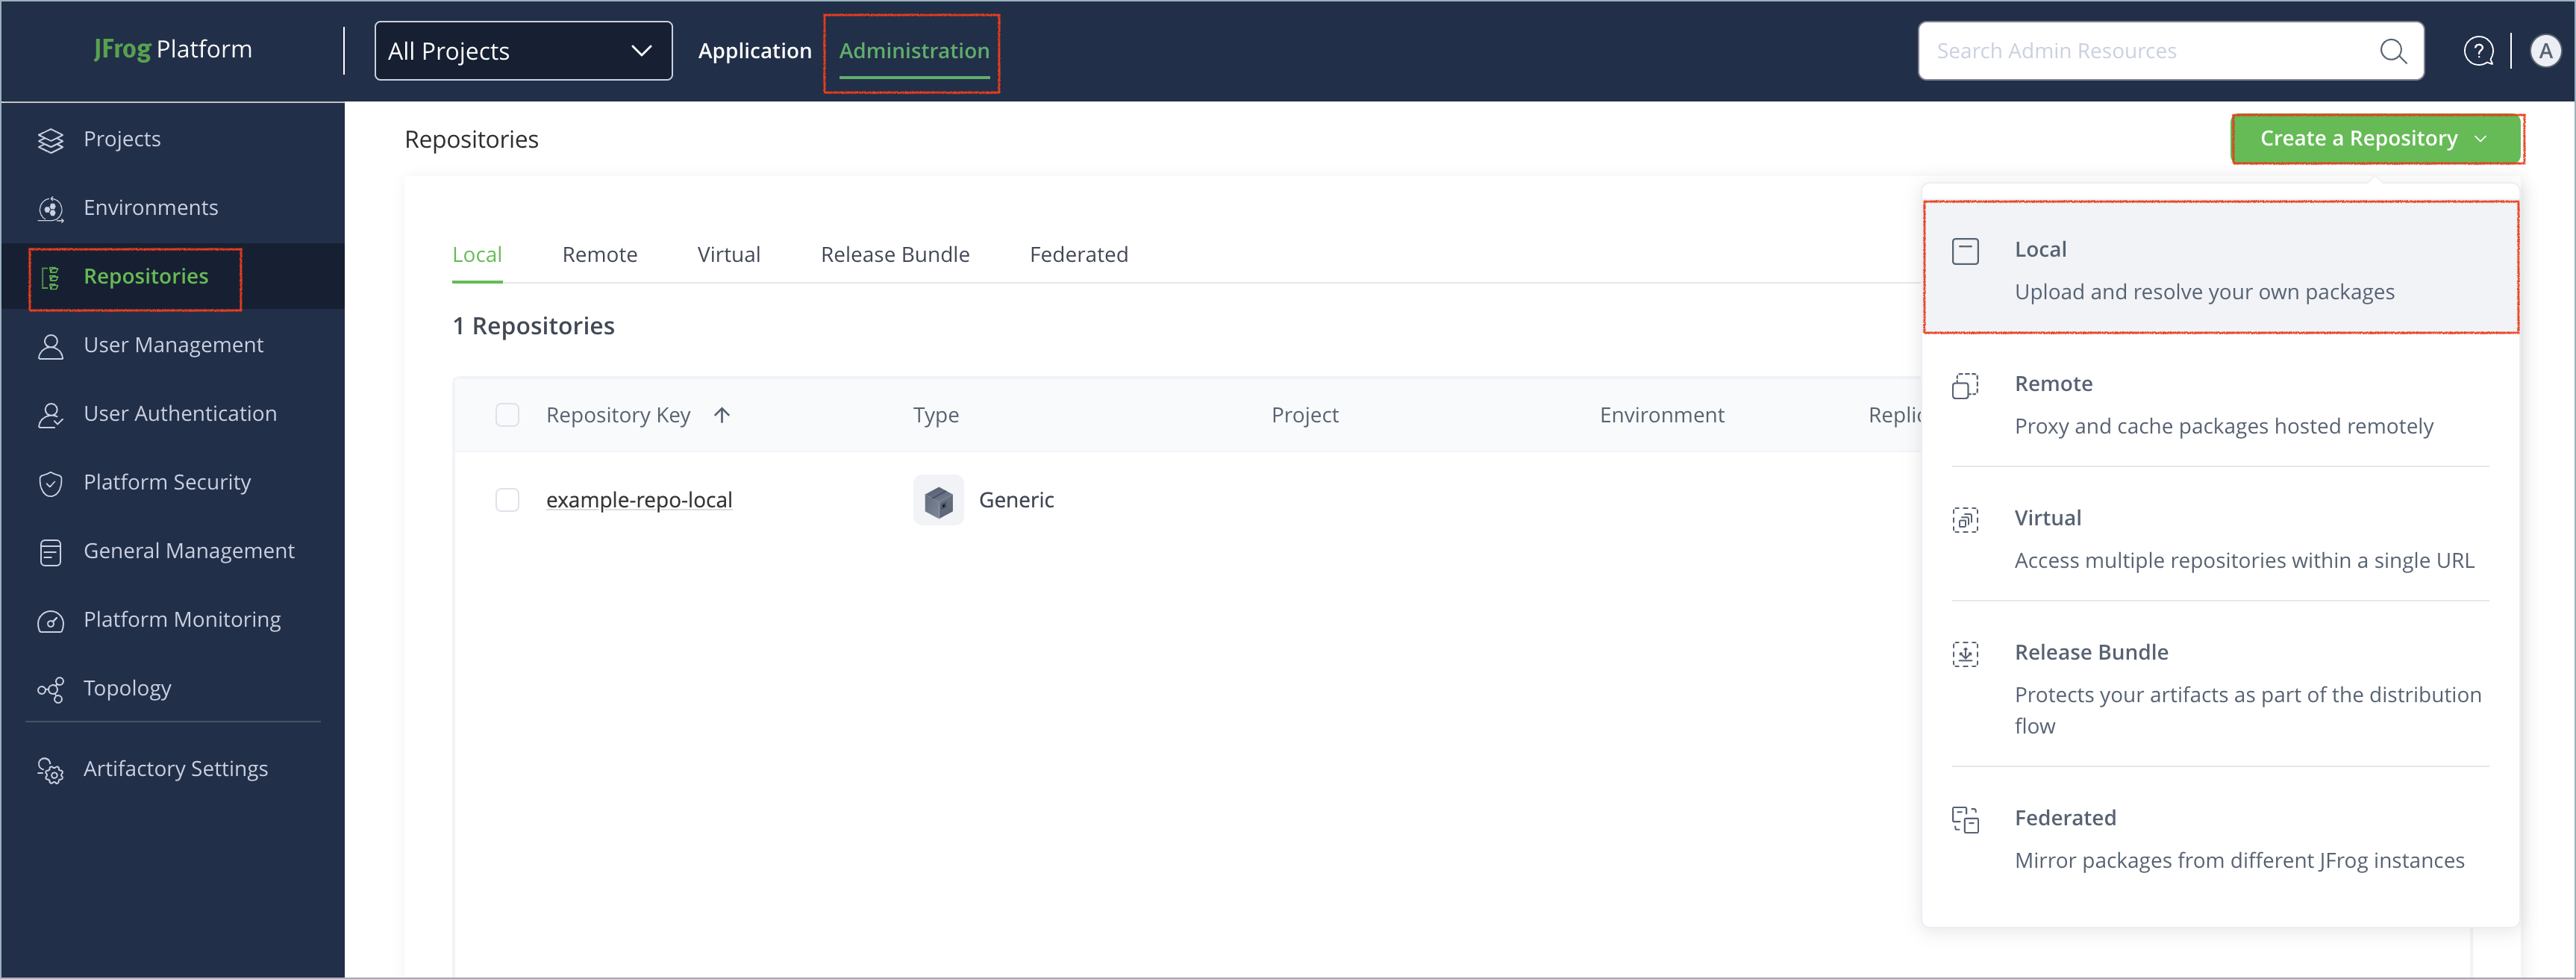
-
Select the type of repository you want to create: local, remote, or virtual.
-
Select the OCI package type.
-
Configure the required fields for the repository:
- For local repositories, in the Repository Key field, type a meaningful name for the repository. For example,
oci-local. For more information on local repositories and their settings, see Local Repositories. - For remote repositories, verify the Repository URL and update as needed. For more information on remote repositories and their settings, see Remote Repositories.
- For virtual repositories, select one or more local or remote repository types to include in the virtual repository. For more information on virtual repositories and their settings, see Virtual Repositories.
- For local repositories, in the Repository Key field, type a meaningful name for the repository. For example,
-
Click Create Repository. The repository is created and the Repositories window is displayed.
Connect OCI Clients to Artifactory
This topic provides details on configuring OCI clients to work with Artifactory. To get up and running quickly to use OCI, see Get Started with OCI.
Pre-requisite: Before connecting your client to Artifactory, you must have an existing OCI repository in Artifactory. For more information, see Create an OCI Repository.
Supported Clients
Note
The example JFrog Platform URLs in the following instructions use the repository path method. Depending on your Artifactory deployment and setup, your JFrog Platform URL may use different formats. For examples, see Docker Repository URL Formats.
Podman
The following topics describe how to configure and use Podman with Artifactory:
Connect Podman to Artifactory
Podman, or the Pod Manager, is a tool for managing, developing, and running OCI images on Linux systems. It is daemonless, which makes it more accessible and less vulnerable to security breaches than other clients. You can configure Podman to work with Artifactory using two methods:
Logged in vs. Anonymous User: You can work with Podman and Artifactory as either a logged-in user, or as an anonymous user without logging in. To work with Artifactory using Anonymous Access, configure that access under Admin | Security | General. For details, refer to Allow Anonymous Access.
Connect Podman to Artifactory Using podman login
podman login-
Run the following command:
podman login [JFrogPlatformURL]Where:
[JFrogPlatformURL]: The URL of your JPD, without the protocol schema
For example:
podman login company.jfrog.io -
Enter your Artifactory credentials.
Note
You can also use JFrog Set me up to copy the snippet populated with your token and environment. For more information, see Use Artifactory Set Me Up for Configuring Package Manager Clients.
Connect Podman to Artifactory Manually
By default, Podman looks for authentication information in ${XDG_RUNTIME_DIR}/containers/auth.json. If no valid credentials are found in the file, Podman falls back to the ~/.docker/config.json file. You can also specify a different authentication file path by using the --authfile flag with your Podman commands.
To manually connect Podman to Artifactory:
Add the following snippet to the ${XDG_RUNTIME_DIR}/containers/auth.json or ~/.docker/config.json file:
{
	"auths": {
		"[JFrogPlatformURL]" : {
			"auth": "<AUTH_TOKEN>",
			"email": "<EMAIL>"
		}
	}
}
Where:
[JFrogPlatformURL]: The URL of your JPD, without the protocol schema<AUTH_TOKEN>: Your Base64-encoded credentials<EMAIL>: The email address you use to access your JFrog account
For example:
{
	"auths": {
		"company.jfrog.io" : {
			"auth": "ZGVtb191c2VyOnNhbXBsZV9hdXRoX3Rva2VuXzEyMzQ1QUJDREVGRg==",
			"email": "[email protected]"
		}
	}
}Note
You can also use JFrog Set me up to copy the snippet populated with your token and environment. For more information, see Use Artifactory Set Me Up for Configuring Package Manager Clients.
Next steps:
Push OCI Images with Podman
To tag and push an OCI image to Artifactory with Podman:
-
Tag your image by running the following command:
podman tag <IMAGE_ID> [JFrogPlatformURL]/<REPO_NAME>/<IMAGE>:<TAG>Where:
<IMAGE_ID>: The existing image ID[JFrogPlatformURL]: The URL of your JPD, without the protocol schema<REPO_NAME>: The name of the target repository<IMAGE>: The image name<TAG>: The tags you want to apply to the image
For example:
podman tag a1b2c3d4e5f6 company.jfrog.io/oci-local/froggy-app:v1.0.0 -
Run the following command to push the image to Artifactory:
podman push [JFrogPlatformURL]/<REPO_NAME>/<IMAGE>:<TAG> -f=ociWhere:
[JFrogPlatformURL]: The URL of your JPD, without the protocol schema<REPO_NAME>: The name of the target repository<IMAGE>: The image name<TAG>: The tags you want to apply to the image
For example:
podman push company.jfrog.io/oci-local/froggy-app:v1.0.0 -f=oci
Note
You can also use JFrog Set me up to copy the snippet populated with your token and environment. For more information, see Use Artifactory Set Me Up for Configuring Package Manager Clients.
Pull OCI Images with Podman
To pull an OCI image with Podman:
Run the following command:
podman pull [JFrogPlatformURL]/<REPO_NAME>/<IMAGE>:<TAG>Where:
[JFrogPlatformURL]: The URL of your JPD, without the protocol schema<REPO_NAME>: The repository where the image is located<IMAGE>: The image name<TAG>: The tags identifying the version of the image you want to pull
For example:
podman pull company.jfrog.io/oci-local/froggy-app:v1.0.0Note
You can also use JFrog Set Me Up to copy the snippet populated with your token and environment. For more information, see Use Artifactory Set Me Up for Configuring Package Manager Clients.
BuildX
The following topics describe how to configure and use BuildX with Artifactory:
Connect BuildX to Artifactory
Docker Buildx is a CLI plugin that extends the standard docker build command. It supports advanced features like creating multi-platform images from a single command and offers enhanced caching and output options.
To connect BuildX to Artifactory:
Run the following command:
docker login [JFrogPlatformURL]Where:
[JFrogPlatformURL]: The URL of your JPD, without the protocol schema
For example:
docker login company.jfrog.ioNote
You can also use JFrog Set me up to copy the snippet populated with your token and environment. For more information, see Use Artifactory Set Me Up for Configuring Package Manager Clients.
Next steps:
Push OCI Images with BuildX
BuildX supports building and pushing images in two ways:
Push Single Images with BuildX
Run the following Docker command:
docker buildx build --platform <ARCHITECTURE> -t [JFrogPlatformURL]/<REPO_NAME>/<IMAGE>:<TAG> . --pushWhere:
<ARCHITECTURE>: The operating system and CPU architecture combination you want to build[JFrogPlatformURL]: The URL of your JPD, without the protocol schema<REPO_NAME>: The repository where the image is located<IMAGE>: The image name<TAG>: The tags identifying the version of the image you want to pull
For example:
docker buildx build --platform linux/amd64 company.jfrog.io/oci-local/froggy-app:v1.0.0 . --pushNote
You can also use JFrog Set me up to copy the snippet populated with your token and environment. For more information, see Use Artifactory Set Me Up for Configuring Package Manager Clients.
Push Multiple Images with BuildX
-
Run this command to open a new builder instance that you can use to build images for multiple architectures:
docker buildx create --use -
Build and publish multiple images by running the following command:
docker buildx build --platform <ARCHITECTURES> -t [JFrogPlatformURL]/<REPO_NAME>/<IMAGE>:<TAG> . --pushWhere:
<ARCHITECTURES>: A comma-separated list of the operating system and CPU combinations you want to build[JFrogPlatformURL]: The URL of your JPD, without the protocol schema<REPO_NAME>: The repository where the image is located<IMAGE>: The image name<TAG>: The tags identifying the version of the image you want to pull
For example:
docker buildx build --platform linux/amd64,linux/arm64,linux/arm/v7,linux/s390x,linux/ppc64le -t company.jfrog.io/oci-local/froggy-app:v1.0.0 . --push
Note
You can also use JFrog Set me up to copy the snippet populated with your token and environment. For more information, see Use Artifactory Set Me Up for Configuring Package Manager Clients.
Pull OCI Images with BuildX
BuildX itself does not provide a direct command for pull actions. To download an OCI image to your local machine, use a separate client like Docker.
To pull an OCI image with BuildX:
Run the following Docker command:
docker pull [JFrogPlatformURL]/<REPO_NAME>/<IMAGE>:<TAG>Where:
[JFrogPlatformURL]: The URL of your JPD, without the protocol schema<REPO_NAME>: The repository where the image is located<IMAGE>: The image name<TAG>: The tags identifying the version of the image you want to pull
For example:
docker pull company.jfrog.io/oci-local/froggy-app:v1.0.0Note
You can also use JFrog Set me up to copy the snippet populated with your token and environment. For more information, see Use Artifactory Set Me Up for Configuring Package Manager Clients.
BuildKit/buildctl
The following topics describe how to configure and use BuildKit/buildctl with Artifactory:
- Connect BuildKit/buildctl to Artifactory
- Push OCI Images with BuildKit/buildctl
- Pull OCI Images with BuildKit/buildctl
Connect BuildKit/buildctl to Artifactory
BuildKit is a toolkit for building container images and other build artifacts efficiently and securely. You can use the toolkit to build multiarchitecture images. It operates as a daemon that executes build operations. buildctl is the BuildKit command-line client used to interact with the daemon and define build processes.
To connect BuildKit to Artifactory:
-
Run the following Docker command:
docker login [JFrogPlatformURL]Where:
[JFrogPlatformURL]: The URL of your JPD, without the protocol schema
For example:
docker login company.jfrog.io -
Enter your Artifactory credentials.
Note
You can also use JFrog Set me up to copy the snippet populated with your token and environment. For more information, see Use Artifactory Set Me Up for Configuring Package Manager Clients.
Next steps:
Push OCI Images with BuildKit/buildctl
To tag and push an OCI image to Artifactory with buildctl:
Run the following command:
buildctl build \
--frontend=dockerfile.v0 \
--local context=. \
--local dockerfile=. \
--output type=image,name=[JFrogPlatformURL]/<REPO_NAME>/<IMAGE>:<TAG>,push=true \
--export-cache type=registry,ref=[JFrogPlatformURL]/<REPO_NAME>/<IMAGE>:<TAG>,mode=max,push=true \
--import-cache type=registry,ref=[JFrogPlatformURL]/<REPO_NAME>/<IMAGE>:<TAG>
Where:
[JFrogPlatformURL]: The URL of your JPD, without the protocol schema<REPO_NAME>: The name of the target repository<IMAGE>: The image name<TAG>: The tags you want to apply to the image
For example:
buildctl build \
--frontend=dockerfile.v0 \
--local context=. \
--local dockerfile=. \
--output type=image,name=company.jfrog.io/oci-local/froggy-app:v1.0.0,push=true \
--export-cache type=registry,ref=company.jfrog.io/oci-local/froggy-app:v1.0.0,mode=max,push=true \
--import-cache type=registry,ref=company.jfrog.io/oci-local/froggy-app:v1.0.0Note
You can also use JFrog Set me up to copy the snippet populated with your token and environment. For more information, see Use Artifactory Set Me Up for Configuring Package Manager Clients.
Pull OCI Images with BuildKit/buildctl
buildctl itself does not provide a direct command for pull actions. To download an OCI image to your local machine, use a separate client like Docker.
To pull an OCI image with BuildKit/buildctl:
Run the following Docker command:
docker pull [JFrogPlatformURL]/<REPO_NAME>/<IMAGE>:<TAG>Where:
[JFrogPlatformURL]: The URL of your JPD, without the protocol schema<REPO_NAME>: The repository where the image is located<IMAGE>: The image name<TAG>: The tags identifying the version of the image you want to pull
For example:
docker pull company.jfrog.io/oci-local/froggy-app:v1.0.0Note
You can also use JFrog Set me up to copy the snippet populated with your token and environment. For more information, see Use Artifactory Set Me Up for Configuring Package Manager Clients.
WASM to OCI
The following topics describe how to configure and use WASM to OCI with Artifactory:
- Connect WASM to OCI to Artifactory
- Pull WASM Files with WASM to OCI
- Push WASM Files with WASM to OCI
Connect WASM to OCI to Artifactory
Wasm to OCI refers to the standard and tooling that allows WebAssembly (Wasm) modules to be packaged, distributed, and run using OCI specifications.
To connect WASM to OCI to Artifactory:
Run the following Docker command:
docker login [JFrogPlatformURL]Where:
[JFrogPlatformURL]: The URL of your JPD, without the protocol schema
For example:
docker login company.jfrog.ioNote
You can also use JFrog Set me up to copy the snippet populated with your token and environment. For more information, see Use Artifactory Set Me Up for Configuring Package Manager Clients.
Next steps:
Push WASM Files with WASM to OCI
To tag and push WASM files to Artifactory with WASM to OCI:
Run the following command:
wasm-to-oci push <WASM_FILE> [JFrogPlatformURL]/<REPO_NAME>/<PACKAGE>:<TAG>Where:
<WASM_FILE>: The path to the WASM file on your local environment[JFrogPlatformURL]: The URL of your JPD, without the protocol schema<REPO_NAME>: The target repository<PACKAGE>: The name of the WASM file in Artifactory<TAG>: The tags you want to apply to the package
For example:
wasm-to-oci push ~/projects/my-app/target/wasm32-wasi/release/froglogic.wasm company.jfrog.io/oci-local/froggy-app:v1.0.0Note
You can also use JFrog Set me up to copy the snippet populated with your token and environment. For more information, see Use Artifactory Set Me Up for Configuring Package Manager Clients.
Pull WASM Files with WASM to OCI
To pull WASM files from Artifactory with WASM to OCI:
Run the following command:
wasm-to-oci pull [JFrogPlatformURL]/<REPO_NAME>/<PACKAGE>:<TAG>Where:
[JFrogPlatformURL]: The URL of your JPD, without the protocol schema<REPO_NAME>: The target repository<PACKAGE>: The name of the WASM file in Artifactory<TAG>: The tags you want to apply to the package
For example:
wasm-to-oci pull company.jfrog.io/oci-local/froggy-app:v1.0.0Note
You can also use JFrog Set me up to copy the snippet populated with your token and environment. For more information, see Use Artifactory Set Me Up for Configuring Package Manager Clients.
ORAS
The following topics describe how to configure and use ORAS with Artifactory:
Connect ORAS to Artifactory
ORAS (OCI Registry As Storage) is a tool and set of libraries that extend OCI-compliant registries to store and manage all artifact types. It allows you to use push and pull commands to distribute and manage diverse content like Helm charts, SBOMs, signatures, and WebAssembly modules.
To connect ORAS to Artifactory:
Run the following command:
oras login [JFrogPlatformURL]Where:
[JFrogPlatformURL]: The URL of your JPD, without the protocol schema
For example:
oras login company.jfrog.ioAlternatively, you can provide your username and token in advance with the following command:
oras login -u <USERNAME> -p <TOKEN> [JFrogPlatformURL]Where:
<USERNAME>: Your JFrog username<TOKEN>: Your identity token<JFrogPlatformURL>: The URL of your JPD, without the protocol schema
For example:
oras login -u [email protected] -p eyJhbGciOiJIUzI1NiJ9eyJzdWIiOiJ1c2VyMTIzIiwiaWF0IjoxNzA0MDY3MjAwfQ company.jfrog.ioNote
You can also use JFrog Set me up to copy the snippet populated with your token and environment. For more information, see Use Artifactory Set Me Up for Configuring Package Manager Clients.
Next steps:
Push OCI Artifacts with ORAS
To push an OCI artifact to Artifactory with ORAS:
Run the following command:
oras push [JFrogPlatformURL]/<REPO_NAME>/<IMAGE>:<TAG> <ARTIFACT_FILE_NAME>Where:
[JFrogPlatformURL]: The URL of your JPD, without the protocol schema<REPO_NAME>: The name of the target repository<IMAGE>: The image name in Artifactory<TAG>: The tags you want to apply to the image<ARTIFACT_FILE_NAME>: The local file you want to push to Artifactory
For example:
oras push company.jfrog.io/oci-local/froggy-app:v1.0.0 froggy-app.jsonNote
You can also use JFrog Set me up to copy the snippet populated with your token and environment. For more information, see Use Artifactory Set Me Up for Configuring Package Manager Clients.
Pull OCI Artifacts with ORAS
To pull an OCI artifact from Artifactory with ORAS:
Run the following command:
oras pull [JFrogPlatformURL]/<REPO_NAME>/<IMAGE>:<TAG>Where:
[JFrogPlatformURL]: The URL of your JPD, without the protocol schema<REPO_NAME>: The name of the target repository<IMAGE>: The image name in Artifactory<TAG>: The tags you want to apply to the image
For example:
oras pull company.jfrog.io/oci-virtual/froggy-app:v1.0.0Note
You can also use JFrog Set me up to copy the snippet populated with your token and environment. For more information, see Use Artifactory Set Me Up for Configuring Package Manager Clients.
Helm OCI
The following topics describe how to configure and use Helm OCI with Artifactory:
- Connect Helm OCI to Artifactory
- Push OCI Charts to Artifactory with Helm
- Pull OCI Charts from Artifactory with Helm
Connect Helm OCI to Artifactory
You can store and distribute Helm charts directly within an OCI registry, leveraging the same infrastructure used for container images. This allows for a unified approach to managing and distributing application code as images, and deployment configurations as charts through a single registry.
Supported client versions: Helm 3.8 and above
To connect Helm OCI to Artifactory:
Run the following command:
helm registry login [JFrogPlatformURL]Where:
[JFrogPlatformURL]: The URL of your JPD, without the protocol schema
For example:
helm registry login company.jfrog.ioAlternatively, you can provide your username and token in advance with the following command:
helm registry login -u <USERNAME> -p <TOKEN> [JFrogPlatformURL]Where:
<USERNAME>: Your JFrog username<TOKEN>: Your identity token- [JFrogPlatformURL]: The URL of your JPD, without the protocol schema
For example:
helm registry login -u [email protected] -p eyJhbGciOiJIUzI1NiJ9eyJzdWIiOiJ1c2VyMTIzIiwiaWF0IjoxNzA0MDY3MjAwfQ company.jfrog.ioNote
You can also use JFrog Set me up to copy the snippet populated with your token and environment. For more information, see Use Artifactory Set Me Up for Configuring Package Manager Clients.
Next steps:
Push OCI Charts to Artifactory with Helm
You can use Helm to push charts to Artifactory in OCI format.
Run the following command:
helm push <CHART_TGZ> oci://[JFrogPlatformURL]/<REPO_NAME>Where:
<CHART_TGZ>: The filepath to the local Helm chart file[JFrogPlatformURL]: The URL of your JPD, without the protocol schema<REPO_NAME>: The name of the target repository
For example:
helm push frog-chart-1.0.0.tgz oci://company.jfrog.io/oci-virtualNote
You can also use JFrog Set me up to copy the snippet populated with your token and environment. For more information, see Use Artifactory Set Me Up for Configuring Package Manager Clients.
Pull OCI Charts from Artifactory with Helm
You can use Helm to pull charts in two ways:
Pull a Specific OCI Chart Version
Run the following command:
helm pull oci://[JFrogPlatformURL]/<REPO_NAME>/<CHART_NAME> --version <CHART_VERSION>Where:
[JFrogPlatformURL]: The URL of your JPD, without the protocol schema<REPO_NAME>: The name of the repository where the chart is located<CHART_NAME>: The name of the chart in Artifactory<CHART_VERSION>: The version number that you want to pull
For example:
helm pull oci://company.jfrog.io/oci-virtual/frog-chart --version 1.0.0Pull the Latest OCI Chart Version
Run the following command:
helm pull oci://[JFrogPlatformURL]/<REPO_NAME>/<CHART_NAME>Where:
[JFrogPlatformURL]: The URL of your JPD, without the protocol schema<REPO_NAME>: The name of the repository where the chart is located<CHART_NAME>: The name of the chart in Artifactory
For example:
helm pull oci://company.jfrog.io/oci-virtual/frog-chartNote
You can also use JFrog Set me up to copy the snippet populated with your token and environment. For more information, see Use Artifactory Set Me Up for Configuring Package Manager Clients.
Additional OCI Topics
The following pages provide additional information about using OCI with Artifactory:
Shared-Digest Download Statistics
OCI and Docker share the same download statistics behavior. When multiple tags share one manifest digest, you can enable shared-digest download statistics so pulls update Number of downloads, Last download date, and Last downloaded by consistently across those tags.
Use Referrers REST API to Discover OCI References
Starting from Artifactory version 7.90.1, Artifactory supports Referrers API, part of the OCI specification version 1.1 which provides a new way to link between images and their related information.
Using referrers API, you can connect an image to its signatures, SBOM certificates, attestations, Xray scan results, and other related artifacts, easily retrieve them together, and transfer them between repositories.
For more information, see Open Container Initiative Distribution Specification.
How Referrers API Works in Artifactory
When deploying an image to a repository, you can use many different OCI-compliant tools to add referrers and attestations. This will create a new signature image in the folder of the original image- when you open the manifest.json file for that image, it will contain a ‘subject’ field that points to the original image. Using the Referrers API also creates a referrers.json index file only visible to users with Manage permissions, which will be updated whenever this image is updated or new referrers are added.
Now these images are linked, and you can discover the connection via CLI or REST API.
To use the CLI, you can use functions like oras discover to find all associated artifacts, such as signatures, attestations, and SBOMs, that reference a specific image. For example, when running the following command:
oras discover <JFROG_PLATFORM_URL>/<REPOSITORY_NAME>/<IMAGE>:<DIGEST_OR_TAG>You will get a list of all of the artifacts referencing your image.
To use REST API, use the following GET request:
GET <ARTIFACTORY_URL>/<REPOSITORY_NAME>/<IMAGE>/referrers/<DIGEST_OR_TAG>To get a JSON file with a manifest list detailing all of the signatures associated with your image.
How to Use Referrers API
To enable referrers API on an image in an Artifactory repository:
- Select an image and a reference you would like to attach to it. Use the CLI command for the client you selected for attaching a signature. For example,
cosign attest.
Note
If you are using Cosign, use Cosign version 2.0.0 and above. Using OCI 1.1 with earlier versions of Cosign required adding the following feature flag to your system configuration file:
export COSIGN_EXPERIMENTAL=1For more information, see the Cosign Changelog.
-
To verify that Referrers API is activated on an image, when pushing an image with a subject field, make sure that the response contains the following header with the SHA256 digest for the referenced image:
OCI-Subject: <DIGEST_OR_TAG>
OCI Limitations in Artifactory
- Xray Scanning: Currently, Xray scans are only supported for container images that follow OCI and Docker image specification. Other content types wrapped in OCI, like WASM and other payloads, are not supported. For more information, see Xray.