Transfer files between Artifactory servers
Transfer files between two Artifactory instances using JFrog CLI.
Use the transfer-files command to transfer (copy) all files stored in one Artifactory instance to a different Artifactory instance. The command allows transferring files from single or multiple repositories. The command expects the relevant repository to already exist on the target instance and have the same name and type as the repositories on the source.
Follow these guides for focused procedures:
- Install the data-transfer plugin —
jf rt transfer-plugin-install - Transfer full configuration —
jf rt transfer-config - Merge configuration into an existing target —
jf rt transfer-config-merge - Transfer artifact files —
jf rt transfer-files
Before You Begin
Complete all of these checks before starting the transfer process:
-
Ensure you have JFrog Artifactory Pro or Enterprise edition on the source instance. Artifactory OSS does not support the data-transfer user plugin required by this workflow.
-
Ensure that you can log in to the UI of both the source and target instances with a user that has admin permissions and that you have the connection details for both instances.
-
Ensure that all repositories on the source Artifactory instance that you want to transfer also exist on the target instance with the same name and type.
-
Ensure that JFrog CLI is installed on a machine that has network access to both the source and target instances.
-
Ensure that the
JFROG_HOMEenvironment variable is set on the source Artifactory machine and points to the JFrog installation directory (typically/opt/jfrog). This variable is required for the plugin installation step. If it is not set, configure it before proceeding:export JFROG_HOME=/opt/jfrogFor more information, see the JFrog Product Directory Structure article.
Command Reference
transfer-files
Transfer files from one Artifactory instance to another.
Syntax
jf rt transfer-files [command options] <source-server-id> <target-server-id>Arguments
The following table lists the positional arguments for jf rt transfer-files.
| Argument | Description |
|---|---|
source-server-id | Server ID of the Artifactory instance to transfer from. The server should be configured using the jf c add command. |
target-server-id | Server ID of the Artifactory instance to transfer to. The server should be configured using the jf c add command. |
Command Options
The following table lists the command options for jf rt transfer-files.
| Option | Description |
|---|---|
--include-repos | [Optional] List of semicolon-separated (;) repositories to include in the transfer. You can use wildcards to specify patterns for the repositories' names. |
--exclude-repos | [Optional] List of semicolon-separated (;) repositories to exclude from the transfer. You can use wildcards to specify patterns for the repositories' names. |
--include-files | [Optional] List of semicolon-separated (;) path patterns to include in the transfer. Files will be filtered based on their directory path. Pattern examples: folder/subfolder/*, org/company/*. |
--ignore-state | [Default: false] Set to true to ignore the saved state from previous transfer-files operations and restart the transfer from scratch. |
--proxy-key | [Optional] The key of an HTTP proxy configuration in Artifactory. This proxy will be used for the transfer traffic between the source and target instances. To configure this proxy, go to Proxies > Configuration > Proxy Configuration in the JFrog Administration UI. |
--status | [Default: false] Set to true to show the status of the transfer-files command currently in progress. |
--stop | [Default: false] Set to true to stop the transfer-files command currently in progress. Useful when running the transfer-files command in the background. |
--filestore | [Default: false] Set to true to make the transfer mechanism check for the existence of artifacts on the target filestore. Used when the files are already expected to be located on the filestore. |
--prechecks | [Default: false] Set to true to run pre-transfer checks before starting the file transfer. |
Examples
Transfer all files from source to target:
jf rt transfer-files source-server target-serverTransfer only specific repositories:
jf rt transfer-files source-server target-server --include-repos="libs-release;libs-snapshot"Transfer with wildcard patterns:
jf rt transfer-files source-server target-server --include-repos="libs-*" --exclude-repos="*-temp"Filter files by path pattern:
jf rt transfer-files source-server target-server --include-files="org/mycompany/*"Check transfer status:
jf rt transfer-files --statusWhen no transfer is in progress, this command exits 0 and prints:
Status: Not runningStop a running transfer:
jf rt transfer-files --stopNote
If no transfer is currently active, this command exits with a non-zero status and prints:
There is no active file transfer process.This is expected behavior. Scripts that use--stopas an idempotent cleanup step should account for this exit code.
Run pre-transfer checks:
jf rt transfer-files source-server target-server --prechecksRestart transfer from scratch:
jf rt transfer-files source-server target-server --ignore-stateLimitations
- Artifacts in remote repository caches are not transferred.
- The file transfer process allows transferring files that were created or modified on the source instance after the process started. However, files that were deleted on the source instance after the process started are not deleted on the target instance by the process.
- The custom properties of newly created or modified files are updated on the target instance. However, if only the custom properties of a file were modified on the source, but not the file's content, the properties are not modified on the target instance by the process.
- The source and target repositories must have the same name and type.
- Since the files are pushed from the source to the target instance, the source instance must have a network connection to the target.
Running the Transfer Process
Step 1 - Set Up the Source Instance for File Transfer
To set up the source instance for file transfer, you must install the data-transfer user plugin on the primary node of the source instance. This section guides you through the installation steps.
Important
The data-transfer user plugin requires JFrog Artifactory Pro or Enterprise edition. Artifactory OSS does not support user plugins.
-
Install JFrog CLI on the primary node machine of the source instance. For more information, see Installing JFrog CLI on the Source Instance Machine.
-
Configure the connection details of the source Artifactory instance with your admin credentials by running the following command from the terminal:
jf c add source-serverNote: This command produces no output on success. To verify the server was added, run
jf config show. -
Ensure that the
JFROG_HOMEenvironment variable is set and holds the value of the JFrog installation directory, which usually points to the/opt/jfrogdirectory. If the variable is not set, set its value to point to the correct directory. For more information, see the JFrog Product Directory Structure article. -
Install the data-transfer user plugin.
Important: The
jf rt transfer-plugin-installcommand must be run directly on the primary node machine of the source Artifactory instance. Running it from a remote workstation or a machine where Artifactory is not installed will fail with a directory lookup error. If you are setting up the transfer from a separate machine, SSH into the primary node first.If the source instance has internet access, install the plugin automatically:
jf rt transfer-plugin-install source-serverIf the source instance does not have internet access, install the plugin manually. For more information, see Installing the Data-Transfer User Plugin Manually.
Step 2 - Push the Files from the Source to the Target Instance
Install JFrog CLI on any machine that has access to both the source and the target JFrog instances. To do this, follow the steps described in Installing JFrog CLI on a Machine with Network Access to the Source and Target Machines.
Run the following command to start pushing the files from all the repositories in source instance to the target instance:
jf rt transfer-files source-server target-serverThis command may take a few days to push all the files, depending on your system size and your network speed. While the command is running, it displays the transfer progress visually inside the terminal.
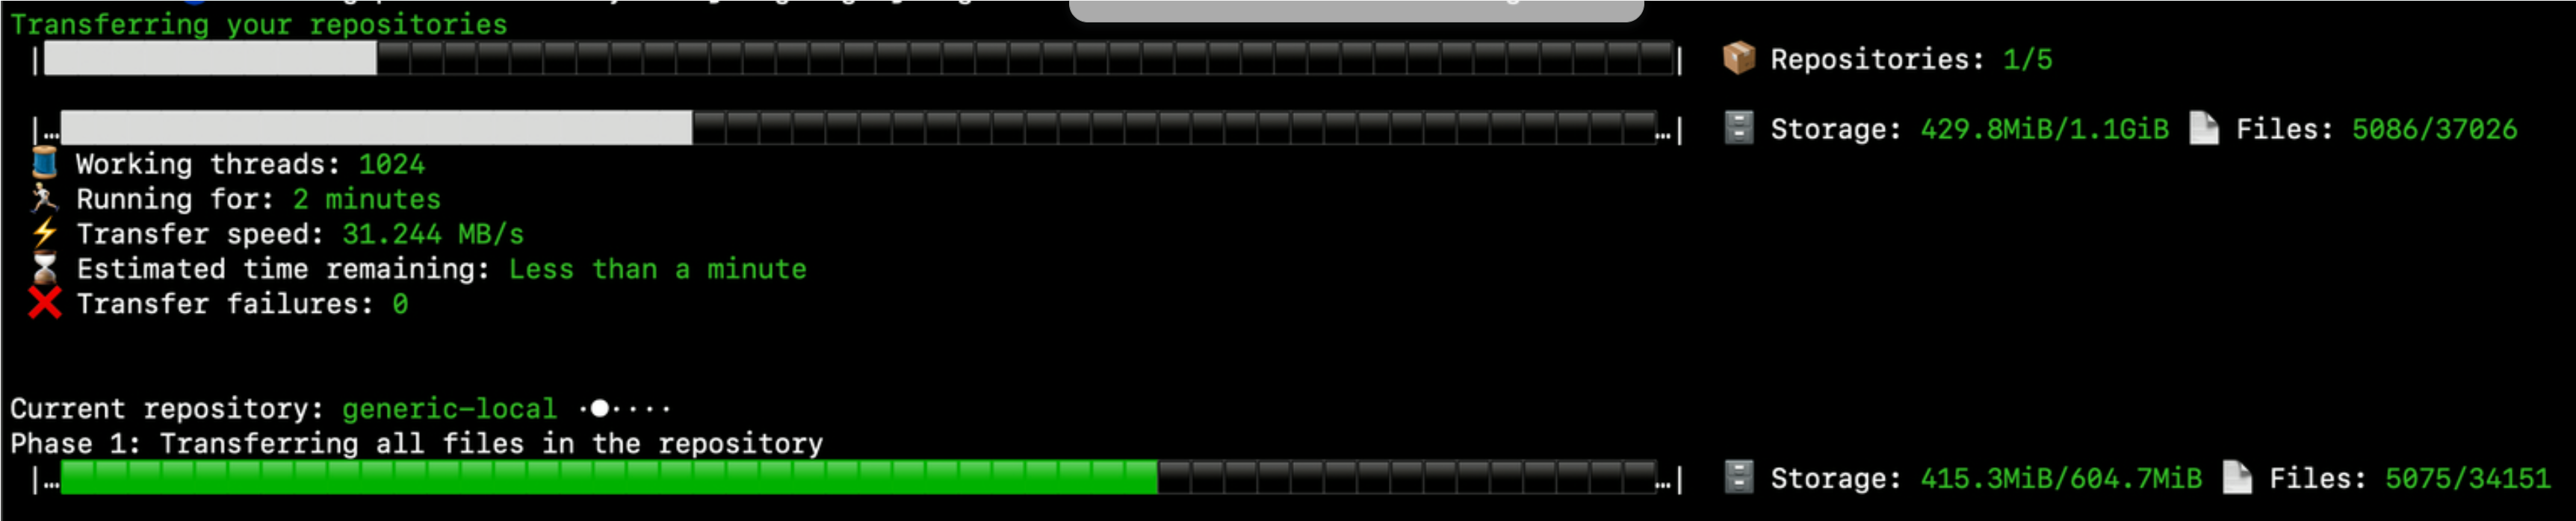
If you're running the command in the background, use the following command to view the transfer progress:
jf rt transfer-files --status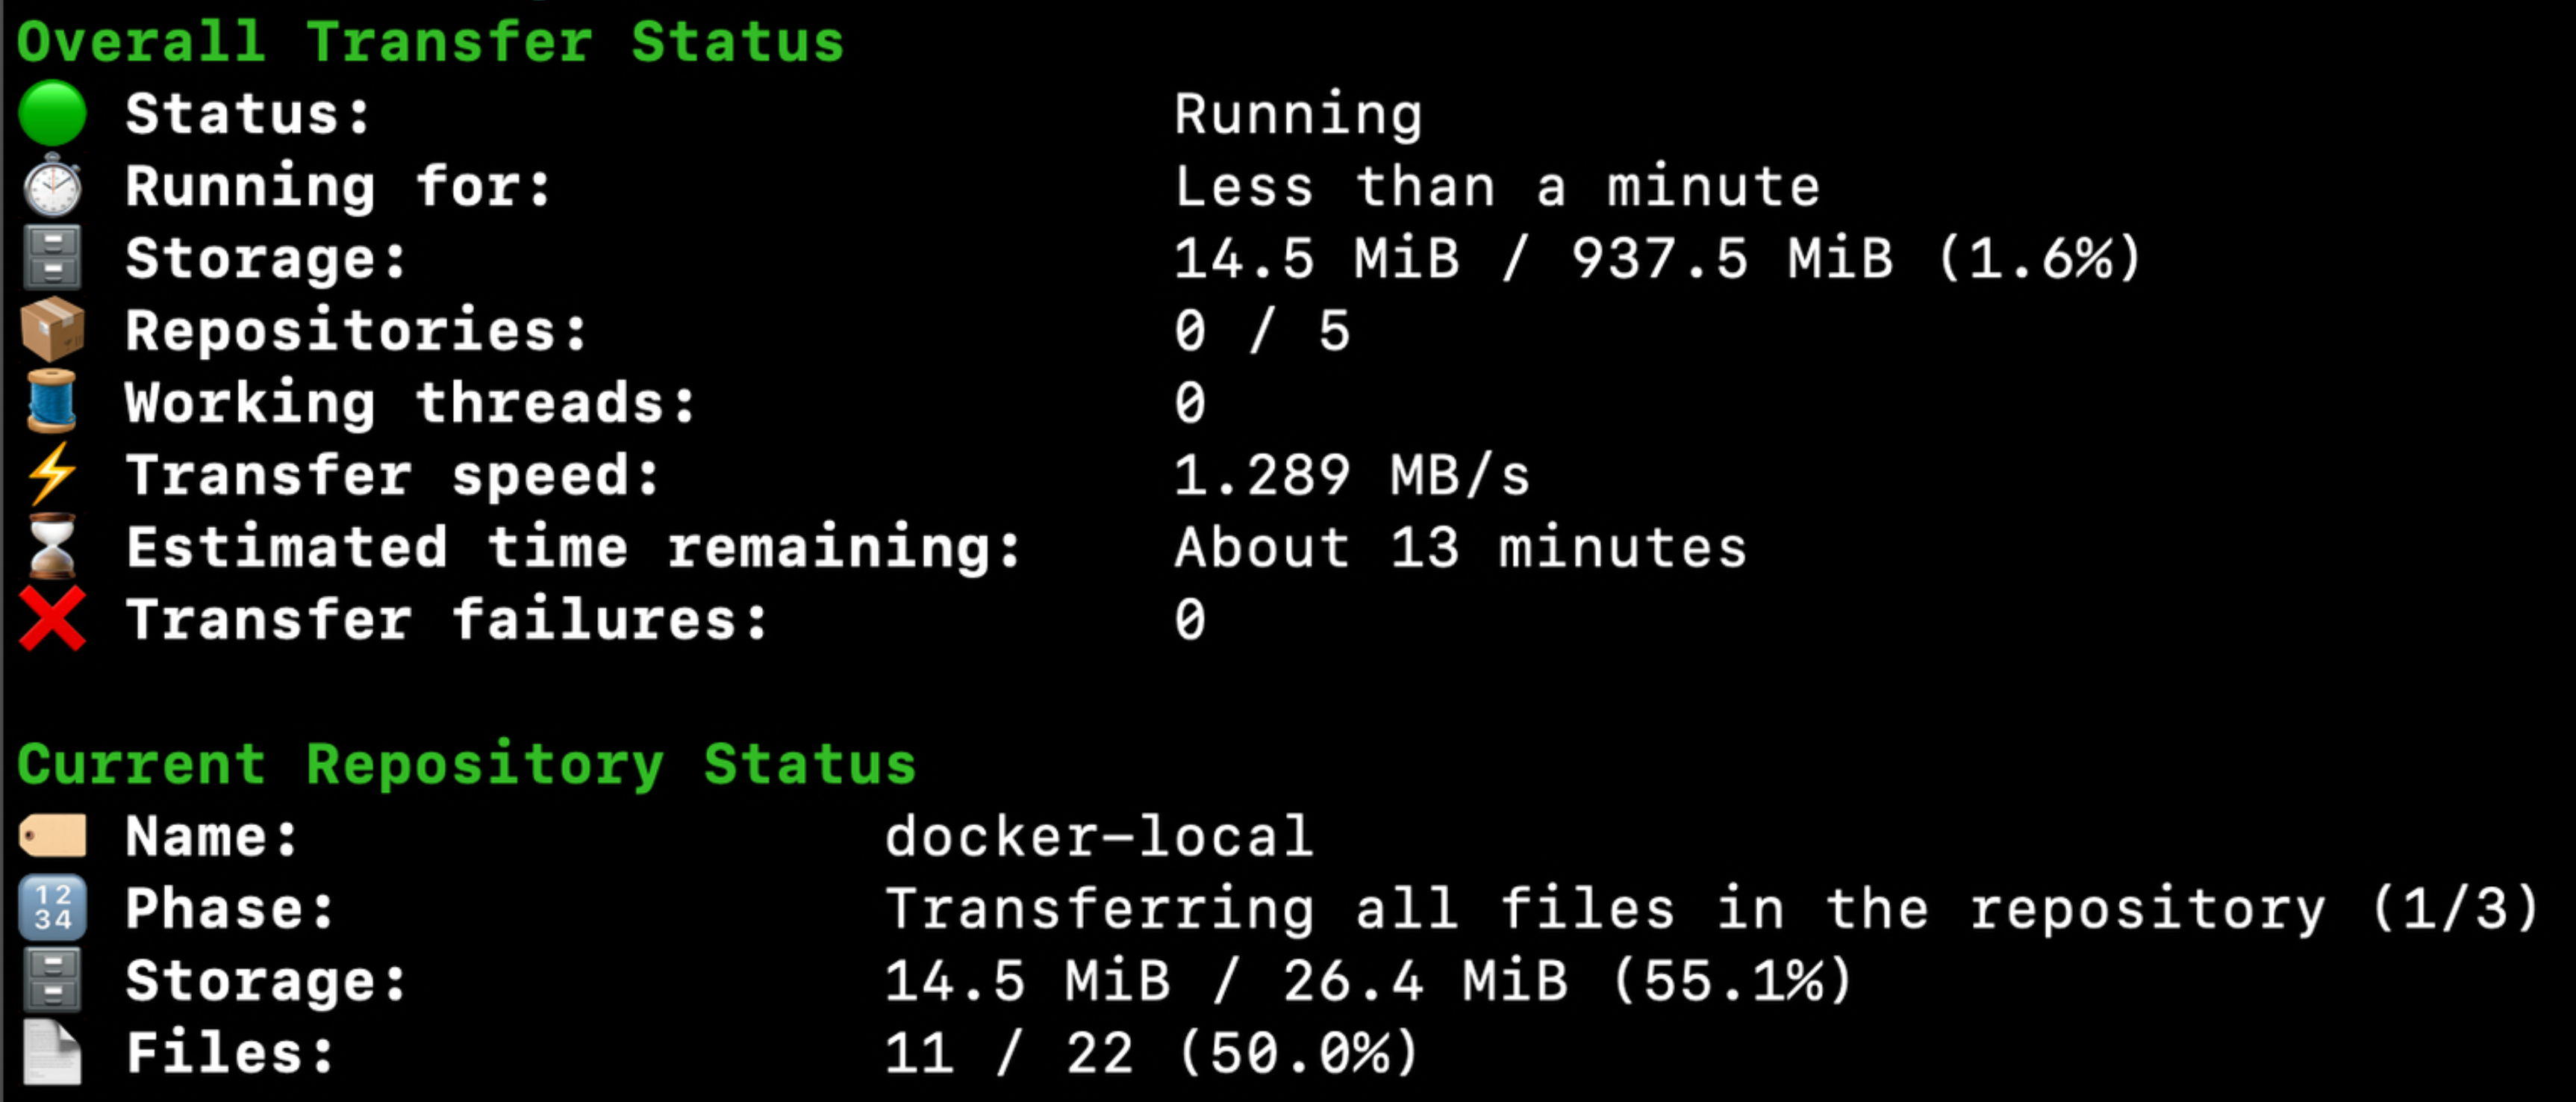
In case you do not wish to transfer the files from all repositories, or wish to run the transfer in phases, you can use the --include-repos, --exclude-repos, and --include-files command options. Run the following command to see the usage of these options:
jf rt transfer-files -hIf the traffic between the source and target instance needs to be routed through an HTTPS proxy, refer to Routing the Traffic from the Source to the Target Through an HTTPS Proxy.
You can stop the transfer process by pressing CTRL+C if the process is running in the foreground, or by running the following command if you're running the process in the background:
jf rt transfer-files --stopThe process will continue from the point it stopped when you re-run the command.
While the file transfer is running, monitor the load on your source instance, and if needed, reduce the transfer speed or increase it for better performance. For more information, see Controlling the File Transfer Speed.
A path to an errors summary file will be printed at the end of the run, referring to a generated CSV file. Each line on the summary CSV represents an error of a file that failed to be transferred. On subsequent executions of the jf rt transfer-files command, JFrog CLI will attempt to transfer these files again.
Once the jf rt transfer-files command finishes transferring the files, you can run it again to transfer files which were created or modified during the transfer. You can run the command as many times as needed. Subsequent executions of the command will also attempt to transfer files that failed to be transferred during previous executions of the command.
Note
Read more about how the transfer files works in CLI for JFrog SaaS Transfer.
Installing the data-transfer User Plugin on the Source Machine Manually
Important
The data-transfer user plugin requires JFrog Artifactory Pro or Enterprise edition. Artifactory OSS does not support user plugins.
To install the data-transfer user plugin on the source machine manually:
-
Download the following two files from a machine that has internet access:
-
data-transfer.jar from
https://releases.jfrog.io/artifactory/jfrog-releases/data-transfer/<RELEASE>/lib/data-transfer.jar -
dataTransfer.groovy from
https://releases.jfrog.io/artifactory/jfrog-releases/data-transfer/<RELEASE>/dataTransfer.groovy
Note: Replace
<RELEASE>with the specific version number you want to install (for example,1.0.0). -
-
Create a new directory on the primary node machine of the source instance and place the two files you downloaded inside this directory.
-
Install the data-transfer user plugin by running the following command from the terminal. Replace
[plugin files dir]with the full path to the directory which includes the plugin files you downloaded:jf rt transfer-plugin-install source-server --dir "[plugin files dir]"
Installing JFrog CLI on the Source Instance Machine
For detailed installation steps including Docker container support, see the Installing JFrog CLI on the Source Instance Machine section in the CLI for JFrog SaaS Transfer guide.
Quick install:
curl -fL https://install-cli.jfrog.io | shHow Does Files Transfer Work?
For a detailed explanation of file transfer phases, transfer state, and how JFrog CLI manages incremental transfers, see the How Does File Transfer Work? section in the CLI for JFrog SaaS Transfer guide.
Installing JFrog CLI on a Machine with Network Access to the Source and Target Machines
For step-by-step instructions on installing JFrog CLI on a machine with access to both instances, see the Installing JFrog CLI on a Machine with Network Access to Both Instances section in the CLI for JFrog SaaS Transfer guide.
Controlling the File Transfer Speed
For details on controlling transfer speed, adjusting working threads, and build-info repository throttling, see the Controlling File Transfer Speed section in the CLI for JFrog SaaS Transfer guide.
Pre-Transfer Checks
Before starting a full file transfer, you can run pre-transfer checks to validate the configuration and identify potential issues early. This is especially useful for large transfers that may take days to complete.
To run pre-transfer checks:
- Run:
jf rt transfer-files <source-server-id> <target-server-id> --prechecksWhere:
<source-server-id>and<target-server-id>— JFrog CLI server IDs configured withjf config add.
Full example:
jf rt transfer-files source-server target-server --prechecksThis will validate:
- Connectivity to both source and target servers
- Repository existence and compatibility
- Permission requirements
- Plugin installation status
Pre-transfer checks typically complete within a few seconds to a few minutes depending on the number of repositories. If all checks pass, the command exits 0 and reports the validation results. If any check fails, review the error output before proceeding with the full transfer.
Note
If the data-transfer plugin is not installed on the source instance,
--precheckswill fail and print a plugin installation error. Complete Step 1 before running pre-transfer checks.
Routing the Traffic from the Source to the Target Through an HTTPS Proxy
The jf rt transfer-files command pushes the files directly from the source to the target instance over the network. In case the traffic from the source instance needs to be routed through an HTTPS proxy, follow these steps:
-
Define the proxy details in the source instance UI as described in Managing Proxies.
-
When running the
jf rt transfer-filescommand, add the--proxy-keyoption to the command, with the Proxy Key you configured in the UI as the option value. For example, if the Proxy Key you configured ismy-proxy-key, run the command as follows:jf rt transfer-files source-server target-server --proxy-key my-proxy-key
Transfer Plugin Install Command
Install the data-transfer user plugin on an Artifactory server.
Important
This command requires JFrog Artifactory Pro or Enterprise edition. Artifactory OSS does not support user plugins.
Syntax
jf rt transfer-plugin-install <server-id> [command options]Arguments
The following table lists the argument for jf rt transfer-plugin-install.
| Argument | Description |
|---|---|
server-id | The ID of the source server on which the plugin should be installed. The server should be configured using the jf c add command. |
Command Options
The following table lists the command options for jf rt transfer-plugin-install.
| Option | Description |
|---|---|
--version | [Default: latest] The plugin version to download and install. |
--dir | [Optional] The local directory that contains the plugin files to install. Use this option when installing from local files without internet access. |
--home-dir | [Default: /opt/jfrog] The local JFrog home directory to install the plugin in. |
Note
The
--dirand--versionflags are mutually exclusive. Use--dirwhen installing from local files (no internet access), or--versionwhen downloading from the internet. Providing both flags in the same command will result in an error.
Examples
Install the latest version of the plugin:
jf rt transfer-plugin-install source-serverInstall a specific version:
jf rt transfer-plugin-install source-server --version 1.0.0Install from local files:
jf rt transfer-plugin-install source-server --dir "/path/to/plugin/files"Install to a custom JFrog home directory:
jf rt transfer-plugin-install source-server --home-dir "/custom/jfrog/home"Transfer Settings Command
Configure the settings for the jf rt transfer-files command interactively.
Syntax
jf rt transfer-settingsDescription
This interactive command allows you to configure the file transfer settings, including:
- Number of working threads: Controls how many parallel threads are used for transferring files. The default is 8 threads. You can increase this for faster transfers (higher load) or decrease it for slower transfers (lower load).
Note
For Build Info repositories, the number of working threads is automatically capped at 8, regardless of the value you configure here. This limit applies only to Build Info repositories. All other repository types use the full configured thread count.
The settings are cached by JFrog CLI and will be used for subsequent runs of the jf rt transfer-files command from the same machine.
Example
jf rt transfer-settingsWhen you run this command, you will be prompted to enter the desired number of working threads. The change takes effect immediately, even if a transfer is currently in progress.
Updated 3 days ago
What’s Next
First, install the transfer plugin on your source Artifactory instance.