Opkg Repositories
Opkg (Open PacKaGe) is a lightweight package manager designed for embedded Linux systems. Opkg automates the process of installing, removing, and managing software from remote repositories known as feeds. You can use Artifactory as a fully-fledged Opkg repository to generate index files that are fully compliant with the Opkg client. For more information, see the Opkg documentation.
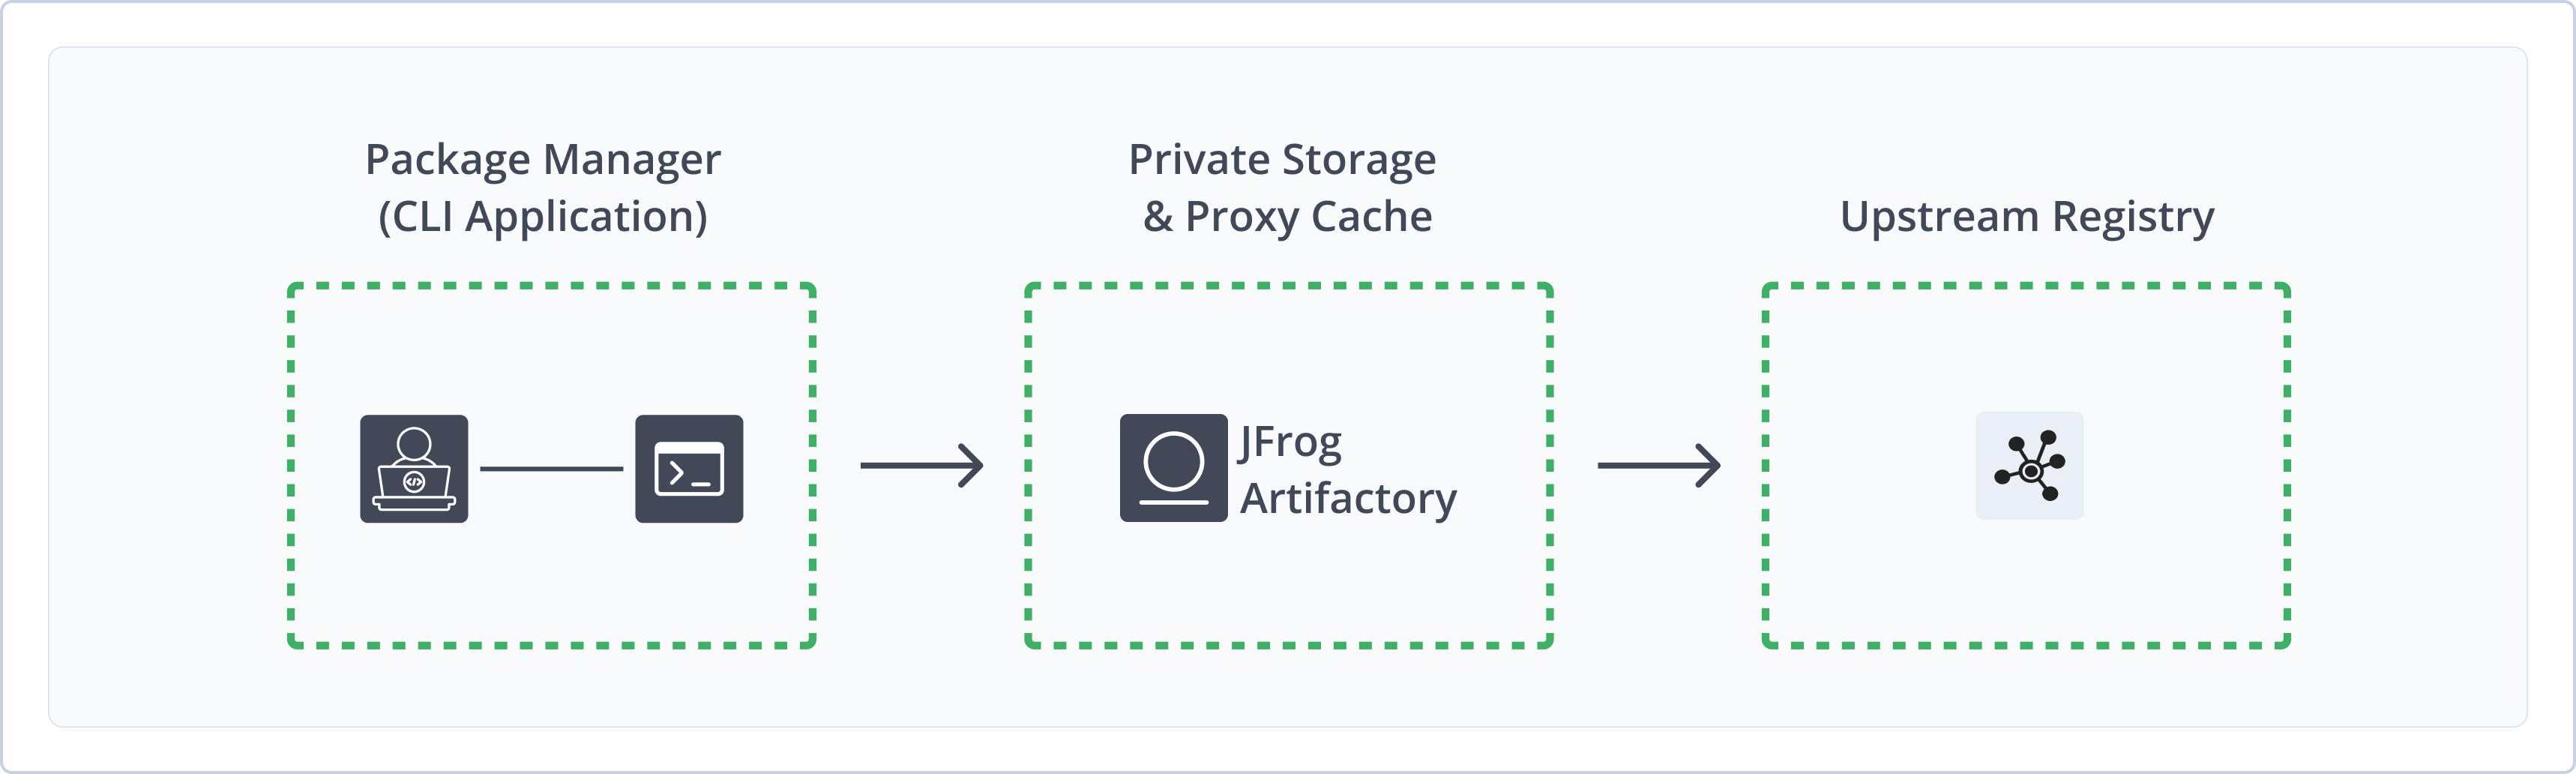
Artifactory fully supports Opkg repositories, including the following capabilities:
- Unified Repository Management: Consolidate all your
.ipkpackages by using Opkg repositories in Artifactory as a single source of truth. Set up secure local repositories, access cached versions ofdownloads.openwrt.org, and create a single access point for all sources with virtual repositories. - Full Automation with REST API and JFrog CLI: Natively manage and provision
.ipkpackages from Artifactory using theopkgclient, or automate fully with the JFrog CLI and REST API to optimize software delivery. - Automated Metadata Calculation: Artifactory automatically calculates metadata for packages uploaded to local repositories, eliminating the need for manual indexing.
- Flexible Key Management: Sign indexes and verify packages with GPG signatures, and manage the GPG signatures using the Artifactory UI and REST API.
- Enterprise Readiness: Use secure, private Opkg repositories in a High Availability installation of Artifactory. Artifactory provides enterprise-ready stability, reliability, scalable storage through Cloud providers, and advanced replication options for disaster recovery.
Get Started with Opkg
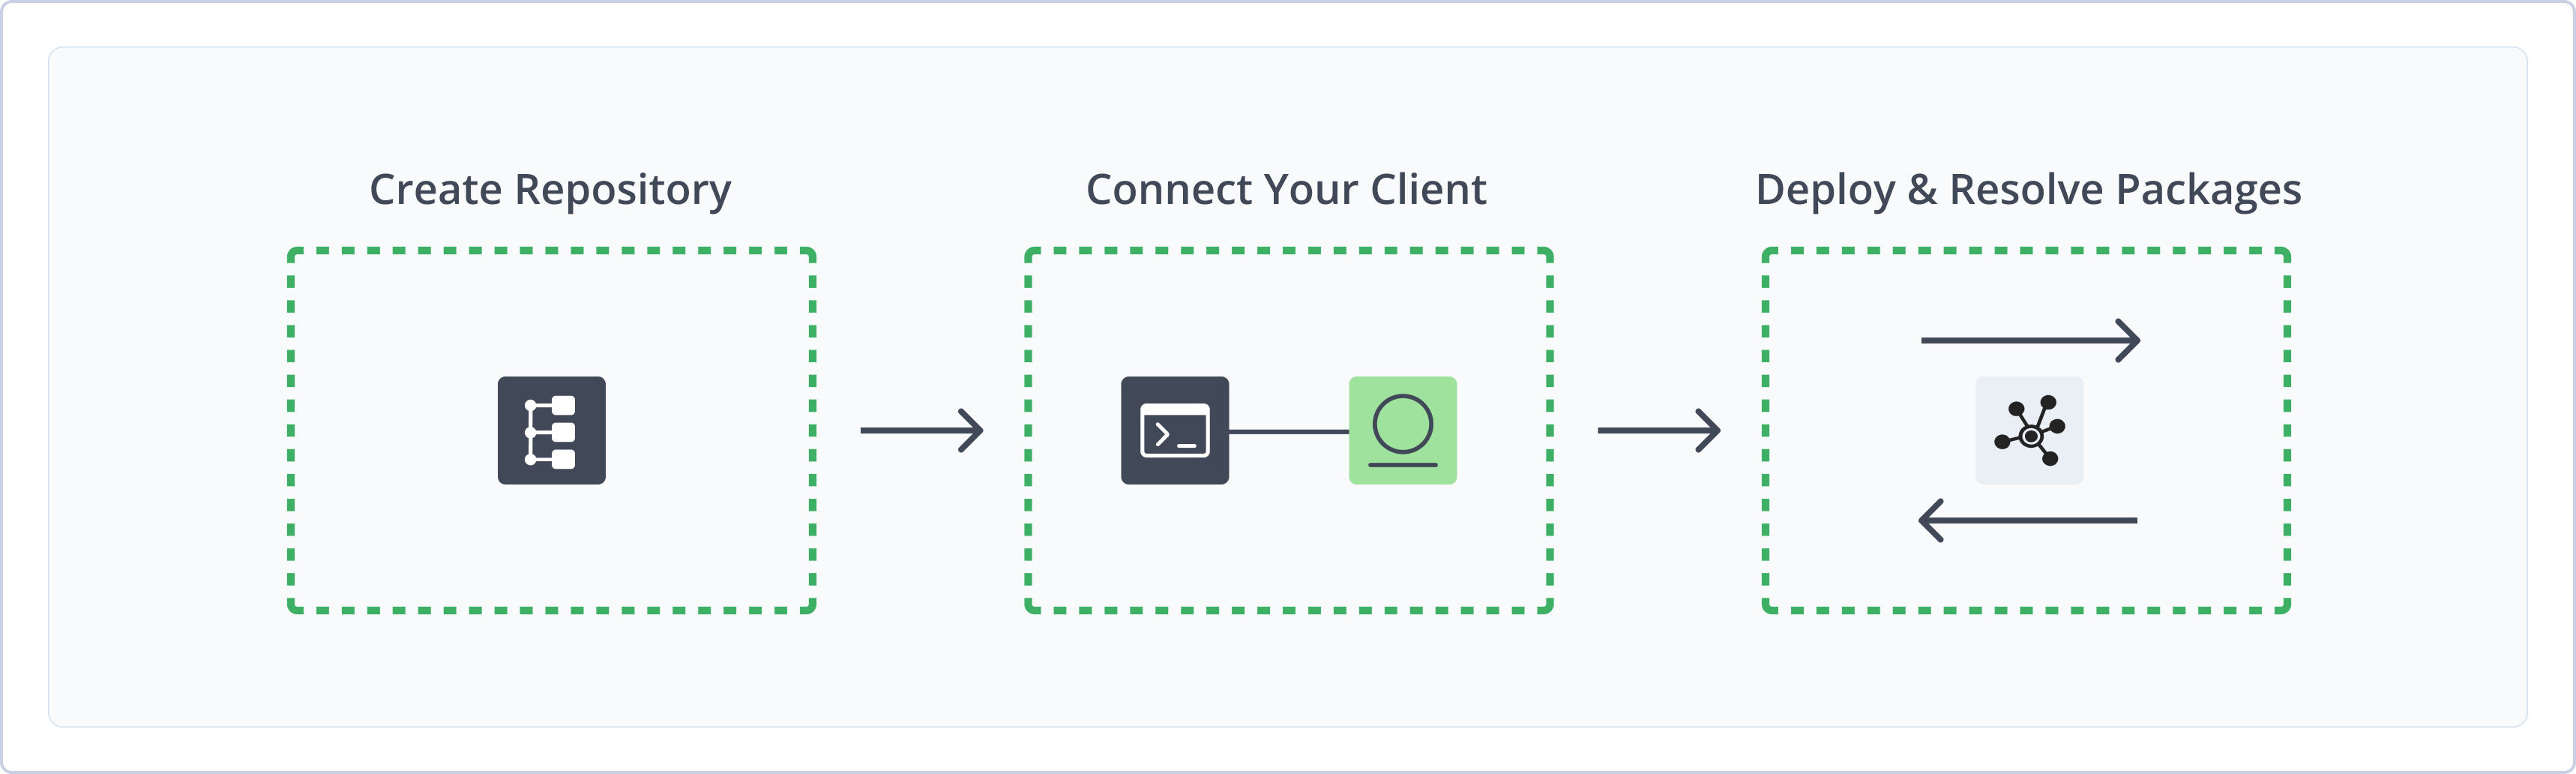
To get started working with Opkg, complete the following main steps:
- Create an Opkg Repository
-
Connect
opkgto Artifactory - Deploy and resolve Opkg packages
Create an Opkg Repository
This topic describes how to create an Opkg repository. This is required before deploying and resolving Opkg packages. There are three primary types of repositories:
- Local repositories: Store and share first- and second-party packages with your organization
- Remote repositories: Download packages from Opkg feeds and other remote locations or Artifactory instances
- Virtual repositories: Aggregate remote and local repositories, enabling your organization to scale by providing a single URL that provides access to multiple repositories and types
For more information on JFrog repositories, see Repository Management.
Prerequisite: You need Admin or Project Admin permissions in Artifactory to create a repository. If you don't have Admin permissions, the option will not be available.
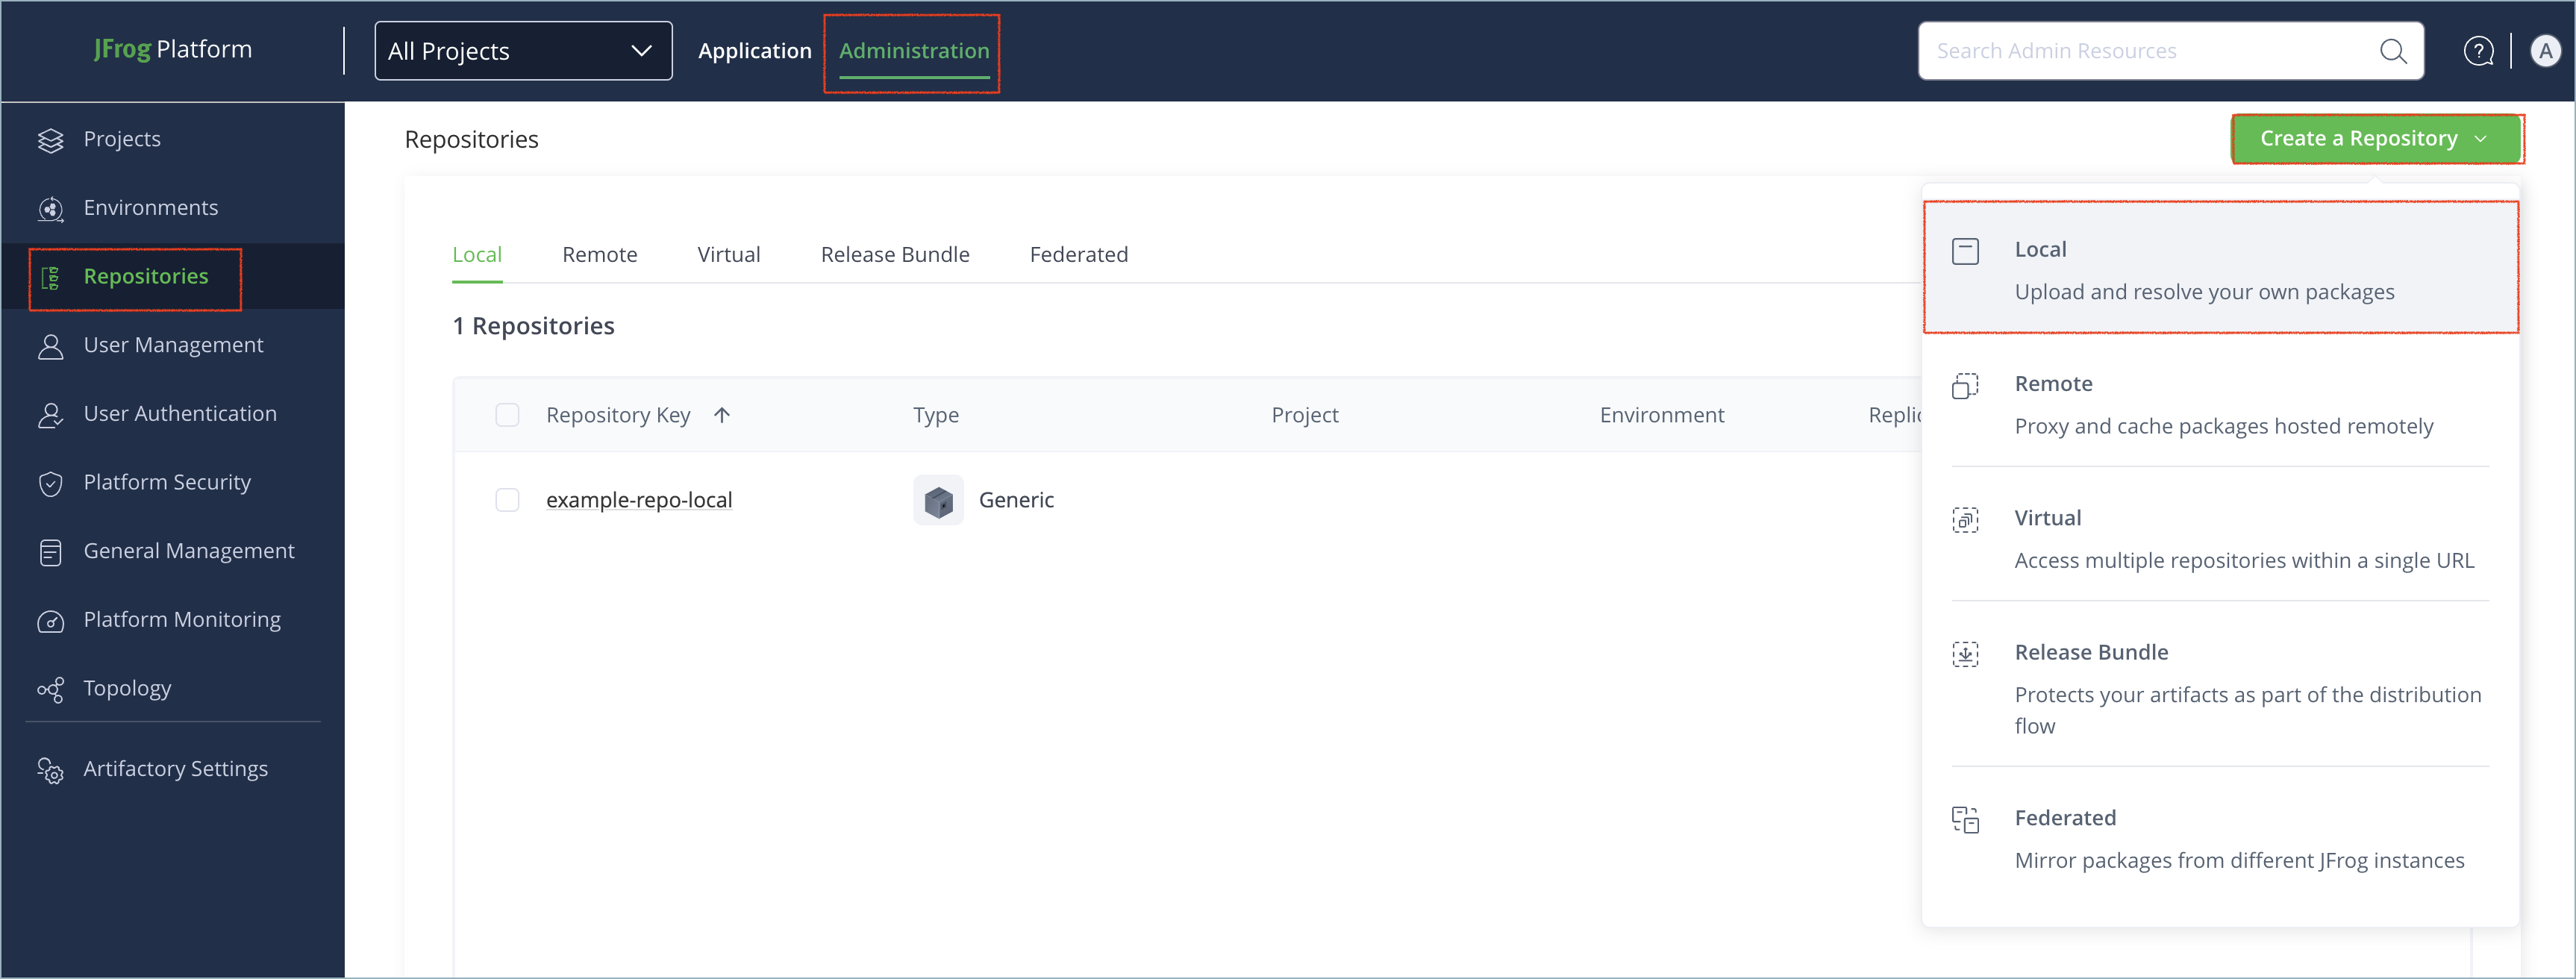
To create an Opkg repository:
-
In the Administration tab, click Repositories | Create a Repository.
-
Select the type of repository you want to create: local, remote, or virtual.
-
Select the opkg package type.
-
Configure the required fields for the repository:
-
For local repositories, in the Repository Key field, type a meaningful name for the repository. For example,
opkg-local. For more information on local repositories and their settings, see Local Repositories. -
For remote repositories, verify the Repository URL and update as needed. For more information on remote repositories and their settings, see Remote Repositories.
You can set the repository URL to point to a specific Opkg feed, like
http://downloads.openwrt.org/chaos_calmer/15.05/adm5120/rb1xx/packages/luci, or point to a base level likehttp://downloads.openwrt.org/chaos_calmer/15.05/and specify feeds in the client'sopkg.conffile. -
For virtual repositories, select one or more local or remote repository types to include in the virtual repository. For more information on virtual repositories and their settings, see Virtual Repositories.
-
-
Click Create Repository. The repository is created and the Repositories window is displayed.
Connect opkg to Artifactory
There is no single release of the opkg client, so you must manually download, compile, and configure the client according to your environment by completing these steps:
- Compile and Install the opkg Client
-
Configure
opkgto Work with Artifactory - Configure Signature Verification
Next steps:
Compile and Install the opkg Client
Prerequisite: Before connecting opkg to Artifactory, you must have an existing Opkg repository in Artifactory. For more information, see Create an Opkg Repository.
Note
This task includes universal commands for Unix-like systems. Commands for your environment may vary. Treat this workflow as a template, and use relevant commands that serve the specified purpose.
To compile and install the opkg client:
-
Install the compilation dependencies using one of the following commands based on your environment:
-
Debian/Ubuntu using APT:
sudo apt-get update && sudo apt-get install -y gcc libtool autoconf pkg-config libarchive-dev libcurl4-gnutls-dev libssl-dev libgpgme-dev -
Red Hat/Fedora using DNF:
sudo dnf install -y gcc libtool autoconf pkgconf libarchive-devel libcurl-devel openssl-devel gpgme-devel -
macOS using Homebrew:
brew install autoconf automake libtool pkg-config libarchive curl openssl gpgme
-
-
Download and extract the source code of the latest stable release of the
opkgclient:wget https://downloads.yoctoproject.org/releases/opkg/opkg-<VERSION>.tar.gz && tar -zxvf opkg-<VERSION>.tar.gzWhere:
<VERSION>: The version number of the latest stable release
For example:
wget https://downloads.yoctoproject.org/releases/opkg/opkg-0.7.0.tar.gz && tar -zxvf opkg-0.7.0.tar.gz -
Navigate to the extracted directory:
cd opkg-<VERSION>Where:
<VERSION>: The version number of the latest stable release
For example:
cd opkg-0.7.0 -
Run the configuration script, making sure to add
--enable-gpgand--enable-curlto support signature verification and HTTPS authentication:./configure --with-static-libopkg --disable-shared --enable-gpg --enable-curl --prefix=/usr/local --sysconfdir=/etc -
Compile and install the client:
make && sudo make install -
If needed, manually create the client configuration file:
mkdir -p /etc/opkg && touch /etc/opkg/opkg.conf
Next steps:
Configure opkg to Work with Artifactory
In order for your opkg client to work with Artifactory, you need to add Artifactory Opkg feeds and credentials to your opkg.conf file.
To configure the opkg client to work with Artifactory:
-
Run the following command to add an Artifactory feed to your client:
echo 'src <FEED_NAME> [JFrogPlatformURL]/artifactory/<REPO_NAME>/<PATH_TO_FEED>' >> /etc/opkg/opkg.conf
Tip
To install the
.gzvariant of the Package index file, replacesrcwithsrc/gz.
Where:
<FEED_NAME>: The name of the feed[JFrogPlatformURL]: The base URL of your JPD<REPO_NAME>: The name of the target repository in Artifactory<PATH_TO_FEED>: The path to the index file in the target repository
For example:
# Default connection using hostname and port
src artifactory-feed http://prod.mycompany:8080/artifactory/opkg-virtual/my-distro/1.0/i386 >> /etc/opkg/opkg.conf
# Secure connection using a standard HTTPS URL
src/gz artifactory-feed https://company.jfrog.io/artifactory/opkg-virtual/my-distro/1.0/armv7a >> /etc/opkg/opkg.conf-
To access Artifactory feeds that require authentication, run this command to add credentials to your client:
echo 'option http_auth <USERNAME>:<AUTH_TOKEN>' >> /etc/opkg/opkg.confWhere:
<USERNAME>: Your Artifactory username<AUTH_TOKEN>: Your Artifactory identity token
For example:
echo 'option https_auth jeffry:akcp_aL9k4jPq7bE2C8QmZcV8nF3mG5hJ1yX9mI8oPzAsDtFgHjKlM' >> /etc/opkg/opkg.conf
Tip
You can also use an encrypted plaintext password as described in Centrally Secure Passwords.
Note
You can also use JFrog Set me up to copy the snippet populated with your token and environment. For more information, see Use Artifactory Set Me Up for Configuring Package Manager Clients.
Next steps:
Configure Signature Verification
You can configure the opkg client to verify signatures created with your private GPG key pair.
Prerequisites:
- Generate and upload GPG keys to Artifactory. For more information, see Manage Signing Keys.
- Make sure
gnupgis installed.
To configure signature verification:
-
Import your GPG keys to the
opkgkeychain:-
0.3 legacy versions:
opkg-key add key.pub -
0.4 versions and newer:
mkdir -p /etc/opkg/keys
opkg-key add key.pub
-
-
Run the following command to add the
check_signatureoption to youropkg.conffile:echo 'option check_signature true' >> /etc/opkg/opkg.conf
Note
If resolving fails with this error:
"opkg_verify_gpg_signature: No sufficiently trusted public keys found."
"pkg_src_verify: Signature verification failed for <repoName>."
The trust level of the
key.pubmay not be high enough. Upgrade the trust level.
Deploy Opkg Packages
Run the following command:
curl -L -u <USERNAME>:<AUTH_TOKEN> -XPUT "https://[JFrogPlatformURL]/artifactory/<REPO_NAME>/<PATH_TO_FEED>/<IPK_PACKAGE_NAME>" -T <PATH_TO_FILE>Where:
<USERNAME>: Your Artifactory username<AUTH_TOKEN>: Your Artifactory identity token[JFrogPlatformURL]: The URL of your JPD<REPO_NAME>: The name of the Opkg repository in Artifactory<PATH_TO_FEED>: The path to the feed in the repository<IPK_PACKAGE_NAME>: The name of the.ipkpackage file<PATH_TO_FILE>: The local path to the file you want to upload
For example:
curl -L -u jeffry:AKCp89XxY7wLPqL6vK3Dsfdh4fe887SguYnm90x -XPUT "https://company.jfrog.io/artifactory/opkg-local/feeds/armv7a/my-app.ipk" -T ~/builds/my-app.ipkNote
You can also use JFrog Set me up to copy the snippet populated with your token and environment. For more information, see Use Artifactory Set Me Up for Configuring Package Manager Clients.
Resolve Opkg Packages
Run the following command:
opkg install <PACKAGE>Where:
<PACKAGE>: The name of the target package in your Artifactory repository
For example:
opkg install my-appAdditional Opkg Information
The following pages provide additional information about using Opkg with Artifactory:
Deploy an Opkg Package Using the UI
To deploy an Opkg package to Artifactory, go to the Artifactory Repository Browser and click the icon.
icon.
Select your Opkg repository as the Target Repository, and upload the file you want to deploy.

Tip
After you deploy the artifact, you need to wait about one minute for Artifactory to recalculate the repository index and display your upload in the Repository Browser.
REST API Support for Opkg
The Artifactory REST API provides extensive support for signing keys and recalculating the repository index as follows:
Opkg Limitations in Artifactory
The following are the limitations of Opkg in Artifactory:
- Package index signing: Artifactory signs the repository metadata file, or the index, not individual Opkg packages themselves.