Deploy Artifacts
In the JFrog Artifactory UI, you can deploy artifacts to JFrog Artifactory one at a time or in batches. You can also upload an archive file as a bundle and Artifactory will expand the file contents on deployment.
Artifactory repositories have built-in logic for parsing metadata, creating index files, and optimizing performance by package type. Uploading non-conformant content like images, text files, and other resources that are not wrapped in a package format, can impact indexing and reduce performance. Make sure to deploy generic or non-conformant content to a Generic repository type.
Note
The Artifactory UI supports uploads of up to 100MB. To deploy artifacts larger than 100MB, use the JFrog CLI, a package manager client, or a multi-part upload.
Prerequisites: Make sure your artifact name adheres to naming conventions. For more information, see Artifact Naming Conventions.
To deploy artifacts:
-
On the Platform module, navigate to Artifactory > Artifacts. The artifact browser appears.
-
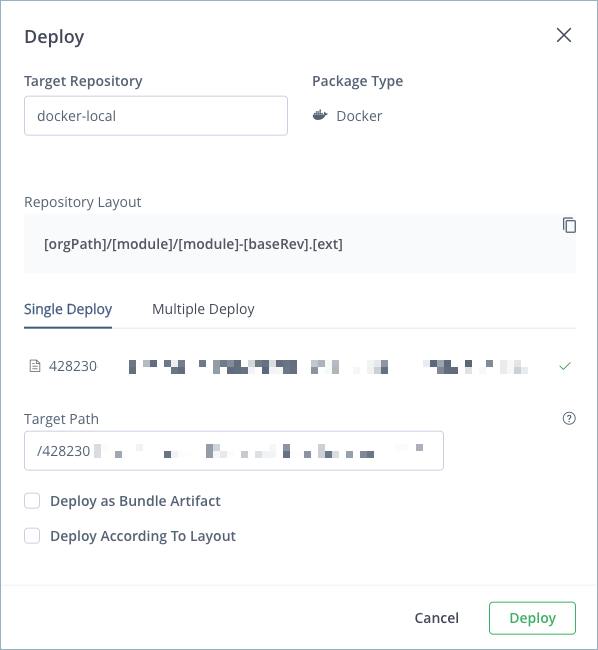
Click the action menu and select Deploy (Upload). The Deploy window appears.
-
From the Target Repository menu, select the repository where you want to deploy artifacts.
-
Select one of the following tabs:
- Single Deploy: Upload one artifact to the target repository. This is the default option.
- Multiple Deploy: Upload more than one artifact to the target repository.
-
Drop or select the files you want to upload.
-
Optionally, in the Target Path field, enter a custom path in the target repository or add artifact properties using matrix parameters. For more information, see Using Properties in Deployment and Resolution.
-
Depending on the file type, optionally select any of the following checkboxes:
-
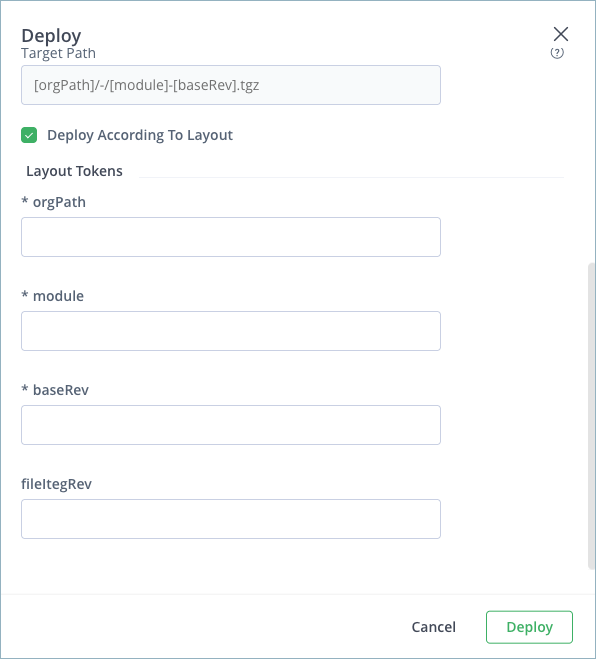
Deploy According to Layout: Select this option to deploy the package according to the configured layout that appears in the Target Repository section. When selected, the layout tokens are exposed for configuration. Changes are reflected in the target path.
-
Deploy as Bundle Artifact: Select this option when you upload multiple artifacts packaged into a
.zip,.tar,tar.gz, or.tgzarchive file. Artifactory extracts the archive contents when you deploy it.
-
Note
Artifacts should be packaged in the archive with the same file structure with which they should be deployed to the target repository.
-
Deploy as Maven Artifact: For Maven artifacts, this option lets you configure Maven artifact attributes like
GroupID,Version,Classifier, andType. The attributes are automatically populated according to the artifact name. You can edit them and changes are reflected in the target path. -
Generate Default POM / Deploy Jar's Internal POM: For Maven artifacts, select this option to use the POM within the artifact you are deploying or generate a default POM. Use this option if your target repository does not include a POM.
Note
If you edit the POM manually, be careful to keep it in a valid state.
- Click Deploy.
Artifact Naming Conventions
The following conventions and limitations apply to artifact names when deploying from the JFrog Artifactory UI:
- Do not use the special characters
|,*,?, or". - You can use
&as part of an artifact name, but not as a path token. - A spaces before
/is not allowed.
Troubleshooting Failed Deployment
The following are some of the most common reasons for failed deployments:
- Inadequate permissions
- Conflict with target repository include/exclude patterns
- Conflict with target repository snapshots/releases handling policy
Configure Virtual Repositories for Deployment
To deploy artifacts to a virtual repository, you must set one of the local repositories aggregated by the virtual repository as the default deployment target.
Prerequisite: You must have Admin or Project Admin permissions to create and modify repositories.
To configure a virtual repository for deployment:
- In the Administration module, navigate to Repositories. The repository list appears.
- Select the repository you want to configure from the list. The repository settings appear.
- In the Repositories section, verify that the local repository you want to deploy to is selected and aggregated in the virtual repository. If it's not, use the selector to add it to the list of selected repositories.
- In the Default Deployment Repository section, select the repository you want to deploy to from the list.
- Click Save.
Deploy commands for the virtual repository now deploy to the selected virtual repository. Additionally, the Set Me Up dialog for the repository includes instructions and code snippets for deploying to that repository.
Tip
You can also set the Default Deployment Repository with the
defaultDeploymentRepoparameter in the repository configuration JSON. This parameter is used by the Update Repository Configuration REST API. For more information, see Repository Configuration JSON.
For more information, see Basic Settings for Virtual Repositories.
Deploying Large Files Using Multi-Part Upload
For large files, JFrog Artifactory implements a fast and reliable multi-part upload approach with the JFrog CLI. In case of upload failure, the multi-part approach has a retry mechanism that resumes uploads from the point of failure. This approach preserves all content that was uploaded before the point of failure. In contrast, with standard uploads, upload failure results in the loss of all data.
Multi-Part Upload Availability
Multi-part upload is available with the following software configurations:
- Artifactory version 7.90.7 and later
- JFrog CLI version 2.62.2 and later
- Artifactory instances using AWS S3 or Google Cloud storage
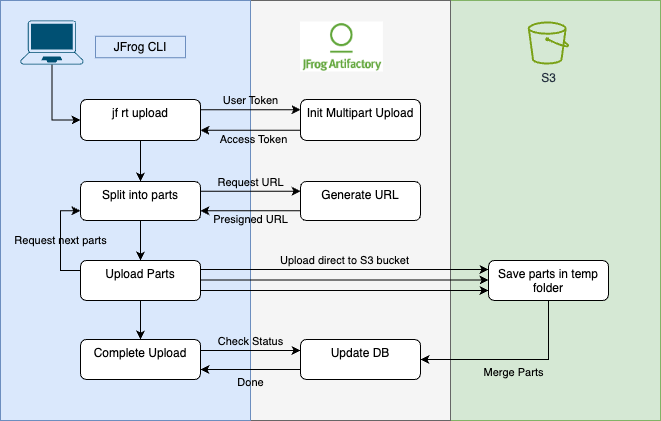
The following diagram shows the sequence of events that occur when you perform a multi-part upload. This example uses AWS S3 storage, but note that Google Cloud storage is also supported.
-
An upload request is submitted using JFrog CLI.
-
Artifactory authenticates the request.
-
JFrog CLI splits the file into parts and sends a request to Artifactory for five pre-signed URLs for the first five parts.
Note
The default number of parts that can be uploaded concurrently is five, but this number can be modified with the
--split-countvariable in the JFrog CLI.
- Artifactory sends the pre-signed URLs to JFrog CLI.
- JFrog CLI concurrently uploads the first five parts directly to the S3 bucket.
- Steps 3-5 are repeated until all parts are uploaded.
- When all parts have been uploaded, JFrog CLI sends a
‘Complete Upload’trigger to the S3 bucket. - The S3 bucket merges the parts into a single file (this merge can take some time). While the merge is happening, JFrog CLI polls Artifactory regarding the progress of the merge.
- Artifactory verifies the checksum and notifies JFrog CLI that the upload has completed successfully.
Multi-Part Upload Settings
The JFrog CLI automatically uses multi-part upload for large files without intervention, according to the values of the following settings:
--min-split: Determines the minimum file size required for multi-part upload. The default is 200 MB.--split-count: Determines the number of parts that can be concurrently uploaded per file during a multi-part upload. The default is 5.--chunk-size: Determines the upload chunk size in MB of the parts that are concurrently uploaded. The default value is 20.
You can change the values when you run an upload command in the CLI. For example:
jf rt upload filename.zip /target-repo --min-split=150 --split-count=6 --chunk-size=25After running a command with changed values, the values for these settings revert to the default. For more information on uploading files with the JFrog CLI, see Generic Files.
Configuring Multi-Part Upload for Self-Managed Instances
Multi-part upload is enabled for self-managed Artifactory instances using the system property artifactory.multipart.upload.enabled. For more information, see Artifactory System Properties.
Note
Multi-part upload is not supported on self-managed platforms with S3 sharding, or when S3 storage is configured with client-side KMS encryption (
kmsClientSideEncryptionKeyId).
Multi-Part Upload with Encryption using a KMS Key
To perform multi-part upload with encryption using a KMS key, you must have permission for the kms:Decrypt and kms:GenerateDataKey actions on the key. These permissions are required because Amazon S3 must decrypt and read data from the encrypted file parts before it completes the multi-part upload.
If your IAM user or role is in the same AWS account as the KMS key, then you must have these permissions on the key policy. If your IAM user or role is not in the AWS account as the KMS key, then you must have permissions on both the key policy and your IAM user or role.
Updated 20 days ago