Additional Docker Information
This page contains additional information about using Docker with Artifactory. For instructions on how to create and configure Docker repositories, see Docker Repositories.
Docker Repository URL Formats
Depending on your Docker implementation, the URL format for your Docker repository may vary. The following table provides examples of different Docker URL formats by hosting framework. Use this table as a reference while completing the configuration steps in Connect your Docker Client to Artifactory.
| Hosting Framework | Method | Format |
|---|---|---|
| SaaS | Repository path |
For example:
|
| SaaS | CNAME and repository path |
For example:
|
| SaaS | Instance and repository key in subdomain |
For example:
|
| SaaS | Subdomain and CNAME |
For example:
|
| Self-Managed | Repository path |
For example:
|
| Self-Managed | Subdomain |
For example:
|
| Self-Managed | Port method |
For example:
|
Test Docker and Artifactory Cloud
Prerequisites: Set up a Docker virtual repository and connect your Docker client to Artifactory. For more information, see Create a Docker Repository and Connect your Docker Client to Artifactory.
To test your Docker setup with Artifactory Cloud:
-
Run the following command to pull the Docker
hello-worldimage:docker pull hello-world -
Log in to Artifactory:
docker login [JFrogPlatformURL]Where:
[JFrogPlatformURL]: The URL of your JPD, without the protocol schema
For example:
docker login company.jfrog.io -
Run this command to tag the
hello-worldimage:docker tag <IMAGE_ID> [JFrogPlatformURL]/<REPO_NAME>/hello-world:<TAG>Where:
<IMAGE_ID>: The ID of thehello-worldimage[JFrogPlatformURL]: The URL of your JPD, without the protocol schema<REPO_NAME>: The name of the target virtual repository<TAG>: The tag you want to apply to the image
For example:
docker tag a1b2c3d4e5f6 company.jfrog.io/docker-virtual/hello-world:test -
Push the tagged image:
docker push [JFrogPlatformURL]/<REPO_NAME>/hello-world:<TAG>Where:
[JFrogPlatformURL]: The URL of your JPD, without the protocol schema<REPO_NAME>: The name of the target virtual repository<TAG>: The tag you applied to the image
For example:
docker push company.jfrog.io/docker-virtual/hello-world:test -
Verify that the
hello-worldimage with your specified tag appears in your Artifactory repository.
Resolve Latest Docker Image
To set your virtual Docker repository to pull Docker images according to their modification time, enable Resolve Docker Tags By Latest Timestamp. This is useful in scenarios where two or more aggregated repositories contain the same tag name. For example, busybox:1.1.
When enabled, instead of fetching the image that is positioned higher in the resolution order in the virtual repository, Artifactory will return the Docker image last deployed to one of the aggregated repositories in the Virtual repository. Artifactory will first try to fetch the tag from the Local repositories according to the modification time, if not found, it will continue to try to fetch the image from the Remote repositories according to the resolution order.
This functionality is useful for multi-site environments where you create the same image on two different instances.
REST API
This can also be configured by setting the resolveDockerTagsByTimestamp parameter to true (false by default) when creating a new repository using REST API.
Promote Docker Images
Artifactory supports promoting Docker images from one Docker repository in Artifactory to another.
Promoting is useful when you need to move Docker images through different acceptance and testing stages, for example, from a development repository, through the different gateways all the way to production. Instead of rebuilding the image multiple times using promotion will ensure the image you will have in your production environment is the one built by your CI server and passed all the relevant tests.
Note
- From Artifactory 7.117.1, when Docker image promotion overrides an existing image tag in the target repository, shared layers from other tags of the same image will not be deleted. In versions prior to 7.117.1, these shared layers may be deleted.
- Starting from Artifactory version 7.94.1, retagging a docker image using docker promotion enforces tag validation according to the OCI specification by default. To avoid using tag validation, set the
artifactory.docker.filter.digests.from.tags.list.enabledparameter tofalsein your system configuration file.
Promotion can be triggered using the following endpoint with cURL:
POST /artifactory/api/docker/<repoKey>/v2/promote
{
    "targetRepo" : "<targetRepo>",
    "dockerRepository" : "<dockerRepository>",
    "tag" : "<tag>",
        "targetTag" : "<tag>",
    "copy": <true | false>
}
Where:
| Parameter | Description |
|---|---|
| repoKey | Source repository key |
| targetRepo | The target repository to move or copy |
| dockerRepository | The docker repository name to promote |
| tag | An optional tag name to promote, if null - the entire docker repository will be promoted. Default: latest |
| targetTag | The new tag that the image should have after being promoted if you want to |
| copy | When true, a copy of the image is promoted. When false, the image is moved to the target repository |
An example for promoting the docker image jfrog/ubuntu with all of its tags from docker-local to docker-prod using cURL would be:
curl -i -uadmin:password -X POST "https://artprod.company.com/api/docker/<repoKey>/v2/promote" -H "Content-Type: application/json" -d '{"targetRepo":"docker-prod","dockerRepository":"jfrog/ubuntu"}'https://artprod.company.com/api/docker/ <repoKey>/v2/promote
Notice that the above example is executed through your reverse proxy. To go directly through Artifactory, you would execute this command as follows:
curl -i -uadmin:password -X POST "http://localhost:8080/artifactory/api/docker/docker-local/v2/promote" -H "Content-Type: application/json" -d '{"targetRepo":"docker-prod","dockerRepository":"jfrog/ubuntu"}'The following example adds retagging with a specific version of the jfrog/ubuntu image (4.9.0) being retagged to latest as it gets promoted:
curl -i -uadmin:password -X POST "https://artprod.company.com/api/docker/docker-local/v2/promote" -H "Content-Type: application/json" -d '{"targetRepo":"docker-prod","dockerRepository":"jfrog/ubuntu", "tag" : "4.9.0", "targetTag" : "latest"}'Browse Docker Repositories
For general information on how to browse repositories, please refer to Browsing Artifacts.
The Docker Info tab includes three sections:
Docker Tag Info
Presents basic details about the selected tag.
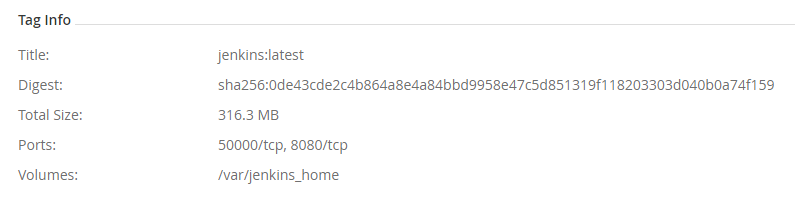
| Field | Description |
|---|---|
| Title | The Docker tag name. |
| Digest | The tag's SHA 256 digest. |
| Total Size | The total size of the image |
| Label Count | The number of labels attached to this tag.
|
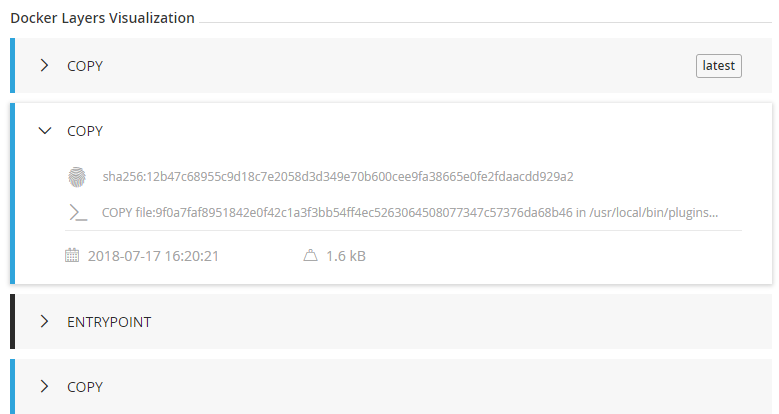
Docker Tag Visualization
This section maps the entire set of commands used to generate the selected tag along with the digest of the corresponding layer. Essentially, you would see the same series of commands using docker history.
You can select any layer of the image to view the following properties.
| Symbol | Property |
|---|---|
 | The layer ID |
 | The layer size |
 | The timestamp when the layer was created |
 | The command that created the layer |
 | The digest |
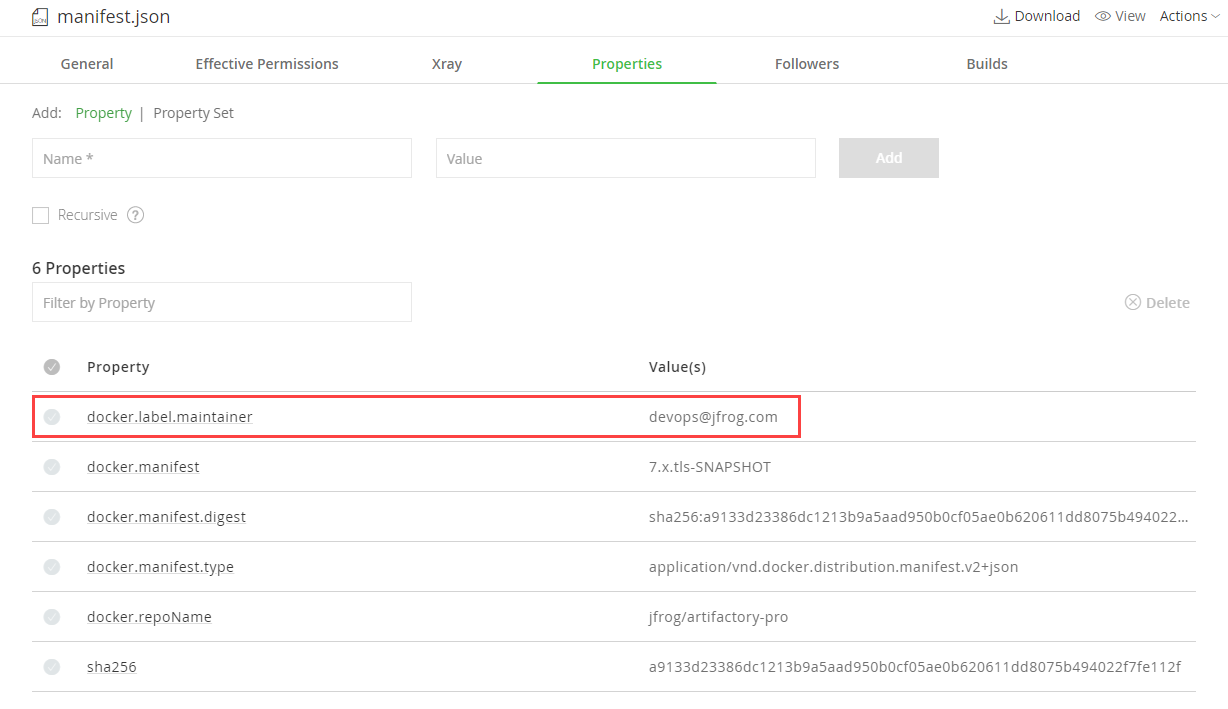
Docker Labels
This section displays the labels attached to the image.
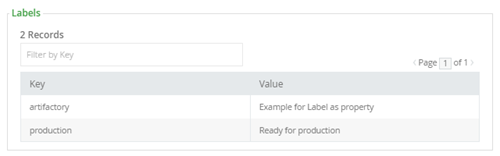
Note also, that Artifactory extracts any labels associated with a Docker image and creates corresponding properties on the manifest.json file which you can use to specify search parameters, this can be used to easily add additional metadata to any image.
List Manifest Content
Starting from Artifactory version 7.81.0, this section displays the manifests nested under a list manifest in the tag folder and the list.manifest.json file in the Artifacts page. You can click the  icon or the SHA value to focus on the artifact in the Artifacts page, without manually searching for it. Unavailable manifests will show on the table as greyed out.
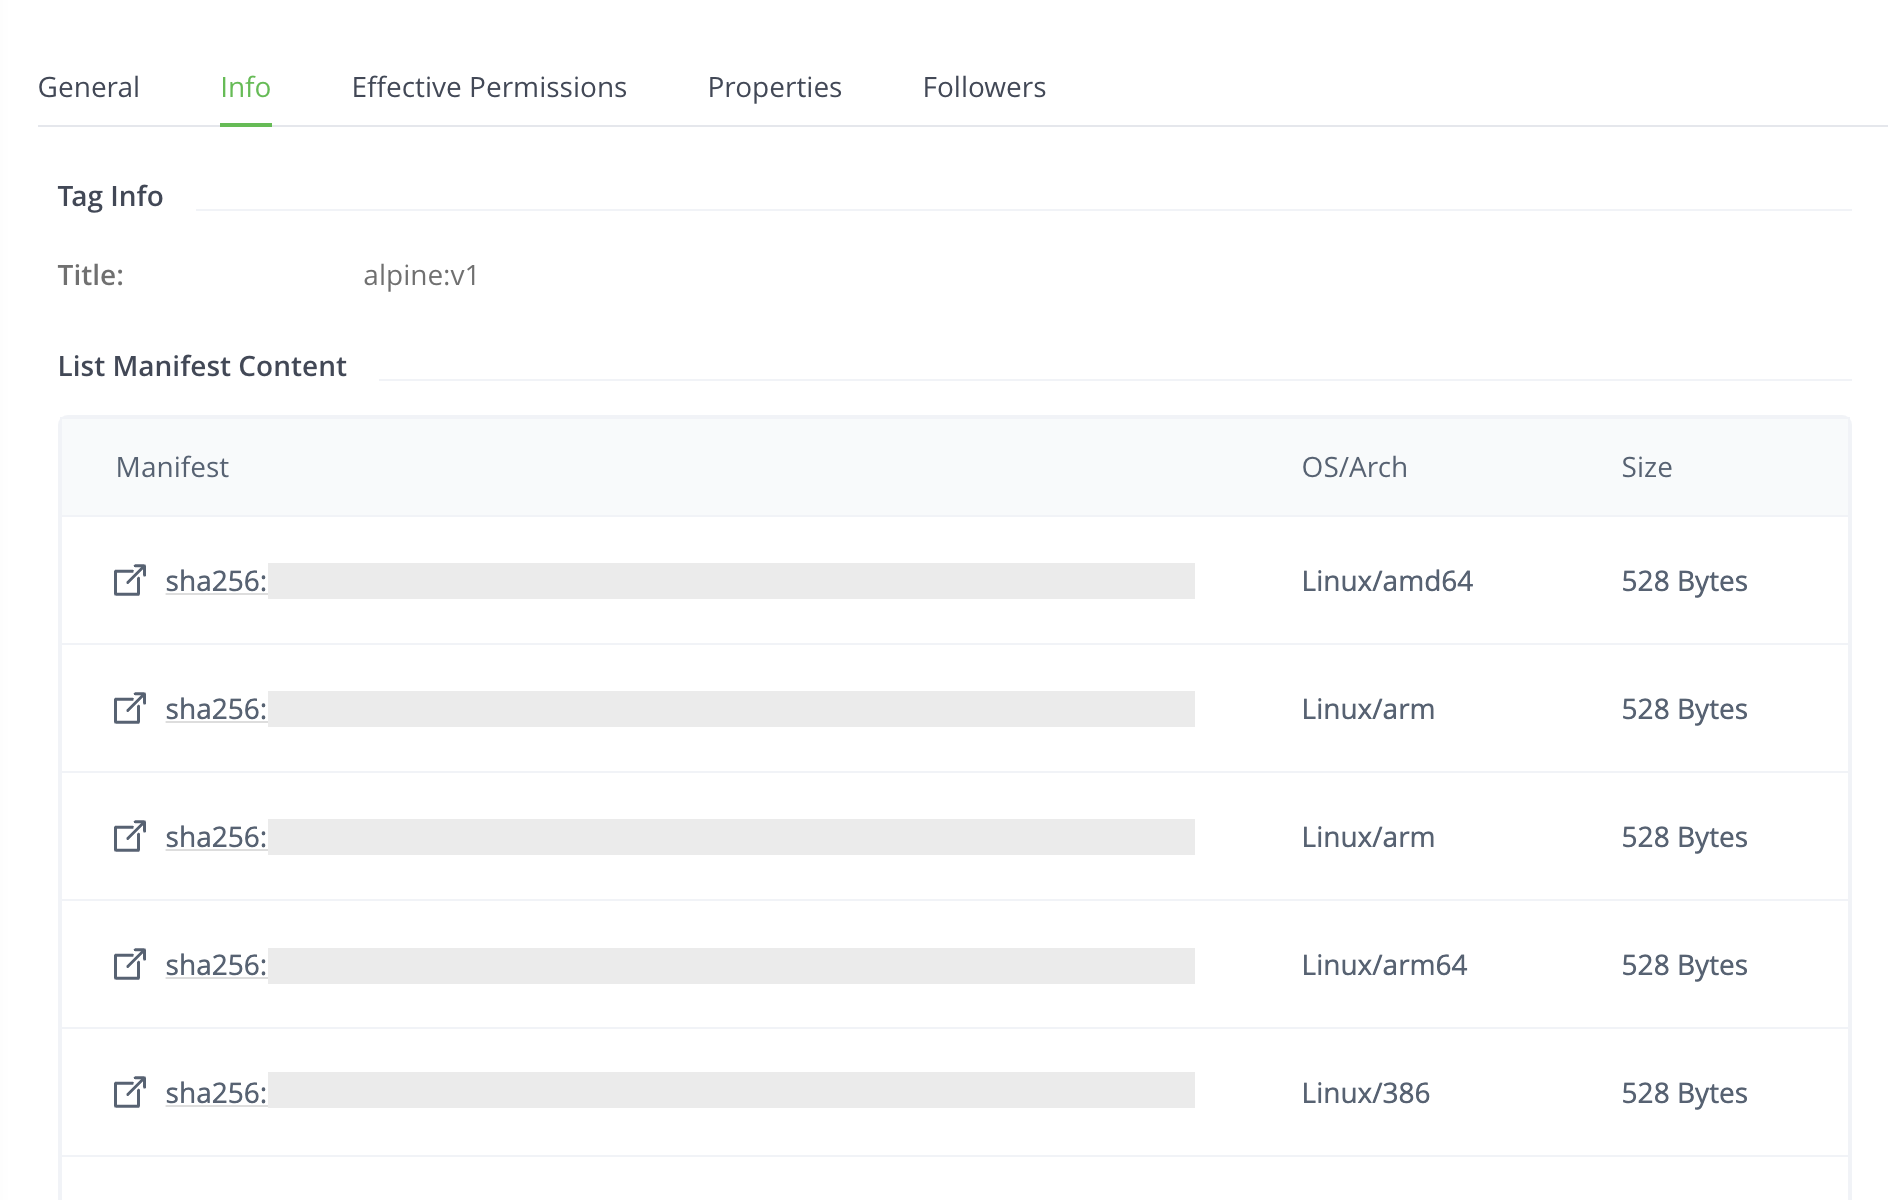
| Field | Description |
|---|---|
| Manifest | The SHA256 value of the nested image |
| OS/Arch | The operating system and architecture of the image |
| Size | The size of the manifest file |
List Docker Images
Artifactory supports the following REST API endpoints related to Docker registries:
- Find Parent Manifest Lists API shows all multi-architecture images that include a specific single-architecture Docker image. This list allows you to identify dependencies before deleting an image.
- List Docker Repositories API provides a list of Docker images in the specified Artifactory Docker registry. This endpoint mimics the Docker
_catalogREST API. - List Docker Tags API provides a list of tags for the specified Docker image.
Artifactory also supports pagination for this endpoint.
To enable fetch from cache using the List Docker Repositories API and the List Docker Tags API, set the artifactory.docker.catalogs.tags.fallback.fetch.remote.cache system property to true (default false) in the artifactory.system.properties file:
## Enable fetch from cache in Docker repositories
#artifactory.docker.catalogs.tags.fallback.fetch.remote.cache=true
Artifactory needs to be restarted for this change to take effect.
Working with Tags in Docker
This section contains information about working with tags in Docker:
- Deletion and Cleanup of Docker Tags and Repositories
- Delete Multi-Architecture Docker Tags
- Tag Retention Logic
- Enable Synchronized Download Statistics for Shared Digests
Deletion and Cleanup of Docker Tags and Repositories
Artifactory natively supports removing tags and repositories and complies with the Docker Hub spec.
Deletion of Docker tags and repositories automatically cleans up any orphan layers that are left (layers not used by any other tag/repository).
Currently, the Docker client does not support DELETE commands, but deletion can be triggered manually. To delete an entire Docker repository using cURL, execute the following command:
curl -u<user:password> -X DELETE "<Artifactory URL>/artifactory/<Docker v2 repository name>/<image namespace>"Or for a specific tag version:
curl -u<user:password> -X DELETE "<Artifactory URL>/artifactory/<Docker v2 repository name>/<image namespace>/<tag>"For example, to remove the latest tag of an Ubuntu repository:
curl -uadmin:password -X DELETE "https://artprod.company.com/artifactory/dockerv2-local/jfrog/ubuntu/latest"Empty Directories
Any empty directories that are left following removal of a repository or tag will automatically be removed during the next folder pruning job (which occurs every 5 minutes by default).
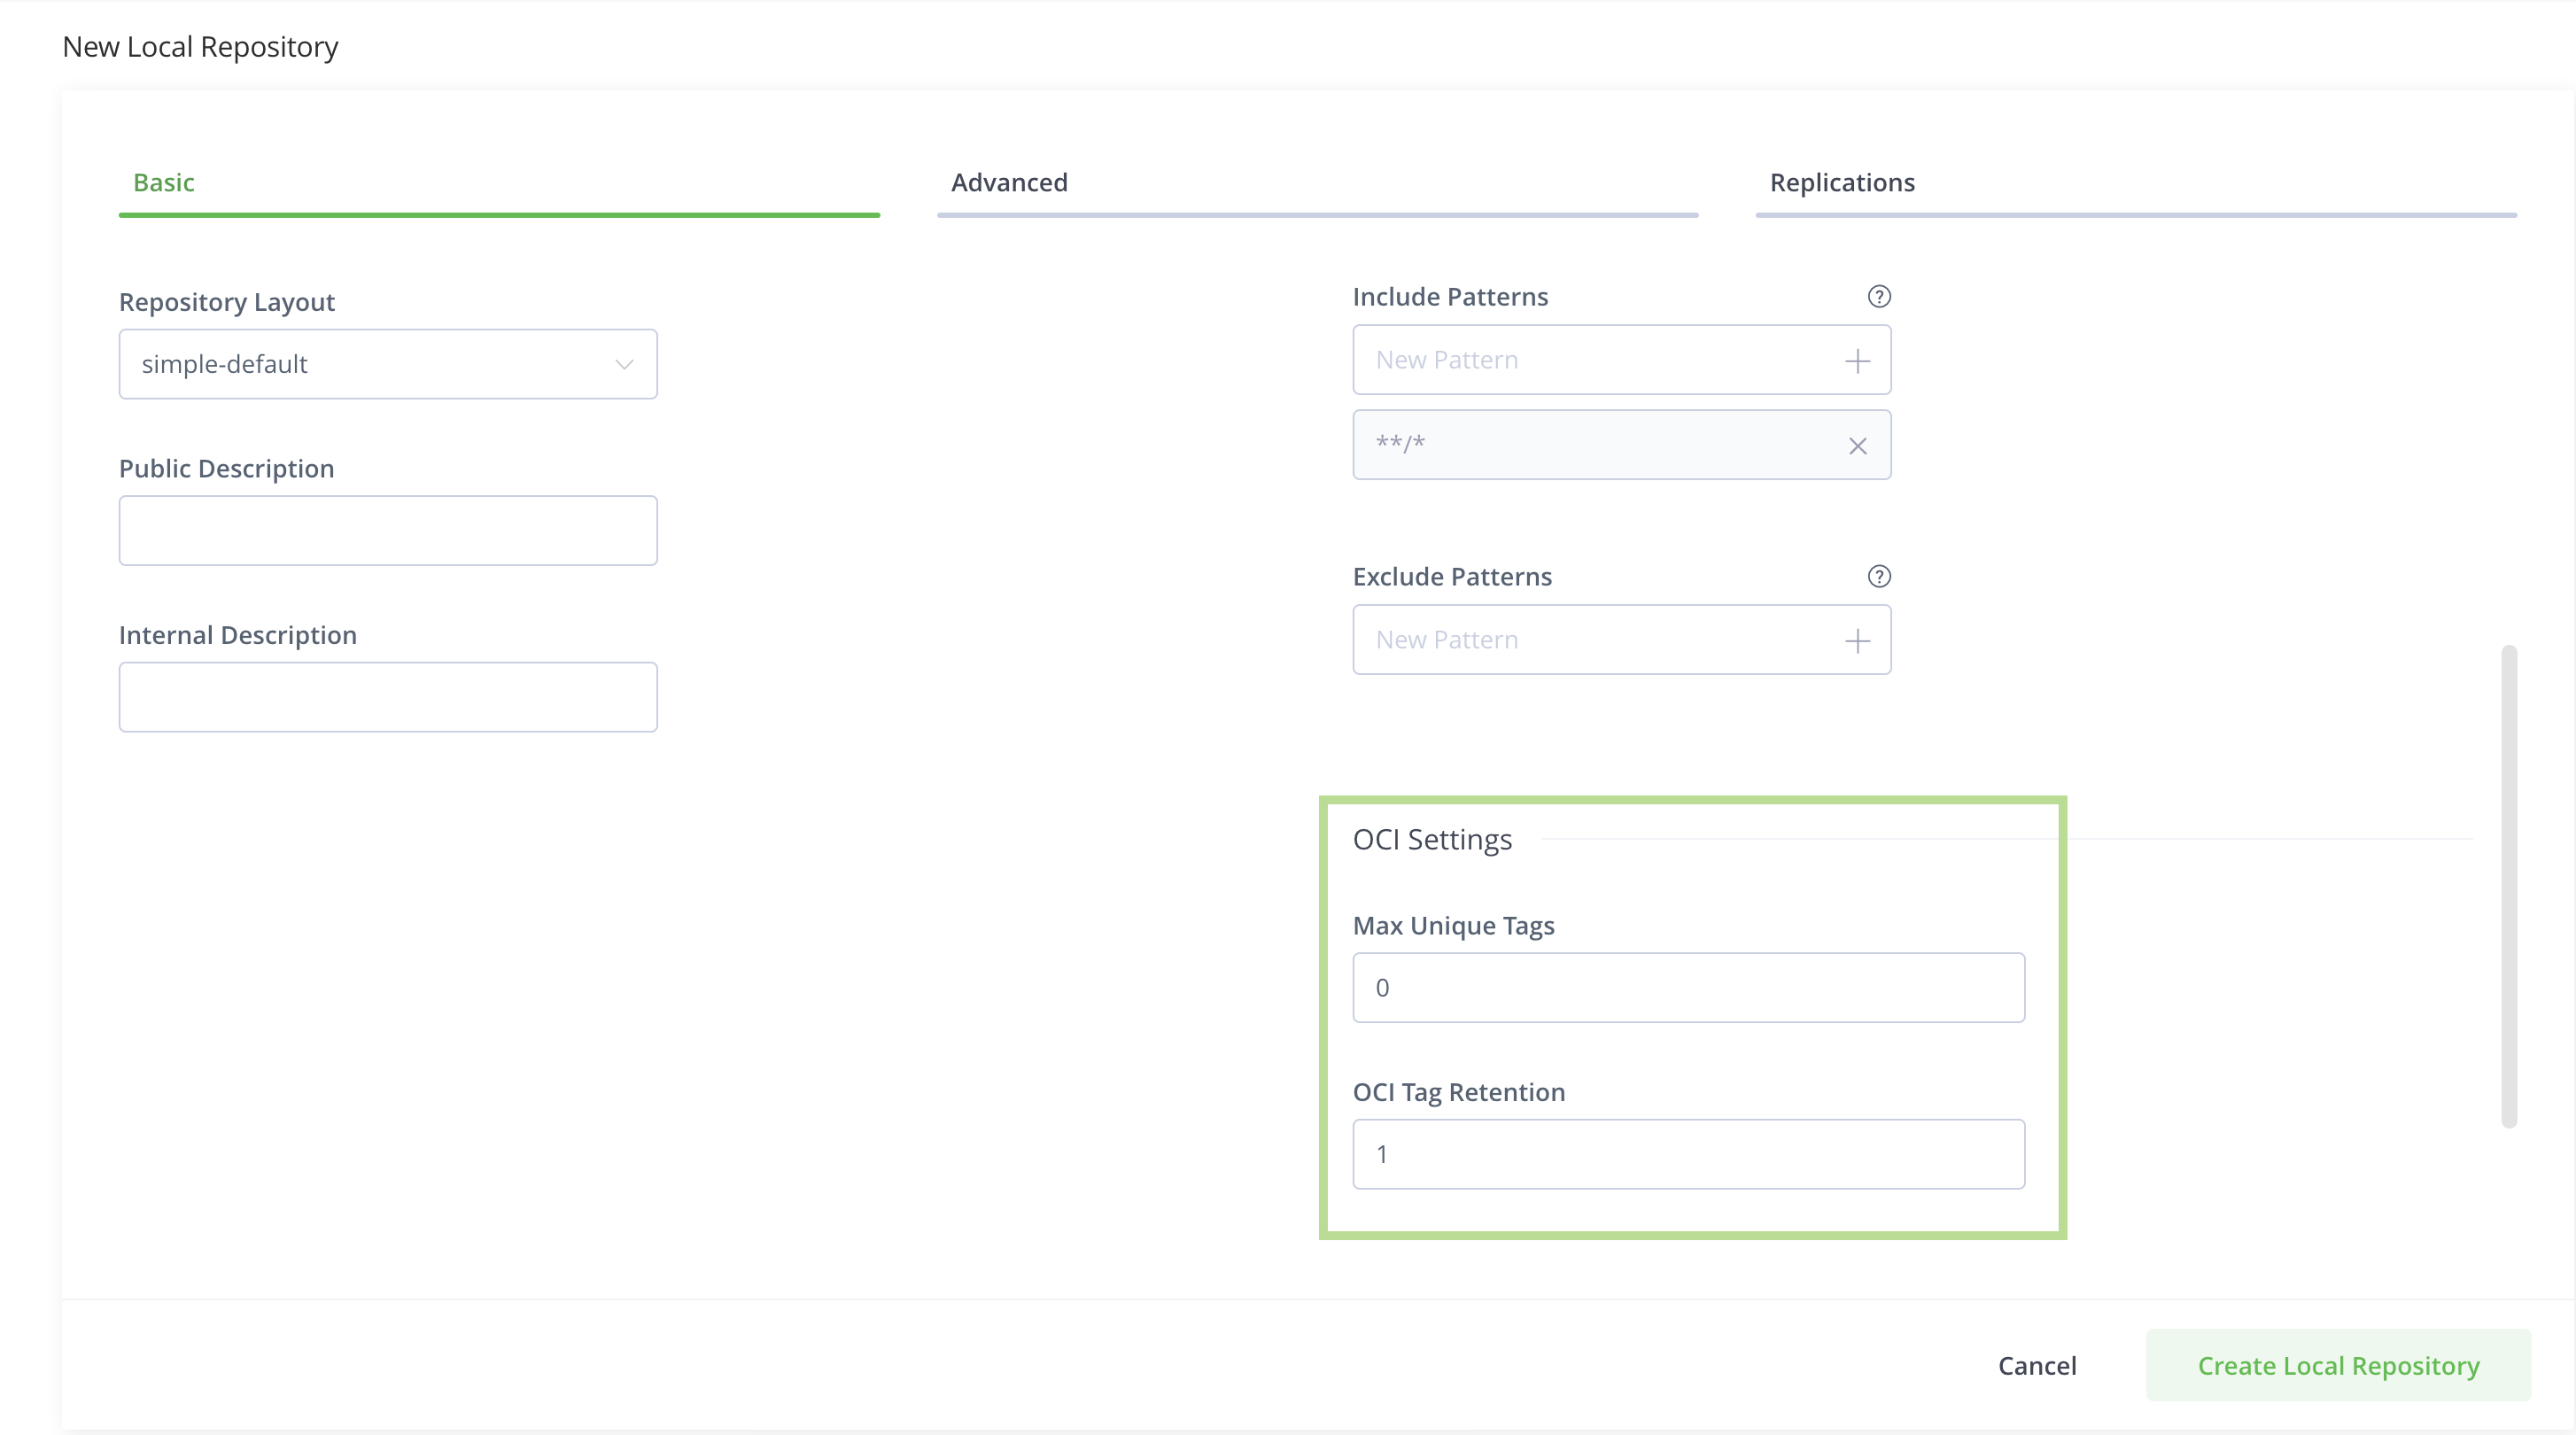
Limiting Unique Tags
To avoid clutter and bloat in your Docker registries caused by many snapshots being uploaded for an image, set the Max Unique Tags field in the Local Docker Repository configuration to limit the number of unique tags.
Delete Multi-Architecture Docker Tags
You can delete multi-architecture image tags and all of the architectures under them at once using two ways:
- Via the JFrog Platform WebUI (Supported from version 7.98.2)
- Via curl (Supported from version 7.91.0)
Warning
For Artifactory versions earlier than 7.118.0, deleting multi-architecture tags also deletes shared parts (like sub-manifests and layers) used by other tags of the same image. This applies to shared parts in the same repository.
As of Artifactory version 7.118.0, shared manifests and layers are protected from deletion.
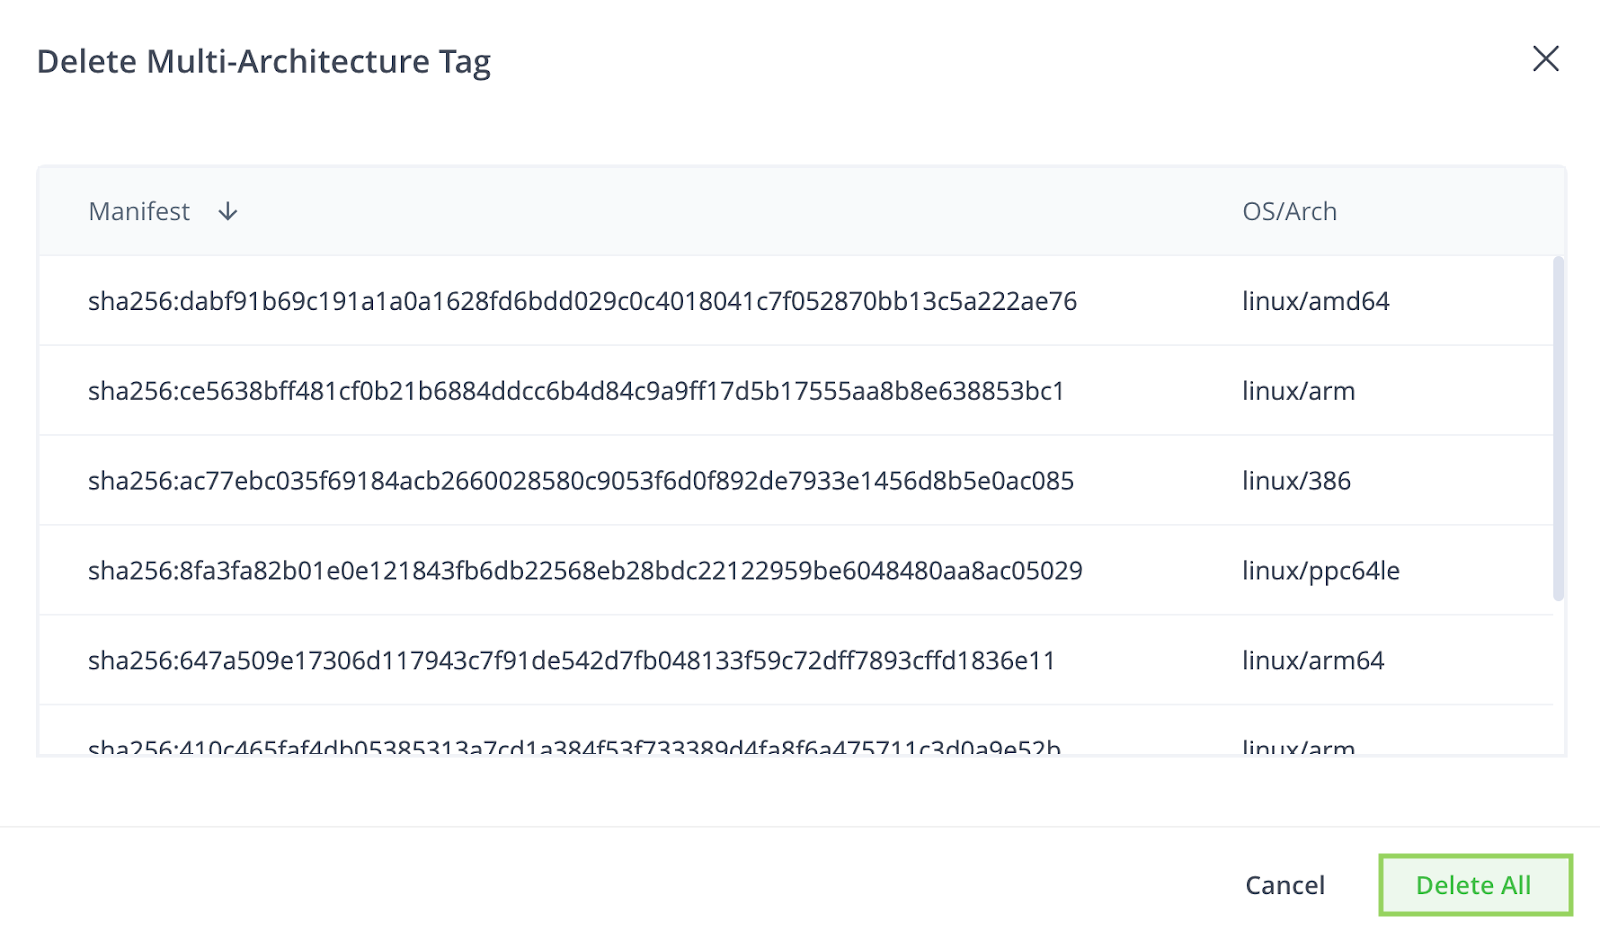
Via the JFrog Platform WebUI
Starting from Artifactory version 7.98.2, Artifactory supports deleting image tags containing a manifest.list with several architectures at once through the JFrog Platform WebUI.
To delete a multi-architecture tag:
-
Find the tag you would like to delete in the Artifact tree, and right-click the tag name
-
Select Delete Architectures from the options menu
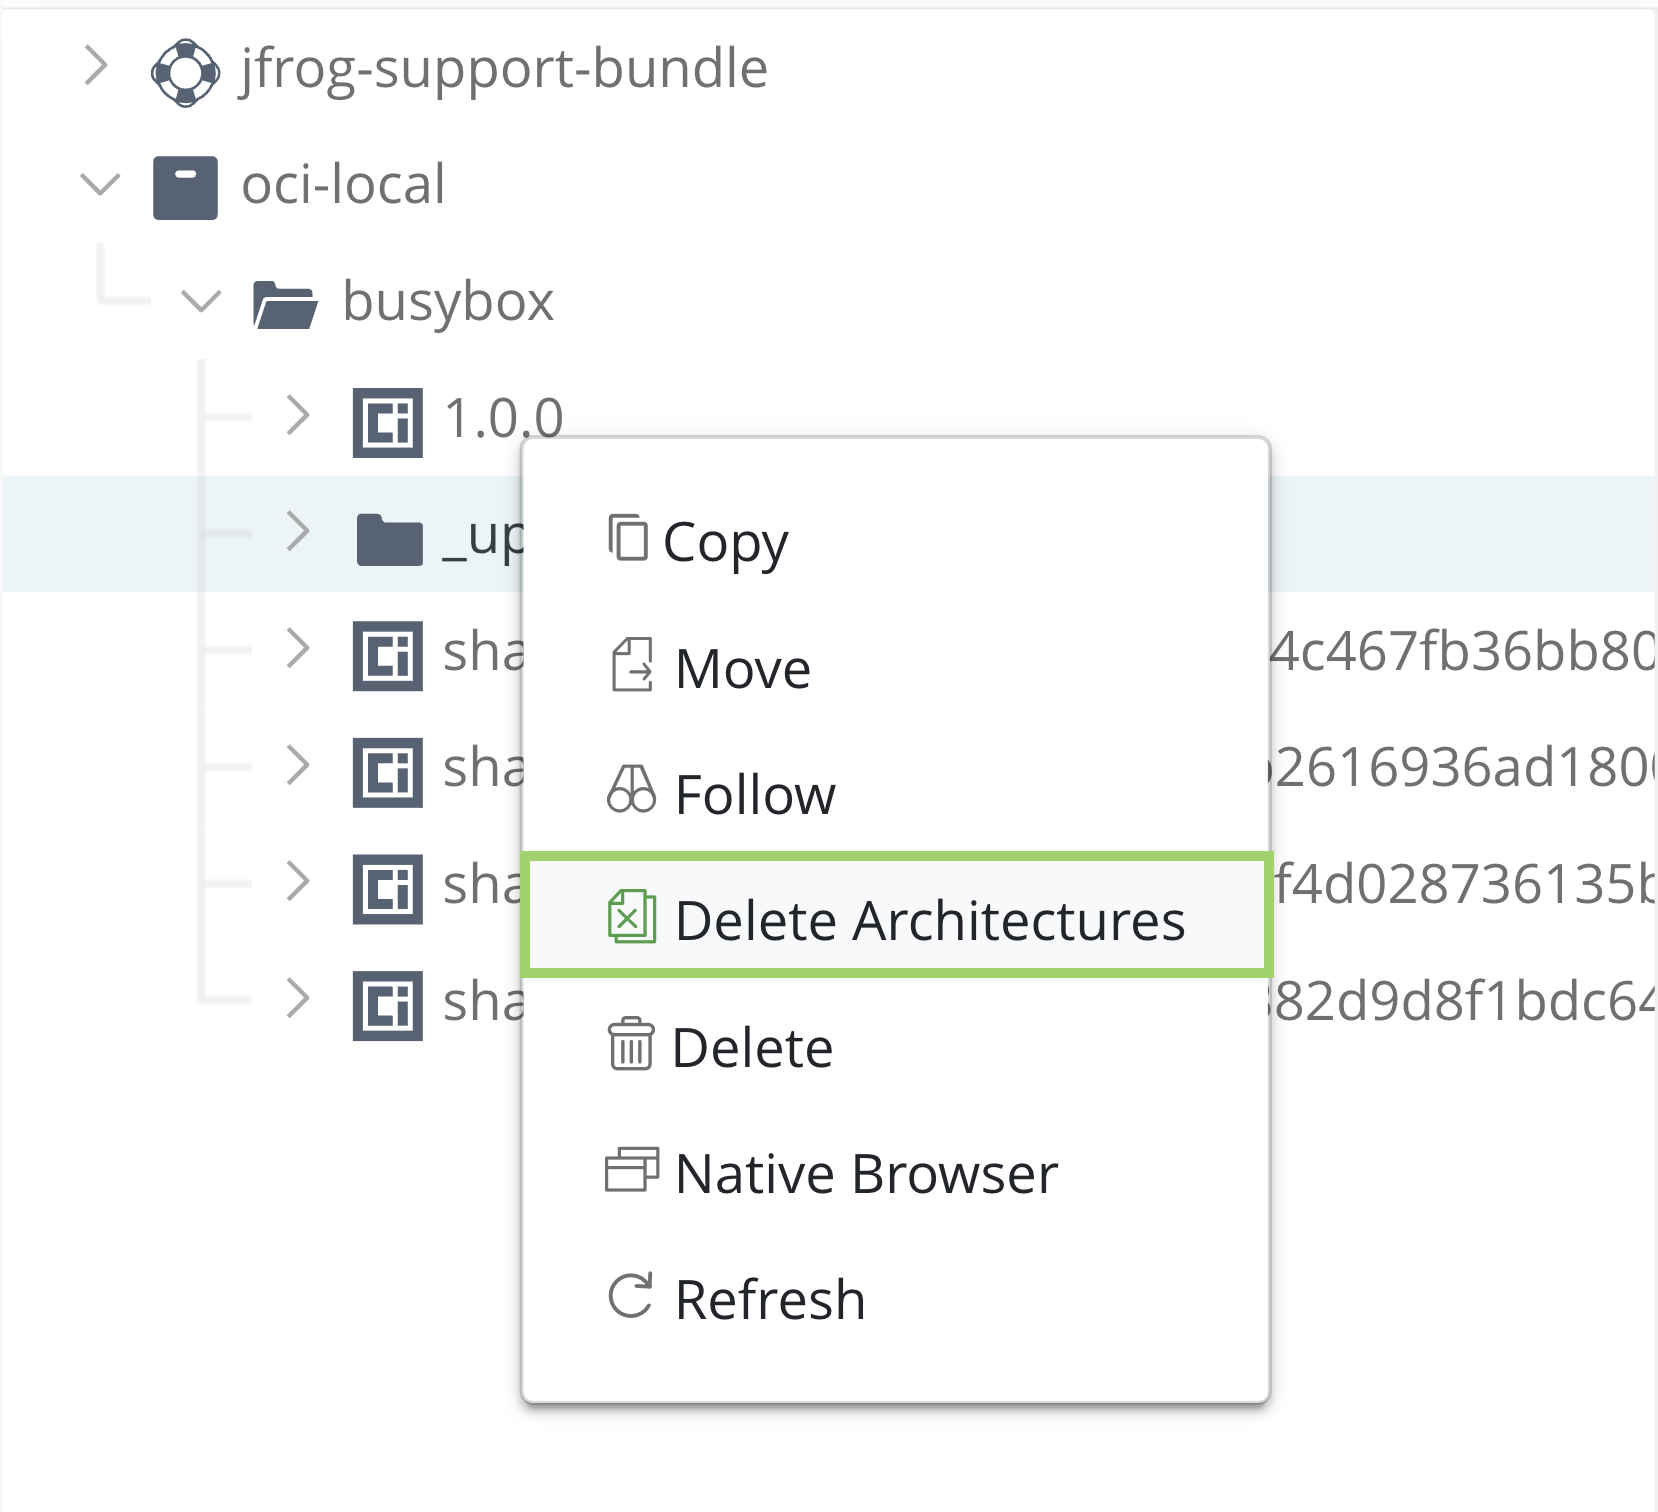
-
The window will show a list of the architectures that will be deleted: review the list and when you are sure, click Delete All
Via Curl
From version 7.91.0, Artifactory supports deleting multi-architecture Docker tags with all of their sub-architectures. To delete a multi-architecture tag using curl, execute the following command:
curl -H "Authorization: Bearer <TOKEN>" -X DELETE -H "Content-Type: application/json" "https://<JFROG_HOST_URL>
/artifactory/api/docker/<REPOSITORY_NAME>/v2/delete" -d '
{
    "dockerRepository": "<PATH_TO_IMAGE_NAME>",
    "tag": "<TAG>"
}'
Where:
| Parameter | Description |
|---|---|
dockerRepository | The docker repository and path to the image for deletion |
tag | The docker image tag that you want to delete |
Note
Make sure to replace the placeholders in bold with your own token, host URL, repository name, path to image name, and tag.
For example, the following curl command will delete the Docker image library/ubuntu with all of its sub-architectures from the docker-prod repository:
curl -H "Authorization: Bearer <TOKEN>" -X DELETE -H "Content-Type: application/json" "https://my-awesome.jfrog.io/artifactory/api/docker/docker-prod/v2/delete" -d '
{
    "dockerRepository": "library/ubuntu",
    "tag": "1.0.0"
}'
Tag Retention Logic
Docker, OCI, and Helm OCI local repositories include the ability to define repository-specific retention policies using the Max Unique Tags and Tag Retention fields. These fields allow you to control how Artifactory behaves when pushing new images and tags, and how it deals with tag overwriting.
In this article, learn how each field works and the implications when both settings are active together.
Important
Before version 7.75.3, the tag retention logic applied only to the tag entities themselves, but not to their layers or blobs. This meant that when a manifest exceeded the limits and was deleted, Artifactory continued to store its nested images, layers, and blobs, although their reference tag was removed. This led to unnecessary utilization of storage.
"Tag retention logic" refers to two fields that are available in Docker, OCI, and Helm OCI local repository settings when creating or editing a repository:
By default, Max Unique Tags is set to zero (0) and Tag Retention is set to one (1), which means that they are inactive. With these default values, Artifactory allows uploading an unlimited number of unique tags and does not save previous overwrites of existing tags. However, this behavior applies specifically when overriding a manifest file. When overriding a list manifest, there are two options:
- Only the list manifest is overwritten, the associated sub-manifests remain unchanged (default behavior).
- Both the list manifest and associated sub-manifests are overwritten. To use this option, set the system property
artifactory.docker.complete.manifest.override.enabled = true.
When entering a higher limit value, these fields become active and apply FIFO (first in, first out) logic, meaning that the oldest tag is removed when the number of tags or overwrites exceeds the defined limits.
Use Max Unique Tags
This field allows you to set a numeric limit to how many unique tag names your local repository can hold. This field uses FIFO (first in, first out) logic meaning that once you upload a new unique tag name that exceeds the set limit, your oldest tag will be removed and your new unique tag will be stored instead.
By default this field is set to zero (0), meaning that there is no limit and you may upload as many unique tag names as you like.
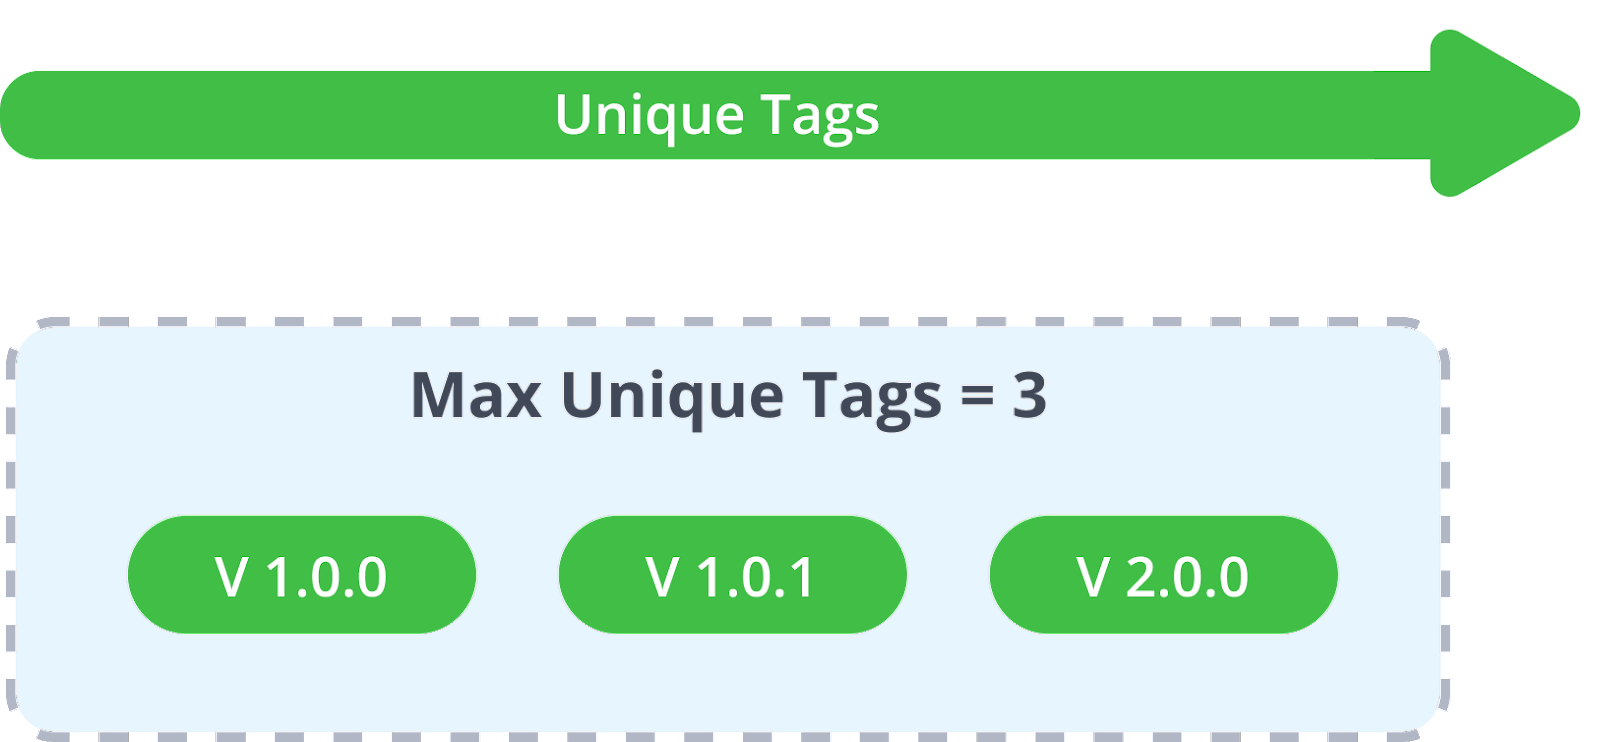
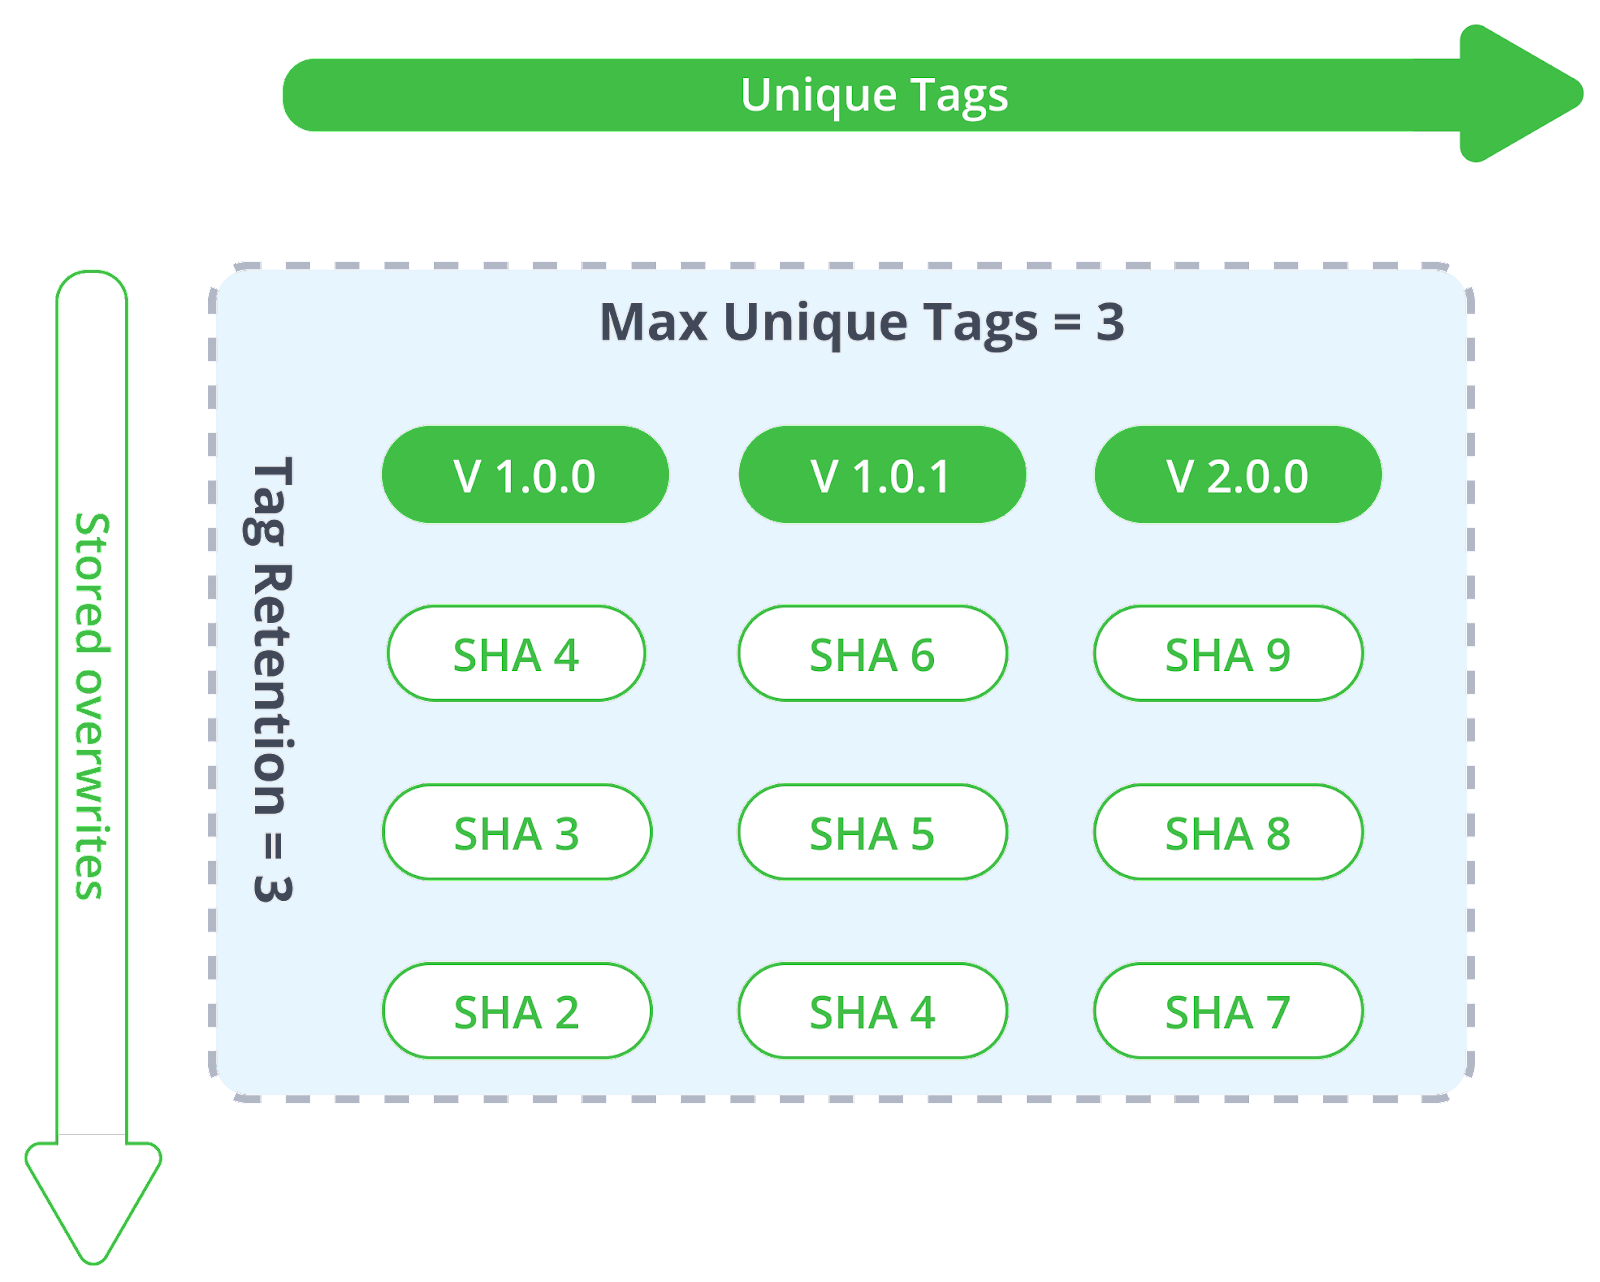
Example of Max Unique Tags Usage
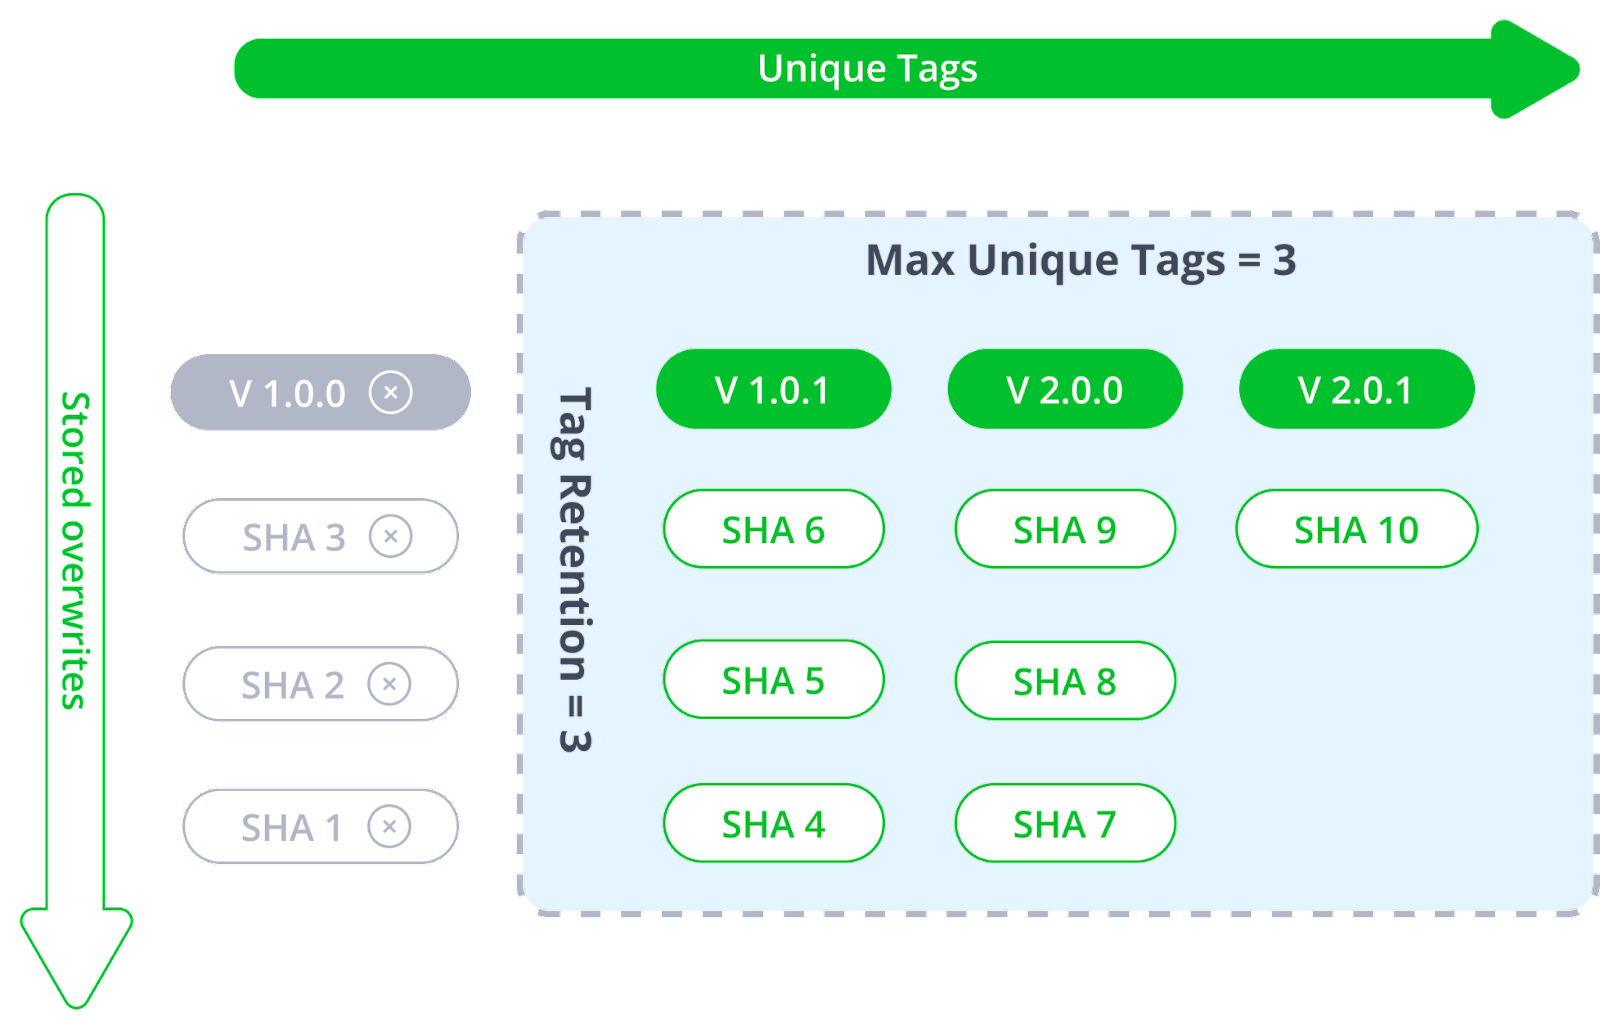
In your repository, you have three unique image tag names that were pushed to your repository in this order: V 1.0.0, V 1.0.1, and V 2.0.0 (V 1.0.0 being the first, and V 2.0.0 the last).
In this repository, Max Unique Tags is set to 3, meaning that at any given time, you can only store 3 unique tag names: V 1.0.0, V 1.0.1, and V 2.0.0.
Note
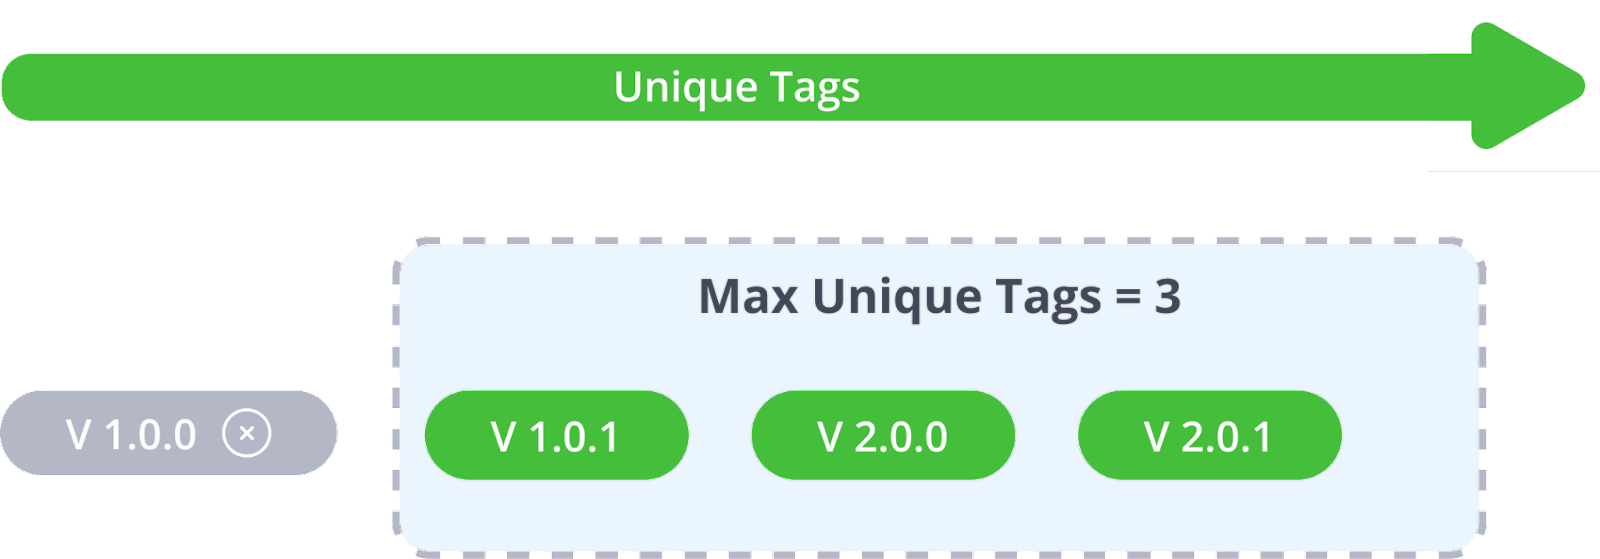
In the diagrams, the green boxes = stored tags, and the gray boxes = deleted tags.
Next, you upload an additional tag: V 2.0.1. Because V 2.0.1 has a new and unique tag name, it will exceed the Max Unique Tags limit that you have set on your repository, and therefore your oldest tag, which is V 1.0.0, will be removed to make space for the new V 2.0.1.
The result would show that your repository now stores V 1.0.1, V 2.0.0, and V 2.0.1.
Note
If your artifactory instance has Trash Can enabled, you will be able to retrieve removed tags if needed.
Use Tag Retention
The Tag Retention field controls how many overwrites of the same tag are saved in Artifactory. Tag overwriting occurs when you upload a new revision of a tag name that already exists in your repository: for instance, “latest”.
Note
The Tag Retention limit applies to any tag name you overwrite, not just “latest”.
By default, this field is set to one (1), implying that if you upload a tag, Artifactory will not save the previous version of the tag that is being overwritten.
When setting this field to a value of 2 (or above), Artifactory will automatically make a copy of the existing tag in Artifactory before it is overwritten and rename it according to its SHA2 hash value. This field accepts any number that represents a limit of how many previous revisions of the same tag should be stored. This field also works according to FIFO (first in, first out) logic, meaning that once you overwrite your tag beyond the limit, the oldest tag revision will be removed.
Note
If your artifactory instance has Trash Can enabled you will be able to retrieve your oldest overwritten tag according to its SHA2 hash value if needed.
Example of Tag Retention Usage
The following diagram shows what happens when you overwrite the same "Latest" tag over and over again three times:
- 1st push: Latest (Original)
- 2nd push: Latest (revision 2)
- 3rd push: Latest (revision 3)
Note
In the diagrams, the green boxes = stored tags, and the gray boxes = deleted tags.
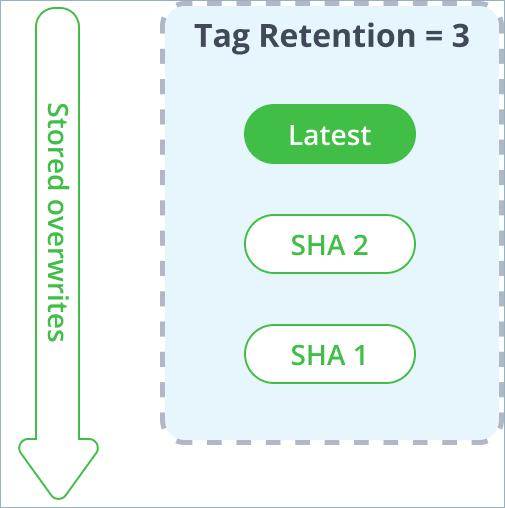
During this process, once we upload the Latest tag for the 2nd time, the original copy of Latest already stored in Artifactory is renamed according to its hash and continues to be stored in the system, making way for the updated revision of Latest that will use the “Latest” tag name. Then, when the 3rd revision of Tag1 is pushed, the 2nd revision of the second version is renamed as a SHA value.
Finally, when uploading the Latest tag for the 4th time, the number of overwritten tags exceeded the Tag Retention limit of 3, meaning that the oldest iteration of Latest tag (SHA 1), the original first push, will be removed.

Using Both Max Unique Tags and Tag Retention
The main implication of applying both Max Unique Tags and Tag Retention together is that Max unique tags takes precedence and will remove all retention revisions associated with the current tag if it is being deleted by the logic. This means that if a tag is removed due to exceeding the Max Unique Tags limit (being the oldest unique tag when a new one has been pushed), all of its Tag Retention copies will be removed as well.
This prevents Artifactory from storing redundant revision copies of unneeded tags if they are removed by the Max Unique Tags logic. Therefore, Tag Retention duplicates continue to aggregate with each tag overwrite, as long as the current tag remains within the Max Unique Tags limit.
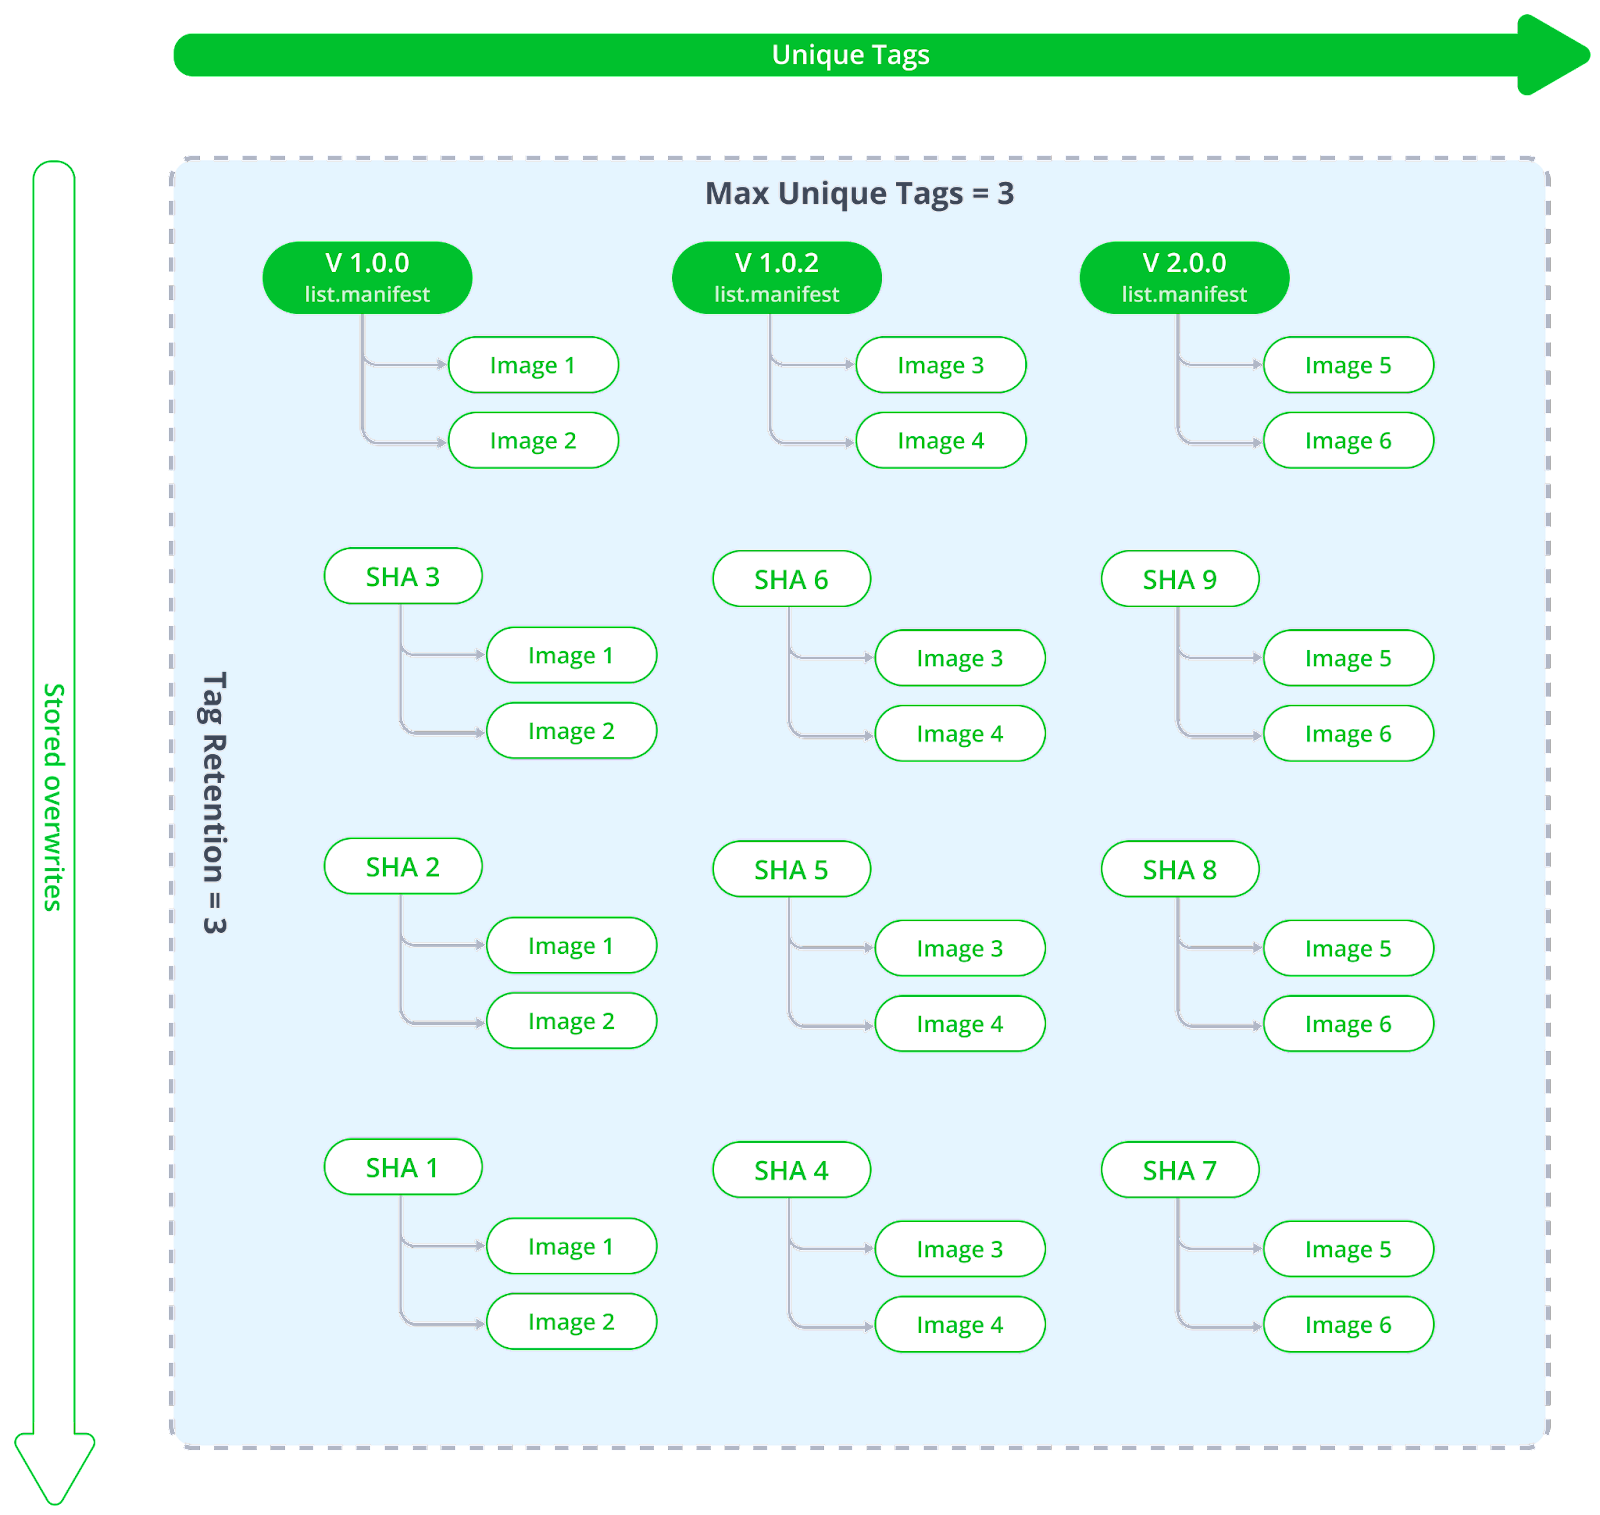
This interaction between Max unique tags and Tag retention is best understood as a matrix. Looking at the following diagram, the X axis (left to right) represents unique tags being pushed into your repository. The Y axis (top to bottom) represents overwrites of the same tag over and over again.
Note
In the diagrams, the green boxes are stored tags, and the gray boxes are deleted tags.
In this example, we have set the following limits:
- Max Unique Tags = 3
- Tag Retention = 3
These limits are represented as a blue area applied to both axes.
When you exceed the Max Unique Tags limit, the oldest unique tag will be removed from Artifactory. Since the unique tag is considered a lead tag, all of its overwrite revisions that are associated with it will also be removed. In the following example, the moment tag V 2.0.1 is uploaded, then V 1.0.0 is removed (since it exceeded the max unique tags settings), and together with it, all SHA1, SHA2, and SHA3 are previous revisions of V 1.0.0.
How Tag Retention Logic Affects Manifest Lists
The Docker/ OCI upload APIs have been enhanced to add relationship markers between manifests and manifest lists. This allows us to apply the tag retention logic of both Max Unique Tags and Tag Retention, to remove a manifest list including all of its referenced sub-manifests as a single complete tag context.
If we have a list.manifest with several manifests under it, the tag retention logic remains the same and simply renames that tag with all its sub-manifests as a whole. Manifests that are nested under the list are treated according to their relationship mapping and removed when they exceed the limits.
Overwriting List Manifests with a Manifest and Vice-Versa
The base principle in Artifactory is that if you have decided to rewrite a tag, you are performing a complete replacement. Therefore if you decide to overwrite a list.manifest with a single manifest, all of the sub-manifests related to the original revision will also be removed. When tag retention is applied, the complete structure of the previous revision is saved including both the list.manifest and all its sub-manifests all together.
Limitations of Tag Retention Logic
-
Multi-architecture retention logic is not backward compatible: the new relationship logic between
list.manifestsand sub-manifests will only apply to tags uploaded via the updated Docker/ OCI upload service. All previously stored tags and images will not be removed.To apply and maintain this relationship logic, Artifactory will mark items during the upload process so it can track the tags during the lifecycle. Older tags would have no markers, and therefore Artifactory would not be able to identify the relationship and remove items accordingly.
-
Removed tags go to the Trash Can and can be restored, but not all JFrog environments have the Trash Can enabled. Before setting tag retention logic, ensure that your Trash Can is enabled.
-
Max unique tags logic currently does not exclude the Latest tag. If for some reason you upload several unique tags that do not include Latest, your latest tag in artifactory will be removed by the FIFO logic just like any other tag.
-
The Max unique tags logic uses lazy invocation, meaning that it is triggered per package push command. Once you apply the limit, the removal of exceeding tags will only occur on the specific package you have pushed to Artifactory. Currently, the is no process that runs on all your packages.
Enable Synchronized Download Statistics for Shared Digests
Download statistics for a Docker or OCI tag may be inconsistent when multiple tags share the same digest. Clients such as Kubernetes pull by cached digest after the first resolve, so download activity is attributed to one tag path but not to sibling paths on the same digest.
To address this issue, you can choose to synchronize Docker tag download statistics for shared digests to keep Number of downloads, Last download date, and Last downloaded by consistent across tags when pulling by tag or digest.
Note
- Download statistics are updated only for tags that you have permission to read and pull.
- This setting is not retroactive. Synchronization applies only to pulls that happen after the setting is enabled, and statistics from past pulls are not backfilled.
Prerequisite: Admin or Project Admin permissions.
To enable synchronized download statistics for shared digests:
- In the Administration module, go to Artifactory Settings > Packages Settings.
- In the Docker, OCI, Helm OCI section, select the Synchronize download statistics for shared digests checkbox.
- Click Save.
After enabling, you can run your pull workflows as normal and statistics are updated for all tags that share that digest at the time of the pull. Statistics for tags that you cannot read are not updated.
The sync is asynchronous, and there may be a short delay before updated statistics are reflected.
Working with Docker Content Trust
Notary is Docker's platform to provide trusted delivery of content by signing images that are published. A content publisher can then provide the corresponding signing keys that allow users to verify that content when it is consumed. Artifactory fully supports working with Docker Notary to ensure that Docker images uploaded to Artifactory can be signed, and then verified when downloaded for consumption. When the Docker client is configured to work with Docker Notary, after pushing an image to Artifactory, the client notifies the Notary to sign the image before assigning it a tag.
Note
Artifactory supports hosting signed images without the need for any additional configuration.
Configure Docker Notary and Docker Client
There is no configuration needed in Artifactory in order to work with trusted Docker images. However, in the setup instructions below, we do recommend testing your configuration by signing Artifactory and running it in a container.
To configure the Docker Notary and client to work with Artifactory, execute the following main steps:
- Configure Your Docker Notary Hosts File
- Configure the Docker Notary Server
- Configure the Docker Client with Docker Content Trust
- Test Your Docker Content Trust Setup
Configure Your Docker Notary Hosts File
If you are not working with a DNS, add the following entries to your /etc/hosts file:
sudo sh -c 'echo "<Host IP> <Notary Server Name>" >> /etc/hosts'
sudo sh -c 'echo "<Host IP> <Artifactory Server Name>" >> /etc/hosts'
Configure the Docker Notary Server
Create a directory for your Notary server. In the code snippets below we will use notarybox .
Create a dockerfile with the following content:
FROM ubuntu

RUN apt-get update \
&& apt-get install -y \
tree \
vim \
git \
ca-certificates \
curl \
--no-install-recommends
RUN install -m 0755 -d /etc/apt/keyrings \
&& curl -fsSL https://download.docker.com/linux/ubuntu/gpg -o /etc/apt/keyrings/docker.asc \
&& chmod a+r /etc/apt/keyrings/docker.asc

RUN echo \
"deb [arch=$(dpkg --print-architecture) signed-by=/etc/apt/keyrings/docker.asc] https://download.docker.com/linux/ubuntu \
$(. /etc/os-release && echo "$VERSION_CODENAME") stable" | \
tee /etc/apt/sources.list.d/docker.list > /dev/null

RUN apt-get update && apt-get -y install docker-ce docker-ce-cli containerd.io docker-buildx-plugin docker-compose-plugin

WORKDIR /root
RUN git clone https://github.com/docker/notary.git && \
cp /root/notary/fixtures/root-ca.crt /usr/local/share/ca-certificates/root-ca.crt && \
update-ca-certificates

ENTRYPOINT ["bash"]Use a private certificate
This configuration runs with a public certificate. Any Docker client running with the same public certificate may be able to access your Notary server.
For a secure setup, we recommend replacing it with your organization's private certificate by replacing the public
root-ca.crtcertificate file with your private certificate under/root/notary/fixtureson your Notary server, and under/usr/local/share/ca-certificateson the machine running your Docker client.
Build the test image:
docker build -t [image name] [path to dockerfile]If you are running the build in your dockerfile directory, you can just use "." as the path to the Docker file.
Start the Notary server:
To start the Notary server, you first need to have Docker Compose installed.
Then execute the following steps:
cd notarybox
git clone -b trust-sandbox https://github.com/docker/notary.git
cd notary
docker-compose build
docker-compose up -d
Configure the Docker Client with Docker Content Trust
To connect the Notary server to the Docker client you need to enable the Docker content trust flag and add the Notary server URL as follows:
export DOCKER_CONTENT_TRUST=1
export DOCKER_CONTENT_TRUST_SERVER=https://notaryserver:4443
Test Your Docker Content Trust Setup
The example below demonstrates setting up the Notary server and Docker client, signing an image and the pushing it to Artifactory, with the following assumptions:
- Artifactory is up and running in a Docker container
- You have configured the Notary server
- Notary server and Artifactory run on localhost (
127.0.0.1) - Notary server is in directory
notarybox - Working without a DNS (so we need to configure the
hostsfile) - Notary server name is
notaryserver - Artifactory server name is
artifactory-registry - Docker Compose is installed.
Set up the IP mappings
sudo sh -c 'echo "127.0.0.1 notaryserver" >> /etc/hosts'
sudo sh -c 'echo "127.0.0.1 artifactory-registry" >> /etc/hosts'
Pull an image for testing
docker pull docker/trusttestAfter you have pulled the image, you need to docker login to artifactory-registry:5002/v2
Configure the Docker client
export DOCKER_CONTENT_TRUST=1
export DOCKER_CONTENT_TRUST_SERVER=https://notaryserver:4443
Tag the image you pulled for testing and push it to Artifactory
docker tag docker/trusttest artifactory-registry:5002/test/trusttest:latest
docker push artifactory-registry:5002/test/trusttest:latest
You will be asked to enter the root key passphrase. This will be needed every time you push a new image while the DOCKER_CONTENT_TRUST flag is set.
The root key is generated at: /root/.docker/trust/private/root_keys
You will also be asked to enter a new passphrase for the image. This is generated at /root/.docker/trust/private/tuf_keys/[registry name] /[imagepath]
The Docker image is signed after it is pushed to Artifactory.
Docker Advanced Topics
This section contains advanced configuration options for Docker with Artifactory:
- Use a Self-Signed SSL Certificate with Docker
- Use Your Own Certificate with Nginx
- Set Your Docker Credentials Manually
- Authenticate Docker Via OAuth
Use a Self-signed SSL Certificate with Docker
You can use self-signed SSL certificates with docker push/pull commands, however for this to work, you need to specify the --insecure-registry daemon flag for each insecure registry.
For full details see Docker documentation.
For example, if you are running Docker as a service, edit the /etc/default/docker file, and append the --insecure-registry flag with your registry URL to the DOCKER_OPTS variable as in the following example:
Edit the DOCKER_OPTS variable
DOCKER_OPTS="-H unix:///var/run/docker.sock --insecure-registry artprod.company.com"For this to take effect, you need to restart the Docker service.
If you are using Boot2Docker, refer to the Boot2Docker documentation for Insecure Registry.
If you do not make the required modifications to the --insecure-registry daemon flag, you should get the following error:
Error message
v2 ping attempt failed with error: Get https://artprod.company.com/v2/: x509: cannot validate certificate for artprod.company.com because it doesn't contain any IP SANsUse Your Own Certificate with Nginx
The NGINX configuration provided with Artifactory out-of-the-box references the internally bundled certificate and key which you may replace with your own certificate and key.
For details, see Set TLS on the JFrog Platform.
Set Your Docker Credentials Manually
If you are unable to log in to Docker, you may need to set your credentials manually.
The Docker command line tool supports authenticating sensitive operations, such as push, with the server using basic HTTP authentication.
To enforce authenticated access to docker repositories you need to provide the following parameters to the Docker configuration file.
- The Docker endpoint URL (must use HTTPS for basic authentication to work)
- Your Artifactory username and password (formatted
username:password) as Base64 encoded strings - Your email address
You can use the following command to get these strings directly from Artifactory:
Get config.json entries directly from Artifactory
$ curl -uadmin:password "https://<JFROG_PLATFORM_URL>/artifactory/api/docker/<REPO_NAME>/<v1|v2>/auth"
The command returns credentials that you can paste into your ~/.docker/config.json file. For example:
{
 "https://artprod.company.com" : {
   "auth" : "YWRtaW46QVA1N05OaHZTMnM5Qk02RkR5RjNBVmF4TVFl",
   "email" : "[email protected]"
 }
}
The Docker configuration file may contain a separate authentication block for each registry that you wish to access. For example:
{
        "https://artprod.company.com": {
                "auth":"YWRtaW46cGFzc3dvcmQ=",
                "email":"[email protected]"
        },
        "https://artprod2.company.com": {
                "auth":"YWRtaW46cGFzc3dvcmQ=",
                "email":"[email protected]"
        }
}
Authenticate Docker via OAuth
Artifactory supports authentication of the Docker client using OAuth through the default GitHub OAuth provider. When authenticating using OAuth you will not need to provide additional credentials to execute docker login with Artifactory.
To set up OAuth authentication for your Docker client, execute the following steps:
- Under General OAuth Settings, make sure Auto Create Users is selcted to make sure a user record is created for you the first time you log in to Artifactory with OAuth.
- Log in to Artifactory with OAuth using your Git Enterprise account
Once you are logged in to Artifactory through your Git Enterprise OAuth account, your Docker client will automatically detect this and use OAuth for authentication, so you do not need to provide additional credentials.
Get Started with Docker and Artifactory Self-Hosted
The Docker client has the following two limitations:
- You cannot use a context path when providing the registry path (e.g
localhost:8082/artifactoryis not valid) - Docker will only send basic HTTP authentication when working against an HTTPS host or when using the insecure registry flag
Artifactory offers solutions to these limitations allowing you to create and use any number of Docker registries.
- Using a reverse proxy When used, a reverse proxy, maps Docker commands to one of the multiple Docker registries in Artifactory
- Without a reverse proxy From version 5.8, Artifactory supports using Docker without the use of a reverse proxy allowing you to create and use multiple Docker registries in Artifactory out-of-the-box.
Get Started with Docker Using a Reverse Proxy
When using Artifactory with a reverse proxy, you need to map Docker commands to Docker registries in Artifactory using either the subdomain method, ports method or repository path method.
Testing or evaluating?
If you are currently only testing or evaluating using Artifactory with Docker, we recommend running Artifactory as a Docker container which is easily installed and comes with a proxy server and Docker registries pre-configured out-of-the-box. You can be up and running in minutes.
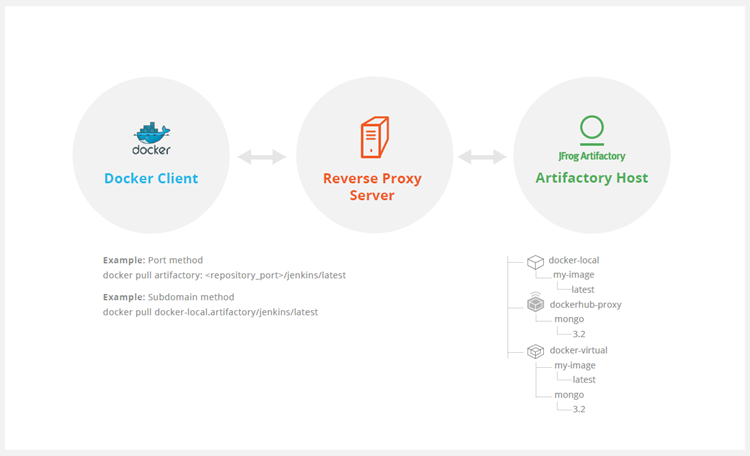
The ports method maps a port number to each Artifactory Docker registry. While this is an easy way to get started, you will need to modify your reverse proxy configuration and add a new mapping for each new Docker registry you define in Artifactory. In addition, firewalls and other restrictions by your IT department may restrict port numbers making the ports method not feasible.
With the subdomain method, you only need to configure your reverse proxy once, and from then on, the mapping from Docker commands to Docker registries in Artifactory is dynamic and requires no further modification of your reverse proxy configuration.
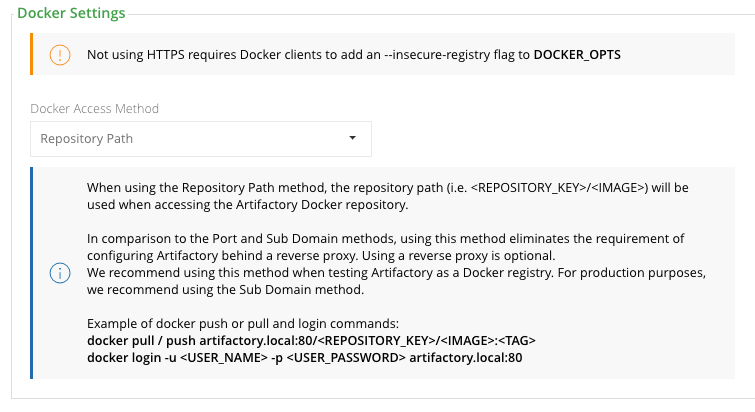
The repository path method allows a single point of entry (URL) to access different repositories. This is done by embedding the name of the repository being accessed into the image path.
If a wildcard certificate is available, we recommend the subdomain method since it will only require a one-time effort and follows the Docker convention more closely.
The Subdomain Method for Docker
Getting started with Docker and your self-hosted Artifactory Pro installation using the subdomain method involves four basic steps:
Configure Artifactory
To configure Artifactory and your reverse proxy using the subdomain method, carry out the following steps:
-
Make sure Artifactory is up and running, and is activated with a valid license.
-
Create a virtual docker repository, as well as a local and remote Docker repository that it should aggregate). For more information, see Create a Docker Repository.
-
Make sure you have a reverse proxy server up and running.
-
Obtain a wildcard SSL certificate or use a wildcard self-signed certificate. To create a self-signed certificate, you can follow these instructions for Ubuntu.
Note
Make sure your certificate matches the Artifactory hostname used in your reverse proxy configuration. In our example below we will use art.local.
Configure Your Reverse Proxy
Artifactory's can generate your complete reverse proxy configuration file for supported servers.
Go to Reverse Proxy Configuration Generator and fill in the fields according to how your reverse proxy is set up while making sure to:
- Use the correct Artifactory hostname in the Public Server Name field of Reverse Proxy Settings (in our example this will be
art.local) - Select Subdomain as the Reverse Proxy Method under Docker Reverse Proxy Settings.
Nginx for Docker
Copy the code snippet generated by the configuration generator into your artifactory-nginx.conf file, and place it in your /etc/nginx/sites-available directory.
Create the following symbolic link.
sudo ln -s /etc/nginx/sites-available/artifactory-nginx.conf /etc/nginx/sites-enabled/artifactory-nginx.confApache HTTPD for Docker
Copy the code snippet generated by the configuration generator into your artifactory-apache.conf file and place it in your /etc/apache2/sites-available directory.
Create the following symbolic link:
sudo ln -s /etc/apache2/sites-available/artifactory-apache.conf /etc/apache2/sites-enabled/artifactory-apache.confNote
The
httpd.confheader file should be tuned to work correctly using these values to avoid errors:# Apache libraries location (should be tuned) Define APACHE_LIB_DIR /usr/lib/apache2/modules <---- Input fied in UI could be great # Apache Logs (default : beside other Artifactory logs) Define APACHE_LOG_DIR /[TheArtifactoryHome]/logs <---- ErrorLog/CustomLog could be uncommented & Input fied in UI could be great LoadModule proxy_module ${APACHE_LIB_DIR}/mod_proxy.so LoadModule rewrite_module ${APACHE_LIB_DIR}/mod_rewrite.so LoadModule proxy_ajp_module ${APACHE_LIB_DIR}/mod_proxy_ajp.so LoadModule proxy_http_module ${APACHE_LIB_DIR}/mod_proxy_http.so LoadModule ssl_module ${APACHE_LIB_DIR}/mod_ssl.so <---- Only if HTTPS used Listen 443 <---- Only if HTTPS used Listen XXX <--- All port used as Docker registry
Test Your Docker Reverse Proxy Setup
To verify your reverse proxy is configured correctly, run the following command making sure that the return code is 200:
curl -I -k -v https://<artifactory url>/api/system/pingRun the following commands to ensure your proxy configuration is functional and can communicate with Artifactory:
-
Pull the "hello-world" image
docker pull hello-world -
Login to repository docker-virtual
docker login docker-virtual.art.local -
Tag the "hello-world" image
docker tag hello-world docker-virtual.art.local/hello-world -
Push the tagged "hello-world" image to docker-virtual
docker push docker-virtual.art.local/hello-world
The Repository Path Method for Docker
Getting started with Docker and your self-hosted Artifactory Pro installation using the path method involves four basic steps:
Configuring Artifactory
To configure Artifactory and your reverse proxy using the path method, carry out the following steps:
-
Make sure Artifactory is up and running, and is activated with a valid license.
-
Create a virtual docker repository, as well as a local and remote Docker repository that it should aggregate). For more information, see Create a Docker Repository.
-
Make sure you have a reverse proxy server up and running.
-
Obtain a valid SSL certificate or use a self-signed certificate. To create a self-signed certificate, you can follow these instructions for Ubuntu.
Note
Make sure your certificate matches the Artifactory hostname used in your reverse proxy configuration. In our example below we will use art.local.
Configure your reverse proxy
Artifactory's can generate your complete reverse proxy configuration file for supported servers.
Go to Reverse Proxy Configuration Generator and fill in the fields in according to how your reverse proxy is set up while making sure to:
- Use the correct Artifactory hostname in the Reverse Proxy Settings window, configure the Public Server Name field (in our example this will be
art.local) - Select Repository Path as the Reverse Proxy Method under Docker Reverse Proxy Settings.
Nginx
Copy the code snippet generated by the configuration generator into your artifactory-nginx.conf file, and place it in your /etc/nginx/sites-available directory.
Create the following symbolic link.
sudo ln -s /etc/nginx/sites-available/artifactory-nginx.conf /etc/nginx/sites-enabled/artifactory-nginx.confApache HTTPD
Copy the code snippet generated by the configuration generator into your artifactory-apache.conf file and place it in your /etc/apache2/sites-available directory.
Create the following symbolic link:
sudo ln -s /etc/apache2/sites-available/artifactory-apache.conf /etc/apache2/sites-enabled/artifactory-apache.confConfigure Your Docker Client
To configure your Docker client, carry out the following steps
-
Add the following to your DNS or to the client's
/etc/hostsfile:<ip-address> art.local -
Since the certificate is self-signed, you need to import it to your Docker certificate trust store as described in the Docker documentation. Alternatively, you can configure the Docker client to work with an insecure registry as described in the Docker documentation.
-
Restart your Docker daemon/engine to apply the insecure registry flag (if self-signed certificate is imported, you do not need to restart the Docker daemon/engine).
Test Your Setup
To verify your reverse proxy is configured correctly, run the following command making sure that the return code is 200:
curl -I -k -v https://<artifactory url>/api/system/pingRun the following commands to ensure your proxy configuration is functional and can communicate with Artifactory:
-
Pull the "hello-world" image
docker pull hello-world -
Login to repository docker-virtual
docker login art.local -
Tag the "hello-world" image
docker tag hello-world art.local/docker-virtual/hello-world -
Push the tagged "hello-world" image to docker-virtual
docker push art.local/docker-virtual/hello-world
Configure Artifactory with Repository Path Method
To configure Artifactory to use the Repository Path method, carry out the following steps:
-
Make sure Artifactory is up and running, and is activated with a valid license.
-
Create your virtual Docker repository (as well as a local and remote Docker repository that it should aggregate). In our example below we will use a repository named
docker-virtual. -
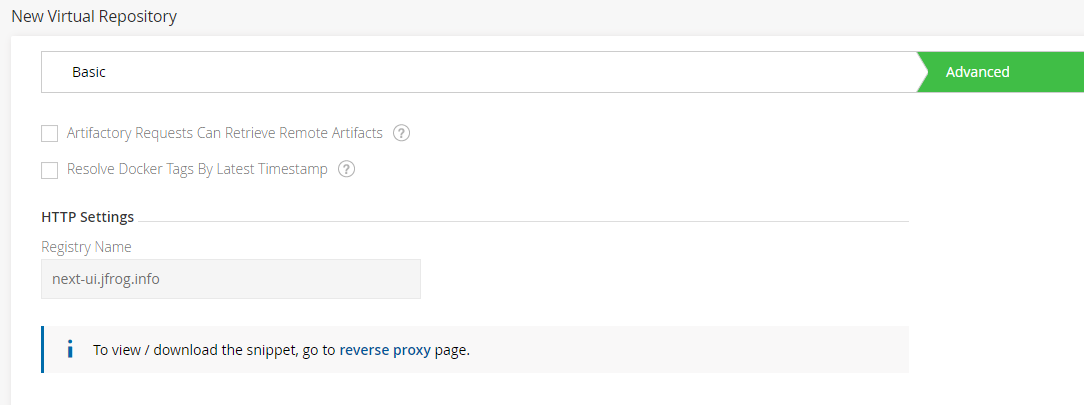
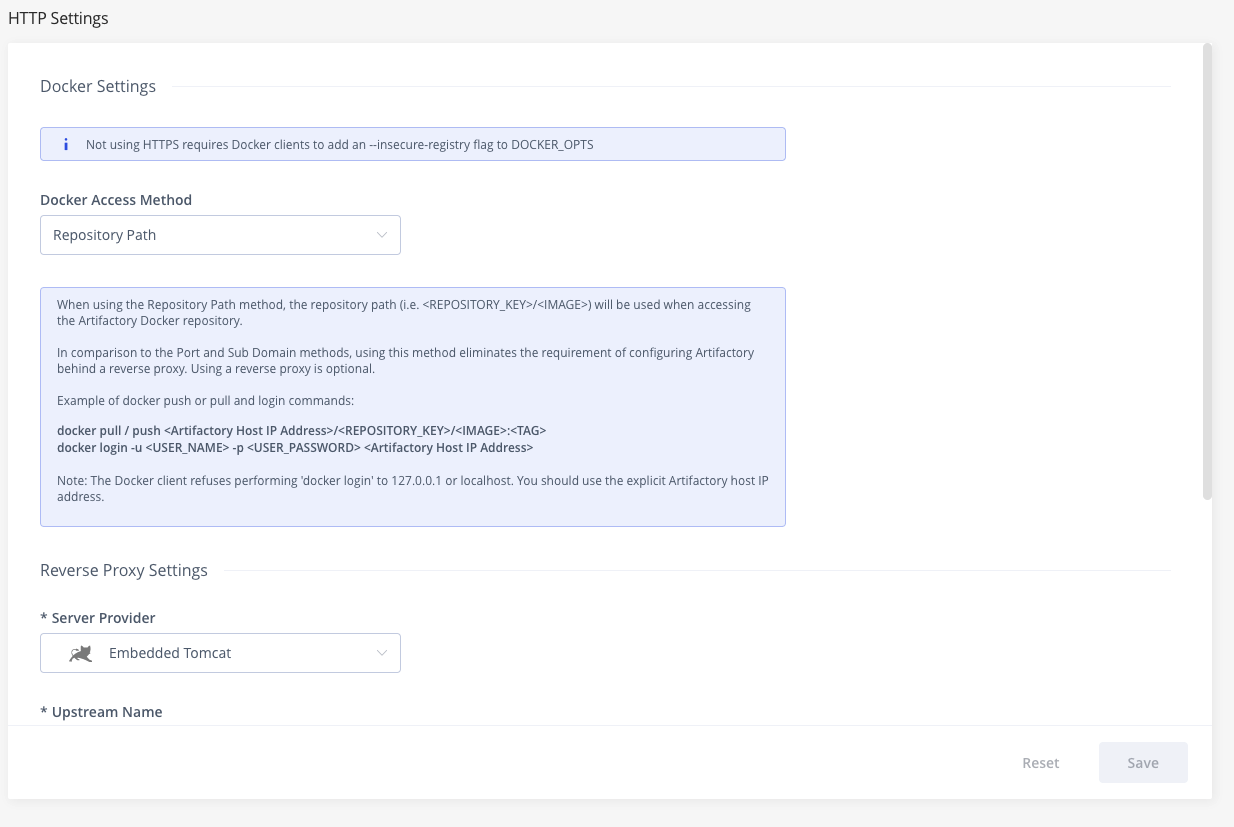
Go to the HTTP Settings page from the Administration module under Artifactory | General | HTTP Settings.In the Docker Settings panel, select Repository Path as the Docker Access Method.
In the Reverse Proxy Settings panel select Embedded Tomcat as theServer Provider (which indicates you're not using a reverse proxy).
You must use Embedded Tomcat
You can only use Artifactory as a Docker registry without a reverse proxy by using the internal embedded Tomcat.
The Ports Method for Docker
Prerequisites:
Configure Artifactory and Reverse Proxy
To configure Artifactory and your reverse proxy using the ports method:
-
Make sure Artifactory is up and running, and is activated with a valid license.
-
Create a virtual docker repository, as well as a local and remote Docker repository that it should aggregate). For more information, see Create a Docker Repository.
-
Make sure you have a reverse proxy server up and running.
-
Obtain an SSL certificate or use a Self-Signed certificate that can be generated following this example.
Note
Make sure your certificate matches the Artifactory hostname used in your reverse proxy configuration. In our example below we will use
art.local.
-
Configure your reverse proxy. Artifactory's Reverse Proxy Configuration Generator can generate your complete reverse proxy configuration file for supported servers. All you need to do is fill in the fields in according to how your reverse proxy is set up while making sure to:
- Use the correct Artifactory hostname in the Public Server Name field
- Select Ports as the Reverse Proxy Method under Docker Reverse Proxy Settings. In the example below, we will use port
5001to bind repositorydocker-virtual**.**NGINX
For Artifactory to work with Docker, the preferred web server is
NGINX v1.3.9and above. First, you need to create a self-signed certificate for NGINX as described here for Ubuntu. Then use Artifactory's Reverse Proxy Configuration Generator to generate the configuration code snippet for you. Copy the code snippet into yourartifactory-nginx.conffile and place it in your/etc/nginx/sites-availabledirectory. Finally, create the following symbolic link:sudo ln -s /etc/nginx/sites-available/artifactory-nginx.conf /etc/nginx/sites-enabled/artifactory-nginx.confApache HTTPD
Install Apache HTTP server as a reverse proxy and then install the required modules. Create the following symbolic link:
sudo ln -s /etc/apache2/mods-available/slotmem_shm.load /etc/apache2/mods-enabled/slotmem_shm.loadSimilarly, create corresponding symbolic links for:
- headers
- proxy_balancer
- proxy_load
- proxy_http
- proxy_connect
- proxy_html
- rewrite.load
- ssl.load
- lbmethod_byrequests.load
Then use Artifactory's Reverse Proxy Configuration Generator to generate the configuration code snippet for you.
Copy the code snippet into your
artifactory.conffile and place it in your/etc/apache2/sites-availabledirectory.HAProxy
First, you need to create a self-signed certificate for HAProxy as described here for Ubuntu. Then, copy the code snippet below into your
/etc/haproxy/haproxy.cfgfile:HAProxy v1.5 Configuration
# haproxy server configuration
# version 1.0
# History
# ---------------------------------------------------------------------------
# Features enabled by this configuration
# HA configuration
# port 80, 443  Artifactory GUI/API
#
# This uses ports to distinguish artifactory docker repositories
# port 443  docker-virtual (v2) docker v1 is redirected to docker-dev-local.
# port 5001 docker-prod-local (v1); docker-prod-local2 (v2)
# port 5002 docker-dev-local (v1); docker-dev-local2 (v2)
#
# Edit this file with required information enclosed in <...>
# 1. certificate and key
# 2. artifactory-host
# 3  replace the port numbers if needed
# ----------------------------------------------------------------------------
global
        log 127.0.0.1   local0
        chroot /var/lib/haproxy
        maxconn 4096
        user haproxy
        group haproxy
        daemon
        tune.ssl.default-dh-param 2048
        stats socket /run/haproxy/admin.sock mode 660 level admin
defaults
        log     global
        mode    http
        option  httplog
        option  dontlognull
        option  redispatch
        option  forwardfor
        option  http-server-close
        maxconn 4000
        timeout connect 5000
        timeout client 50000
        timeout server 50000
        errorfile 400 /etc/haproxy/errors/400.http
        errorfile 403 /etc/haproxy/errors/403.http
        errorfile 408 /etc/haproxy/errors/408.http
        errorfile 500 /etc/haproxy/errors/500.http
        errorfile 502 /etc/haproxy/errors/502.http
        errorfile 503 /etc/haproxy/errors/503.http
        errorfile 504 /etc/haproxy/errors/504.http
frontend normal
         bind *:80
         bind *:443 ssl crt </etc/ssl/certs/server.bundle.pem>
         mode http
         option forwardfor
         reqirep ^([^\ :]*)\ /v2(.*$) \1\ /artifactory/api/docker/docker-virtual/v2\2
         reqadd X-Forwarded-Proto:\ https if { ssl_fc }
         option forwardfor header X-Real-IP
         default_backend normal

# if only need to access the docker-dev-local2 then skip this section. Docker-virtual can be configured to deploy to docker-dev-local2 frontend dockerhub
         bind *:5000 ssl crt </etc/ssl/certs/server.bundle.pem>
         mode http
         option forwardfor
         option forwardfor header X-Real-IP
         reqirep ^([^\ :]*)\ /v2(.*$) \1\ /artifactory/api/docker/docker-remote/v2\2
         reqadd X-Forwarded-Proto:\ https if { ssl_fc }
         default_backend normal

# if only need to access the docker-dev-local2 then skip this section. Docker-virtual can be configured to deploy to docker-dev-local2 frontend dockerprod
         bind *:5001 ssl crt </etc/ssl/certs/server.bundle.pem>
         mode http
         option forwardfor
         option forwardfor header X-Real-IP
             reqirep ^([^\ :]*)\ /v1(.*$) \1\ /artifactory/api/docker/docker-prod-local/v1\2
             reqirep ^([^\ :]*)\ /v2(.*$) \1\ /artifactory/api/docker/docker-prod-local2/v2\2
         reqadd X-Forwarded-Proto:\ https if { ssl_fc }
         default_backend normal

# if only need to access the docker-dev-local2 then skip this section. Docker-virtual can be configured to deploy to docker-dev-local2 frontend dockerdev
         bind *:5002 ssl crt </etc/ssl/certs/server.bundle.pem>
         mode http
         option forwardfor
         option forwardfor header X-Real-IP
             reqirep ^([^\ :]*)\ /v1(.*$) \1\ /artifactory/api/docker/docker-dev-local/v1\2
             reqirep ^([^\ :]*)\ /v2(.*$) \1\ /artifactory/api/docker/docker-dev-local2/v2\2
         reqadd X-Forwarded-Proto:\ https if { ssl_fc }
         default_backend normal

# Artifactory Non HA Configuration
# i.e server artifactory 198.168.1.206:8082
#
backend normal
         mode http
         server <artifactory-host> <artifactory-host ip address>:<artifactory-host port>

#
# Artifactory HA Configuration
# Using default failover interval - rise = 2; fall =3 3; interval - 2 seconds
# backend normal
#        mode http
#        balance roundrobin
#        option httpchk OPTIONS /
#        option forwardfor
#        option http-server-close
#        appsession JSESSIONID len 52 timeout 3h
#        server <artifactory-host-ha1> <artifactory-host ip address>:<artifactory-host port>
#                server <artifactory-host-ha2> <artifactory-host ip address>:<artifactory-host port>
After editing the file as described in the snippet, you can test your configuration using the following command:
haproxy -f /etc/haproxy/haproxy.cfg -cConfigure Your Docker Client
To configure your Docker client, carry out the following steps:
-
Add the following to your DNS or to the client's
/etc/hostsfile:<ip-address> art.local -
Since the certificate is self-signed, you need to import it to your Docker certificate trust store as described in the Docker documentation. Alternatively, you can configure the Docker client to work with an insecure registry by adding the following line to your
/etc/default/dockerfile (you may need to create the file if it does not already exist):DOCKER_OPTS="$DOCKER_OPTS --insecure-registry art.local:5001" -
Restart your Docker engine.
Test Your Setup
To verify your reverse proxy is configured correctly, run the following command:
// Make sure the following results in return code 200
curl -I -k -v https://<artifactory url>/api/system/ping
Run the following commands to ensure your proxy configuration is functional and can communicate with Artifactory. In this example, we will pull down a Docker image, tag it and then deploy it to our docker-virtual repository that is bound to port 5001:
// Pull the "hello-world" image
docker pull hello-world

// Login to repository docker-virtual
docker login art-local:5001

// Tag the "hello-world" image
docker tag hello-world art-local:5001/hello-world

// Push the tagged "hello-world" image to docker-virtual
docker push art-local:5001/hello-world
Test With a Self-signed Certificate
-
Since the certificate is self-signed, you need to import it to your Docker certificate trust store as described in the Docker documentation. Alternatively, you can configure the Docker client to work with an insecure registry as described in the Docker documentation.
-
Restart your Docker daemon/engine to apply the insecure registry flag (if self-signed certificate is imported, you do not need to restart the Docker daemon/engine).
Running
$docker infowill list the Insecure registries that have been applied under the Insecure Registries entry. -
Use the steps above to interact with the Artifactory Docker Registry
Get Started with Docker Without a Reverse Proxy
Previously, Artifactory supported the Ports and Subdomain methods described above when using a reverse proxy. From version 5.8. Artifactory introduces a new method referred to as the "Repository Path" method since it uses the Docker repository path prefix (<REPOSITORY_KEY/IMAGE>) to access a specific Artifactory Docker registry from the Docker client. Note that you may still have a reverse proxy configured for Artifactory for other reasons, however, when configured to use Repository Path method, requests to Docker registries in Artifactory will be handled by Artifactory's embedded Tomcat instead of the reverse proxy.
Docker API v2 required
You can only use the Repository Path method with Artifactory Docker registries configured for Docker API v2.
Configure Your Docker Client Without Reverse Proxy
Using the Repository Path method, you can work with Artifactory as a Docker registry without a reverse proxy on an insecure connection (i.e. only HTTP is supported, not HTTPS). You need to configure the Docker client to work with an insecure registry as described in the Docker documentation.
Select Repository Path as the Docker Access Method in the Docker Setting Panel of the HTTP Settings screen.
| Docker Settings in HTTP Settings | Corresponding HTTP Settings in Docker Repository Advanced Configuration |
|---|---|
 |  |
Restart your Docker daemon/engine to apply the insecure registry flag (if self-signed certificate is imported, you do not need to restart the Docker daemon/engine). Running $docker info will list the Insecure registries that have been applied under the Insecure Registries entry.
Test Your Docker Without Reverse Proxy Setup
Don't use localhost or 127.0.0.1 or "/artifactory"
Due to a limitation in the Docker client, you cannot access an Artifactory Docker registry as localhost or
127.0.0.1.If you need to access a local installation of Artifactory, make sure to specify its full IP address.In addition, when specifying Artifactory's URL, you should omit the
/artifactorysuffix normally used.For example, if your local machine's IP address is 10.1.16.114, then you must specify your Artifactory URL as
http://10.1.16.114:8082(usinghttp://localhost:8082will not work).
The code snippets below assume you have a virtual Docker repository named docker-virtual in an Artifactory installation at IP 10.1.16.114.
First, you should verify that your Docker client can access Artifactory by run the following command. Making sure that the return code is 200:
curl -I -k -v http://10.1.16.114:8082/artifactory/api/system/pingNow you can proceed to test your Docker registry.
-
Login to Artifactory as your Docker registry
docker login -u admin -p password 10.1.16.114:8082 -
Pull the
hello-worldimage from thedocker-virtualrepositorydocker pull 10.1.16.114:8082/docker-virtual/hello-world:latest -
Tag a Docker image
docker tag 10.1.16.114:8082/docker-virtual/hello-world:latest 10.1.16.114:8082/docker-virtual/<tag_name> -
Push the tagged image to
docker-virtualdocker push 10.1.16.114:8082/docker-virtual/<tag_name>
Use Kubernetes with Artifactory Cloud
Follow this guide to configure your Kubernetes server with an Artifactory container registry, and be able to pull your images from a private Artifactory registry.
Kubernetes often pulls images using a cached digest instead of re-resolving the tag on every pull. When shared-digest download statistics are enabled, tag-level download statistics still reflect those pulls for every tag you can read that shares the digest.
To integrate Artifactory with Kubernetes, you need:
- An Artifactory instance with a configured Docker repository. For more information, see Create a Docker Repository.
- A Kubernetes cluster.
To configure Kubernetes to pull containers from a private Artifactory registry:
-
For each relevant namespace, create a Kubernetes docker-registry secret for connecting to your Artifactory by running the following command:
kubectl create secret docker-registry regcred \
--docker-server=<JFROG-HOSTNAME> \
--docker-username=<JFROG-USERNAME> \
--docker-password=<PASSWORD> \
--docker-email=<EMAIL> \
--namespace <NAMESPACE>
Note
Make sure to replace the placeholders with your actual user information: for security reasons, it is best to choose a dedicated user which is not your Artifactory admin and has minimal required permissions.
Variable Description JFROG-HOSTNAME Your JFrog hostname URL JFROG-USERNAME Your JFrog account username PASSWORD Your secret or JFrog identity token. Note that you can edit the token scope to restrict access to Artifactory. The email address associated with your JFrog account NAMESPACE Your Kubernetes cluster namespace
For example:
➜  ~ kubectl create secret docker-registry regcred \
--docker-server=my-artifactory.jfrog.io \
--docker-username=read-only \
--docker-password=my-super-secret-pass \
[email protected] \
--namespace my-app-ns-
Set up Kubernetes to use the secret to pull images for your workloads. You can do this either for all the workloads in your namespace, or for each workload separately.
- To set the secret as default to your namespace (recommended), run the following command to edit your Service Account object and add your secret name into the
imagePullSecretslist attribute:
- To set the secret as default to your namespace (recommended), run the following command to edit your Service Account object and add your secret name into the
Note
Make sure to replace the placeholder with your actual Kubernetes namespace
➜  ~ kubectl edit serviceaccount default -n <NAMESPACE>
apiVersion: v1
kind: ServiceAccount
imagePullSecrets:
- name: regcred
...-
To add the secret to every workload separately, add it into your object manifests and helm charts, see the below example:
apiVersion: apps/v1 kind: Deployment ... spec: ... template: spec: containers: - image: my-artifactory.jfrog.io/default-docker-virtual/my-app:1.0.1 imagePullSecrets: - name: regcred -
Test your configuration by running the following command:
Note
Make sure to replace the placeholder with your actual Kubernetes namespace
➜ ~ kubectl get pods -n <NAMESPACE>You should get the following response:
NAME                        READY   STATUS    RESTARTS   AGE
my-app-57db67b7d5-nr8db 1/1 Running 0 5mAmazon EKS Integration
If you are using Amazon EKS, you can use JFrog’s seamless integration with AWS AssumeRole which allows JFrog Artifactory to securely serve container images to EKS. For more information, see Empowering Kubernetes Security: JFrog’s Seamless Integration with AWS AssumeRole.
For more information about Artifactory and Kubernetes, see Kubernetes Helm Chart Repositories.
Migrate from Docker V1 to Docker V2
If you are still using Docker V1, we strongly recommend upgrading to Docker V2. This requires that you migrate any Docker repositories that were created for Docker V1, and is done with a simple cURL endpoint.
For details, please refer to Migrate a V1 repository to V2 under the Use Docker V1 documentation.
Using Docker V1?
This document shows how to use Artifactory with the Docker V2 . If you are using the Docker V1, please refer to Use Docker V1.
Use Docker V1
This section describes how to use Artifactory with the Docker V1 Registry API. If you are using the Docker V2 Registry API, please refer to Docker Repositories.
For general information on using Artifactory with Docker, see Get Started with Docker.
Note
Docker V1 is not supported on Cloud instances.
Get Started with Artifactory and Docker V1
Artifactory supports Docker transparently, meaning you can point the Docker client at Artifactory and issue push, pull and other commands in exactly the same way that you are used to when working directly with a private registry or Docker Hub.
To get started using Docker with Artifactory you need to execute the following steps:
- Set up a web server as a reverse proxy
- Create a local repository
- Set up authentication
- Push and pull images
1. Set up NGINX as a Reverse Proxy for Docker V1
Artifactory can only be used with Docker through a reverse proxy due to the following limitations of the Docker client:
- You cannot provide a context path when providing the registry path (e.g
localhost:8081/artifactoryis not valid) - Docker will only send basic HTTP authentication when working against an HTTPS host
For Artifactory to work with Docker, the preferred web server is NGINX v1.3.9 and above configured as a reverse proxy.
For other supported web servers, please refer to Alternative Proxy Servers.
Below is a sample configuration for NGINX which configures SSL on port 443 to a specific local repository in Artifactory (named docker-local) on a server called artprod.company.com/
Using Docker v1, Docker client v1.10 and Artifactory 4.4.3 known issue.
To avoid incompatibility when using Docker V1 with Docker 1.10, use the NGINX configuration displayed below and not the NGINX configuration generated by Artifactory v4.4.3.
This code requires NGINX to support chunked transfer encoding which is available from NGINX v1.3.9.
 [...]

http {

    ##
    # Basic Settings
    ##
    [...]

    server {
        listen 443;
        server_name artprod.company.com;

        ssl on;
        ssl_certificate /etc/ssl/certs/artprod.company.com.crt;
        ssl_certificate_key /etc/ssl/private/artprod.company.com.key;

        access_log /var/log/nginx/artprod.company.com.access.log;
        error_log /var/log/nginx/artprod.company.com.error.log;

        proxy_set_header Host $host;
        proxy_set_header X-Forwarded-For $proxy_add_x_forwarded_for;
        proxy_set_header X-Real-IP $remote_addr;
        proxy_set_header X-Forwarded-Proto $scheme;
        proxy_set_header X-Original-URI $request_uri;
        proxy_read_timeout 900;

        client_max_body_size 0; # disable any limits to avoid HTTP 413 for large image uploads

        # required to avoid HTTP 411: see Issue #1486 (https://github.com/docker/docker/issues/1486)
        chunked_transfer_encoding on;

        location /v1 {
            proxy_pass http://artprod.company.com:8081/artifactory/api/docker/docker-local/v1;
        }
    }
}Multiple Docker repositories and port bindings
If you want to use multiple Docker repositories, you need to copy this configuration and bind different ports to each local repository in Artifactory. For details, please refer to Port Bindings.
Repository URL prefix
When accessing a Docker repository through Artifactory, the repository URL must be prefixed with
api/dockerin the path. For details, please refer to Docker Repository Path and Domain.
2. Create a Local Docker V1 Repository
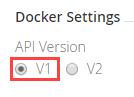
This is done in the same way as when configuring a local repository to work with Docker V2. However, in the Docker Settings section, you should make sure to select V1 as the Docker API version.
Work with Artifactory Cloud For Docker V1
Due to limitations of the Docker client, in Artifactory Cloud there is a special configuration for each server with a sub-domain.
You need to create a new Docker enabled local repository named
docker-local.Then, use the following address when working with the Docker client:
"${account_name}.jfrog.io"
3. Set Up Authentication for Docker V1
When using Artifactory with Docker V1, you need to set your credentials manually by adding the following section to your ~/.docker/config.json file.
~/.docker/config.json
{
        "auths" :{
                "https://artprod.company.com" : {
                        "auth": "<USERNAME>:<PASSWORD> (converted to base 64)",
                                "email": "[email protected]"
                },
                "https://artdev.company.com" : {
                        "auth": "<USERNAME>:<PASSWORD> (converted to base 64)",
                                "email": "[email protected]"
                }
        }
}
4. Push and Pull Images With Docker V1
Pushing and pulling images when using Docker V1 is done in the same way as when using Docker V2.
Browse Docker V1 Repositories
Artifactory stores docker images in a layout that is made up of 2 main directories:
- .images: Stores all the flat docker images.
- repositories: Stores all the repository information with tags (similar to how repositories are stored in the Docker Hub).
In addition, Artifactory annotates each deployed docker image with two properties:
- docker.imageId: The image id
- docker.size: The size of the image in bits
Deployed tags are also annotated with two properties:
- docker.tag.name: The tag name
- docker.tag.content: The id of the image that this tag points to
View the Docker Images tree
Artifactory lets you view the complete images tree for a specific image directly from the UI in a similar way to what you would get from the docker images --tree command.
In the Artifacts module Tree Browser, drill down to select the image you want to inspect. The metadata is displayed in the Docker Ancestry tab.
View Individual Docker Image Information
In the Artifacts module Tree Browser, drill down to select image you want to inspect. The metadata is displayed in the Docker Info tab.
Search for Docker Images
In addition to other properties related to Docker repositories, you can also search for repositories using a property called docker.repoName, which represents the repository name (e.g., library/ubuntu).
Promoting Docker images with Docker V1 is done in exactly the same way as when Promoting Images with Docker V2.
Migrate a Docker V1 repository to V2
We recommend using Docker V2 repositories when possible (provided your Docker client is version 1.6 and above).
If you have an existing Docker V1 repository, you can migrate its content into a V2 repository using the following endpoint with cURL:
POST api/docker/<repoKey>/v1/migrate
{
    "targetRepo" : "<targetRepo>",
    "dockerRepository" : "<dockerRepository>",
    "tag" : "<tag>"
}
where:
| Parameter | Description |
|---|---|
<repoKey> | Source repository key (For example, docker-local as used in this page) |
<targetRepo> | The target Docker V2 repository to migrate to (For example, docker-local2 as used in this page). The repository should be created before running the migrate endpoint. |
<dockerRepository> | An optional docker repository name to migrate, if null - the entire source repository will be migrated. Default: "" |
<tag> | An optional tag name to promote, if null - the entire docker repository will be promoted. Default: "" |
An example for migrating the docker image "jfrog/ubuntu" with all of it's tags from docker-local to docker-local2 using cURL would be:
curl -i -uadmin:password -X POST "http://localhost:8081/artifactory/api/docker/docker-local/v1/migrate" -H "Content-Type: application/json" -d
'{"targetRepo":"docker-local2","dockerRepository":"jfrog/ubuntu"}'
Docker V1 Deletion and Cleanup
Note
For Docker v2 and OCI images in local repositories, use the Delete Multi-Architecture Docker Tags API to remove a specific tag. This API supports multi-architecture manifest lists and shared-layer handling.
The V1 deletion APIs in this section apply only to legacy Schema 1 repositories and remain available for backward compatibility.
Artifactory natively supports removing tags and repositories and complies with the Docker Hub Spec.
Deletion of Docker tags and repositories automatically cleans up any orphan layers that are left (layers not used by any other tag/repository).
Currently, the Docker client does not support DELETE commands, but deletion can be triggered manually using cURL. Here are some examples:
Removing repositories and tags
//Removing the "jfrog/ubuntu" repository
 curl -uadmin:password -X DELETE "https://artprod.company.com/v1/repositories/jfrog/ubuntu"

//Removing the "12.04" tag from the "jfrog/ubuntu" repository
 curl -uadmin:password -X DELETE "https://artprod.company.com/v1/repositories/jfrog/ubuntu/tags/12.04"
Any empty directories that are left following removal of a repository or tag will automatically be removed during the next folder pruning job (which occurs every 5 minutes by default).
Docker V1 Advanced Topics
This topic discusses advanced configuration options for Docker V1 and contains the following sections:
- Use a Self-Signed SSL Certificate for Docker V1
- Docker V1 Alternative Proxy Servers
- Port Bindings for Docker V1
- Docker V1 Repository Path and Domain
Use a Self-signed SSL Certificate for Docker V1
From Docker version 1.3.1, you can use self-signed SSL certificates with docker push/pull commands, however for this to work, you need to specify the --insecure-registry daemon flag for each insecure registry.
For full details please refer to the Docker documentation.
For example, if you are running Docker as a service, edit the /etc/default/docker file, and append the --insecure-registry flag with your registry URL to the DOCKER_OPTS variable as in the following example:
Edit the DOCKER_OPTS variable
DOCKER_OPTS="-H unix:///var/run/docker.sock --insecure-registry artprod.company.com"For this to take effect, you need to restart the Docker service.
If you are using Boot2Docker, please refer to the Boot2Docker documentation for Insecure Registry.
If you do not make the required modifications to the --insecure-registry daemon flag, you should get the following error:
Error message
Error: Invalid registry endpoint https://artprod.company.com/v1/: Get https://artprod.company.com/v1/_ping: x509: certificate signed by unknown authority.Using previous versions of Docker
In order to use self-signed SSL certificates with previous versions of Docker, you need to manually install the certificate into the OS of each machine running the Docker client (see Issue 2687 ).
Docker V1 Alternative Proxy Servers
In addition to NGINX, you can setup Artifactory to work with Docker using Apache.
The sample configuration below configures SSL on port 443 and a server name of artprod.company.com.
<VirtualHost *:443>
  ServerName artprod.company.com

  ErrorLog ${APACHE_LOG_DIR}/error.log
  CustomLog ${APACHE_LOG_DIR}/access.log combined

  SSLEngine on
  SSLCertificateFile      /etc/ssl/certs/artprod.company.com.pem
  SSLCertificateKeyFile   /etc/ssl/private/artprod.company.com.key

  ProxyRequests off
  ProxyPreserveHost on

  ProxyPass         / http://artprod.company.com:8080/artifactory/api/docker/docker-local/
  ProxyPassReverse  / http://artprod.company.com:8080/artifactory/api/docker/docker-local/
</VirtualHost>
Port Bindings for Docker V1
If you want to use multiple repositories, you need to copy the NGINX configuration and bind different ports to each local repository in Artifactory.
When binding a port other than 443, note that the configuration for the proxy header must be appended with the port number on the proxy_set_header line.
For example, for a server running on port 444 you should write proxy_set_header Host $host:444.
Docker V1 Repository Path and Domain
When accessing a Docker repository through Artifactory, the repository URL must be prefixed with api/docker in the path.
You can copy the full URL from the UI using Set Me Up when the repository is selected in the Tree Browser.
For example, if you are using Artifactory standalone or as a local service, you would access your Docker repositories using the following URL:
http://localhost:8081/artifactory/api/docker/<repository key>
Also, the domain of your Docker repository must be expressed as an explicit IP address. The only exception is when working locally, you can use the localhost domain name as the proxy pass.
Updated about 1 month ago