Distribute a Release Bundle v2 Version Using the Platform UI
Learn how to distribute a Release Bundle v2 version from the timeline in the JFrog Platform UI.
RLM Deprecation
As of July 31, 2026, all feature development, patches, and security fixes for Release Lifecycle Management will end, except for critical security fixes. RLM End of Life is currently scheduled for January 31, 2028. For more information, see JFrog Release Lifecycle Management Deprecation - End of Life.
You can distribute Release Bundle v2 versions from the version timeline in the JFrog Platform UI. Available options depend on whether the enhanced distribution engine introduced in JFrog Distribution release 2.28.1 is installed.
Subscription Information
This feature is supported with the Enterprise+ license.
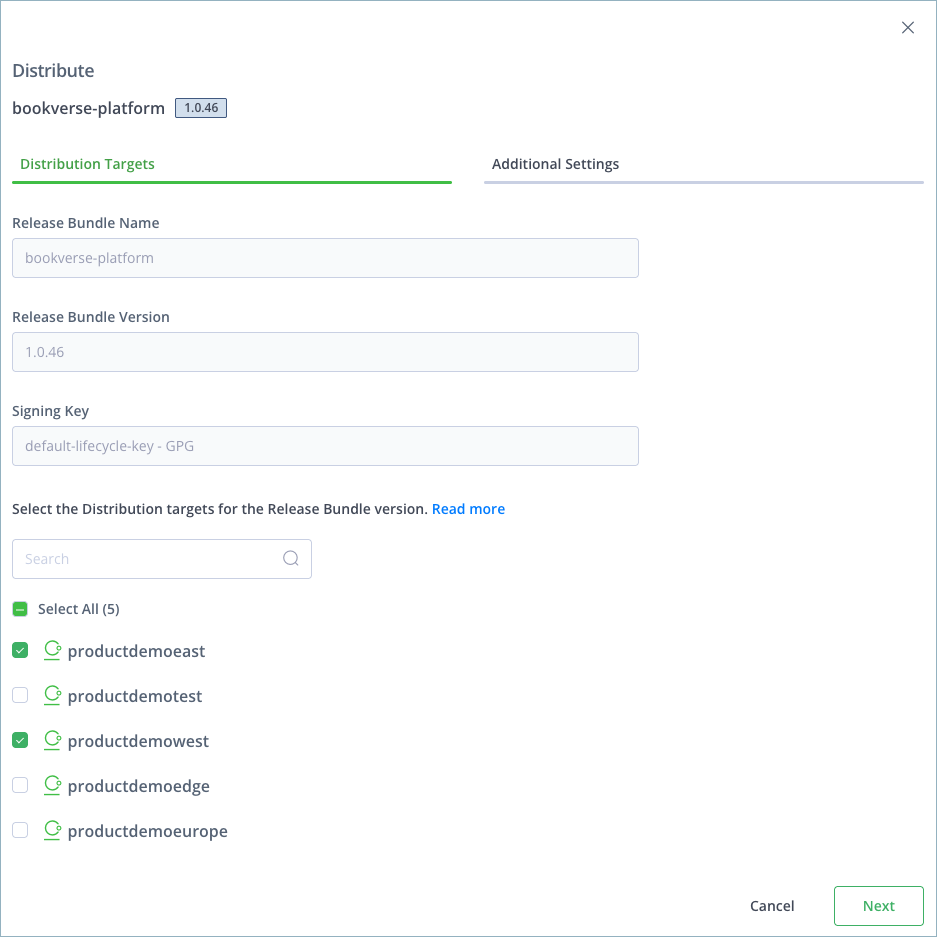
To distribute a Release Bundle v2 version:
-
In the Platform module, select Artifactory > Release Lifecycle.
-
Click the name of the relevant Release Bundle. The Versions tab is displayed by default.
-
Click the name of the relevant Release Bundle version. The Version Timeline tab is displayed by default.
-
Click Actions and then select Distribute. The Distribute window is displayed.
-
In the Distribution Targets tab, select the desired distribution targets, for example Edge nodes.
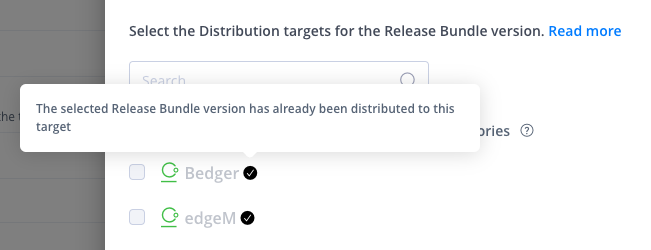
Note
A checkmark next to a grayed-out distribution target indicates that the target already contains the selected Release Bundle version. To redistribute the same Release Bundle version to that target, you must first delete the previous distribution, as described in Delete a Release Bundle (v2) from Multiple Edge Nodes.
Tip
If no distribution targets are displayed, click the troubleshooting link provided in the window to see suggestions about the possible cause. For more information, see Distribution Target Troubleshooting.
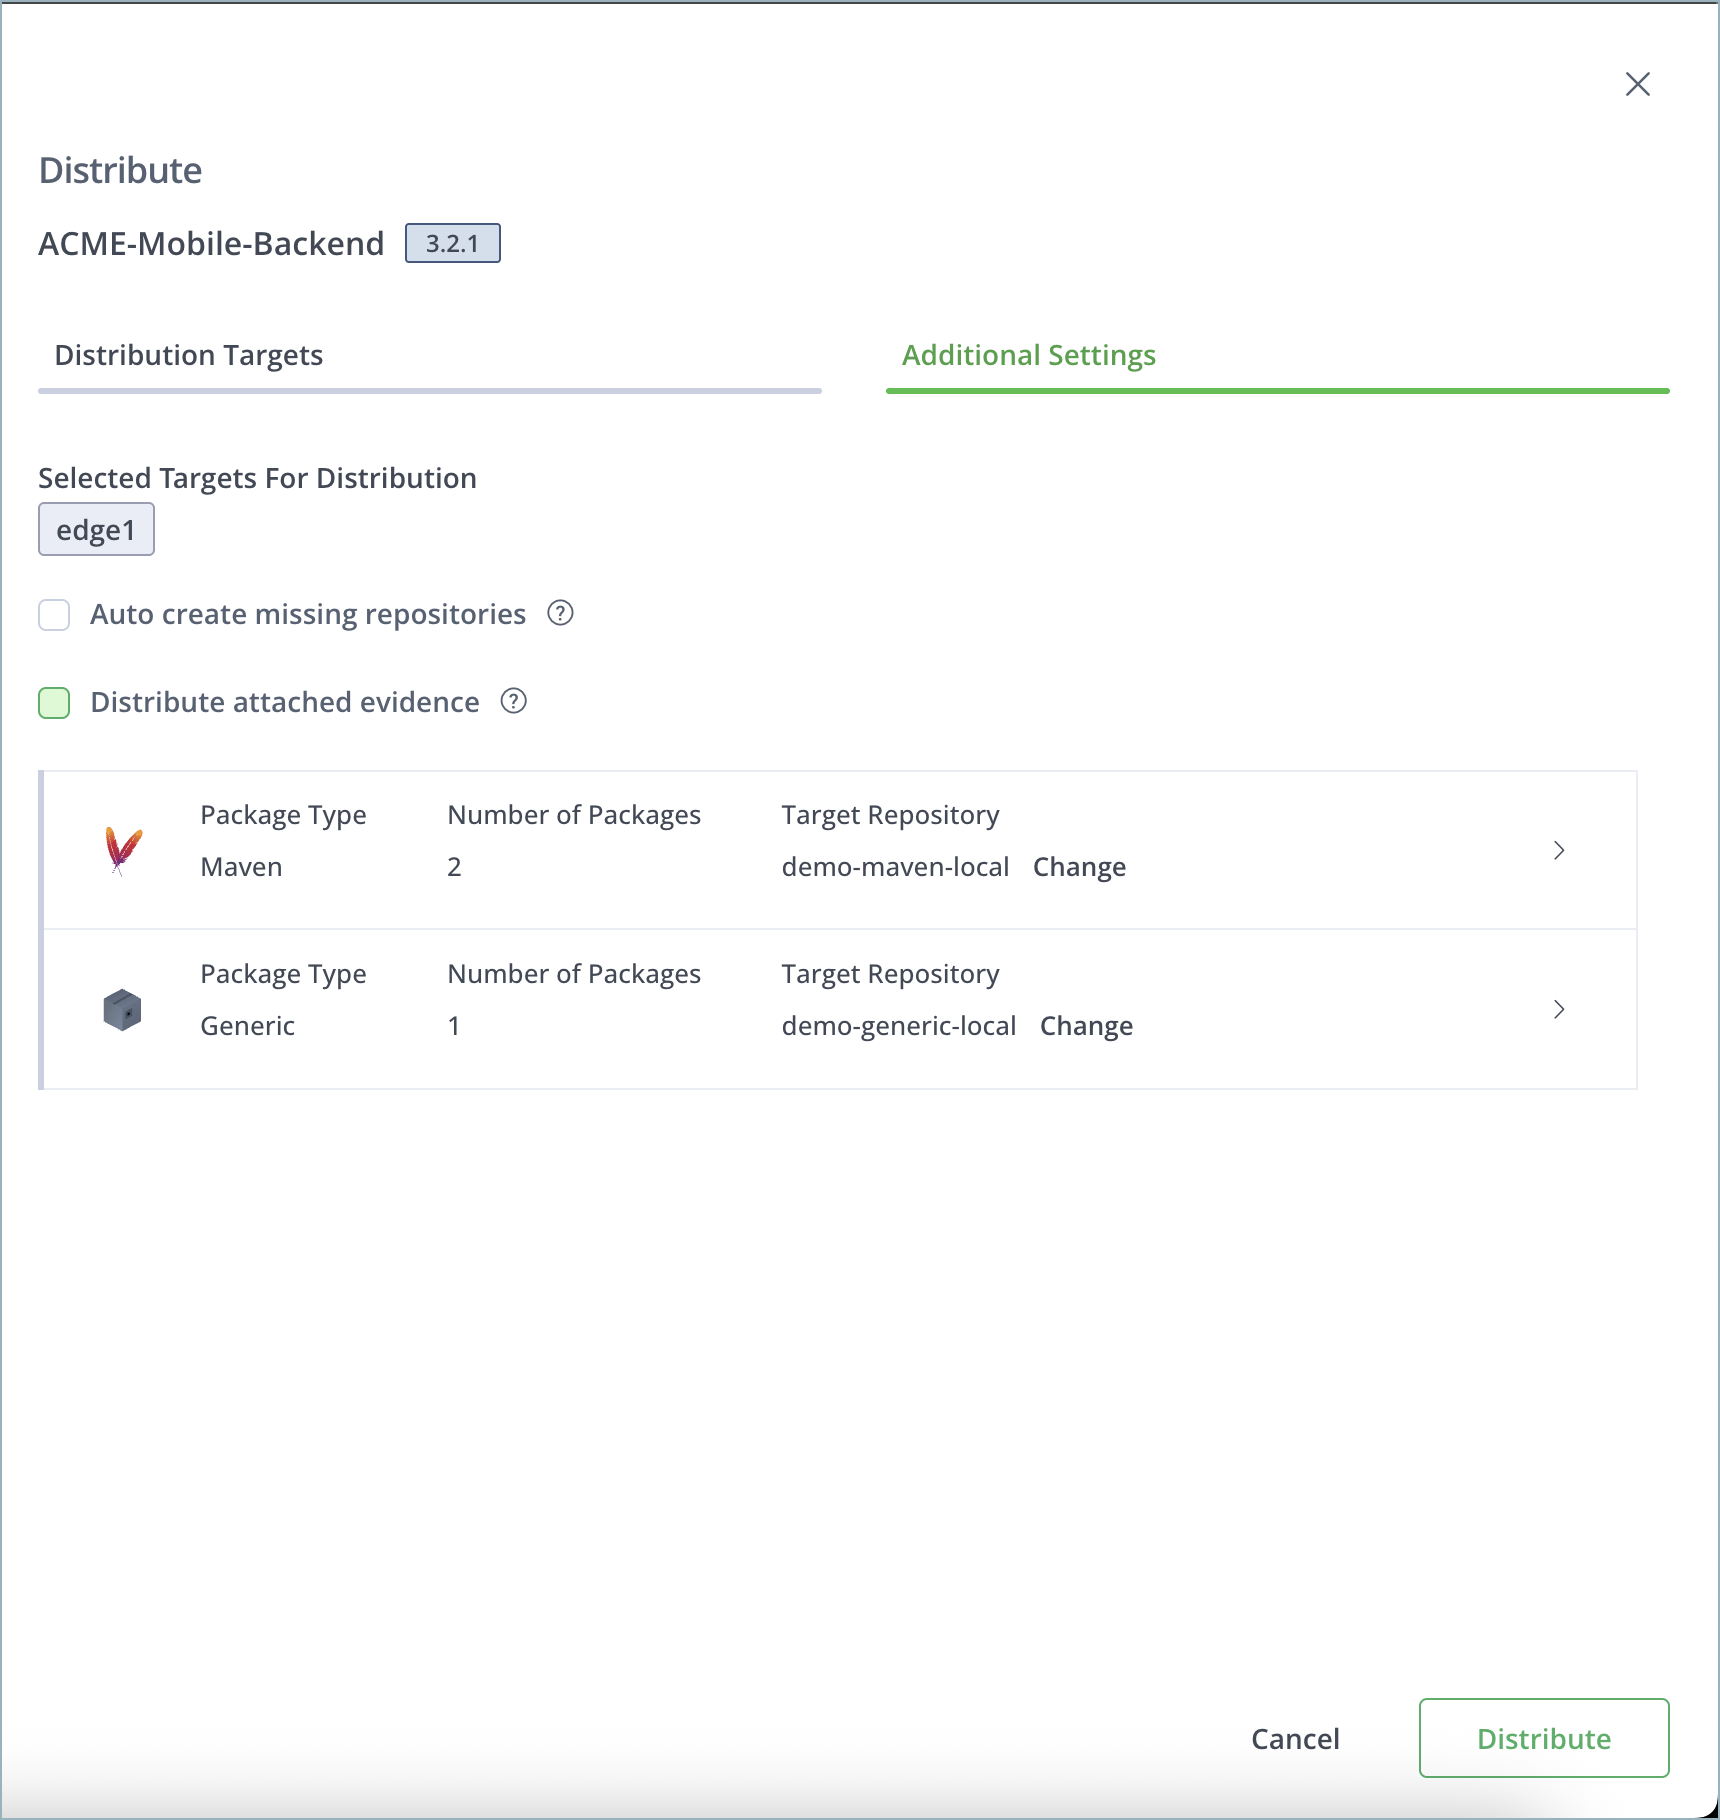
- Click Next to move to the Additional Settings tab, as described in the following sections:
Additional Settings with the Enhanced Distribution Engine Installed
You can perform the optional steps described in this section if your JFrog Platform contains the enhanced distribution engine that was introduced in JFrog Distribution release 2.28.1.
-
Select the Auto create missing repositories checkbox to have any missing repositories in the distribution targets created automatically. If this option is not selected and a missing repository is detected, distribution will fail.
-
Select Distribute attached evidence to distribute all evidence associated with the Release Bundle version and its contents.
-
To change the target repository for a specific package, click Change and enter a new target path. Click the checkmark to save your changes.
Important
See Path Mapping Guidelines for Release Bundles v2 for path mapping instructions and limitations.
-
Click Distribute. The status of the distribution operation is displayed in the version timeline. There will be an entry in the timeline for each distribution target. For example, if you distribute the Release Bundle to 3 Edge nodes, three entries will be added to the timeline, one for each target.
Note
If the distribution operation included multiple targets, and one or more targets did not receive the Release Bundle version successfully, you can still download the artifacts from those targets that did receive it successfully.
Warning
When JFrog Xray is used to scan Release Bundles for potential vulnerabilities and license violations, Xray will block distribution if the Release Bundle violates a Policy that has a blocking action defined. Scan results are shown in the timeline event and in the Xray tab of the dashboard.
For more information, see Scan Release Bundle v2 Versions with Xray.

Additional Settings without the Enhanced Distribution Engine
You can perform the optional steps described in this section if your JFrog Platform does not contain the enhanced distribution engine that was introduced in JFrog Distribution release 2.28.1.
- Select the Auto create missing repositories checkbox to have any missing repositories in the distribution targets created automatically. If this option is not selected and a missing repository is detected, distribution will fail.
Note
By default, the repositories on the target will match those at the source. To change this behavior, see Configure Path Mapping from the Last Promotion.
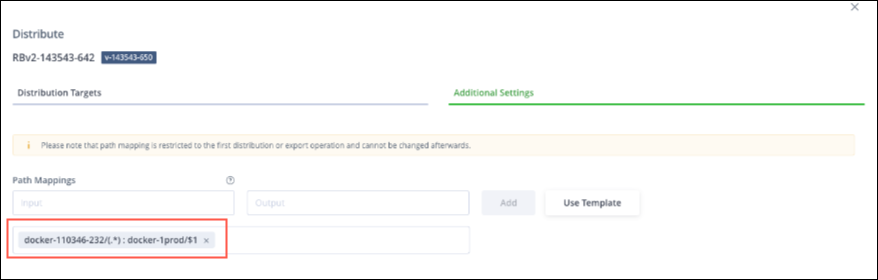
-
Specify a list of input and output regex mapping pairs that define where the queried artifact is located and where it should be placed. Use this option if the path on the target is different than the source path.
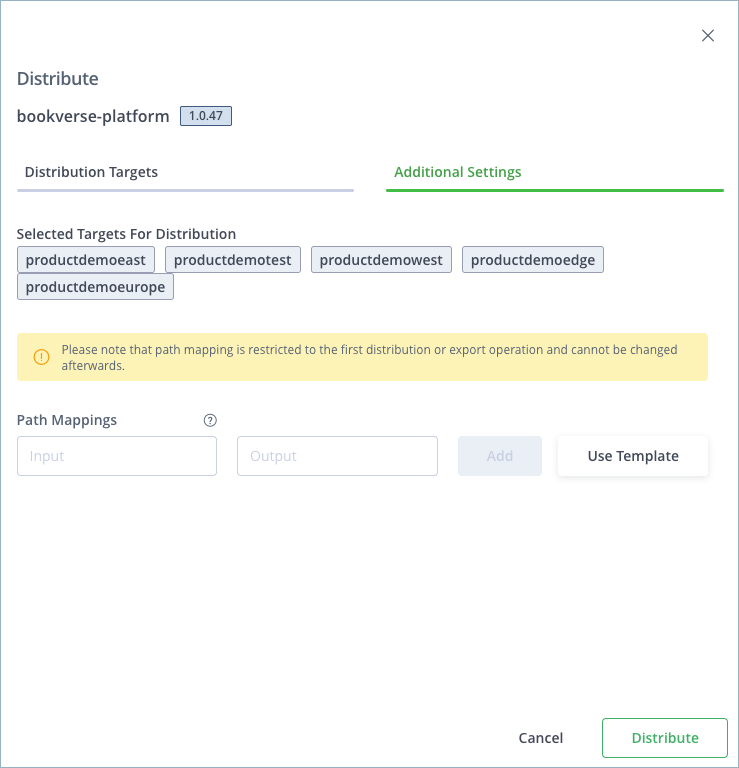
There are several options for defining path mappings:
-
You can define custom mapping pairs manually and click Add.
-
You can click Use Template to use one of the provided Path Mapping templates:
-
| Template | Description |
|---|---|
| Change Repository | All files in a specific repository on the source Artifactory service are mapped to a different repository on the target. |
| Change Folder | All files are moved to a specific folder in the target. |
| Rename Folder | All files in a specific folder on the source Artifactory service are mapped to a different folder on the target. |
Note
If the Default Path Mapping by Last Promotion feature is enabled (requires Distribution 2.26.1 or higher), the repositories used for the most recent promotion of this Release Bundle version are provided as the default path mapping. If you do not want this path mapping definition, click the X to remove it.
Important
See Path Mapping Guidelines for Release Bundles v2 for path mapping instructions and limitations.
- Click Distribute. The status of the distribution operation is displayed in the version timeline. There will be an entry in the timeline for each distribution target. For example, if you distribute the Release Bundle to 3 Edge nodes, three entries will be added to the timeline, one for each target.
Note
If the distribution operation included multiple targets, and one or more targets did not receive the Release Bundle version successfully, you can still download the artifacts from those targets that did receive it successfully.
Warning
When JFrog Xray is used to scan Release Bundles for potential vulnerabilities and license violations, Xray will block distribution if the Release Bundle violates a Policy that has a blocking action defined. Scan results are shown in the timeline event and in the Xray tab of the dashboard.
For more information, see Scan Release Bundle v2 Versions with Xray.
Configure Path Mapping from the Last Promotion
Starting with release 2.26.1, JFrog Distribution includes an option for defining a default path mapping when distributing or exporting a Release Bundle v2 version. This option can be enabled in the Distribution YAML file for all Release Bundle v2 distributions or via API for specific distribution operations, as described in Enable Default Path Mapping.
When the default path mapping option is enabled, the default destination repositories from the last successful promotion, if one exists, will be displayed in the UI. You can use this mapping if desired, replace it with a mapping of your own, or leave the fields blank. If no such promotion has been performed, the path mapping fields in the UI are left blank, and the destination repositories will match those at the source, which is the default system behavior.
Enable Default Path Mapping
The option for defining a default path mapping is enabled as follows:
- YAML file: A new configuration parameter,
default-path-mapping-by-last-promotion(default=false) has been introduced to support this feature at the system level. For more information, see Distribution Application Config YAML File. - REST API: This feature can be enabled using an optional request parameter in the Distribute Release Bundle Version v2 API. This is useful for enabling the feature for specific requests, facilitating a gradual rollout of this feature.
Note
If the optional request parameter is configured in the API (true or false), that setting overrides the configuration parameter in the YAML file.
Path Mapping Guidelines for Release Bundles v2
Observe the following guidelines when defining path mappings for distributed Release Bundle v2 versions to Edge nodes.
When the enhanced distribution engine is not activated or not available (before release 2.28.1)
- You can define path mapping only during the first distribution or export of a Release Bundle version.
- Each distribution target must use the same path mapping.
- Once a path mapping has been defined, it cannot be changed afterward.
When the enhanced distribution engine is available and activated (release 2.28.1 or later)
Note
For more information about the enhanced distribution engine, see Distribution 2.28.1.
- Each distribution operation can have one defined path mapping.
- You can define different path mappings for each distribution target by executing multiple distribution operations.
- The path mapping functionality described in this section does not apply to exported archives in air-gap environments in the current version.
- Once you define path mappings to a target you cannot define a different set of path mappings for the same Release Bundle version to that target.
- You can use the REST API to redistribute a Release Bundle version to a target that already has that version provided the path mapping has not changed. If the path mapping has changed, you must first delete the Release Bundle version from the target before redistributing it. When using the Platform UI, you must delete the Release Bundle version before redistributing it even when the path mapping has not changed.
- After activating the enhanced distribution engine, you must create a new version of Release Bundles that were distributed before activation before they can be redistributed.
- If the enhanced distribution engine is activated and later deactivated, you must create a new version of Release Bundles that were distributed during activation before they can be redistributed.
- Enhanced distribution features are available only when the source Artifactory and all Edge nodes have been upgraded to Artifactory 7.101.2 or later and Distribution 2.28.1 or later. If you try distributing a Release Bundle version to a mix of upgraded and non-upgraded Edge nodes, the operation will fail.
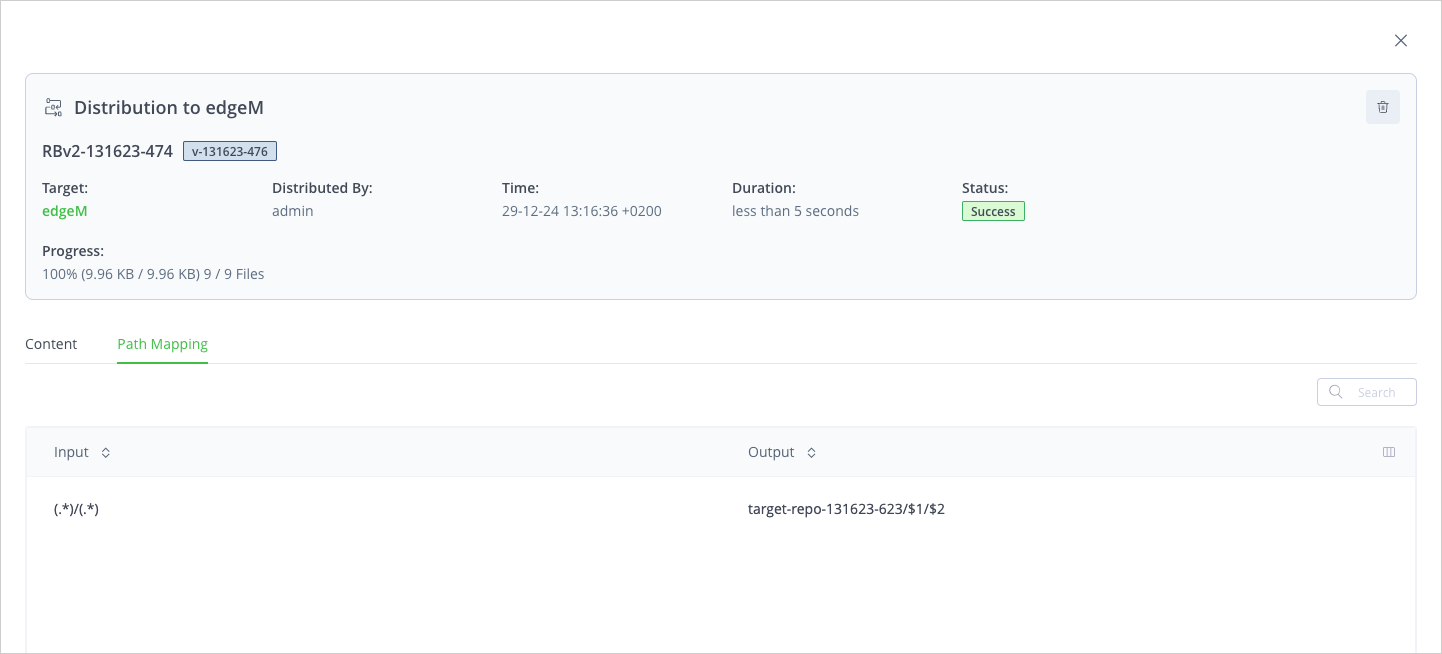
View Distribution Details
To view distribution details after the operation is complete:
- Click the relevant event in the timeline.
- Review the Content tab for the list of artifacts included in the distribution.
- Review the Path Mapping tab for the path mapping that was used between the source and target.

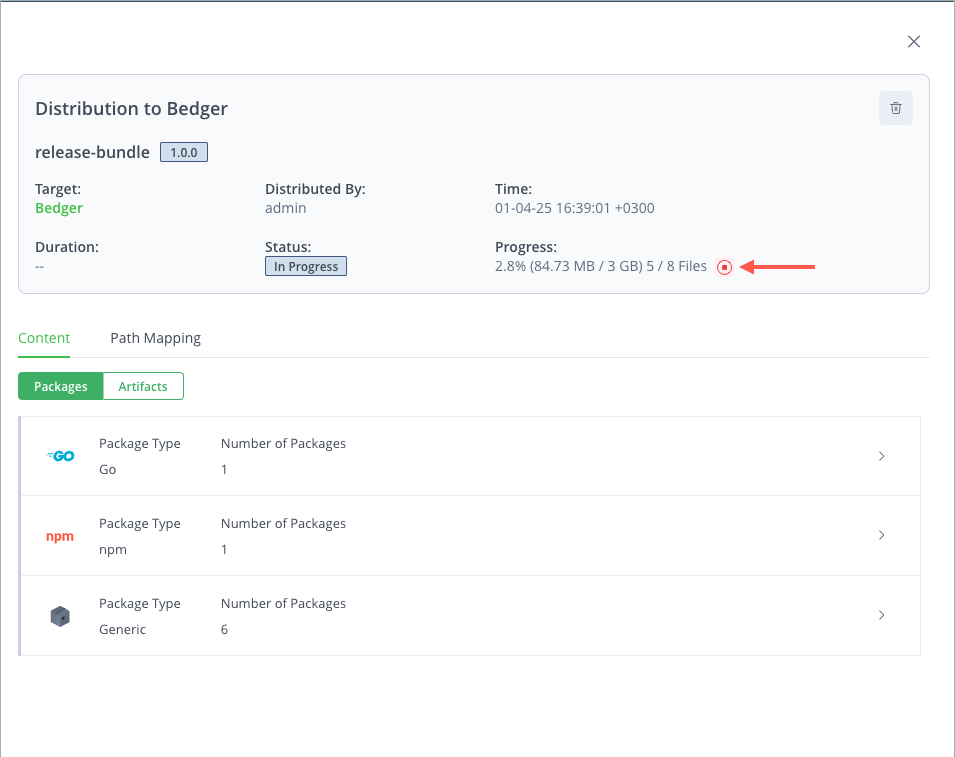
Stop a Distribution Operation in Progress
You can stop the distribution of a Release Bundle v2 version while it is in progress. Stopping the distribution aborts the operation.
To stop the distribution of a Release Bundle v2 version:
-
Initiate the distribution operation, as described in Distribute a Release Bundle v2 Version. An entry is added to the timeline indicating the distribution operation is in progress.
-
Click the timeline entry to open the window that displays the content and current status of the operation.
-
In the Progress field at the top of the window, click the red stop icon. A confirmation window is displayed.
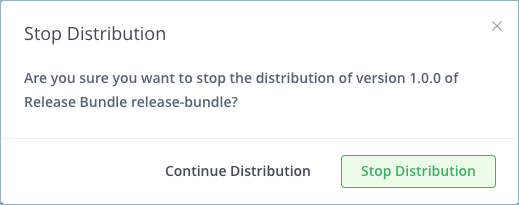
-
Click Stop Distribution. The status of the timeline entry changes to Abort in progress. When complete, the timeline indicates that the operation was canceled.
Frequently Asked Questions
This section provides answers to frequently asked questions about distributing a Release Bundle v2 version using the Platform UI.
FAQs
Q: How do I start distributing a Release Bundle v2 version in the Platform UI?
A: Open the version timeline, click Actions, then select Distribute. See Distribute a Release Bundle v2 Version.
Q: What is the enhanced distribution engine?
A: An upgraded distribution engine introduced in JFrog Distribution release 2.28.1. It changes Additional Settings options and path-mapping behavior. See Additional Settings with the Enhanced Distribution Engine Installed.
Q: What if a distribution target already has the Release Bundle version?
A: The target appears grayed-out with a checkmark. Delete the previous distribution before redistributing. See Delete a Release Bundle (v2) from Multiple Edge Nodes.
Q: Can I stop a distribution that is in progress?
A: Yes. Open the in-progress timeline entry and click the red stop icon in Progress. See Stop a Distribution Operation in Progress.
Q: Where can I see path mapping after distribution completes?
A: Open the timeline event and select the Path Mapping tab. See View Distribution Details.
Related Topics
- Distributing Release Bundles v2
- Distribute a Release Bundle v2 Using REST APIs
- Use the Release Bundle Version Timeline
- Scan Release Bundle v2 Versions with Xray
- Delete a Release Bundle (v2) from Multiple Edge Nodes
Updated 10 days ago